Search the Community
Showing results for tags 'photo'.
-
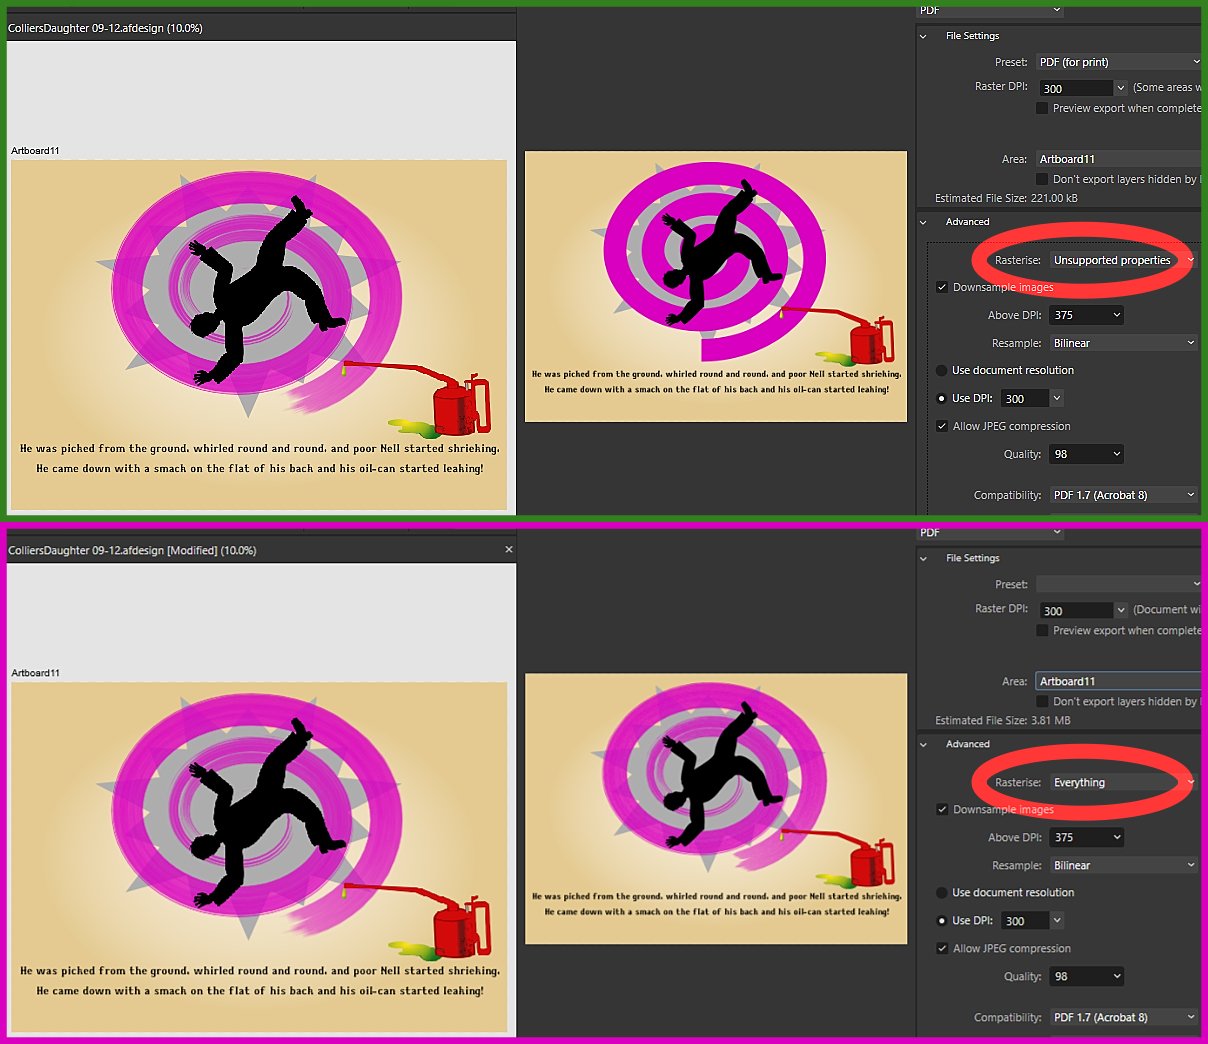
 A page from a project I've been working on. The violet curve is a spiral with a vector brush applied. Is it possible to keep the appearance when exporting as a PDF without having to rasterise either the whole artboard or just the curve? (If you're wondering, it's from a comic monologue by Billy Bennett, called The Collier's Daughter; you can find it on YouTube and other websites.)
-
Here are some 35mm and 4x5 filmstrip templates which can be easily reused in AD/AP as photo borders, or for other sort of image presentations etc. - Each of these templates does contain always two (in past times) popular analog film brand looks, so you can switch between them through enabling/disabling layers, or modify/add your own additional ones. There is always also an indicated image place section, where you can mount your photos in. AD/AF Templates: 35mm_film_template.afdesign 4x5_film_template.afdesign 35mm_strip_template.afdesign Examples:
- 36 replies
-
- 19
-

-

-
 The problem has been present since the release of the V2 version. MacBook Air M1 macOS Sonoma (also happened on Ventura). Only happens if I close the window before developing the photo. If I develop a photo and after developing I go back to Develop Persona and close the window the app does not crash. This happens every time with both hardware acceleration enabled and disabled. I recorded a short video. Nagranie z ekranu 2023-12-2 o 11.27.57.mov
 -
 Why can I not paint in Affinity Photo? It is as if the program does not register that I am putting a black paint stroke on a layer...or any other color stroke for that matter.
 -
Hi, it is possible to insert an affinity-photo file as file layer like the workflow in Clip-Studio-Paint?
-
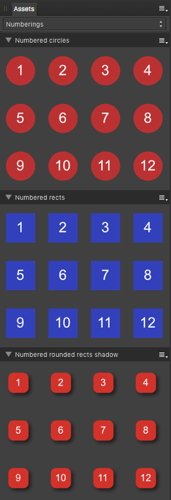
Here are some reusable common numbering items as assets to share. I often use such numberings for screenshots & documentation purposes etc., in order to show specific usability flows or step for step procedures and the like. The dragged over numbering assets are groups, which do contain a numering text and a background shape. They can be easily manipulated to custom needs, like for example changing the text and shape colors, applying some stroke colors, or FX shadows and the like. You can even change the number text & shape type on demand. When dragging one such numbering assets over into your document and manipulating it the way you like (or need), the easiest way to assign the made changes then over to another numbering assets is via a Copy and then a Paste Style or Paste FX, dependent on what portion of a numbering group was changed. You may freely use/reuse these numbering assets for whatever work you've to do. - Have fun! Here's the corresponding numberings assets file: numberings.afassets
-
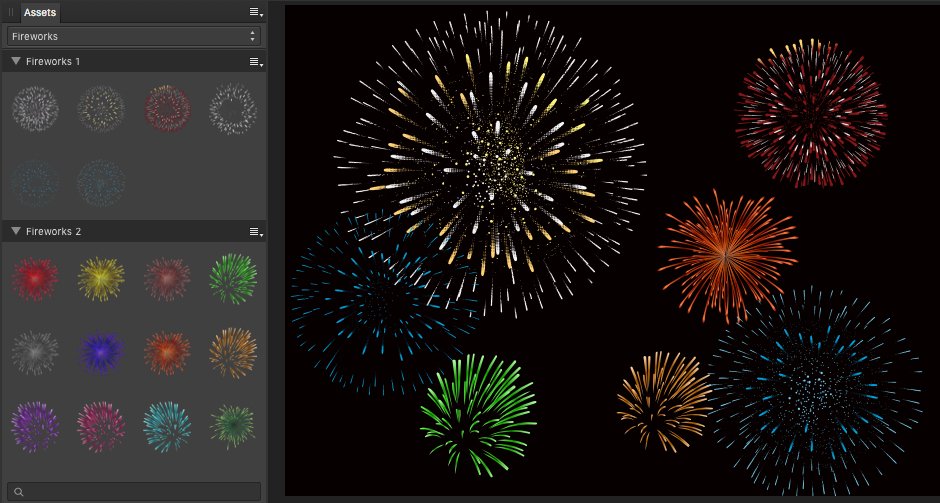
The year is almost over, so let's share some reusable fireworks items for your possible flyers and new year cards. - Note that those firework assets are always groups of vector elements, thus if you want to recolor some of them you best select the whole individual group. These assets are usable for things like shown in the following examples ... The corresponding fireworks assets file as a zip-archive: fireworks.zip
- 24 replies
-
- 31
-
-
-
 There is a path field in the slice properties of photo's export persona. When I enter an absolute path there, like E:\secondary_project\exports it is converted to E\secondary_project\exports i.e. th colon is omitted. When I export this slice, I am prompted for a path. If I chose e.g. E:\primary_projects\export (just confirming the prompted path) the exported file is stored at: E:\primary_projects\export\E\secondary_projects\export Saving the path without drive letter doesn't help, becaus in this case the leading backslah is omitted. "\secondary_projects\exports" becomes "secondary_projects\exports". As a workaround I save relative paths and chose root directory on export.
 -
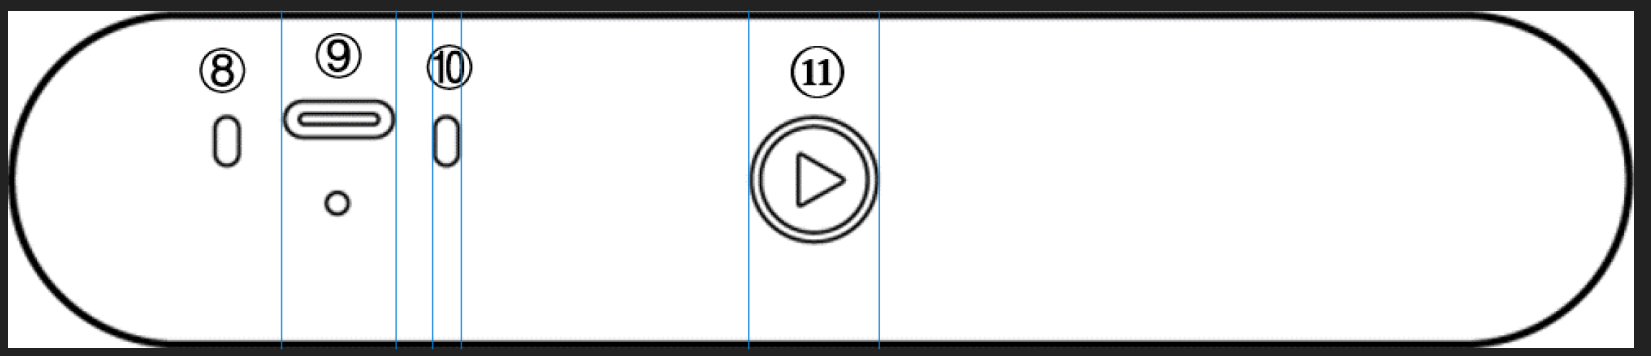
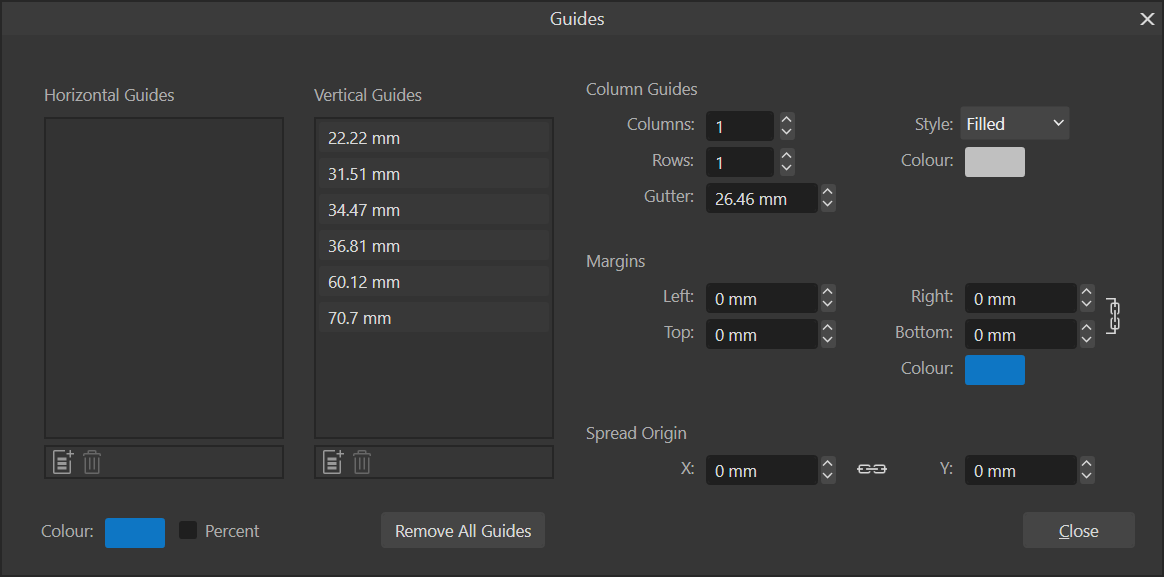
 I've got something I'm looking at designing and 3D printing some accessories for, but I need to make sure my designs don't get in the way of anything on it. I took a diagram of the layout from the manual and have been working up guides to delineate these areas: The problem is that as far as I'm aware, the only way to see where a guide is is by grabbing it and dragging it a little so its position comes up. I know there's the guides window which displays all of their positions, but it can get a bit crowded and hard to figure out which is which when you have more than a couple. So is there an easier way for me to see where these guides are, like just displaying their positions next to them or something? Or am I mooing up the wrong tree to begin with?
-
 I do a lot of design, photography and website work. One of the things I run into a lot are needing specific page sizes for various websites or designs. In photoshop I would be able to create a preset for a image size that I could go back too, and not have to remember the dimensions of. For instance, creating slides for a website slideshow. Some may be 800 x 600, and another website would have one that is 900 x 300. Is there a way that I can save those presets in the drop down list when creating a new project in Affinity Photo so I can have it labeled "Tom's Website Slideshow" so I know which preset it is? It would make it a lot faster than having to go back and lookup what the size parameters were for each website. Thank you
 -
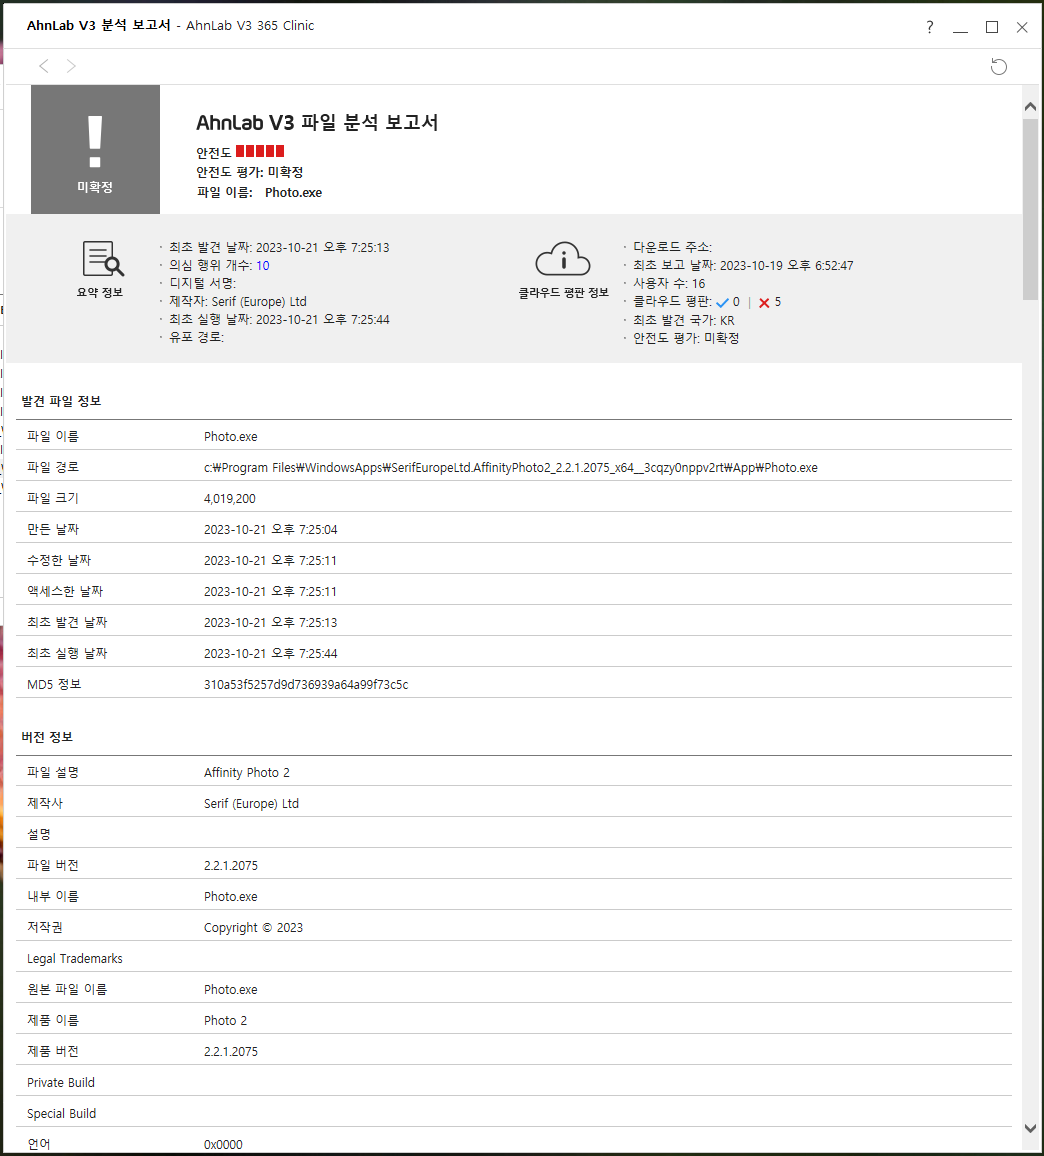
 I recently updated Affinity photo 2 to version 2.2.1.2075. By the way, in my antivirus program (V3), every time the Affinity photo program runs, it talks about a problem. When running photo.exe, a remote IP exists, but the remote IP comes out differently. And the original report is different. The problem that I find uncomfortable is that every time I run the Affinity Photo program, they ask me a question, saying that the antivirus program (V3) is a low-security program. I can't set it up so that this questioning procedure doesn't come up in the antivirus program I use. Whenever the Affinity Photo program runs, I have to turn off the warning message. I can't ignore the warning message that the safety is bad, so I'm sending you a question. Please help me on how to solve it.
-
 Working a lot with Moho Pro I saw myself rebuilding scenes I designed in Affinity Designer or Photo with exported images in Moho again. I never have to do that when using Spine to animate as Affinity has this great Spine JSON batch exporter in the Export Persona. So I was missing that when working in Moho. Until now; I've developed a free plugin script for Moho which let's Moho import all layers and exported cropped images from Affinity Photo and/or Designer via the exported spine.json file! For who is using both Spine and Moho, like me, it is even quite far in importing the setup pose with all images as exported from Spine too. Including all transformations of the images and even tinting of images. There are some limitations when importing spine.json files coming from Spine tho (see mohoscripts page for the script), like images which use meshes aren't supported. But the most important features are supported already! [update] Also when the spine.json file has bone data (like files exported from Spine itself, or when using special layer naming in Krita's exporter), the skeleton will be recreated in Moho during import since v1.1.0! But the main reason for making this was to import layers from Affinity tho. And that all works great now! A real time saver. It also works for Krita, Photoshop, After Effects, Gimp etc. when you install an existing export to spine.json script in Krita. The script is free to download. Downloadlink and more information is here: https://mohoscripts.com/script/wp_spine_import And here are some demo's/tutorial videos I just created. Have fun!
-
 Hello, Affinity Photo is awfully lagging and slow on my Macbook Pro. It wasn't awfully lagging and slow before. But now since I have updated to MacOS Sonoma version 14.0, it's lagging and slower than usual. What should I do to make it faster and not lag? Also, I have attached a photo so you can see my performance settings.
-
Affinity Photo v.2 have a bug where you can't create LUTs to be used for color correction in other softwares. I show here how it is not working but also that it works great in version 1 of Affinity Photo. This problem have been since December 2022 as I can see on the forum and still haven't been fixed.
-
 I'm writing to share some tips, but I also hope Affinity developers will see these and make the Arrange tools easier to use in future versions. I'm working on texture images for 3D models which need to be symmetrical from left to right. Conceptually for me, the easiest thing to do is paint on the left side, duplicate the layer, flip the copy, and mask if necessary. But I've found it exceptionally difficult to get expected behavior from Affinity Photo's Arrange menu items. Keep in mind that all these tips are in the context of using Flip transforms to end up with artwork that is mirrored left-to-right or top-to-bottom. Tip #1: If the layer you want to mirror has a mask, make sure there are visible pixels somewhere at the extreme edges. Photo apparently does not use the current selection as a guide to how you want to flip stuff. So if the layer you need to flip was created by pasting, it might flip according to bounds smaller than your full image width, even if you hit Ctrl-A to select the full image bounds before flipping. As a result, even if the visible pixels mostly fill the layer, the flipped portion can end up the the wrong place. To be sure my flipping will result in a mirror image, I make sure to paint a few visible pixels along the left and right edges when flipping horizontally, or along the top and bottom edges when flipping vertically. Basically I use pixel painting to make sure the layer I'm flipping extends across exactly the full width or height of the image before I flip it. To be fair, Photo's behavior in this regard is not a bug. If you've pasted in something small on a collage and need it to face the other way, you don't want it to jump from one side of the screen to the other when flipped. Tip #2: Temporarily set the layer to full opacity and Normal mode before flipping, if applicable. Today I had a layer with a mask set to Color Burn mode at 10% opacity, and flipping horizontally simply erased the layer's content. I tried several times but always ended up with a blank layer. I wondered if opacity or mode was somehow confusing the program, so I set the layer to Normal mode at 100% opacity, and then flipping worked. Tip #3: If the Arrange menu items are grayed out, lasso- or box-select something to copy and (temporarily) paste. I started a new document from an image I wanted to mirror. After duplicating the Background layer, I found the Arrange menu's transform items all grayed out. In an attempt to enable them, I tried all these things in turn: Made sure the unlocked duplicated layer was selected Hit Ctrl-A to select the full image size Saved and quit and reopened the program Renamed the duplicate layer in case the program prevents you from transforming based on the name "Background" Added a new, empty pixel layer Quit the program again and updated to version 2.2.0 before retrying Nothing worked. Then I used the lasso to copy and paste a small portion of the duplicated layer, and the Arrange menu items came alive. After that I was able to delete the temporarily pasted layer and then flip the duplicated layer.
 -
 Hello: I have an existing EPS logo I'm adding to a photo illustration and want to shrink it first, then maybe rasterize it. But when I shrink it, the strokes remain the same thickness and do not scale proportionally. If I were working in Adobe Illustrator, this is a simple preference that can be checked or unchecked. But I can't find any sort of preference like that in Affinity Photo. I tried opening it in Designer, but it similarly didn't have an option to keep strokes the same proportion. So how do I keep the vector strokes the same proportion when scaling? This is one of the MANY frustrations I've had with Photo! While Photo does have easier ways to edit PHOTOS, it's hard for me to use it for GRAPHIC raster-based illustrations the way I did with Photoshop (lack of bitmap mode, lack of raster stroke selection, etc.) Thanks.
 -
It is possible to increase/decrease the rotation angle of an object using the scroll wheel of your mouse when hovering over the belonging input field (in steps of 1 degree). With 'Ctrl' pressed, the increment/decrement is 0.1 degree, which is already very helpful. Question: Is there a way to get an even finer increment/decrement of 0.01 degrees? (I often have to align scanned images, where finer rotation steps would prove useful)
-
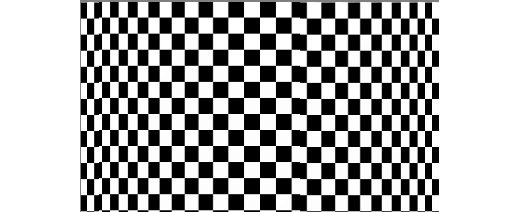
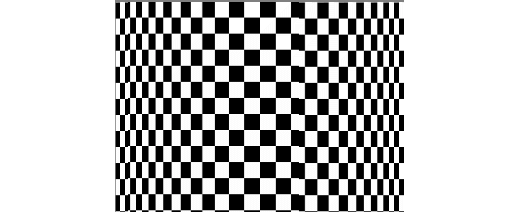
Some time ago I produced a macro to Wrap an Image around a Bottle or Mug. This involved some complex trigonometrical operations on the image. I present here an alternative approach for a macro to perform the same action. Here is my original image: o It is easily possible to produce an equation that contracts the image width-wise to emulate the reduction in perceived width as the image is wrapped. Such an equation has the form: x=w/2+(w/2-x)*pi/2 and has the result of: The contraction is uniform across the reduced width. The expression pi/2 is the appropriate scaling for a bottle diameter that accepts the image around its half-circumference. What I was aiming for was a function that would scale the edges so that they appeared contracted, whilst applying zero scaling to the centre of the image. After much trial and error, I came up with this: x=w/2-(w/2-x)*(1+1.571*(1-sqrt(1-(1-2*x/w)^2))) Edit: Note that this has a minus sign after the first w/2. The original had a plus sign. The value 1.571 is just half pi. The resulting image is: This is a single result. I have further refined by including a scaling parameter, a, which accentuates the compression at the edges. w/2+(w/2-x)*(1+(1.571/a)*(1-sqrt(1-(1-2*x/w)^2))) Here it is with the a parameter around half. Note that in these images, the central squares remain square. Edit: Like my previous version it has a parameter (in this case b) which affects the viewpoint, above or below. If you want to use this then you need to enlarge the canvas vertically beforehand to give room for the curvature. You may wish to use Document > Clip Canvas at the end in this case. Edit: various members had pointed out that the final image was flipped horizontally. This has now been fixed. I have also added Layer > Unlock and Layer > Rasterize at the start of the macro. I have not added a clip canvas at the end. Do you think that this is desirable? Here is the macro: WrapAroundV2.afmacro John
-
 This is so necessary for keeping objects in register for things such as animation.
 -
 This is an extension of my tutorial on Trigonometrical transformations using Filter > Distort > Equations. This one is focused on simulating flags waving in a light wind. Flags have an advantage in that they have a standard shape (width is twice the height). Edit: I have been told that this is not true. I stand corrected. To get the desired waving, I apply a sine transformation to each of the x and y-axes. The equations to apply are: x=(x+20*sin(360*y/h))/c-100*b y=y+a*(h/10)*sin(2*360*x/w)-(x/w)*h/10 I add a sideways sine wave to the x-axis as a function of the y-position. When the flag waves, the visual width is decreased, so I have added a parameter c which scales the width of the flag. The parameter b is an offset, since the left-hand corners of the flag can otherwise move outside the canvas. The y-axis also has a sine wave, depending on the x-position. The parameter a determines the magnitude of this sine wave. The final expression (-(x/w)*h/10) ensures that the fly (RHS in this case) is below the hoist (LHS here). (Definitions: hoist is the part next to the flagpole; fly is the part flying free.) Here is the UK Union Flag, plus a bit of extra space above and below to create room: And waving in the breeze: And here is a macro that implements these transformations: FlagWaving.afmacro And a macro library containing the single macro: FlagWaving.afmacros The parameters should appear when you run the macro. Parameter a controls the vertical wave; parameter b controls the horizontal offset; parameter c controls the overall horizontal scaling. This macro will not simulate a flag in too strong a wind, where the parts overlap! John
-
 Is there a way to set a default for column guide or grid settings? I often find my self working on a document and just needing a quick grid to line things up, so I use the keyboard shortcut and nothing shows up, then I need to go open the window and pick a preset for anything to show up. (I think Photoshop would always have the previous grid remembered.) (I'm using Affinity Photo 2.1.1 specifically)
 -
 Having used the pen tool to produce a curve, I select the brush line style, by clicking on the line graphic, click on properties, click on a brush in the brushes panel and the brush appears in the properties panel and then ... nowt. Help.
 -

Plugins for DESIGNER & PHOTO!
thegary posted a topic in Feedback for Affinity Designer V1 on Desktop
When is AFFINITY going to allow plugins to be made for their software? I would really like to use HOT DOOR CADTOOLS. Its an amazing plugin. I recently asked them if they intend on making a DESIGNER version. But they said AFFINITY doesn't allow this? This is odd, these other companies can help you grow and give us users the specific needs they require. This goes for PHOTO as well. AFFINITY your software is great, but it could be even more amazing with tons of companies supporting it. Please open the doors to these developers. If you don't believe me see how BLENDER had risen to the top of the 3D with completely open source coding. The addons for this software are amazing, making great software even better and one of the best communities for software ever. Just my thoughts Gary -
 I am right handed and was wondering if the dock tools can be permanently moved to the right side of the interface?
-
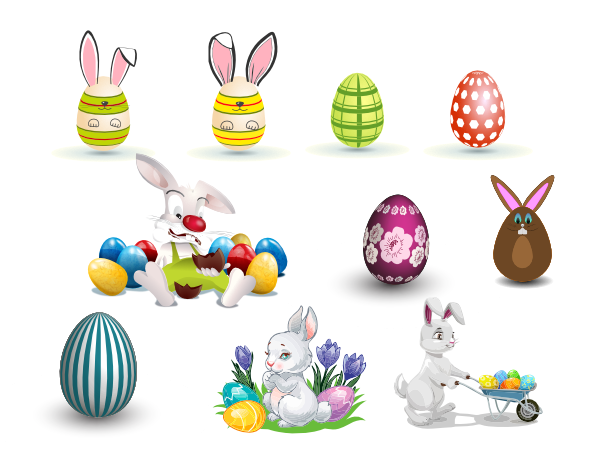
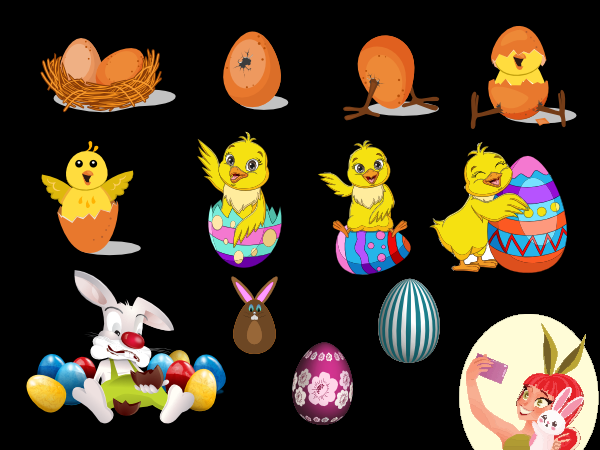
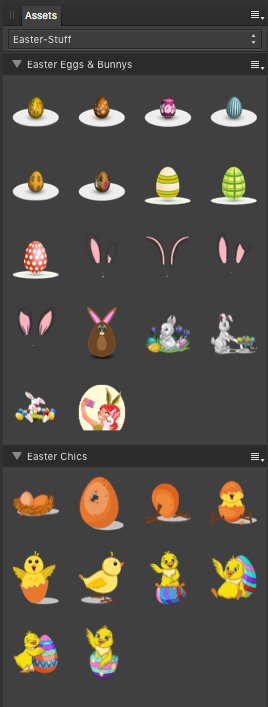
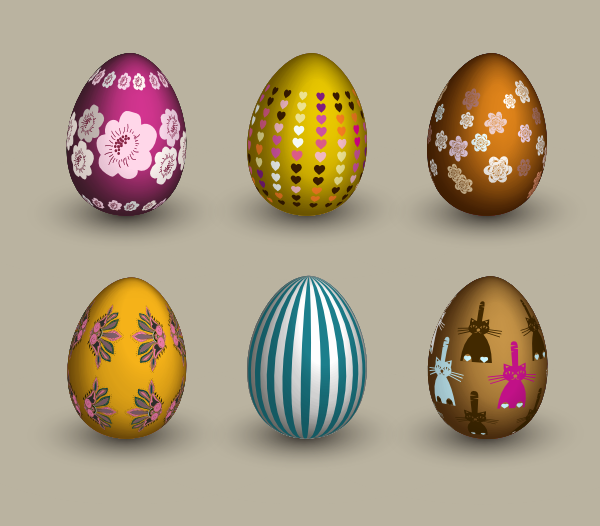
Some Affinity Designer v.1.10.5 based Easter Stuff vector assets. - Note: the assets are compound of unlocked, grouped vectors, thus when moving, resizing etc. inside docs, make sure to always select the outer group layer. The assets file: easter-stuff.afassets You will find a bunch of other Affinity related things under some of my other resources contributions, see therefor: Retrospective of resources contributions Have a nice and peaceful Easter time!