Search the Community
Showing results for tags 'curves'.
-
 Hi there, first of all, congratullations for the app. Do you have plans to implement in curves, the option to see the image in background, of the histogram for every color chanel (I dont know i writing it right in english, see the attached image). I think that is imprescindible for a profesional retouching photo app. Thanks.
-
Telegram (on iPhone at least) has a pretty nice curves adjustment feature in their photo sharing dialog you do not add points onto the curve but give the curve a gentle push to either side this gives more subtle results and feels just right on a touch surface maybe this is something that could be added to the iPad as well to even better use the touch input method cheers
-
 Hi! At first – sorry for my english. Second – my problem. I want to join curves, but I don’t know how
-
 Hello! Cannot find option to convert text in curves? How I can do it? Thx!
 -
 It was brought up in this topic: https://forum.affinity.serif.com/index.php?/topic/16297-any-way-to-force-everything-to-paths-when-exporting-to-svg/ Essentially, when I export to svg I want everything exported as <path>'s but I get some <rect>'s even though they are displayed as (Curve)'s. Is there a solution for this?
 -
Hey people! Found Curves under Adjustments, easy enough, but after clicking it the panel shows nothing at all. Adjustments < Curves > (nothing more) So uhhh, how do I adjust the curves?
-
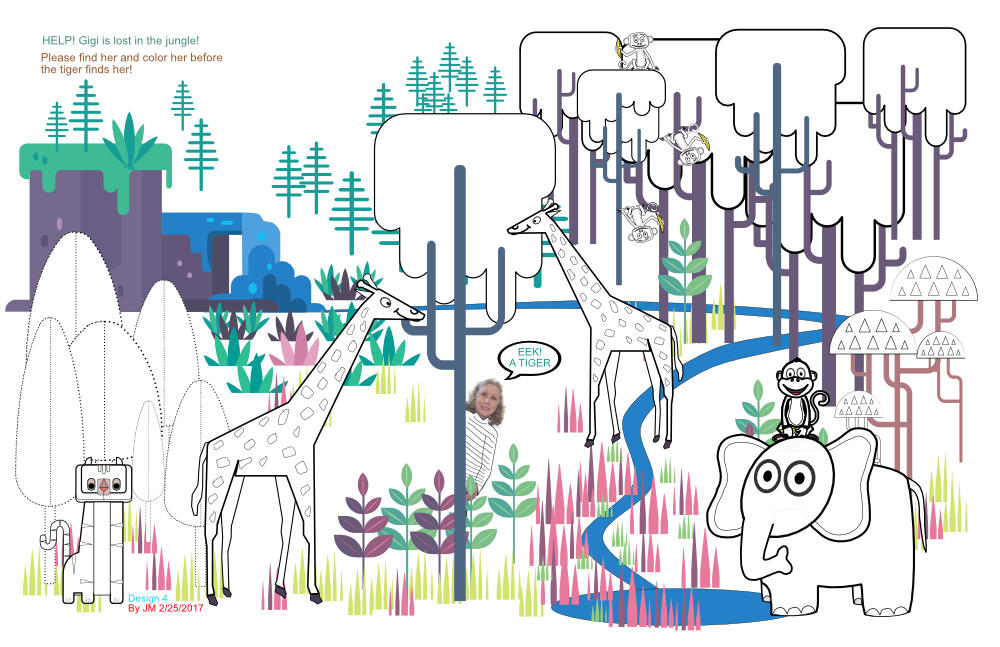
Thought Enrique (Frankentoons) might like to see a use I have made of his eBook resources - thanks again, Enrique! Here is the post where he announced it... https://forum.affinity.serif.com/index.php?/topic/34700-free-ebook-for-designer-by-frankentoon/?hl=frankentoon For fun, I create coloring pages for family members using Affinity Designer and Photo. Each coloring page is Tabloid size as I have found it fits high-chair tray-tops nicely and provides error-room for straying crayons. :lol: I make a colored copy for a visual sample, and a minimally colored one for the kids to use their crayons. Each set I do takes several days to create. Below is one set I did a few months ago using Frankentoon eBook resources and additional *animals (this one has no shadows/shading as it was busy enough for kids). The kids responded they really liked having their own "Gigi" in the forest. Color Sample: To be colored version: * Disclaimer: since it is not for resale or publication, I use Google images as a guide for animals/people/subjects. I pen-tool and modify each and every one to fit my concept and I don't claim complete originality.
- 2 replies
-
- 2
-

-
- Pen tool
- AFdesigner
- (and 1 more)
-
 Good day! Having played around with Affinity Designer the whole afternoon creating curves and shapes, I would like to share some thougths. - It often happens to me that I add a node accidentally, because it just takes a single click. I would prefer a double click instead of a single click for adding a node, which is something I do far less often than trying to select a curve or a node or dragging the path. - When deleting a node, the curve is distorted significantly. It would be great if you could apply an algorithm that tries to adjust the neighboring nodes such that the shape is preserved as much as possible without the deleted node. (I know that this is not possible exactly mathematically, but when adding a node and then deleting it again, I would expect to get back almost the same curve.) I often simplify curves by deleting nodes, for example when drawing with the pencil tool and the curve is a bit shaky and has too many nodes. But deleting the superfluous nodes does not produce a smoother curve, rather it ends up more like a series of nearly straight lines. Or I try to place a new node along the curve in a better location and then delete its neighbour (effectively moving a node along the path). As it is now, this always requires me to restore the path to its previous shape. - In the help I read this: "The curve will automatically reshape because of the deleted node, but you can retain the curve's original geometry by pressing Alt+Delete key instead." This does not work on my Version (1.5.3 on Windows, Swiss German Keyboard Layout). Alt+Delete does not do anything. In my opinion, the current behaviour (automatically reshape) is not useful. Make a shape preserving node deletion the default. Then Alt-Delete could be used for something else, for example to create a straight-line segment. - While talking about keyboard shortcuts: There are some keyboard short cuts that do not work for me. I have a Swiss German Layout. For example, the [ and ] keys do not work. On my Keyboard, I need to type them with the AltGr key, which is the same as Alt+Ctl. This gets confused with Keyboard shortcuts like Ctl+Alt+[ which I cannot press at all. When trying to redefinine a function to [ and ] in the shortcut editor, it is recognized as AltGr-ü and AltGr-¨, which is insofar correct as it is the typed key combination, but it does not work. Keys defined this way show no reaction. (Letters and numbers do work, though) - The "Smooth curve" function sometimes produces unpleasant results. For example, I draw a circle and convert it to a path. This gives me a perfectly smooth path with 4 nodes. After clicking "Smooth curve" I get a path with 12 nodes. While I admit that it is still smooth, it goes as against my experience that the smoothest paths I create are usually those with the fewest nodes. Also, when drawing a line with the pencil tool which seems a bit shaky, "Smooth curve" will just add more nodes! - A "Simplify curve" function might be more useful. Successively reducing the node count while trying to keep the overall shape as much as possible. Either apply it on the whole curve or a selection of adjacent nodes. - When designing free form curves, a good strategy is to place the majority of nodes so that their handles extend vertically or horizontally. (This trick I learned from typographers https://theagsc.com/blog/tutorials/so-whats-the-big-deal-with-horizontal-vertical-bezier-handles-anyway/ ) It would be great if there was a way to restrict the handles to these directions. In the help I learned that by pressing Shift, the directions are constrained to multiples of 45°, but it seems this only works when laying out the curve with the pen tool. When editing it with the Node tool, pressing shift just fixes the handle direction (which is also useful). Nevertheless, I really like the program! Best regards, Andreas
 -
 Hi, I am new to Affinity Designer (a week) and need some guidance. I have a simple problem that I cannot seem to get past. I'm trying to reduce the weight of a font and cannot seem to do it. I am using the PilGi font and would like to reduce the weight. - Thus far I have been converting to curves and adjusting it manually but am not 100% happy with my work. I am struggling with keeping the lines smooth. - I have also tried to create/edit text style as it seems to have that option, but it is greyed out. I would like to just dictated the weight of that font. Please help, this is driving me bonkers! Thanks ahead of time!
 -
It's nice that Affinity Photo has got such good support of the 32 floating point mode but it is somehow unfinished. There are particularly two things that I desperately miss: 1. The ability to show the 32 bit float color values in the info panel. How should we work accurately with 32 bit float values if they are displayed nowhere? All that I can see are the conventional RGB values from 0 - 255 but these are meaningless in 32 bit float. 32 bit float per definition contains color values below 0 (actually a bad thing) or above 1 (actually a good thing). 2. Please make the curves dialogue zoomable so we can also edit values that exceed the white point of 1. The values beyond the white point are in fact one of the main advantages of 32 bit float.
-
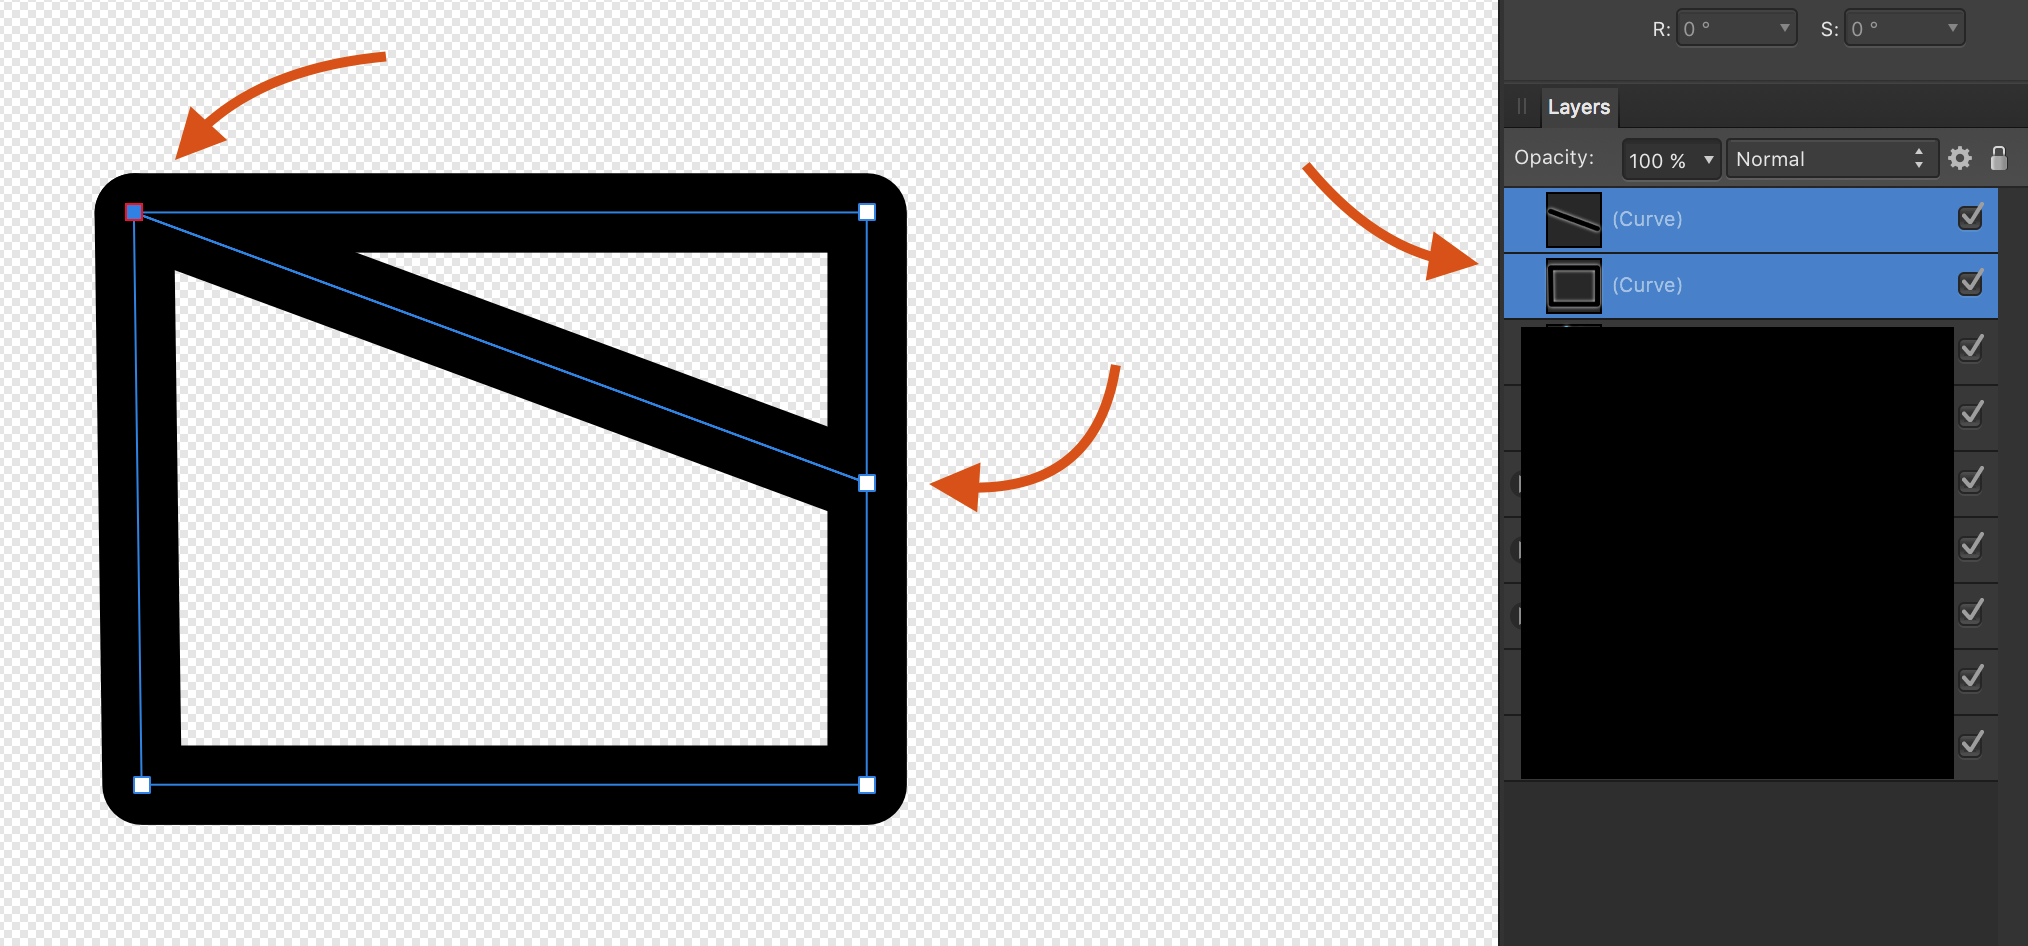
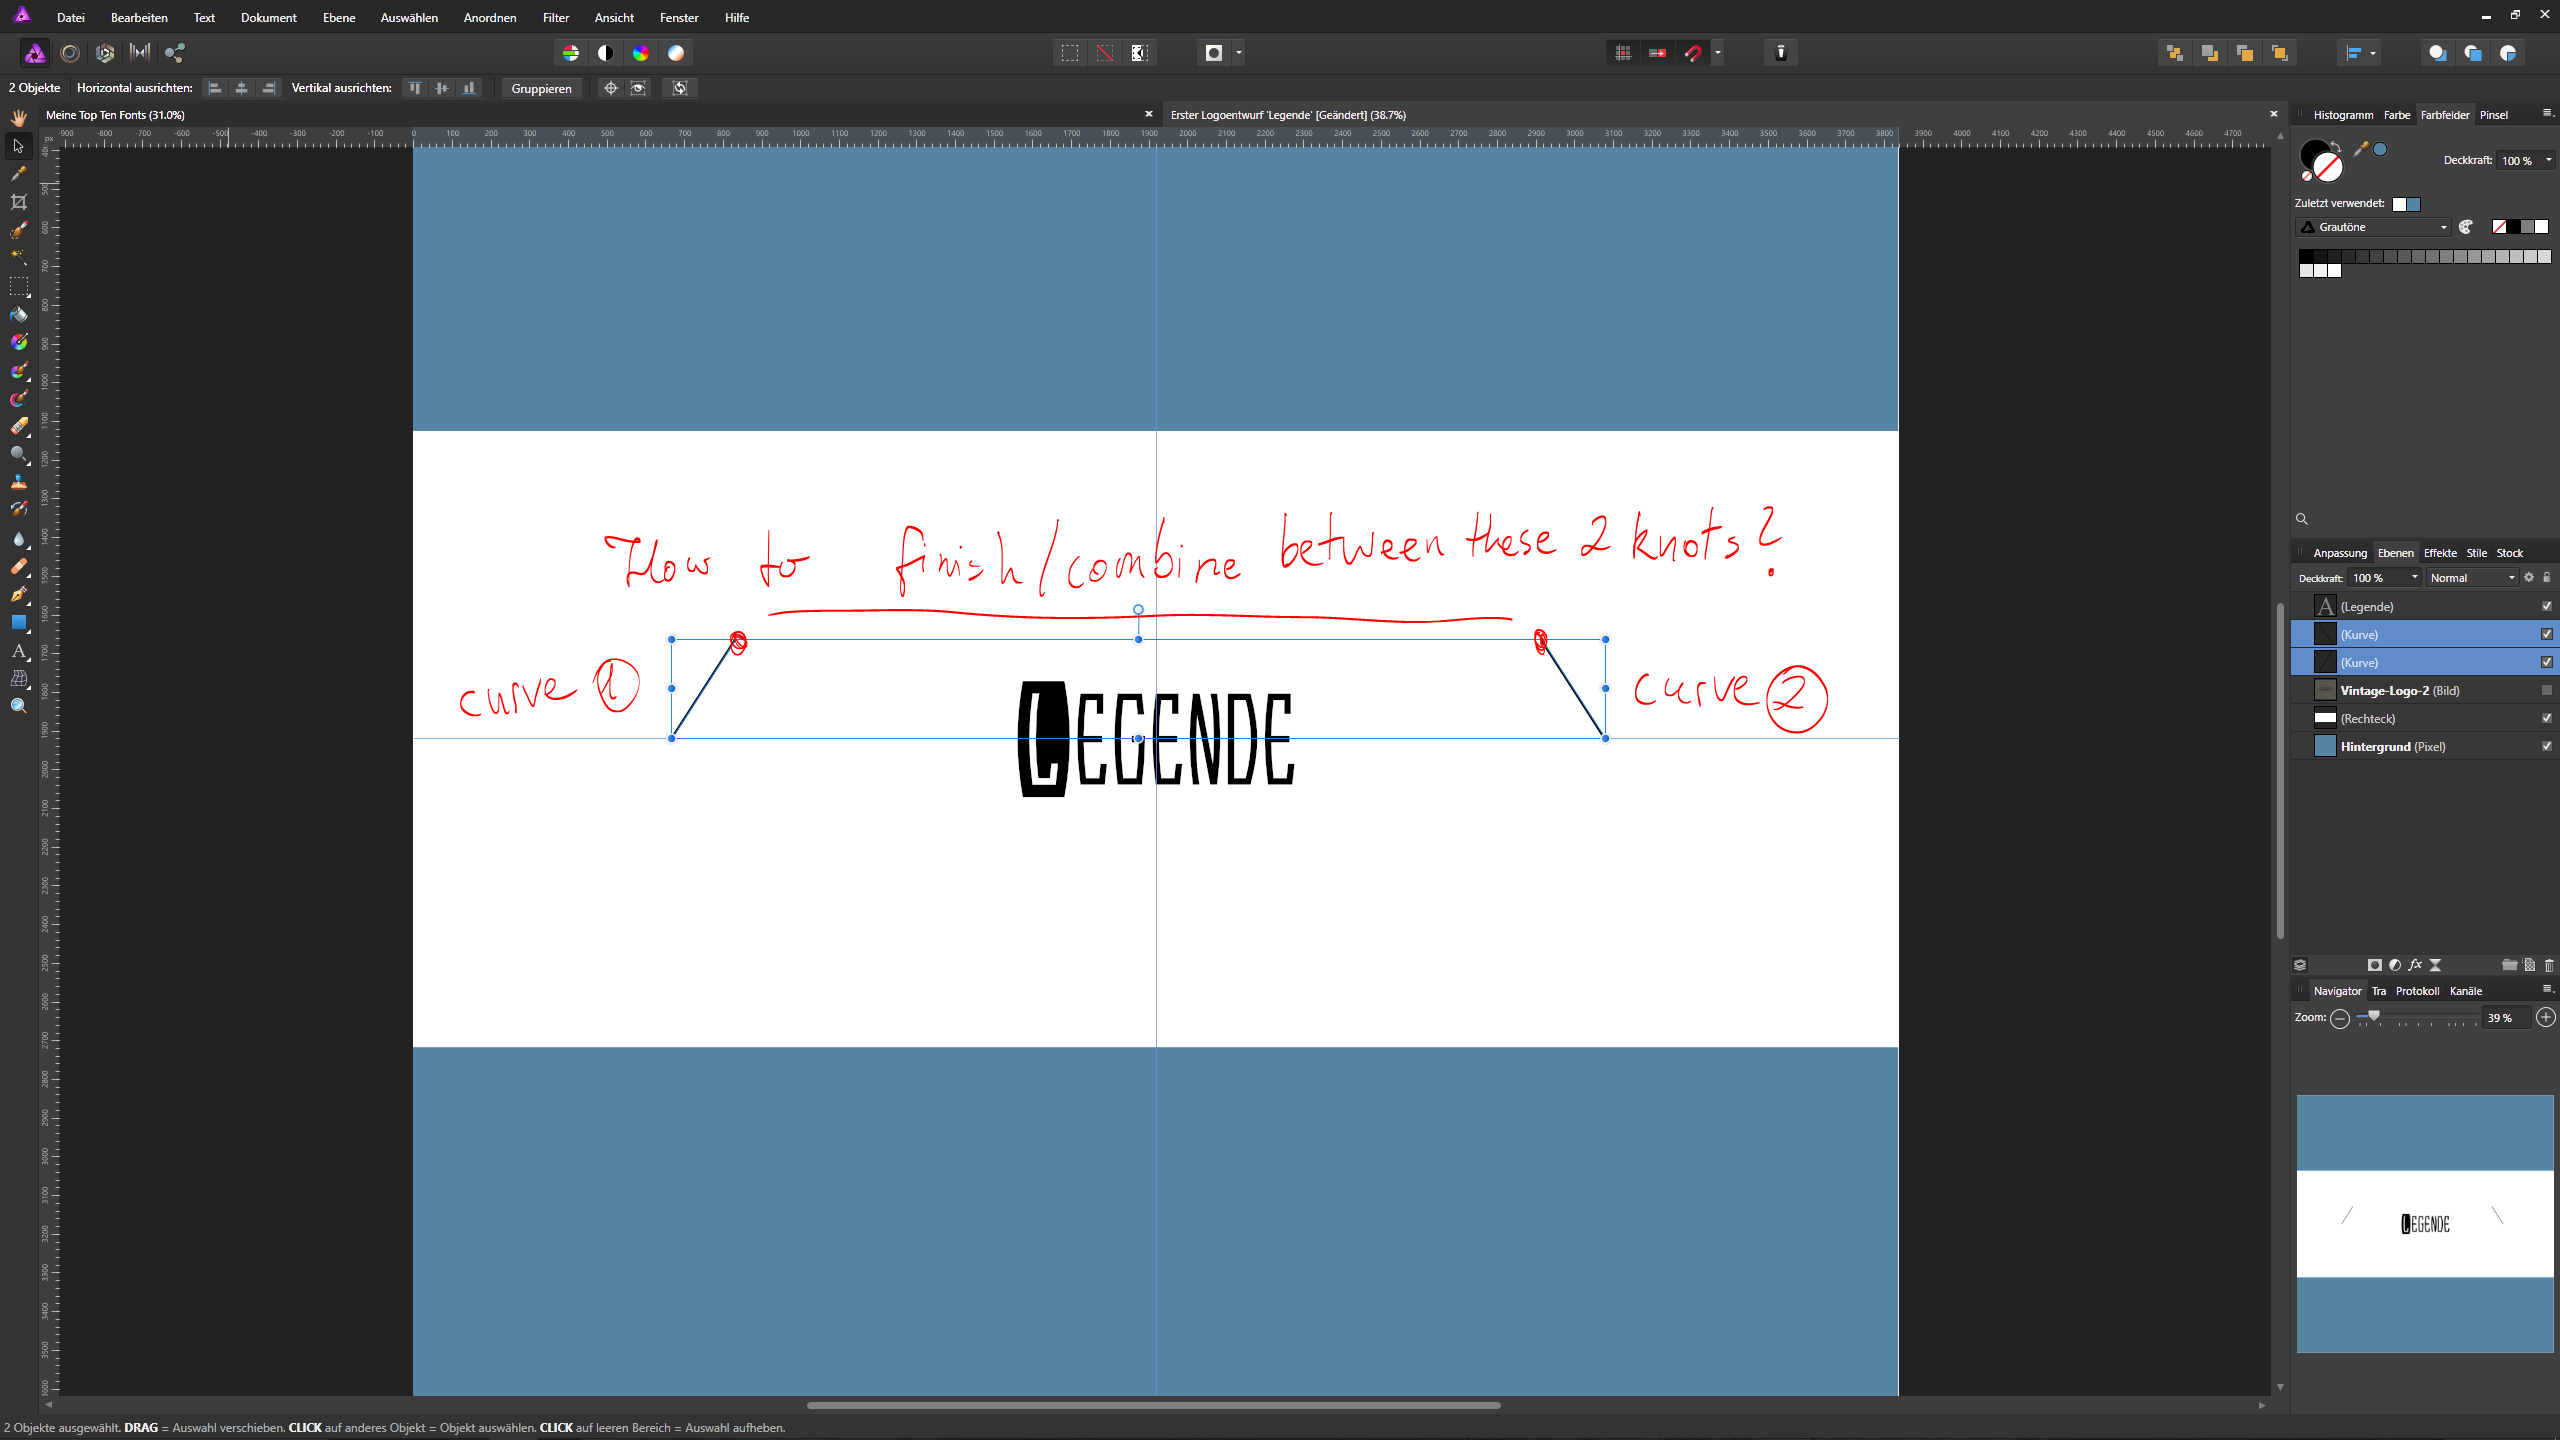
 Hey, I'm new to Affinity Photo and I would love to know how to finish or add a curve/line between 2 separate curves. Enclosed you will find a screenshot, so that you can understand better what I mean with this issue.
-
Attached is an AP file containing just a group of adjustments. Copy and paste the group as a child of an image (or above if you like). Then open the Curves, HSL or Vibrance sub-groups and double-click on any of the adjustments to tweak blacks, shadows, mid-tones, highlights or whites. It's quite simple - just a curve in Blend Ranges for each. You can constrain changes further with masking. You can also use it in conjunction with macros from a previous post (https://forum.affinity.serif.com/index.php?/topic/38379-luminosity-mask-selection-macros/), for example to preview area of the image that will be affected. 5-Stage_Adjustments.afphoto
-
- 1
-
-
- luminosity
- curves
- (and 1 more)
-
Attached is a simple tones bar that can be used in AP for: Assessing luminosity of parts of an image. Constraining curves adjustments to specific tones. Variable luminosity-based selection and edit. Details on origin and use are included in a pdf. mono-tones.zip
- 1 reply
-
- 4
-
-
- luminosity
- curves
- (and 1 more)
-
I made some curves adjustments for AD and AP which I'd like to share with you. the attached Affinity file features embedded documents so that you can easily preview the effect of all curves on a single photo and then choose a curve that fits best/ gives you a good starting point/ idea. You can add them to your AP though opening the document, selecting each group, selecting the "curves" adj, so that it's panel opens up, click "add preset". (I've made a feature request to make that easier) You can then access them by the "view > studio > adjustments" panel which is active by default (only available in AP) please don't overdo it blend modes, opacity and blend ranges can, and should be adjusted upon your needs for more information about such techniques you can have a look over here https://affinity.ser...er-amateur-pro/ cheers PS: similar presets for the "channel mixer" are available here PS: similar presets for "LUT" adj. are available here PS: here is a great resource to really understand curves EDIT: just added some Black and White adjustments too FWIW >> curves mix.afdesign << >> BW mix.afdesign <<
-
UPDATE: New post including macros here: https://forum.affinity.serif.com/index.php?/topic/38379-luminosity-mask-selection-macros/ I've been experimenting with doing 'luminosity masking' with curves and blend ranges. Here's the result. Attached is a 'photo' file with three groups - just copy and paste one of these into any photo, either at the top level or as a child. Then open the group and double-click the curve to adjust just the named luminosity range (eg. 'mid tones'). As it's a curve you can also do it selectively by colour. It works by constraining the blend range on each curve. Click on the cogwheel to see this. There are three groups because I wasn't sure which way to chop up the spectrum, so I've done three ways: curved, rectangular and triangular. Please do try them and let us know here which works for you. I tried doing these as macros, but the macro system stopped me doing things like naming adjustment layers and grouping. I guess it's not mature enough yet for such actions. So I resorted to the cut-and-paste method. This forum also doesn't like you uploading .afmacros files (ahem). But if you prefer macros, I've put them on one of my websites here: http://changingminds.org/etc/affinity/Curve%20Blends%20V1.afmacros This is still in the experimental stage - please let me know what you think. Edit: Upated version in post below. Curve Blends V1.afphoto
-
 I see how to save presets for Curves, but I don't see how or where to apply them. Can someone point me in the right direction? Thanks.
 -
 I'd like to suggest the curves sub panel under Tones in the Develop Persona have the input / output values displayed for given points. In addition, I'd like this panel to include an 'editor' feature, whereby the option of entering the numerical values for each point on the curve. It would also be appreciated if the x and y axis (0-255) could be delimitated in 10ths like Photoshop. Either replacing quarter tones, or, in addition to the quarter tones. :) Nick
 -
 ...me again - I am determined to learn this software (it's actually been a blast, just have so many basic questions - thanks for your patience) With the help of MEB, Alfred, R C-R, Callum, and MANY others I have learned a lot but am certainly still in the novice category. I have a relatively simple image (1 - 2 layers) that I want to save in my AD Assets-Panel (a custom panel created for this project). I've saved/moved a number of other images into this panel previously with no problem, simple click/drag operation. However, with this particular layer I'm seeing something I haven't seen before...when I click/drag, the image seems goes to go BEHIND the Assets panel and stays there, unseen. No vertical blue-bar appears in the A-panel, and upon release of the click/drag, the image does appear (or 'stick') in with other Assets. Anyone know why I would see this behavior? One additional Assets related query: what is the trick/procedure to assure the reasonable sizing of an image before dragging it into the Assets-panel so that it is not EXTREMELY LARGE when I access it for use on a newly opened image? Yet another basic skill that I'm 99.9% sure I've missed along the way. Cheers! Hope y'all have a great weekend. -Christo
 -
Thanks in advance friends... ...when flattening into a single pixel layer, do I first need to rasterize the grouped layers? Not sure how to do this, i.e, I'm unclear on the steps involved, and the proper order in which to perform them. A brief walk-thru would be greatly appreciated. FYI - I am wanting to manipulate the Flat image (bend, curve around a cylindrical surface such as a large barrel or a utility pole, alter perspective and/or viewing angle, stretch by pulling/moving nodes independently of each other, etc). greateful for your help, -Christo
-
 1. Is there any way to constrain the movement of the handles, (e.g. 45°) when editing the nodes? 2. Is there anyway to select different curves by dragging the tool instead of clicking on each curve when using the node tool? Thanks for the help
 -
Denny makes useful suggestions here:
-
intelligent_rulers_upd2.afdesign Because some are waiting tooooooooo long for better rulers including a “change origin point” feature, we made a flexible ruler for dm, Berthold points, Pica points, Didot points, DTP Cicero and other units that you can change easily for your own needs just in seconds. Even if you need furlong, light-nanoseconds, Fournier point … no problem. Now you can have many rulers with different units at the same time. And they even can measure curves. Some backgrounds can be found somewhere. Have fun and help to improve Affinity apps. The old ones: intelligent_rulers.afdesign intelligent_rulers_upd.afdesign
-
3 suggestions. Firstly, when deleting nodes, AD should try to keep the original curve. The current algorithm leaves a almost straight line between the two remaining points. This makes cleaning up curves much easier (since the couture function is a bit node crazy.) Secondly Node alignments. I was doing an organigram chart and a quick align nodes would have helped a lot to work more quickly and cleanly. I could try guidelines but for this function it can slow things down a bit. Thirdly, nodes welding. The way that nodes join is not good, when I break open a curve where it intersects with it's self it will not weld any of the open points unless they were welded before. Very keen to see how this software develops forward, enjoying the current version already.
-
 Hi, in diesem Tutorial Affinity Photo Portrait Text zeige ich wie man ein Portrait mit Schnittmaskentext versieht. Dabei ist das Foto nur durch die Buchstaben zu sehen wie bei einem Fenster. Dazu spielen auch Anpassungen eine besondere Rolle. In this Affinity Photo Tutorial, I show you how to create a text with a clip mask on a portrait. Furthermore I refine the photo Have fun Your Jack Foto / photo: „85778626“ von www.shutterstock.com (Lizenz) Link to YouTube tutorial
-
- 2
-
-
- Affinity Photo
- Text
- (and 3 more)
-
Hi, in diesem Tutorial Affinity Photo Bildoptimierung Skulptur zeige ich wie man eine Steinskulptur in Szene setzen kann. Dabei spielen Gradationskurven und das Licht eine besondere Rolle. Viel Spaß dabei In this Affinity Photo Tutorial, I show you how to optimize a sculpture of stone. I use especially curves and light. Have fun Ciao Jack Link to YouTube Tutorial Foto / photo: eigenes