Search the Community
Showing results for tags 'affinity designer'.
-
 Hello there 🤗! If you don't go to the mountain, the mountain will come to you! Learn how to create 2D artwork from scratch, similar to this example! 🏔️ Learn more by visiting the link https://www.vectorizeclub.com! cheers 🤘 10_Mountain.mov
 -
Hello Vectorizers 😊! Today I'm showing you this beautiful 2D treasure chest art 😆! Come see the tutorial in full by accessing the link https://www.vectorizeclub.com and let me know if you liked it! enjoy 😚 9_Treasure.mov
-
 When in affinity photo, and I need to find a file, and I have many files, I goto the folder I think the file will be in, and as I select a pdf or jpg file, even a png or ai file, i can see a file preview in my window, but if I select a native .afdesign file, there is no preview....this doesn't sound right. Is this an oversight or a bug or is there a setting to turn this on? right now I have to open each file to check, this is time consuming...many files... windows 10 thanks! Rob
 -
William

-
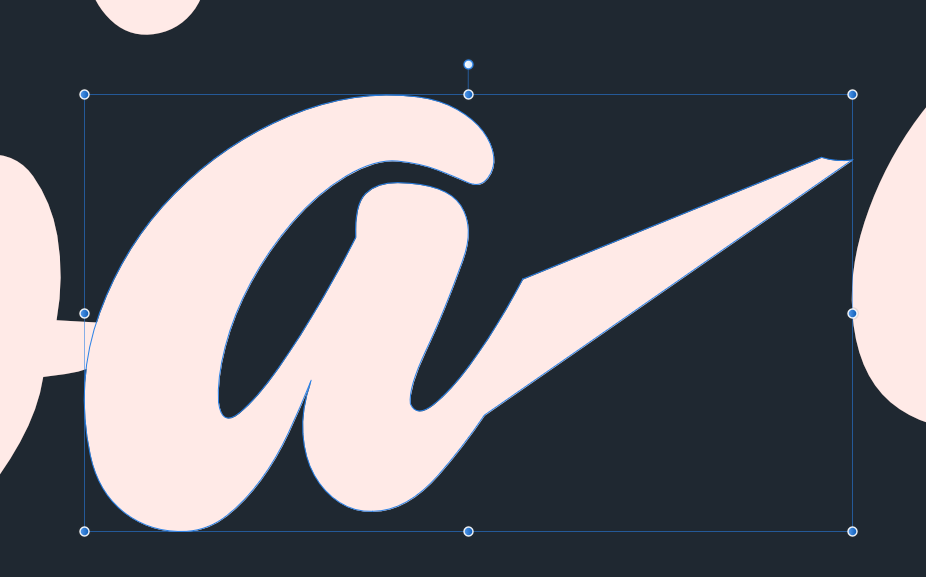
 Hello! When attempting to combine these two curves together, the result is a completely different shape. The "r" is being warped in such a weird way and I'm not sure why this might be happening. Before the add: After the add: Any help is appreciated! Please be patient, I'm decently new to this.
-
 hello, i'm new user, who trying editing svg file's. i was search a tutor on youtube about ungroup svg file in affinity designer, but isn't work, because feature like editing document or paste special, is doesn't appear, cant u help me guys, to fix the problem, thanks . by the way my affinity version v 1.10.4.... (newest version) windows.
-
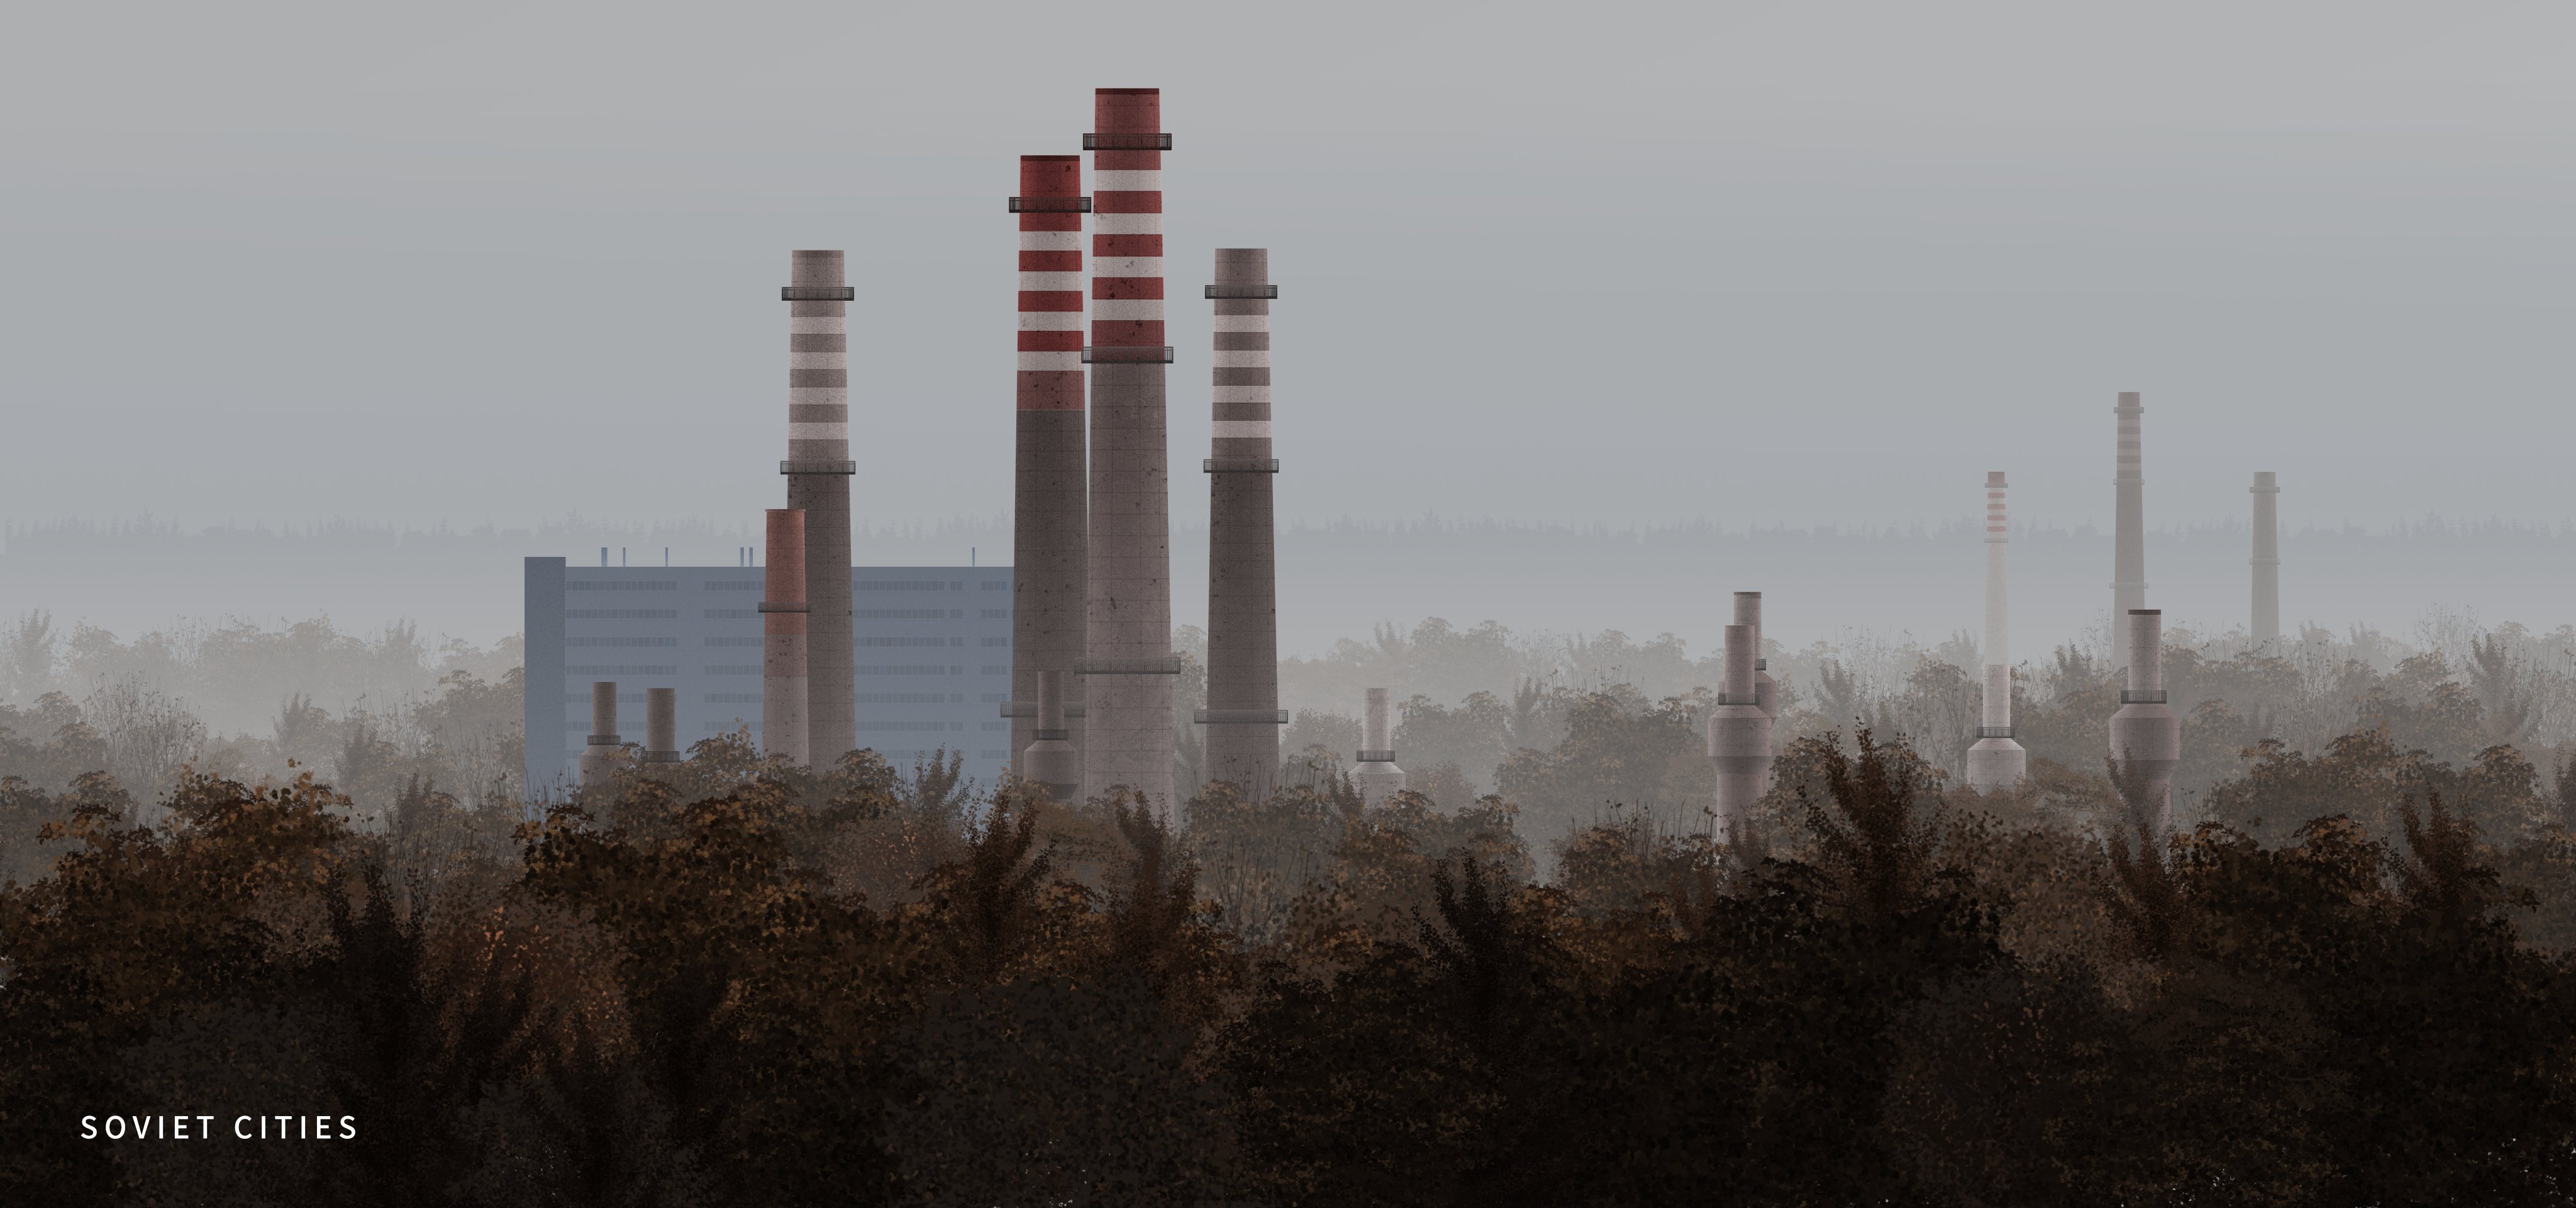
These are part two of my Soviet Cities series illustration.
- 8 replies
-
- 10
-

-
Hi there! How about learning to create a crystal from scratch 😲? Meet the Vectorize Club school and come from improving your art to learning to vectorize from scratch! 🚀Join the design school! https://www.vectorizeclub.com cheers 😆 7_Crystal.mov
-
 I know this has been discussed a lot in previous posts but I'm asking for advice here rather than complaining about the shortcomings of this "feature". I've drafted the basic shapes for a design and used strokes with thickness and varying alignments (inside, centre and outside). Several elements start life as an ellipse. In removing the strokes that I don't require in the final design I often have to break the curves at intersection points. Doing so reverts the alignment to centre. This changes the design and the alignment of the graphic elements. I realise that this isn't going to be fixed so I was wondering if anyone has any advice about a workflow that avoids this issue. Clearly not using the alignment option on any curves used in a design that might be broken seems to me to be the only option. Any thoughts?
 -
 I want to export my results with grid or guide line. Are you under development or already having that functions? In detail, In Affinity designer, grid and guideline managers exist. Therefore, I want my illustration export png or other file with grid and guideline. So, this maximizes my client's understanding of the design configuration of my illustrations.
-
Hello my friends! What do you think of this cute little bat 🦇? It was created as a tutorial for Vectorize Club students! If you're interested, come learn more about Vectorize, just access the link https://www.vectorizeclub.com! Enjoy 🤗 6_Bat.mov
-
 Hi! First things, first: Your applications are wonderful and awesome. They are a must for me and lots of people. Getting better and better every day, so keep the good way, team! 🙂 I would like you to create a new tool that will be able to make a shape or figure that requires a little time to get done by hand (manually). I do not know what to be its name. Maybe umbrella. I make and use it every now and then to use it as a sunset or sunrise or whatever. Maybe the tool will have some parameters (you know: the interactive little red points to change them): Number of sectors or parts, some of them larger than the others alternativelly, the external part of the sector if it is concave, hollow or convex and so on... I think that with the image attached is good to understand the meaning of the new “umbrella tool”. I know that Designer has similar tools, but the key of the “umbrella tool” is that have “divided sectors”. Thank you - - - - - - - - - - - In Spanish: Petición o sugerencia de una nueva herramienta llamada paguas o sombrilla que sirve para muchos propósitos como simular un amanacer, atardecer, sombrilla, paraguas u objetos parecidos. Lo interesante aquí es que no sería como otras herramientas parecidas ya que habría sectores (partes del objeto total) separados. Además se podría hacer que hubiese manejadores interactivas como en este tipo de herramientas que permitiesen que el perímetro exterior del objeto pudiera tener segmentos, cócavos, convexos o desiguales, etc. Gracias por vuestro tiempo y dedicación.
-
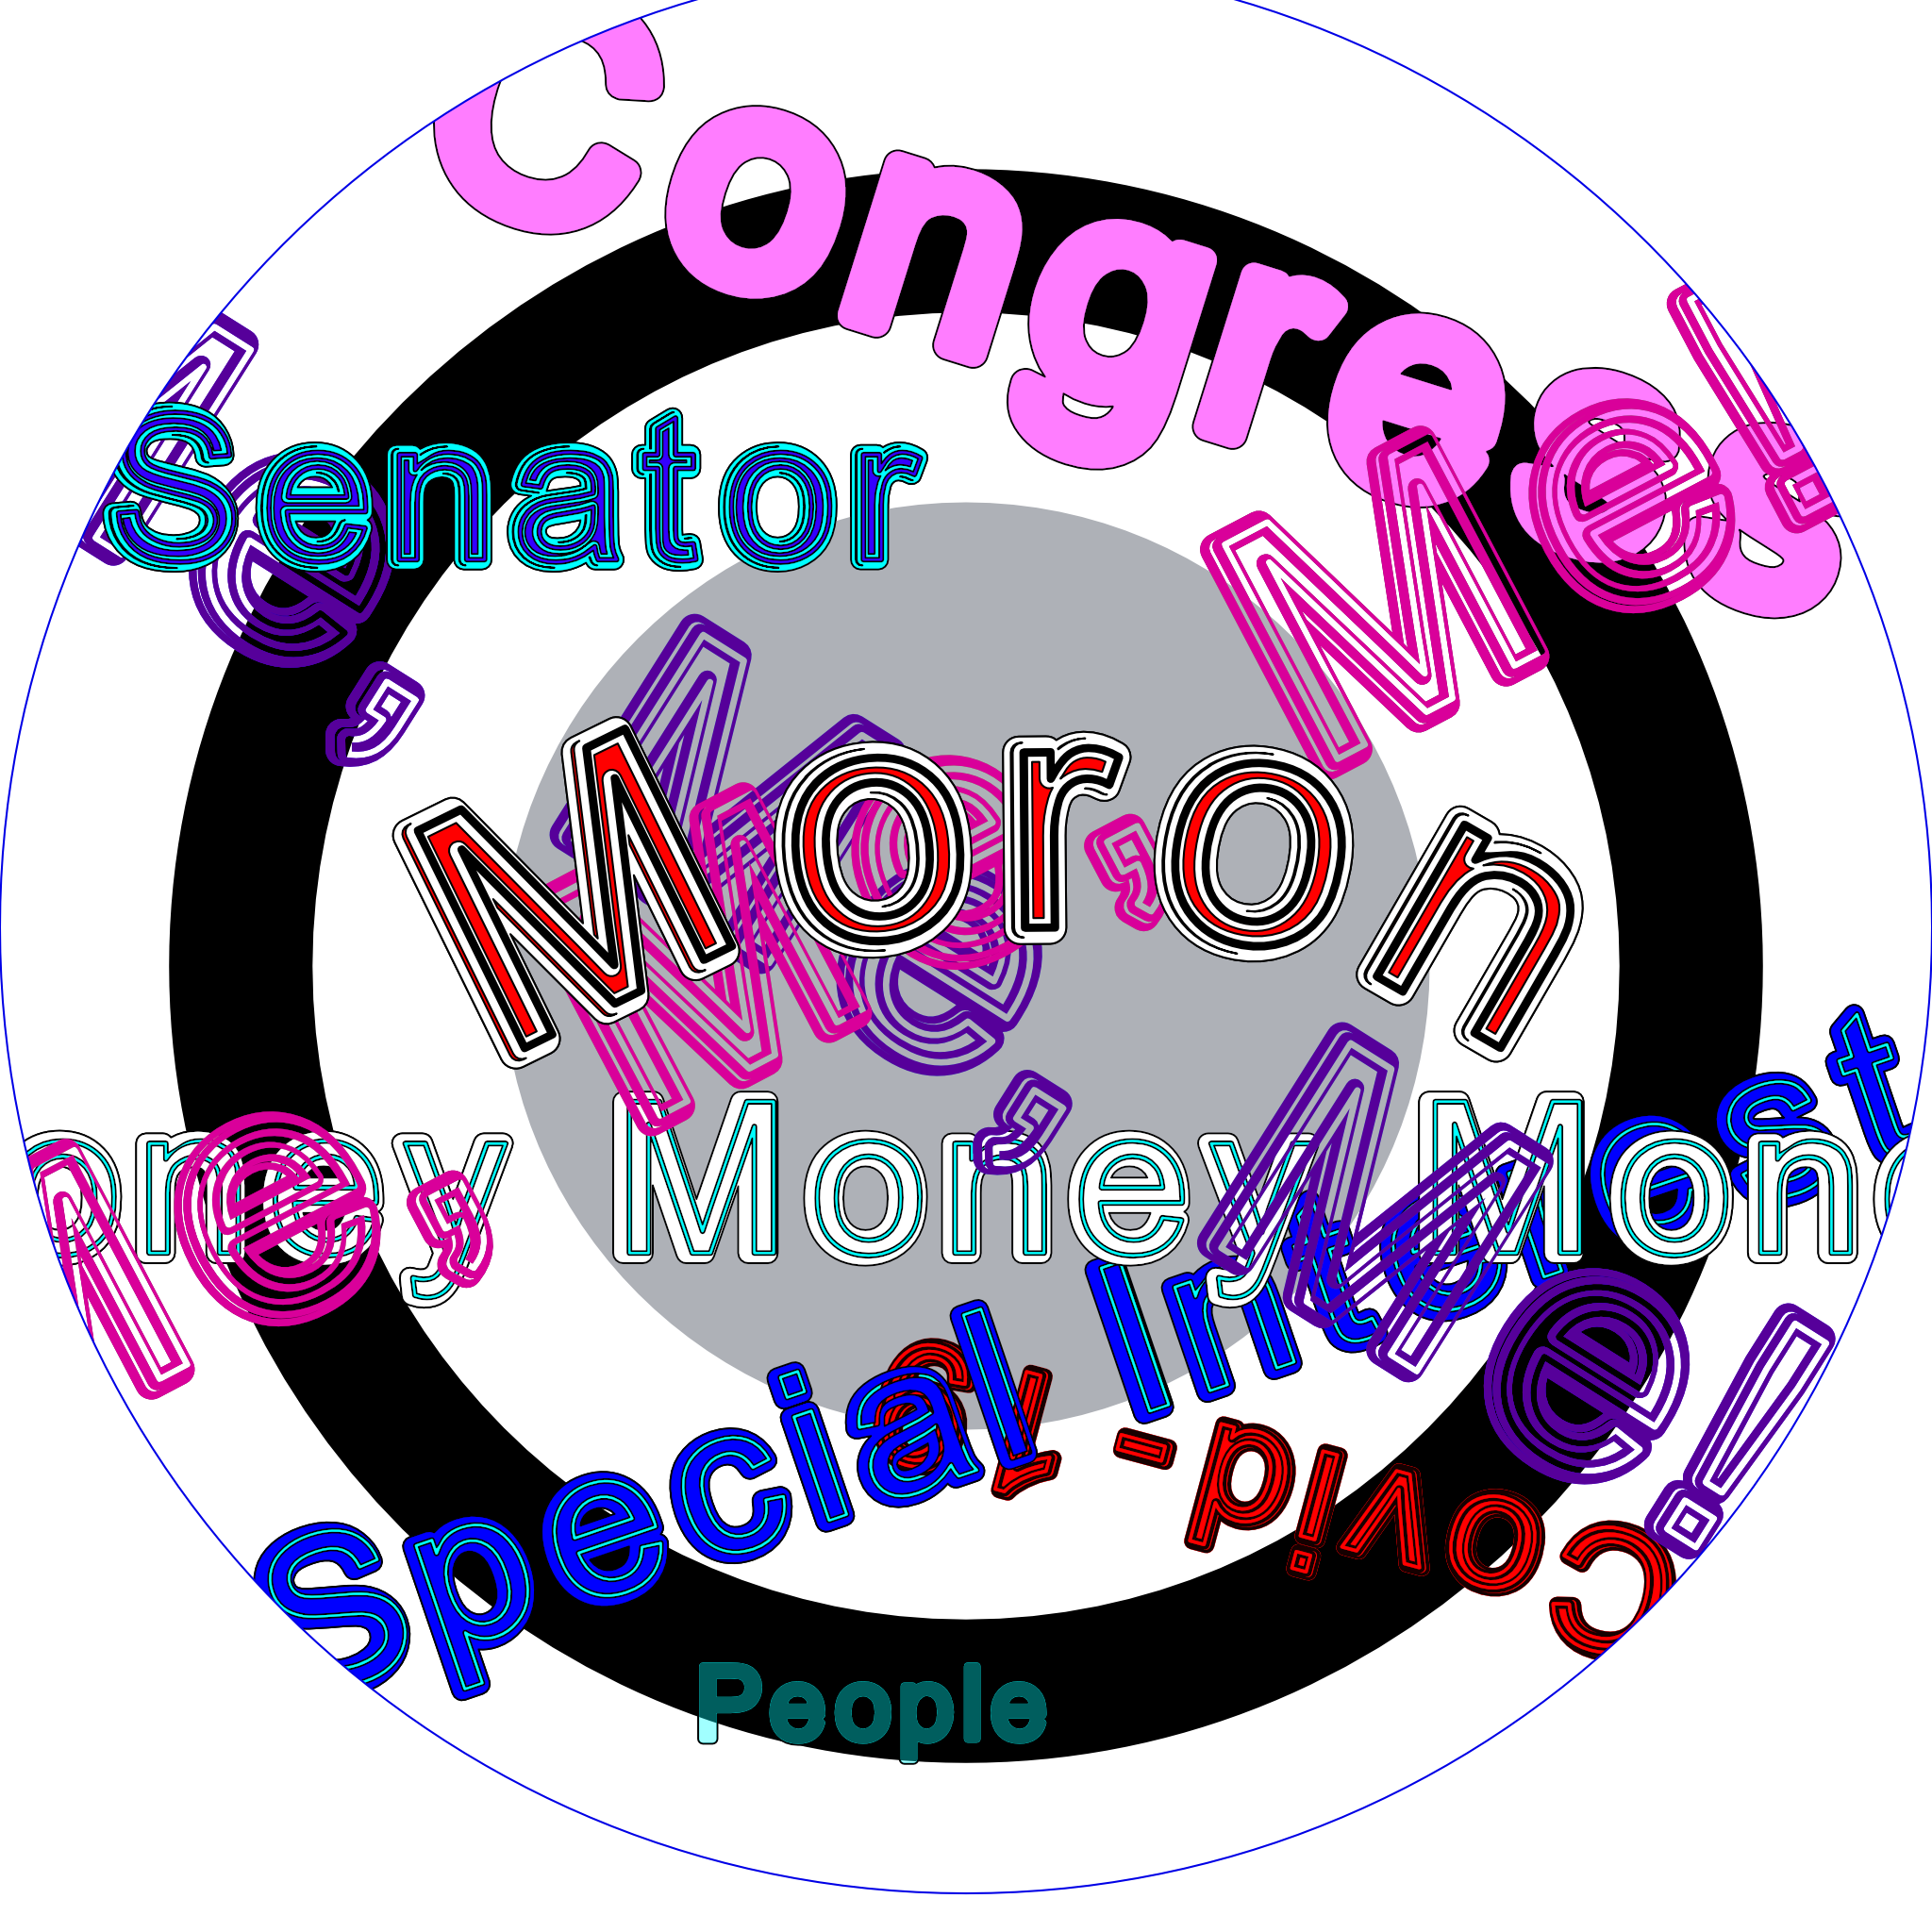
This is what, in my humble view, the US Congress (and the rest of Washigton) has devolved to by now (January 2022). Reminds me of the ancient Chinese curse, May you live in interesting times! Anyway, created in Affinity Designer.
-
- 1
-
-
- washington dc
- congress
- (and 1 more)
-
 I have tried importing some PDF documents that contain a Barcode into both Designer and Publisher. Both apps load the PDFs but make a mess of the Barcodes. In fact the PDF Barcodes are rendered automatically into the Barcode's text by both Designer and Publisher. How can I persuade Designer and Publisher to load the actual Barcodes without auto conversation. Please see attached images from Publisher. Many thanks Allan
-
Hey guys 😆! look how creepy this dungeon is! And the best thing is that you are also able to perform one similar to this one! 🚀Did you like it? so come learn more about the Vectorize Club by visiting the link https://www.vectorizeclub.com! kisses 😘 5_Dungeon.mov
-
Hello there 🤗! In this tutorial I teach you how to create a backpack from scratch! Check out this and other tutorials by accessing the link https://www.vectorizeclub.com! cheers 😊 4_Backpack.mov
-
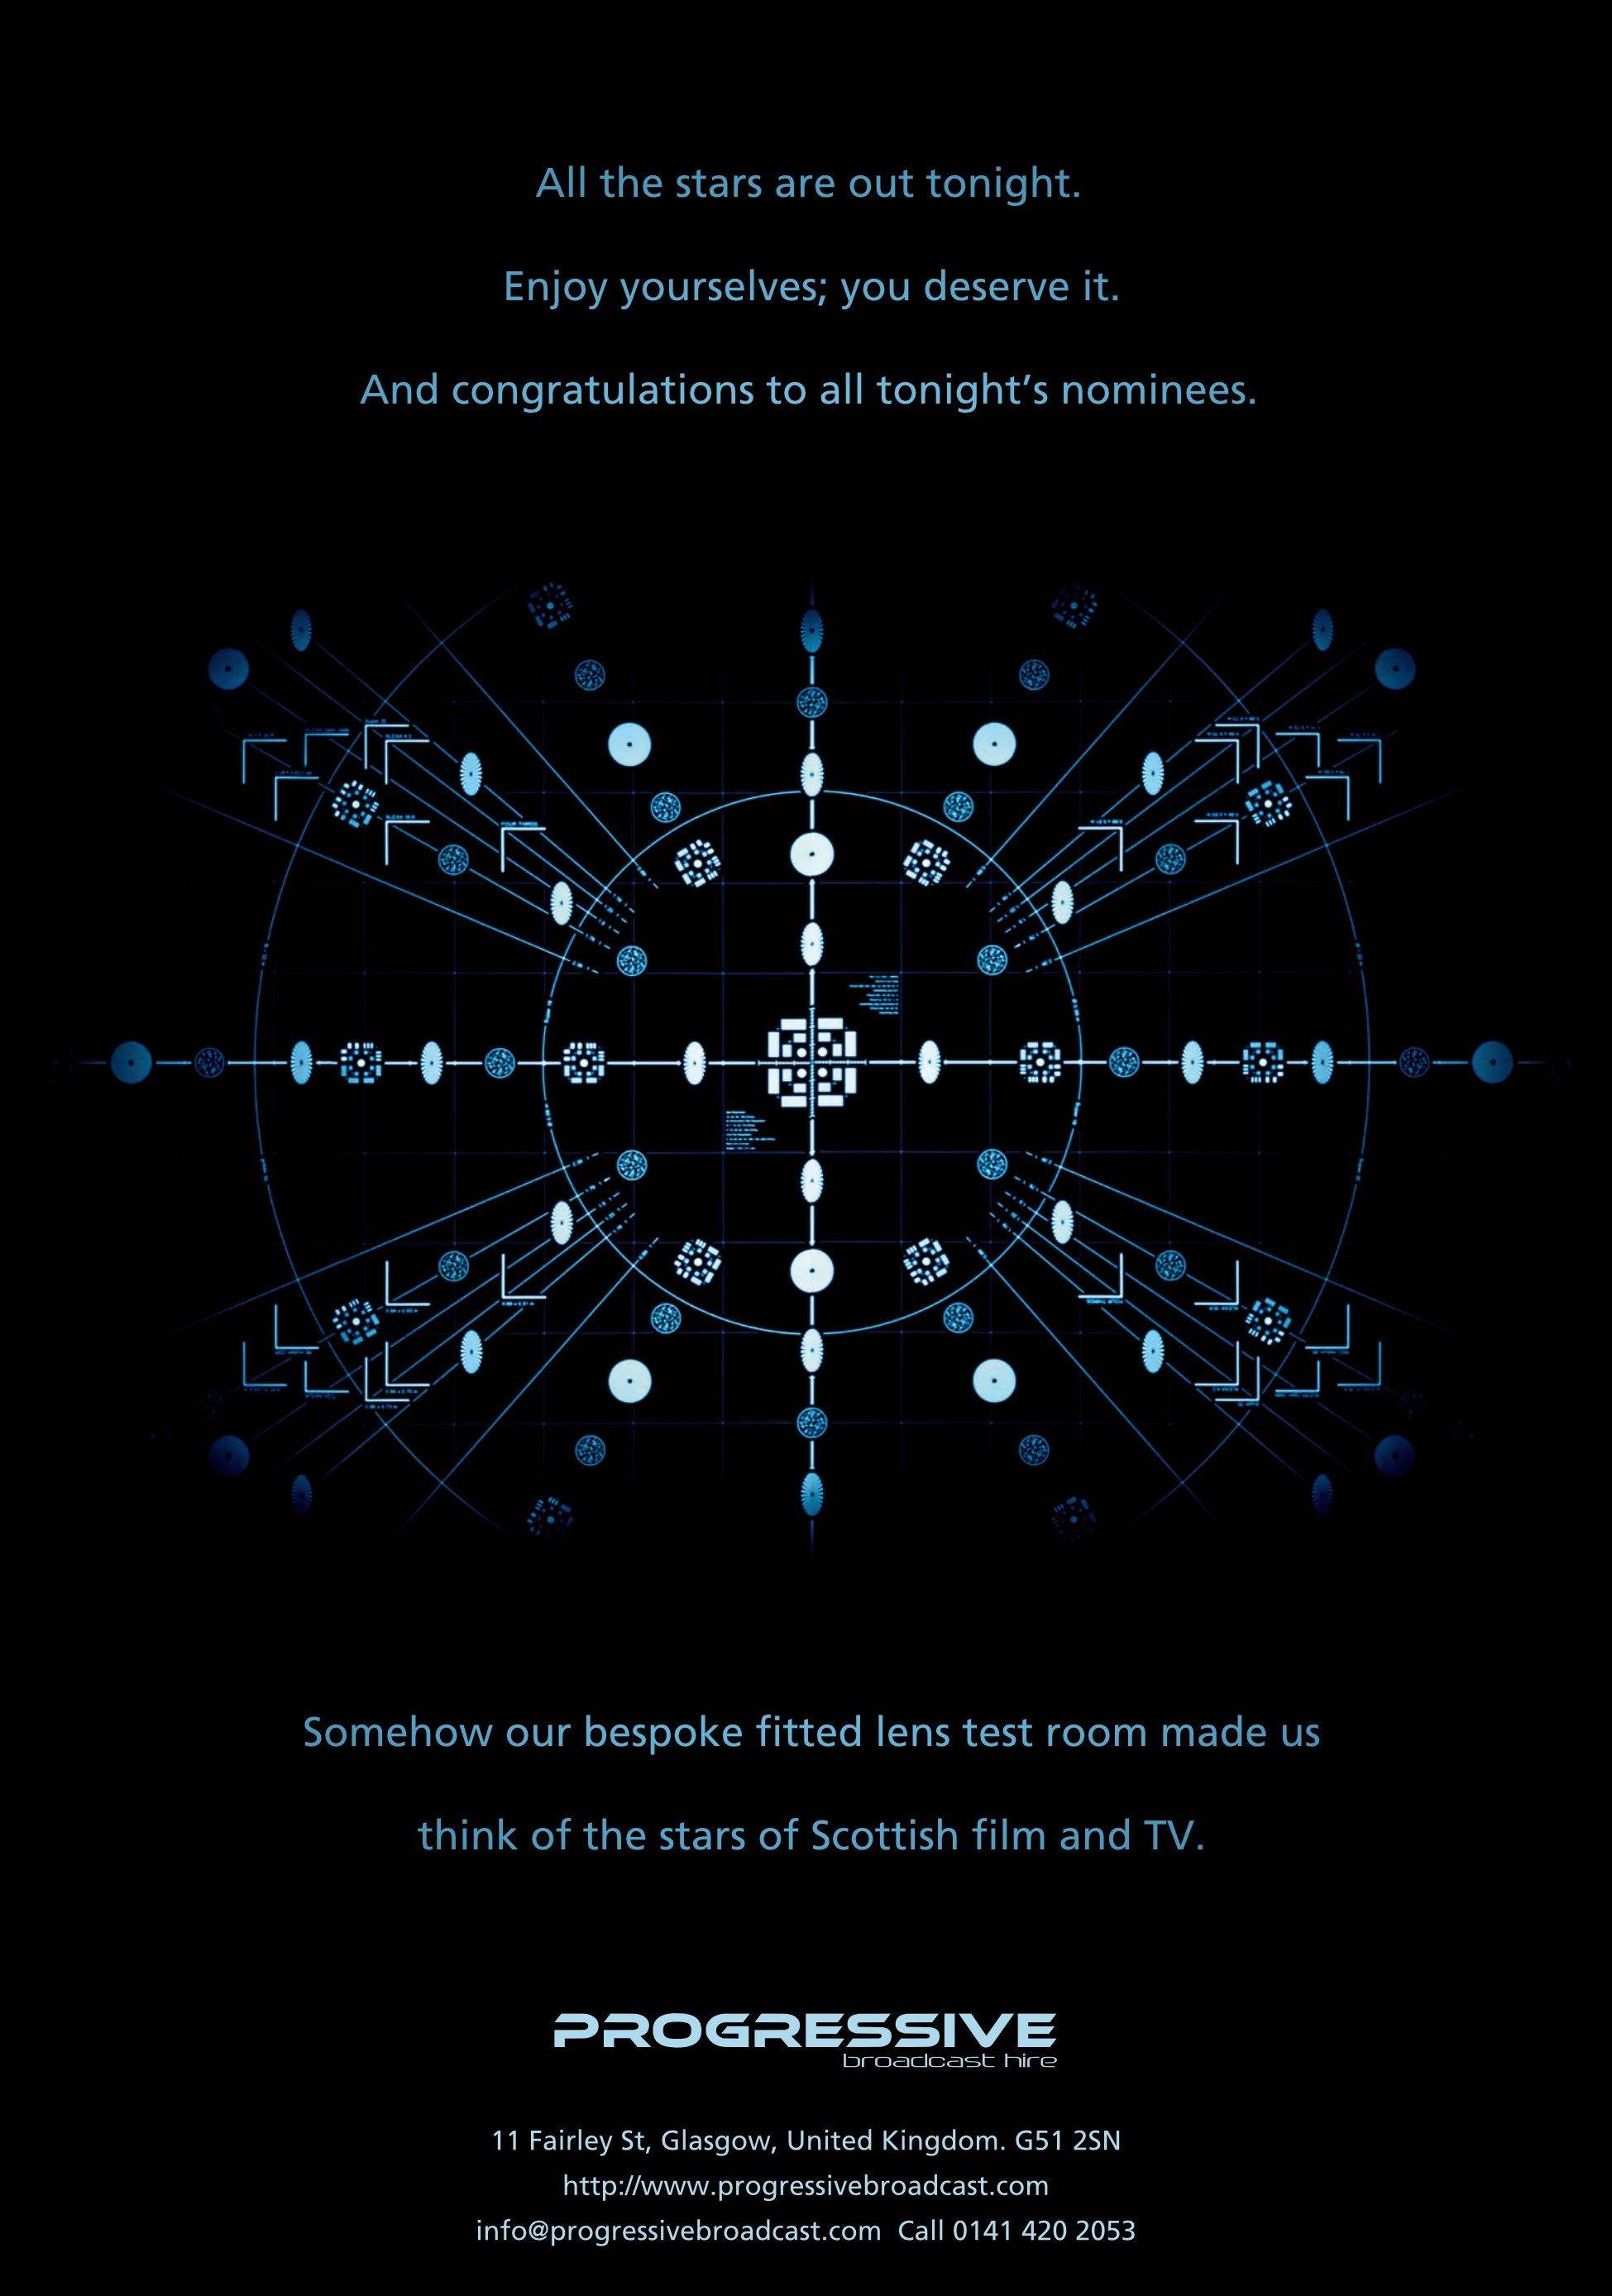
Progressive Broadcast Hire commissioned me to do a full-page ad in the Scottish Bafta 2021 Awards programme. The image is from their newly installed lens test room. The primary purpose of the ad was to celebrate the talent in Scottish film and TV and congratulate the evening's nominees. Then suggest how Progressive can help them achieve even better results.
- 1 reply
-
- 4
-
-

-
- affinity designer
- affinity photo
- (and 2 more)
-
 I think I ask this question every year and I don't give up hope. Since the beginning of Affinity programs there is a desire for a tidy user interface. Arranging palettes / windows. And exactly since then, it still doesn't work. Combine palettes in a user friendly block, move them together and dock them to the main window accordingly .... ? No way. How can you help the Affinity team with this? With examples? They should know them, right? Since I am again lost in the maze of palettes and have lost so much time, I will write my document (in publisher) using the Office functions of Google. Almost a blessing Stay safe!
 -
 Hi, Please could someone explain how to join coincident points in Designer? I understand how to use the Join tool with non-coincident points: shift-select the two end points with the node tool, select Join and hey presto! you get a new line which joins the two selected points. However, what about if I don't want a new line? How do I select the two coincident points such that they then join to create a single point which joins the two lines together? In Illustrator, this is not tricky - click and drag over the two coincident points > select join (decide if you want a sharp corner or a curving corner) and it's done. I'm sure I'm missing something in Designer... could someone spill the beans please? Thank you! Edward
 -
Hello Vectorizers! 😆 Today I come to show you the warrior art I created at the Vectober event that takes place every year in October! Interested? Then find out more by clicking the link https://www.vectorizeclub.com! enjoy 😊 3_Warrior.mov
-
I'm new to Designer and I'm probably not the best GD in this forum by a long shot, but I just wanted to share my first project in A.Designer because i'm really proud of myself!
- 7 replies
-
- 9
-
-
- kirby star allies
- fan art
- (and 2 more)
-
 Hello all, this is my first post to the forum. I've been a happy Affinity user so far (well, I still am... I own Designer and Photo, both for Windows) and I work on a Windows 8.1 Bootcamp partition on a 2011 MacBook pro (yep, THAT old). In the last weeks though, a problem occurred twice: Affinity Designer (1.8.3.641) apparently saved correctly my file, but the next day while trying to open it again I got an error and the file does not open again. After the first time (an unpleasant surprise), I searched the forum and a few posts pointed to a potential drive corruption but I checked my SSD and it's ok. I should add here that the drive I'm saving to is in the Mac partition and managed in Windows through MacDrive (I am using this setup since 2011 and I never had any issues with any program, Affinity Designer and Photo included). Fortunately, for the first case I had a recent backup and I was able to recover most of the work done. But the second time happened after a particularly productive day finishing late at night, so I stupidly didn't do a backup. In both cases there were no warning signs: Designer seems to save correctly, there was no weird behaviour from the computer or the operating system themselves, everything looked like it all went well. Except, the next day the files were suddenly not opening anymore. Also, there are no related files in the AppData\Roaming\Affinity\Designer\ folders and subfolders (there was a crash report from 2019, but nothing more recent). The errors were different in the two cases: "The file type is not supported" and "The file appears to be corrupted". I am attaching here the file that generated the "corrupted" error (for some reason the upload of the other file fails even though it's just a little above 1 Mb) in the hope something can be done or that at least some light can be shed on the cause and maybe have potential fixes in future versions. Than you in advance for the support! Alessio froGH_icons_20200427_problem-corrupted.afdesign
 -
 I found a photo of this cover, low res and couldn't work out how many colours they had used, so a little artistic license. But thought I'd re-do it and limited the colours to the obvious ones. Drawing all the lettering is always fun.
- 2 replies
-
- 13
-
-
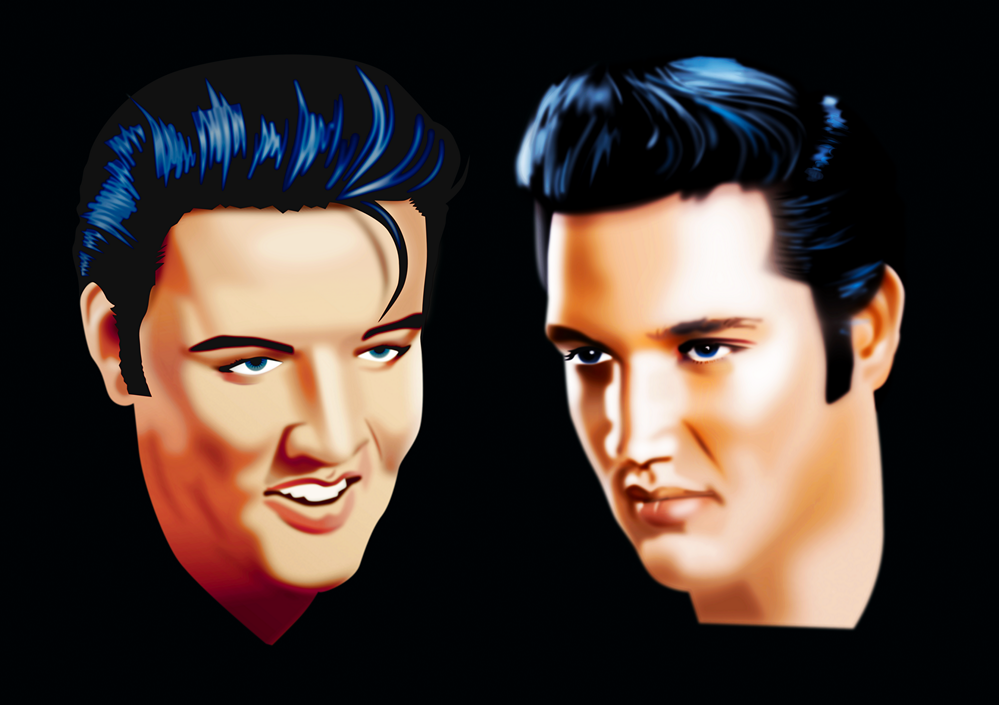
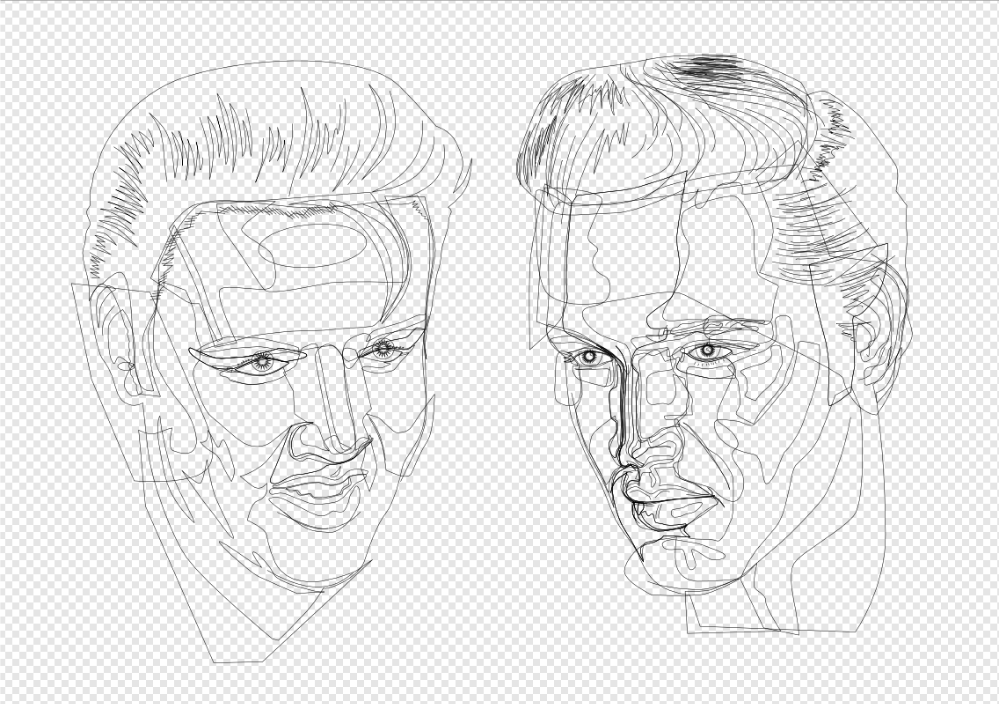
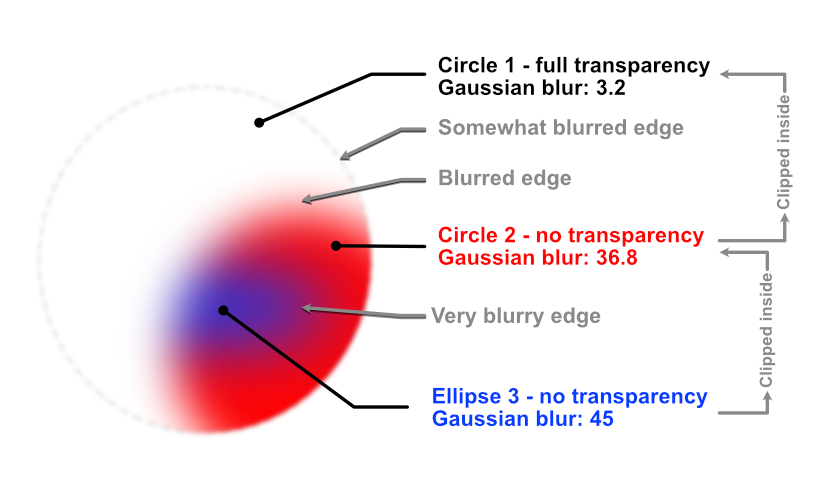
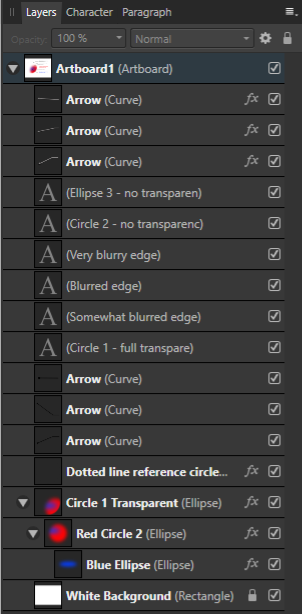
 In the images below cartoonish vector portraits of Rock & Roll legend Elvis Presley can be seen. This image was created in Affinity Designer. After having worked with Adobe Illustrator professionally, CorelDRAW privately and Inkscape occasionally for decades, I have come to the conclusion that Affinity Designer is better suited to create vector portraits that do not have hard edges in the face, even if it does not include the Mesh Fill function, that is very time consuming and tedious to work with. The drawing and editing process - particularly when editing the drawing at a later point in time - in this program takes far less time and effort. Progress sequence of the portrait on the right can be seen in an other blog entry: https://communicats.blogspot.com/2020/07/this-is-other-vector-portrait-of-elvis.html?fbclid=IwAR1Yp4CNvlXspX1W_S5LV5Q0UzM1sWsn_TibSegexxHwWyH6C7ayKQ3LJG4 The image below this paragraph is a screen dump of the vector outline of the double portrait. Extensive use was made of Affinity Designers Gaussian blur function, which allows to avoid hard edges in the facial features, as are often seen in vector portraits created in Adobe Illustrator. Many of the curves with which areas on the face were drawn are made by applying multiple node gradient fills and gradient transparency. This method allows to quickly edit (also afterwards) of the drawing which is much faster than while using mesh gradient fill tool that isn't present in Affinity Designer. Personally, I don't miss it. A brilliant Russian artist who works with mesh fills in CorelDRAW once revealed that it took him months to draw a vector portrait, while it is possible in Affinity Designer to make the same effect in much less time. I used CorelDRAW for many years, but only after accidentally running across Affinity Designer I was able to create realistic vector portraits a lot quicker, while making editing afterwards easier and faster. Examples of (more) realistic vector portraits and illustrations can be found in my website at: https://vectorwhiz.com/Vector.html To create (gradient) tints and blurs in the facial area of a vector portrait, it often is necessary to draw curves that have a variable level of blur along their edges, meaning that some edge parts are just slightly unsharp, while other parts are blurred and yet other parts are very blurry. To achieve this effect, I apply the following technique that is below this paragraph: In these vector portraits a Gaussian blur trick was applied in Affinity Designer, as can be seen in the third image. Ellipse 3 is clipped inside Circle 2 and circle 2 is clipped inside circle 1. In the image below you see, Circle 1 is transparent, the other two objects are opaque. Circle 1 has a minimal blur rate, Circle 2 has a higher blur rate and Ellipse 3 has the highest blur rate. The result of these settings are that circle one has an unsharp edge, circle 2 has a blurred edge to the left and an unsharp one to the right, while Ellipse 3 has a very blurry edge on the left and a less blurred towards the right. The blur values are indicated in the third image. The circle with the dotted line only serves to indicate the position and size of Circle 1 that is completely transparent, slightly blurred and used to clip the other objects. In the image below the Layer panel is shown containing the hierarchy of the objects in the image above this paragraph. Objects that are indented to the right are clipped inside the ones above them. The object names correspond with those in the Example drawing. The circles and ellipse are at the bottom of the panel. The objects marked with an 'A' thumbnail refer to the text in the Example drawing. In addition all parts can be given a colour gradient and gradient transparency, all settings that are independently editable of the ones described above this paragraph. In doing so the annoying hard edges of shadows in the face of a vector portrait can be avoided that are almost always seen in vector portraits created in Adobe Illustrator. Affinity Designer allows to create more realistic vector portraits in a much easier way that vector portraits created with the mesh fill function. The added benefit of working in this way is that at a later point in time all the parameters can be edited and tweaked to the preference of the vector portrait artist. Working in vectors with this method allows to resize the portrait without any loss of quality. Of course this technique can be applied to any shape you can draw, not just to circles and ellipses, that I used in the example above, as can be seen in the completed vector double portrait at the top of this blog entry and the vector outline view screen dump below it.
-
- 5
-
-
- affinity designer
- gaussian blur
- (and 5 more)
-
Hello my friends! 🐸 How about learning how to create a cute chameleon in 2d? Discover the Vectorize Club and learn simply how to perform amazing arts! 🔥learn more by clicking on https://www.vectorizeclub.com! Kisses 😚 2_Chameleon.mov