

LostInTranslation
-
Posts
199 -
Joined
-
Last visited
Posts posted by LostInTranslation
-
-
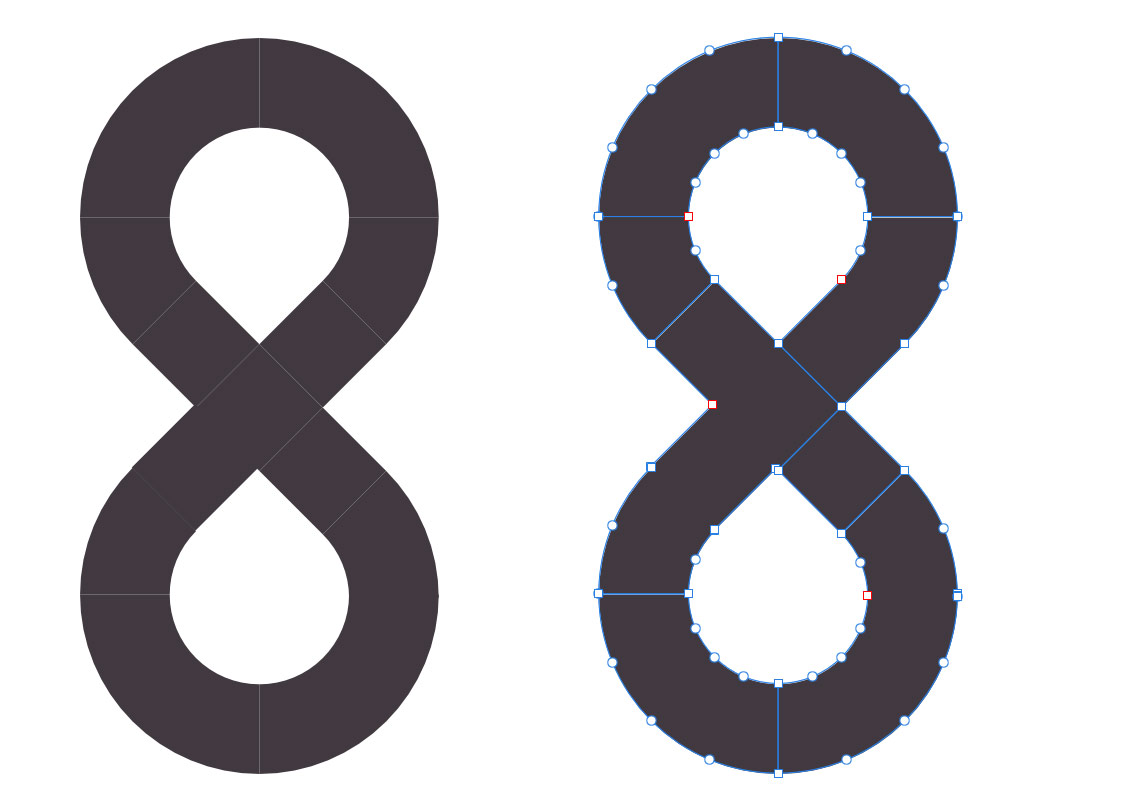
I often build symbols and logos out of simple shapes, or at least I dabble around with them to get ideas.
Sometimes, I'd like to combine (add) certain elements to get one curve.
Even if I turn on snapping and position every element dead next to each other, there will be visible gaps inbetween.
Worst of all, if I add those curves, the former gaps show up as lines through the curve. Sometimes I can delete them, but most often this will totally break the rest of the curve.
(see example, left are the parts, right after "Add" curves.Is there a trick or workaround, how to flawlessly and beautifully combine multiple shapes to a single curve?

-
31 minutes ago, carl123 said:
If you have Publisher and APhoto you can open a Designer file in Publisher, use StudioLink to switch to the Photo persona, start recording a macro, switch to the Designer persona, do what you need to do (it will be recorded) switch back to the Photo persona and stop/save the macro.
What functions can be recorded are down to the macro Gods but you can record macros in Designer this way
Thanks, I just tried that and it actually seems to work. But it's wayyy to complicated in real life and since it works like this, I really see no way why we can't have it natively.
On another note, the macro is useless anyway, since it does not let me set a fill color. Imagine that.
-
I created some sort of 3D-text in Designer, which is easy to make, but labour intensive.
It would really help to record the process into a little macro and then play it back on other objects.But why is there not Macro functionality in Designer?
I also tried in Publisher with Studio Link and it's not there as well.I don't belive this would be very hard to implement, since Photo already has it.
Please?
- Joachim_L, Bilbo Bowman, Aammppaa and 1 other
-
 4
4
-
3 hours ago, Komatös said:
I cannot confirm this!
I have output the file with the default "svg (digital - high qualitiy)".
Man, this is really strange.
Exporting with "svg (digital - high qualitiy)" works for me as well.I had made and used my own preset, but the only changes to the default were "Export text as curves" and no rasterization.
And with my preset, I got the effect of my original post every time.
But here it gets really strange: I modified my preset back to the EXACT settings of "svg (digital - high qualitiy)" and it STILL did not work. Double and triplechecked that it really was the same in every way.Only when I deleted my preset and then created the EXACT ONE like before again ("Export text as curves" and no rasterization) it worked with it as well.
Might be some incompatibility between versions or something, I had my preset since 1.7 at least and no problems so far.
I still find it very strange that it did not work with 5px height, but no problems at 400px height with everything else unchanged.So maybe this was just a fluke, thanks for your help. Will keep watching it though if something like this should happen again.
-
I was just trying to export a small divider with a horizontal gradient (620px by 5px)as SVG.
But it exports as plain color, instead of a gradient.
I can't really "read" SVGs, but if I look at the code, both colors are present in the file.
Same thing exported as PNG for example works though.The same thing exported from Xara gives the expected result (even though I find Xara's SVG-export generally worse than AD).
If I make it higher, say 620px by 400px, it exports perfectly.
Please check attached files:
-
I often export SVGs and in 99.9% of the cases, I want the area to be "Selection without background".
But EVERY TIME I export, the area resets to "Whole document" and I have to change it again and again and again for EVERY export, while most other settings are remembered from before.Also adding a new preset while "Selection without background" is selected does not help, this setting is simply ignored.
Please fix, as this is extremely annoying and tiresome!
-
8 minutes ago, NotMyFault said:
You can define your own presets using
- Export
- More
- Manage Presets
- Create Preset
Sounds good, but does not do diddly.
The setting of "Area" is ignored, even if I save it as a preset. -
I often export SVGs and in 99.9% of the cases, I want the area to be "Selection without background".
But EVERY TIME I export, the area resets to "Whole document" and I have to change it again and again and again for EVERY export, while most other settings are kept from before.
This is extremely annoying and tiresome.How can I either set it to "Selection without background" as default or at least to remember the last setting?
-
Hi Sean,
I was just about to start the screen recording with a new document, when suddendly everything worked again.
I had made a test document before to try out some of the new features. I had fiddled with outlines and something else but nothing fancy, but I tried the brushes on new layers.
And in this document they still did not work today. I deleted it, it was only for doodling anyway.Will keep my eyes open though if it happens again.
Cheers
-
I updated to 1.9, logged in and downloaded some of the free brushes.
Everything seems ok at first, but when I select them they all act like solid round brushed. Even though the texture shows up in the bottom toolbar., the brush itself seems to have no alpha channel.
Some bruhes in Acrylics seem to work, but only after I changed the controller to Brush Default.
Tried the same thing with the same brushes in designer on Windows and everything works fine.
Any ideas?
-
Is there any "official" reply to this?
Moderators, maybe move it to bugs forum? -
1 hour ago, walt.farrell said:
This is a quick attempt in Designer. I'm not sure it's what you're looking for.
Each letter is an individual Artistic Text layer.
- Create the shape they need to follow.
- Create a horizontal guide.
- With the Artistic Text Tool, drag to set the size of the first T so it spans from the guide to the shape. Type the T. You'll probably have some font size with decimals. With the letter selected, retype the font size to give an integer (or Copy the font size with decimals). Press Esc to terminate that Artistic Text object.
- Create an E the same size, and an S the same size, and the final T. Press Esc between each so they remain separate objects.
- Select the E with the Move Tool. Grab the bottom center node of the bounding box and drag it down until the letter touches the shape.
- Do the same for the S and the T.
This should also work in Photo or Publisher.
Walt, this shows exactly my problem. Note how the top bar of the "T" wildly differs between the two. Also the "E" and the "S" is way heavier than the rest.
The answer from GarryP below yours is correct. This is what I want it to look like. -
For a specific design, I need a line of text to be "flat" on top, but follow a line on the bottom.
It's a bit hard to explain for me with words, but just look at the example and you will know what I mean.With "straight" characters like "T", "E", "I" and so on, this is not a problem. The node tool is your friend here.
But with "curved" charcters like "S", "G" or even "D", things get trickier.
It's mostly not possible to move nodes down without breaking the general shape.Also just scaling the whole character vertically is not the right way.
I did this in my example and you see that the "S" is much heavier than the rest because of the stretching.And all this only goes for sans-serif fonts. Serif or decorative fonts can be a challenge even with the simplest of characters.
So I was wondering, is there a tool or special way to do this the right way?
I'd like to be able to stretch characters without changing their shape or weight.Any help is appreciated.
-
I often need pieces of text from a Publisher document for use in other documents or in webpages.
When I copy from Publisher and paste into an ASCII editor, linebreaks are lost and strange characters are showing up. Sometimes I delete a single character and the word suddendly "breaks apart" somewhere.
This ONLY happens when pasting from Publisher (and possibly Designer/Photo too, but I don't do that)Please give me the option to copy plain, unformatted text that can be used in other applications without the hasssle.
-
I am designing some packaging right now, that will be folded later. To make editing of the sides easier, I use View -> Rotate.
Visually this works fine, but when nudging frames with cursorkeys they will still work like the view was not rotated.For instance when view is rotated right, the "up"-key will actually nudge right in the current view.
This is very unintuitive and really frustrating when finetuning.Please change this, so the cursor keys work correct in relation to the current view.
- thomaso, buschbrand, lacerto and 1 other
-
4
-
+1
I came here for this very thing.
I have a couple of LUTs and am looking for an easy way to check them against any given image.Please inlude this, the current way of opening every single LUT is not practicable.
- HenrikF and IsabelAracama
-
2
-
Hi, I believe this is a bug. If not please tell me what I am doing wrong.
I was playing around with different Character Variants (Alternates).
You can select a letter and then go through the Alternates to see what's best.
Strangely, for some letters the preview shows them as "b" and don't let me change them.
The font is called "Boston Angel", maybe there is something wrong or different about it?
This is how it should work:
But some letters show up wrong:
-
I was looking for the very thing and found this thread.
I do product design and on a sheet there is a lot of information only needed for commercial printing as well as some notes only for me.
When I print locally, it would be great if I could set those elements to "no print". Its just a waste of toner otherwise.Even better if we could chose visibility between screen, print and export.
Currently I set the visibility of unwanted layers manually, but it can get tiresome.
Please add this, thanks!
-
10 hours ago, Lisbon said:
"1) CTRL-Backspace and ALT-Backspace to fill a layer with either the foreground- or background-color."
Probably the first thing i changed.You have to assign the shortcut keys:
Edit > Preferences > Keyboard Shortcuts > Photo / Edit:
- Fill with Primary Colour
- Fill with Secondary ColourIf im not mistaken Alt+Backspace is already taken by Inpaint so you have to solve the conflict.
Thanks, that works perfectly, even still a little different than PS. There I can use it to fill the background of an empty document. In AP, I have to create a blank layer first, but close enough.
-
No answers so far, is it really not possible?
-
There are two functions, I use all the time in Photoshop and I can't find a way to replicate them in AD.
1) CTRL-Backspace and ALT-Backspace to fill a layer with either the foreground- or background-color.
2) Make a selection with the Marquee tool, then CTRL-T to transform this selection. Also perspectively by holding CTRL.
For the first one I have no idea how to do this in AD.
For the second I tried to assign CTRL-T as a shortcut to the Perspective tool. But it does not let me use a modifier in this shortcut, always uses just "T" which clashes with the text tool. Also it does not work with a Marquee-selection, only with the whole image.Any ideas how to achieve both of them as near as possible to PS?
-
4 minutes ago, Jowday said:
If I download the full package from the top link: https://github.com/twbs/icons/archive/v1.0.0-alpha4.zip
I can open the files directly from the ZIP file without issues.
Interesting.
I just redownloaded the whole pack from the same link with the same filename as before.
And you are right, they open perfectly in AD now. The individual icons also have slightly different filesizes than the ones I already had.
So maybe the creators have fixed them or something.
I still wonder though why they would not open before when still displaying in the browser.Problem solved in an unexpected way
-
Bootstrap Icons are a relatively new addition to the framework.
They come in SVG-format, but for some reason, I can't open them in AD (nor Inkscape, nor Xara).
They DO however display perfectly in browsers.Sometimes I would like to modify or recolor them, what's wrong with them so they open in graphics software?
I include two examples, full download at https://icons.getbootstrap.com/
Cheers
-
Was this really the last one?
I watched every single one of them and can't believe it would be over.Please continue this forever and ever ...


")
How to properly add curves?
in Pre-V2 Archive of Desktop Questions (macOS and Windows)
Posted
Thanks, that sounded plausible at first, but did not work in my case.
Maybe because your shape was constructrd differently, with less shapes?
I tried different methods of geometry snapping, with grid snapping off, but I always get the same result.
Try if you like:
8.afdesign