DanM
-
Posts
50 -
Joined
-
Last visited
1 Follower

-
 vjmassny reacted to a post in a topic:
The Road Beneath our Feet (split)
vjmassny reacted to a post in a topic:
The Road Beneath our Feet (split)
-
ElleGee reacted to a post in a topic:
The Road Beneath our Feet (split)
-
DanM reacted to a post in a topic:
Affinity Photo DAM
-
iuli reacted to a post in a topic:
The Road Beneath our Feet (split)
-
jmwellborn reacted to a post in a topic:
The Road Beneath our Feet (split)
-
 Andreas Scherer reacted to a post in a topic:
Printing? Anyone?
Andreas Scherer reacted to a post in a topic:
Printing? Anyone?
-
AdamStanislav reacted to a post in a topic:
The Road Beneath our Feet (split)
-
Wosven reacted to a post in a topic:
The Road Beneath our Feet (split)
-
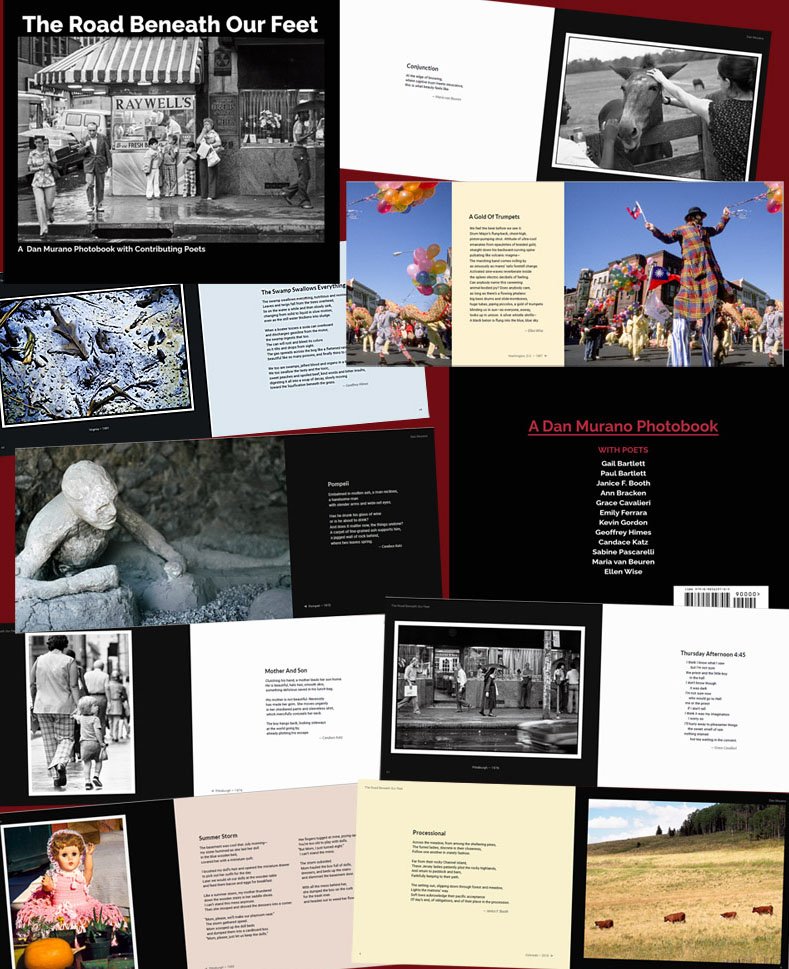
Nothing controversial here ... finally completed my 78-page both hard and softcover Blurb photo book with Affinity Publisher (and all while learning how to use the program). I'm really happy with how it turned out. Thanks, Affinity program designers, technicians, and trainers!

-
DanM reacted to a post in a topic:
HOW TO: Book editing in Affinity Publisher
-
Printing? Anyone?
DanM replied to bt1138's topic in Pre-V2 Archive of Affinity on Desktop Questions (macOS and Windows)
I have printed beautiful cards using Affinity Publisher. Much easier than printing them through Qimage. Also, I can save the design template for horizontal & vertical cards in different sizes. The only tedious part is having to go through the color settings (telling the program to save the paper color profiles and print settings). I have to redo that each time I restart Publisher, though if I print different cards in one session, it is only necessary to do that once. I have also just completed my first Blurb book in Affinity Publisher with terrific results. -
DanM reacted to a post in a topic:
Hide Selection (marching ants)
-
DanM reacted to a post in a topic:
PLEASE READ THIS: Using and searching the FAQ forum
-
Dan C reacted to a post in a topic:
Arrows no arrow tails in the document, but they appear in exported PDF
-
@Dan CThanks for the feedback. I'm glad there was a workaround when I had the issue. I will check my Acrobat settings. I'm loving Publisher and am happy that I gained a decent grasp on it (though with way more to learn) throughout this whole book-making process. Dan
-
[Multi] Sticky Settings
DanM replied to mredig's topic in Feedback for the V1 Affinity Suite of Products
Another request for some of the tool settings to be sticky. Every time I open AP to do a quick dust fix on some scans, I have to change the healing brush back to aligned, which is the way I almost always use it. It wouldn't be that big a deal, except that I'm used to PS keeping the setting, so it sometimes takes me a mistake or two to realize that I need to set that option again. Thanks. Even though I've had AP for several years, I'm only now delving into it, as is a pro-photographer friend who I also convinced to give it a try. It's a great program. -
DanM reacted to a post in a topic:
[Multi] Sticky Settings
-
Thank you, @Dan C, No worries about the delay. I viewed them in Acrobat Reader. When I went back just now to recreate what I had done, I discovered that if I pulled the edge of the box up tight to the edge of the arrow, the tail did not show in the pdf, so I could have successfully used the arrow tool by just closing the gap (with hide overflowing text option selected). Here is a page from the document with all three arrows - the top box is with a full arrow frame, the 2nd with the frame pulled in tight, and the actual caption is a simple triangle shape, which is the one I ended up using. Turns out I could have saved time by just resizing the arrow box. Dan (Looks like the files might have been rearranged in upload - the arrow with the tail is from before I shortened the frame/box.) File-4-troubleshooting.afpub File-4-troubleshooting.pdf
-
DanM reacted to a post in a topic:
Foreground/Background Colors Icon
-
DanM reacted to a post in a topic:
Affinity Photo - Save As...
-
Hello everyone, I'm just about ready to send my 80-page photo book (with poetry by others) to Blurb and wondering if anyone has any pitfalls to look out for before I order a proof. I've gone over all the Blurb settings a dozen or more times and I'm pretty sure I have those as they are specified on their website. One thing I'm a bit unsure about - the inner margin is 1/2" and outer margins are 1/4" - considering the number of pages, am I generally safe centering the poems between the margins. Asking because with the inner margin being wider, things sometimes look a bit off-center on screen. Would appreciate any and all tips. Thanks
-
DanM reacted to a post in a topic:
Color mode when creating photo book for Blurb
-
Alfred reacted to a post in a topic:
Arrows no arrow tails in the document, but they appear in exported PDF
-
Not sure about h. scale, but I just finished replacing all of them with shapes. Whenever I have to go through and redo a bunch of stuff, it often ends up looking better anyway. Thanks for all the responses!
-
Thanks - I want a slightly elongated one - I think the shape tool will work well - I have to replace about 35 of them in either case. It must be a bug though, since the tails don't show at all in the program.
-
LOL, I just started replacing them with a shape. I'll check in the Glyphs though - that might be a lot easier. THANKS for the quick response. I'm hoping to send my first Affinity Publisher book out for a proof today or tomorrow.
-
I have no arrow tails in the document (the way I want them), but when I export to a PDF, the tails show as a fine line extending into the text next to them. (see images). Nothing I do makes them appear without the fine tail line, even though they are not shown in the program. Is this a bug?
-
Rectangle to Text Frame "feature" or bug?
DanM replied to thetasig's topic in V1 Bugs found on macOS
Thanks for this! I couldn't figure out why I only sometimes couldn't change the colors of my text layers as I was making edits. -
firstdefence reacted to a post in a topic:
Creating a white border around the image?
-
That's a whole lot easier. I guess I thought there would be a simple way to do that by just adding a stroke or filling the picture frame. Thank you!
-
All I wanted was a square-cornered white border around my photos. I spent a huge part of the afternoon trying to figure this out. With Layer Effects, I was able to put a border around the image, but could not square the corners. How I finally achieved this was to: a) Size the photo frame to fit within the margins. b) Use Frame Properties to anchor the image to the center of the frame. (otherwise you may see uneven borders. c) Do the same and scale to minimum fit (you may desire a different option). c) Select the photo inside the frame and apply a stroke of the desired size. Options (avail. next to the stroke button in the top menu bar) Square cap, Miter join, Align stroke to outside. d) (Here's the part I was missing) Shrink the photo itself within the frame to reveal the stroke. It would be helpful if this were easier, but at least it can be done. Hope this helps anyone else trying to do this.
-
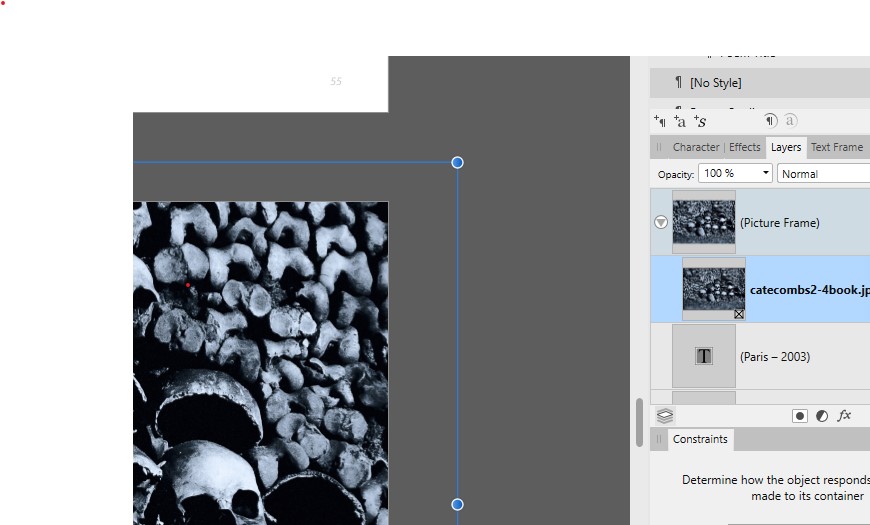
It moves with the mouse, but won't move with the keyboard arrows. The arrows move the whole box.
-
Thanks, but I'm still getting the frame selected whether I click outside the 4 arrows or not. Also tried from the Layers panel. (see pic.)