.png.e7630a08ee6e1c84d06141c3a5feb319.png)

Frozen Death Knight
-
Posts
1,361 -
Joined
-
Last visited
Posts posted by Frozen Death Knight
-
-
On 4/11/2021 at 1:33 PM, loukash said:
Layer > Convert To Curves
Thanks a lot! That is exactly what I needed. Would be really nice if this operator was visible in the R click menu when inside the Layers panel, since it would make it easier to discover this feature. Also would be nice if I could just select the main Vector Layer and perform this action on everything inside it (currently it is greyed out), or at least allow you to select everything inside the layer in one go through the Layers panel with the R click menu. Would help speed up making boolean operations and converting to curves.
On 4/11/2021 at 1:33 PM, loukash said:This already works for closing open curves.
For joining two open curves it's a mere two-steps process:- drag-select the overlapping nodes
- Join Curves – assign a keyboard shortcut to it to make it even faster (I've chosen shift-A)
Also make sure the required node-snapping options are active in the context toolbar.
Well, I want to be able to do this regardless of if they're open or not. Would make cleaning up nodes on the fly a lot easier. This is just an alternative way of merging nodes other than merging nodes by distance that I mentioned.
On 4/11/2021 at 1:33 PM, loukash said:Isn't that what the Window Stabilizer is for? If you set the window to a low value, that already makes a difference.
Yeah, that method actually helps a bit. However, I still notice drawing artefacts when the stroke size is large, so there must be something else going on that creates them.
On 4/11/2021 at 1:33 PM, loukash said:I don't really get the point of this request.
You're aware that you can change this ctrl-L to anything else you need?
As for not wanting to use the Delete key, I don't know about Windows, but on Mac you could create e.g. an AppleScript based Automator macro that would type the Delete key for you when executing a specific keyboard shortcut of your choice in Affinity Designer. Advanced macro utilites like Keyboard Maestro make it even easier. I'm using those with Affinity as well.Change it into what? I am on Windows, so whatever method you're using on Mac is not really going to help me here. However, I would love it if Affinity supported macros being chained to tools. I would be able to create some really useful macros this way that would help a lot for some specific tools. Anyway, it is not really what I was asking for in this case. I just want to delete nodes with a more convenient shortcut like ctrl+L click or by pressing X. The Del-key is too far away from my left hand and my right hand is used for my tablet pen.
-
Just wanted to toss out some ideas on how to improve Designer's vector capabilities as to be a bit smoother when working.
Last night I was working on a drawing that used vector shapes to colour in my lineart by using the Pencil Tool and then Expand Stroke to make them a solid shape. However, I noticed quickly that the Pencil Tool keeps creating tons of nodes despite not moving the cursor a lot, which would cause a lot of errors for Expand Stroke. Not to mention the final result creates tons of tightly packed nodes because of the previously mentioned issue.
My first suggestion would be to add an option for the Pencil Tool so that it doesn't draw a new node until you have made a certain distance or pressure with the pen, kind of like if it had Spacing the same way a raster brush has by changing the distance between each dot. This would help a lot with making more reliable results from Expand Stroke, which really struggles with the Pencil Tool and Brush Tool creating these tightly packed node groups if you hold down your tablet pen stationary while drawing for a bit.
My other suggestion would be to add a merge by distance operator when dealing with nodes that are tightly grouped together. While I was drawing I noticed that certain areas could create really tight node groups which I had to manually select, delete, and then reshape to make it look cleaner. If it was possible to clean up nodes by having them merge to each other based on distance to its neighbouring nodes, it could help speed up the clean-up process by a ton.
Another feature I would like to see for handling nodes is a toggle option to merge any node with another node when snapping them together while working on one layer. Right now you are able to snap nodes to each other, which can give off the illusion that they are now combined into one node, but in reality they are just right on top of each other. It would be very convenient if it was possible to merge two nodes into one by dragging them on top of each other.
As for the Pen Tool and Node Tool, right now you are able to ctrl+L click a curve to break two nodes apart. I love this feature. However, could we get this same feature by ctrl+L clicking the nodes as well? Right now you have to delete nodes by pressing the Del-key, which requires me to reposition my hand from the ctrl, alt, shift position on the left side of the keyboard to reach it. If ctrl+L click to delete nodes is not possible I would like to see the delete node/nodes operator on the X-key as well, which is closer to my hand positioning when using modifiers.
Been using the Compound Layer a lot lately and found it pretty useful overall. However, one thing I wish was possible would be to destructively collapse the non-destructive booleans into a single layer by destructively performing all the booleans. This would also be useful on a regular Layer (not Pixel Layer) by just selecting the main layer and then perform all boolean operators on everything inside. Alternatively you could just R click a layer with vectors inside and do an operator that selects everything inside that specific layer without having to manually select everything.
Also, please add a Blob Brush Tool and Eraser Brush Tool to Designer. Right now I am using a workaround by using the Pencil Tool and Expand Stroke to get a similar effect, but Expand Stroke still creates artefacts which can be holes inside the mesh I want to be completely solid, so it is still a bunch of extra work. Not to mention I have to keep adding them together with booleans to clean things up. An eraser brush is basically the complete opposite to a blob brush, so to me it is a no-brainer to complete this workflow.
-
@Jowday Ctrl+alt+L click the thumbnail of the adjustment layer with the built in mask. Then select the other adjustment layer and ctrl+I to invert. This will create the same gradient but in the opposite direction. Then press Esc to deselect and ctrl+I again so you get the exact same mask. If you want them to always be identical you can also just drag and drop the masked adjustment layer into Pixel content in the the Links panel to make them identical. Remember to select the layer you want to the mask to be copied to to make this work.
-
This could also possibly explain a bit why there is such a huge delay when doing fast brush strokes with Hardware Acceleration on Windows. The amount of dots created at the beginning and end of each stroke is likely making the computing skyrocket. Of some reason this slowdown doesn't happen to the same extent with regular CPU computing, but the inconsistent brush stroke spacing likely doesn't help.
Good detective work, by the way!
")
-
Wanted to make a quick tutorial on how to make completely symmetrical, non-destructive vector art with the help of Affinity Photo's brand new Linked Layers feature. Most of this is possible within Affinity Designer, but you absolutely must use Affinity Photo to make this work.
To the people who are confused by some of the steps like making a Compound Layer or duplicating a layer as linked, I will explain them briefly. Hold down alt and then click on the Add Boolean button (in Photo go to View -> Customize Toolbar... to make this feature visible in the upper toolbar), which will create a non-destructive Compound Layer that ensures that all the shapes are unified. This works with the other boolean operators as well, so experiment! If you want to quickly duplicate a layer as linked you then need to add it manually in Preferences -> Keyboard Shortcuts (I added it as ctrl+shift+J so it matches regular ctrl+J duplicate). Anyway, on to the video!
Here is the tutorial file for people to play around with.
Complex Symmetrical Vector Layering.afphoto
P.S. to the Affinity team. I was trying to upload this video directly to this website, but had to use my own YouTube channel since I got error -200 when attaching it to this topic. Any clue as to why this happened?
-
Was trying to save time with the new links feature by creating assets with links already prepared. This way I could quickly do symmetry work without having to set things up too much. However, creating assets will remove every single link created if I make it into an asset. Here's a video demonstration.
-
Change Hardness. Affinity has much harder looking brushes compared to Photoshop and Krita. Also, the smoothness does not scale with the size of the brush, so depending on the size the results of Hardness can vary a lot. Down below is an example of a typical 30 pixels round brush with various levels of Hardness.

A good rule of thumb I have is that small brushes look the best with around 99-80 Hardness.I always use 99 Hardness brushes because my canvases are already high res to the point where the extra smoothness barely matter (also large brushes still look pretty good with this setting), but at least it's something to bear in mind.
In all honesty, if there is one thing Serif could improve, it would be actually adding better default standard brushes. The ones packaged in have really poor defaults and do not feel right for those who have come from other softwares like Photoshop and Krita.
- RNKLN, firstdefence and cutout3
-
 3
3
-
2 hours ago, MadPropz101 said:
Sorry for taking a while, here it is:
I think some of the differences in behaviour might have to do with the default brushes that you are using. They are a bit wonky and the brush settings in Affinity are not quite the same as the defaults in Photoshop. I personally changed the basic brushes to behave more like the Photoshop ones. Could you try my brush pack that I have posted here and see if the round brushes I made feel better? Here's a video example of how my custom brushes look and behave as a frame of reference (this is without Stabilizer btw).
-
7 minutes ago, MadPropz101 said:
I'm sorry, but didn't I already say in my post? I use a tablet, I messed around with Windows Ink and it doesn't change anything...stabilizer doesn't change it either, and neither does the pressure button.
Sorry, I missed that part. Just woke up, so my brain isn't completely there, lol. ^^;
Do you have a way to record your screen and post a video of the problem in question? I also use a Wacom tablet (Cintiq 13" HD), but I can't really replicate your issue it seems.
-
11 hours ago, MadPropz101 said:
I just found out about Affinity Photo and was really looking forward to make the switch from Adobe Photoshop, so I decided to get the free trial.
As soon as I started using it, I noticed an issue with the brushes. I use a Wacom tablet, but even when I try drawing with the mouse the brush strokes are still not perfectly smooth like in Photoshop, and instead they appear jaggy. I noticed a bunch of threads by other people on this same issue, and they never seem to come to a solution...I tried disabling/enabling Windows Ink, changing the Brush hardness etc.
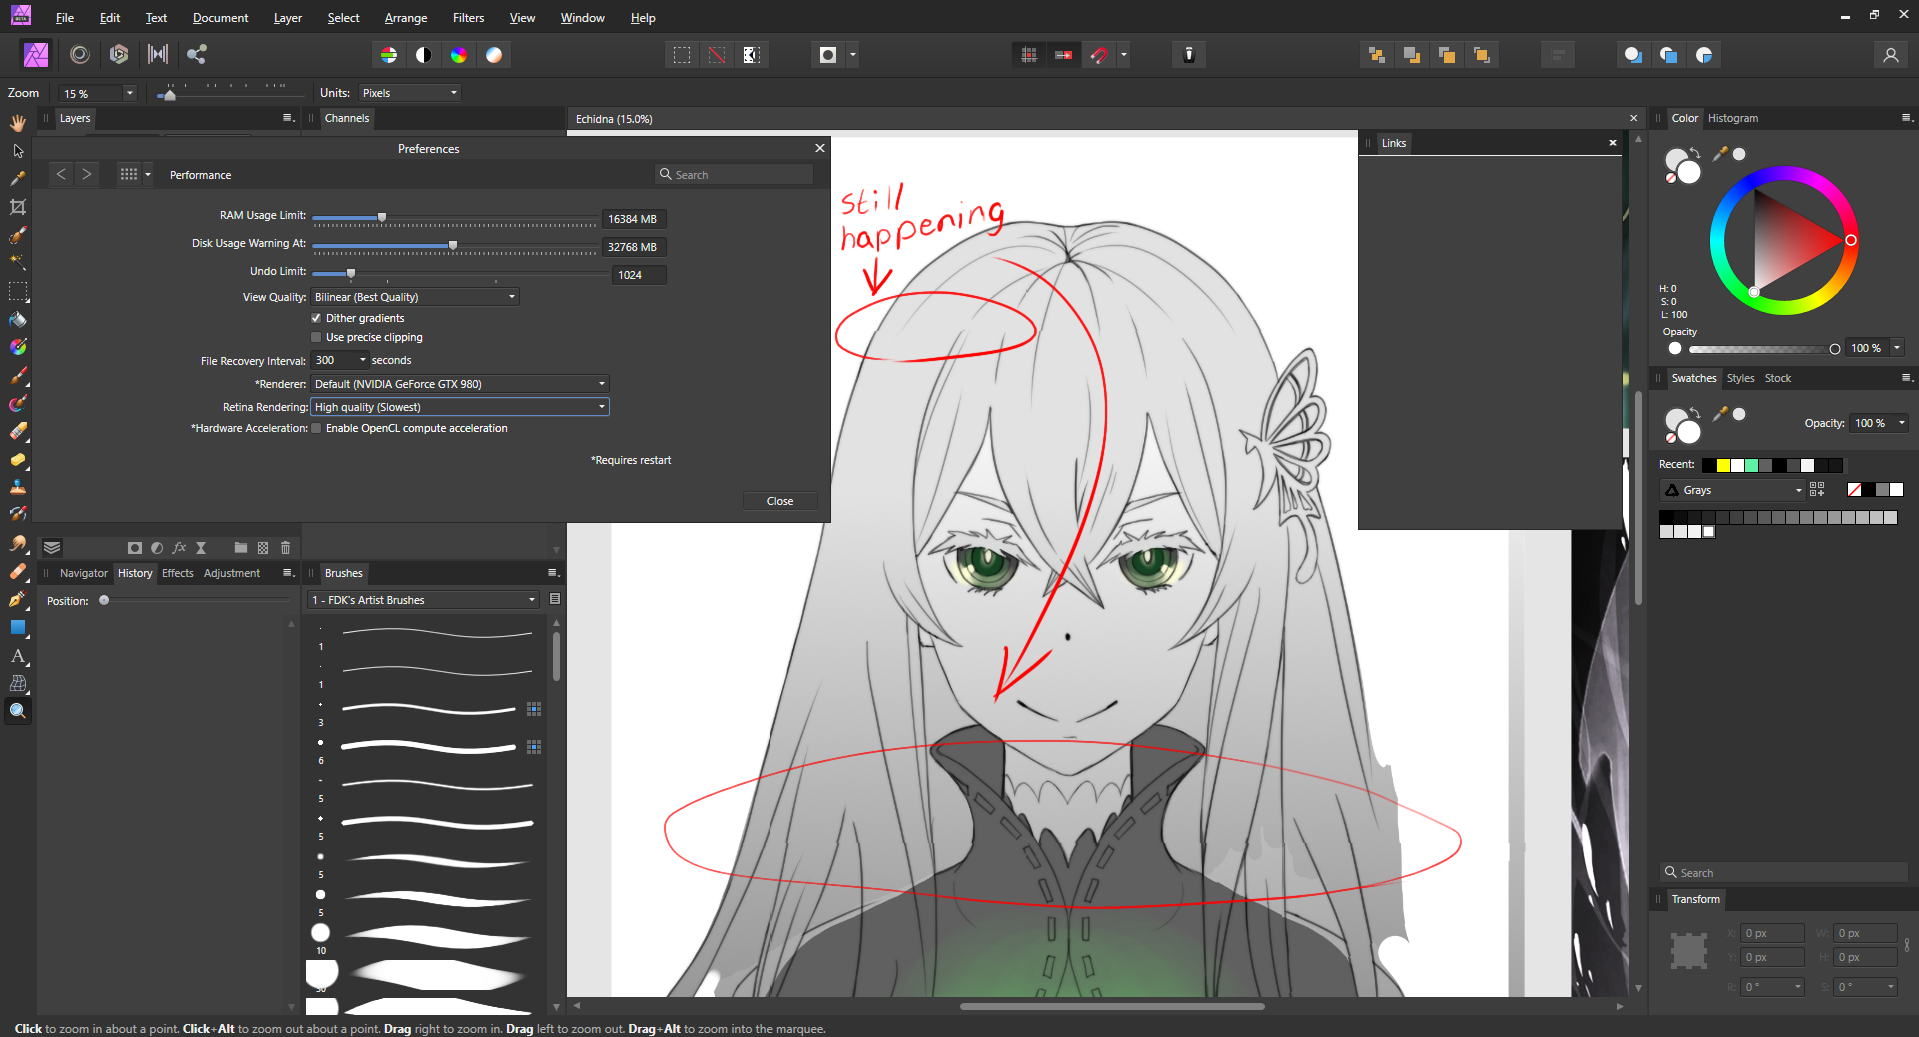
It seems like the View Quality (Bilinear) is not enough for some reason, also I don't know if this only affects the editor or not, but even when I export a .png the lines are still not smooth. I'm really eager to get the program, but this is a real deal breaker for me. Is there a way to fix this or not?
Are you using a tablet? You need to use Windows ink or High Precision when drawing with a tablet. Drawing with a mouse will produce jagged lines regardless of which mode you pick. I recommend always activating Stabilizer when drawing with a mouse to deal with those jaggy strokes. I personally use Window Mode with around 15 in strength.
-
23 hours ago, Chris B said:
Hey Frozen Death Knight,
can you reproduce this from a new document? Gabe and myself have had a go and we can't seem to reproduce it—I'm not entirely sure what I'm missing. That document looks quite complex so is there any chance you can attach a simple one with a few shapes? The video is clear enough but we just can't get it...
Thanks for all your help
Hey Chris!
Well, I double checked what was going on in a scene that wasn't nearly as complex as this one and I found out what was really going on. I was in fact wrong about the layers getting deleted. What was actually happening was that the layers got moved to the very back of the layer stack pile, thus making them disappear when other layers covered them completely. Even if I had an artboard layer the selected layer that was dragged into the Links panel was sorted to the very back, thus making it invisible on the canvas. In my previous video I was using an artboard, so I got genuinely confused with what was going on.
Here's a clearer demonstration of what is going on in a much smaller document. I tried moving my Links panel somewhere else on the UI to see if that solved the problem, but linking any layer kept messing with the layer ordering, thus creating problems like that "deleted layer" problem I mentioned earlier. Not sure if it is intentional that dragging a layer is supposed to change the order of the layers like this, but from my own perspective this behaviour is really annoying.
-
Okay, so we all know about Power Duplicate that repeats the transformations of the previous layer as you keep repeating ctrl+J after having alt-dragged a layer on the canvas. What I would like to see is the same workflow being added to the new Linked Layers feature in 1.9.
Right now you can't drag-duplicate a layer so it becomes linked with its original copy. I would suggest adding the shortcut ctrl+alt+drag as an alternative to alt+drag to duplicate a linked layer on the canvas. Then I would add the Power Duplicate feature into the Duplicate Linked operator as ctrl+shift+J so every layer remains linked after each copy while respecting the transformations made on the previous one.
With these changes it would become a lot easier to work with complex repeating patterns since every layer would be identical to each others.
-
Designed this business card and logo for a small indie studio that I am currently a part of. We wanted to use the one with rounded corners, but had to cut down on costs by going with sharp ones.
Got to say that the features added in 1.9 were absolutely invaluable when designing ideas and creating the final version. The Contour Tool and Linked Layers in particular. The former helped a lot with adjusting text and the shapes of the logo and the latter helped a lot with repeating patterns like the waves at the top and elements across multiple artboard iterations of the final design. I really hope Linked Layers get fully implemented into Designer as well, because this feature is incredible when working with vector shapes (symmetrical vectors anyone?). ^-^
-
On 3/23/2021 at 4:12 PM, Chris B said:
Bah, I can't get it - even with your file. OpenCL on/off - doesn't matter. Rendering - doesn't matter.
I've tried every zoom % from 1 to 100.
Those render tiles should snap back almost instantly. Stabbing in the dark here but do you use a non-default Windows scaling option? Other than say 100, 125, 150 etc?
I recently installed Windows 10 from scratch because my SSD broke and I got a replacement. Right now I am looking at Display Settings. Scale and layout shows everything being at 100%. However, I think you might be on the right track regarding these settings, because I might have found the true culprit.
See, I happen to use more than one display for my PC; my regular screen and my Cintiq 13" HD screen. I use them both in extended mode so I can get a lot more screen space by working on one screen and checking other stuff on the other. When I disabled my Cintiq screen and went back to my project file I noticed that the screen tearing disappeared after switching between different Affinity documents. I have a strong suspicion that having multiple screens in extended display mode will result in these tears to occur.
If you happen to have multiple displays like a Cintiq available, please try and check if you can replicate my issue by making them an extended display.
-
2 hours ago, Sean P said:
Hi Frozen Death Knight - I don't believe this is actually a bug. The object began as a 'Triangle' and the Corner Tool needs to operate on a 'Curve' object, so it has to be first converted to a curvewhich will break the link.
If you convert the triangle to a 'Curve' object first and then Duplicate Linked you will be able to apply the corner tool as you want to.Ah, okay! I just tried it myself and and you are right. In that case I would like to ask if it would be possible to create an option to re-link the converted shapes into curves or at least warn when a link is broken? I think this workflow could be a little smoother than it currently is, since having to re-link everything after realising one's mistake is a bit unfortunate.
-
Tried duplicating an Artboard layer where I had some text that used the Contour Tool. The text ended up becoming invisible in one of them and could only appear again if I moved them outside of the Artboard or used Bake Appearance, which is a destructive action, especially for text.
-
Linking layers manually deletes the original layer you wish to link the data from. You can get it back by undoing the action, but linking always does two actions at once; 1) it links the layers together and 2) it deletes the layer you sourced the data from (it says "Move" in the History panel, but the actual source layer completely disappears in the Layers panel). Having to press undo after every link is very tedious.
-
While I was jumping between tools in the different Personas in Publisher, I noticed that the new Linked Layers system implemented in Photo does not play well with the Corner Tool in Designer. The tool in fact breaks the link between shape layers. It is possible to link them back together with the changed corners intact, but using the Corner Tool afterwards to make adjustments will break them again.
-
On 3/19/2021 at 1:17 PM, Chris B said:
I've just found an older bug report for a similar issue on macOS but that was related to hardware acelleration. You don't even have that enabled so it cannot be the same.
The only thing we could do is ask you for the file to see if we can reproduce at similar zooms - it might be the contents of your layers (if you have filters/adjustments) which is why I can't reproduce.
Sent it over now. Hope you'll be able to reproduce it!
-
@Tonysettanta, go to Affinity's main website (not the forums) and log in to your account. Then check the menus where you will find a link to all products you own. On that page you will see all your owned assets and programs. When you scroll down you will start seeing download links for Photo, Designer, and Publisher as well as your e-mail and product keys you need to activate each (if you own them all).
Copy paste the information and everything should be working again.
-
2 hours ago, Chris B said:
What's your Retina Rendering set to in Preferences > Performance? It looks like you're seeing the render tiles being disturbed and then not settling back. Does using High Quality (slowest) make a difference?
It was set to Automatic. I tried changing the setting just now and these were the results.
-
I am having the exact same issues as you but on lower hardware (own a 980). My own solution to the problem was to go back to using CPU only by disabling Hardware Acceleration (also disabling brush preview seemed to help a tiny bit with performance). The feature is still pretty buggy and fast strokes always start with a massive delay before they speed up very fast if you hold down the pen long enough. If your CPU is good enough you should be able to draw at a reasonable speed without the feature, but massive brushes will suffer in speed when compared to Hardware Acceleration.
As for aliasing, there is no fix for that I know of until the devs change how it works when rotating the canvas. I am however positive that both issues will be solved eventually.
-
I don't know if my video is able to display the problem, but what basically happens is that when I zoom at specific percentages (i.e. 15%) I start to notice that the image becomes distorted and is not shown correctly. The canvas gets cut up into pieces based on height and some pieces get pushed to the side horizontally, thus breaking the image by displaying a broken view of the canvas. It also seems to happen at specific heights, since moving around your view also changes the nature of the distortion. Some other zoom percentages do not experience this problem of some reason.
-
32 minutes ago, walt.farrell said:
Hm. Perhaps I am doing something wrong. Tried adding shift+F3 (F15) to one of my Wacom buttons as well as resetted my tablet shortcuts, but I can't seem to get it to work. What am I doing wrong?


.png.df8f9616c2e5adf77932d79fca98cf7c.png)
.png.cea687f3611695e9d23cbf59375dc493.png)


Simple gradient graphic fade to transparent?
in Pre-V2 Archive of Desktop Questions (macOS and Windows)
Posted
@Randall Lee Reetz I am going to make a brief explanation on how the Gradient Tool works in Affinity as well as provide a video demonstration. Hopefully it will solve your problem.
The default colours for the tool are always black and white. The colours inbetween each end are a mix of both colours, so when you create a new gradient node in the middle you will just create a colour that is 50/50, in this case grey 50. The actual colour of a gradient is super important, since when you lower the opacity of any of these points down to 0% the colour on that node will still be mixed with the other gradient nodes. If you want a pure black gradient with opacity you must make every node 100% black, even on the nodes that are fully transparent. This applies to every single colour, so you will have to match each node if you want a pure coloured gradient with opacity.
As for your weird PNG artefacts, I have no idea how that happened and I don't think anyone can help you with that unless you provide an actual file.