

- S -
-
Posts
817 -
Joined
Posts posted by - S -
-
-
Generally I don't use Dodge and Burn tools for dodging and burning. I find using curves adjustment layers (and painting directly on the layer masks with a soft brush set to a low flow) a more flexible method for dodging and burning; and it will allow you to set a maximum amount that you want to dodge/burn using the curve adjustment.
The masks can be edited afterwards using a black or white brush. The amount of dodge and burn can also be edited afterwards by adjusting the curve in the curves adjustment layer.
If you record the steps for creating the dodge and burn layers with a macro, you can save it to the macro library to use on other documents. See below video.
-
On 12/14/2020 at 9:28 AM, Mark Ingram said:
…It does mean there is a disparity between .jpg;.jpeg and .tiff;.tif, which could only be solved with a Preference option like "Prefer legacy 8.3 filename extensions". But I'm not planning on adding something like that yet.
The lengths Serif go to to avoid admitting they made a poor decision is astounding.
If you want to cure your OCD, do what you should have done in the first place (and what I have been complaining about for four years) and make it (*.tif;*.tiff) and (*.jpg;*.jpeg) so that it defaults to three letter extensions – like the entire imaging industry has been doing for over 25 years. This is already the long established de facto standard for those file types. It has also always been recommended practice to use the most commonly used extension on the left (which .tiff and .jpeg are not).
"For Save File, include all variations of the supported file extensions, even if uncommon, and put the most common extension first."

Serif's obsession with forcing their users to use *.tiff is absurd; I have never come across a single person in 25 years who has wanted files to be saved as *.tiff or *.jpeg. There are zero advantages to doing this, it only creates problems and inconsistencies with what is already in place. If you get OCD over a dialogue box, try having to deal with having both *.tif and *.tiff in the same folder and two files of the same file type being able to have the same name.
Fighting Affinity software workflow issues like this is why I decided to go back to using Photoshop, which I had previously been using since Photoshop 5 in 1998 anyway. Earlier this year I had enough; I had an archive of over 18000 historical images I needed to go through, clean up the metadata and embed ICC profiles in. Affinity Photo insisting on taking the *.tif originals and then spitting them out as *.tiff when batch processing them was too unworkable. Whether Serif thinks .tiff looks prettier – or some equally nonsense reason – is moot; the software cannot do what I need it to do. With Photoshop I do not need to fight the software or use work-a-rounds – it just works as it should.
I cannot force you to act on feedback, however when I was a frequent visitor in this forum, I used to see a lot of excellent feedback from people who were very clearly power users – then someone would reply with some sort of excuse or work-a-round. Serif then appear to view these issues as 'problem solved'; I never saw any of that feedback from heavy users acted on. A work-a-round is perhaps OK for hobbyists dealing with relatively small numbers of images at their leisure, but when dealing with large numbers of images at a time and working extensively with the software every day, even something seemingly minor to others makes using the software unbearable for what is already a tedious and repetitive process. Power users know what they want to software to do; Serif can try to justify their decisions and ignore the feedback, but the issue won't go away – it just leads to resenting the software.
To be clear, I'm not looking for a reply – this is feedback only.
-
On 8/21/2020 at 8:15 PM, Bad_Wolf said:
This is indeed a Windows issue. When I want to remove a program, I have a lot of problems because Windows is refusing. What I do is restart again and when asked, agree with forcing a restart. After that I can remove the remaining files. Serif has nothing to do with your problem. You should turn to Microsoft.
It's not.
When trying to update or uninstall Affinity software, the installer looks for the Affinity MSI installer database file located in the C:\Windows\Installer folder (I.E. C:\Windows\Installer\83225.msi).
If it can't find this file (for example, if something has deleted it), then it will try to find the original installer database file. In Affinity's case, the original installer database file would have been extracted to a temporary location during the original installation (I.E. C:\Users\UserName\AppData\Local\Temp\AffinitySetup\8c1170d2-f3c0-4caf-b5c8-5c8ec4804826\Affinity.msi). After installation, it is deleted from this temporary location by the installer.
The dialogue you can see in the OP's screenshot when they try to uninstall it is saying just this: It can't find the Affinity MSI installer database file located in the C:\Windows\Installer folder and it also can't find the original 'Affinity.msi' file (which it won't, because after installation it's deleted from that temporary location). Although the dialogue gives a 'Browse' option, it is not possible to point the dialogue box to the msi (as it doesn't exist anymore) and it's also not possible to point it to the original downloaded file instead – as Affinity supply an exe file, not an msi file.
Therefore, the OP will need to run the Microsoft troubleshooter tool and follow the prompts for an 'uninstalling' issue; this will allow the application to be uninstalled.
-
On 8/21/2020 at 4:48 PM, RNKLN said:
It’s a shame indeed that Windows still isn’t capable of doing a good job in installing and removing software. 😉
This is neither a Windows issue, nor a Serif issue; Affinity products uninstall fine. This is likely a third-party issue, such as something "cleaning" the installer folder when it should be left alone. The application needs the msi installer intact so it knows what's installed and where before it updates or uninstalls itself. If it's not, then you get the errors the OP posted in their screenshots (demonstrated below).
They will need to download & run the tool from the below link, follow the prompts for an 'uninstalling' issue, then uninstall the Affinity software:
https://support.microsoft.com/help/17588/windows-fix-problems-that-block-programs-being-installed-or-removedEdit:
The tool in the above link is no longer available to download from 3 August 2020 due to it not being signed with a SHA-256 certificate (it was signed in 2015 with a SHA-1 cert). However, Serif have a link in the FAQ section to a version of the "Microsoft Uninstall Troubleshooter" tool hosted on OneDrive:
https://forum.affinity.serif.com/index.php?/topic/98922-faq-installer-errors-setup-failed-installer-windows-ui-issues/&do=findComment&comment=541684If the OneDrive link doesn't work, there's also a version here:
https://www.tenforums.com/tutorials/86975-program-install-uninstall-troubleshooter-windows.html -
22 hours ago, Throne777 said:
Is there anything I can do in the meantime because currently my Affinity suite is useless if I can't get the colour white 😕 How do I correct the colour profile?
I would use the monitor ICM colour profiles that Microsoft supply for the Intel Surface Laptop 3.
1) Download the "SurfaceOemPanel (Intel).zip" file from my post above.
2) Follow the below video.
-
On 8/17/2020 at 1:00 PM, Throne777 said:
At first I thought my eyes were going funny, but Affinity sometimes doesn't show colours correctly and I have no idea why. See screenshot. Both highlighted circles are white, except in Affinity it clearly isn't white, it's got a yellowish hue to it. That fill colour is RGB = 255 / 255 / 255, so why is it not white (it's the top layer by the way, so nothing should be applying to it - even if it was it still doesn't look right in the Fill: boxl)? I wondered if it was just my screen going mad (it's a Surface Pro Laptop 3 in case that helps), but I checked the screenshot on my phone screen and you can still see a colour difference. What's going on?
Looking at the display model number (LQ150P1JX51), that's a display from a 15" Surface Laptop 3, rather than a Surface Pro. Although, I'm guessing that's just a typo.
"…it is a Sharp LQ150P1JX51 panel made especially for the Microsoft Surface Laptop 3. It is Sharp factory calibrated to 100% sRGB, Delta E <1 and also offers an enhanced mode (saturated)."
12 hours ago, Mark Ingram said:@Throne777, is that the default profile (SurfacesRGB.icm) that came with your Surface Pro 3 laptop?
Until the OP replies, the ICM colour profile name does match the Surface Laptop 3 ICM colour profile. Someone has previously posted about this colour profile on the Microsoft website – however, over the years, I've yet to see a display/hardware manufacturer give a technical reason why some of their ICC/ICM display colour profiles display one of the RGB colour channels oddly:
Interestingly, if I extract the ICM display colour profiles directly from the Surface Laptop 3 driver MSI files, the ICM colour profile included with the Intel drivers displays 255,255,255 as white (at least in Windows Sandbox, on an Intel desktop machine, with a Dell monitor), however the one included with the AMD drivers gives a yellow colour cast.
Surface Laptop 3 (with Intel Processor Drivers and Firmware):
MSI link:
https://www.microsoft.com/en-us/download/details.aspx?id=100429Extract MSI command:
msiexec /a C:\Users\WDAGUtilityAccount\Desktop\SurfaceLaptop3_Win10_18362_20.072.28623.0.msi /qb TARGETDIR=C:\Users\WDAGUtilityAccount\Desktop\MSIOutput
The extracted ICM profiles from the Intel MSI file (Zip file):
Screenshot:
Surface Laptop 3 (with AMD Processor Drivers and Firmware):MSI link:
https://www.microsoft.com/en-us/download/details.aspx?id=100428Extract MSI command:
msiexec /a C:\Users\WDAGUtilityAccount\Desktop\SurfaceLaptop3_Win10_18362_20.053.37902.0.msi /qb TARGETDIR=C:\Users\WDAGUtilityAccount\Desktop\MSIOutput
The extracted ICM profiles from the AMD MSI file (Zip file):
Screenshot:
- Chris B and Mark Ingram
-
 2
2
-
-
4 hours ago, codeneuess said:
i've opened a jpg picture in AffinityPhoto an 90% of the Image is transparent. When I open it in Finder or OSX Preview the Image looks normal.
In the Layer-section Affinity shows a pixel-layer with Curves an some of the little previews (with the content not displayed) are stricked out.
From the description, it sounds like the JPG image has a clipping path:
– When you open the image in software that recognises the clipping path (like Affinity Photo), then you see the transparency.
– When you open the image in software that doesn't recognise the clipping path (like an image viewer), it ignores the clipping path and displays the whole image.
Example (zip file):
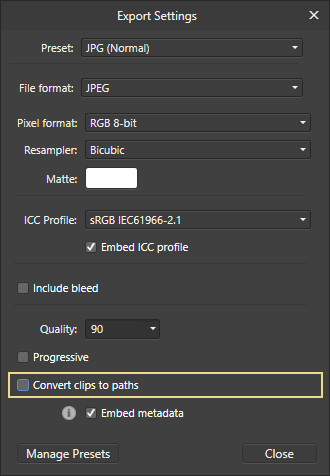
001 (Contains clipping path).zipTo export the image without a clipping path: In the JPG export settings, click the 'More' button, then untick 'Convert clips to paths'.
-
-
2 hours ago, ripitup_startagain said:
Thank you for that response. I tried checking the Antialias box then deleting with marquee and it did the same even at 0 feathering. I also checked the view quality and it is already on Bilinear!
I'm starting to think it's my MacBook but it's only about 3 years old...
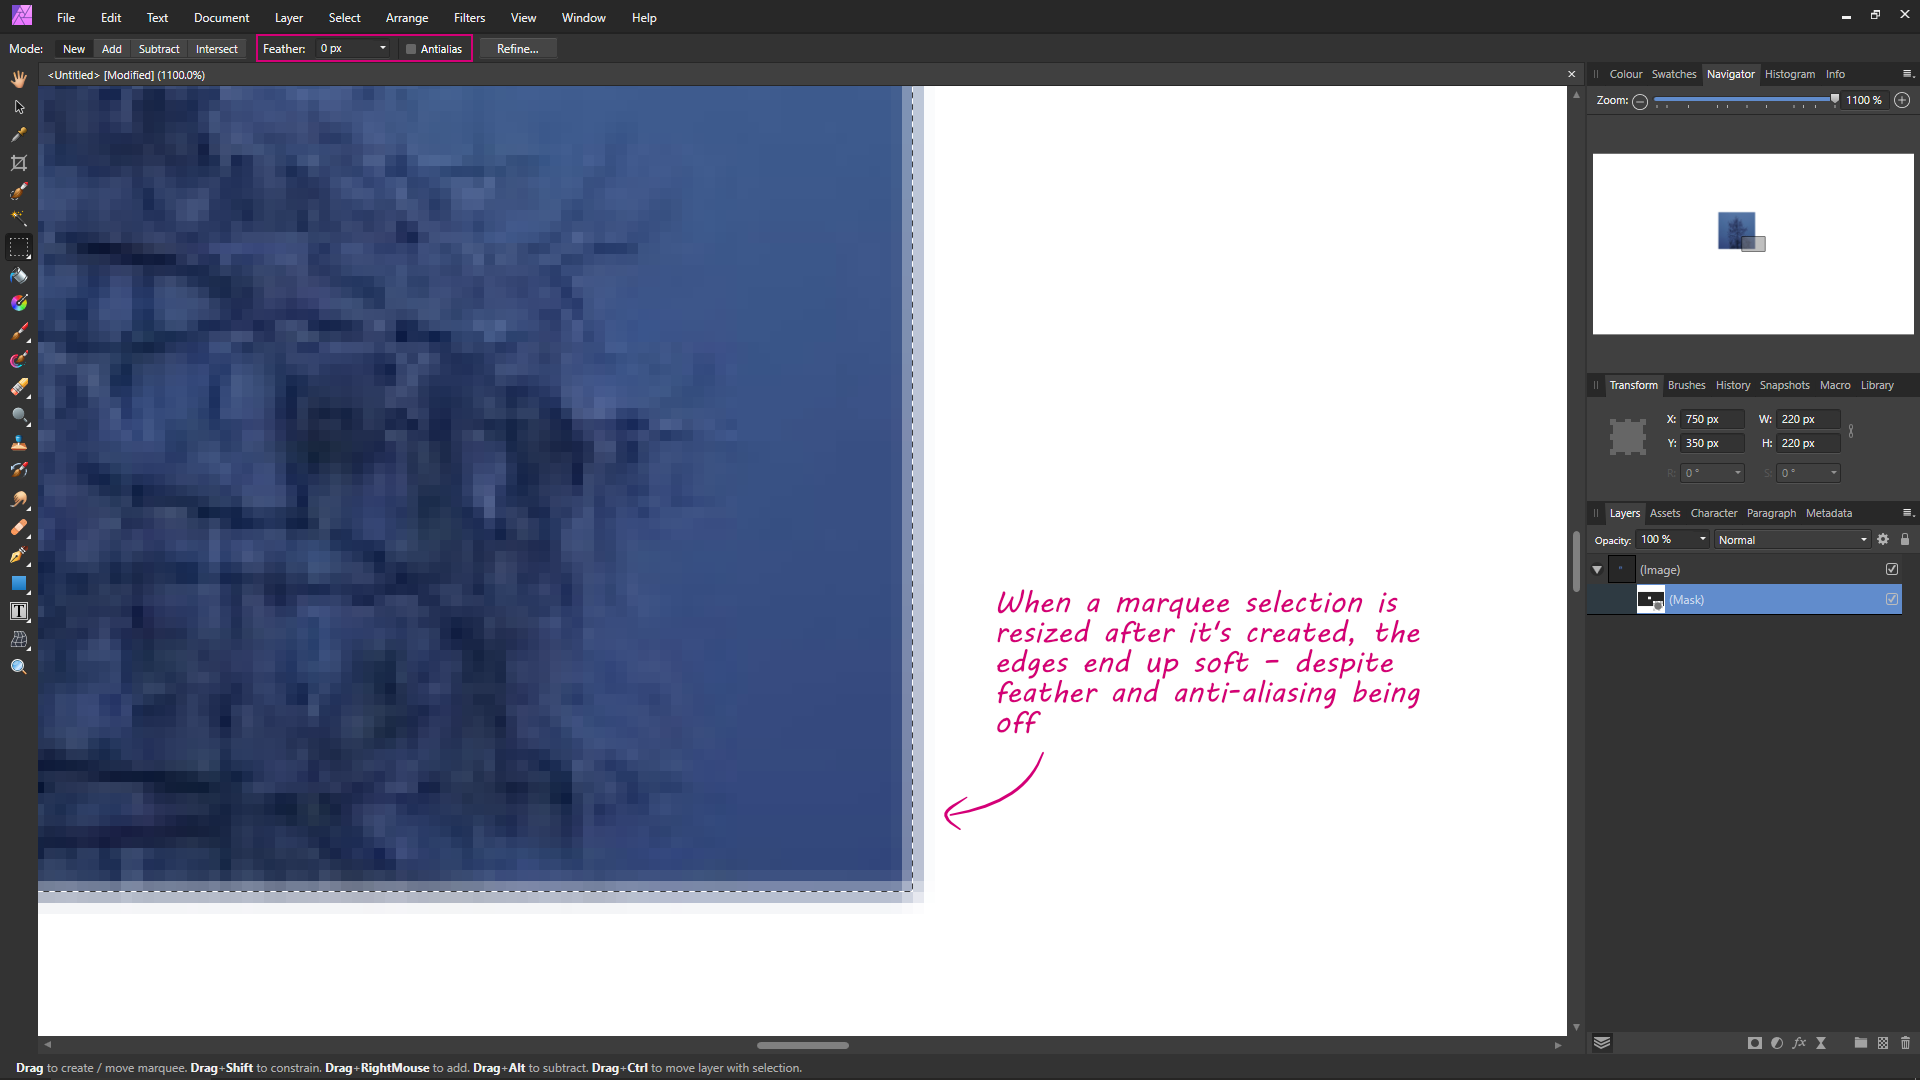
What appears to be happening, is the marquee antialiasing has no effect if the layer has been rotated before making the selection. Or to think of it a different way, the jagged edges are coming from the rotated layer below, rather than the marquee itself.
If the layer has already been rotated, right-click on the rotated layer, select 'Rasterise' and then make the selection. Do the jagged edges then disappear?
-
When using the Marquee tools, select the Marquee tool you want to use and also tick the 'Antialias' tick box in the Context Toolbar at the top (before making the selection). However, as you previously mentioned using feather instead, it's likely that the below setting is what's causing the issue.
Go to [Affinity Photo Preferences > Performance] and change the 'View Quality' from 'Nearest Neighbour' to 'Bilinear (Best Quality)'.
-
5 hours ago, seeknowbrown said:
… I noticed the following problem when I uploaded jpeg files to my online Flickr account. The files upload, but the titles are often totally wrong (in this example, possibly the name of the old original defunct file "Blue_10.afphoto". The title is not only totally incorrect, but I now have to double-check each and every image exported from Photo before sending, uploading or delivering to avoid major mistakes or embarrassment if not caught and corrected.
Please tell me there's a fix for this. I have never had such a problem before. Thanks, anyone.
Unfortunately, that is how it is.
Affinity Photo automatically writes the filename directly into the 'Title' field in the file metadata – meaning the original filename is stuck as the title in the metadata, even if the file is later renamed.
If you're only dealing with a small number of files, then in your 'Blue_10.afphoto' example you can delete 'Blue_10' from the 'Title' field in the Affinity Photo Metadata panel. Then when you save the file as 'Green_20.afphoto', the title will be blank. However, if you are dealing with lots of photos, it's a PITA.
I previously submitted feedback regarding this behaviour, however I wouldn't hold my breath on them changing it.
-
On 7/17/2020 at 8:41 PM, Antonhartenberg said:
I try to brush over some shiny skin with a soft brush and 20% opacity on a new pixel layer. However, a white ring appear around my brush work:
This seems to happen only when I start by developing a NEF-file. When I copy the below pixel layer in a new document, it does not happen.
Is this a bug? Am I doing something wrong?
It's because when developing the raw image in the Develop persona, it's currently being developed to 32-bit linear output (RGBA/32). It looks OK when you copy and paste the layer from the Photo persona into another document because it's converted to the format of the receiving document – RGBA/8 or RGBA/16 for example.
Are you intending to work on the image in RGBA/32 format? If not, in the Develop persona you could go to [View > Assistant Manager] and change the 'Raw output format' from 'RGB (32 bit HDR)' to 'RGB (16 bit)'. Alternatively, when in the Photo persona, you could go to [Document > Convert Format/ICC Profile] and change the format to say RGBA/16 or RGBA/8.
However, if you're intending to work on the image in RGBA/32 format, then I'm not sure why it's doing this; I'm guessing it's a bug It doesn't necessarily need to be just from developing a raw image file: if you open a new blank document in Affinity Photo – with the colour format set to 'RGB/32 (HDR)' – the Paint Brush Tool will do the same.
RGBA/32:
RGBA/16:
- Dan C and firstdefence
-
 1
1
-
1
-
-
2 hours ago, Chris B said:
I would not pin your hopes on it. There was a discussion on this and because we can move it once it has been dragged out, there isn't a general feeling that this needs to be changed so that we can mvoe it during an initial drag.
You end up with soft edges if you resize the marquee afterwards.
You have to use the rectangle/ellipse tools instead. However, this means users have to use the rectangle/ellipse tools with 0% opacity fill, position it where it's required, change to 100% opacity fill, then either CTRL + click the thumbnail in the layers panel to get the selection, or use it as a vector mask directly.
As a tool maker, if you want to make the marquee selection tools more usable, allowing spacebar to move the selection should also be possible. It should be possible for the user to zoom in close, align one part of the marquee selection tool using the spacebar, then dragging to expand the selection. Or in the case of selecting something like a pupil/iris of an eye, or wheels/tyres of a vehicle, switching between spacebar (to move) and dragging (to resize) a few times while keeping the left mouse button pressed.
Using quick mask to resize selections is also prone to crashing.
-
9 hours ago, Donna Mc said:
I just saved this file in Designer. The thumbnail is now showing but as you can see the icon on the file shows Publisher. Also, all of my other files still show no thumbnail and are the wrong Icon.
Did the thumbnail image for this file still remain displayed after it finished syncing with OneDrive?
-
6 hours ago, anniefarbs said:
Newbie here....I restore and color old photos. the past few days my paint brush ( round light brush ) that I have used forever suddenly is like a spray brush or air brush with a little blue circle and my brush expands and then goes the blue circle..I have checked all my setting for the brush.......I never changed anything as to how it would change to this, I never mess with it,,, It is really messing up my precise coloring in an area. What could I have possibly done.I have tried restarting, Thank you Carole
The 'little blue circle' usually indicates that the 'Stabiliser' is enabled for the brush. This setting can be enabled/disabled in the brush context tool bar at the top of the screen, when the Paint Brush Tool is selected.
I'm not sure what is making the 'Round Light Brush' act like a spray brush/airbrush. You can try resetting all the brushes back the defaults. To do this, export any custom brushes that you have created in the Brushes panel, then go to [Edit > Preferences > Miscellaneous > Reset Brushes]. After doing this you will then need to import any custom brushes you previously exported, as they will be removed when resetting the brushes.
However, it's difficult to understand exactly what you mean without seeing what you are seeing. Therefore, if you would prefer to get to the bottom of what's happening, you will need to post a screenshot showing the issue. Post a screenshot of the whole Affinity Photo screen, with the Paint Brush Tool selected and also with the brush settings open (click on the 'More' button in the brush context tool bar). This may provide an indication of what's happening.
-
7 hours ago, Michail said:
It is about a (for me) very popular function. It is no longer possible to move a selection (e.g. a rectangle selection) during creation.
I don't know when this stopped working but it has been like this for quite a while.QuoteTry this:
- Create a rectangle selection (Don't let go of the mouse.).
- Press the space bar and keep dragging the mouse.
I don't think it has ever been like this in Affinity Photo.
It works like this in Adobe Photoshop, but not in Affinity Photo. There have been quite a few feature requests over the years for it to work like this though.
-
12 minutes ago, Foolix said:
I am sorry for disrupting you guys, I found the setting for this function. It's called " Align handle positions using snapping options "
Read here: …
There's also a video at the below link (starts at 3:45) :
https://www.youtube.com/watch?v=hntb-PMGUEA
-
1 hour ago, totjoss said:
For now, however the issue may return. As per my original bug report:
Quote…After manually toggling the 'Wet Edges' setting in the context tool bar, the problem disappears for a while, only to return later.
I think the issue is caused due to a discrepancy between the 'Wet Edges' setting in the brush context tool bar and the 'Wet Edges' setting in the brush settings.
-
Are 'Wet Edges' being turned off in the Paint Brush Tool context toolbar when you switch between the Paint Brush Tool and the Erase Brush Tool?
If this is the case, it's a bug. I previously reported it in the link below (the second video in the linked thread), but the only change I've seen so far is for the first video in that linked thread – where if you now open a new document and the current brush has Wet Edges set to on, Affinity Photo incorrectly turns Wet Edges off (the brush should still have Wet Edges on as it's still the currently selected brush).
Try to reproduce it using a pre-defined brush that has wet edges set to on – such as the [Dry Media > Square Charcoal] brush for example. In the below videos, Affinity Photo is running in a Sandbox, meaning it's a totally clean installation of 1.8.3.641.
Video showing 'Wet Edges' being turned off when switching between Paint Brush Tool and Erase Brush Tool:
Video showing 'Wet Edges' being turned off when opening a new document, even though the brush with 'Wet Edges' is still selected:
-
If a brush nozzle is longer diagonally than it is horizontally or vertically, parts of the brush nozzle get cut off when rotating the brush either with the left/right keyboard arrow keys, or with [Brush Properties > General > Rotation].
If a 'Rotation Jitter' is set for the brush [Brush Properties > Dynamics > Rotation Jitter] – even if only set to 1% – the brush nozzle isn't cut off when rotating the brush.
Although it's possible to make the brush nozzles smaller so that they don't cut off when rotating, the brushes should be able to be rotated without cutting off – like what happens when 'Rotation Jitter' is set to 1%.
To reproduce:
1) Create a test brush nozzle where the nozzle is longer diagonally than it is horizontally or vertically.
2) Create a new intensity brush from it.
3) Draw on the canvas with the new brush. The brush will draw correctly.
4) Using either the left/right keyboard arrow keys, or using [Brush Properties > General > Rotation], rotate the brush say 10%. Part of the brush nozzle gets cut off.
5) Go to [Brush Properties > Dynamics > Rotation Jitter] and set the 'Rotation Jitter' to 1%. The brush will draw correctly without cutting off.
Screenshot 1:
Screenshot 2:
Screenshot 3:
Screenshot 4:
-----
Windows 10 2004 (19041.329)
Affinity Photo (1.8.3.641) -
On 6/13/2020 at 7:40 AM, Sudasho said:
How can I save pictures without change modified date?
A month ago I purchased Affinity photo and started to edit some pictures and saved as XXX.afphot and JPEG as well.
Then I noticed their modifyied date switched a day when I edit.
Let's say a picture taken last Dec25 and edit today as June 13 saved as JPEG then click "Get info" on Mac, and see modified date is the day not Last Dec25.
Please teach me how to fix the problem.
22 hours ago, Sudasho said:Psenda I concern to DL EXIF TOOL thank you.
For TIFF and JPEG files, the correct place for the 'Date taken' date is in the ExifIFD:DateTimeOriginal tag. When using ExifTool to add a date to TIFF and JPEG files that do not already have this field populated, you can use the -AllDates tag, which will add the date to DateTimeOriginal, CreateDate and ModifyDate (these will be in the EXIF tags, not the file timestamps). However, Affinity Photo deletes the CreateDate tag when exporting an image, so the DateTimeOriginal tag is the important date.For PNG files, EXIF metadata was only recently added to the official PNG specification in 2017, which was too little too late. Therefore the main place the 'Date taken' date is stored – other than the file timestamps – is in the PNG:CreationTime tag. As support for metadata in the PNG specification was historically pretty sketchy, it's hit and miss whether applications support this tag. Affinity Photo doesn't and deletes this tag when exporting the image, so you can't currently use this date unless you want to keep reapplying it every time you export the file from Affinity Photo. For photos, it's better to stick with TIFF/raw originals and JPEG for output files, rather than PNG if you can.
The file 'Date modified' timestamp you mentioned isn't very reliable. If you take a bunch of raw images on Christmas day, but don't process them for five months, the 'Date modified' timestamp is going to be the date you processed the images, not the date they were taken. If a year later, you decide you you want to reprocess some of the images again, the 'Date modified' timestamp is now going to be even further off. Also, the 'Date modified' timestamp can be inadvertently changed; just rotating an image in an image viewer for example can change the 'Date modified' timestamp.
Fortunately, when taking a photo with a digital camera, it will automatically add the 'Date taken' date to the EXIF metadata and then when opened in Affinity Photo, Affinity Photo keeps this metadata in the file. So if your photo was taken on Christmas Day with a digital camera, the 'Date taken' date in the EXIF remains constant regardless of when you actually process/edit the image or export it from Affinity Photo. This is the main timestamp to go by.
The only real time where the file 'Date modified' timestamp is useful in photos is as a last resort fall-back date when there isn't a better date in the file (such as a 'Date taken' date in the EXIF). Or in the case where the images are being viewed in a photo viewer where not much thought has gone into it: I.E. it completely ignores the EXIF metadata and just uses the 'Date modified' timestamps instead. The Google photo app that comes with stock Android for example does this. To accommodate for this, you *could* change the 'Date modified' date in the file to match the 'Date taken' date, but it's not something I would personally do – as per the drawbacks I mentioned above and what other people have mentioned. The author of ExifTool also doesn't really recommend doing this. In the above example with the raw images, every time you process the images, or export then from Affinity Photo, it will mean you're going to need to keep changing the 'Date modified' timestamps again to match. This will be a massive PITA. Then, if you're dealing with old scanned photos, changing the 'Date modified' timestamp in the file can be problematic with images taken before 1970-01-01. ExifTool is 32-bit and therefore changing the 'Date modified' timestamps in the file to pre-1970 dates will produce odd dates – like a century and a half out. It's possible to install 64-bit Perl and use a different version of ExifTool with it, but it's more hassle (at least on Windows, it may not be an issue on MacOS). Really a photo viewing app should be reading the 'Date taken' date from the EXIF metadata if it's in the file, which has a higher priority than the file 'Date modified' timestamp. Therefore, stick to the proper EXIF tags for adding 'Date taken' to image files.
In the case where the image is a scanned photo or artwork, then the date is going to have to be added manually. If it's just a couple of images (for example, an urban sketch/painting), the 'Date taken' date can be added using the Windows File Explorer properties dialogue box (or the MacOS equivalent to this, such as Apple Photos). If it's quite a few images (for example a few hundred images from an airshow in 1982), then you'll need to use something like ExifTool to add the dates to the EXIF metadata; this will also make it possible to add sequential times to the 'Date taken' dates as well, so that they appear in the correct chronological order in a photo viewer that correctly reads the 'Date taken' tag in the EXIF metadata.
When adding the 'Date taken' date to the files manually, the dates need to be added to the files before opening them in Affinity Photo. I.E. Scan the images in TIFF file format, add the 'Date taken' date to the file metadata, then open them in Affinity Photo. This will mean the 'Date taken' will already be in the EXIF metadata when you save the Affinity Photo working file or export to JPEG/TIFF.
Personally, I would like to see the ability to add or modify the 'Date taken' in the Affinity Photo 'Metadata' panel, but I don't know whether that will happen.
-
2 hours ago, TheCrimsonBird said:
I just wonder why the limitation ? and was it always a thing ?
No idea. I reported it HERE in 2016, but they stuck with 50%.
Although the slider only goes up to 50%, it's possible to manually type a value greater than 50% in the box. It's also now possible to use the left and right arrow keys on the keyboard to rotate a brush 360°, which was a useful addition. In addition, for something like a cloud, it's now possible to save objects as an asset in the 'Assets' panel too. However, it's still not possible to flip a brush on the X or Y axis though.

.png.0e17db5c2857ca5621b33c318394f421.png)
.png.a459b64968c09016eeebfd1e37860d1a.png)


Masking a Group Causes Colour Fringes due to Passthrough Blending Mode
in V1 Bugs found on Windows
Posted
This is an old issue – I even commented on it five years ago. However, I never figured out what Affinity Photo is actually doing. Affinity Photo is obviously applying some sort of blending mode, but I don't understand what blending mode it is actually applying – or why it is applying it. I can't think of any reason how this would be considered normal operation; there are no real world scenarios where this behaviour would be expected.
The attached test file contains a single pixel layer, which is in a group, and a mask is applied to the group. In a real world scenario, there would be more layers in the group and therefore the mask would be masking multiple layers in the group, but for demonstration purposes I am only using one pixel layer in the group here.
The default blending mode for groups in Affinity Photo is Passthrough. With the Passthrough blending mode, the mask does not work as expected (see below screenshots).
Screenshot A: The mask that is masking the group is just a straight horizontal line running through the centre of the image. The expected result would be the group mask just revealing the pink layer (Fill layer) below. However, as can be seen in the screenshot, the Passthrough blending mode causes odd distortions, colour shifts and fringes.
Screenshot B: With the group blending mode set to Normal, the mask works as expected – the straight horizontal mask running through the centre of the image just reveals the pink layer below, with no odd distortions, colour shifts and fringes.
Original File:
Test 01.afphoto