Bri-Toon
-
Posts
2,178 -
Joined
-
Last visited
Everything posted by Bri-Toon
-
CTRL + Y removes my colors
Bri-Toon replied to MaryLou's topic in [ARCHIVE] Designer beta on Windows threads
MaryLou, if it does help you and the people in your forum, I can walk you through the steps in how to modify the keys. For me, I have Ctrl Z as Undo and Ctrl Y and Redo. 1. First click Edit > Preferences > Keyboard Shortcuts 2. Switch "File" to "Edit" in the second drop-down menu 3. Undo and Redo will show up first in the list. Click in the box next to them and add in your own key command 4. Click "Save" and save the setting to your own computer location Keep in mind that once you redo to your most latest state, you will enter outline view. -
Hello Edmonium, There is also an alternative. Through DrawPlus, there is the option in the File menu to "Publish as PDF." That will keep your artwork in vector quality and Affinity does have control over PDF documents. When you bring the file into Designer, just click on the button on the context toolbar that says "Edit Document." Do keep in mind that since Designer was built from scratch, some groups or layer arrangements might be misplaced, but testing this for myself, the artwork looks exactly the same. I don't know how Designer will handle features that are not yet in Designer such as vector patterns, mesh warps, and B-splines, but I hope this helps for the most part.
-
I completely forgot about those two options. Sweet.
-
Windows Beta introduction video
Bri-Toon replied to James Ritson's topic in [ARCHIVE] Photo beta on Windows threads
I was not expecting Photo to be out already. That is awesome. And wow, the topics are piling up so fast. I merely just got on the waiting list. -
What clever thinking, Obtusity. That method is way easier. Also, Electrofied, on Step 4 when you duplicate the 12 O' clock mark, make sure you do it by rotation + Alt (shortcut for duplicating). If you copy and paste, the Power Duplicate won't work.
-
multiple strokes and fills, 3d
Bri-Toon replied to wsg7562's topic in Older Feedback & Suggestion Posts
lol, When I said roadmap, I meant the topic of features which will be on the next version of Designer. But hey, I did forget to mention to him how to have double strokes. -
I believe Affinity is working on improving the color picker. I'm not sure if it will copy the properties as well, but it would make things easier if it does.
-
Unfortunately no, but if you copy the new object and then select the original, you can paste the style of the original one to the new one. (Edit > Paste Style, or Ctrl/Cmd + Shift + V).
-
For something like this whereas you need to be more precise, power duplicate may not be the best option. 1. Create a circle holding Shift to constrain it. 2. With snapping enabled, create a vertical line from the top middle of the circle to the bottom middle. 3. Copy and paste it. (The copy will be right on top of the original) 4. Rotate the copy holding Shift to rotate it in a 30 degree increment (2 snaps). (Repeat steps 3 and 4 until the circle is filled.) 5. Copy and paste each line and the circle 6. Shrink the copy of the circle holding Shift + Ctrl to constrain and center it until there is a small gap between the two. 7. Resize each lines so each stays in between the two circles. 8. Now just delete the middle circle.
-
I made a topic on this back in July. https://forum.affinity.serif.com/index.php?/topic/22931-vector-flood-tool-for-affinity-designer/ I wouldn't mind having a regular flood fill tool. Sure we would have to adjust the stroke and fill separately, but with the boolean operations, it shouldn't take too much time. Just fill again and add. Personally, I think that would be my favorite feature if it does come to pass.
-
Sounds interesting, Mark. A little foreshadowing feature. Pretty clever. Though, it sounds like MaryLou caught a bug in regards to it appearing in the preset flyout when it isn't even listed in the flyout. Playing around with that hidden tool, the same thing happened to me. Wait a minute...you hid the cat on purpose! Seeing your photo how you're a dog and all.
-
But did you dock the panels before adding the cat tool back? For me, it will not show double as it does when the panels hover. Either way, it's definitely a bug. I guess the tool is just an extra thing they decided to add. Not sure.
-
Oops. I was clicking the wrong "customize" option. I never noticed those two extras before. Regarding this: It looks to be a separator for the tools themselves, not an actual tool. As for the cat showing doubles, it looks like it is indeed a bug. If you reset your tools, dock your panels, and then add the cat tool back to your toolbar, you do not get the same result. Also, I agree that it should be listed with the other presets.
-
I'm confused. I just downloaded and installed the latest version (1.5.0.32 for Windows), and I see no cat tool or horizontal bar tool on the shape flyout.
-
Looks very nice. I like the way you made the area around the mouth. It makes her chin pop out.
-
Affinity Users
Bri-Toon replied to wordsberry's topic in Pre-V2 Archive of Affinity on Desktop Questions (macOS and Windows)
That's a good source you found. -
Affinity Users
Bri-Toon replied to wordsberry's topic in Pre-V2 Archive of Affinity on Desktop Questions (macOS and Windows)
Yes to this one. The video tutorials are mostly on Vimeo instead of YouTube, but here is the overall Tutorials section. The pinned topics are the featured ones. -
Aw you did this just for me? I'll be sure to tip your kitty.

-
Interesting concept. I like the way you made the snowman's body. That first image reminds me of the weather we get here in New England. Haha.
-
Okay, I'll take fries cauldron style.
-
A witch that sells fast food? I'm in.
-
Oh dear. I hope she doesn't put a spell on the Affinity software.
-
I think he might be looking into creating a mandala. Mark, if you create a circular grid that has guidelines all the way around and then have objects around that grid applied as symbols, you can create a symmetrical effect based off of those symbols. See how it's done here.
-
That's an interesting idea, Alfred. I opened up the file and took a look for myself. It does make the clock look worn out.
-
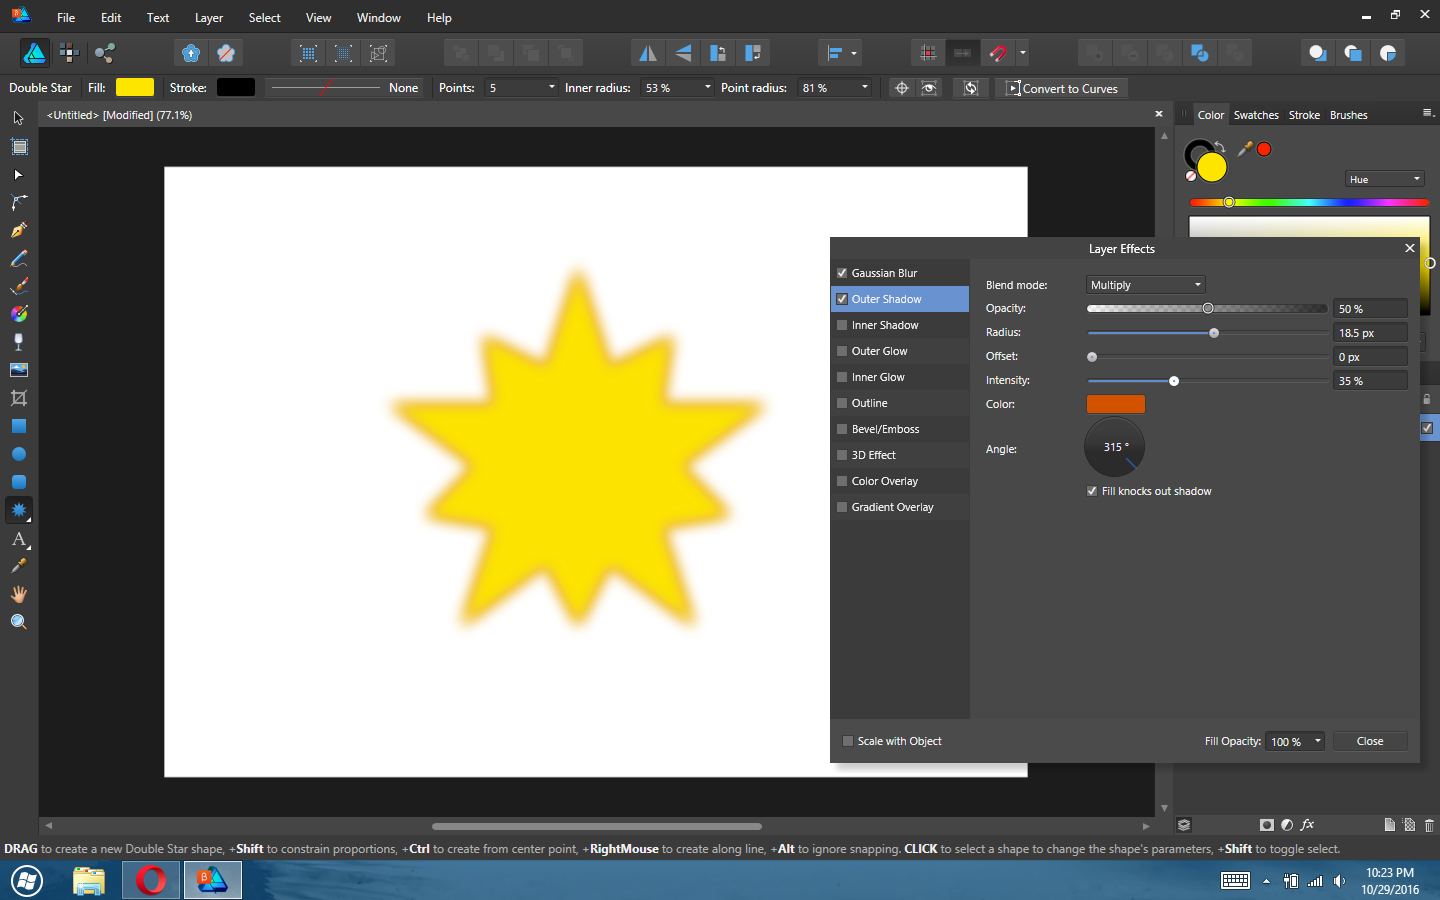
Hello Darita, It sounds like you're getting creative there. Well something I can think of is to to add a double star shape behind the clock indicating alarming impact. It's not in my example, but maybe also have a circular shadow beneath the clock to make it look like it's jumping. (Once the distort tool comes in, that should be fun to play with too.)