TrentL
-
Posts
200 -
Joined
-
Last visited


-
 AffinityMakesMeWonder reacted to a post in a topic:
Unofficial PDF Manual - Expert Guide to Affinity Publisher
AffinityMakesMeWonder reacted to a post in a topic:
Unofficial PDF Manual - Expert Guide to Affinity Publisher
-
iyo8 reacted to a post in a topic:
Procedural Textures - Tutorial for Affinity Photo
-
iyo8 reacted to a post in a topic:
Procedural Textures - Tutorial for Affinity Photo
-
Blueprint reacted to a post in a topic:
Masks for Beginners : Tutorial for Affinity Photo
-

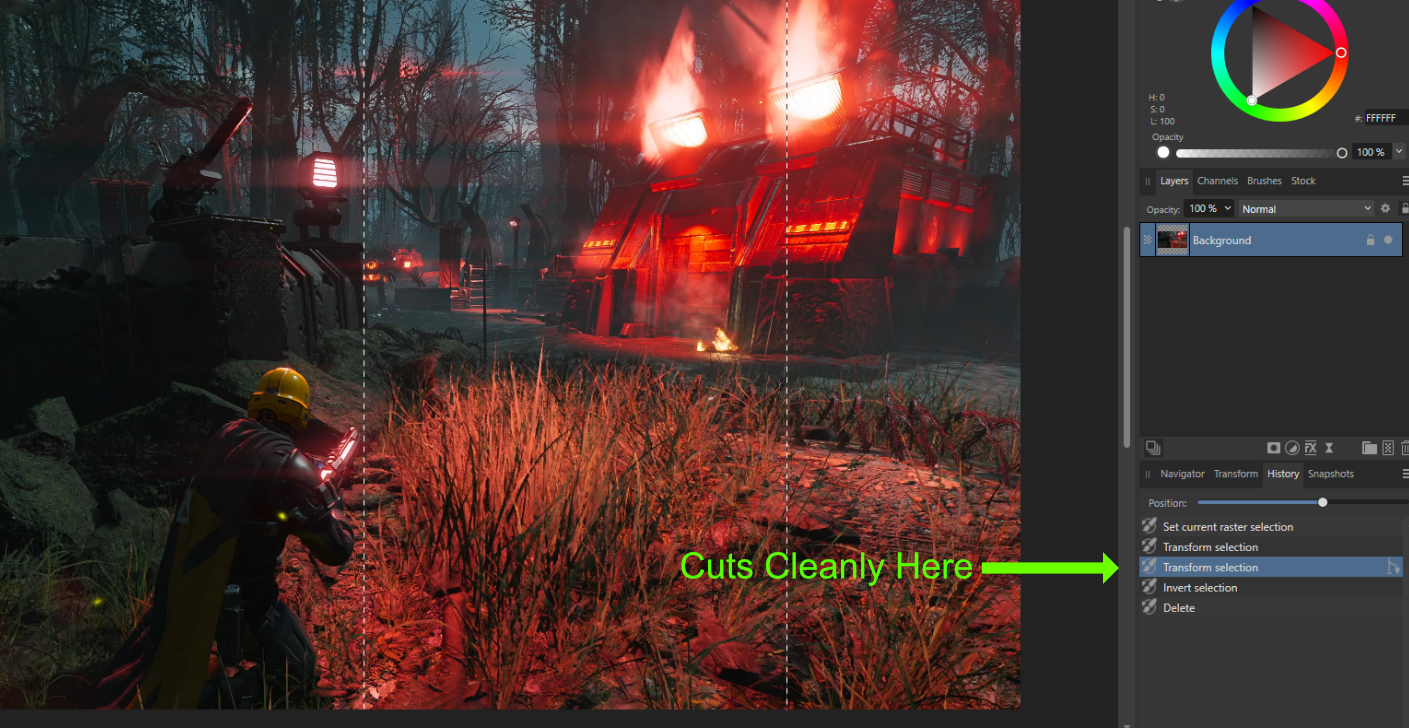
Is there any way to not have the transparent residue left by selection tools? I just want a hard edge. This trim was using the rectangular marquee tool without refining, feather at 0px, and anti alias box unchecked.
TrentL replied to Ym Eman's topic in Affinity on Desktop Questions (macOS and Windows)
The alpha problem is really hard to reproduce. Does it still happen if you just make a totally new selection and try again? -
Is there any way to not have the transparent residue left by selection tools? I just want a hard edge. This trim was using the rectangular marquee tool without refining, feather at 0px, and anti alias box unchecked.
TrentL replied to Ym Eman's topic in Affinity on Desktop Questions (macOS and Windows)
Yes, I (think) I am seeing the same thing as you. Cutting (CTRL-X) at that point seems clean to me. But duplicating (CTRL-J) or even masking will gives the soft edge result. -
Is there any way to not have the transparent residue left by selection tools? I just want a hard edge. This trim was using the rectangular marquee tool without refining, feather at 0px, and anti alias box unchecked.
TrentL replied to Ym Eman's topic in Affinity on Desktop Questions (macOS and Windows)
The strange thing is that if you look through the History, it will cut out cleanly before he does the Invert Pixel selection. After the invert, that is when some alpha values seem to be altered:
- 39 replies
-
- 1
-
-
- transparency
- selection
- (and 2 more)
-
TrentL reacted to a post in a topic:
How to Use The Glyph Browser - Tutorial for Affinity Photo, Designer, and Publisher
-
TrentL reacted to a post in a topic:
How to Use The Glyph Browser - Tutorial for Affinity Photo, Designer, and Publisher
-
TrentL reacted to a post in a topic:
How to Use The Glyph Browser - Tutorial for Affinity Photo, Designer, and Publisher
-
Blueprint reacted to a post in a topic:
How to Use The Glyph Browser - Tutorial for Affinity Photo, Designer, and Publisher
-
StuartRc reacted to a post in a topic:
Brush Up On Vector Brushes - Affinity Designer Tutorial
-
Yurembo reacted to a post in a topic:
Select all pixels above a certain RGB value
-
TrentL reacted to a post in a topic:
Select all pixels above a certain RGB value
-
 AffinityMakesMeWonder reacted to a post in a topic:
Procedural Textures - Tutorial for Affinity Photo
AffinityMakesMeWonder reacted to a post in a topic:
Procedural Textures - Tutorial for Affinity Photo
-
AffinityMakesMeWonder reacted to a post in a topic:
Procedural Textures - Tutorial for Affinity Photo
-
Most of what I know about procedural textures is covered in the 2 videos and a livestream I did a few months ago. Eventually I lost patience with the interface (could we please load the code from a text file at least?*) and the lack of documentation. Also, I really wanted a kernel-based system but Affinity seems to lack that. I applaud PlasmaPortal for valiantly carrying the torch on procedural textures 🫡 *EDIT: The UI being so small is one reason I didn't do more videos. I probably would have done one more on some basic patterns (co-centric rings, sine waves) if it was easier to show the code. Yes, I can zoom in, but it is still really awkward explaining multiple statements of code on one line.
-
In this video, we’ll look at how to use a vintage font in the Affinity programs (Affinity Designer, Affinity Photo, Affinity Publisher).
-
In this video, we’ll look at how to use the Glyph Browser in Affinity programs (Affinity Designer, Affinity Photo, Affinity Publisher). This will let you change a character’s image if a font supports it.
-
TrentL reacted to a post in a topic:
A short interview video all about Modern Art Printmaking (using Affinity Photo)
-
TrentL reacted to a post in a topic:
Support Layers Clipped To Groups
-
TrentL reacted to a post in a topic:
Support Layers Clipped To Groups
-
TrentL reacted to a post in a topic:
Machine Learning: Object Selection Tool
-
I agree, none of them are perfect. I think the top 2 could probably work with some perspective warping. SolidSnake, you can use the walls to find the vanishing points and then align your coffins that way.
- 25 replies
-
- 2
-
-
- help
- photo compositing
- (and 6 more)
-
The coffin closest to us likely isn't going to work in this scene. It was photographed at too low an angle compared to the other coffins. It doesn't match the perspective of the floors & walls. Maybe you could try warping it with the warp filters. You can also try copying the middle coffin again and add some different textures so it doesn't look identical. Maybe paste a handle on to it from the near coffin.
-
In this second video on Procedural Textures, we'll look at how to use the system variables. This includes the values R, G, B, A, x, y, w, h, rx, and ry:
- 1 reply
-
- 6
-
-
-
In this introductory video, we'll look at Procedural Textures in Affinity Photo. What they are, how to use them, and a few tricks:
- 1 reply
-
- 6
-
-
-
Today we’ll learn how to create QR codes in Affinity Photo, Affinity Designer, an Affinity Publisher. In addition to normal QR codes, we’ll look at how to add a custom logo.
-
- 2
-
-
Thanks for the info. I'm making a tutorial on Procedural Textures and I start with x and y to keep it simple, but then I mention that benefits of rx and ry. As far as I can tell, these are all the pre-defined variables: R G B A x y rx ry w h Are there any others?
-
I was wondering, "In a procedural texture, does the top left pixel in an image have the x,y coordinate of (1,1) or (0,0)?" I thought I'd write a simple procedural texture to test it, and now I have biggest questions: I assigned the Red channel (R) the value of x and checked the top-left pixel in my image with the color picker: If x was 0, I expected the Red channel to be 0. If x was 1, I expected the Red channel to be 255 (because the Procedural Texture convert values from 0...1 into 0...255) ...but the result was 127, which means the x value was 0.5. So does this mean that the integer coordinates are BETWEEN the pixels and every x,y pixel value is the average of the 2 coordinates around it?
-
Stamp Layer?
TrentL replied to MG2's topic in Pre-V2 Archive of Affinity on Desktop Questions (macOS and Windows)
I think "Merge Visible" sounds scary because "Merge Selected" destructively merges the selected layers. Hence most people associate "merge" with a destructive operation (or at least that's what I assumed for a long time). -
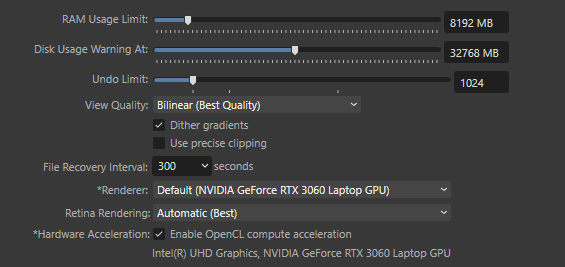
I have the same experience. It even works well in Affinity Designer's Pixel Persona with OpenCL turned on. But in Affinity Photo, adding a manual mask to an Adjustment Layer will make Blend Options be ignored if OpenCL is enabled. I'm on Windows 11 with a NVIDIA GeForce RTX 3060.