David in Яuislip
-
Posts
1,407 -
Joined
-
Last visited
Everything posted by David in Яuislip
-
 I just tried in Photo, dropped a rectangle over part of an image, set the fill to white and the stroke to 0px, exported with everything rasterised and it's fine
 -
This will work but they will all end up one one layer Select all curves, menu Layer\ Geometry\ Merge curves then Rasterise
-
If you work like that then great On windows you can right click the file and choose Open with, then go down and find Photo, click the box Always open. No idea on a mac
-
Part2, actually atemplate only works for same size image. I've opened it, placed larger and smaller images, clipped canvas and the guides go awol. So whether you use a template or a macro you will need one for each image size. APhoto doesn't play nicely with percentages
-
Idea is to open the template and File/Place the image then save as .afphoto. If the tiffs are the same dimensions then you can record a macro to create the guides and run that for each file. It doesn't work on other sizes as the macro stores the positions in pixels and not percentages
-
Yep, set up a blank document, create your guides, File/Export as Template GuidesOnly.aftemplate
-
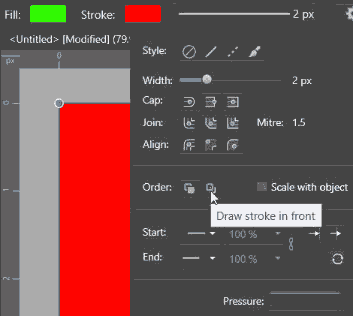
Thanks for the comment but I don't know how to do that in Photo, the choices are stroke behind or in front

-
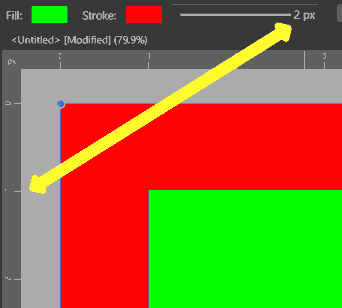
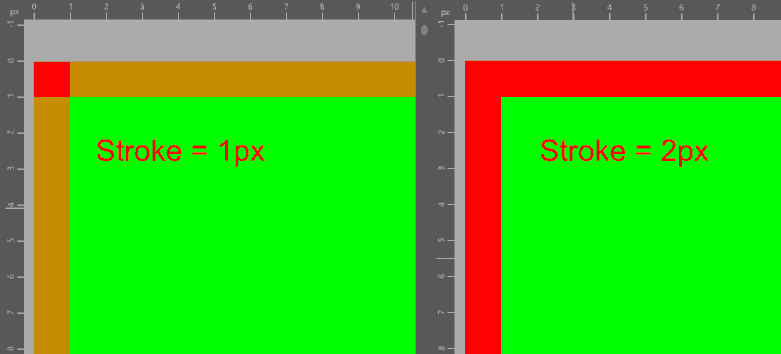
I think you've found some weirdness WeirdStroke.afphoto is a simple square 798px. If you zoom in on a corner to 4800%, with the stroke at 1px it loses opacity, with the stroke at 2px the opacity is 100% but the width stays at 1px. Exporting both cases as pngs shows the same issue Sorry couldn't help but an expert will hopefully be along in a minute WeirdStroke.afphoto
-
Export
David in Яuislip replied to Viktoria's topic in Pre-V2 Archive of Affinity on Desktop Questions (macOS and Windows)
Я не использую фигму, но Affinity пишет это <svg width="100%" height="100%" Я изменил это на <svg width="555px" height="555px" Откройте файл в текстовом редакторе и измените его на все, что вам нужно icon-555px.svg -
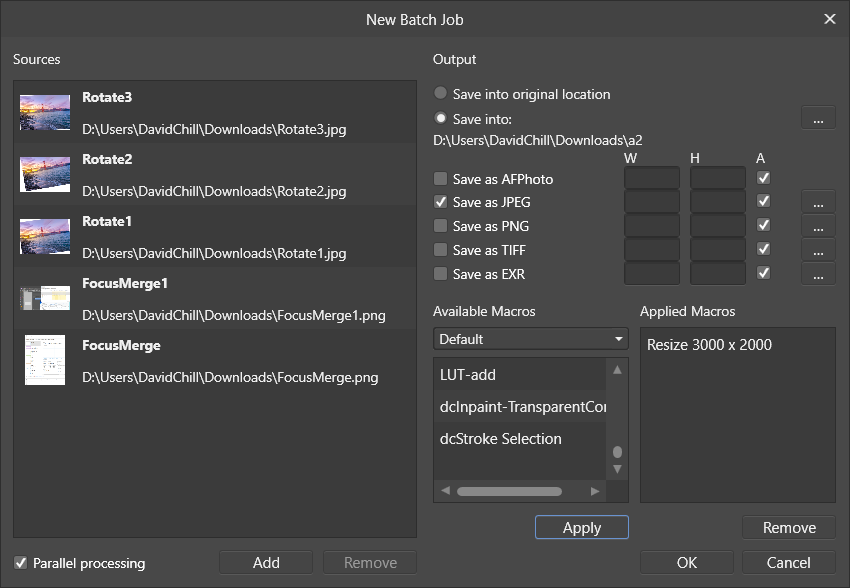
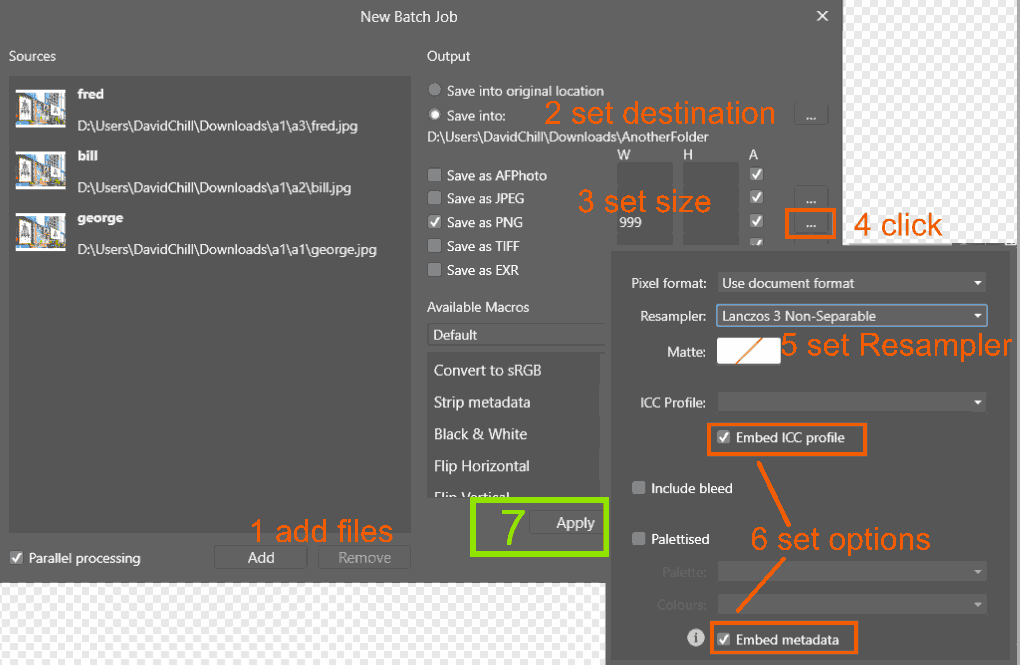
For the images below 3000 x 2000 you could try upsizing with max(w, 3000) max(h, 2000) and Lanczos 3 resampler Upsizing is a bit hit/miss depending on how much you are upsampling, the image content and what level of quality you find acceptable If you don't get acceptable quality with APhoto then you could look at something clever like Topaz Gigapixel AI
-
Look up 'Expressions for field input' in the help. On Windows it's here https://affinity.help/photo/English.lproj/index.html?page=pages/Workspace/expressions.html?title=Expressions for field input and quite a challenge
-
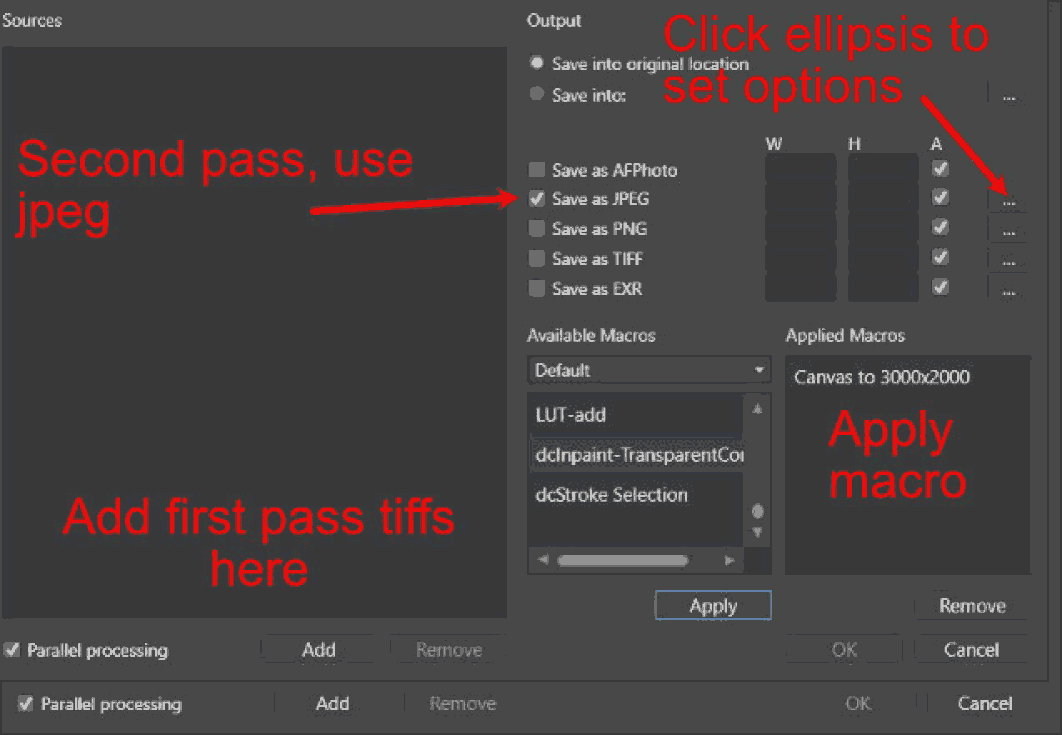
Nope, AP can do it after all Enter these expressions min(w, 3000) min(h, 2000) into the boxes on the batch job. The first pass will resize the images to these constraints. Then a second pass to resize the canvas with the attached macro. I've tested this approach on landscape, square and portrait images and it works well CanvasTo3000x2000.afmacro
-
My weapon of choice would be Photoshop Javascript but..... If the images are smaller than 3000 x 2000 then this macro and a batch job will work but the original image will not be resized If they are latger they will be cropped Resize3000x2000.afmacro
-
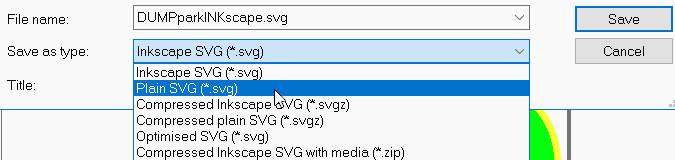
Try saving as a Plain SVG in Inkscape, you don't get all the Inkscape clutter
-
Another suggestion, change the title to something like Focus Merge causes C drive to fill up to 100%
-
Try Googling personabackstore.dat , apparently it's used when the ram is full but your memory usage shows 64 - 66%. How about checking how much memory Photo is allowed, if this is too low it may explain why the program is using the disc?
- 18 replies
-
- 1
-

-
- affinity photo
- cpu 100%
- (and 1 more)
-
If you open an Affinity exported svg with a text editor you'll see this <svg width="100%" height="100%" Try changing it to the size you actually need eg <svg width="10in" height="254mm"
-
According to this the temporary files are written to %appdata%. Can you enter %appdata% into a file explorer window and see where it goes? Can you then go down to the Affinity area \AppData\Roaming\Affinity\Photo\1.0\autosave, click properties and see that it is on your L: drive which would confirm that the symlink is working Apart from that, your system has 12 GB of ram so it should not need to write temporary files at all I have just done a 7 image focus merge using tiff files 31.8 MB, 4609 x 2244 pixels each. The process took 7 seconds, nothing was written into windows/temp which I have relocated to the D drive, the autosave folder showed a file of 0 bytes. The CPU briefly hit 100% but the C disc usage didn't go above 0
-
Yes, I saw that but any colour change without creating a new object will have the same effect. If you click on a shape then change colour without creating the shape the new colour fill will be applied to the selected Image Layer. Same thing with the Pen. It'll be interesting to read Serif's feedback
-
I may have misunderstood but if the images are completed and you are only opening them in Photo to resize and save as png then this can be automated by a Batch Job
-
Do what I do, cheat DonutRainbow.afphoto
-
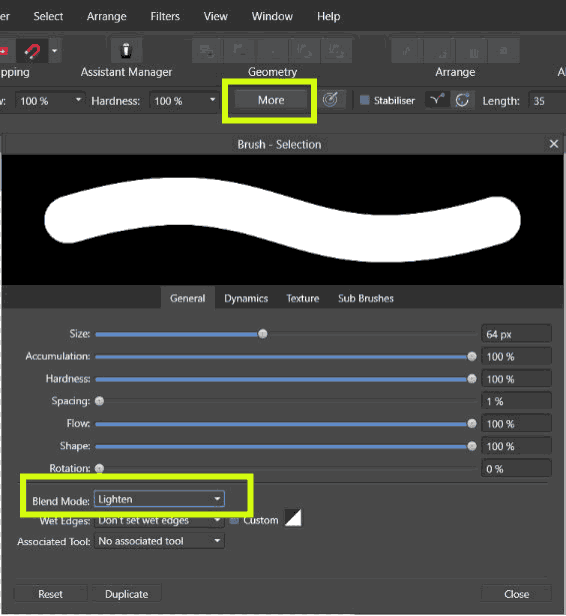
I can do that with the brush blend mode set to Lighten Try clicking More and checking the setting
-
After cropping, right click on the layer and choose Rasterise & Trim Or you can access the same choice from the Layer menu