David in Яuislip
-
Posts
1,642 -
Joined
-
Last visited
Everything posted by David in Яuislip
-

Affinity PHOTO export to .bmp *HELP*
David in Яuislip replied to Max Mitty's topic in Desktop Questions (macOS and Windows)
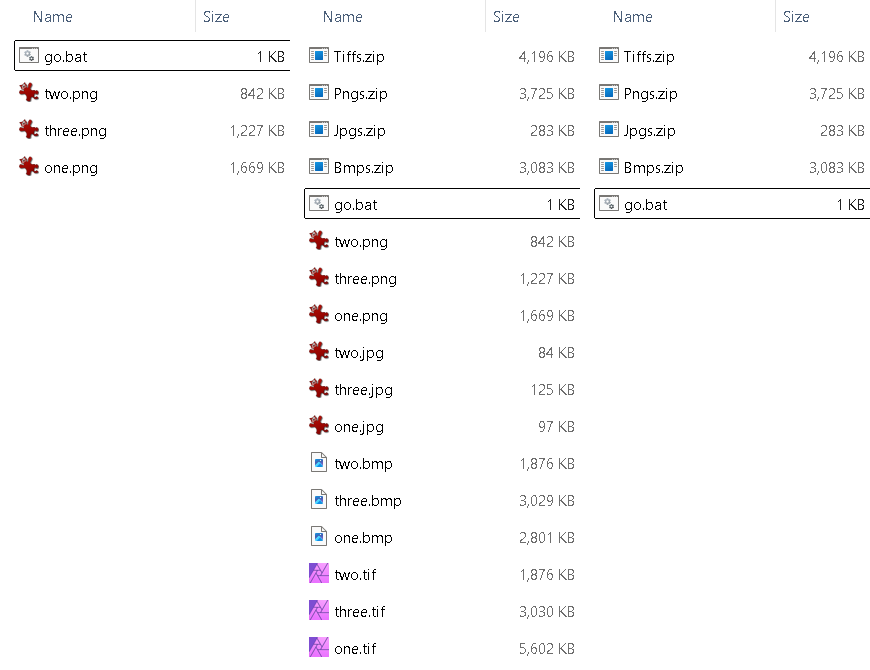
I would use Photo for what it's good at and other programs for what they're good at A simple batch file can take a single format from Photo, produce the other required formats, pack into zips and delete the originals. This example (windows bat) takes four seconds to produce 4 zips from 3 pngs @echo off magick mogrify -format tif -compress none *.png magick mogrify -format jpg -quality 70 *.png magick mogrify -format bmp *.png 7z a Tiffs.zip *.tif -mx9 7z a Jpgs.zip *.jpg -mx9 7z a Bmps.zip *.bmp -mx9 7z a Pngs.zip *.png -mx9 del *.tif del *.jpg del *.bmp del *.png Imagemagick is available for windows & mac, I use 7-zip and apparently there's a command line equivalent for macs called p7zip For what it's worth, in my notes "AllAbouAffinityPhoto.odt" I wrote: Cannot produce bmp or pbm - Need this for Potrace. Never thought I’d ask for bmp, the worst format bar none. Clipboard to Irfanview works, sheesh
-
Affinity PHOTO export to .bmp *HELP*
David in Яuislip replied to Max Mitty's topic in Desktop Questions (macOS and Windows)
It certainly is I would use imagemagick, you can either save to a file and convert it magick file.tiff file.bmp or copy to the clipboard and do magick clipboard: file.bmp -
Affinity PHOTO export to .bmp *HELP*
David in Яuislip replied to Max Mitty's topic in Desktop Questions (macOS and Windows)
"Desperate times calls for desperate measures" This works in Photo V1 Copy the image Paste Special DIB Go into View/Resource Manager Click Collect -
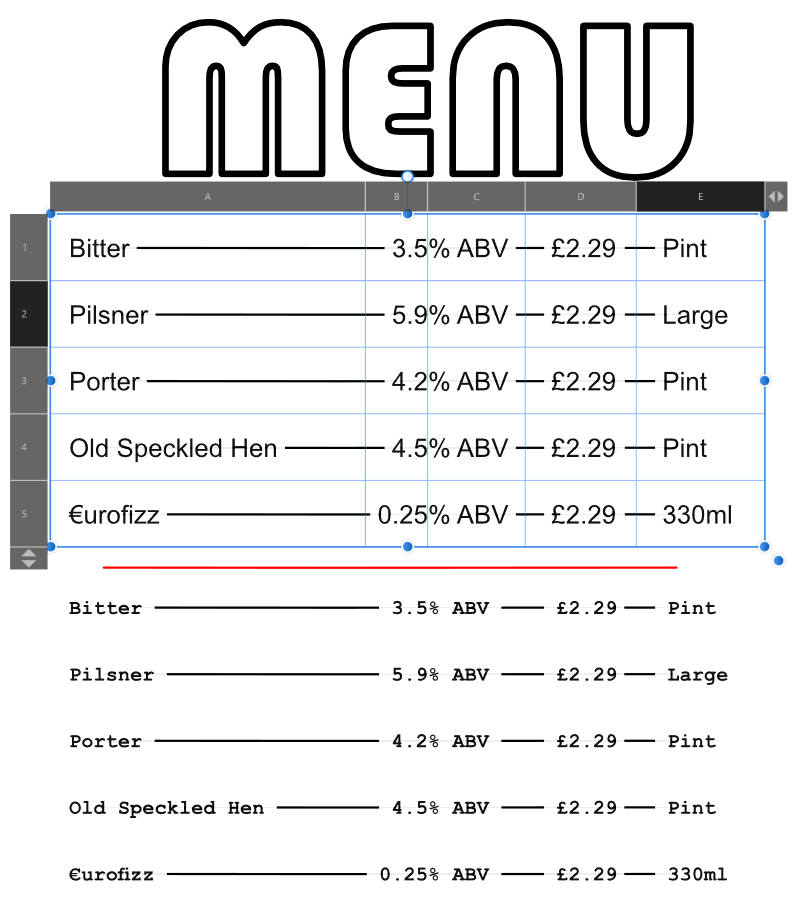
Similar to GarryP but I used a white background on the text with extra spaces to blot out the lines (curves) underneath. All lines identical as the red example BeerList.afpub
-
Aha, you started from a better place than me then. To be honest, it's not that bad a job once you get into the swing of what to look for. I tried using Inkscape but it found about 4 million clipping paths and wouldn't respond I'm glad I don't do this for a living
- 20 replies
-
- 1
-

-
- import
- affinity publisher
- (and 3 more)
-
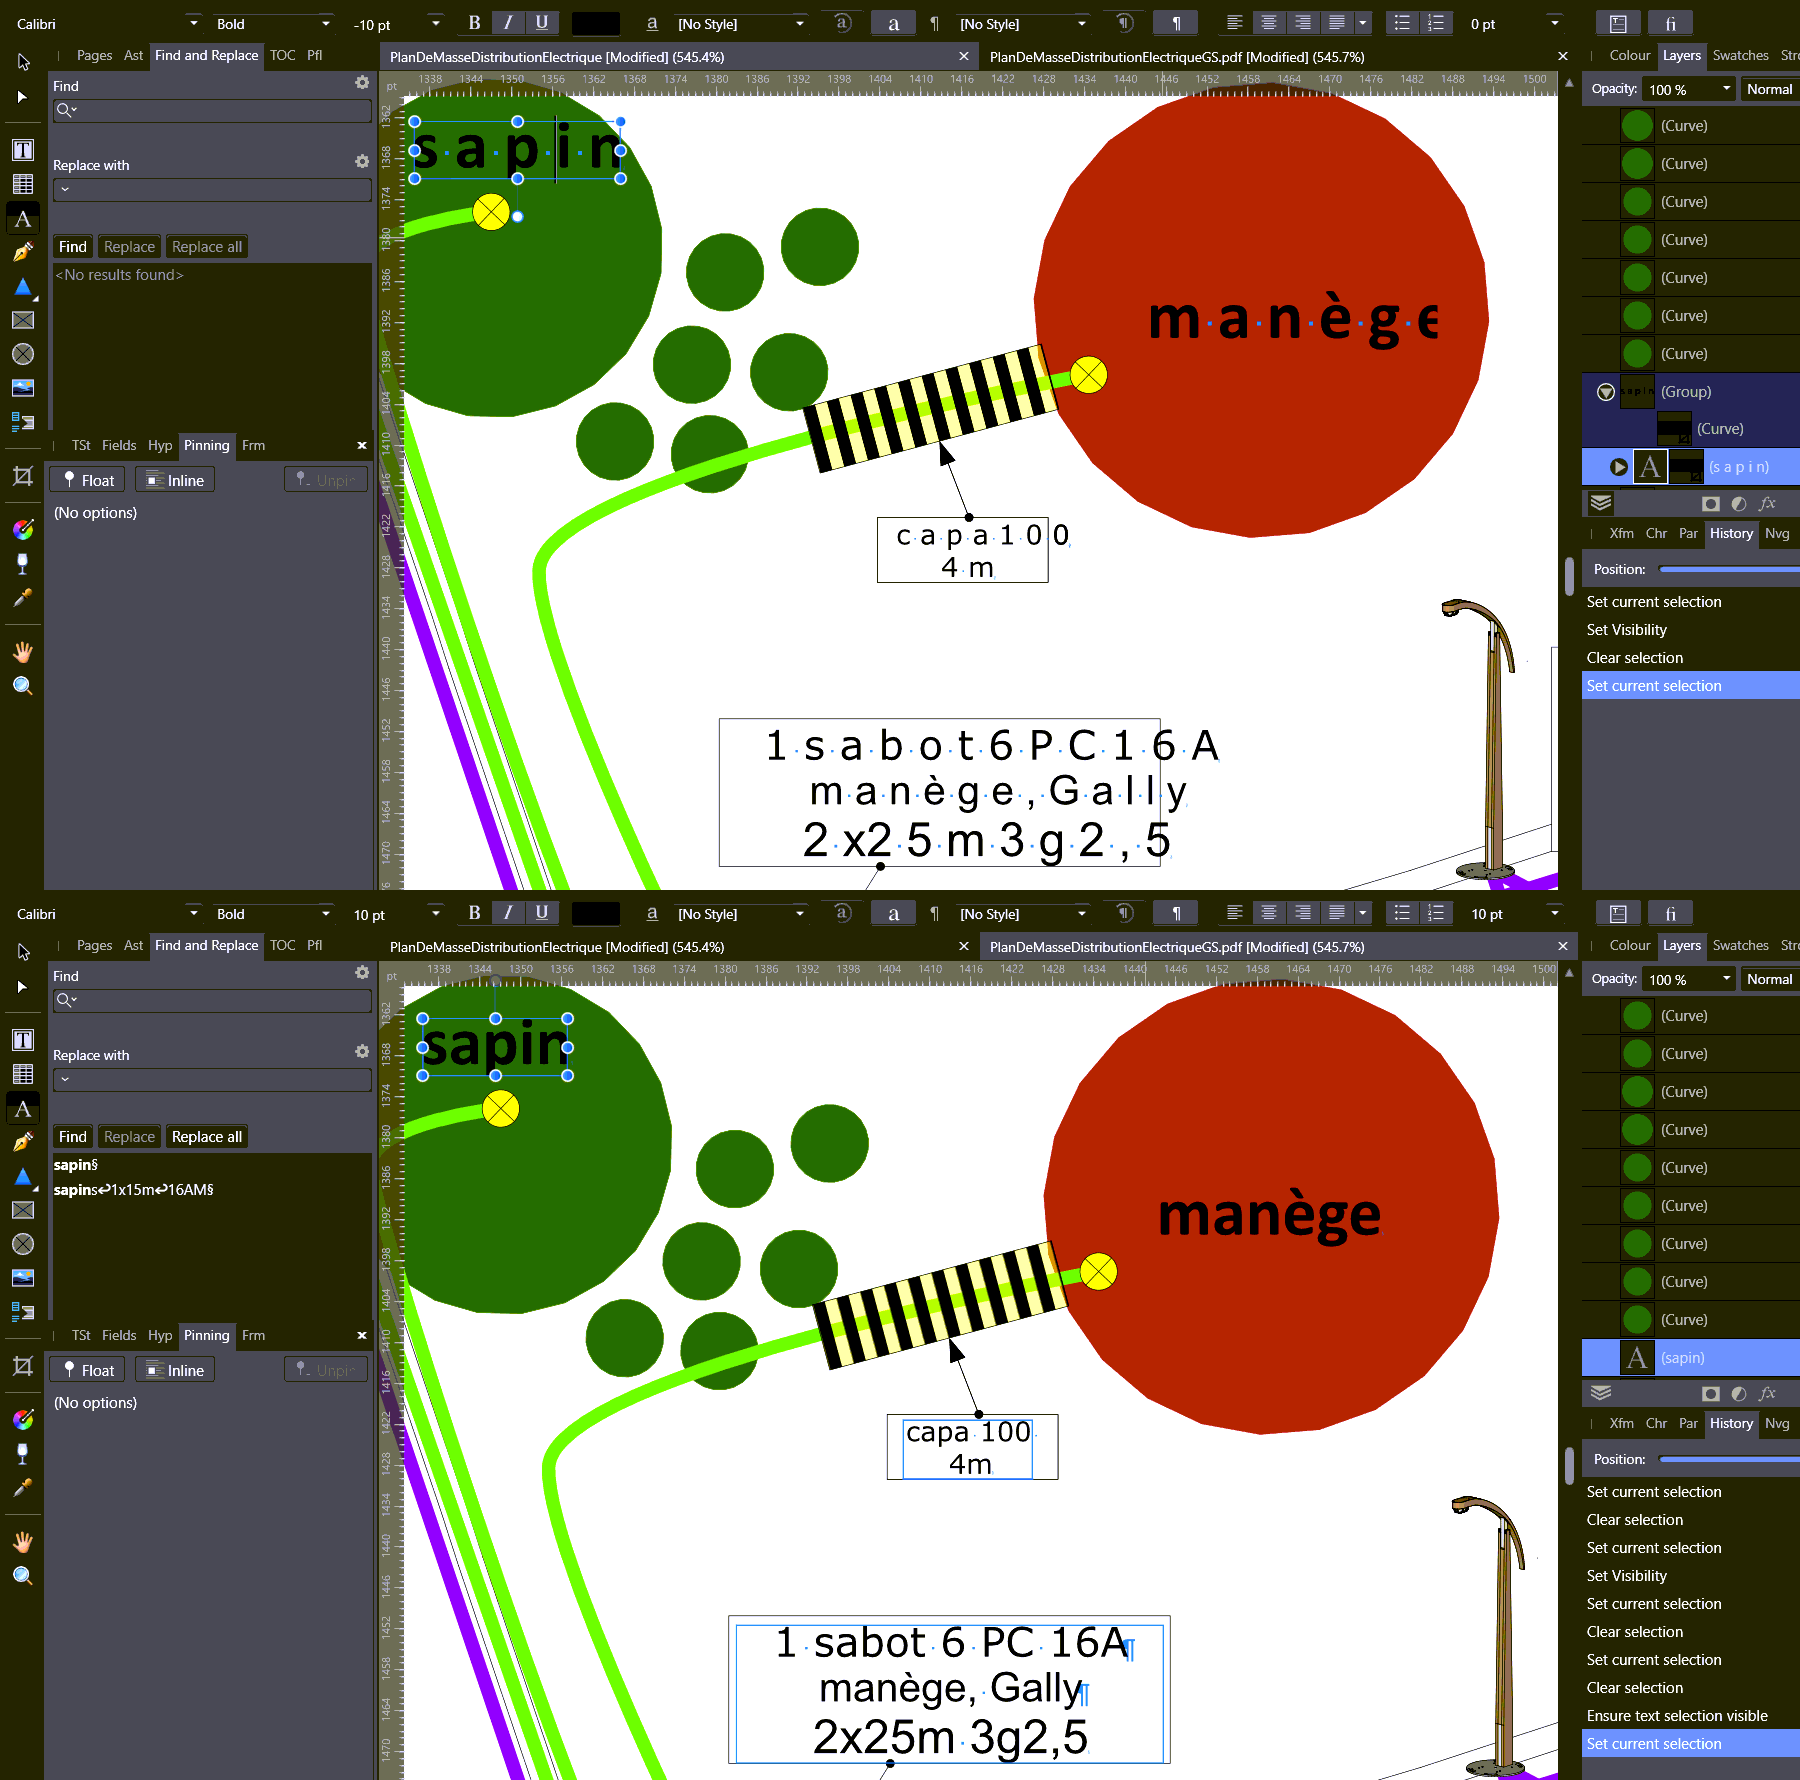
The main problems I noticed using Publisher V1 were: additional spaces between letters font sizes are negative cannot selecr text I used ghostscript on the file gswin64 -dSAFER -sDEVICE=pdfwrite -o PlanDeMasseDistributionElectriqueGS.pdf PlanDeMasseDistributionElectrique.pdf which seems to have improved matters although there could be some gotchas that I've missed. I also replaced the bell bitmaps with svgs Probably a good thing that steveragon has Illustrator PlanDeMasseDistributionElectriqueGS-Pub.zip
-
When I use imagemagick on a photo tiff file I get Unknown field with tag 51168 (0xc7e0) encountered. `TIFFReadDirectory' @ warning/tiff.c/TIFFWarnings/927. I don't know what this means and the job runs ok, if I run the file through anything else eg Irfanview then there is no warning It looks like Ultraprint is over sensitive and barfs. At least you have a fix albeit tedious
-
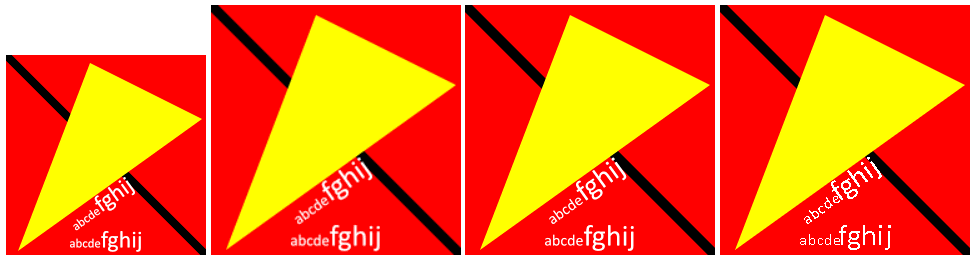
If your logo looks sharp in Affinity and ropey in the browser I would suspect that the browser is resizing the image because of OS display settings On this pc, windows is set to display 1920x1080px and the scale is set to 125% Accordingly, images displayed in Chrome are 25% larger than they should be so some extrapolation and degradation happens Looking at the images below 1) 200x200px with css zoom:0.8 to cancel the 125% system scale so it appears at the correct size 200x200 on the screen and is sharp 2) same image as 1 but no zoom so the image displays at 250x250 and some softening is evident 3) 500x500px with css width:200px. This is displayed at 250x250 but there are plenty of pixels due to the oversize and the result is sharp 4) svg for comparison, this will be sharp at any size I would be careful about webp format if it's a logo with only a few colours and no gradient. You can use imagemagick, pngcrush or similar to reduce the number of colors in a png and this will likely produce the smallest files eg bytes file 3104 logo200IM.png 4713 logo200Q90.avif 5976 logo200Q90.webp 6227 logo200AP.png 7799 logo500IM.png 18598 logo500AP.png Image is also zipped in case this site mangles it logos.zip
-
Convert Format / ICC Profile
David in Яuislip replied to boelens218's topic in Desktop Questions (macOS and Windows)
No. I've been through this exercise using a Profoto source: Original from PhotoLab 778,093 Profoto.jpg PhotoV1 conversion to srgb 895,751 ProfotoAP-srgbExport.jpg 895,751 ProfotoAPconvertedBPC.jpg 895,751 ProfotoAPconvertedNoBPC.jpg Histograms are identical, all files 100% quality jpeg, embedded icc profiles and metadata No difference demonstrated using imagemagick >magick ProfotoAP-srgbExport.jpg ProfotoAPconvertedBPC.jpg -metric RMSE -compare -format "%[distortion]" info: 0 >magick ProfotoAP-srgbExport.jpg ProfotoAPconvertedNoBPC.jpg -metric RMSE -compare -format "%[distortion]" info: 0 -
How To Export Multiple Files At Once?
David in Яuislip replied to boelens218's topic in Desktop Questions (macOS and Windows)
If you use Photo for this purpose, each file must be opened then re-exported without metadata so for jpegs you risk degradation due to re-encoding If you use exiftool the file is basically copied to another but with the metadata removed, the actual image data remains the same. Something like exiftool -all= -r . will modify all files in the current and sub-directories. The dot at the end means current directory, the -r means recurse eg D:\DxOout\test>exiftool -all= -r -overwrite_original . Warning: ICC_Profile deleted. Image colors may be affected - ./next/P5060002exif.jpg Warning: ICC_Profile deleted. Image colors may be affected - ./next/P5070110exif.jpg Warning: ICC_Profile deleted. Image colors may be affected - ./next/P5070112exif.jpg Warning: ICC_Profile deleted. Image colors may be affected - ./next/third/P5060002exif.jpg Warning: ICC_Profile deleted. Image colors may be affected - ./next/third/P5070110exif.jpg Warning: ICC_Profile deleted. Image colors may be affected - ./next/third/P5070112exif.jpg Warning: ICC_Profile deleted. Image colors may be affected - ./P5060002exif.jpg Warning: ICC_Profile deleted. Image colors may be affected - ./P5070110exif.jpg Warning: ICC_Profile deleted. Image colors may be affected - ./P5070112exif.jpg 3 directories scanned 9 image files updated to keep ICC_Profile use exiftool -all= --ICC_Profile:all -r -overwrite_original . -
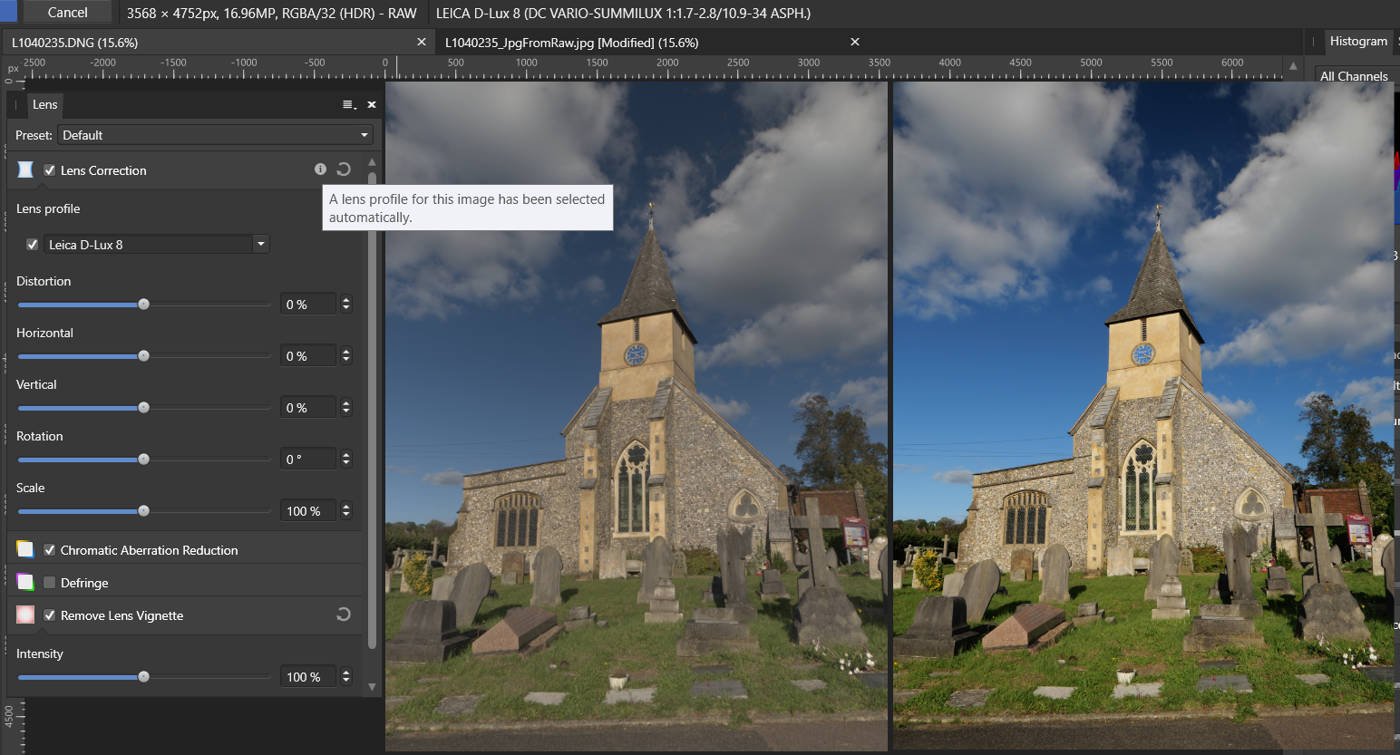
The issue here is that Photo does not recognise the camera. Try adding the attached xml to the Lens Profiles Folder and restarting Photo, it works for V1 For what it's worth, Microsoft Photo's doesn't read the dng but uses the embedded preview jpeg. You can extract this with exiftool -a -b -W %d%f_%t%-c.%s -preview:JpgFromRaw L1040235.DNG The adventurous can remove the jpeg from the dng with exiftool -a -b -W %d%f_%t%-c.%s -preview:JpgFromRaw= L1040235.DNG then Affinity will open the file but Photos won't D-Lux8.xml
-
Editing Metadata
David in Яuislip replied to Coco Below's topic in Desktop Questions (macOS and Windows)
By an amazing coincidence, I have just realised that I forgot to set up my newest camera which I've had a couple of years. exiftool came to the rescue >echo %time% 12:40:53.93 >exiftool -artist="David" -r -overwrite_original . 9 directories scanned 164 image files updated >echo %time% 12:43:12.46 so just less than a second each. On Windows I run the command from the highest level directory, the -r (recurse) processes the sub-directories. The command is exiftool -artist="David" -r -overwrite_original . the dot at the end is important and means current directory -
Cannot Select Lens Profile
David in Яuislip replied to rhythm.rubrics's topic in Desktop Questions (macOS and Windows)
That lens isn't recognised by Photo V1, another case of mistaken identity, but the attached lens profile fixes it. Whether you can add this to an ipad I have no idea but good luck Oly12-100ISpro.xml -
HIGH RES IMAGE PIXELLATION
David in Яuislip replied to BEN MOORE's topic in Desktop Questions (macOS and Windows)
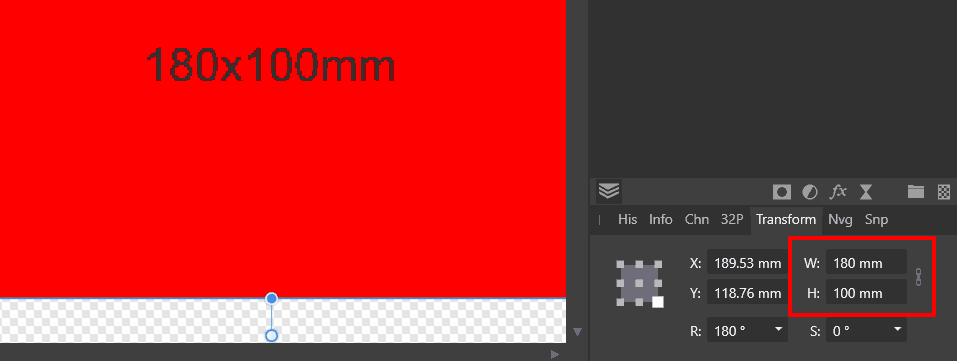
In Preferences/ User Interface ensure Decimal Places for Pixels is set to 6 After placing, resizing & rotating the emerald, check the Transform panel and ensure that the X,Y,W,H values are all integers rounding as necessary When exporting choose Resample Bicubic The file is zipped so that the forum doesn't mangle it, it also shows the transform panel as placed before rounding PixelAlignedBicubic.zip -
Try this command, it removes the clipping paths but retains the Adobe98 colorspace exiftool -Photoshop:all="" _DSC1051.jpg Removing all metadata will remove the icc profile and Photo will assign srgb to an unprofiled image
-
try pdftk pdftk Shapes.pdf output ShapesNoMD.pdf drop_xmp verifed by exiftool D:\>exiftool Shapes.pdf -xmp XMP : (Binary data 1489 bytes, use -b option to extract) D:\>exiftool ShapesNoMD.pdf -xmp D:\> dir Shapes*.pdf 24/05/2025 10:28 2,801 Shapes.pdf 24/05/2025 10:32 1,170 ShapesNoMD.pdf
-
Problems opening scanned image PDFs
David in Яuislip replied to Shane-o's topic in Desktop Questions (macOS and Windows)
OP's file doesn't open in Publisher V1 either, however, in times like these my secret weapon is pdftk and a quick pdftk LT_Issue01_p31v02.pdf output LT_Issue01_p31v02pdftk.pdf produces a file that does work -
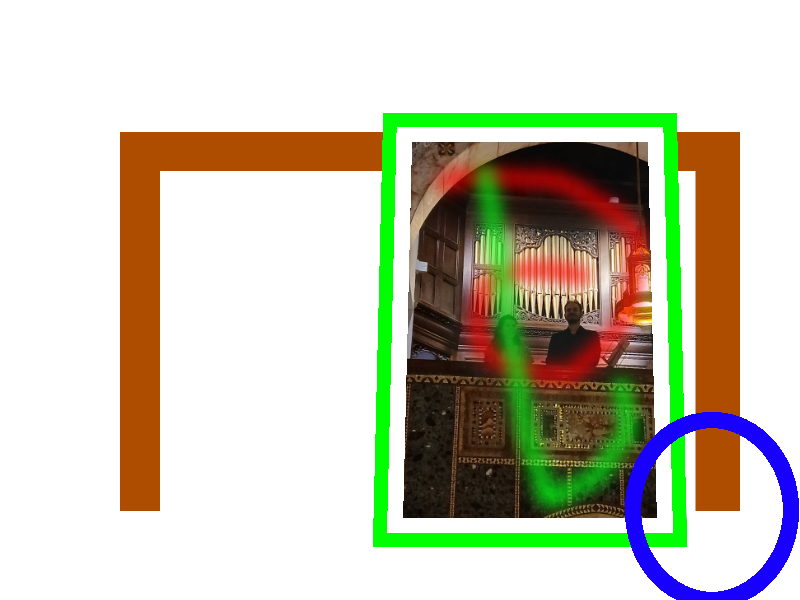
I can't read your files as I use V1 but I would take a different approach as the macro copy/paste is not going to substitute images as you need Use Photo batch to produce picture files of the correct size with the perspective applied Produce seperate files for the background and foreground. I've used a frame in front of the picture, you may prefer to have the frame as part of the background with the picture on top but that will need more accurate positioning Use imagemagick to stitch them together, the example was made from 4 files This command should be a good starting point magick background.png -draw "image over 386,126 0,0 picture.png" frame.png foreground.png -background none -alpha set -flatten result.png The 386,12 represents the x,y dimensions from the top left, adjust as necessary as I used an image 800x600px Then you'll need to use a shell script appropriate for your OS, using windows it'd be a simple bat file with a loop Good luck
-
Designer :: Post Script Type 1 Support
David in Яuislip replied to influxx's topic in Desktop Questions (macOS and Windows)
Whilst I agree with your statement from an ethical standpoint, I would not like to be in a courtroom against Adobe or Monotype -
Designer :: Post Script Type 1 Support
David in Яuislip replied to influxx's topic in Desktop Questions (macOS and Windows)
Fontforge can certainly convert .pfa/b files with or without the .afm's I don't know how accurate the conversions are as I have no way of installing Type 1's It's pretty quick, if using the GUI it takes about 10s per font If using the command line in a batch file whole folders can be converted at about 3 fonts/second Definitely worth trying as long as the licence permits conversion -
It doesn't open in Photos here but if I remove the history by exiftool -history*= IMG_0347.jpg then it does. Weird or what? Photos really is a nasty scab on my hard disc
-
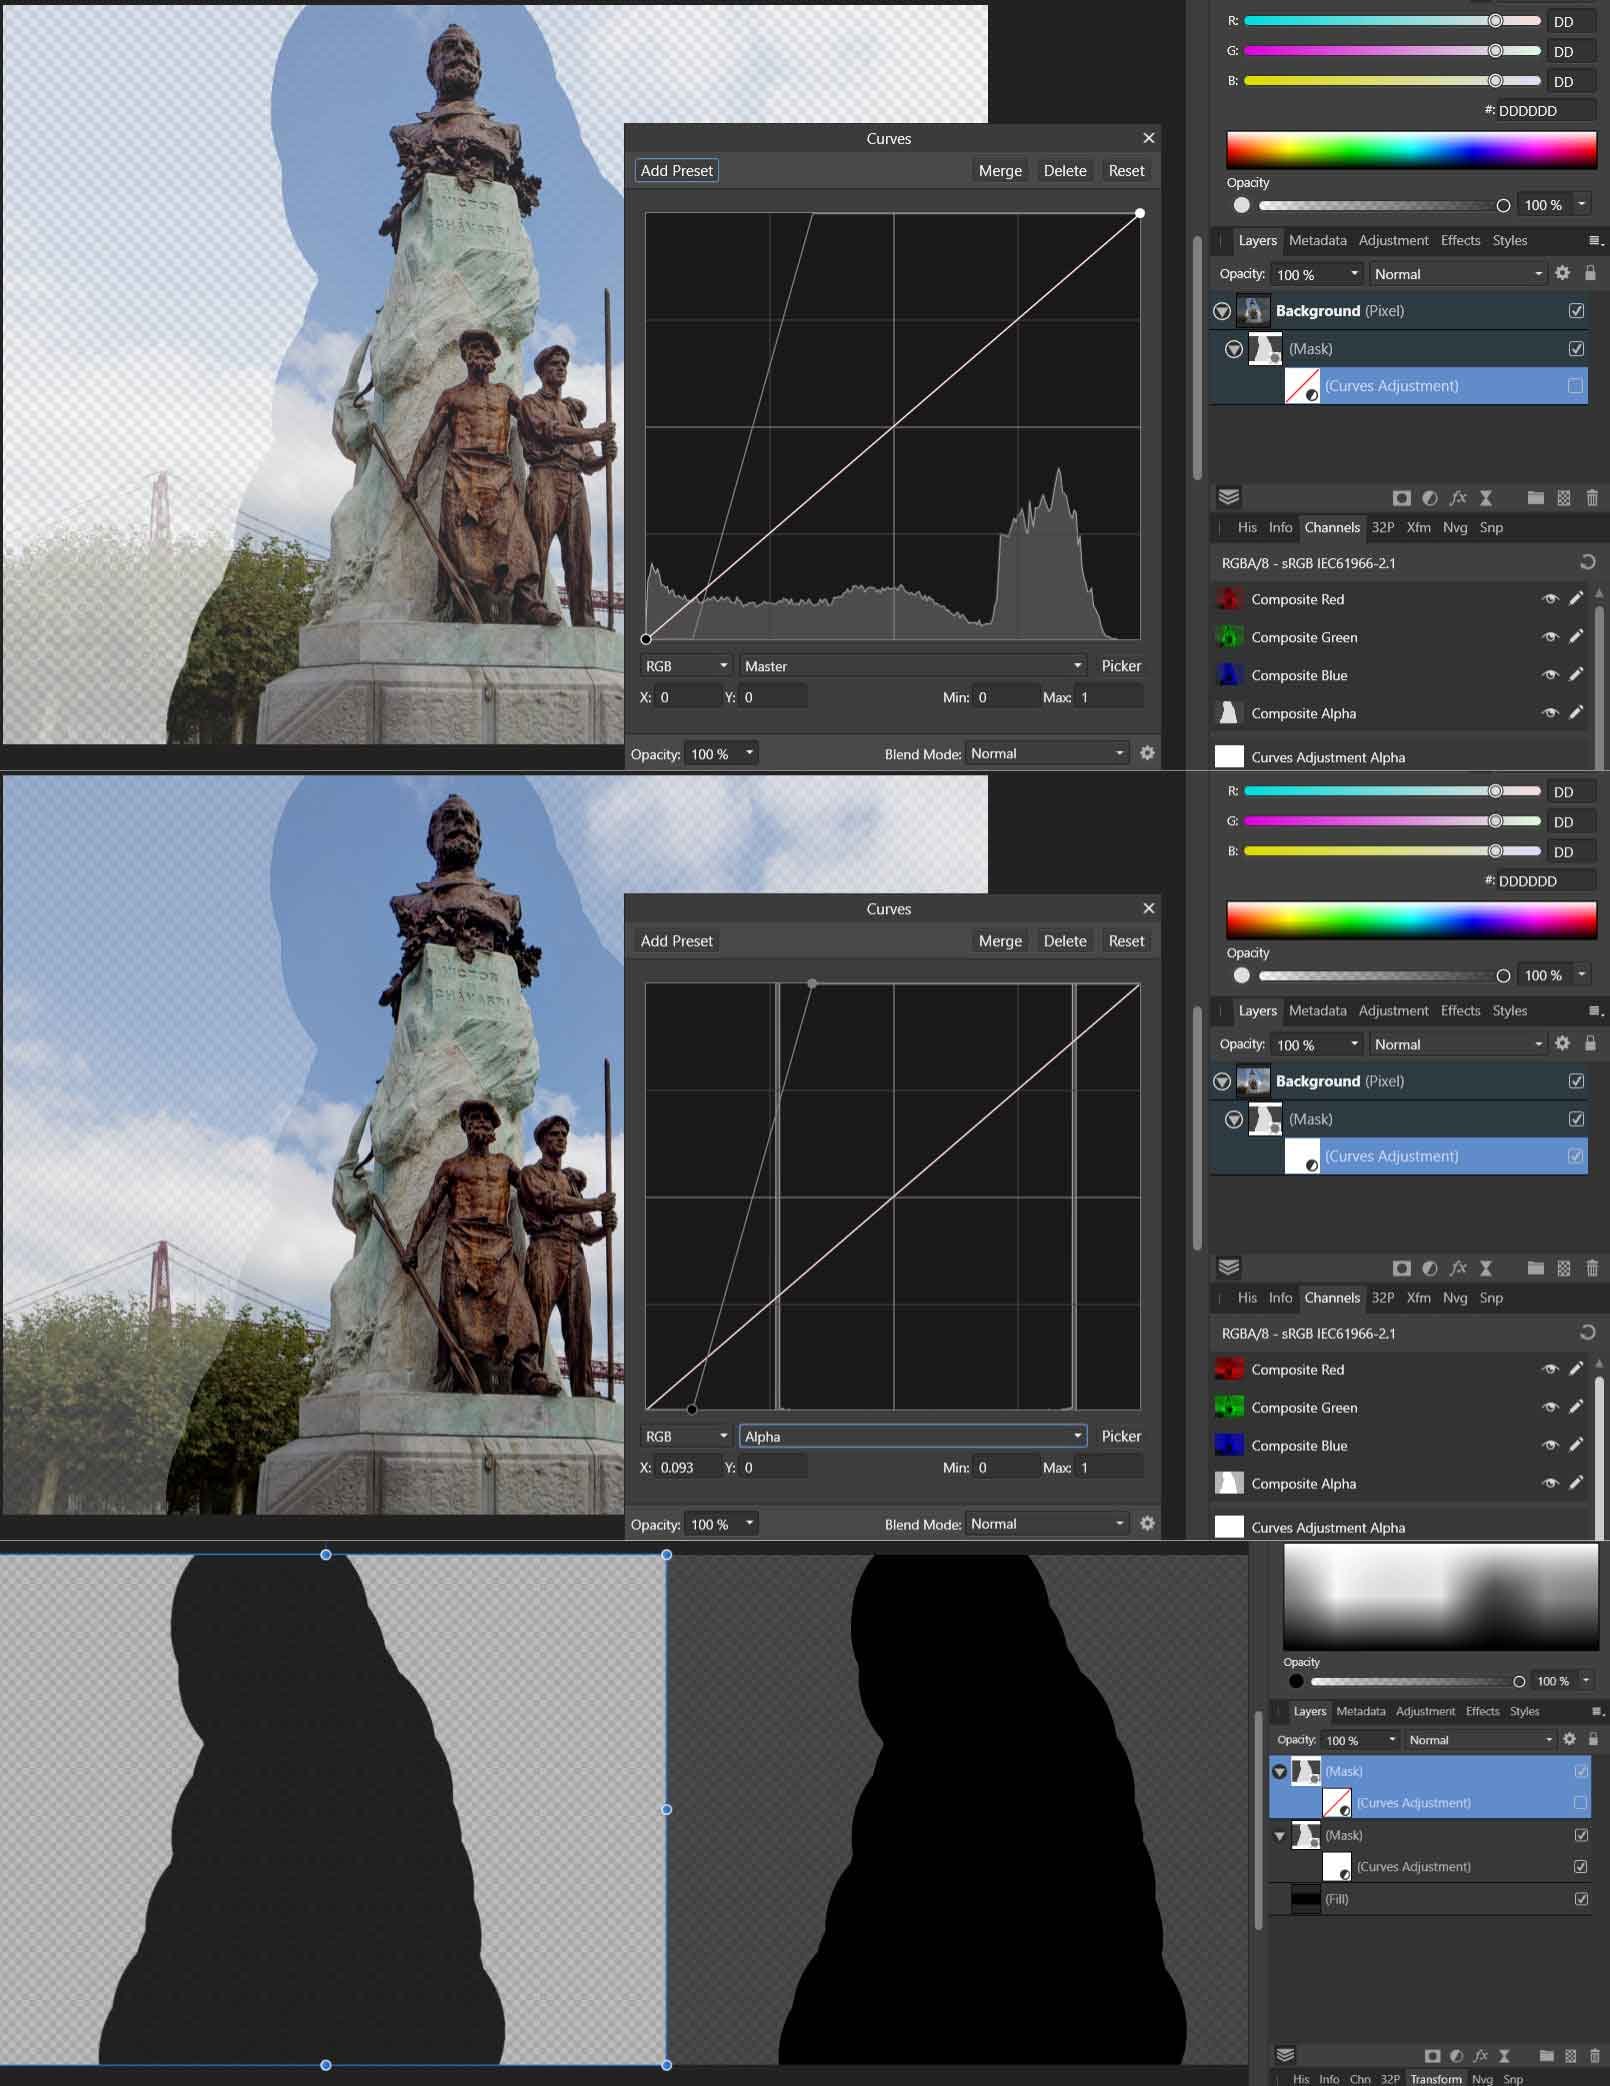
If you add a curves layer to the mask, select the Alpha channel and adjust the curve you'll change the contrast of the mask
-
Affinity & file types
David in Яuislip replied to Grenpara's topic in Desktop Questions (macOS and Windows)
Libre Draw can be used from the command line e.g. soffice --convert-to pdf *.pub will process a folder. Whether it's as good as an export from MS Publisher I don't know but it's much quicker -
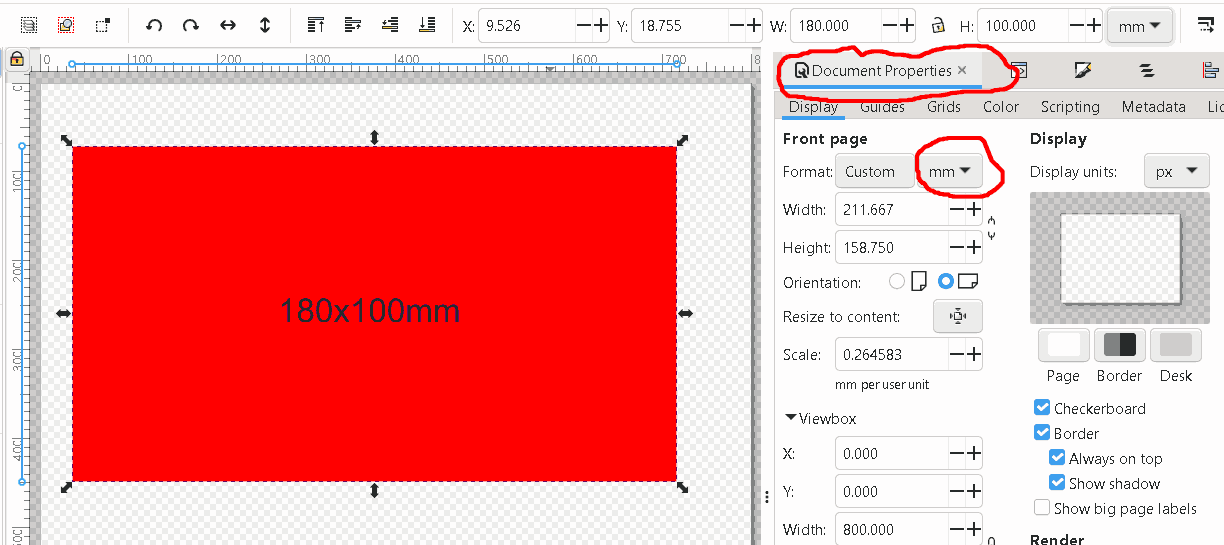
Set the document units to mm in Inkscape and it should open ok in Affinity
-
How to anti reflect
David in Яuislip replied to janjan334's topic in Desktop Questions (macOS and Windows)
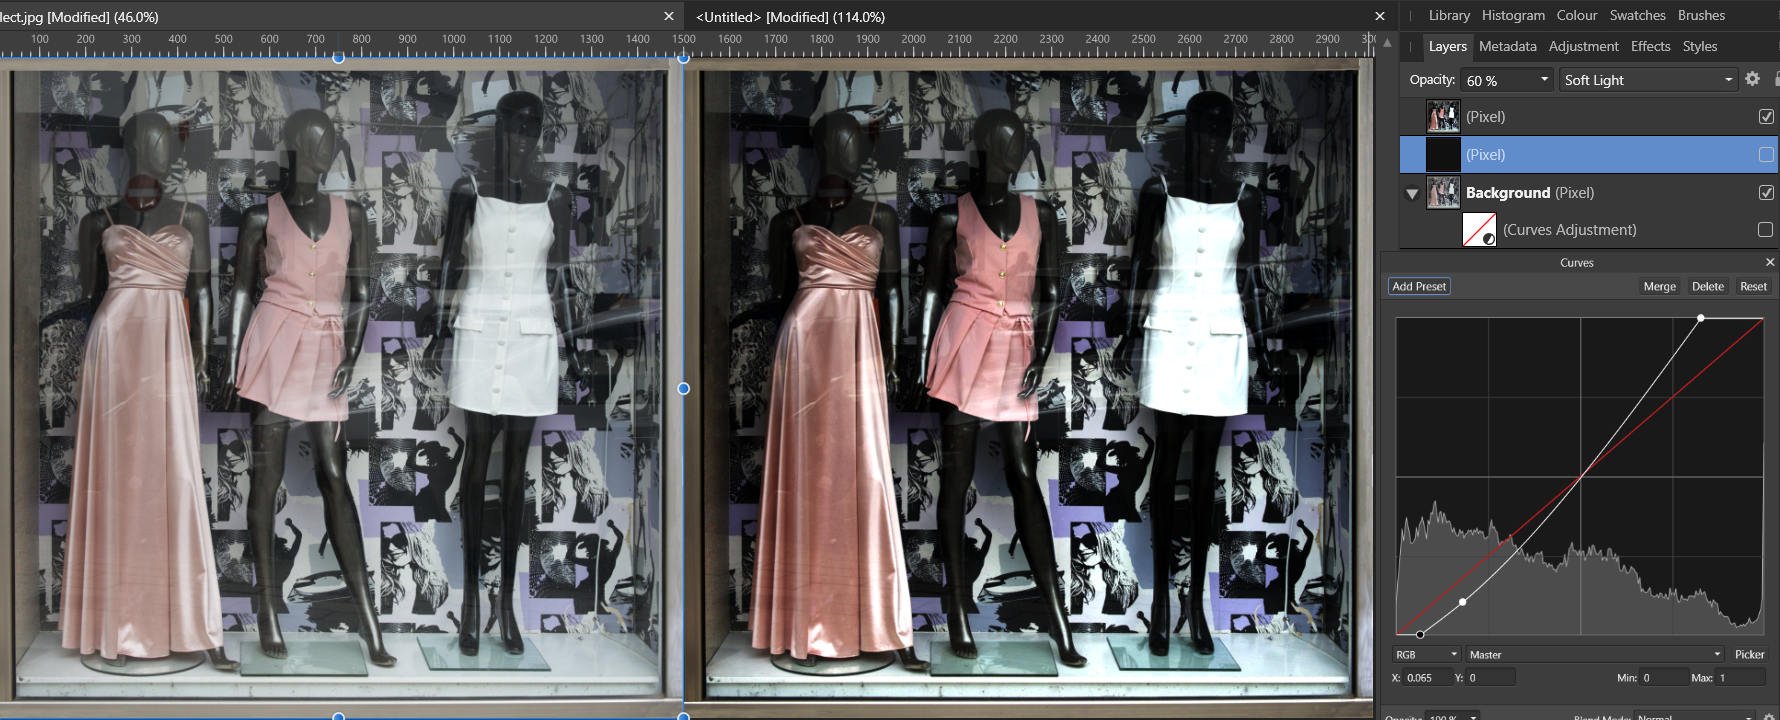
Black layer on top, soft light, reduce opacity Curve layer, use an info point and wind up the highlights until the white dress is white. Use the picker to pull down the red of the no entry sign Can't make a silk purse out of a sow's ear though Usually better to take the shot from an angle and fix distortion afterwards rather than straight on and try to fix reflections. Plus a polariser of course, one of the filters that computers can't emulate