Our response time is longer than usual currently. We're working to answer users as quickly as possible and thank you for your continued patience.
Search the Community
Showing results for tags 'print'.
-
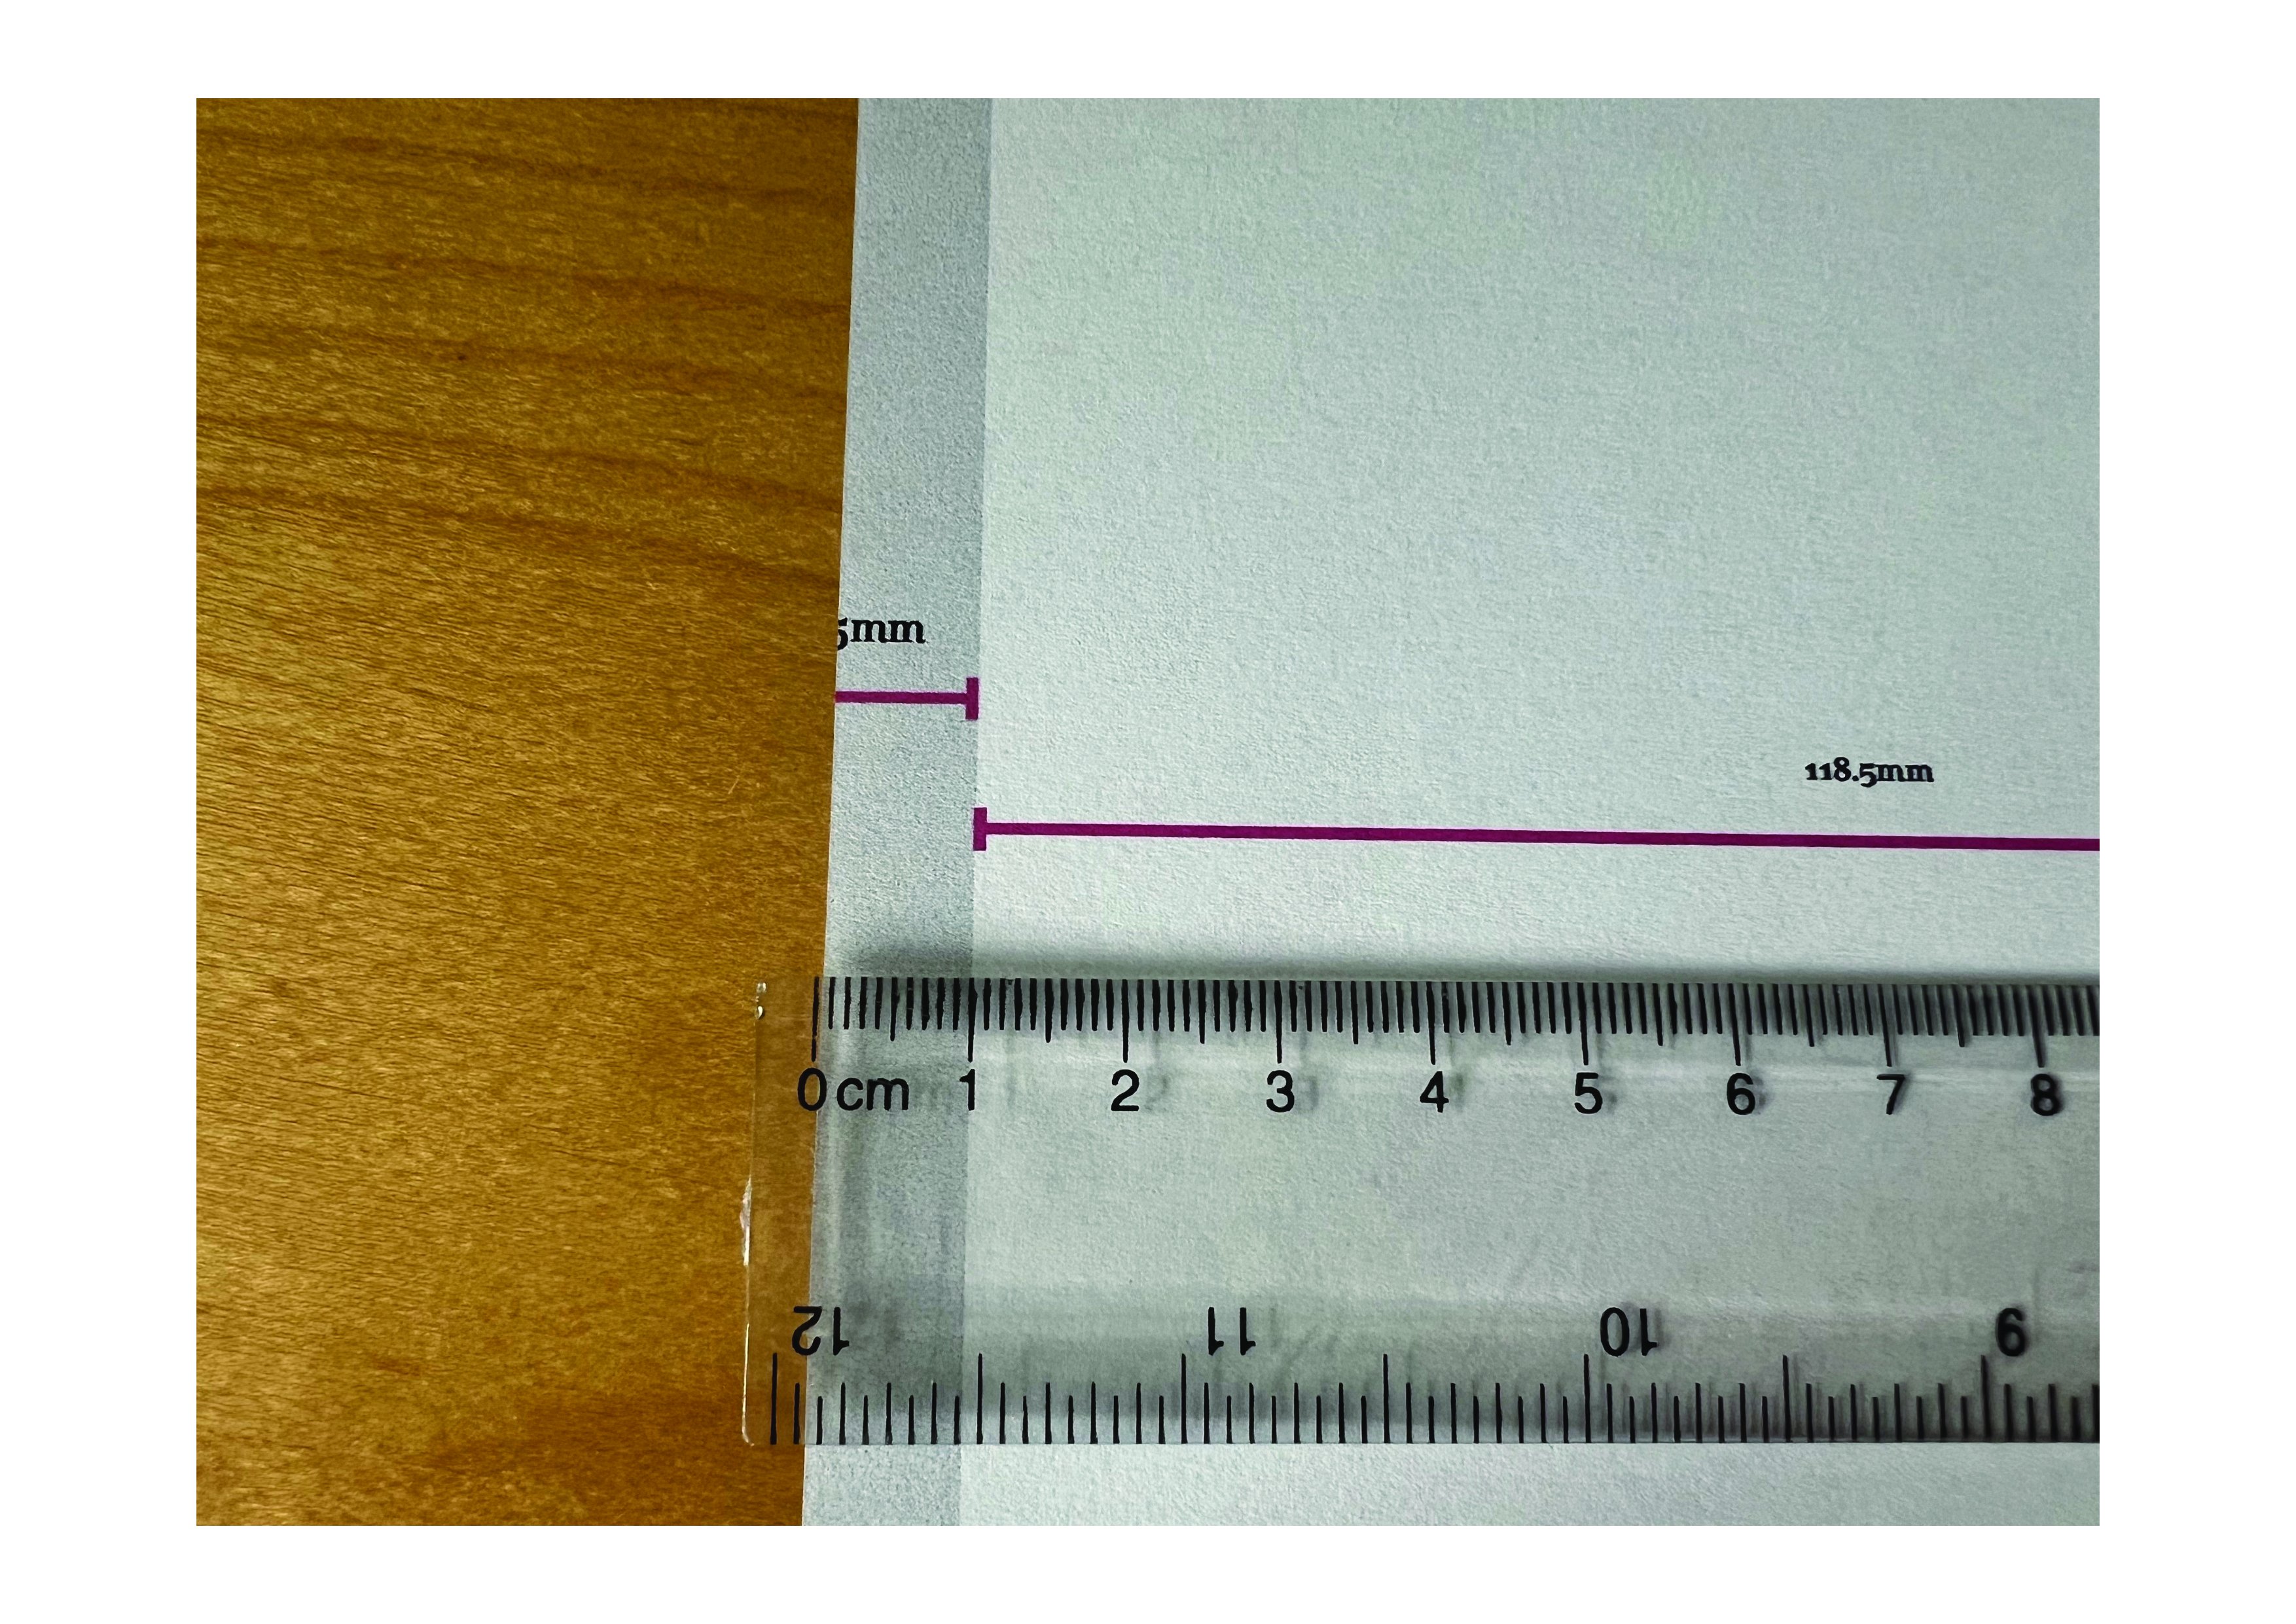
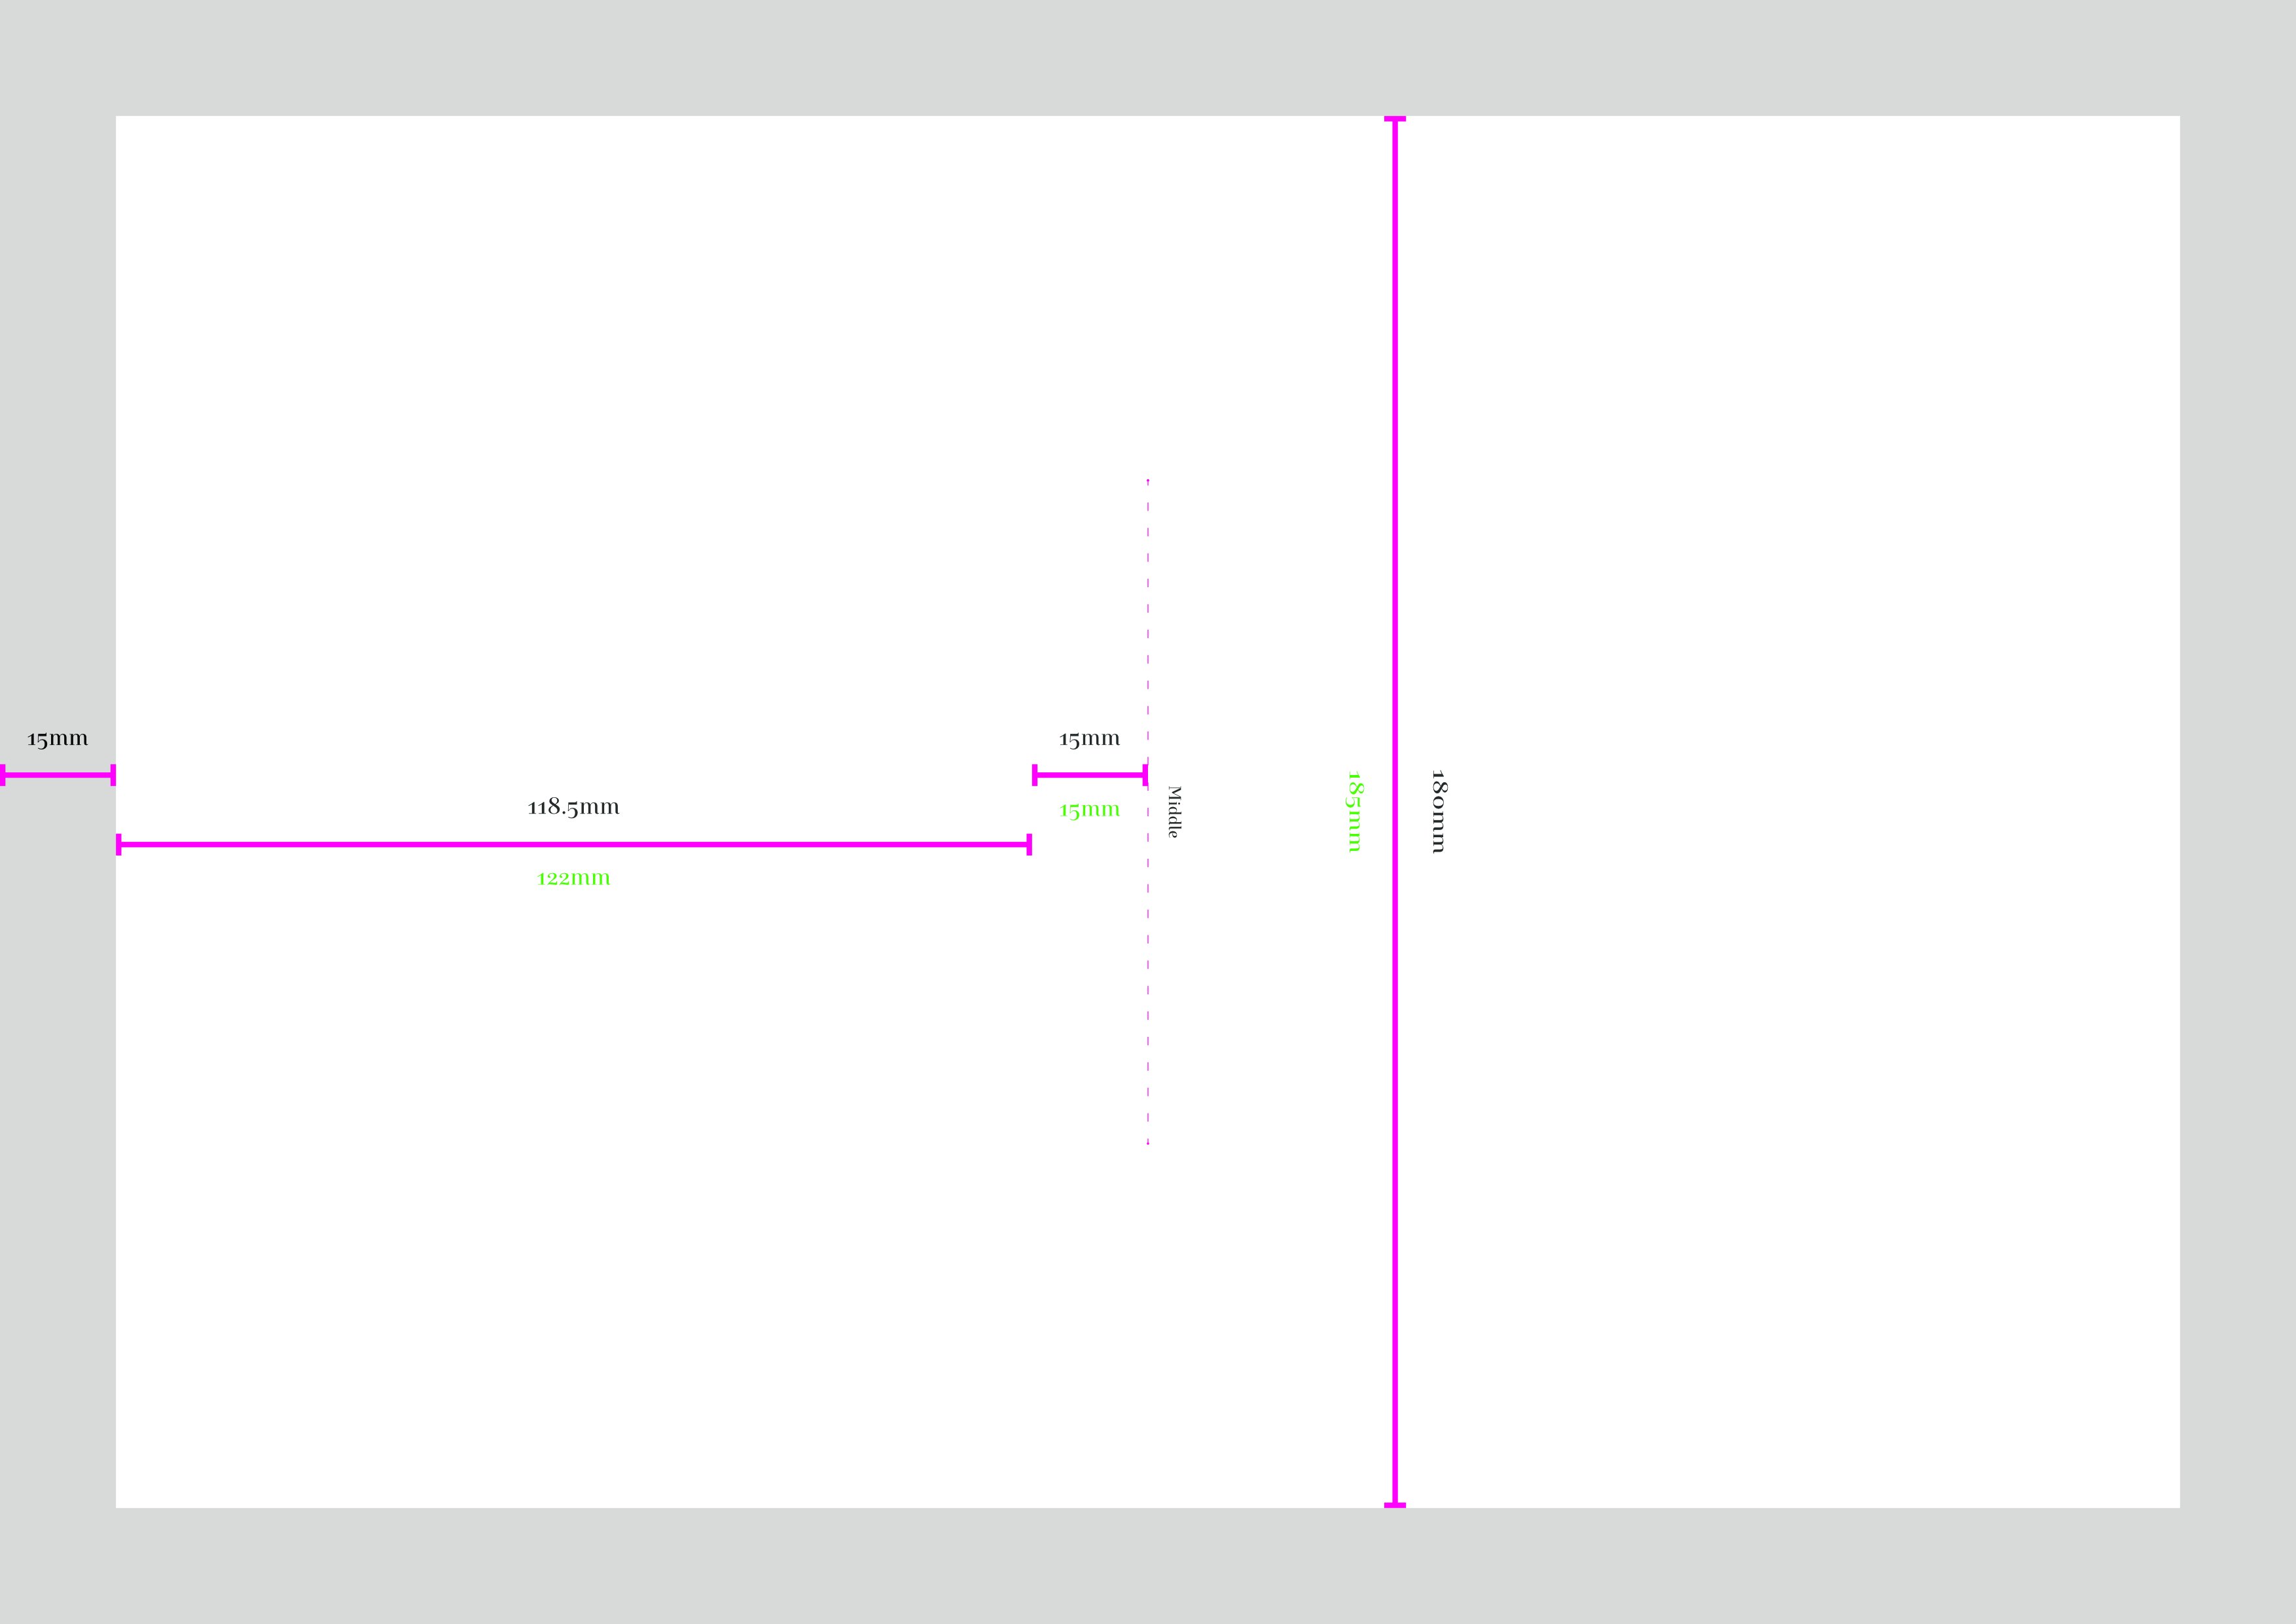
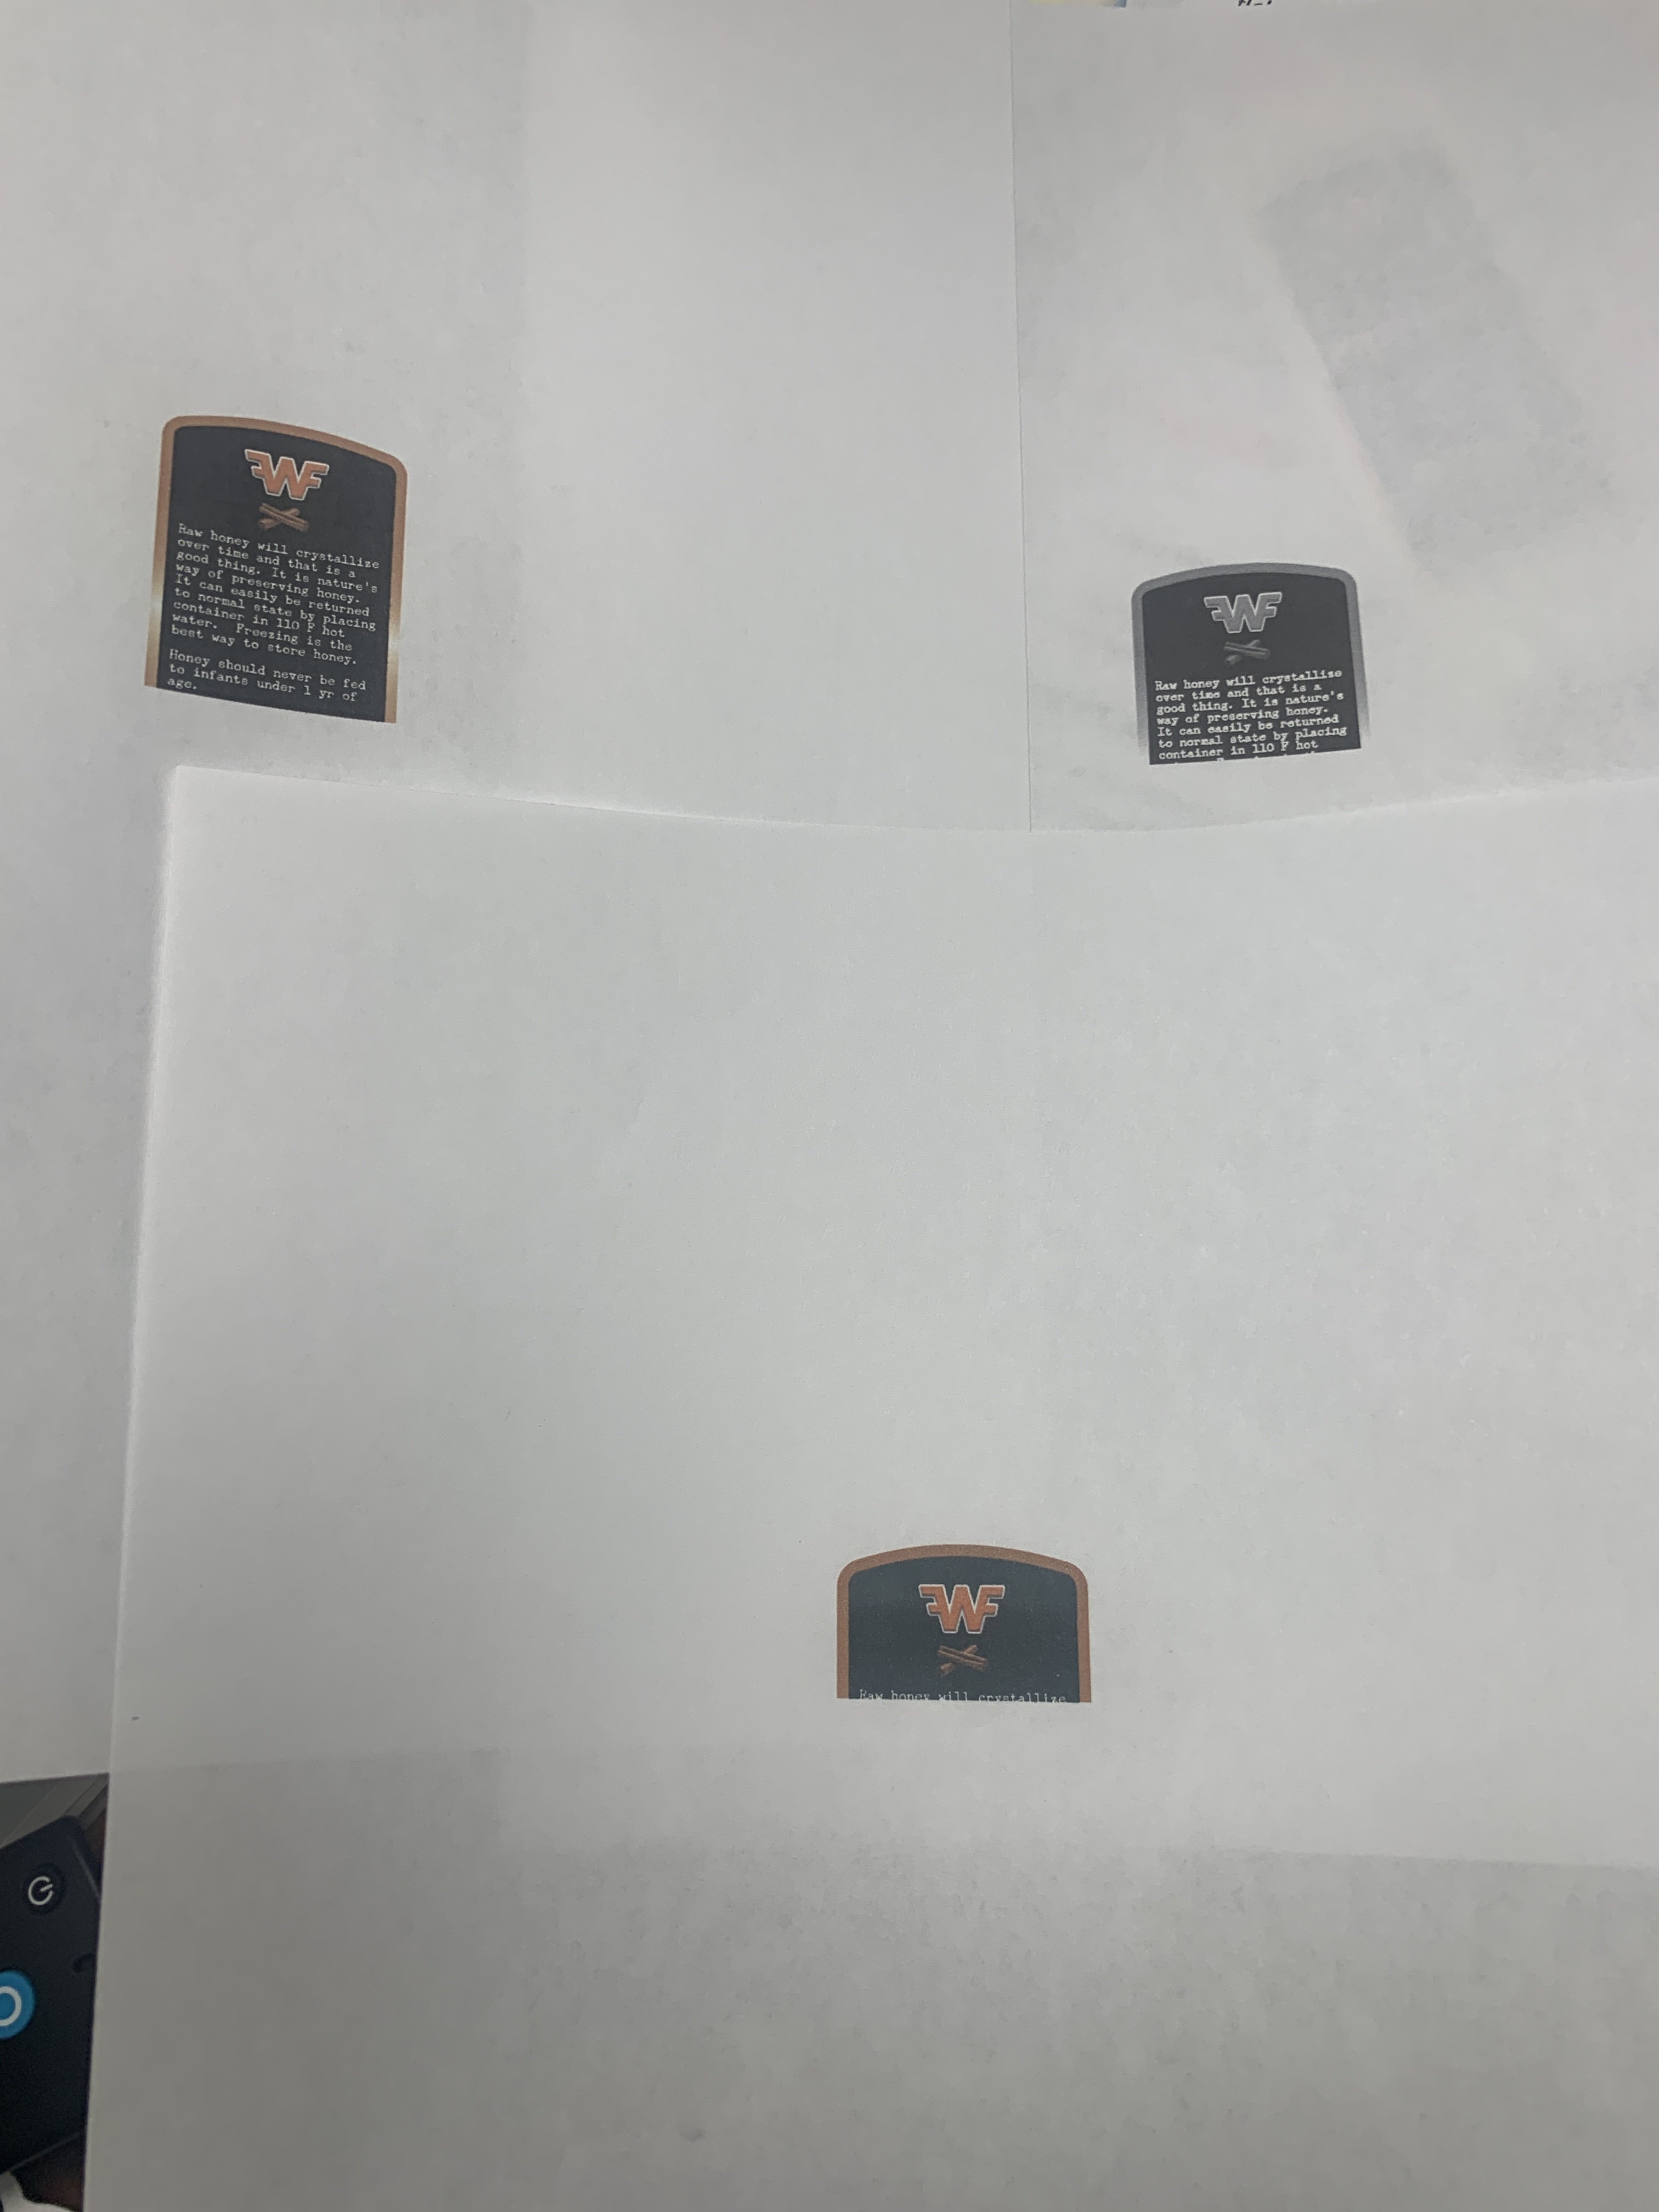
 I’ve created a design in Affinity Publisher on a standard sized A4 landscape setup and want to print it using the borderless setting on my ET8500. When I go to print it however all my measurements seem to get thrown out. I appreciate it has to print over the edge of the page in order to achieve the “borderless” print at home without oversizing and trimming down to size but the results are really odd. I think also the overprint on the left edge being 5mm seems like a lot. The overprint on the edges appears to be Left 5mm, Right 3mm, Top 2mm, Bottom 2mm. Only some of the measurements I outlay in Publisher don’t translate to be the same once printed either which is odd. You’ll see in my pictures that I’ve labeled some lines with their measurements (in black) as done in Publisher but then once printed they are different. The numbers in green on my image are what they come out as once printed. The grey border for reference should be 15mm all around from the edge but comes out as follows: Left = 10mm Right = 12mm Top =13mm Bottom = 13mm My print settings are set to 100% with no scale to fit options etc. When I export to a PDF or JPEG etc it all comes out fine or even print to PDF. Just a little confused as to what’s happening here and if there is a way to improve my results so there’s less overprint at the edge of the sheets as I am folding these sheets and elements in the design are coming out not in the middle of the pages. Hope all that makes some kind of sense! Thanks for the help and advice and can send more pictures etc if needed to clarify.
-
 Hello Is there a way in Affinity Publisher to print specific pages, each in different quantities? What I mean, I want to print labels for products, depending on customer orders. For example: I may have 100 labels, each on a separate page and I need to print 8 labels from page 3, 1 from page 12, 12 from page 46 and so on. I am looking for ways of doing this with just one click of a button and it all would be printed out.
 -
 I want to print a book in a manga format, that is, page order is inverted, so you start from the rightmost page, and the gutter should be to the right relative to the first page instead of to the left as usual. In the printing window there's a invert checkbox but that only inverts the order of the leaves Is there a way to do this?
 -
 I want to print 4 pages of A5 on one A4 sheet, so the A4 will be landscape but printed on a printer that prints A4 portrait. The trailing edge needs to be 16mm, the other edges 3mm. Using Facing Pages, Publisher allows me to set the outside margins at 16mm, but I will only want 16mm for the right-hand margin of the right-hand pages. The left-hand margin of left-hand pages needs to be 3mm. Is there a way of doing this? If not, can you please add the facility to the Facing Pages section?
 -
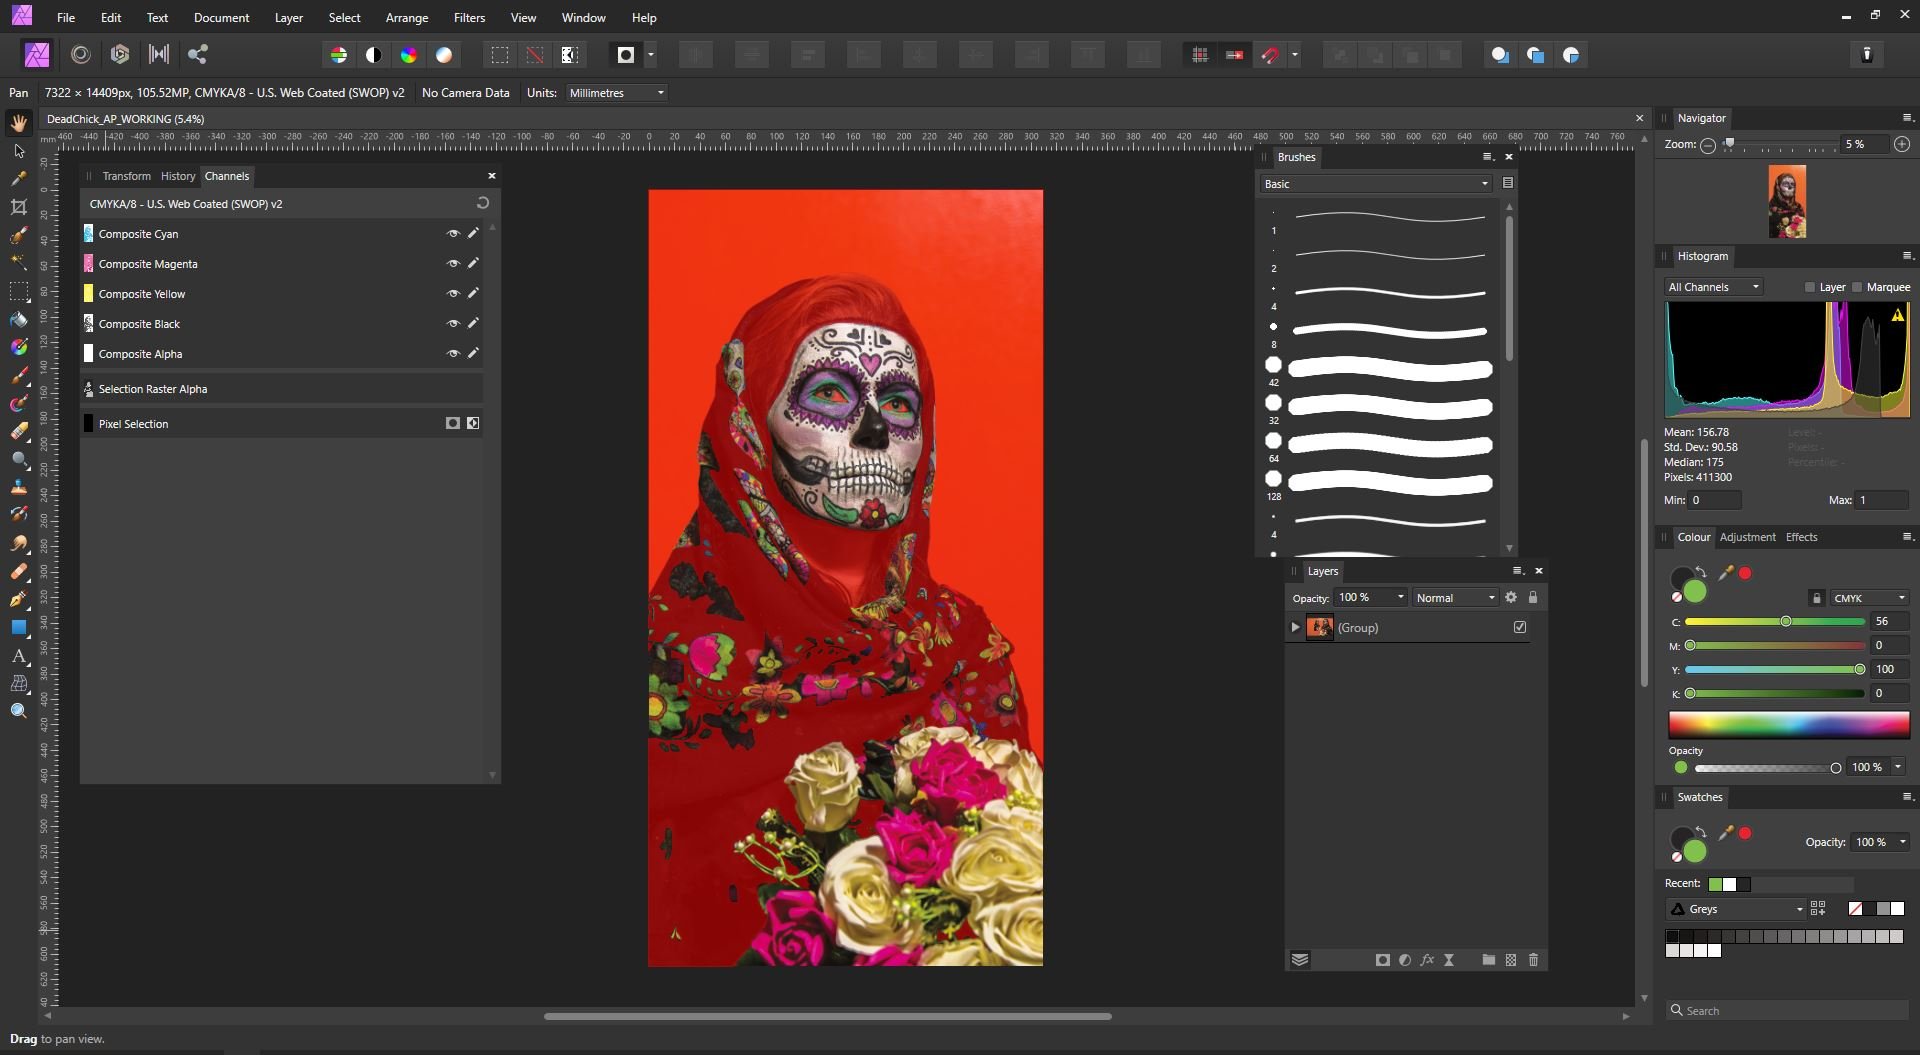
 Hey all, I'm struggling to create and export an Alpha Channel from Affinity Photo (v1.7.1.404) to a CMYK .TIFF image. The image has been masked out and I'm trying to make a named Alpha Channel to be used as a Spot Colour for digital print in an Onyx RIP (To be names 'Spot 1' which refers to a Spot White Ink). Please see the attached screenshot for the masked out area which I'm talking about. I've followed several other posts and YouTube/Vimeo video's and it's just not clicking for me. The image will export as a .TIFF but it won't export an Alpha Channel no matter what I try. Methods I have tried: 1. Mask out areas, on the 'Selection raster Alpha' channel, right click, and 'Create Spare Channel' and name it 'Spot 1' 2. In the layers under Adjustments, create and Channel Mixer and pull up the Alpha slider. What am I doing wrong? Thanks for your help!
-
Once I upgraded, I can't for the life of me to get my images to print a full image when printing. Sometimes it prints about 1/2"-1" worth of image and other times it prints closer to 1/2 of the image. I have zero issues is all other programs I have tried. Printer is HP OfficeJet Pro 6968
-
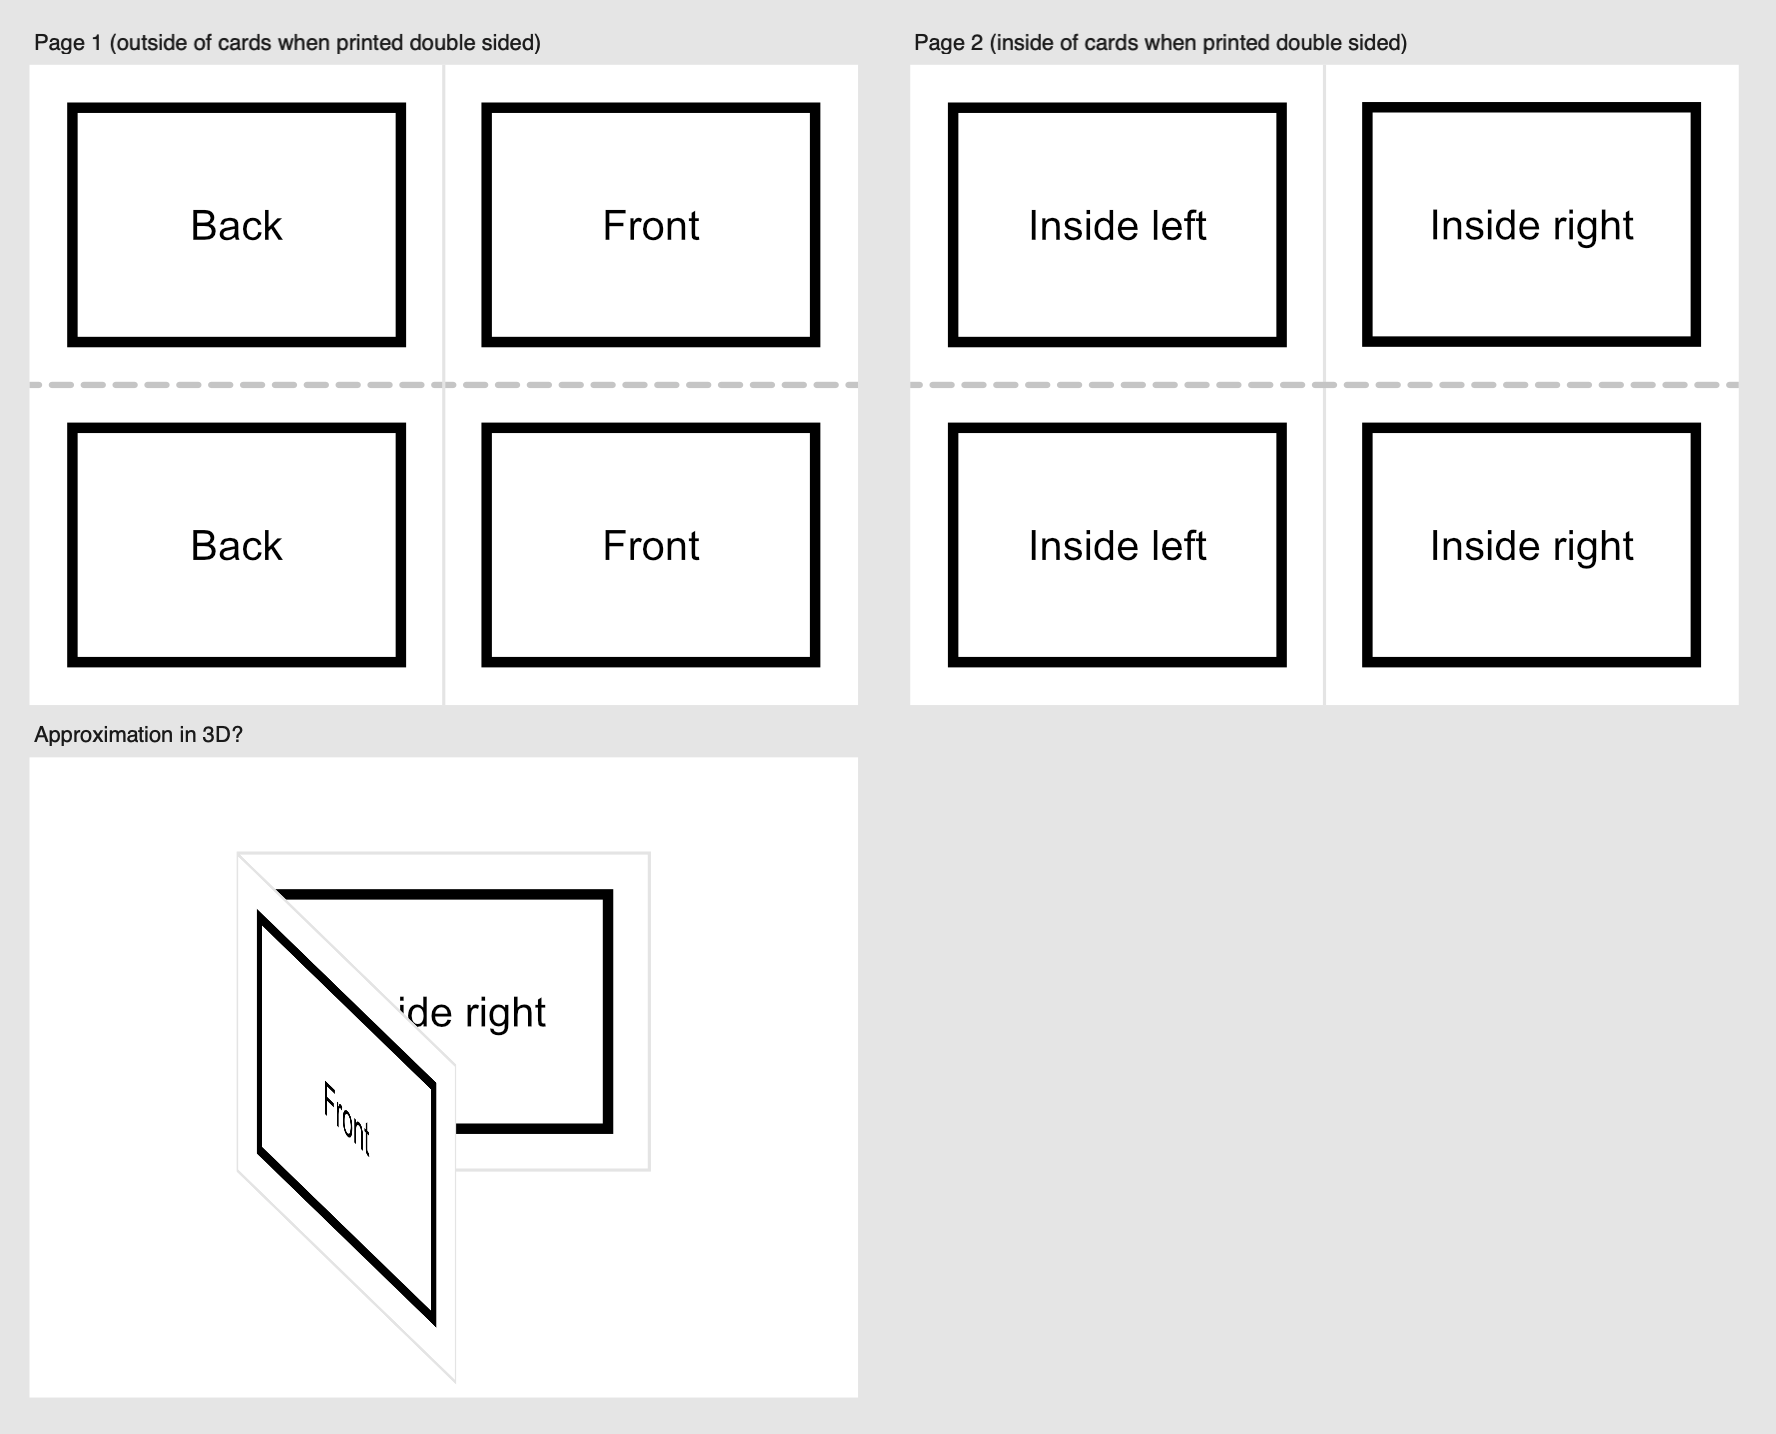
 I'm interested in using Affinity Publisher to make some double-sided greeting cards, but I'm struggling to figure out a good way to set up the Publisher document for it. Each card, when folded, should be a quarter the size of an 8.5"x11" sheet of paper. Because of this, we'd like to print two cards per sheet of paper. I've included an Affinity Designer sketch of what I'd like to do. The top two boards show what would be printed on each side of the 8.5"x11" sheet of paper. I've marked them with a horizontal dotted line where we would cut the paper, and a vertical solid line where we would fold it to make the cards. The bottom board is a rough illustration of how one of these cards might look when opened. I was able to find tutorials online that sounded like they'd work when there was only one card per physical sheet, but being able to print two cards at a time is important for us. Other resources led me to the "N-up" layout option in the Print settings. They sound like they're along the right lines, but I had trouble configuring the settings to be quite right... Might anyone know how I can accomplish the layout depicted in my image? Thanks in advance!
-
 Hi everyone, First post - I'm hoping to be able to lay out a B1 print sheet with designs montaged onto this sheet. What I'm looking for is a simple way to select any of the placed artworks and to apply tick marks to the trim size of the artwork and not of the sheet. I.e - place a PDF at trim size, apply ticks, reselect the pdf and expand to the bleed box size. Possible? If not, all suggestions will be most welcome, Thanks! I know this is possible in Ad*be InD*sign using the 'Cropmarks' script, fingers crossed for something similar in Designer or Publisher...
 -
 Since the last days I am losing all my printing (directly to my L14150 EPSON printer or "Windows Print to PDF"). All imagens with transparence backgraound started to lose the transparence or bright changing, as shown below: There is no filter, transformation, FX, mask (...) applied. Just a PNG over other image. Everything was working fine untill few days ago. What is happening? If I do the same art using Corel, the correct result os obtained: I am using Affinity V 2.0.4 and tryed to chance de color profile several times. Its an Affinity bug, definitely. Is anyone having the same bug?
-
 Hi, If I use a grid adjusted to my requirements in designer and place content in it, can I also print the grid lines in black. Thanks
 -
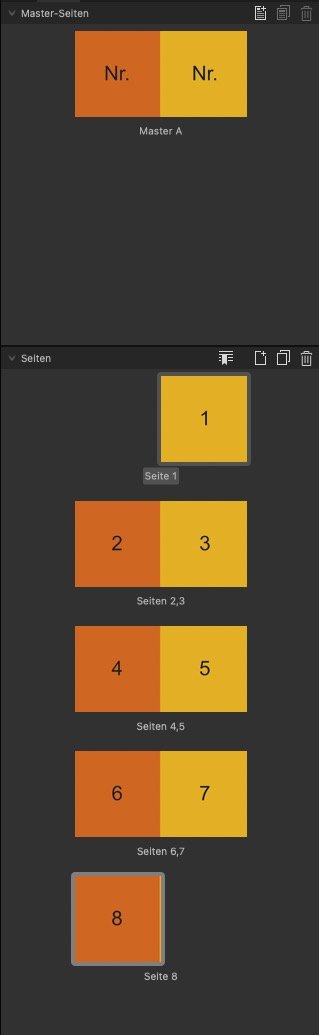
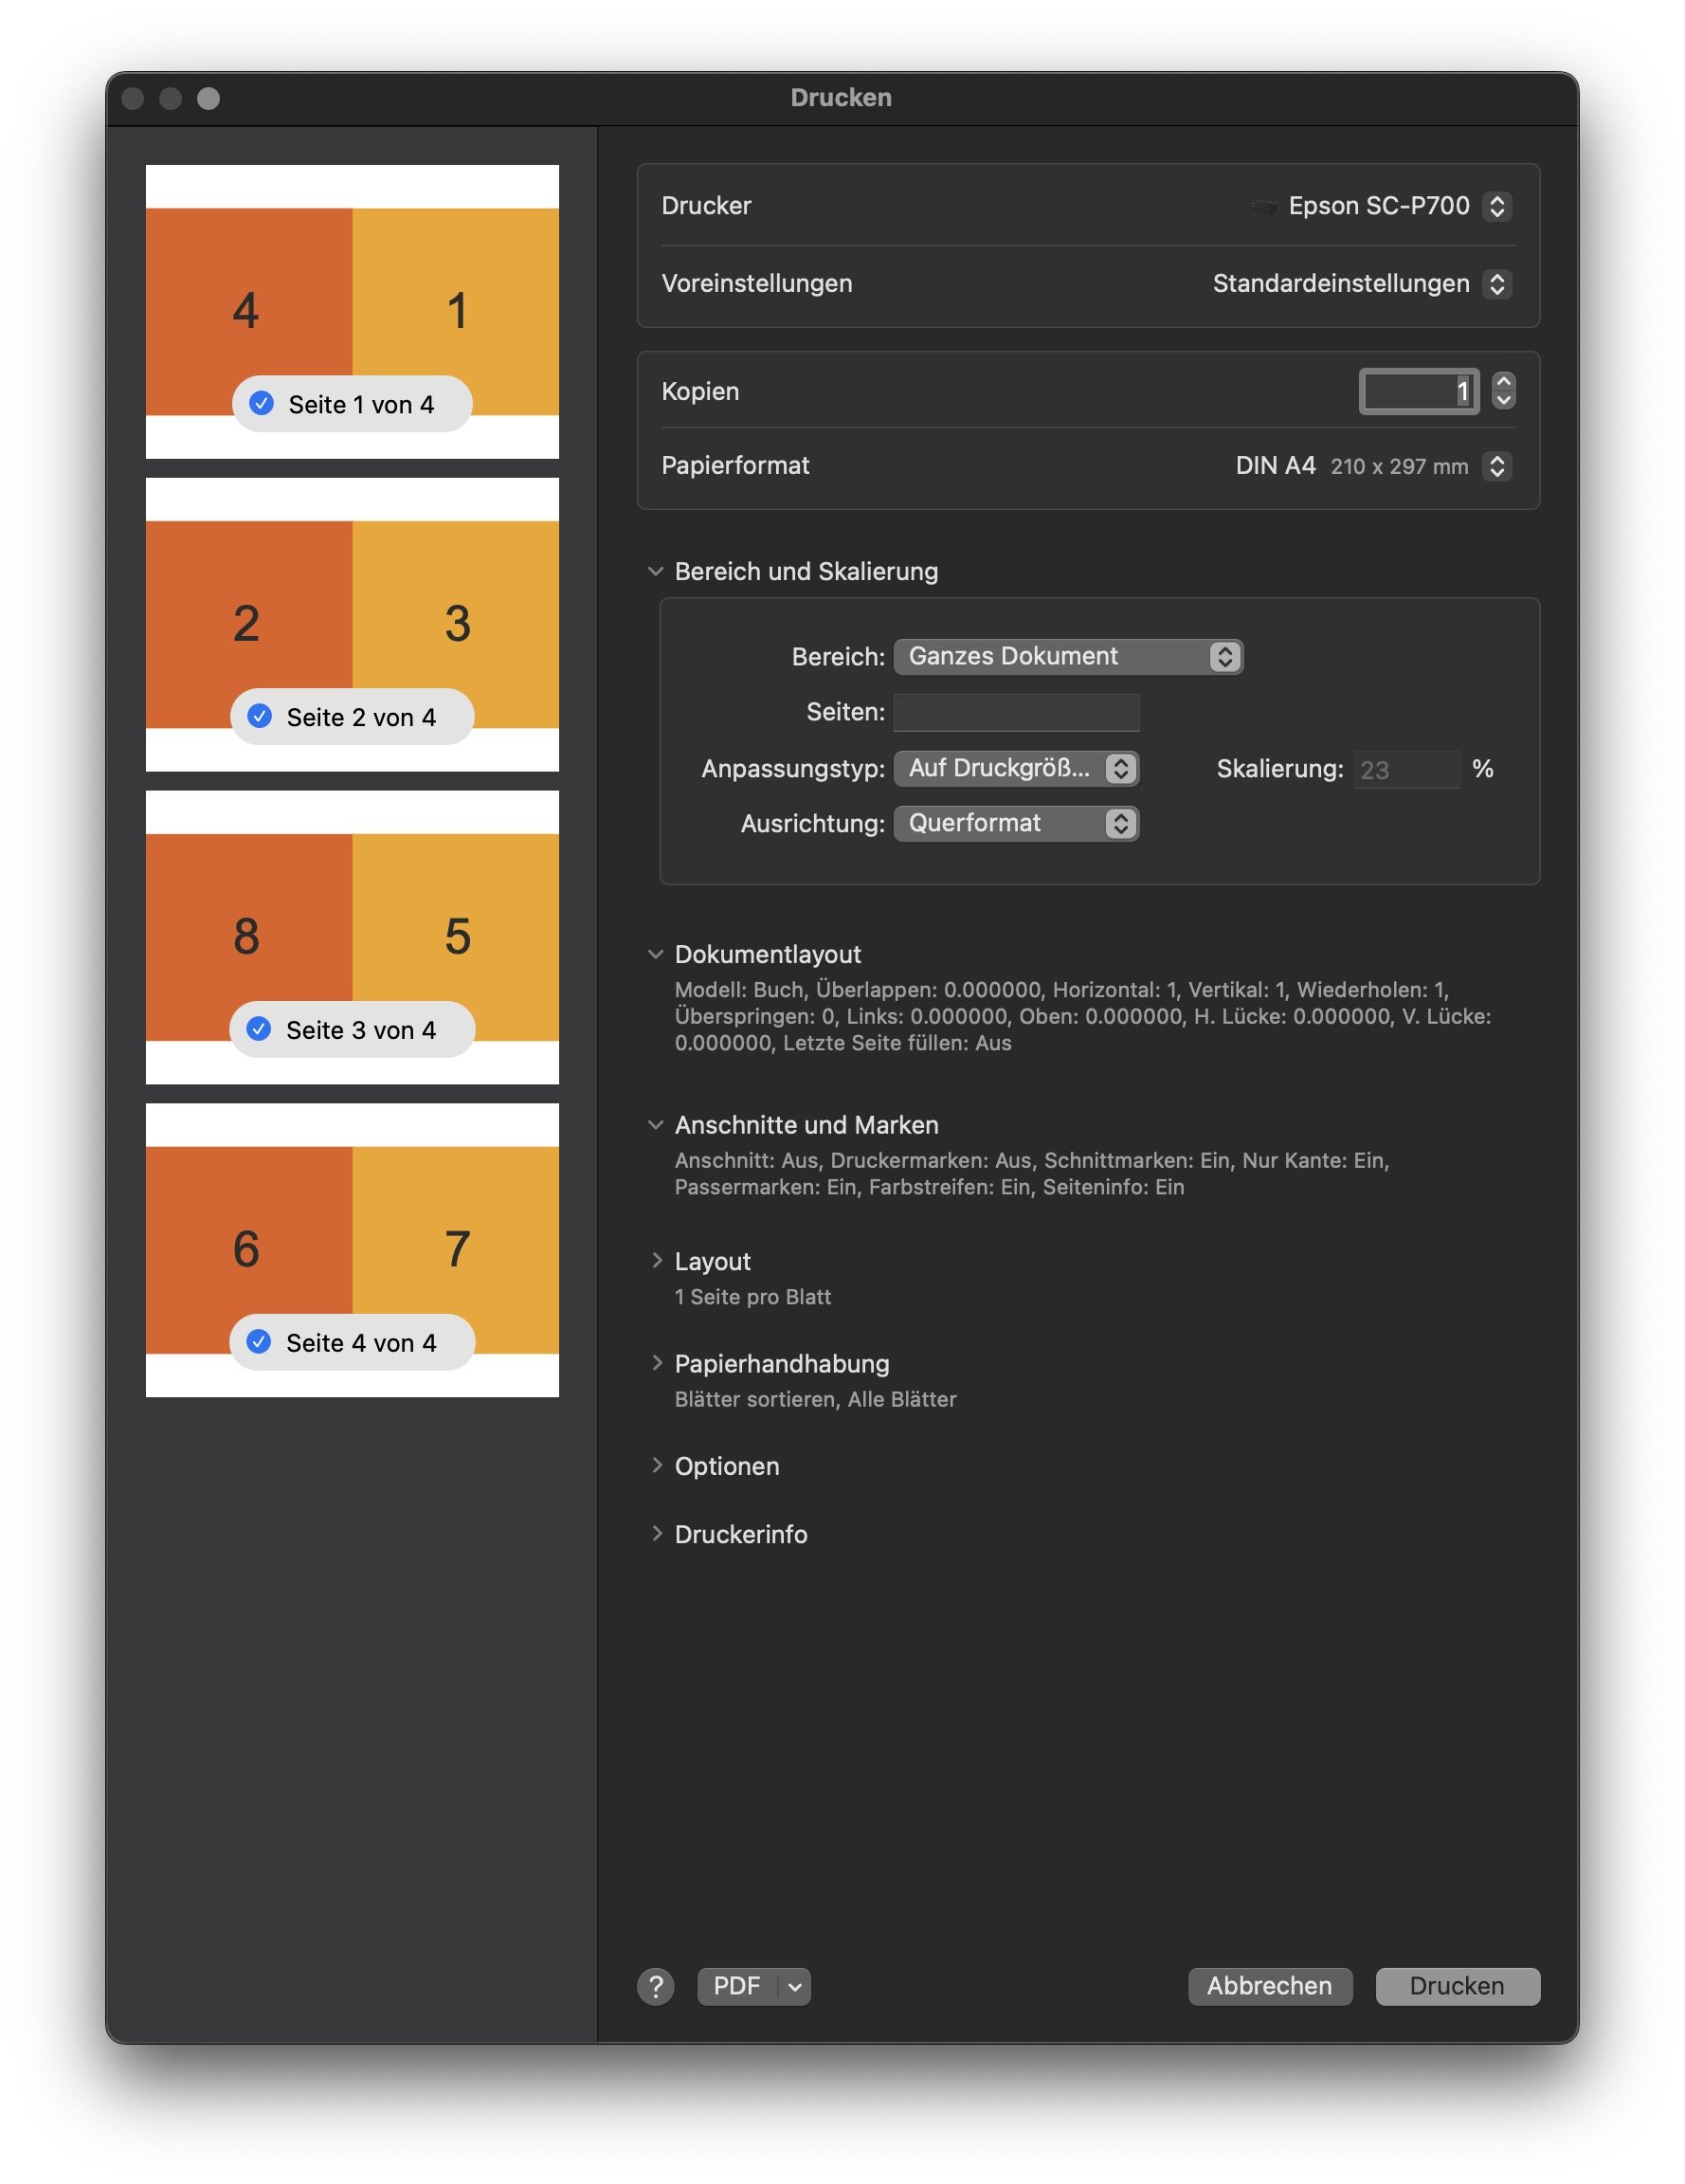
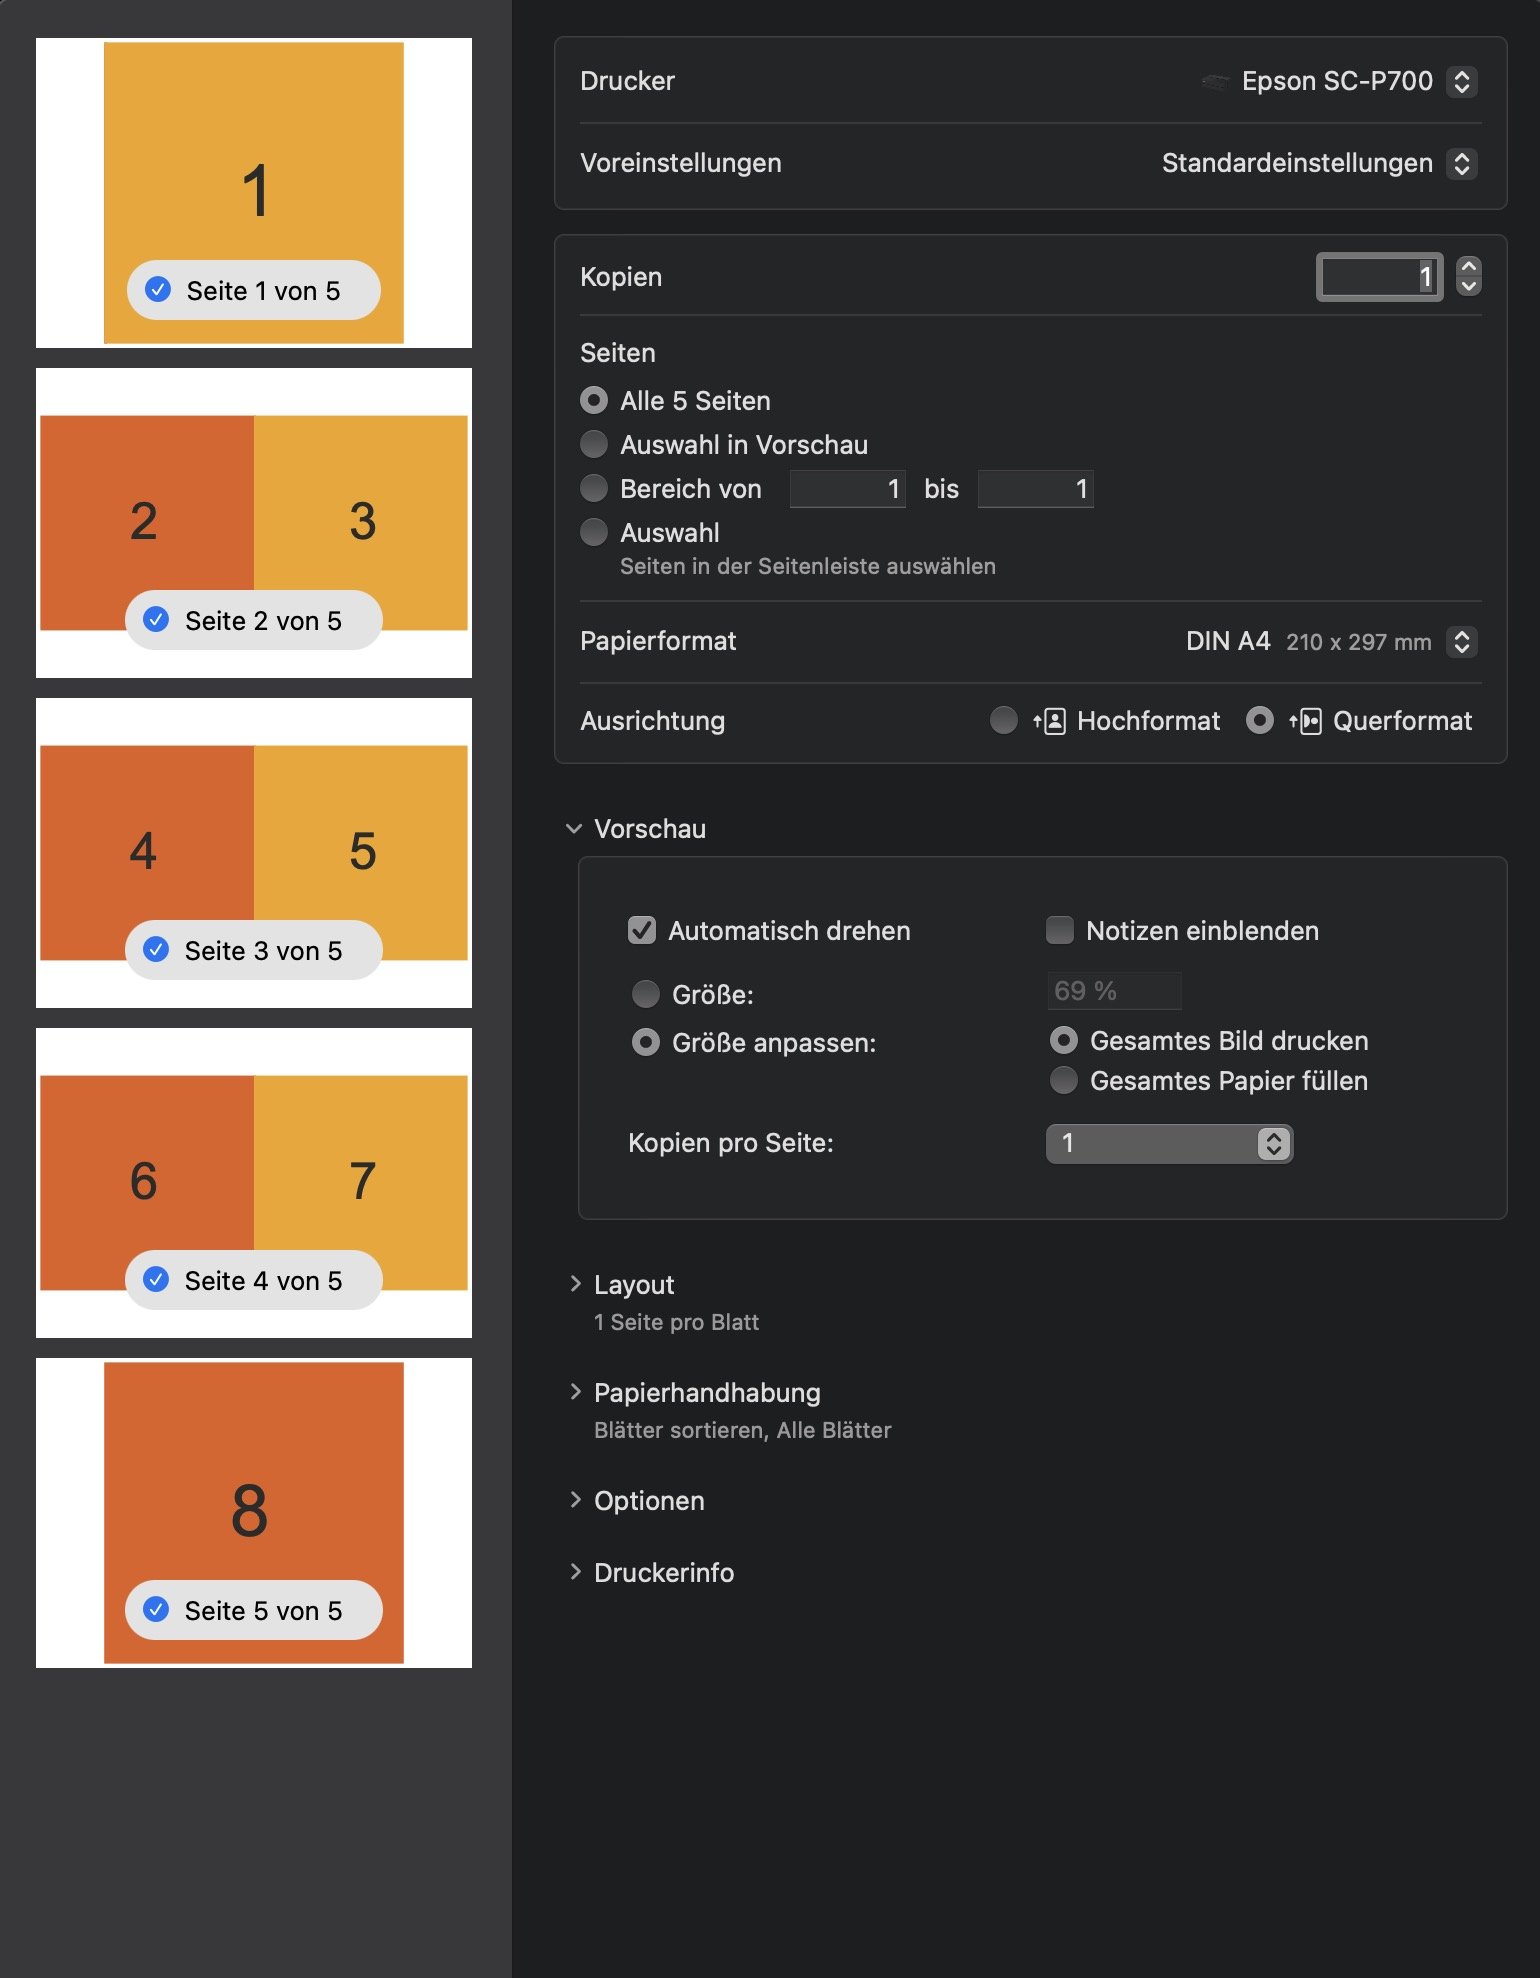
 MacOS Ventura 13.5 … Affinity Publisher 2.1.1. When I want to print a document as a book from Affinity 2, the pages are assembled incorrectly. The first page (right) should be on one sheet. Layout pages 2-7 each on one sheet and then the last (left) page should be printed as a single page again. Unfortunately, the software rearranges the order. This also happens if you choose the option "save as PDF" from the print menu. However, if you export the file using the "Export" function, everything is fine. Does anyone know a solution to print directly from Affinity correctly. For my large book project with many images, the way via the PDF export would be very inconvenient. PDF Export.pdf Print_Save as PDF.pdf
-
 Every once in a while I end up with unwanted printed pages, due to (what I consider) two counter-intuitive default settings on the print setup form: 1. After each print the "Range" option is reset to "Document" and the "Pages" field is cleared. Consequently, when only select pages of a multipage document need to be repeatedly printed out, it is easy to neglect the change and the whole document is printed 2. On the other hand, the "Copies" field is not reset after printing one batch, so it is easy to overlook this, particularly when printing from time to time or when working with several files. In combination, these two "features" can result in even more wasted pages, as happened to me several times. I would suggest considering the following changes: a) keep the "Range" setting and "Pages" field unchanged over a session, unless the file for print is changed; these should be reset only at restart of Publisher b) the "Copies" field should be reset after each print
 -
I have a document with portrait and landscape pages. The printout is on both sides. The landscape pages are rotated clockwise. If the same document is exported to PDF and printed with Adobe Acrobat, the pages in landscape orientation are rotated counterclockwise. Turning on the short side is not effective, as otherwise the even-numbered portrait format pages would be upside down. An option to define the rotation direction of landscape pages is missing. A document to show the effect in attachment. The arrow show always to the top side. Print out in Publisher: Top side ist on the right an footmarks on the left. PDF Print out: top Side is on the left. Ausrichtung Ausdruck Test.afpub
-
 i had a pretty intensive course in indesign for the last few months. but since i wasn't a big fan of adobe even before the course, i wanted to transfer the knowledge i gained to affinity publisher. Unfortunately, I quickly discovered that many important functions are not available, or are extremely cumbersome to use. 1. spot colors If you want to make a spot color, you MUST create a new global color. There is no option to convert an existing color to a spot color. 2. overprinting In InDesign you can select an object and mark it as "overprint". In Publisher, you have to set up a swatch and mark the color itself as overprint. 3. delete a global color When you delete a global color, you should be able to replace it with an existing global color. 4. add global colors automatically When adding a vector graphic, the colors it contains should be added directly to the document palette. 5. create palette from document since point 4 does not apply, this function is useful. however, even colors from images are added, so you have to disable it first, otherwise this function is useless again. 6. quality of life A big help would be that when you double click a color in the swatches, the "Global Colors" window (which opens when you create a new global color) opens. This small change would fix point 1. I would love to work 100% with affinity. But these points make my decision difficult.
 -
 I created a file which had a small amount of text to which I applied a warp. Everything looked fine on the screen but when I came to print the file, the text was printed without the warp being applied. In the end I had to export the file as a pdf and print it, which worked perfectly. The file is attached. Using very latest build Windows 11 2023.afdesign
 -
I designed an item and applied a perspective warp to a text layer. Everything worked well on the screen but, when I tried to print the document, both the print preview and the actual print discarded the warp. I tried putting all the layers into a single group, but that didn't work. In the end, all I could do was to export the warp layer into a jpg file, paste it into the document and hide the original layer. Has anyone else found this? I don't see much point in having the warp feature if it cannot be printed. I have attached screenprints of the afdesign file and the print preview afdesign file.docx print preview.docx
-
I feel I ought to apologise because I know that some will think this pedantic nonsense, but there is no escaping a simple reality - DPI is not the same as PPI, and it does not belong in any dialogue box. The world is awash with confusion over this. Designers, publishers, photo editing, ALL need to know PPI. The only people that need to use DPI are the print shops and printing presses. DPI has no place in any software in Affinity, or anywhere in the desktop publishing office or suite. I await thine fury!..............(but I can prove it if you so must) PS, the dialogue box should really range from about 90 then 180 then 260 300 360 and stop there. 360 being the absolute maximum. No quality improvement is available or visible after 360.
- 27 replies
-
- 1
-

-
- document setup
- printer
- (and 2 more)
-
 I've photographed a couple of weddings for friends (I don't normally do them) which the clients have asked for their digital photos to be put into an album. I have Affinitity Photo Publisher and Designer V1, and see that V2 is just released. As a photographer, Photo is the only app I really make use of. Basically I would be happy to buy the V2 suite at the discount launch price if you can tell me that I can use one or more of the apps to make a super printed Wedding album. I remember Apple Aperture had an album printing function within the software and Apple would get it printed and post to you. Or are Wedding photographers using the Wedding Album printers built in software to do the layout? Cheers, Spike
 -
 After updating your iPad to iPadOS 16 you will find that it's no longer possible to print from any Affinity iPad apps. Our developers are aware of this issue but a workaround is to go to Document > Export > Share > Print.
 -
 I am continuing to have a problem in which the displayed document for a booklet does not match the size shown in the printing layout. I set up a "greeting card" layout of four facing pages as a new document (no template), to be printed on 8-1/2 x 11 inch paper. I verified that the on-screen rulers show it to be 8.5 inches by 11 inches. The contents fit within a .5 inch margin on all sides of the pages. When I attempt to print this, however, each has a white space at the top and bottom. I realized that this was caused by trying to fit a letter-sized image into a half sheet—Publisher does not create the correct layout for the 5-1/2 x 8.5 inch "pages" of a booklet printed on "letter" size sheets. In any case, I began trying to understand the relation between "pages" and "spreads" and I'm finding that it is impossible to understand. No matter what combination I've tried, I get ridiculously narrow layouts, or the center spread insists on being dimensioned as 8-1/2 by 17 inches or some other semi-random result. I had assumed that I would use 8-1/2 x 11 "pages" and a 5-1/2 x 8.5 inch "spread." Nope. Can anyone give me precise instructions for how to set up a simple 4-page greeting card layout that prints correctly on 8-1/2 x 11 inch paper? Thanks!
 -
I can’t work out how to set up a template to print 4 pages of A6 on an A4 sheet, and end up with the pages properly imposed. Page Plus does this well. How do I do it in Aff Publisher? I’m using Windows 10 and an Epson ET 2726 printer.
-
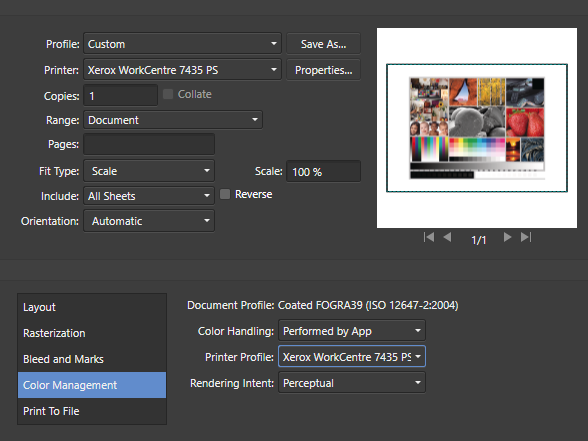
 I have calibrated monitor and printers; I use i1Studio from xRite for both. I setup a document like this, 1 page: I insert a reference photo, this one: Now I print: I disable color management in the printer's driver and enable it in AP The "Xerox workcentre..." printer profile was created by me with i1Studio, it works great in any other app I have As a second check I export the document in PDF and print it with Acrobat, same profile (and the print is ok). So I'm asking: does AP honor the printer profile for a CMYK Postscript printer as old as a Xerox 7435? Infact it doesn't seem to, and ANY profile I use in the print dialog gives the same output. In general I'm very happy with AP it's just so annoyng to have this extra step when it comes to printing. Thank you very much.
-
 Hello all! The company I work for uses Microsoft Publisher (barf) and when you’re ready to print or save to PDF with the software, you’re able to customize your print. A good example—and what I’m trying to do with Affinity Publisher—is print a single (or double) sided business card, multiple times on an 8.5” x 11” sheet of paper with the cards placed on the paper so they will run through our business card cutter properly. I need to have 10 business cards per sheet with 2 columns and 5 rows. I need to be able to set the space on the top, left, bottom and right as well as between the two columns. It would be incredibly handy to create preset of this for printing, or save as PDF. Thanks in advance, Lawrence
 -
 I have some artwork I have had scanned at 600 DPI and it has been saved as 3 files, a TIFF, jpeg and a PDF. The original size of the piece of art was 30cm x 25cm. I would like to have it printed as a tea towel by an online print on demand site but the template for that is sized at 72cm x 44cm. I can't upload the art to the website, I have to email it at the correct size or aspect ratio. How can I adjust one of the scans in either Affinity Designer or Affinity Photo without distorting it or losing any quality so that I can send it off for printing? Or is this not possible? I am very new to the software so I'm hoping someone can help me with some step by step instructions!
 -
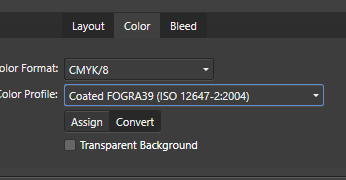
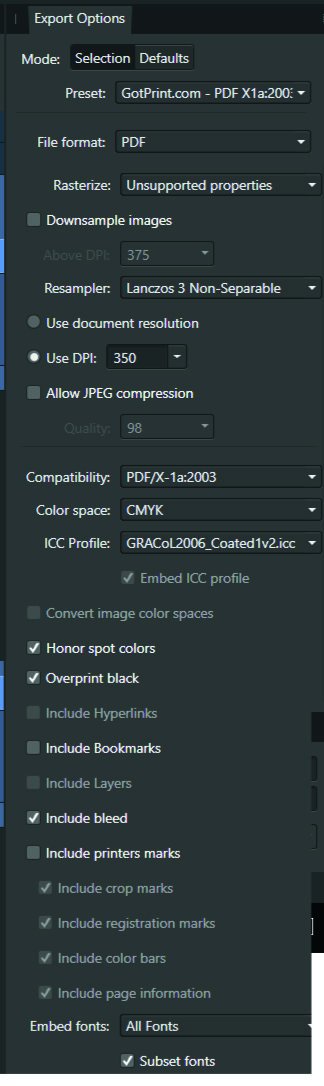
 Hi, The title is my problem. Here's how it's working. Example I make a CMYK document, and set the color of a black box to 30, 30, 30, 100. The color picker detects that exact color. I'll export the above into a PDF as PDF/X-1a:2003 or X4, and the included export setting image. Then when I import that PDF into Affinity Designer, the color picker detects different values... The box is now 79, 76, 70, 95. This same thing happens with every color. A 100, 0, 0, 0 cyan will be 72, 12, 0, 0, and so on. When exporting the same elements into a jpg, this problem doesn't happen. See for yourself in the afdesign file here. Question What can I do to get the exact values I set when printing via PDF, so I can still allow non rasterized elements to scale without losing quality?? I read around, and even InDesign seems to have this same problem... Maybe Affinity Designer is ignoring the embedded ICC profile of the imported image??... I just don't want $1,000 worth of prints to turn out bad over something so small. Thanks! problems with color values.afdesign