JCarls
-
Posts
29 -
Joined
-
Last visited
-
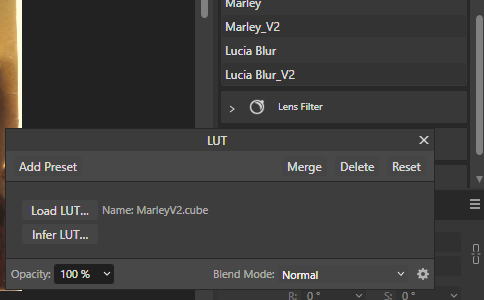
Okay, my mistake. I've determined that the LUT is actually working, but I just couldn't tell any difference in the resulting photo and the pop-up suggested that it was still asking me to locate a file. I would like to get rid of the double entries on the list, though. Would uninstalling the empty one affect the other instance? I assume I can install it again, but this seems unnecessarily full of unknowns.
-
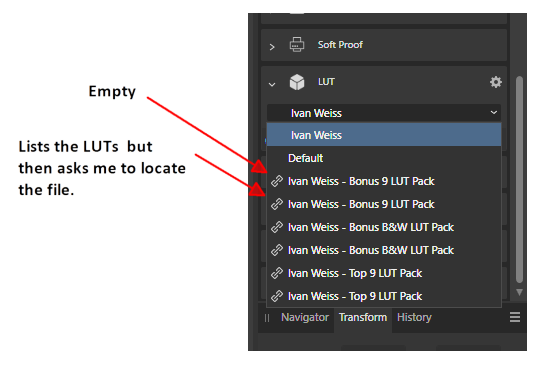
Months ago, I used the Account interface to install the Ivan Weiss LUTs and am now trying to access them. Within Photo, the LUTs adjustment lists the package, but lists it twice for some reason, with the first instance empty. I can select a LUT from the second instance, but then the file selection window appears. If I click on "Load LUT..." (which should not be needed, right?) a file selection window appears at a random folder unconnected to Affinity. I've searched the entire Program Files> Affinity folder and found neither .cube nor .lut files in it. Intending to remove what is currently there, I have now downloaded the ZIP version of the LUTs, but I don't want to install them unless I know where they should be permanently located—that is, will Affinity use the Download folder (wrong) or will it copy them to their proper location?. Any advice would be appreciated.

-
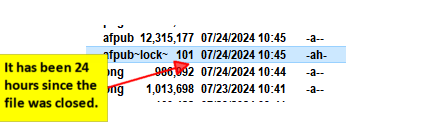
Just a heads up: I have been noticing that the semaphore file, indicating a user-locked Publisher file, is not being deleted consistently. I read elsewhere that this expires after not being updated for 5 minutes, but it looks like using multiple Affinity apps misses this step. I was able to duplicate the scenario by opening a Publisher file, switching to the Photo app within Publisher, making a change and then closing the software and saving the change. I did this two ways: by closing it from the Photo app and also by switching back to Publisher and closing it from there. Both resulted in an orphaned semaphore file.
-
Okay, I've figured out that two things are happening instead of one and both can create confusion in the interface. If I edit a text frame and then try to select any shape and click on it, the next click converts it to a "shape text." This happens without actually warning you (other than the inscrutable pentangle icon). While a shape text might be desirable for some shapes, there are plenty of others where this isn't needed, yet I just saw it happen to a simple ellipse for which no text is needed. The second thing: text frame mode absolutely will not cancel without extra keystrokes (my original issue). I realize that in a publishing project full of text, this might be convenient, but it seems like a setting that turns this off (meaning, a simple [Esc] returns to "Move" mode) would be very useful for people doing complex graphic publications with minimal, non-connected text frames. Thanks for the input. 🙂
-
Yes, I've done that. However, in a graphics user interface (and except at the beginning of a project), the single most common operation is to point to something, not to create something. So the system should make it easy to select things. Although I understand that there is more than one level of meaning for [Esc] in a text frame, the last one should be "cancel text frame mode" but it doesn't. That would mean that the cursor reverts to the Move pointer so the next action is to select another object. Also, if the interface assumes that the most common long-term editing action is to select something, repeating the "last tool" should have a hot key (or an option to set an "auto-repeat" until canceled).
-
I tried that but it does not do that—frame text mode remains active. The most common operation I am doing in this context is to edit a piece of text in a frame, then adjust a callout rounded rectangle below it (comic book dialog style). It takes more keystrokes than needed to do this when I should be able to cancel text editing mode and just select the next object to manipulate. Example: I have a photograph over which there are two callout rounded rectangle layers and two text frame layers on top of those. If I click twice to edit a text, then either click on a rectangle or click on the rectangle layer, the cursor remains in frame text mode. Worse, when I hover over the rectangle (or any shape) at this time, the square text icon turns into a pentangle, the meaning of which is a mystery (Help isn't any help here). Pressing [Esc] by itself (even multiple times) does not cancel the text mode. This is the specific behavior that is so frustrating. If I don't pay attention, I wind up adding a "V" in the text, or an unnecessary text box that needs to be deleted (and I still have to cancel the text mode before I can do that), or I've sometimes accidentally created a hybrid rectangle containing text and not realized it. What is needed is 1) for text mode to be completely and definitively canceled by only clicking in an empty space or only pressing [Esc], and 2) for text mode to have a "repeat" option for people who are creating multiple text frames.
-
This is especially problematic in Publisher, but probably makes sense for all apps: When I draw a text box or edit its contents, the text box tool remains active. I want it to return to a selection arrow so I can pick the next thing I'm going to manipulate or edit. I realize that having a persistently active tool is good in many situations, especially at the beginning of a project. However, in a project with a large mix of graphics and some text, this is a real obstruction when editing. In trying to get rid of the text tool, I constantly leave the letter "V" in text that was just edited, because simply pressing "V" won't switch to the Move tool. What we need is a preferences toggle that controls whether tools are persistent or simply return to the Move arrow if you either press [Esc] or click in an empty area. This is the standard for all other graphic software I've used, and it's very intuitive.
-
I'm having the same problem, although it affects the left and right margins (due to the paper orientation). This is a greeting card project, printed in landscape orientation and then folded in half. The margins are shifted to the left by a very noticeable 1/8" of an inch (see attached images). This occurs on both my Canon i9900 and my Brother HLDC laser, but not if I print to a PDF file first. This seems to me to be a rather glaring bug in the software, which should certainly work with both of these printers by this point. Note that the last "page," which was the first edge to print (on the reverse side of what I'm showing), originally had much smaller margins. However, I tried correcting that, then set up a master page with .5" margins and applied it to all pages. I'm still getting the same result.
-
It was to simply clear the text tool so that I could select another object (of any kind) to manipulate or edit. The problem was really a dissonance in user interfaces: What I expected (from using other software): Click or double-click on an object, activating whatever editing mode/tool is associated with it. Or, graphically select or Click + Ctrl-Click, etc. to select multiple objects for positioning (or editing shared properties). Click on another object (immediately deselecting the previous object) activating its editing mode, or click on an empty space to release all selected objects. What I was experiencing: I would double-click a text box and edit the contents. If I clicked in an empty space, a new text box was created because for some reason, the software stayed in textbox mode (or perhaps depending on what object I clicked in #1, I would get a Node tool instead). As others have suggested, I now realize I need to double-click in an empty space to both deselect an object and cancel the editing mode. I think the essential problem is that the system is set so that the editing mode of any edited object is "sticky" and does not exit when the object is deselected. That seems counterintuitive; it only makes sense if you had just created a new textbox and might want to either create more or simply cancel the implicit "auto-add" mode. It doesn't make sense when editing existing objects, because it assumes it knows what you want to do next.
-
Thanks for the replies. Double-clicking the empty space seems to work so far. I was very much accustomed to a single click to release selected items. I'm still not sure what is triggering the Node tool, though, but I keep seeing that cursor appear unexpectedly. That seems unlikely to be used under normal circumstances, but maybe I'm not doing the kind of work where it would. Note that I only use separate text frames and rectangles (separate layers), never combining them (grouping, yes). However, I sometimes convert a rectangle accidentally and I've learned to just delete those and start over—there doesn't seem to be any intuitively way to edit them. I still don't know what causes this hybrid.
-
 JCarls reacted to a post in a topic:
How to force mouse to always return to the "Move" tool when an empty space is clicked
JCarls reacted to a post in a topic:
How to force mouse to always return to the "Move" tool when an empty space is clicked
-
I'm having a lot of throughput inefficiency when working with both Affinity Publisher and Affinity Photo. I use a lot of textboxes backed up by the Callout Rounded Rectangle (these are self-contained instances—no flowing to another textbox). A great deal of this work involves editing the contents of a text box, resizing the callout rectangle and/or moving both into the desired position in a graphic. My problem is that if I edit a textbox, when I finish, it wants to create new textboxes instead of allowing me to easily click on another object to manipulate it. I've seen it try to impose a new textbox on an existing one instead of selecting that one to edit. To make things worse, when I click in an empty space, I'm often presented with a Node tool cursor instead of the Move tool, which is simply inexplicable. So there is a lot of unnecessary use of either the [Esc] key or the [V] shortcut just to get to what I consider the "starting" point: an active selection pointer I can use on the next item of interest. Of course, trying the [V] shortcut when a textbox still has focus leaves my text littered with "v" characters that I may not notice. So I have to do at least two steps to get out of editing a textbox and move on. Is there a setting that will allow me to dependably click on a empty spot (i.e., select no object) and always get the Move pointer? Thanks!
-
JCarls reacted to a post in a topic:
Booklet printing on "letter" printing too small / "page" vs. "spread" incomprehensible
-
Okay, the usual pattern for posting problems has prevailed for me. After posting, I figured out the correct settings (and thanks, Old Bruce, for adding some additional info). I was thrown, however, by what I believe was a change in the software some time ago, because I had done multiple cards in the past without encountering this problem before. Still applicable: The need to use the "Facing pages" option and... For a portrait card layout, "Arrangement" = "Horizontal" and "Start with" set to "Right" For a landscape "tent card" layout," "Arrangement" = "Vertical" and "Start with" set to "Last" So, here are the correct settings for a greeting card on 8-1/2 x 11" paper, using the "Spread Setup..." dialog: For a portrait (vertical) finished card: Use the "Selected spreads" option, then for each of the four pages, use the "Set dimensions of" to set each page to 5.5 x 8.5, Portrait (unlock the dimension lock first). Then, change "Set dimensions of" to "Spread" and set the spreads for each spread to (again, unlocking the dimension lock): Spread 1 (Page 1) = 5.5 x 8.5, Portrait Spread 2 (Pages 2,3) = 11 x 8.5, not Portrait Spread 3 (Page 4) = 5.5 x 8.5, Portrait If your printer supports two-sided printing, you will most likely want to use "flip on short edge" as the option for that. For a landscape (tent) card layout: Use the "Selected spreads" option, then for each of the four pages, use the "Set dimensions of" to set each page to 8.5 x 5.5, not Portrait (unlock the dimension lock first). Then, change "Set dimensions of" to "Spread" and set the spreads for each spread to (again, unlocking the dimension lock): Spread 1 (Page 1) = 8.5 x 5.5, not Portrait Spread 2 (Pages 2,3) =8.5 x 11, Portrait Spread 3 (Page 4) = 8.5 x 5.5, not Portrait Once you finish your contents, you will probably need to select and rotate/position the contents of page 4 so it prints "upside down" which will make it print correctly on the card back. If your printer supports two-sided printing, you will most likely want to use "flip on long edge" as the option for that. If you are in the U.S., you definitely want to save these as templates.
-
I am continuing to have a problem in which the displayed document for a booklet does not match the size shown in the printing layout. I set up a "greeting card" layout of four facing pages as a new document (no template), to be printed on 8-1/2 x 11 inch paper. I verified that the on-screen rulers show it to be 8.5 inches by 11 inches. The contents fit within a .5 inch margin on all sides of the pages. When I attempt to print this, however, each has a white space at the top and bottom. I realized that this was caused by trying to fit a letter-sized image into a half sheet—Publisher does not create the correct layout for the 5-1/2 x 8.5 inch "pages" of a booklet printed on "letter" size sheets. In any case, I began trying to understand the relation between "pages" and "spreads" and I'm finding that it is impossible to understand. No matter what combination I've tried, I get ridiculously narrow layouts, or the center spread insists on being dimensioned as 8-1/2 by 17 inches or some other semi-random result. I had assumed that I would use 8-1/2 x 11 "pages" and a 5-1/2 x 8.5 inch "spread." Nope. Can anyone give me precise instructions for how to set up a simple 4-page greeting card layout that prints correctly on 8-1/2 x 11 inch paper? Thanks!
-
I've experienced a similar problem with many images I've used in Publisher: The images appear yellowed on the screen (but only in Publisher), but not when the document prints. Here's the link to that thread:
-
 JCarls reacted to a post in a topic:
Using File> Export on "selected objects" isn't trimming area to just the selected objects
JCarls reacted to a post in a topic:
Using File> Export on "selected objects" isn't trimming area to just the selected objects
-
Here it is (I trust you believe the last U.S. election was conducted properly 😬). I test exported it again using "Selection only" and the right and bottom included strips of transparent background (also attached). Thanks! trump deposition.afpub