JCarls
-
Posts
26 -
Joined
-
Last visited
Everything posted by JCarls
-
Okay, I've figured out that two things are happening instead of one and both can create confusion in the interface. If I edit a text frame and then try to select any shape and click on it, the next click converts it to a "shape text." This happens without actually warning you (other than the inscrutable pentangle icon). While a shape text might be desirable for some shapes, there are plenty of others where this isn't needed, yet I just saw it happen to a simple ellipse for which no text is needed. The second thing: text frame mode absolutely will not cancel without extra keystrokes (my original issue). I realize that in a publishing project full of text, this might be convenient, but it seems like a setting that turns this off (meaning, a simple [Esc] returns to "Move" mode) would be very useful for people doing complex graphic publications with minimal, non-connected text frames. Thanks for the input. 🙂
-
Yes, I've done that. However, in a graphics user interface (and except at the beginning of a project), the single most common operation is to point to something, not to create something. So the system should make it easy to select things. Although I understand that there is more than one level of meaning for [Esc] in a text frame, the last one should be "cancel text frame mode" but it doesn't. That would mean that the cursor reverts to the Move pointer so the next action is to select another object. Also, if the interface assumes that the most common long-term editing action is to select something, repeating the "last tool" should have a hot key (or an option to set an "auto-repeat" until canceled).
-
I tried that but it does not do that—frame text mode remains active. The most common operation I am doing in this context is to edit a piece of text in a frame, then adjust a callout rounded rectangle below it (comic book dialog style). It takes more keystrokes than needed to do this when I should be able to cancel text editing mode and just select the next object to manipulate. Example: I have a photograph over which there are two callout rounded rectangle layers and two text frame layers on top of those. If I click twice to edit a text, then either click on a rectangle or click on the rectangle layer, the cursor remains in frame text mode. Worse, when I hover over the rectangle (or any shape) at this time, the square text icon turns into a pentangle, the meaning of which is a mystery (Help isn't any help here). Pressing [Esc] by itself (even multiple times) does not cancel the text mode. This is the specific behavior that is so frustrating. If I don't pay attention, I wind up adding a "V" in the text, or an unnecessary text box that needs to be deleted (and I still have to cancel the text mode before I can do that), or I've sometimes accidentally created a hybrid rectangle containing text and not realized it. What is needed is 1) for text mode to be completely and definitively canceled by only clicking in an empty space or only pressing [Esc], and 2) for text mode to have a "repeat" option for people who are creating multiple text frames.
-
This is especially problematic in Publisher, but probably makes sense for all apps: When I draw a text box or edit its contents, the text box tool remains active. I want it to return to a selection arrow so I can pick the next thing I'm going to manipulate or edit. I realize that having a persistently active tool is good in many situations, especially at the beginning of a project. However, in a project with a large mix of graphics and some text, this is a real obstruction when editing. In trying to get rid of the text tool, I constantly leave the letter "V" in text that was just edited, because simply pressing "V" won't switch to the Move tool. What we need is a preferences toggle that controls whether tools are persistent or simply return to the Move arrow if you either press [Esc] or click in an empty area. This is the standard for all other graphic software I've used, and it's very intuitive.
-
I'm having the same problem, although it affects the left and right margins (due to the paper orientation). This is a greeting card project, printed in landscape orientation and then folded in half. The margins are shifted to the left by a very noticeable 1/8" of an inch (see attached images). This occurs on both my Canon i9900 and my Brother HLDC laser, but not if I print to a PDF file first. This seems to me to be a rather glaring bug in the software, which should certainly work with both of these printers by this point. Note that the last "page," which was the first edge to print (on the reverse side of what I'm showing), originally had much smaller margins. However, I tried correcting that, then set up a master page with .5" margins and applied it to all pages. I'm still getting the same result.

-
It was to simply clear the text tool so that I could select another object (of any kind) to manipulate or edit. The problem was really a dissonance in user interfaces: What I expected (from using other software): Click or double-click on an object, activating whatever editing mode/tool is associated with it. Or, graphically select or Click + Ctrl-Click, etc. to select multiple objects for positioning (or editing shared properties). Click on another object (immediately deselecting the previous object) activating its editing mode, or click on an empty space to release all selected objects. What I was experiencing: I would double-click a text box and edit the contents. If I clicked in an empty space, a new text box was created because for some reason, the software stayed in textbox mode (or perhaps depending on what object I clicked in #1, I would get a Node tool instead). As others have suggested, I now realize I need to double-click in an empty space to both deselect an object and cancel the editing mode. I think the essential problem is that the system is set so that the editing mode of any edited object is "sticky" and does not exit when the object is deselected. That seems counterintuitive; it only makes sense if you had just created a new textbox and might want to either create more or simply cancel the implicit "auto-add" mode. It doesn't make sense when editing existing objects, because it assumes it knows what you want to do next.
-
Thanks for the replies. Double-clicking the empty space seems to work so far. I was very much accustomed to a single click to release selected items. I'm still not sure what is triggering the Node tool, though, but I keep seeing that cursor appear unexpectedly. That seems unlikely to be used under normal circumstances, but maybe I'm not doing the kind of work where it would. Note that I only use separate text frames and rectangles (separate layers), never combining them (grouping, yes). However, I sometimes convert a rectangle accidentally and I've learned to just delete those and start over—there doesn't seem to be any intuitively way to edit them. I still don't know what causes this hybrid.
-
I'm having a lot of throughput inefficiency when working with both Affinity Publisher and Affinity Photo. I use a lot of textboxes backed up by the Callout Rounded Rectangle (these are self-contained instances—no flowing to another textbox). A great deal of this work involves editing the contents of a text box, resizing the callout rectangle and/or moving both into the desired position in a graphic. My problem is that if I edit a textbox, when I finish, it wants to create new textboxes instead of allowing me to easily click on another object to manipulate it. I've seen it try to impose a new textbox on an existing one instead of selecting that one to edit. To make things worse, when I click in an empty space, I'm often presented with a Node tool cursor instead of the Move tool, which is simply inexplicable. So there is a lot of unnecessary use of either the [Esc] key or the [V] shortcut just to get to what I consider the "starting" point: an active selection pointer I can use on the next item of interest. Of course, trying the [V] shortcut when a textbox still has focus leaves my text littered with "v" characters that I may not notice. So I have to do at least two steps to get out of editing a textbox and move on. Is there a setting that will allow me to dependably click on a empty spot (i.e., select no object) and always get the Move pointer? Thanks!
-
Okay, the usual pattern for posting problems has prevailed for me. After posting, I figured out the correct settings (and thanks, Old Bruce, for adding some additional info). I was thrown, however, by what I believe was a change in the software some time ago, because I had done multiple cards in the past without encountering this problem before. Still applicable: The need to use the "Facing pages" option and... For a portrait card layout, "Arrangement" = "Horizontal" and "Start with" set to "Right" For a landscape "tent card" layout," "Arrangement" = "Vertical" and "Start with" set to "Last" So, here are the correct settings for a greeting card on 8-1/2 x 11" paper, using the "Spread Setup..." dialog: For a portrait (vertical) finished card: Use the "Selected spreads" option, then for each of the four pages, use the "Set dimensions of" to set each page to 5.5 x 8.5, Portrait (unlock the dimension lock first). Then, change "Set dimensions of" to "Spread" and set the spreads for each spread to (again, unlocking the dimension lock): Spread 1 (Page 1) = 5.5 x 8.5, Portrait Spread 2 (Pages 2,3) = 11 x 8.5, not Portrait Spread 3 (Page 4) = 5.5 x 8.5, Portrait If your printer supports two-sided printing, you will most likely want to use "flip on short edge" as the option for that. For a landscape (tent) card layout: Use the "Selected spreads" option, then for each of the four pages, use the "Set dimensions of" to set each page to 8.5 x 5.5, not Portrait (unlock the dimension lock first). Then, change "Set dimensions of" to "Spread" and set the spreads for each spread to (again, unlocking the dimension lock): Spread 1 (Page 1) = 8.5 x 5.5, not Portrait Spread 2 (Pages 2,3) =8.5 x 11, Portrait Spread 3 (Page 4) = 8.5 x 5.5, not Portrait Once you finish your contents, you will probably need to select and rotate/position the contents of page 4 so it prints "upside down" which will make it print correctly on the card back. If your printer supports two-sided printing, you will most likely want to use "flip on long edge" as the option for that. If you are in the U.S., you definitely want to save these as templates.
-
I am continuing to have a problem in which the displayed document for a booklet does not match the size shown in the printing layout. I set up a "greeting card" layout of four facing pages as a new document (no template), to be printed on 8-1/2 x 11 inch paper. I verified that the on-screen rulers show it to be 8.5 inches by 11 inches. The contents fit within a .5 inch margin on all sides of the pages. When I attempt to print this, however, each has a white space at the top and bottom. I realized that this was caused by trying to fit a letter-sized image into a half sheet—Publisher does not create the correct layout for the 5-1/2 x 8.5 inch "pages" of a booklet printed on "letter" size sheets. In any case, I began trying to understand the relation between "pages" and "spreads" and I'm finding that it is impossible to understand. No matter what combination I've tried, I get ridiculously narrow layouts, or the center spread insists on being dimensioned as 8-1/2 by 17 inches or some other semi-random result. I had assumed that I would use 8-1/2 x 11 "pages" and a 5-1/2 x 8.5 inch "spread." Nope. Can anyone give me precise instructions for how to set up a simple 4-page greeting card layout that prints correctly on 8-1/2 x 11 inch paper? Thanks!
-
I've experienced a similar problem with many images I've used in Publisher: The images appear yellowed on the screen (but only in Publisher), but not when the document prints. Here's the link to that thread:
-
Here it is (I trust you believe the last U.S. election was conducted properly 😬). I test exported it again using "Selection only" and the right and bottom included strips of transparent background (also attached). Thanks! trump deposition.afpub
-
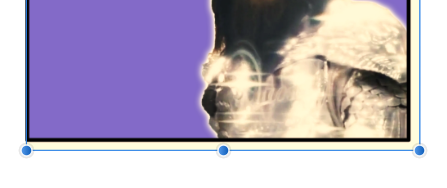
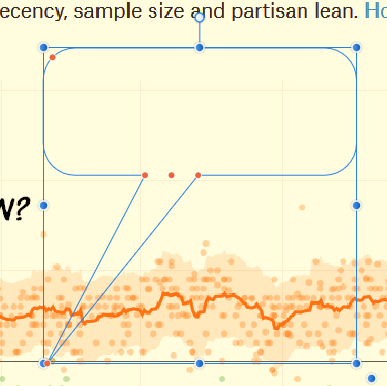
I frequently create memes assembled from multiple graphic elements and export the result to an image file. I started this with PagePlus and did not notice this problem until I started using Publisher: If I select all the elements in the design (which is typically bounded by a visible, bordered rectangle) the resulting image has an obvious extra, transparent "space" on the right and bottom. I can't connect the extra space's dimension to any specific element, although I first suspected that it might be due to cropped elements. I have to then open the final result in an image editor and crop it, which is tedious and prone to mistakes in crop placement. Here is a piece of a resulting image that I exported with "Selection only" and then placed in a new document. When this image is selected, the selection handles should correspond to the corners of the outer rectangle, but as you can see, on the bottom right they do not. The selection indicators in the original design clearly included only that border rectangle and the elements within it. Although this extra space is transparent, it causes problems when uploaded and the dimensions don't match the image itself. This occurs with both PNG and JPEG exports. I haven't tried other formats. As I mentioned, I've tried it with "Selection area," too. Thanks for any input.
-
To all: I think there might have been a misunderstanding: I wasn't looking for "card ideas" (all of my cards are created "from scratch"). I was looking for a blank template that already had all the needed settings in this new program for setting up and printing a folded card. It seemed like an obvious thing to include in any first release of publishing software. 🙂
-
Yes, getting a four-page document that needs to print in 4-1-2-3 order (with one page upside-down if it's a "tent" style card) adds a whole level of complexity if you don't know what options to select. However, if you wanted to print to a PDF so that you could print a card later at another location, the issue would be the same: the PDF would typically be a two-page document on which the four pages of the card were properly oriented for printing, then folding. By now you've probably seen my post in your workshop. Hope that explains it. Thanks for setting that up.
-
Here are the two templates to try. card-letter-port.aftemplate card-letter-lands.aftemplate
-
Hello, I am the trouble-maker who complained about the total lack of standard greeting card templates in Affinity Publisher. My question was mainly focused on creating the proper four-page layout (a half sheet each) and then (most important) getting it to print properly with all pages oriented for folding. I've now figured it out, which sort of reinforces my astonishment that they did not include this in the software's presets. There are two parts of this: 1) Creating a four-page template with the correct size and orientation and 2) Setting up and saving a printing profile to print the resulting document on a single two-sided sheet. Instruction are below, but before that: Regarding the question about DPI in images: If I only have a low resolution image that I need to use, I regularly make a practice of using photo software (even Paint will do it) to upsize a lower resolution image and then sharpening it with other software—not perfect but slightly better than stretching a badly fuzzy image. Lately however, I'm in love with a program called Gigapixel AI, which uses artificial intelligence to upsize images in a way that can be startling (even if miracles are not possible). Although Publisher has a "Bleed" setting, that would only apply to situation where you are trimming the card stock. If you want to "bleed" images to the edge of a card and your printer supports it, look for a "borderless" option, commonly used with pre-cut photographic paper. Set it to the lowest setting (least extension) and see what you get. PROCEDURE Here is how to set up and print a folded card in either portrait or landscape layouts (dimensions are in inches and assume an 8-1/2 X 11 sheet, but metric will work the same after proper use of math). This is not a true step-by-step, but I'm assuming you can figure out how to save templates and profiles. Unfortunately, when you use File> Export as Template... the active printing profile does not seem to be saved, so you have to remember to select your saved profile when you print: Portrait - Setup After creating a document with these settings, use File> Export as Templates... to create the template. Note: Publisher does not seem to have a default location for storing templates. You will need to 1) create a folder and save templates to that and then 2) tell Publisher to add that folder as a template folder. Otherwise, your saved templates may not show up in the interface. Portrait - Printing Printing a card format is the real trick, so selecting the correct settings is crucial (they are different, depending on the card orientation): Landscape - Setup Landscape - Printing Notes: I have attached two templates that you can try out. They both have a dummy "logo" on the back "pages." Also, I uploaded an incorrect image but this forum interface does not seem to have a way to delete a file once it's uploaded [wait, it's a tiny, tiny garbage can 🙄]. "Card setup - landscape" should be ignored in favor of the corrected version.
-
The workshop is underway, four posts and fifty-two views thus far. As it happens, I've now figured it out. The hard part was realizing that you had to save the correct printing profile in order to print the card correctly.
-
Well... thanks for attempting to help. However importing a PDF version of an existing card isn't useful. It simply yields two pages arranged in "printed" format (one half the outer page upside-down), not the proper four half-pages that can be edited right-side up. I've tried setting up a basic template with four 8.5" X 5.5" pages and it printed incorrectly. After reading through other forum posts, it appears you can't import PagePlus templates at all and the developers haven't addressed this rather common activity, so this is a bit of a bait-and-switch for any home users who thought Publisher would be a better choice. Do you know of any guides for setting up a booklet- or tent-style card and then printing it on a front and back of a single sheet? Without that or a template, I'll have to stick with PagePlus for this. Thanks again. -JC
-
This should be an obvious feature when you select "New Document." Please don't tell me I have to set this up myself after having it available in Serif PagePlus.
-
I'm pretty sure it's not the canvas, since the background of the rest of the publication is white. This color cast was an obvious difference when I switched from Serif Page Plus to Affinity Publisher, so the monitor's setting should not be involved. You can see the difference when I preview the original source image next to how it appears in Publisher.
-
All of the images I'm adding to a document show a yellowish cast on the screen. The originals do not show this and the printed version does not either, so I'm assuming this is some kind of display setting. How can I turn this off? Thanks!
-
How to control callout rectangles
JCarls replied to JCarls's topic in Tutorials (Staff and Customer Created Tutorials)
Thanks! That was definitely a missing bit of information for me. However, even if I clicked on the copy with a text tool it still lost those properties as you said, disappearing and leaving only the text I had typed. This seemed to be a permanent change, which makes me wonder why this is even a "feature." Perhaps I misread what you wrote and the proper procedure is to create a separate text box and move it over the callout, then group those if desired. That seems to work with more predictable results. Another problem kept happening, though: I would suddenly get the message that the layer I was working on was rasterized, and I could no longer edit the textbox at all. I get the feeling that there is something about the Affinity interface that is at odds with the way I expect it to work. I understand how that can happen, but until I understand how to control the interface, I keep feeling lost. -
Is there a tutorial showing the most direct way to create comics-style "word balloons"? I've been trying to use the "callout rounded rectangle" tool and and finding it almost completely unpredictable and impossible to control. I was able to work with it a week ago and get a black outline with white opaque infill. I had to create a separate text box and group that because at no point was there any indication that the callout included a text feature. This week, I can put text in it but cannot control anything but the nodes. That is, I cannot change the line color or thickness of the blue shape (see attachment), nor give it an opaque fill. Clearly, there is something about this control that is completely changed by some kind of not-obvious setting. What is really needed is a simpler version of this that immediately produces an opaque white "callout" with black lettering and editing nodes, not something that requires that you understand every possible nuance from the very beginning. Help, please!
-
This seems a little too basic to have to ask, but the Help system is not helping. I have an image that I want to rotate a few degrees prior to doing some perspective correction. The Help entry says I can grab "rotation handles" but all I see are a blue outline with blue X's at the corners and midpoints. When I try to "display rotation point" I get nothing. None of the shift type keys have any effect. Is this one of those "can't get there from here" features that I seem to run into on occasion? Thanks!