Meorge
-
Posts
12 -
Joined
-
Last visited
-
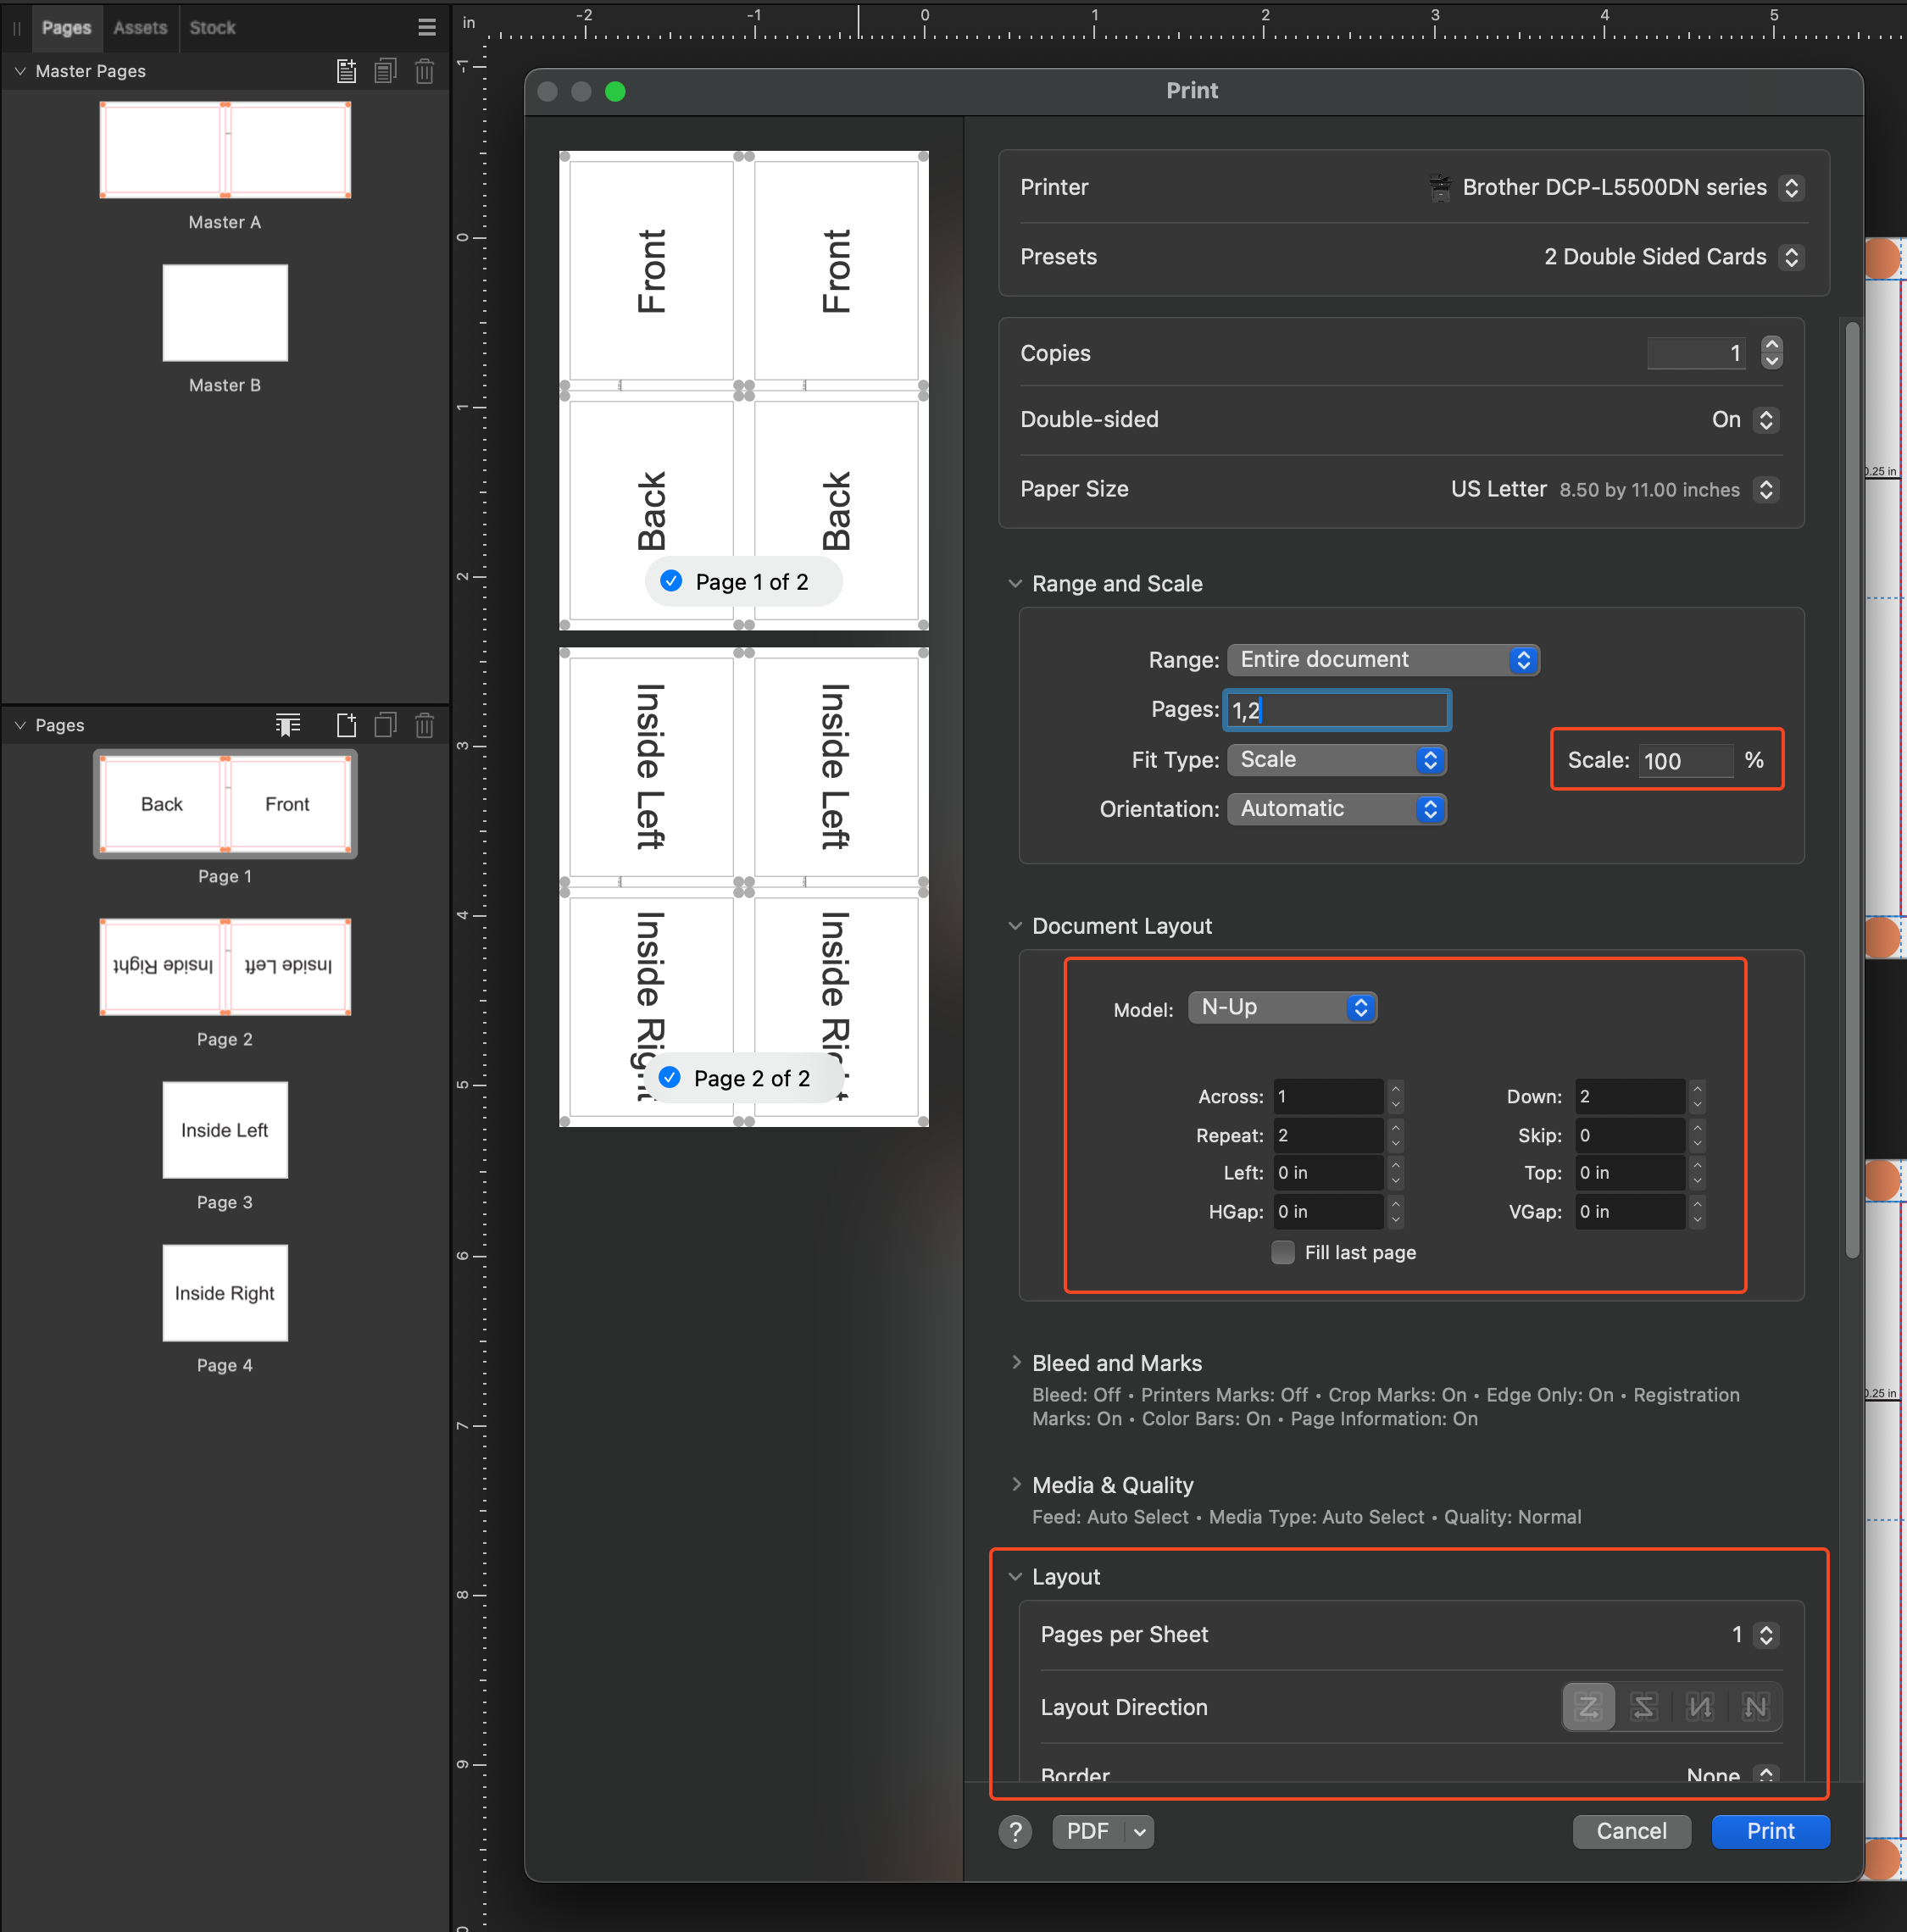
I tried following these steps, but was unable to get the desired result using them. Specifically, once I attempted to set "Pages per sheet" to 2, I started getting some strange results. The closest I've been able to get so far is with the following setup: This gives me mostly what I'm looking for, except the actual printed page doesn't extend all the way to the edges of the sheet. This sounds like it might be an issue with my printer, rather than with Publisher, but maybe there's something else I'm missing? Also, as a side note: is the Print page and N-Up options known to be buggy? I've experienced quite a few crashes and difficulties getting them to provide the intended behavior. When I open the Print page, I often have to fiddle with the N-Up settings a bunch to get the preview back to what I want, even though the numbers in the boxes themselves are the same at the end...

-
Thank you for the suggestions, everyone! Unfortunately I've been busy and unable to spend more time on this project, but when I do, I'll be sure to try these techniques out!
-
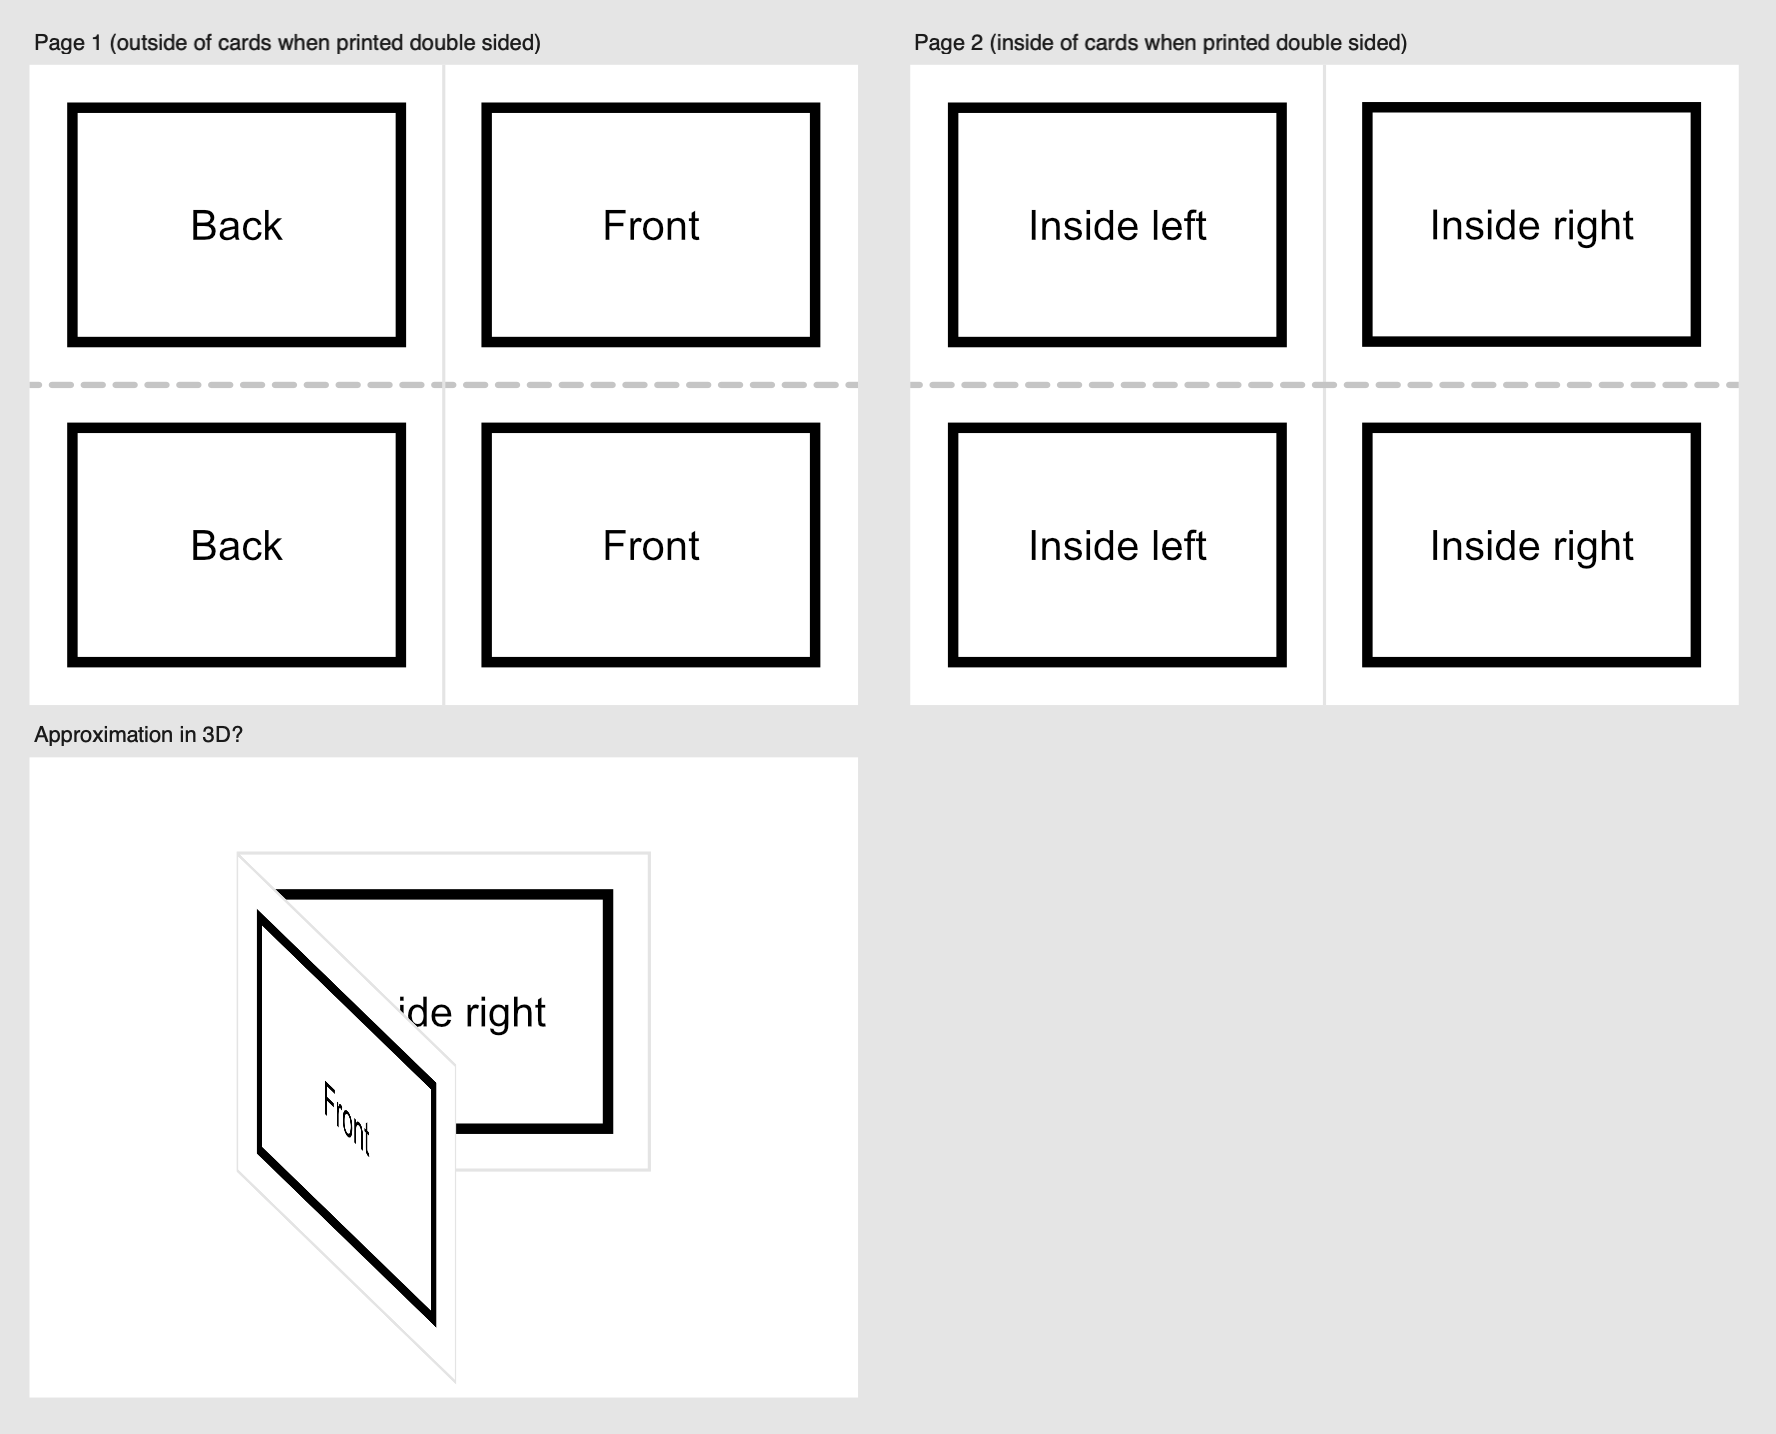
I'm interested in using Affinity Publisher to make some double-sided greeting cards, but I'm struggling to figure out a good way to set up the Publisher document for it. Each card, when folded, should be a quarter the size of an 8.5"x11" sheet of paper. Because of this, we'd like to print two cards per sheet of paper. I've included an Affinity Designer sketch of what I'd like to do. The top two boards show what would be printed on each side of the 8.5"x11" sheet of paper. I've marked them with a horizontal dotted line where we would cut the paper, and a vertical solid line where we would fold it to make the cards. The bottom board is a rough illustration of how one of these cards might look when opened. I was able to find tutorials online that sounded like they'd work when there was only one card per physical sheet, but being able to print two cards at a time is important for us. Other resources led me to the "N-up" layout option in the Print settings. They sound like they're along the right lines, but I had trouble configuring the settings to be quite right... Might anyone know how I can accomplish the layout depicted in my image? Thanks in advance!
-
 NotMyFault reacted to a post in a topic:
Brushes not working correctly with Fill Layers?
NotMyFault reacted to a post in a topic:
Brushes not working correctly with Fill Layers?
-
NotMyFault reacted to a post in a topic:
Brushes not working correctly with Fill Layers?
-
NotMyFault reacted to a post in a topic:
Brushes not working correctly with Fill Layers?
-
Brushes not working correctly with Fill Layers?
Meorge replied to Meorge's topic in V1 Bugs found on iPads
Thank you so much for reproducing and diagnosing the issue! At this point, is there anything else I should do for this, or is it all in the hands of the mods/developers now? -
Brushes not working correctly with Fill Layers?
Meorge replied to Meorge's topic in V1 Bugs found on iPads
An update to this: I decided to test out the same procedure using Affinity Photo on macOS, and it appears this problem doesn't appear there. I've attached a video of my process and the Affinity Photo document to this post. I also used the Color Picker Tool to test the difference in color on the iPad document, and it appears there is a 1-value difference between the original Fill Layer and what has been painted over, as shown in the other video attached. Thinking that this might mean the issue had to do with the Apple Pencil, I decided to go back to the iPad and try replicating the behavior using my finger instead. The issue persisted - simply adding a Fill Layer, switching to the Paint Brush Tool with the default brush and 100% white color, and painting over the Fill Layer with my finger, there was the same difference in color. Screen Recording 2021-10-06 at 9.40.15 AM.mov Screen Recording 2021-10-06 at 9.38.59 AM.mov AF macOS no bug.afphoto
-
Brushes not working correctly with Fill Layers?
Meorge replied to Meorge's topic in V1 Bugs found on iPads
I've attached a small Affinity Photo document that demonstrates the issue, with snapshots for before and after the painting. Additionally, I have a video of me creating the document and displaying the information you requested (color panel with 255,255,255 and 100% opacity, basic factory brush settings, layer information, etc). I wasn't able to get the Layer Alpha (or "Fill Alpha", as the program calls it) to be displayed fully, only the thumbnail. I can see the problem persists in Affinity Photo for macOS as well when I open the document exported from the iPad, as seen in the attached screenshot. RPReplay_Final1633536958.MP4 Fill layer mask bug.afphoto
-
Brushes not working correctly with Fill Layers?
Meorge replied to Meorge's topic in V1 Bugs found on iPads
Thanks, that does indeed sound like it may be related. I'll see if I can take a closer look at it and my workflow tomorrow! -
Brushes not working correctly with Fill Layers?
Meorge replied to Meorge's topic in V1 Bugs found on iPads
Thanks so much for investigating this further, I really appreciate it! I just tried replicating the behavior without using the Flood Fill tool (not really even using the regular Fill tool), and the issue still persists, unfortunately. In my attached video I followed the following steps: Create a Fill Layer. Use the Paint Brush Tool with a 0% white color to create a "hole" in the Fill Layer. Change the Paint Brush Tool to use a 100% white color and paint the "hole" back in. It's difficult to see in the video, but there is definitely a difference between the original Fill Layer color and where I'd painted over it. I made this color difference more pronounced in the attached image. Because of this, I think it might not be an issue exclusive to the Flood Fill Tool and maybe instead related more to this bug report, which was linked in the thread you linked? RPReplay_Final1633475435.mov
-
Brushes not working correctly with Fill Layers?
Meorge replied to Meorge's topic in V1 Bugs found on iPads
I think my phrasing may have confused things. To get the behavior I experienced, I didn't add a mask layer to a fill layer; instead, I cleared the fill layer itself and painted with the white brush on the fill layer. I recorded another video to demonstrate with the following steps: Create a new Fill Layer. Using the Flood Fill Tool, erase all content on the Fill Layer, so that none of its color shows. Use the Paint Brush Tool with the same brush and 100% white, 100% opacity, 0% noise to paint on the Fill Layer. Use the Paint Brush Tool again on top of the previous color. There is a difference in color painting on this step versus step 3. Create a new Pixel Layer. Use the Paint Brush Tool with the same brush and 100% opacity, 0% noise with a dark color (or at least the same one as the Fill Layer) to paint on the Pixel Layer. Use the Paint Brush Tool again on top of the previous color on the Pixel Layer. There is no difference in color that I can see. Return to the Fill Layer, set the Paint Brush Tool's color to 100% white, and paint over the previously painted Fill Layer. Again, there is a visible difference in color. Thanks for suggesting this, it did seem like a potential culprit. I checked, though, and the opacity and noise were at 100% and 0% respectively (as can be seen in the video attached to this post). RPReplay_Final1633410625.mov -
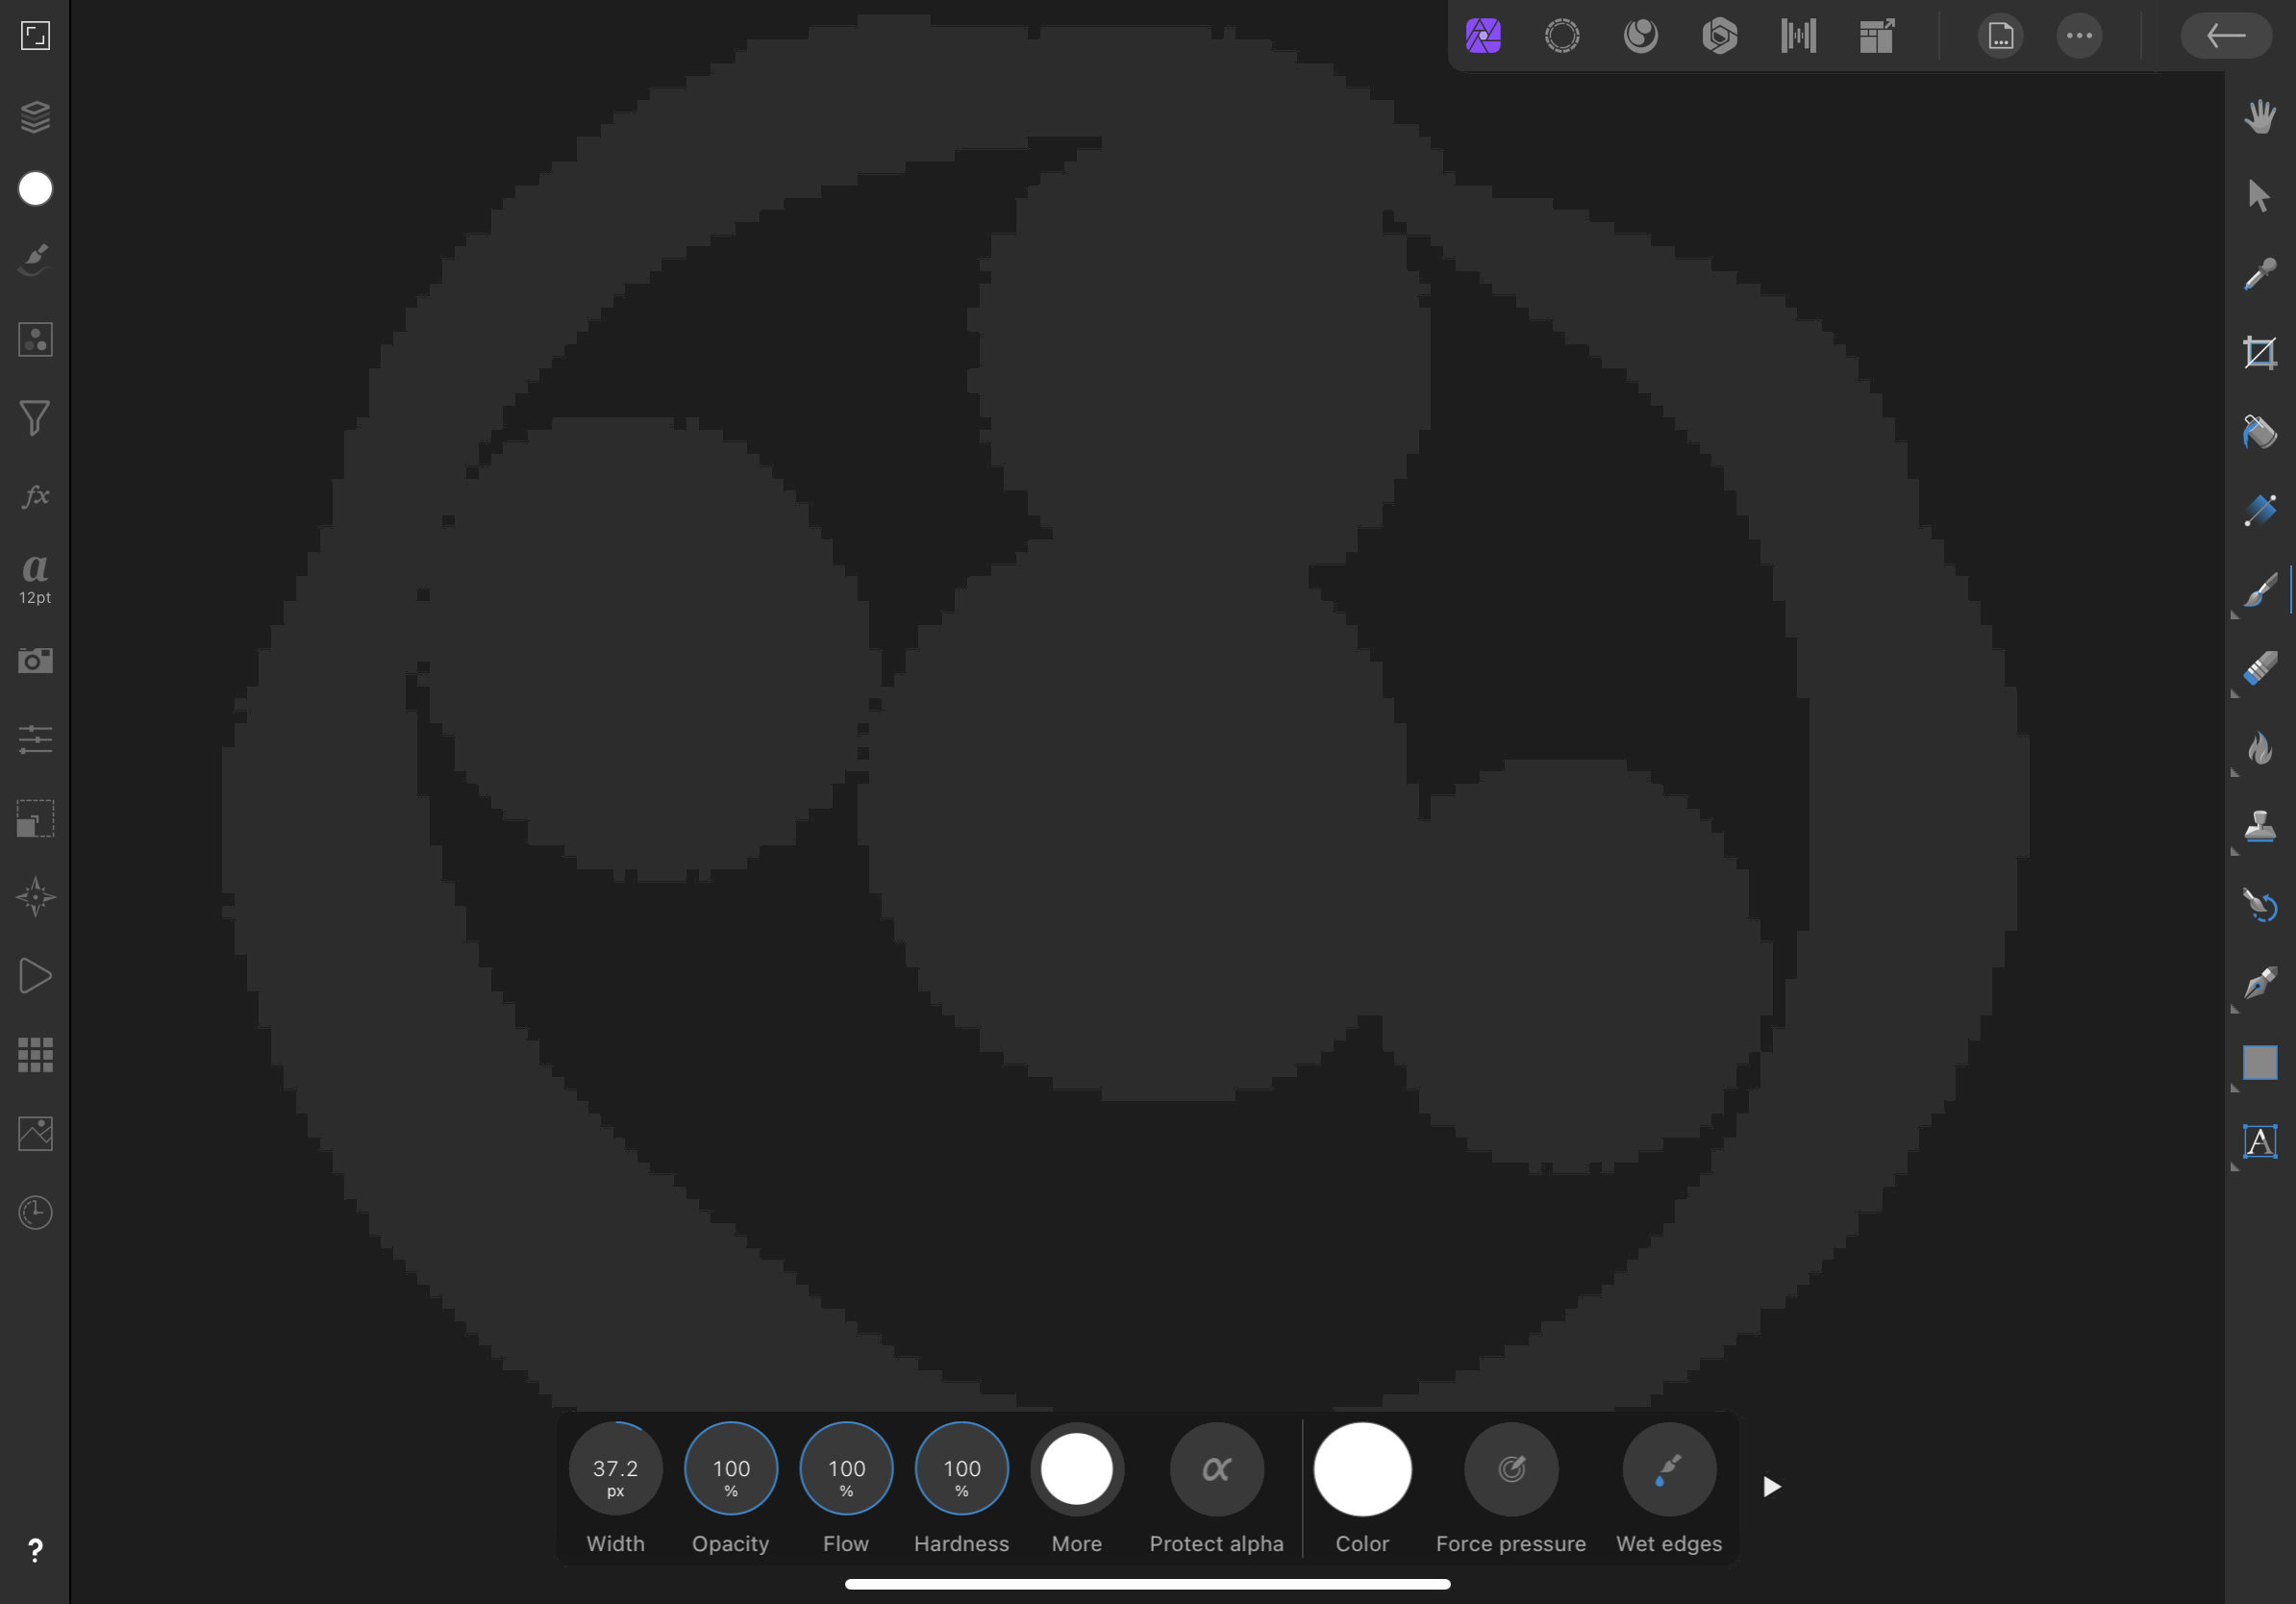
For coloring my artwork, I like to create a fill layer for each color, set the entire layer's mask to black, then paint in the areas where I want the color to show through. Today while following this procedure, I realized that the colors were inconsistent. Despite (at least as far as I can tell) using a brush that should output with 100% opacity and pure white, overlaying strokes results in very slightly different colors. In the video I attached, I confirm that the brush is currently set to 100% white, and display its properties (100% hardness, flow, opacity, etc). I then paint on the canvas, and as you can see it is a solid color. However, when I paint on the canvas again, the color is a tiny bit lighter. Since I'm painting with the same 100% white brush both times, there should be no variation in color. While I didn't record a video of it, I just tried replicating the behavior with the same brush and same color as the fill layer, but in a normal pixel layer, and there the color seemed to be fine. RPReplay_Final1633404443.mov
-
Thank you for the response! No, it wasn't ticked. However, I think I did discover today what the "bug" was! To switch between brush and eraser mode, I'd often press the B key on my keyboard. I thought that this simply toggled between the two tools, but it looks like it was actually switching me to the "Colour Replacement Brush Tool", which gave the strange behavior. Since I took note of that earlier today and began switching explicitly to the normal brush, I haven't had the issue anymore!
-
Recently as I've been doing drawing/painting in Affinity Photo, I've been experiencing a strange bug. Seemingly at random, my brush strokes will act as though they're being masked by what's already on the current layer. This often results in me not being able to paint over areas with partial transparency (only where there is no data for the layer), but sometimes it will also prevent painting in certain areas where there is no data. Restarting Affinity Photo always seems to fix a particular instance of the bug, and using my trackpad to zoom on the canvas sometimes works. I've attached a short video I recorded that will hopefully make the bug easier to understand. I'm really liking Affinity Photo so far for my digital drawing and painting - it's way smoother than Krita! - but this bug is making it difficult to get work done quickly. Please let me know if there's any more information I can provide to help here! Thank you! Screen_Recording_2020-06-23_at_8_37.50_PM.mov