Search the Community
Showing results for tags 'brushes'.
-
 Two things. 1) On a MAC where the image has a black background, this terminal command I find works (in the directory where the JPG files are located) to convert them from JPG to PNG with a transparent background: for i in *.jpg; do convert -transparent black "$i" "${i%.*}.png"; done *(use at your own risk) which brings me to my next point. I now have 99 formerly JPG, PNG images with transparent backgrounds that I would like to import into their own category as Intensity Brushes. Is there any convenient way to do this by bulk import or is my only option one at a time? Selecting more than one assumes I want them all as the same intensity brush, which isn't what I'm after.
 -
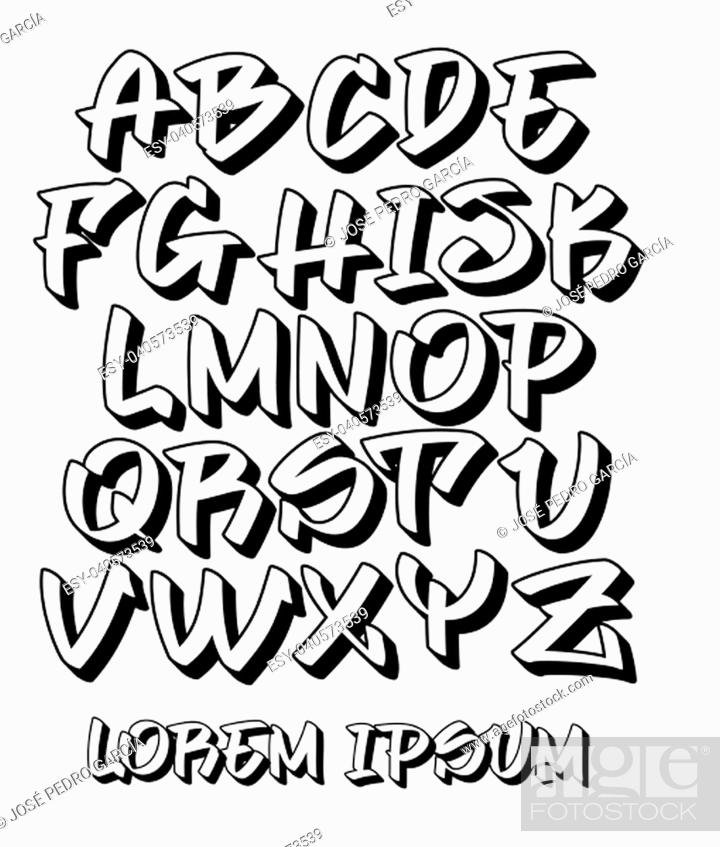
 If someone know brushes like this one down here we (with the black edges) I would like to know I would also like to know about any other brush that can be useful for graffiti style lettering
-
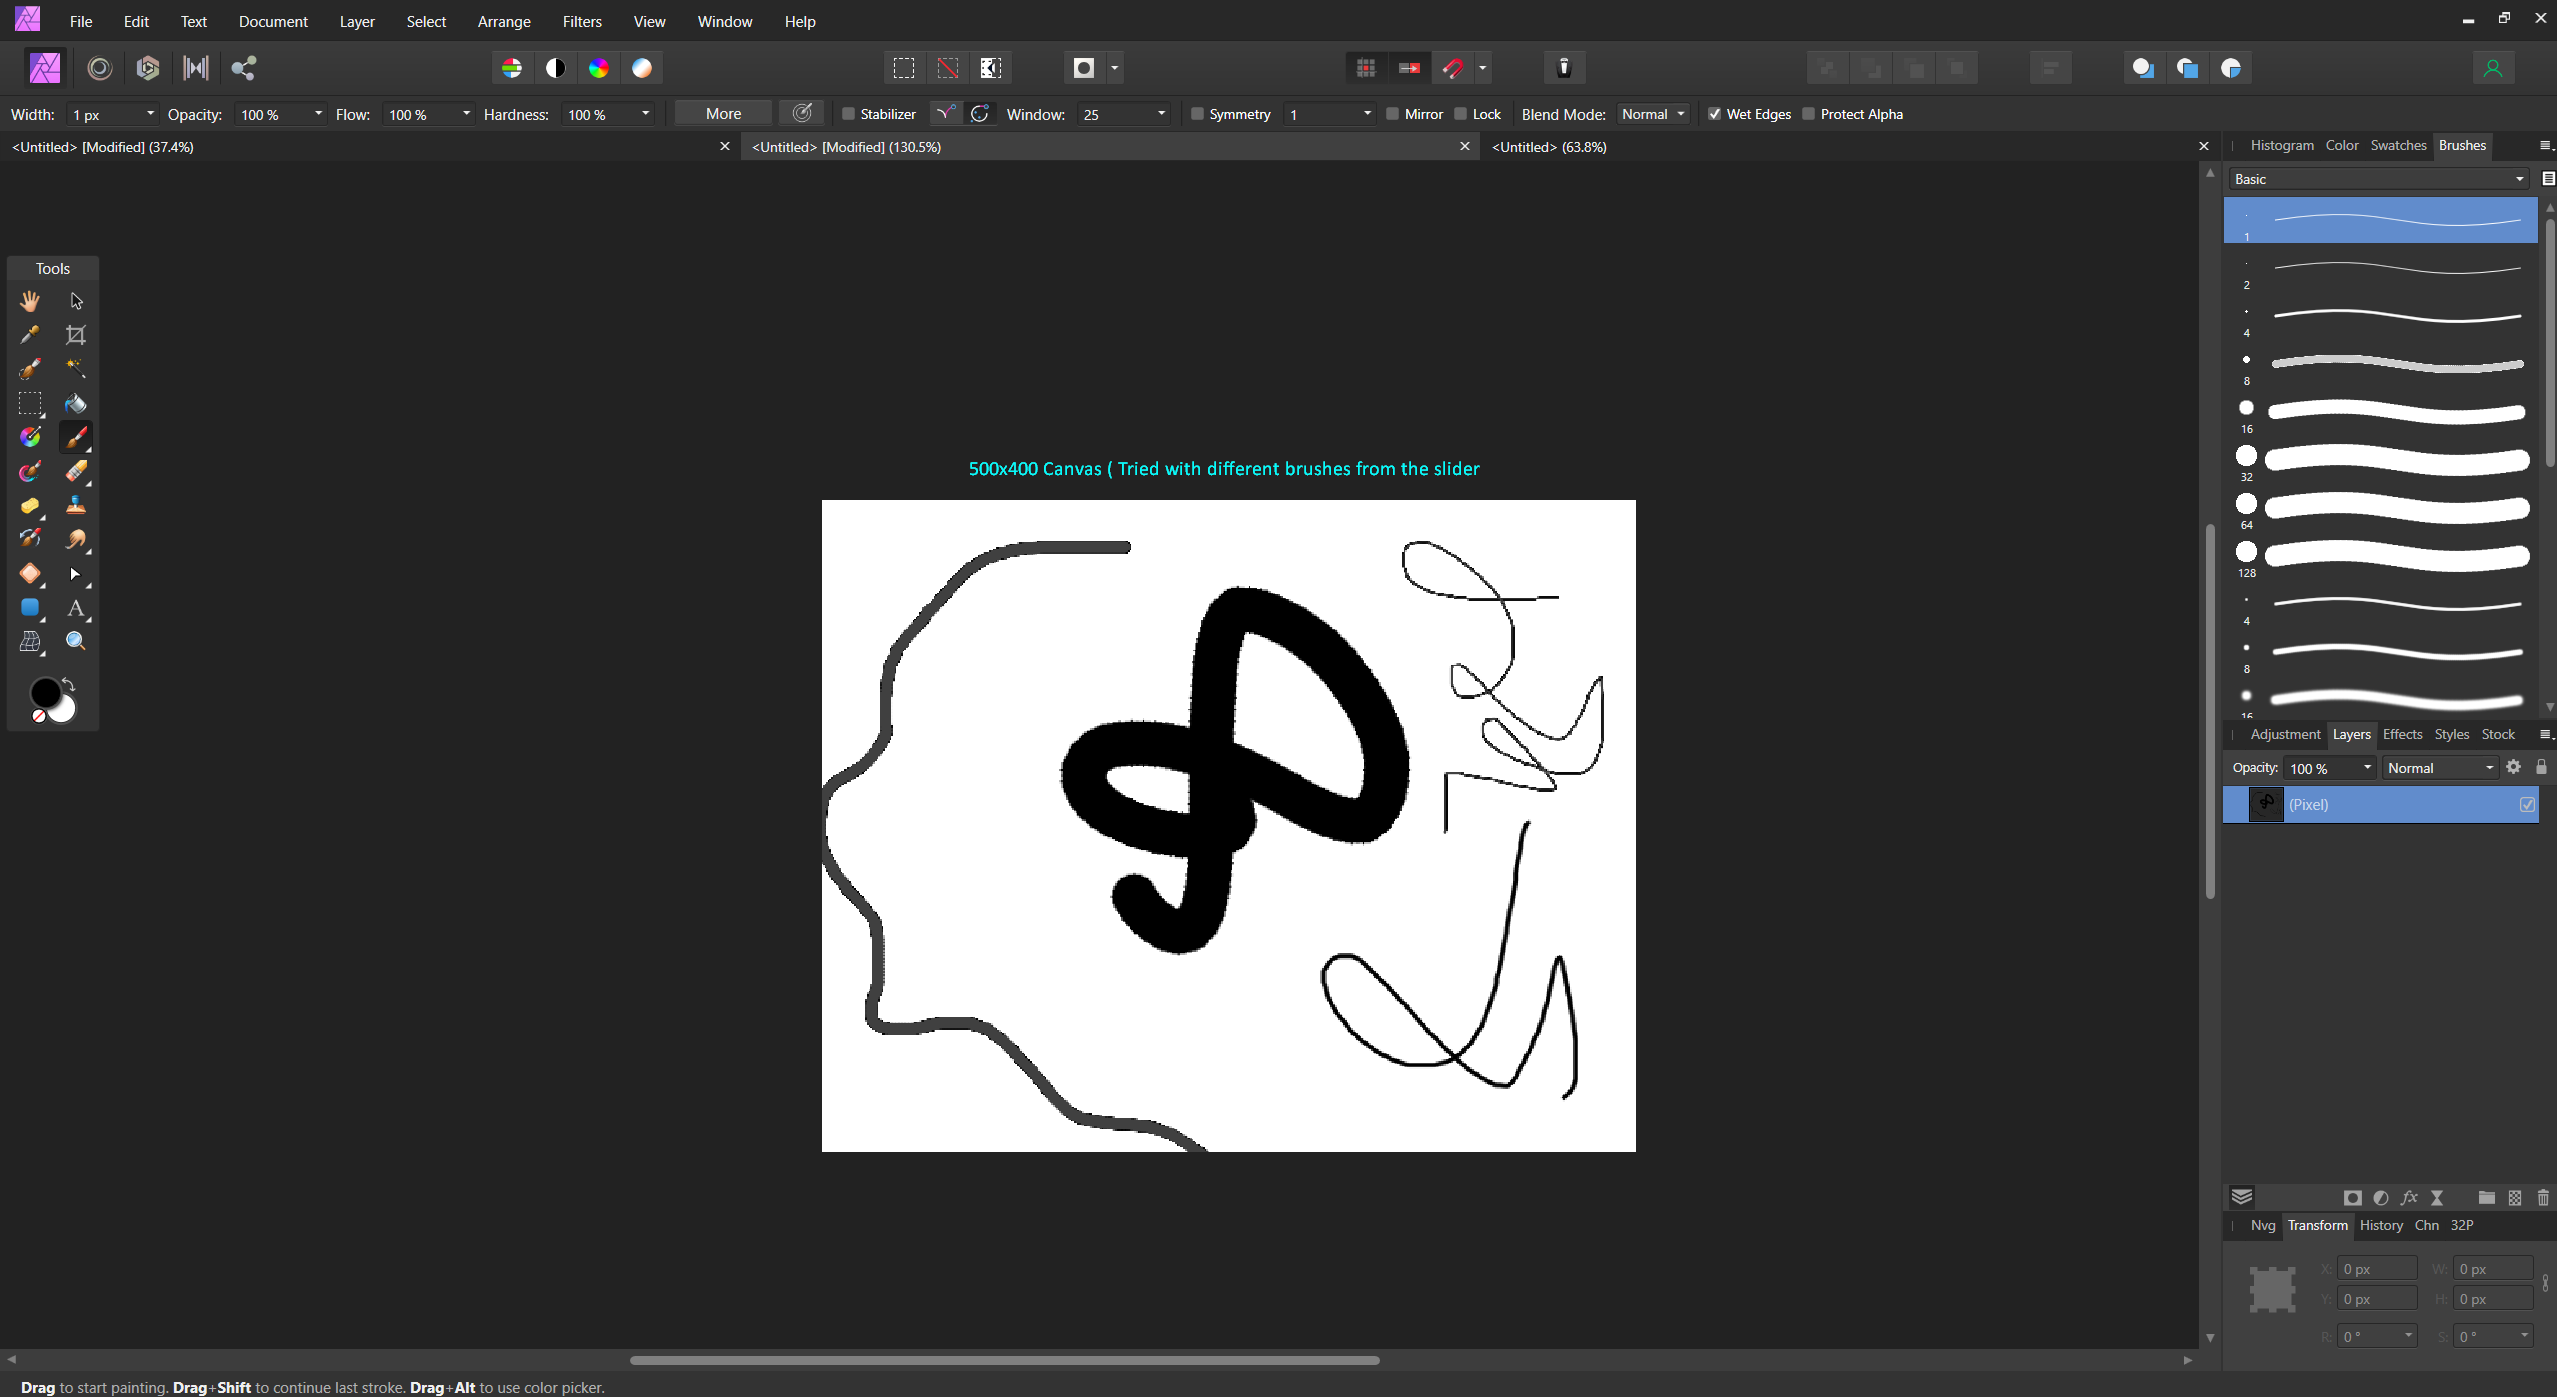
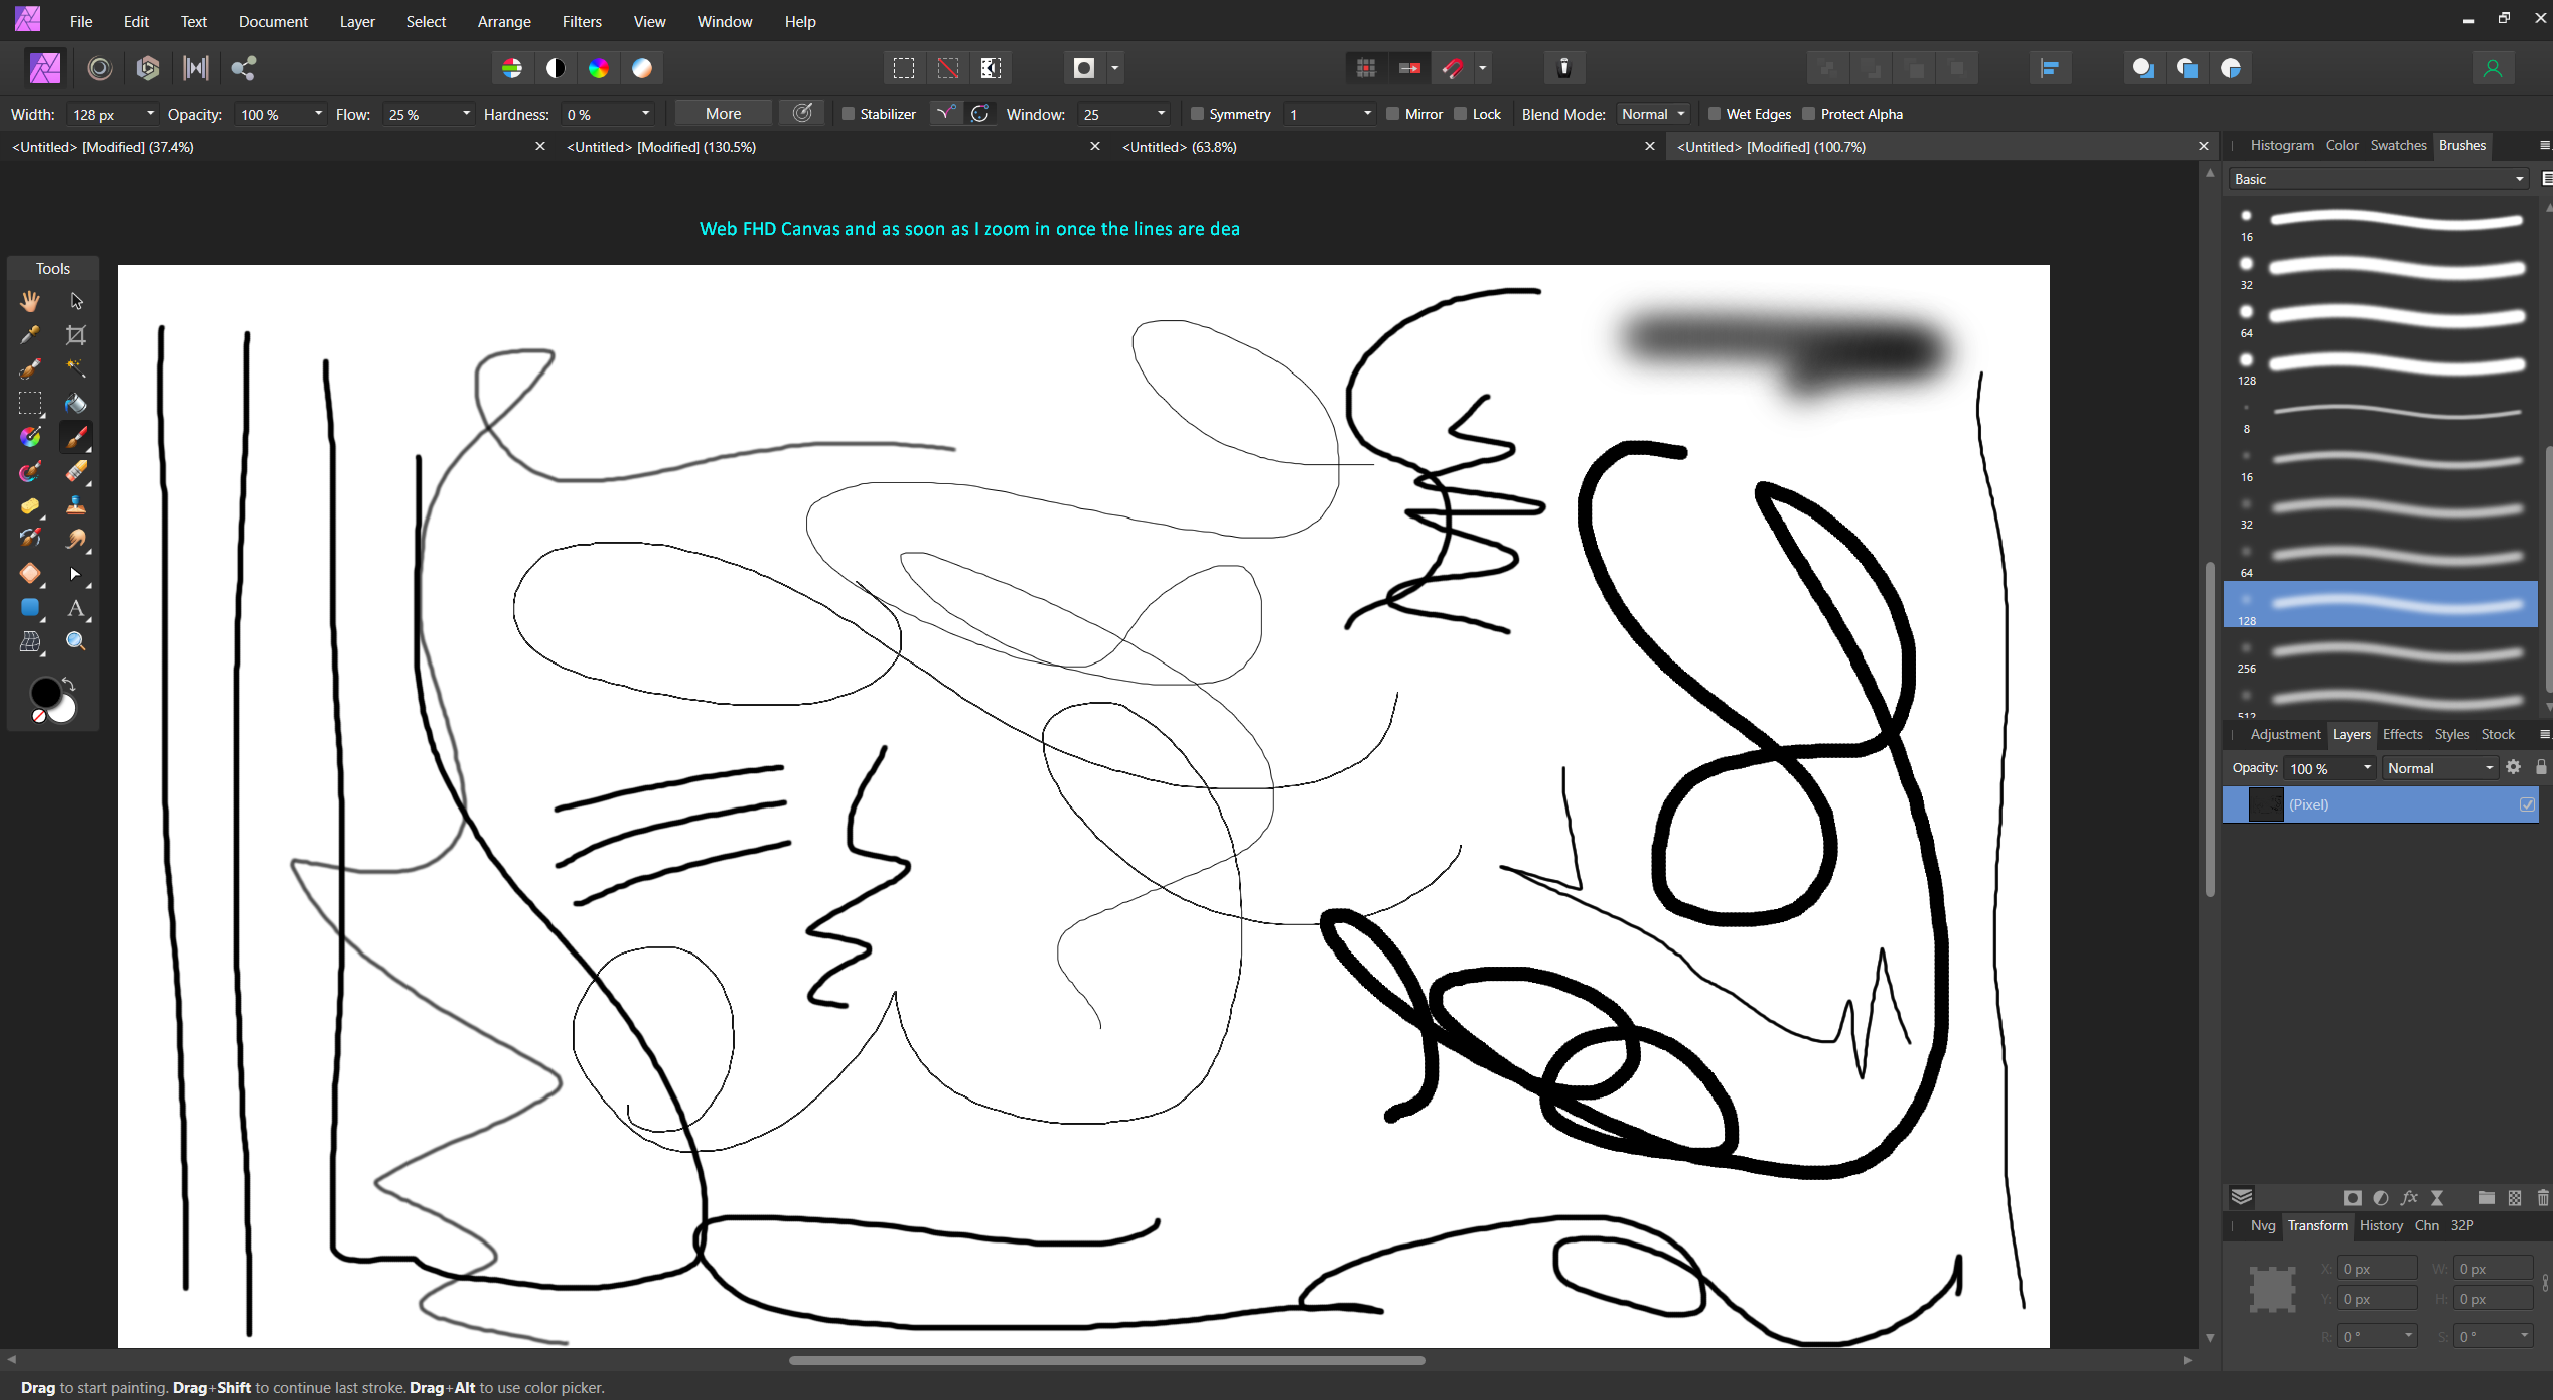
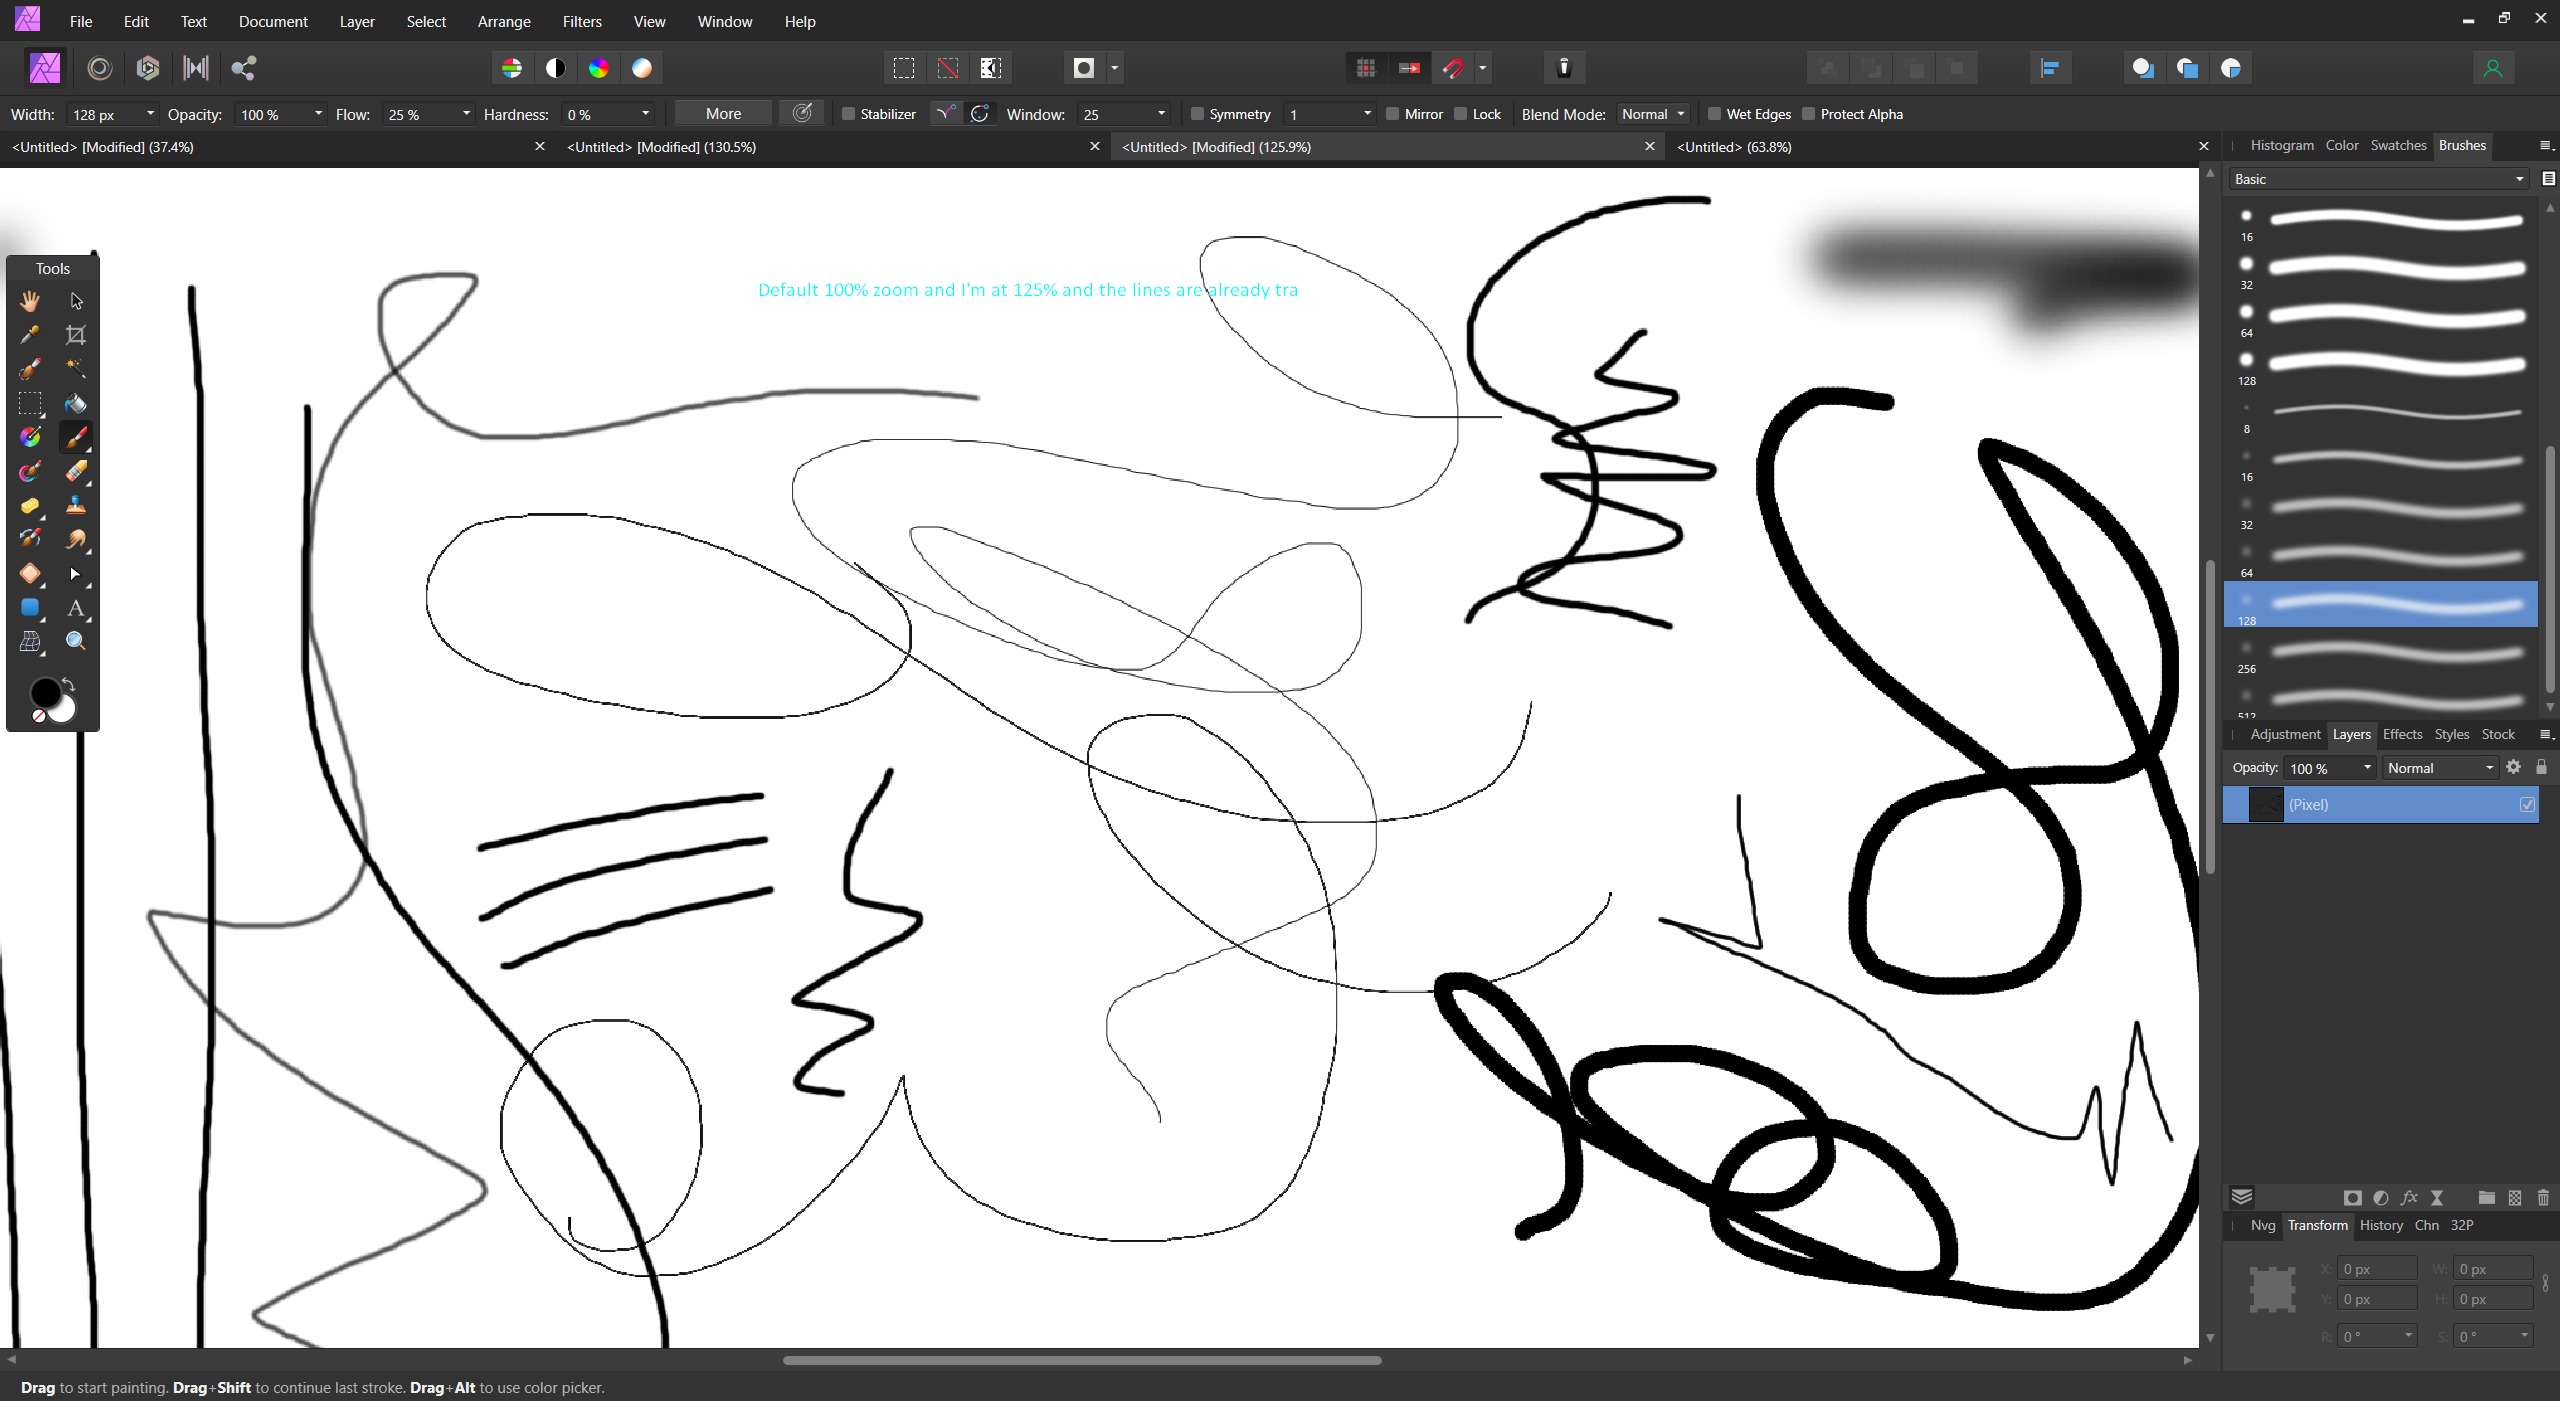
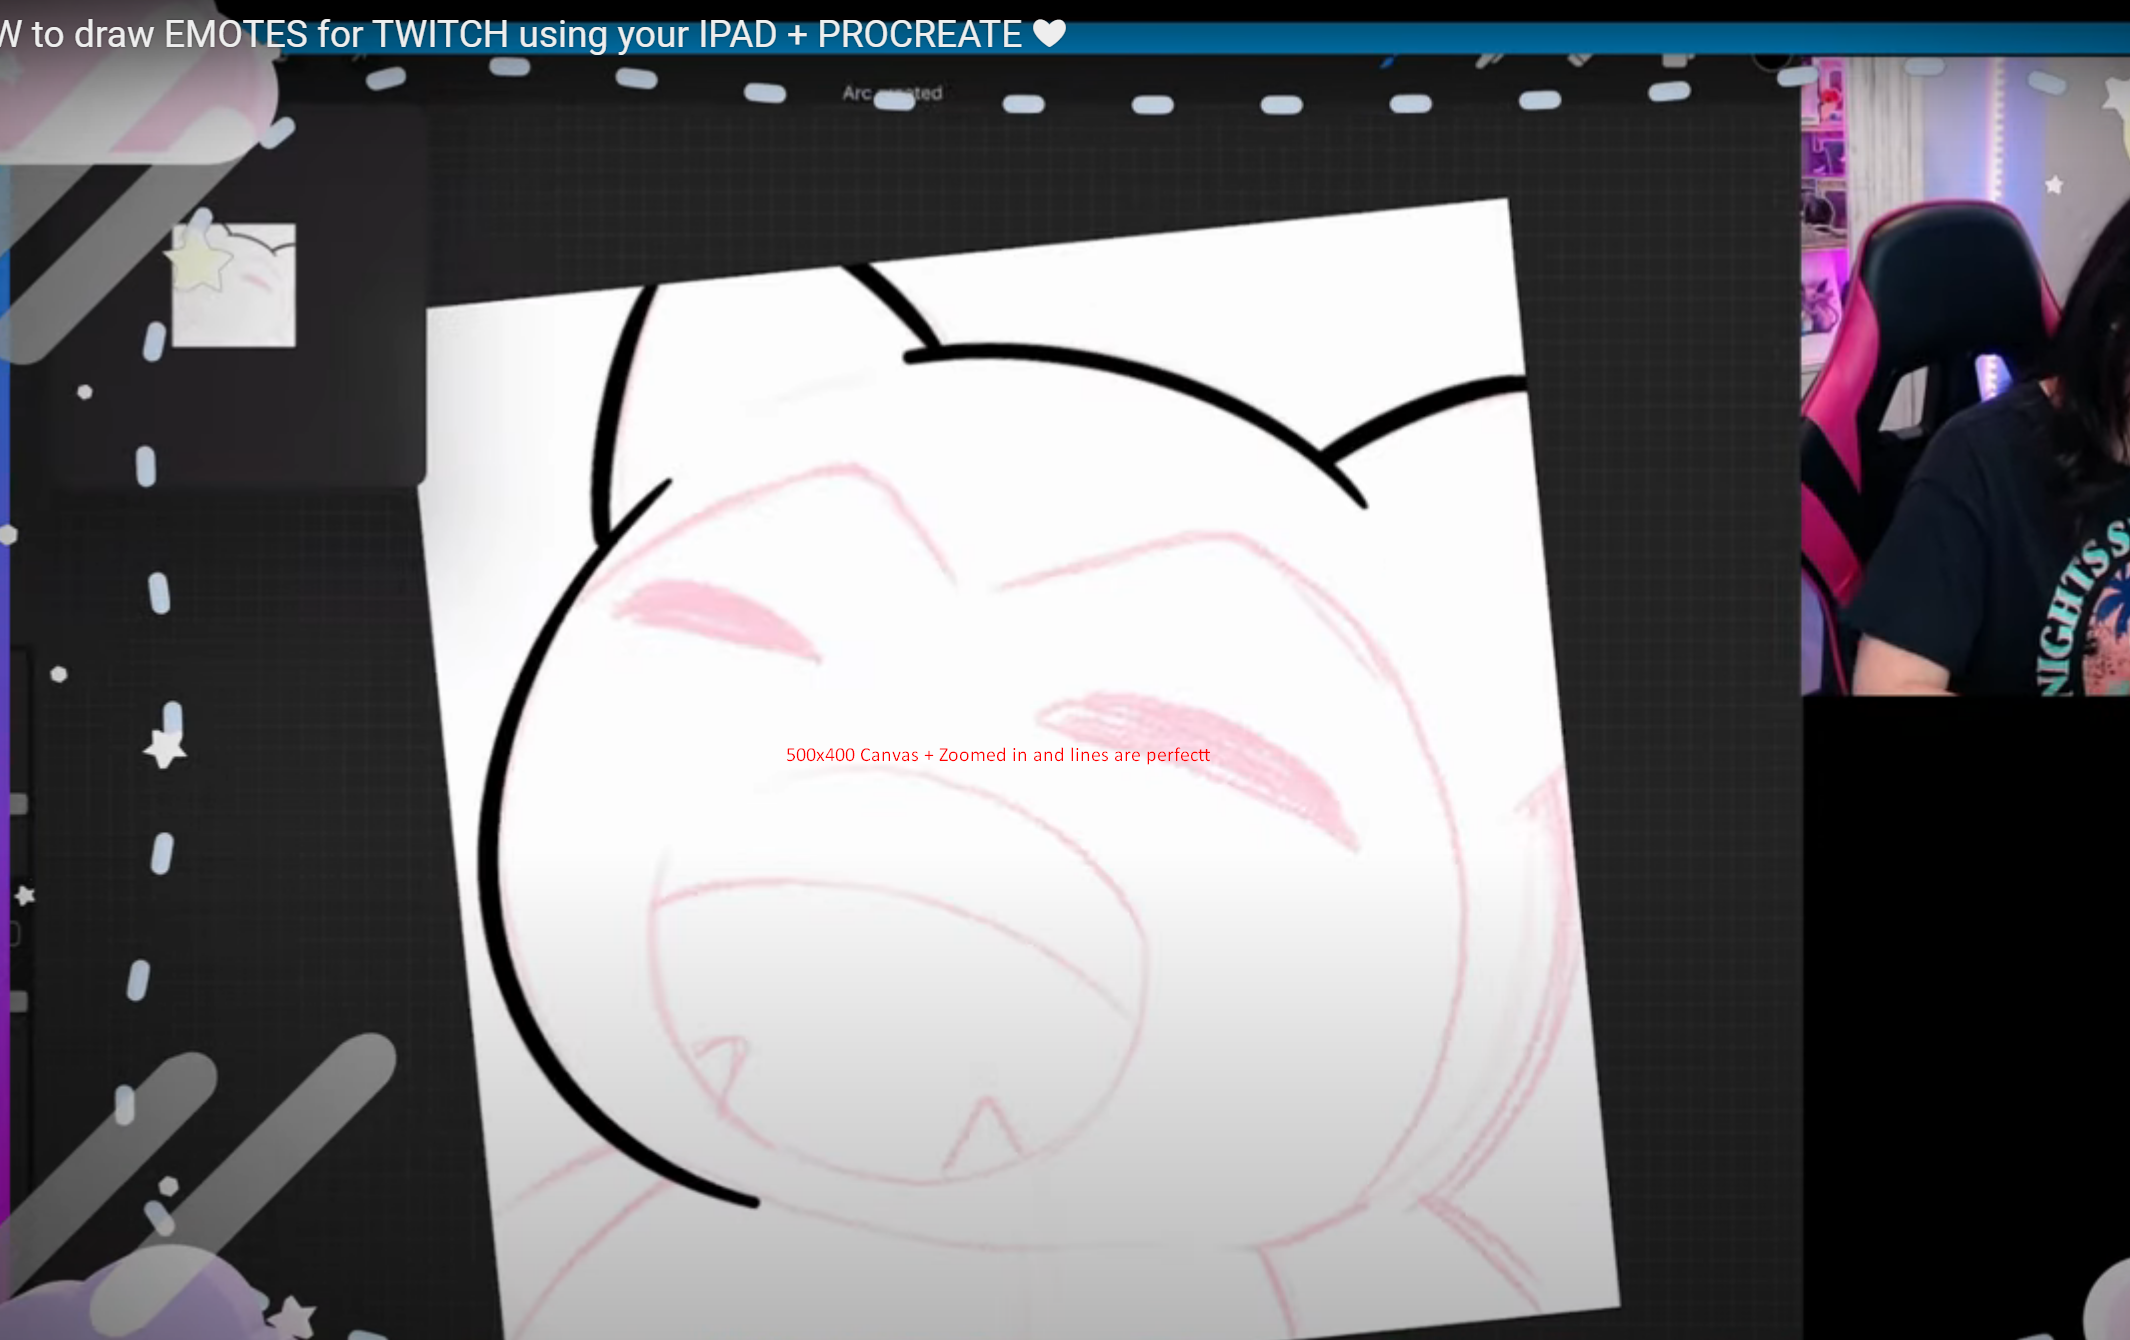
 First of all I want to say hi and thanks to each one of you who decided to waste 2 minutes of their time to read my thread and possible helping me out. As the title states the issue I have a problem in Affinity Photo with the brushes. I'll provide a couple screenshots below, so you can get the idea of what I'm talking about. Pretty sure this isn't as rera as I think it is but I literally did not find any information that could help me out on google, here on the forum, reddit and different sites including youtube videos. I bought the program around 2 days ago since I bought a drawing tablet mainly because I decided to try out with the digital art. Anyway... I'm trying to make some twitch icons, sub badges, logos etc. or even discord emojis but the low resolution of the brushes is killing me. Things I already tried: 1. I've contacted the support and still waiting for an answer. 2. I've tried different brushes ( big - small - meduim ) size and they're all the same. 3. Tried to play with the brush settings and that didn't help either. 4. Tried to play with the flow and hardness of the brush and nothing.... 5. A milion times I made sure that I'm using the "Paint Brush Tool" and not something else. 6. Tried to use different style of brushes etc. and didn't solve anything. 7. Uninstalled the app then installing it again didn't help. 8. Tried different settings when creating a new canvas ( including size ). ( The main settings that I'm normally trying to use are: DPI: 300-400 / Page Width: 500 / Page Height: 400 / Pixels / RGB/8 / sRGB IEC61966-2.1 ). The only way to get a nice looking brush is to make the canvas 5000x5000px but then when I save the image it's too big to be uploaded on discord or twitch. PC Specs: Intel-Core i7-9700 nVidia RTX 2070 (8GB) RAM 16GB DDR4 I'm 100% sure it's not from the tablet, since it's the same when I use the mouse but the tablet is GAOMON M106K PRO. Also the brushes I'm using are the "default basic" ones. P.S: Check if there's a red text on the screenshots, if there is a red text it means that the screenshots is an example taken from a youtube video.
-
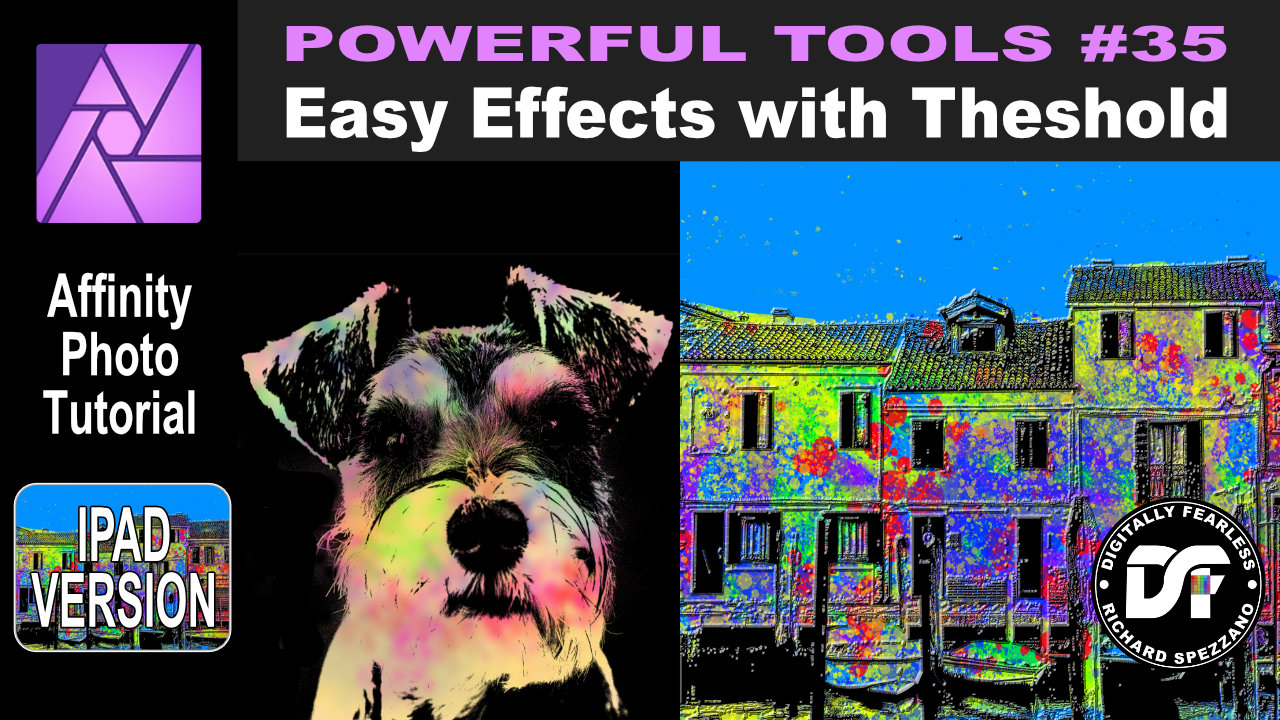
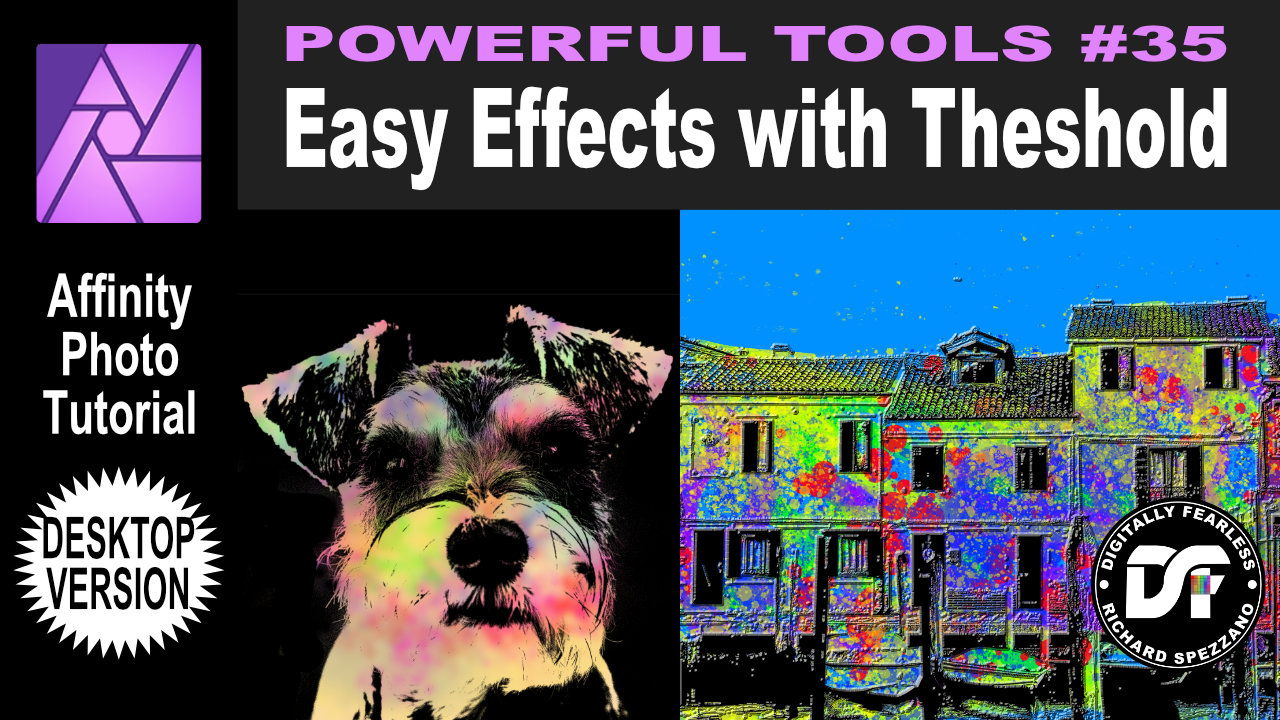
 Affinity Photo beginner tutorial photo manipulation. In this beginner Affinity Photo tutorial I use the threshold filter to create some interesting photo manipulation effects. This is number 35 in the Digitally Fearless “Powerful Tools of Affinity” series. The links to the iPad and desktop versions of this tutorial in the video description and below. iPad version of this tutorial: https://youtu.be/OzVzMuVw5zw Desktop version of this tutorial: https://youtu.be/4RNqDk6qpIk
-
 Hello ! First, I wanted to thank teams who work on affinity because if it doesn't exist,I won’t be able to pay software that i need to work. So really thank you for that ! I hope there is an answer for my question : Actually, i am not getting to vectorize contours when i apply brush to them. It's possible when it's continuous line contours but not with brush. I downloaded this brush on your site, so it's not a problem of compatibility....So i hope i am on the right place to ask this. And sorry for my english.
 -
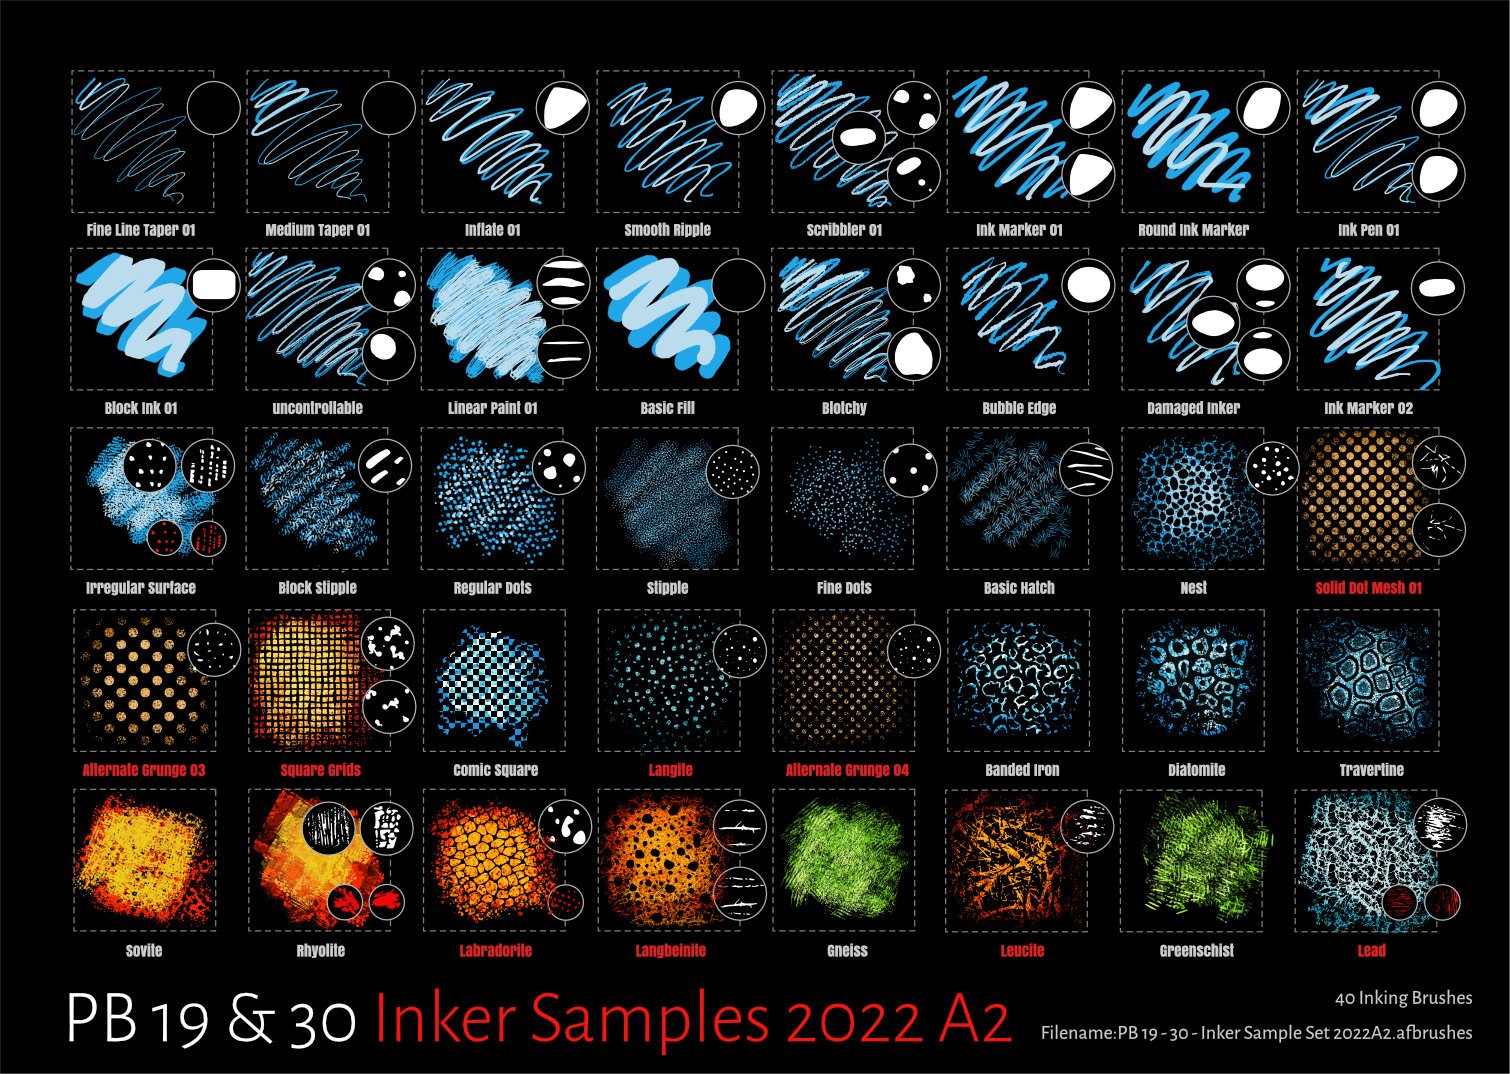
Project Brushes 19 & 30 mixed sample set A2 Uploaded a sample set of the latest brush offerings used for #Inktober 2022. Attempted to improve the brush set with the addition of PB 30 Comic Grunge and PB 19 Inker Texture samples Still Consists of 40 Raster brushes but extracted from 7 inker Brush sets. Updated for Affinity 2 but retained version 1 brush set Affinity 01 Affinity 01: Original Brush set (Sample sheet removed) Affinity 02 Affinity 02: Updated version 2 set with adjustment to dynamics to include Distance and Interpolate (Sample sheet as below). Replaced Linear Paint 01 with better nozzles! Extracted Brushes 1. PB Inker 19 (Used in 2020) from collection of 60...about to modify to version 3 so will be archived! 2. PB 19 Inker pattern (2020) 3. PB 26 Distressed Pattern (6) Blue 4. PB 26 Distressed Eraser (4) Orange 5. PB 26 Distressed Paint (4) Green 6. PB 19 Inker Texture (2022) 7. PB 30 Comic Grunge (2022) New Brushes highlighted in red! Updated using new Affinity 2 brush dynamics Samples as below: Affinity 01 PB 19 - 30 - Inker Sample Set 2022.zip Affinity 02 PB 19 - 30 - Inker Sample Set 2022 A2.zip
- 12 replies
-
- 20
-

-

-
- inktober inkers
- inktober
- (and 3 more)
-
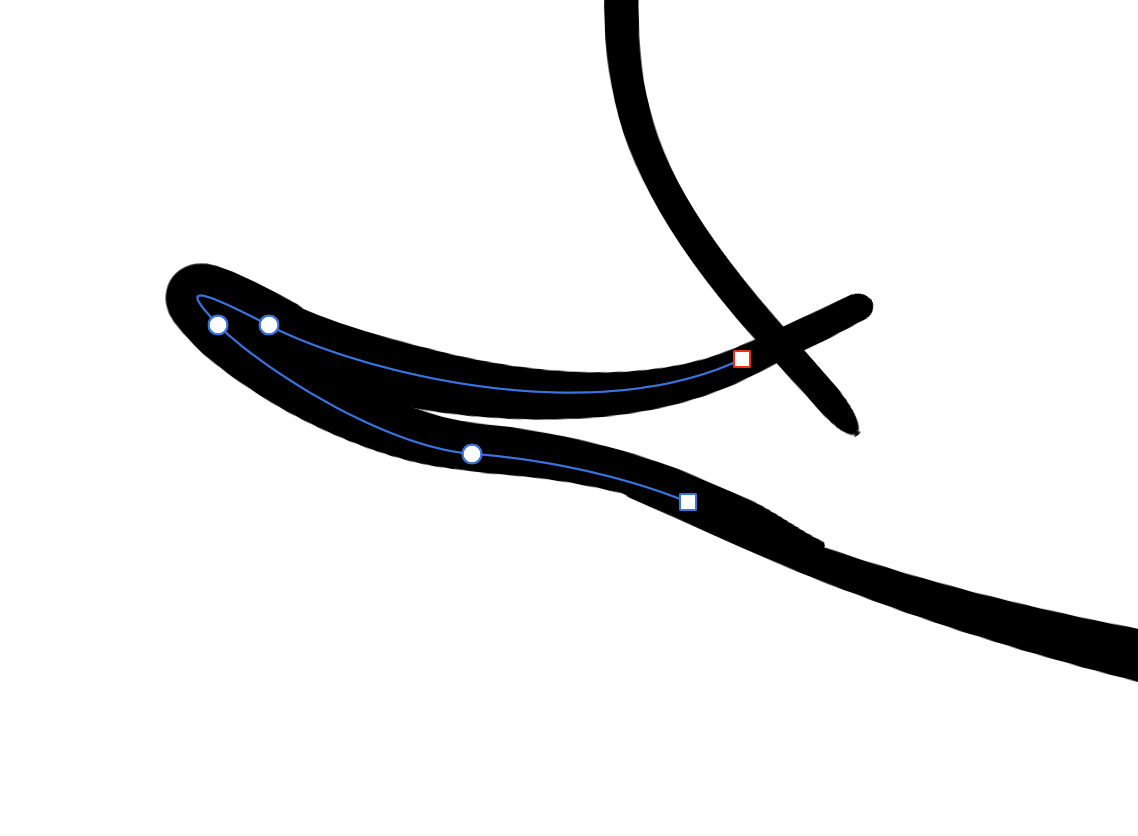
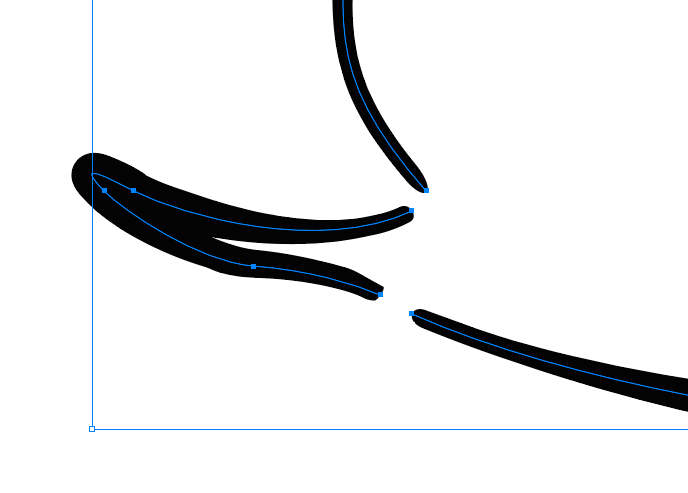
 Hi, I've not been able to find an answer to this with some googling, so I thought it'd be best to ask. Basically, I'm trying to recreate a logo that was originally done with a sweeping calligraphic brush, but the original has been lost in the mists of time and now the file only exists as a 400px png. I've managed some of it so far with the pen tool and poking at that with the brush options (the dark path in the image), but what I'm really looking to do is like a blade-tip marker so that it will look like the rest of the text - as in the angle of the brush stays at the same angle rather than perpendicular to the path. Is this possible? Thanks, Sean
-
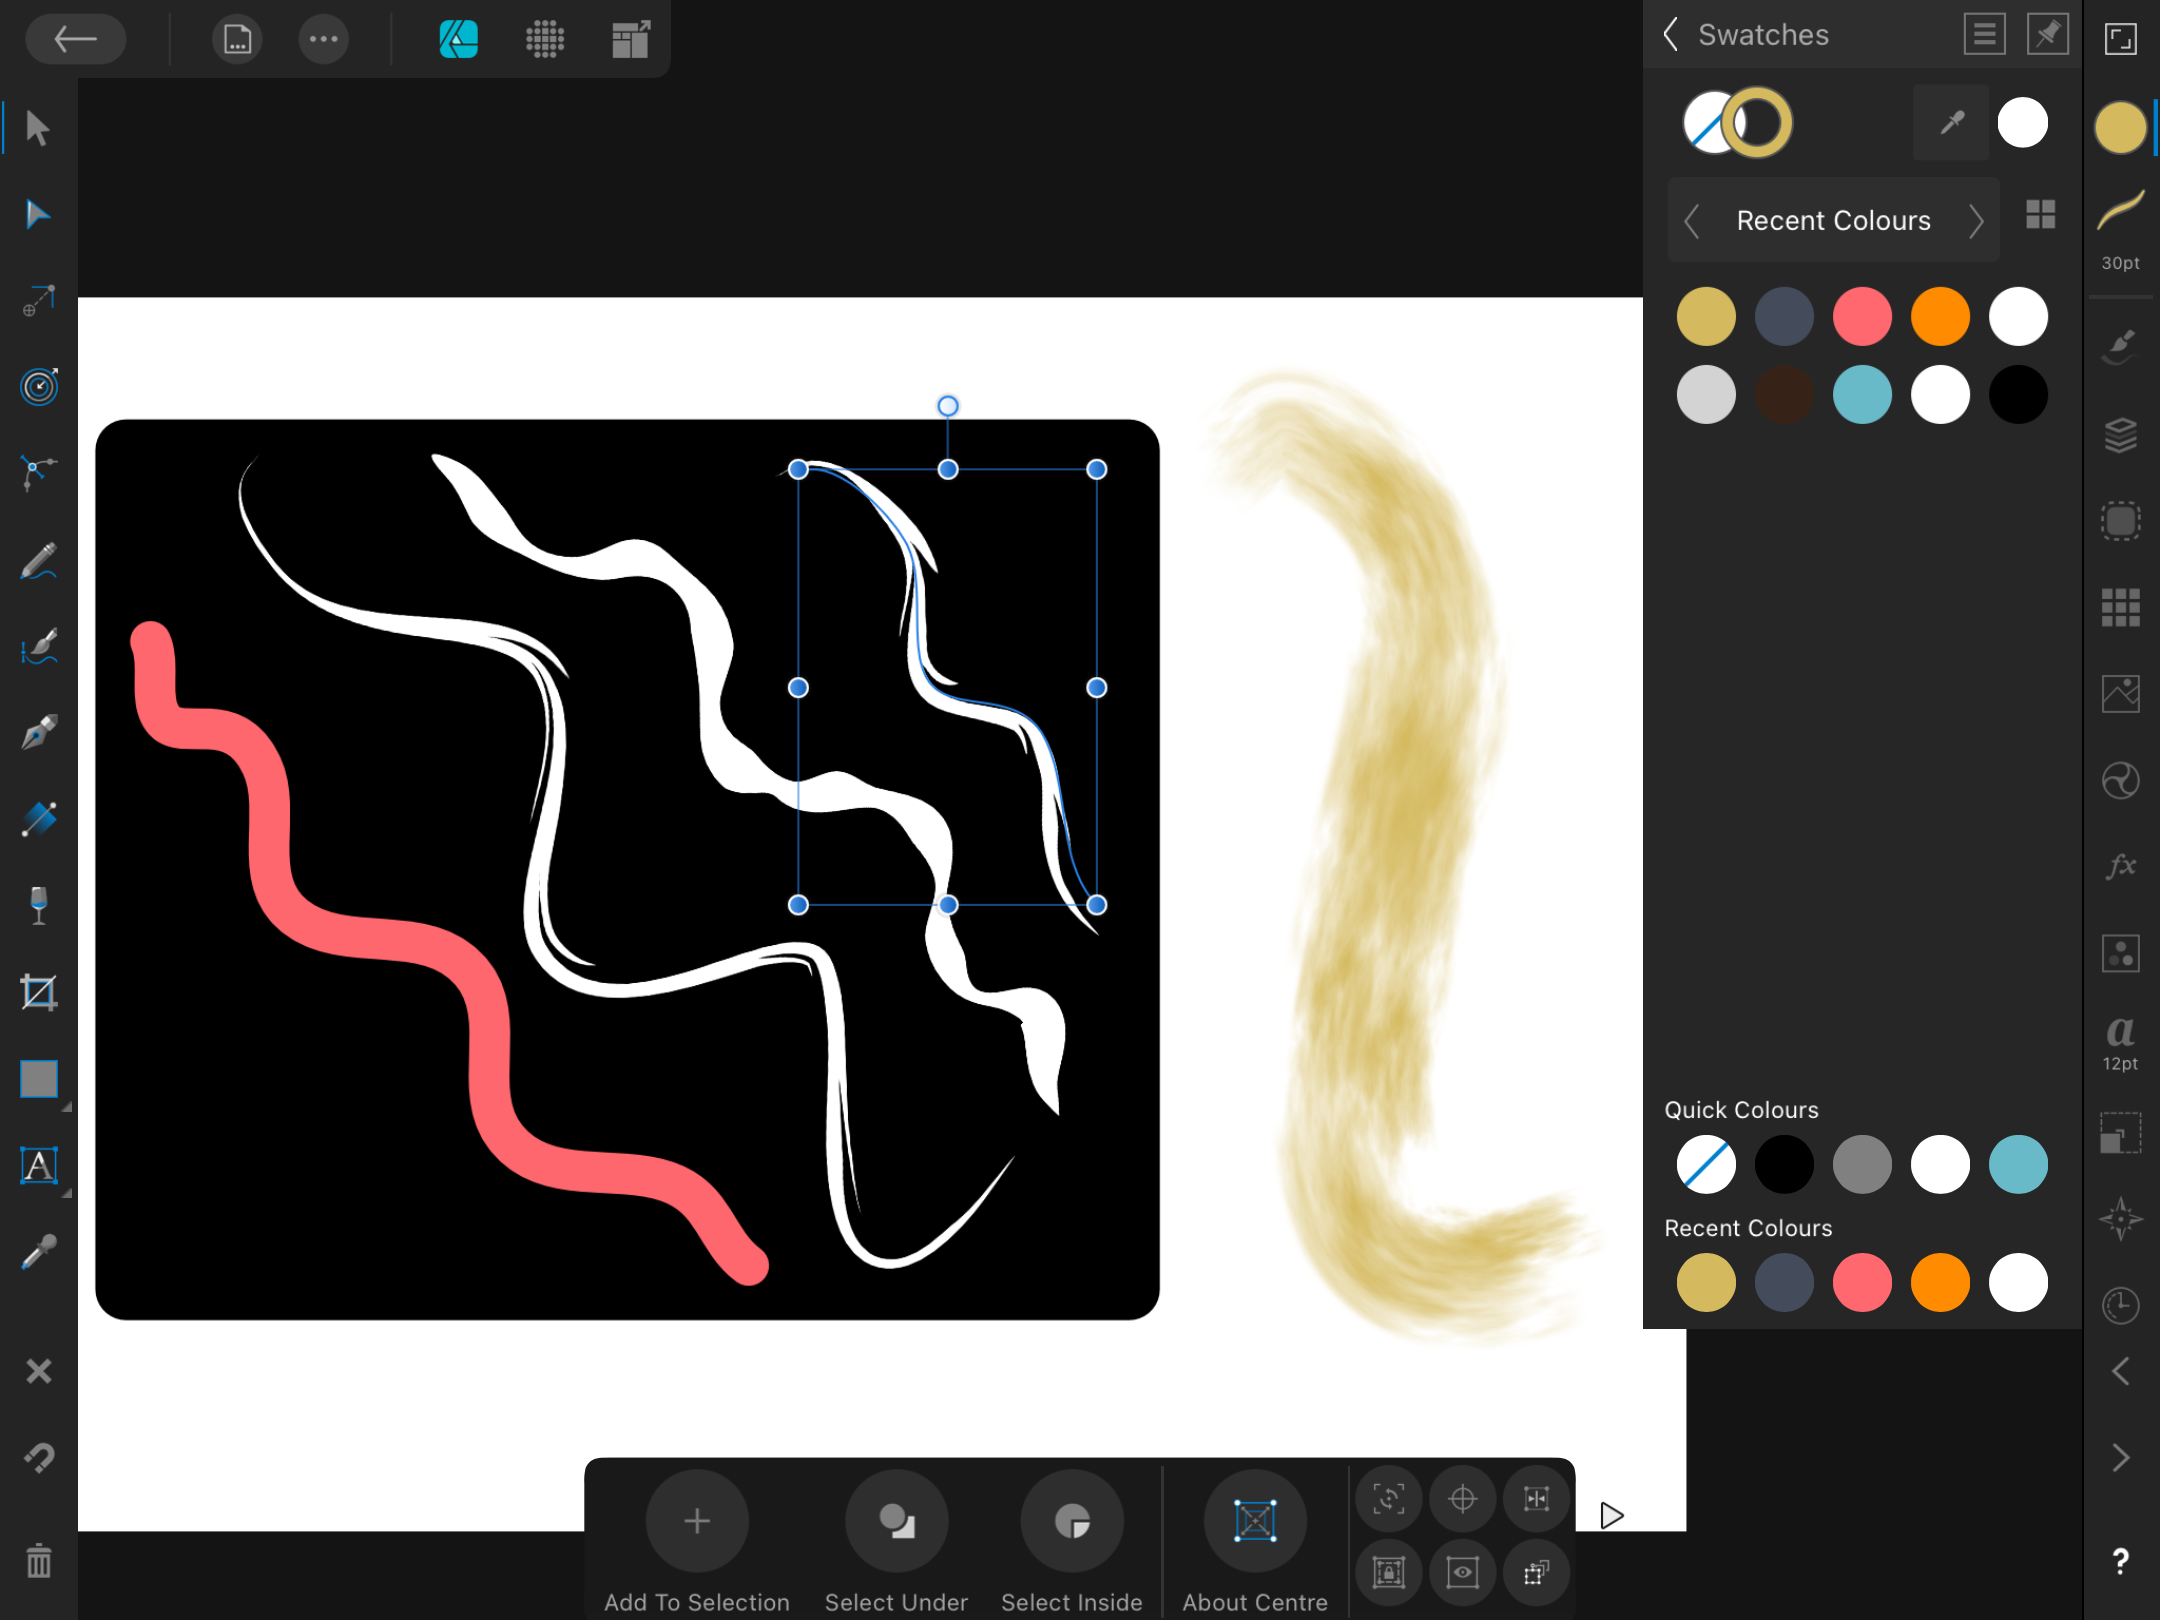
 I decided to try and recreate some of my favourite brushes for Affinity Designer and I am really struggling with this. The pressure I set in the brush creation tool doesn't seem to work when I use it as an actual brush for the brush I made from a solid brush. When I try to create an image brush it doesn't change colour. But the brushes I purchased or downloaded are image and solid brushes but they do everything the way they are supposed to. What am I doing wrong? Screenshot attached. In the image the left is a solid brush with varying pressure sensitivity that is set in the brush settings. But it doesn't show when I paint. I have to manually create the pressure I had set on the brush each time. This is tedious and the reason that I made a specific brush for this. but it doesn't work. I Tried making the same kind of brush with a shape using an image brush but that refuses to change colour. You can see the selected brush is meant to be yellow but it refuses to be anything but white. But the brush stroke outside the shape changes colour as it should. I've checked the settings and I don't see anything about this. How can I fix this? In screenshot 2 I'm having the same issue. But this time on the desktop app. Again it won't change colour and the pressure won't work except when I'm testing the brush. I'm sure I am doing something wrong because the brushes I download seem to work. Could someone help please. Thank you.
-
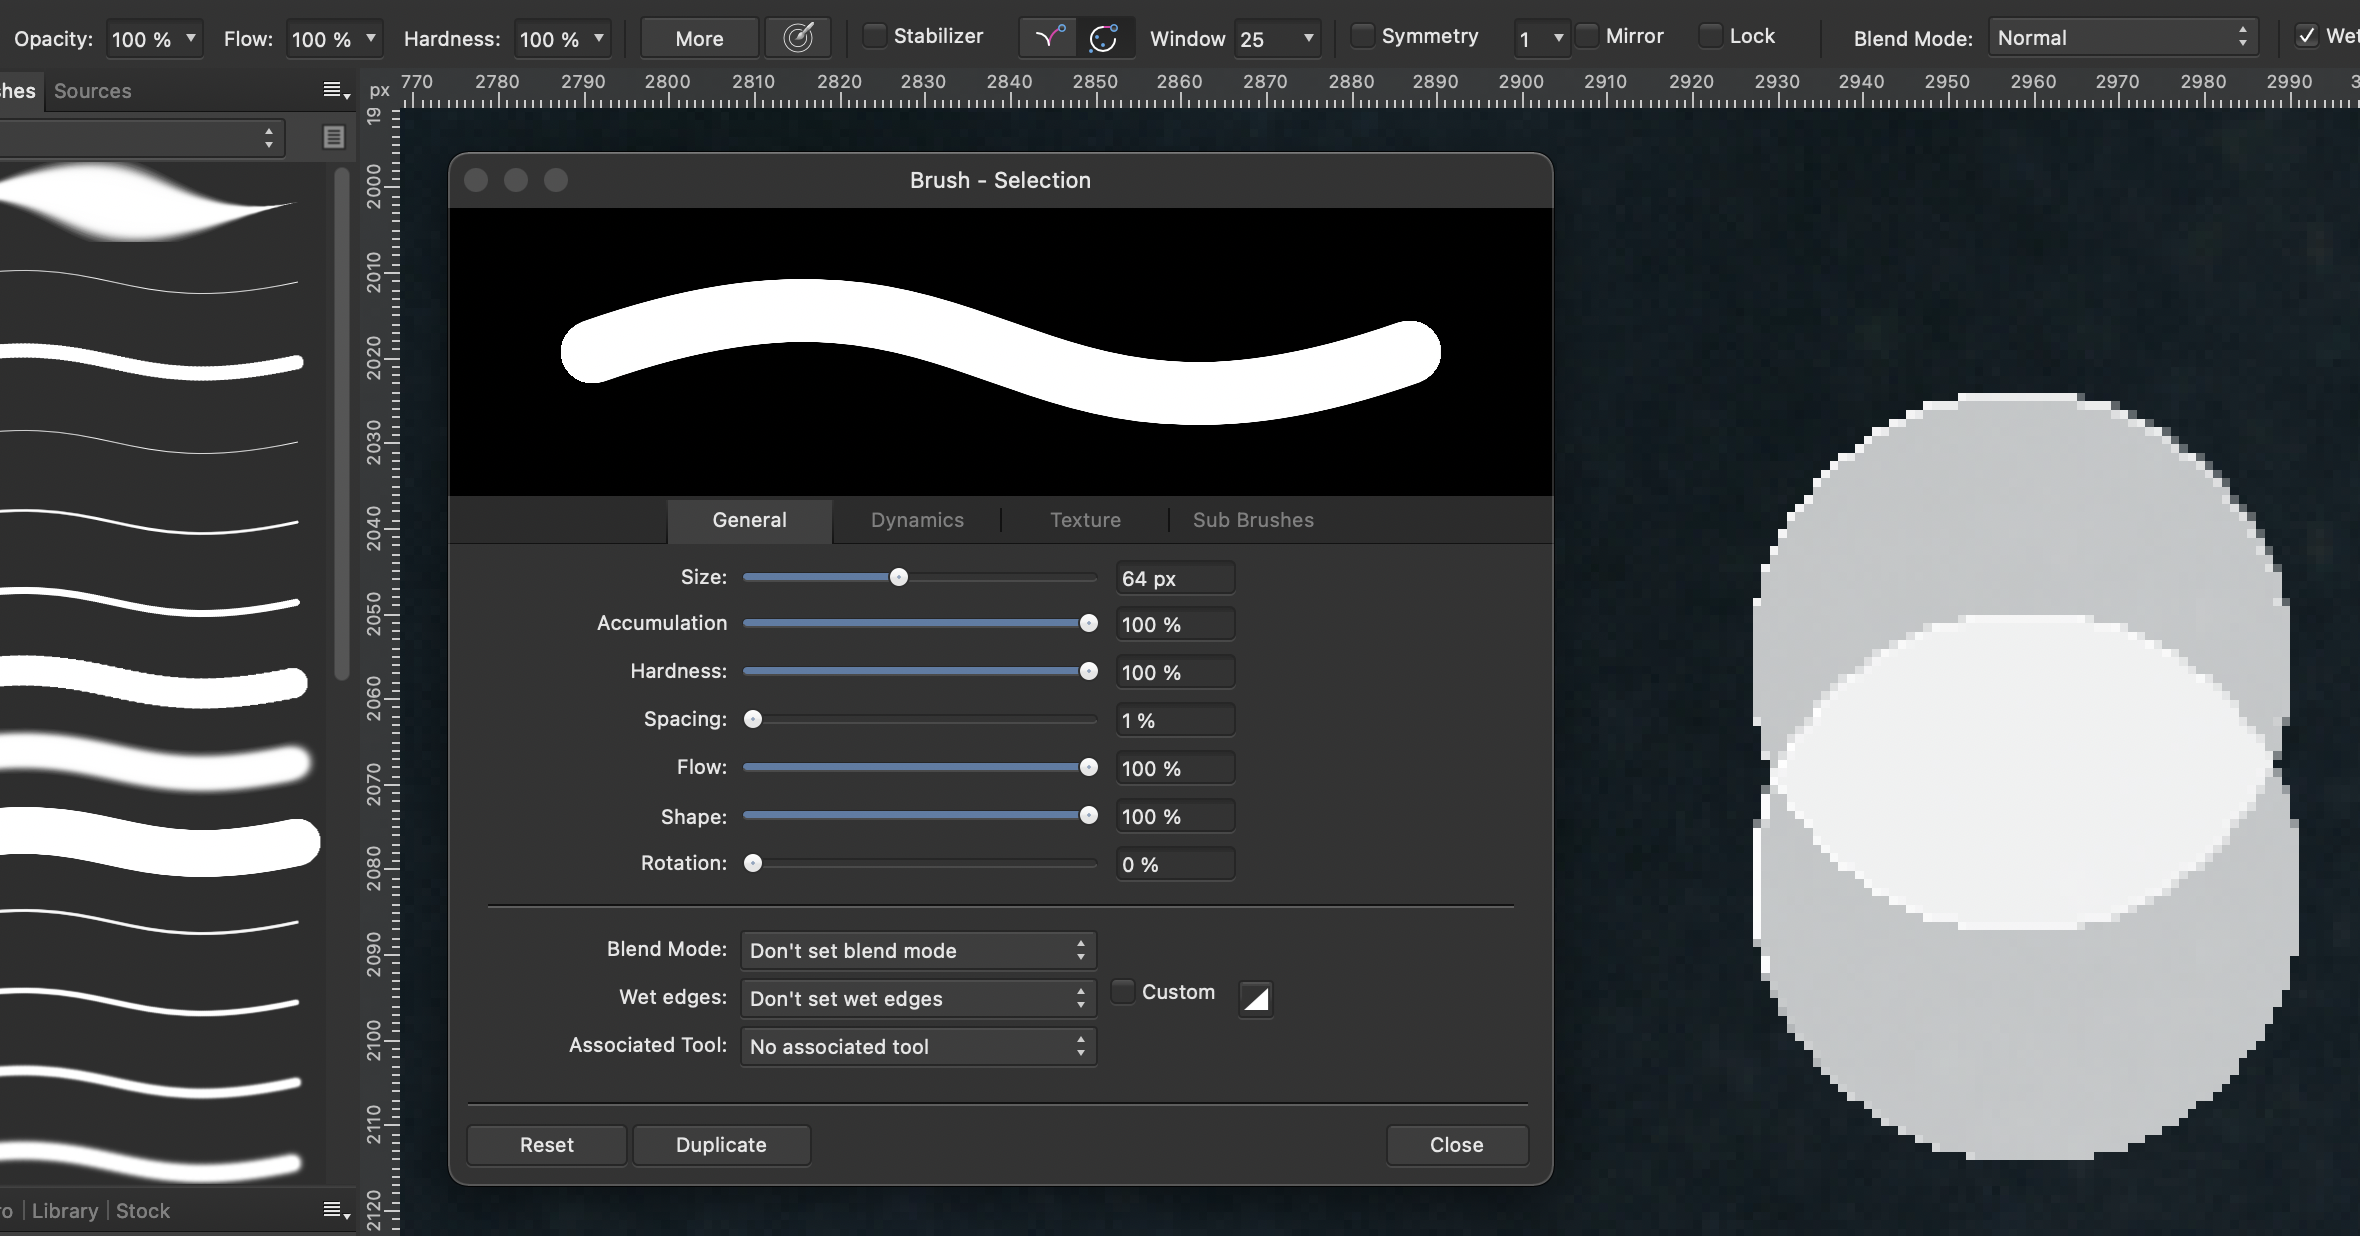
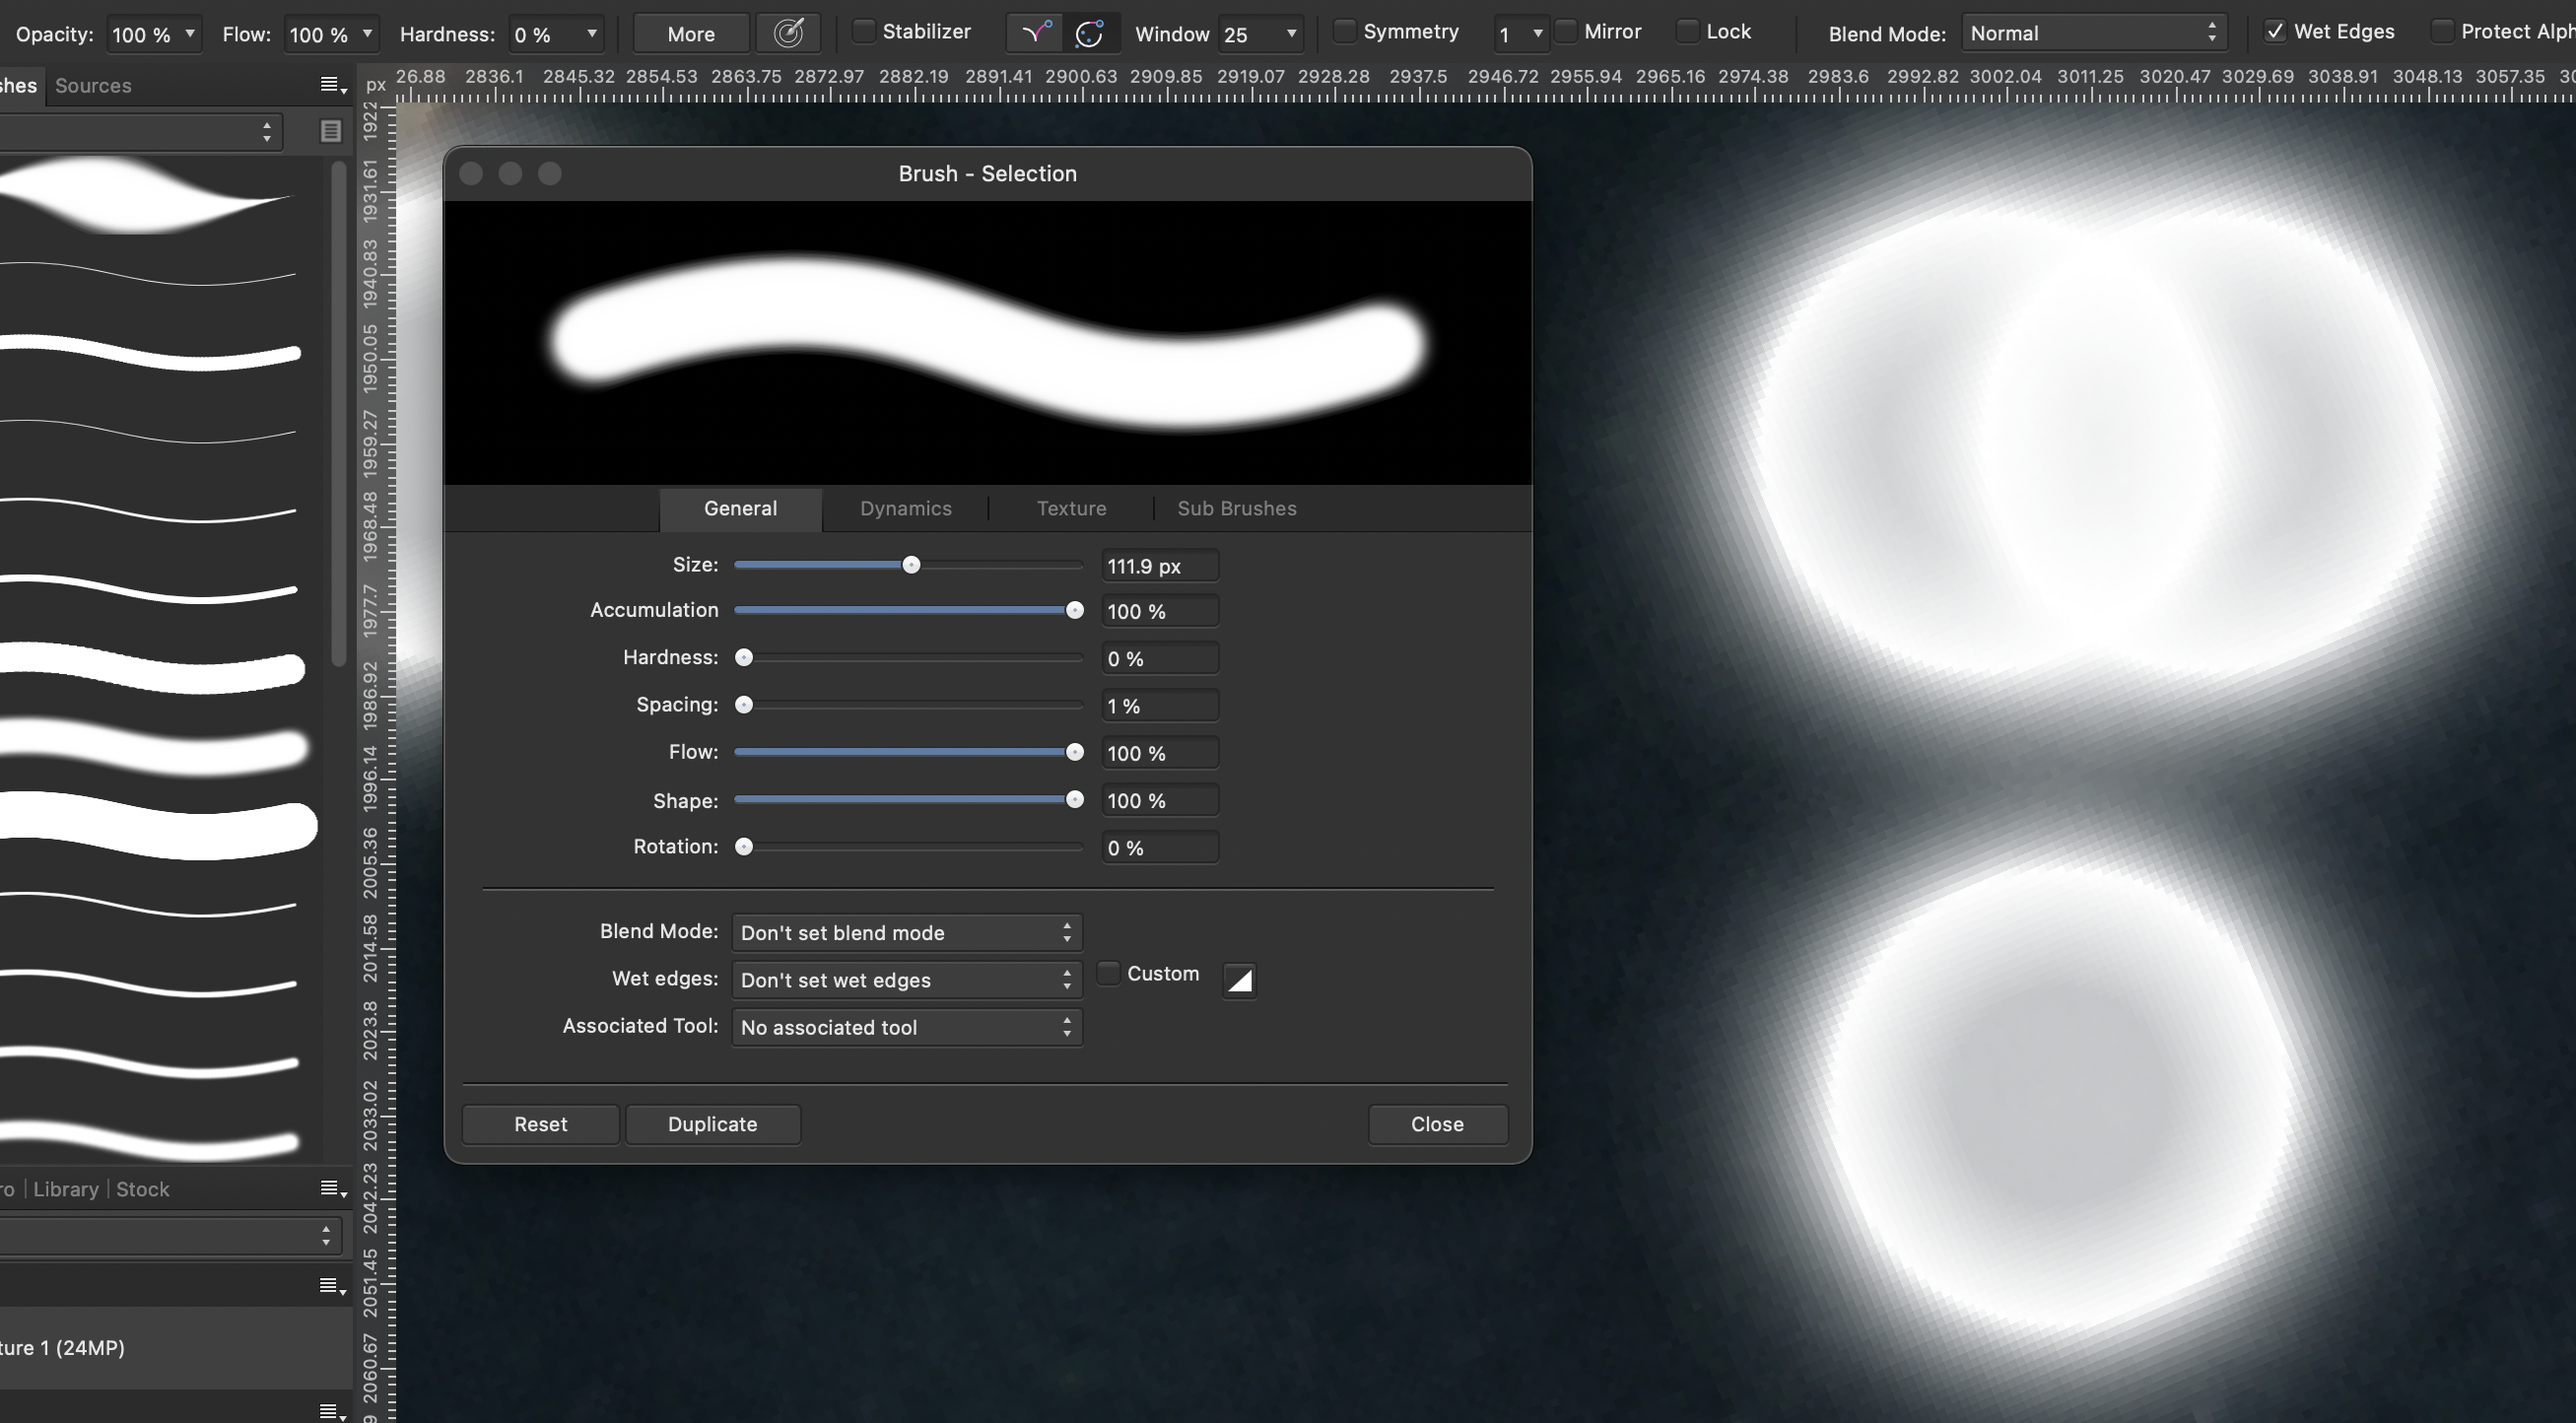
I noticed a brush issue in 1.10 and 1.10.1 where despite the settings, the basic round brush itself is not 100% opaque at the center and there is a hard opaque ring around the edge at every hardness setting. All brush dynamics are zeroed out. No textures or sub-brushes used. Same results using Mouse or Tablet. Wet edges are zeroed out. It's negatively affecting photo retouching and drawing. (MacOS 11.5.1 M1 iMac)
-
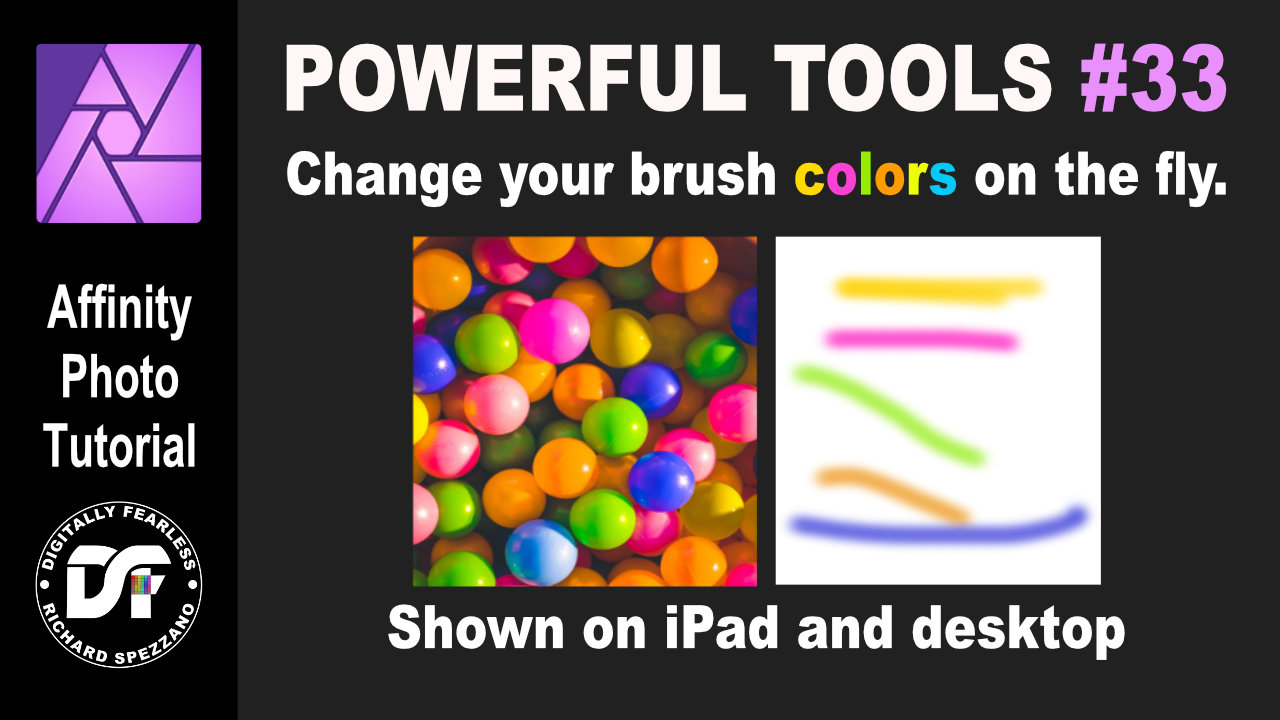
Change Affinity Photo brush colors on the fly. In this Affinity Photo tutorial I show in both iPad and desktop how to change your brush colors on the fly. It is number 33 of my Digitally Fearless Powerful Tools of Affinity. https://youtu.be/xh9oMoIxE_w
-
- 2
-
-
-
- ipad.
- desktop apps
- (and 5 more)
-
 Due to purchase of new computer system, I had to reload Affinity Photo Version 1.9.2.1035. Unfortunately, I'm unable to load saved ABR brushes that worked on previous system. Attempts to import get the Error Importing Brushes message. Some ABR brushes I made work others don't Has there been a fix or patch made for AFP? Thanks
 -
 Hi, I have created a basic black PNG watermark and loaded it onto a new image brush. So far so good -- it applies. My understanding is, as this is a brush, I should be able to set the colour, e.g. white. But nothing I do changes the colour when I apply the brush. What am I missing here?
 -
 Hi I have an issue with the brushes from the „VectorHero - Ink Brush Pack for Affinity Designer“ by RetroSupply on the Mac as well as on the iPad. I’m attaching 2 screen grabs: 1. Unexpected behaviour in latest Affinity Designer on the Mac (same behaviour in latest Affinity Designer on iPad): 2. Expected behaviour in Illustrator 2017 on a Mac with High Sierra: In Affinity Designer after I apply the brushes to vector lines, the line visually continues after the endpoints, respectively gets added before the starting point. When I use the equivalent brushes in Illustrator on the same file (exported as .EPS from Affinity Designer) the brushes apply to the curves as expected. Anyone else seeing something like this? Is this a bug in the brushes or an Affinity quirk?
-
 “Space Base” is a vectorial image with a sci-fi theme, created as if it was a still frame from an anime movie. Another vector illustration made with basic shapes, gradients and this time, special brushes for the clouds. This work was also made following a tutorial by visual artist Isabel Aracama, and you can acess her site for this tutorial plus the freebies: www.isabelaracama.com
-
 It is these brushes in particular. https://gumroad.com/l/yFKMw There doesn't appear to be anything different about them from normal photoshop brushes that can work just fine with Affinity. Normally when I install anything of substance it might cause Affinity to freeze for a second before starting to work again. When I go to install these it just freezes permanently. I've given it up to four hours to start working again, but it always results in crashing instead. And I do say Affinity because I have tried installing the brushes on all three platforms with the same results. I have tried drag and dropping them in to install as well as the usual import brushes option. The brush pack is only 53 mb. How can I install these brushes without causing a crash? Or if it can't be done, why? I'd like to know so I don't purchase unusable brushes in the future.
 -
 Hi I hope this is the right area to post this question. I would like to make an alcohol ink effect background but I cannot see any brush kits for sale that refer to Affinity, only Procreate and Photoshop (I assume they are not compatible). Is it possible to create the same effect with existing brushes? Have tried but failed with watercolour brushes. Many thanks
 -
 Hello, I bought a bundle of brushes (https://gumroad.com/chuvabak?sort=page_layout#euNx) for my board game prototype but I ran into a problem: the ABR brushes seem to be semi-transparent once imported to Affinity and thus instead of being able to stack the ship parts under or on each other, they blend, which does not work at all (see the screenshot). Is there some way to prevent that? (Blending options did not help at all). If not, is there some workaround? (I tried to apply selection to the object, then invert the selection, so that the new object would only appear "outside" of the previous one, but it does not work well, since there are always some white spots between the objects when used in this way.) Thank you for the answer!
-
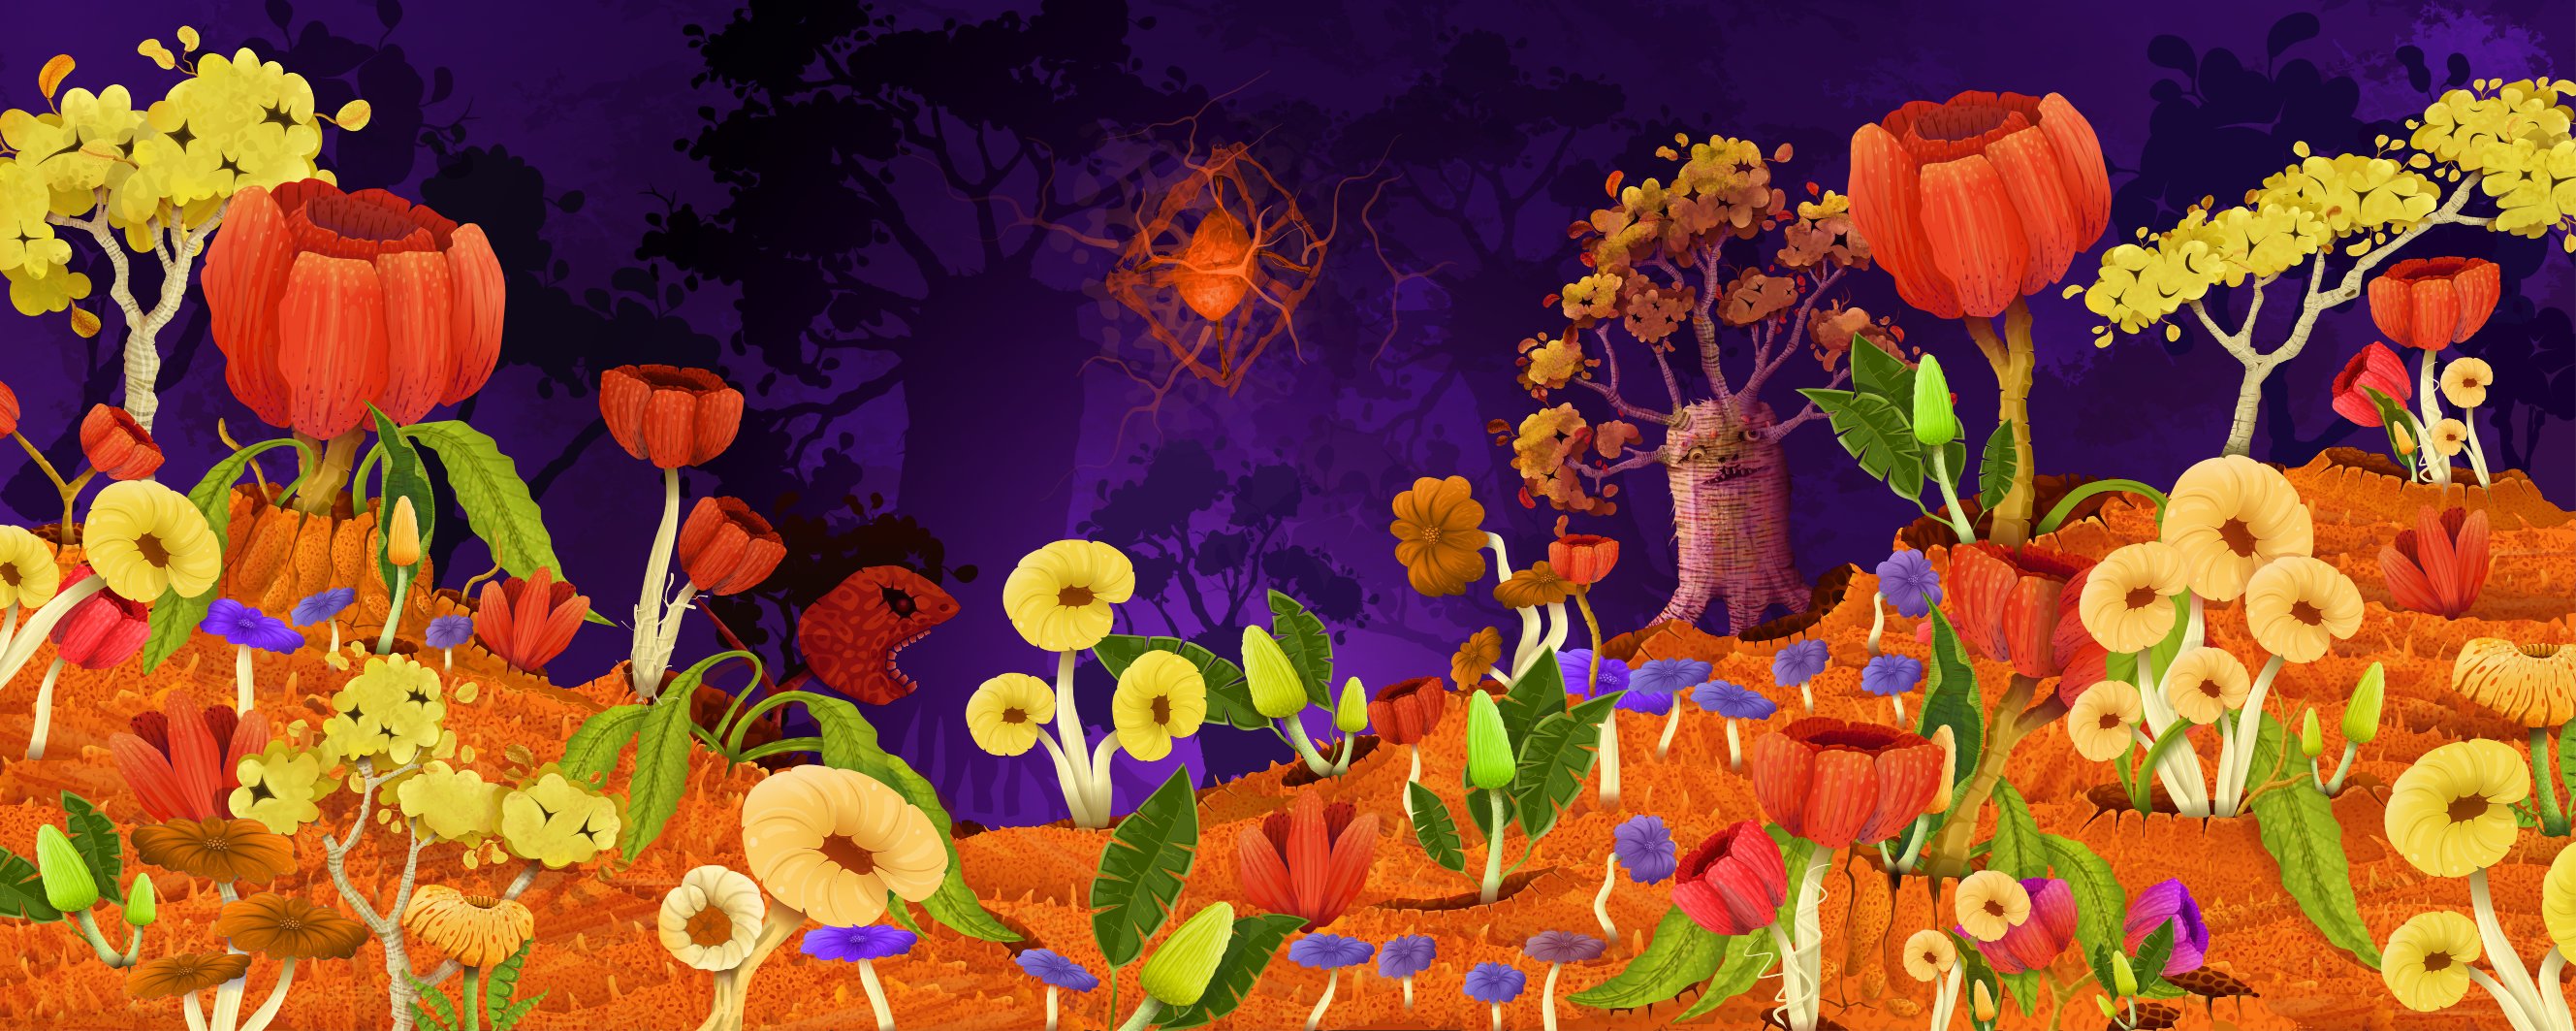
Camouflage III The Third Camouflage Vector Drawing. Completed in Affinity Designer 1.91 with some of the vector objects based on Ecosystem (Raster) Camouflage III A Original size 1500 x 600mm 300dpi Uploaded at 2657 x 1063 jpg Eight layer composite linked file set Camouflage III B Original size 1500 x 600mm 300dpi Uploaded at 2657 x 1063 jpg Single File Assembled Vectors
- 22 replies
-
- 15
-
-
- vector artwork
- brushes
- (and 1 more)
-
 Windows 10 I have my Affinity Photo setup on my laptop under my account, but made a second account on the same computer for a family member to use my device. I'm trying to teach them to use Affinity and would like all of my preferences - brushes, texts, setup, ect -- on her account. Computer automatically made it so she can access the application but set her version to factory presets. Same device, didn't have to redownload the program or anything Quick way to get all my brushes and fonts so she can access them?
 -
 Hey, so what are subbrushes and how do they work with the mainbrush? When do you use subbrushes? Thank you for your answers
 -
Hey, 1. I want to make a brush of three different images, lets say smileys (one happy, one very happy and one sad). The images do exist. Now when i paint with the brush the appearing smiley should be random how do i do it? 2. Now i want a more complex brush a brush of garden gnomes but this time i want them to differ in thei features randomly. So i have three mouths, 2 beardstyles and 5 hats they should not differ in any other way. Can i get a brush maybe with the subbrush menu that paints a garden gnome with a random combination of these features? All that without me having to create a picture of a gnome for every possible combination first. Do you know whether it is possible in a different program ? Kindest regards and a big thx for your explanations.
-
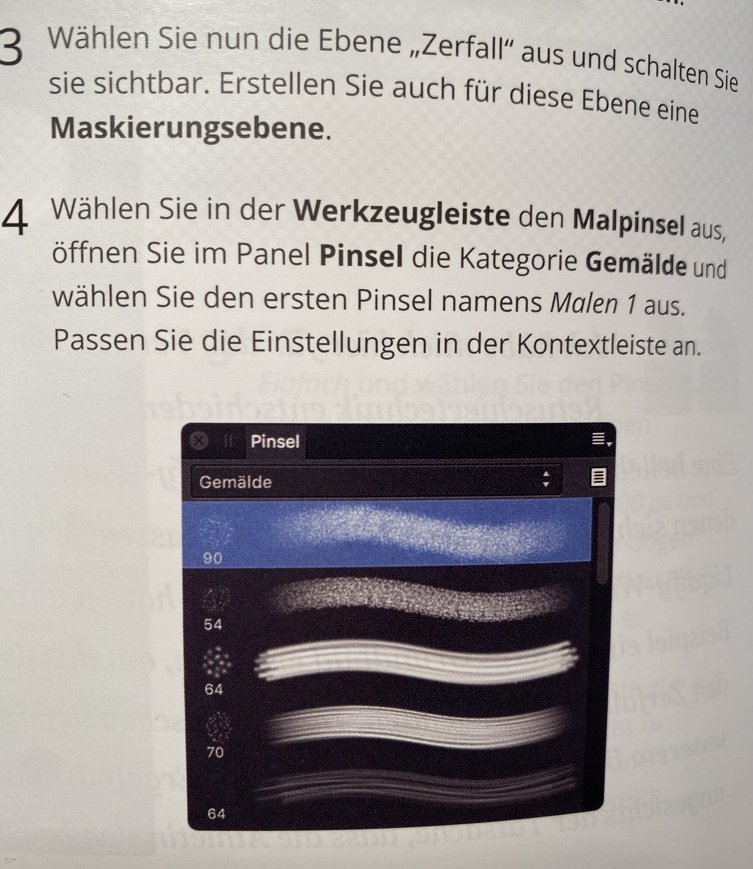
 Hello, I am a beginner with working with Affinity Photo, but I am already totally thrilled by what this Software can do. In order to get familiar in using it, I work through the according work book. In the project "Pure Gold" the book has me to choose a certain brush ("Malen 1") from the "Gemälde" ("Painting" in English?) category. Unfortunately I cannot find this brush in my collection (see attached picture). Aren't these brushes in this category part of the standard software setup of Affinity Photo? Or can I get these brushes somewhere (download) in order to import them into my library? I work with the MacOS desktop version of Affinity Photo. Jens
-
 I know this is gonna sound weird but does anyone one know how to convert a .tpl (tool preset library) file containing brushes to a .abr or .afbrush file? I know it is possible in adobe PS, but im not gonna get adobe lol. i tried editing it with notepad++ to see whats going on but it is unreadable, and i cant find any documentation about it. Ive attached the .tpl im trying to get into. Map tools.tpl
 -
 I absolutely love using the Affinity Designer iPad app and I’m sure I’m not the only one who has amassed a LARGE collection of brushes. So many that it’s almost impossible to quickly find the ones I want and duplicating and moving them to a new brush category is not the easiest solution. I would LOVE to have the ability to ‘star’ or ‘colour-code’ brushes in the brush panel so that when scrolling through the panel and various categories a user can very quickly see which brushes they have ‘favourited’ (they could have a bold outline around them or a star icon next to them). Even better would be the ability to colour-code them like you can with the layers panel. Imagine being able to see your favourite brush categories at a glance! P.S. this would be great for the desktop version too. Mockup attached. Love you.


.png.ebb85789df855bfb2e73be15039dda9b.png)