Search the Community
Showing results for tags 'Fill'.
-
 Locked layers can still be manipulated in terms of fill and stroke colour and other stroke properties. I would expect everything to be locked when locking a layer, so I won't accidentally make changes to the object/ layer, which is the whole reason locking layers exists. Steps to reproduce 1. Create a bunch of objects 2. Group them (and promote the group to layers) 3. Lock both the layer and the object 4. Change the fill colour 5. Notice how appearance changes are permitted 2022-11-21 14-27-00.mp4 2022-11-21 14-33-33.mp4 E: You can also continue drawing/ adding objects to locked layers. So there's no real way to actually make sure a layer remains unchanged.
 -
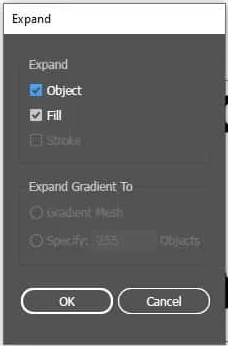
Would be nice if I cloud use the equivalent command to the Expand/Expand Appearance in Illustrator that will separate the stroke and the fill to individual objects. The Expand Stroke command leaves the "bleed" of the fill under the stroke. The Geometry or the Shape Builder needs many steps if it's a complicated object or a group of multiple objects.

-
 Is there a way to convert outlines to filled shapes? The reason behind it is that I'm creating icon glyphs and would like to use the compound shape to "disconnect" a few lines – whereas I can't do that with just an outline and probably would need to convert the line into a stroke.
-
 Elisse con foro.psdElisse con foro.psdHello, in the attached file I designed two elissi on a transparent background. The smallest is positioned inside the largest. How do you proceed to color the interior of the large Elisse, however leaving the interior of the small Elisse empty? Thank you Elisse con foro.afpub
 -
I would like there to be an option in the colour picker to apply sampled colours of filled objects to the selected object's fill colours. Similarly, sampled strokes should be applied to the selected object's stroke colour. This is how it works in Illustrator and bypasses to have to check whether fill or stroke colours are active to determine to where your colour ends up going. For any non-vector objects that were sampled, the colour should still be applied to whether the stroke or fill is currently active. This saves quite a lot of time if you need to apply colours to newly created objects it helps if you can sample them from objects that were already created. This proposal does not cover stroke widths (or appearances in general, which the tool currently does not sample). For that, see:
-
 Picking a color for Gradient strokes and fills, only works from the gradient menu. In the gradient menu there is the option for color. However from this color panel I do not have access to my swatches. Further more, if I navigate to my swatches and select a color, that color overrides the gradient on the object as one solid color. Same goes for the color panel. Note -- For fills I can work around this by using the Fill tool to create the adjustable line for gradients, selecting the nodes on the adjustable gradient line and then selecting colors from my swatches or the color panel with out the swatches overriding the gradient to a solid fill. I should be able to select a color for gradients from swatches and the color panel while I have the gradient panel open with nodes selected. I should not be limited to the single "color selector" button that is within the gradient panel. I feel like it could almost be done away with, as I'm sure most people have their color panel or swatch panel located somewhere on their screen. Edit : I have found that within the gradient color selection there is a drop down which allows me to access my swatch colors. This provides me with a useable work around for coloring stroke gradients. However my point still remains that this color selection button could be done away with. I already have my color panel, and swatch panel, open in my work space, I use them very frequently and habitually. It is very frustrating to have these extra steps/clicks to navigate to and color gradients. When the color and swatch panel are used so frequently, it is very anti intuitive that they both do not work for gradients.
 -
I prefer using the 1 column width toolbar, but it comes at the cost of not having a fill & stroke colour widget there. I prefer to have it there, because it gives me a clear indication on first glance. And it stays there regardless of the studios I have opened. It is also the closest to the canvas and since you already glance the tools to know the active tools, it would be the ideal place to add this. Hopefully this will be reconsidered! Also, see the discussion here:
-
In the appearance panel, I only see a single stroke and fill property when I select multiple objects or layers: This is the case, despite both objects sharing the exact same appearance: This also means that if I go to the appearance panel and duplicate the stroke, the duplicated stroke is applied to all objects and I am not able to see this in the panel itself! That shouldn't be the case. Hopefully, this will be addressed together with a feature request of mine, which is to apply an appearance a layer:
-
I want to use Select > Select Same to filter my objects from a PDF. In Illustrator, I can use Select Same to get all the objects that have a particular stroke & fill colour without selecting objects. I can use this to sort items along a gradient/ palette. The workflow is as follows: create a document palette > select the first colour > Select Same > Group > Deselect, pick the second colour rinse and repeat. This is also helpful to retrieve objects that are nested deep within the PDF, as long as you know the colours of the object.
-
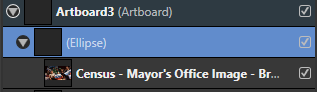
 I need to fill shapes with images, in Designer. I've watched a tutorial which instructs me to create the Shape and then drag the desired Image (already in the working space) up onto the Shape. In the tutorial, the shape fills with the image on both the Artboard and the Context dashboard . However, when I try the same actions, nothing happens. See screen-shots below. I have a project due TODAY. Need an answer ASAP pls. THANK YOU IN ADVANCE!
-
 Hello, is it possible to automatically fill in areas that are made of several paths? So I don't have to draw an area again that was already surroundet by lines that were not coherent. It would be really nice if you could do that with one of the Affinity products, so far I haven't found a function for this. Greetings
 -
 Fill option in context menu doesn't open a window when clicking in the lower half of the button. It sometimes happens clicking in the top half, or there is a delay in the window opening. I'm new to Affinity and this happened from the install on MacOS Monterey 12.1 and has continued after 12.2 upgrade. It's been extremely frustrating. After fooling with it repeatedly to report the bug I only now discovered that it's mainly only in the lower half of the fill rectangle. So, I guess that's a bit of a workaround. Using 1.10.4 I can you reproduce it. It happens for a new document. If you cannot provide a sample document then please give an accurate description of the problem for example it should include most of the following: MacOS Monterey 12.2 Happens with hardware acceleration ON or OFF Clicked on Fill option in context menu and the window dosen't open. Just recently discovered it's mainly a bug in the lower half of the fill rectangle button Selected the object with either the move, node, or pen tool. Then tried to change the fill color In earlier documents every click that wasn't opening the window would show in the History as "set fill" repeatedly. It's not doing that now in new documents. Never worked properly from 12.1 to 12.2 Video capture: Screen Recording 2022-02-05 at 6.26.49 PM.mov Fill context menu bug.afdesign
- 1 reply
-
- 1
-

-
- macos monterey
- fill
- (and 3 more)
-
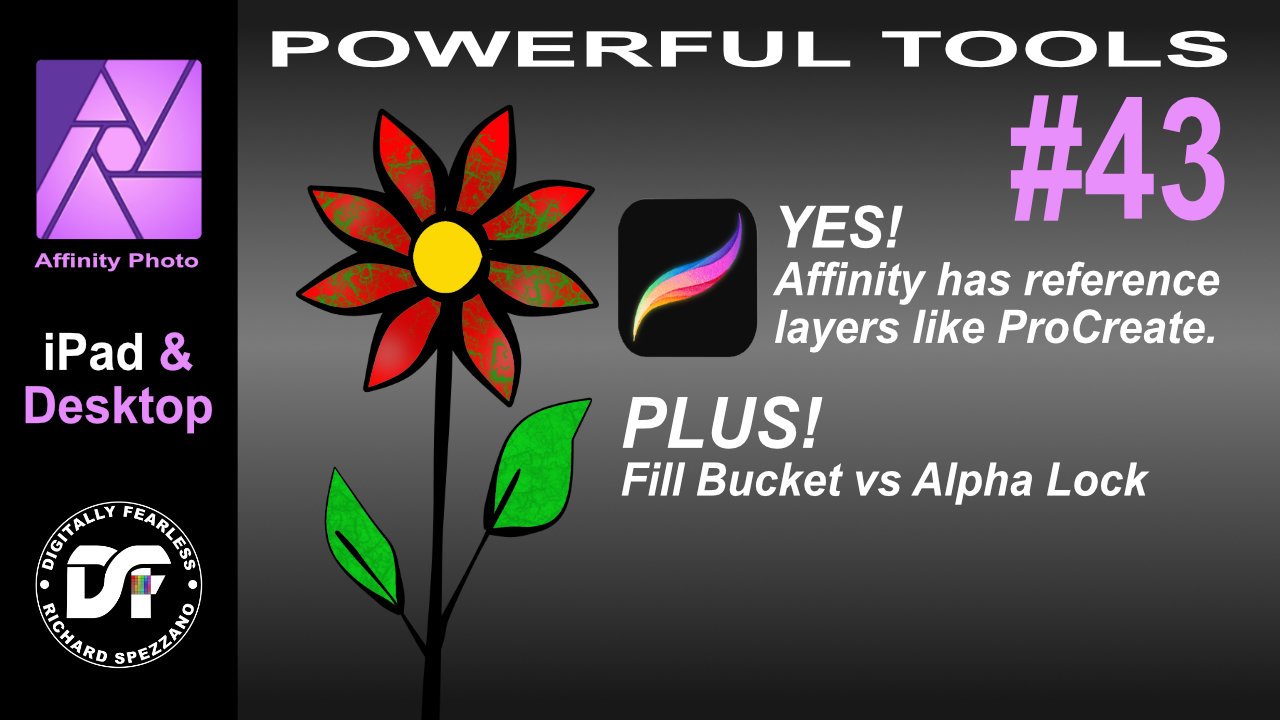
 I've seen posts saying they wish Affinity Photo had reference layers like Procreate. It does! In this tutorial I show this plus when to use Fill vs Alpha lock. Shown in iPad and Desktop. https://youtu.be/NPtN-op8zyg
-
- 2
-

-
- reference layer
- fill
- (and 5 more)
-
 I’m using AD and AP, and would like to make cartoon like characters. Ofter these images are not closed but are filled. Manga creation software like Clip Studio Paint have the ability to close fills (ex. paint can tool) given some user specified size gap constraints, is this possible in an Affinity product?
 -
 When setting up a bitmap fill, you can rotate and scale it, and when replacing the image (especially if you modified the fill image and want to update it in designer) it remembers most of that, except the aspect ratio gets reset. It seems this is done because it sets the aspect ratio to the aspect ratio of the image, but preferably it would instead set the aspect ratio as: newFillAspectRatio = (previousFillAspectRatio / previousImageAspectRatio) * newImageAspectRatio so that it remembers how you stretched the texture.
 -
 Hi, Is there a way to outline / fill a stroke? Thanks.
 -
This is something that I feel is kind of missing from the effects board. While having both overlay color and the fringe option - one still feels like its missing. The "Fill-Effect". Having a Fill-Effect would be a huge improvement when thinking of a more non destructive workflow. This would be especially helpful for artists that work with outlines and want to reduce the layer count while still maintaining a non destructive workflow. This fx could come with modes like these: - Símple Fill-In which searches the outlines of and object/lines inside of the outest outline and fills the spaces that do not yet have any pixels in them. - Fill the whole image (fills the whole layer with all the outlines similar to overlay color but also fills any gaps inside the main outline of the layer) -> This could help creating black versions of objects for more simplified artstyles, masks or sillouettes) (- Fill the whole background behind an object - including outlines) An export fill option would be super helpful here btw - so you are able to just click a few buttons and fill out the whole object without having to fill out each single space on your own. This would give artists the option to create a backlayer quickly while keeping the outline layer separate if they want to. Also, if the artist would change an outline the object would still be filled perfectly which would safe a lot lot of time not having to erase background of add new background to the outline. Please consider adding this. It would make so much so much easier. Greetings, Chris
-
 Windows 10 Home 20H2, Photo 1.8.5.703. Have a look at my attached video and see if it’s doing what you think it should be doing. I create a document of 200×200px with some basic content and export it. Then, in another document, I add a rectangle of random dimensions (because I can’t add one with a specific size). Then I change the dimensions to what I want. Then I add a Wrapped Bitmap Fill but the fill is not at the proportions I would have expected, even with Maintain Fill Aspect Ratio switched on. Is this what is supposed to happen? (It doesn’t seem right to me.) It seems to be related to the seventh point in this thread: https://forum.affinity.serif.com/index.php?/topic/109074-ade-fill-tool-bitmap-fills/ 2020-11-27_12-46-43.mp4
 -
 Hello! I'm currently designing a logo for my friend using AD for iPad but I'm still quite new to the program. Basically, I'm trying to merge the curves together but when I select "merge curves", it merges the curves in such a weird manner. Can anyone please advise me on this? How should I merge it such that it doesn't create those weird fills within the curves? (Please take a look at the video I've attached) FullSizeRender.mov
 -
 Hello, I use AP and AD only for simple work and don't have so much time for practice. Now I would create a card like shown in 25.png Using the PenTool and ArtisticText I became like shown in Try.png, but how can I achive the text marked with the red arrows. I found it very difficult to create curved lines, attach the text and the text fit's perfect. Is there an easy way to create? Thanks in advance Guenter
-
 Hi! The reason I am asking this is because I remember seeing this on a youtube tutorial but somehow I couldnt find the video anymore. Basically what I want to do is when I overlap a pencil tool, I would like the fill tool to not be empty? My english is not the best so I will try and demonstrate using a video and a picture. Help is appreciated! Recording #8.mp4
-
 Please forgive me if I am rehashing an old topic. I've been searching and haven't found answers to my questions. As my project is time sensitive, I don't have the time to sift through all the video tutorials. I'm better with written instructions anyway. First, let me give you background. I was a longtime (and I do mean long) Adobe user who moved to an Autodesk drawing product when Adobe began their insane subscription program. Autodesk discontinued the program I was using and I then migrated to Picta Graphic which apparently is no longer supported. I am intensely frustrated at this point, having sunk thousands of dollars into programs which I can no longer use. And no. It totally was not worth it. So, now with too many years of experience under my belt, I am starting over once again with a new product (new to me.) I have heard a lot of good things about Affinity and like what I see so far. However, there is the usual adjustment period and relearning the new vocabulary. A lot is fairly intuitive which was a selling point. But... I have a project which was started in Picta Graphic and which I ported to Designer. Before Big Sur, I was able to easily import tiled and picture fills into Picta Graphic. Then my old mac crashed and I had to buy a new one. Guess what? Picta Graphic doesn't like Big Sur and will not perform the fills anymore. So.... How does or even can one import graphic fills into the Appearance section of Designer? For instance, I am drawing a boat and wish to have a wood texture fill. Will Designer do that? If so how?
 -
 I am transitioning from InDesign to Affinity Publisher. I have an InDesign document that has text with a black stroke and green fill. The letters really pop! (I'm attaching a sample.) Is there any way to achieve this effect in Publisher?
-
 This did not happen before, but now every time I finish drawing a line (black) with the Vector Pen Tool and my Tablet, I go to fill the new shape (Red). When I click the Vector Pen Tool, the stroke is now RED instead of black, forcing me to constantly switch back to black. This is the first time I've seen the color change based off of whatever color I used to fill a shape. Does anyone know how to keep the black as default and stop changing?
 -
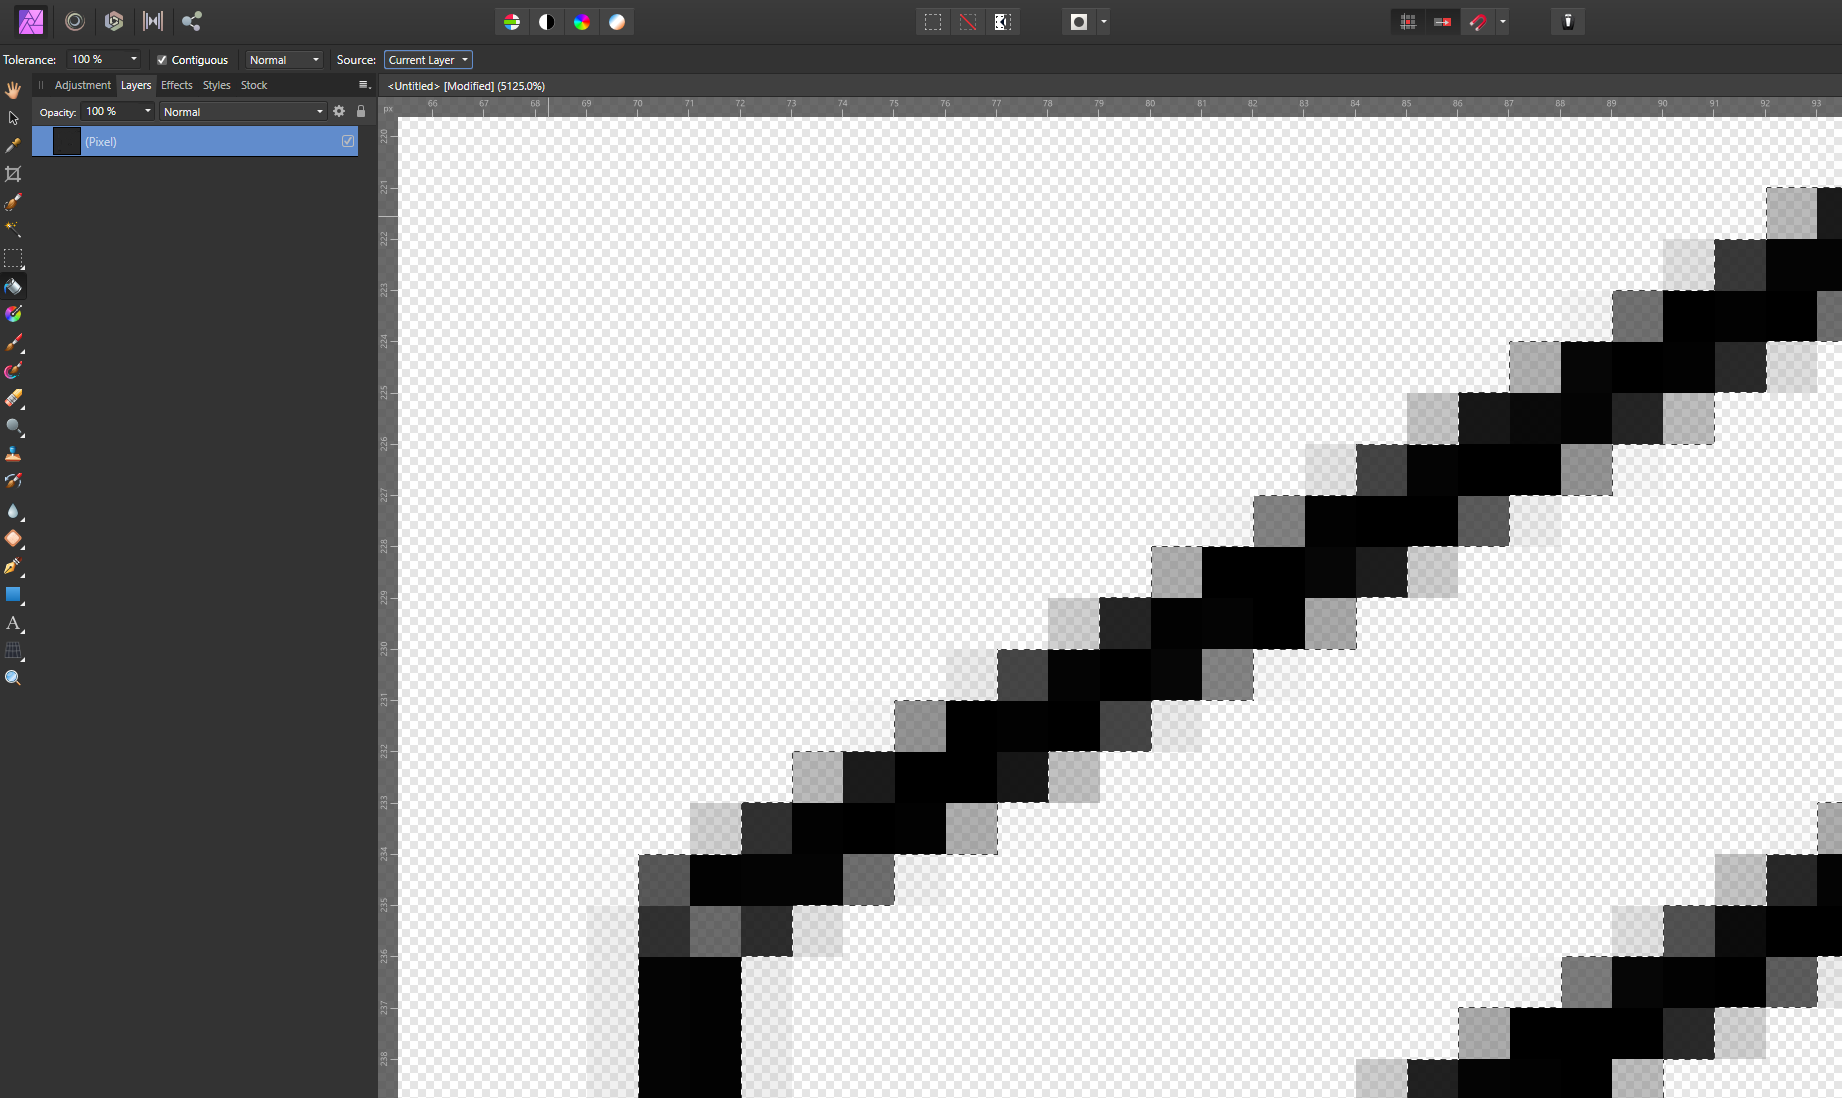
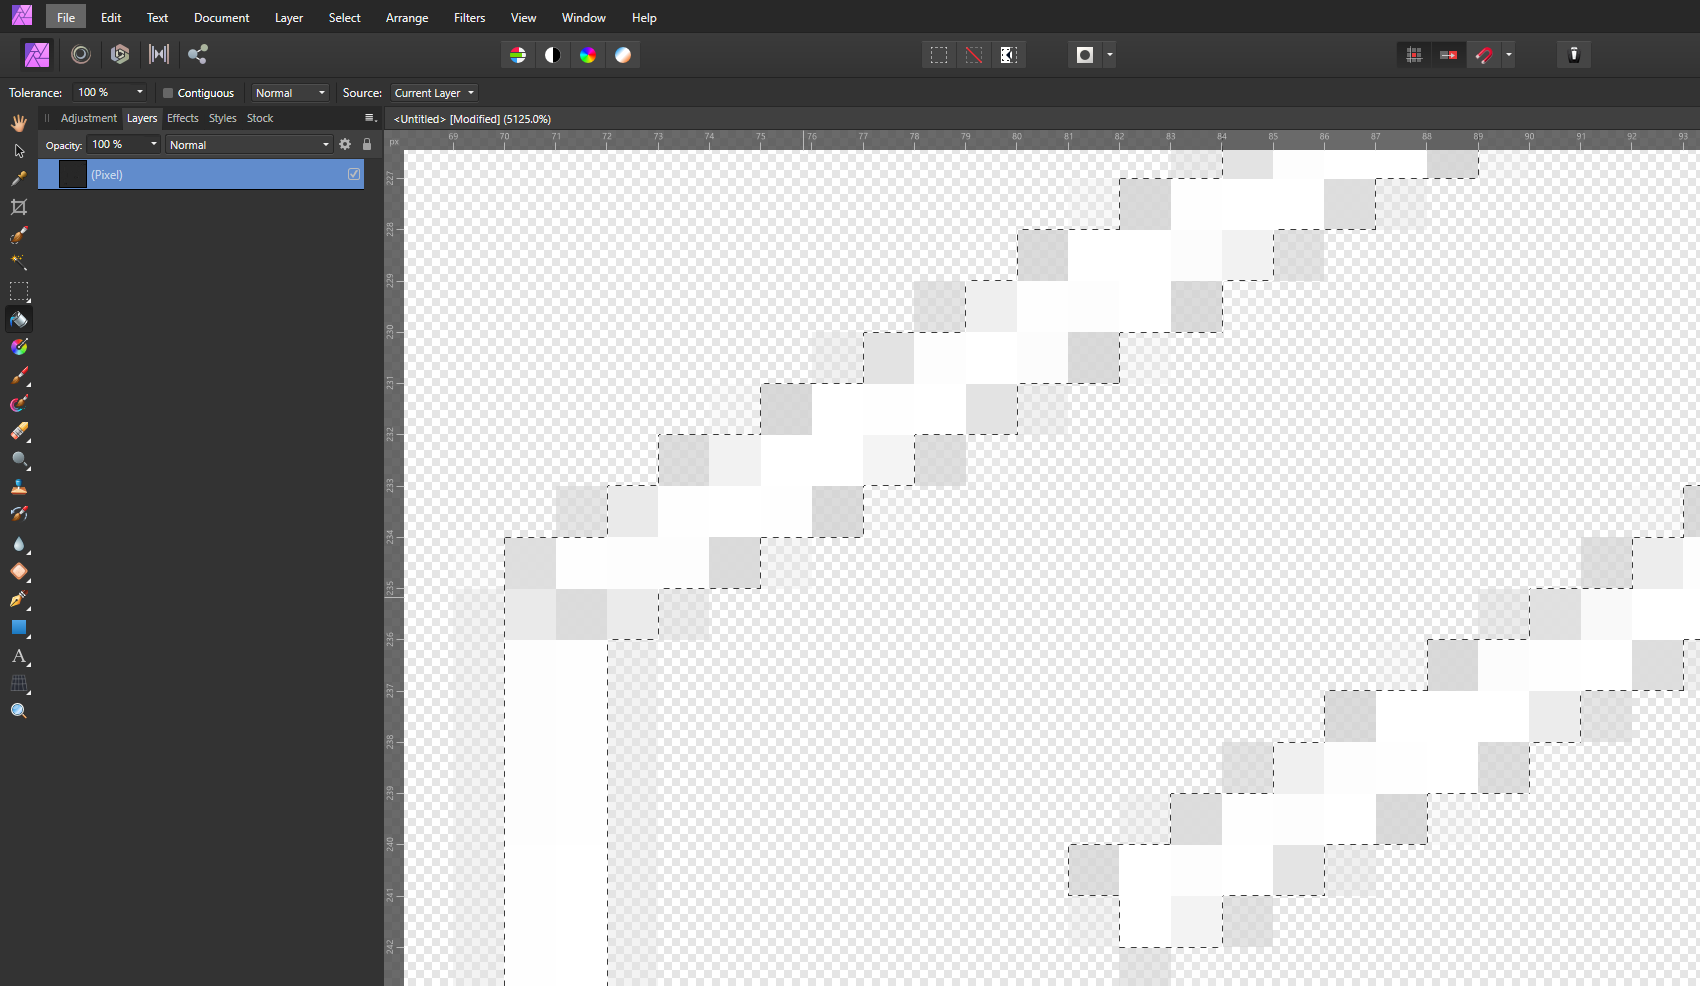
 Hello, I want a selection that I made to be filled simply completely with one color. I used the fill tool and changed tolerance to 100%. However, some dark pixels have alpha in them and they are not being overwritten. How can I simply make every pixel of the selection white, with no alpha?