Search the Community
Showing results for tags 'Affinity photo'.
-
 I have purchased & updated my Affinity Photo application (this is all on my windows laptop), & yet still Affinity Publisher can't seem to connect to it. Any thoughts or suggestions as the problem & solution?
-
 Whenever I want to make a fill on a new layer, I am forced to go to the layer that provides the colors I want to sample from, make a selection there, then go back to my empty layer and then color the selection. This is kind of a lot of work for a fairly basic functionality that is crucial for coloring line art, where you have to create lots of separate color layers. I know painting is not your priority, but from another point of view, seeing how you like to advertise this non-destructive workflow (which I LOVE btw!), I do not see much use for a tool that is only able to realize its full potential (namely edge detection with tolerance) when it is allowed to overwrite your base layer.
 -
We are pleased to announce a major update for the iPad release of Affinity Photo, version 1.7.1 Changes in this build The changes in Affinity Photo for iPad 1.7.1 over the recent release Affinity Photo 1.7.0 are as follows: Support for multi-page Affinity Publisher documents. Shadows and highlights improvements. Another attempt to fix sporadic HSL UI crash. General performance improvements. Fixed brush performance issues on big documents. Fixed crash when adding a mask when editing selection as layer. Fixed noise filter crash when changing layer. Fixed Levels Metal implementation in CMYK. Reduce bloat when resaving 1.6 files. Fixed crash when exporting assets. Added hex colour input support. Added optional checkerboard backgrounds to layers panel. Made inpainting fast again. Node & Pen tool fixes / improvements. Gamut check works again in soft proof. Made custom ICC profiles work on export. Make split view go away when converting to a live filter. Fixed selection refinement working only once per document. Fixed posterise adjustment. Fixed legacy selective colour adjustments rendering wrong when they have children. Fixed potential crash in HSL adjustment. Fixed mixer brush crash. Fixed crash when adding a live filter when in “Edit selection as layer” mode. Fixed crash when dragging out assets when the document is a different colour format. Fixed crash when dragging documents into the home screen when there are no other documents. Fixed live denoise filters when repositioned in layer stack. Fixed weirdness with pinching out of the app. Fixed shadows & highlights filter. Help improvements. Localisation improvements. Changes in 1.7.x since 1.6.12 The changes in Affinity Photo for iPad 1.7.0 over the last Affinity Photo patch 1.6.12 are as follows: Large performance increases with further tuning of metal acceleration Shortcut modifiers added when keyboard is attached (See Here) More effective noise reduction, hot pixel removal and wide colour space development New Stock Panel to search and drag and drop stock photography into your document Symmetry (up to 32-way) is now supported - including on-canvas controls and optional mirroring On the fly nozzle rotation now available with left and right arrow keys New “Procedural texture” and “Voronoi” filter effects Live filter effects have been rewritten to improve performance HSL adjustment layer has been rewritten, supporting custom hue ranges, new UI and picker controls Many PSD import / export improvements Significant improvements to selection refinement Alternate futures for document history have been added. If you undo a lot of steps and start on a different path, you can always branch back to your original position HEIF images can now be loaded, including loading of any depth map Added support for 12bit and 16bit CMYK TIFF files New Assets Panel available to store and drag and drop regularly used assets 100s of other bug fixes and improvements - too many to list! This thread is for commenting on this announcement. Please do not post bugs or problems that you find when using this version of the software in this thread, instead make a new thread in the Photo Bugs on iPad section and questions about usage go in the iPad Questions forum. UPDATING TO THIS VERSION (Free for existing customers) For updates from the iPad Store are done automatically (next time you run after it is available in the store). You need to be logged in as the same user who bought the application. Open iPad store, go to Updates. Once you're there, from the top bar choose Store and on the drop-down click Refresh. It worked for me - both updates appeared instantly. If they don't, there's no point asking us we cannot make it appear quicker. Apple sometimes phase roll outs around the world sometimes taking up to 24 hours.
- 3 replies
-
- 1
-

-
- affinity photo
- photo
- (and 2 more)
-
I am getting into product photography. I am looking for a digital artist that is interested in collaborating. I am looking for someone that can add some digital art to enhance this picture. I am going to post two pictures. The first one is an example of something I am looking for. The second picture is a picture that I am working on now.
-
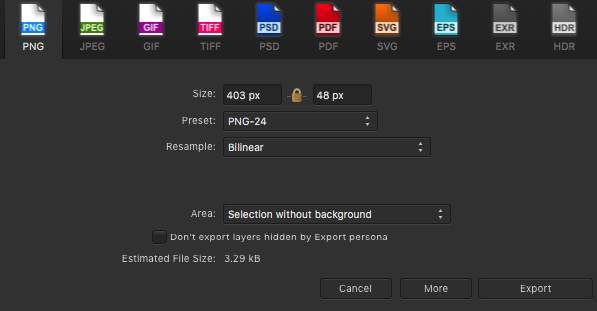
Hi, I'm having a problem similar to the one described in the thread here. I want to export my line art which is a vector (see screenshot ‘Before import’) from Affinity Designer to Affinity Photo in order to colour. I export in a PNG format, import into Affinity Photo, zoom in and that's when I notice the lines look really jagged (see screenshot ‘After export with colour’). I understand that the vector gets turned into pixels during export, but I want to make the lines look smoother. Before using Affinity Designer and Photo, I was working with Adobe Illustrator and Photoshop. My workflow back then was to export the vector from Illustrator as a PNG 'without background' to Photoshop. In Affinity Designer I have tried different PNG preset settings (see screenshot ‘Export settings’) including PNG-24 Bilinear, Bicubic, Lanczos 3 (separable), Lanczos 3 (non-separable) all ‘without background’ selected. But all resulted in the same jagged line. I tried the solutions mentioned in the thread above. However when I click ‘Force pixel alignment’ the quality in Affinity Photo doesn’t seem to change. Would someone on the support team know if I need to do something different in Affinity Designer so that when I import the vector in Affinity Photo there’s not a noticeable difference?
-
I love the Tone Mapping module
-
This build has been superseded by 1.7.1 announced here We are pleased to announce a major update for the MacOS release of Affinity Photo, version 1.7.0 The changes in Affinity Photo for MacOS 1.7.0 over the last Affinity Photo patch 1.6.7 (1.6.11 PK) are as follows: CHANGES SINCE LAST VERSION EDR Added support for EDR displays to Photo. When editing a 32bit document, enabling EDR will switch macOS into a mode whereby it will increase the backlight intensity and darken screen content - increasing the dynamic range available when rendering content. Performance The core processing engine in Affinity Photo has been rewritten to take advantage of the powerful discrete AMD GPUs in modern Mac hardware. It will now automatically use any compatible discrete GPU, alongside the Intel GPU support present in 1.6. Typically this improves compositing / editing performance by at least 1000%. Performance when using integrated Intel GPUs has also been massively improved. External GPUs (eGPU) are also supported - including hot-plug-and-unplug support. Multiple GPUs are supported - if you have more than 1 GPU (ie. Intel + AMD in MacBook Pro, or Intel + eGPU in other Macs) Photo will use them all, at the same time, to improve performance. There is no limit to the number of GPUs which can be used. Brushes Photo 1.7 introduces a new “sub-brush” mechanism, developed in conjunction with Paolo Limoncelli (DAUB® Brushes). This exciting feature allows any brush to have a list of other brushes attached which will draw at the same time. Each sub-brush has a fully separate and customisable set of dynamics. You can control when the sub-brushes are drawn and how they blend with the main brush. The brush engine in Photo has been rewritten to use the new GPU architecture described above. With GPU support, even huge brushes with 1% spacing will perform well. All brushes / brush tools are accelerated. Symmetry (up to 32-way) is now supported - including on-canvas controls and optional mirroring. Wet edges and accumulation are now available on colour brushes and brushes with HSL variance. Brushes with multiple nozzle textures have always chosen the nozzle at random. In 1.7, the nozzle choice has a dynamic controller and ramp for greater control. All brush tools now support left and right arrow keys for rotation - a common feature request. Allow Ctrl key to be held when typing numbers in a brush tool (will change flow instead of opacity). Fixed ABR brush import (would ignore "random" controllers). RAW The RAW processing engine in Photo has been rewritten - producing better results and improved performance. It also takes advantage of the GPU architecture changes described above. RAW files now load much more quickly - especially if you have a compatible GPU. Reimplemented support for XTrans sensors. The denoise algorithm has been rewritten. It produces better results and takes advantage of the new GPU architecture. Hot pixel removal is now automatically performed by the Serif Labs engine. Profiled lens correction are more stable, apply more quickly, and can be toggled in the Develop UI. The histogram in the Develop persona is now presented in the output colour space - as opposed to always being linear. Develop now respects the output profile when previewing. Added support for CR3 RAW when using the Core Image engine. Show which autofocus rectangles were in focus and which were selected by the camera (yellow, green respectively). A large number of new cameras are supported for RAW development (we will provide a list of the new supported cameras as soon as possible!). Automatically fall back to Core Image for cameras which are not supported by Serif Labs. Filters New “Procedural Texture” filter with advanced presets support. New “Voronoi” filter. Denoise, Clarity and Shadows / Highlights filters have been rewritten (using technology from the Develop Persona). More filters are now available as Live Filters - including the new Procedural Texture filter. Live filters have been rewritten to improve performance - especially when multiple filters are used in a document. Improved Polar to Rectangular and Rectangular to Polar filters. Added round dot type to the halftone filter. New “Lens Correction” filter - apply lens correction from the built-in lens database. Bilateral blur accuracy improvements. Adjustments The HSL adjustment layer has been rewritten. It now supports custom hue ranges, a new algorithm, new UI and picker controls. The Levels adjustment layer now supports output levels - a common feature request. The White Balance adjustment layer has been rewritten. The Selective Colour adjustment layer has been rewritten. PSD import / export of adjustments has been improved. The Vibrance adjustment layer has been rewritten. The Recolour adjustment layer has gained a lightness slider. Layers Layers Panel- added option for transparent background for thumbnails. Layers Panel- added multiple thumbnail size options. Layers Panel- added ability to tag layers with a colour - including PSD round-trip. Allow Panel an empty group from the Layer menu. New “Duplicate Selection” item in Layer menu (old behaviour). Duplicate now duplicate the whole layer ignoring pixel selection. Alt / Option is now used to make a pixel selection from layer luminance. You can now also hold shift to add the result to the current selection. Hide / Show / Show All Layers options in layers menu. Ability to either rasterise or rasterise and trim a layer. Previously recorded macros will trim. Selections Significant improvements to selection refinement. When using selection tools with no pixel selection, default to New / Add as appropriate. Added “Alpha Similarity” to Select Sampled Colour tool. Tools Grouped tool shortcuts now default to needing the shift key held to cycle (option in preferences). The Crop tool has been rewritten - it now supports resolution changes, absolute pixel size and has a much improved preset mechanism. The Sponge Brush tool now gives more correct / pleasant results. Allow brush rotate / size key changes while dragging. Added a “Reveal Canvas” checkbox to the crop tool - defaults to off. Added new “Transform object separately” mode into Move tool. A general tools overhaul has been performed - providing editing of grids, guides, page origin, across multiple tools (not just in the Move tool) Patch tool now supports arrow keys for rotate / scale. All brush tools can now be axis constrained once brush has started - not just the pixel tool. History “Alternate futures” for document history have been added. Traditionally, if you roll back the undo history then do something else all your changes after that point are lost. Photo will now display a small branch icon in the history tab when you do this. Pressing that button will cycle between all the different “futures” after that history entry - meaning you will never lose work you have done. The History page now has an “advanced” mode - which shows thumbnails and time info. I/O HEIF images can now be loaded directly into Photo. If they contain a depth map, this will also be loaded as a second layer. Because depth maps are typically lower resolution than the main image, optional “smart” upsampling will be performed. TIFF export now has user selectable compression method. Added support for 12bit TIFF files. Introduced new metadata mining - completely rewritten to improve performance, flexibility and correctness. Metadata is now dynamically synchronised with your document - so if you resize then export, the values will be correct. Added Focal Length to metadata summary view. Added a button in general preferences to open a folder from which Photo will read LensFun-style XML files - if users wish to add / experiment with their own lens profiles. Support 16bit CMYK TIFF import. General New ability to control how macros are scaled / aligned when playing back. Added an “Assets” panel to Photo. New cube setup mode for grids. Add “Fill with Primary / Secondary” to the Edit menu for fast access. The batch process dialog now fully supports expressions for height and width - available constants are “w”, “h” and “dpi”. “Lock guides” added to menus. Support for drag dropping .afstyles into Photo. Support for drag dropping .afpalette into Photo. Photo now supports custom document presets - a popular feature request. A new blend mode - Linear Burn - has been added. New “Move inside / outside” commands have been added - useful for quick operations on clipping masks etc. The Hard Mix blend mode has been improved. New provider options have been added to the stock panel - support for Unsplash, Pexels and Pixabay. All of these providers offer full-resolution stock imagery which is free to use. Numerous text improvements have been made - including new features. Significant stability improvements when working on non-local files (network shares, USB drives, etc.). Significant PDF import / export improvements and fixes. Huge macro and batch processing improvements New welcome screen layout and all new samples. Numerous other bug fixes - too many to list! This thread is for commenting on this announcement. Please do not post bugs or problems that you find when using this version of the software in this thread, instead make a new thread in the Photo Bugs on MacOS section and questions about usage go in the Desktop Questions forum. UPDATING TO THIS VERSION (Free for existing customers) For purchases from the Mac App Store: These are done automatically (next time you run after it is available in the store). In the Mac app store, go to the updates panel and press CMD+R they might appear. Apple sometimes phase roll outs around the world, sometimes taking up to 72 hours. For purchases from the Affinity Store: Each time you start the software it will check for updates and offer any available update, or in the application main menu there is an option "Check for Updates", or it can be downloaded from here (that link is NOT for Mac app store purchases). Alternatively you can log into the affinity store here and find the order in your account and use the download button in there.
-
 My 1.7 Update Live Stream. Tomorrow 8.June from 7PM (GTM+2) Go on Youtube and click the reminder button <3 Watch it here:
 -
starting to love the designer and photo
-
Not too long ago, in a land not very far away, I came across the concept of focus merges to dramatically increase depth-of-field of photos, especially macro ones. This was one of the reasons I bought Affinity Photo, as having learned the technique I had a requirement for affordable software the could do a good job of a focus merge. The focus merges I have done thus far have typically been hand-held and of fairly large 'macro' subjects such as mushrooms and flowers. Generally, these consist of 10-30 shots that Affinity Photo churns through and merges in very short order. Due to the hand-holding, there are often a few ghosting artefacts around some edges, but nothing that a bit of AffinityPhotoShopping can't sort out. Yesterday, I came across an unfortunately-demised beetle which seemed to be a perfect opportunity to try a more technical, tripod based, photo merge. One of the reasons for this post is to showcase the ability of Affinity Photo which coped with a quite staggering amount of data (the other reason is a desire to share what I think is a quite stonking photo!). To achieve the focus merge, I took 270 20-megapixel raw photos, totalling 7.8 GB of data. These I then processed into 16 bit/channel PNGs using RawTherapee which came to 24.7 GB. I then fed them into Affinity Photo's Focus Merge and let it churn away. It took just over 1.5 hours to complete the merge, and I'm very pleased with the results: In case anyone is interested in the hardware involved, here's the list: Camera: Panasonic DC-G9 Lens: Olympus 60mm f/2.8 Macro Images shot at: 0.5 sec, f/3.5, ISO 200 CPU: AMD Ryzen 1500X RAM: 16 GB DDR4 2666 GPU: nVidia Geforce GTX 970 I largely seemed to be CPU-bound during the various processing stages. Memory usage from RawTherapee and Affinity Photo pottered around the 2-3 GB mark; RawTherapee thrashed all 4 cores / 8 threads in the Raw -> PNG conversion (but still took ages; I left it going over night, so I don't know quite how long...) , whilst Affinity Photo used 1 core / 2 threads for the stack. A lower core count / faster GHz processor would therefore seem to be an advantage during the stacking process in Affinity Photo, whilst RawTherapee clearly liked all the cores it could get it's sticky little paws on. I included my GPU in the list as Affinity Photo does seem to use it a bit: 5-8% GPU activity shows up in Task Manager during Focus Merges; I've no idea if it makes a difference though. In conclusion, I'm very impressed with the ability of Affinity Photo to deal with huge amounts of data without choking. A few more threads might be nice though
- 9 replies
-
- 8
-
-
- beetle
- focus merge
- (and 1 more)
-
Hi everyone. i just downloaded Affinity Photo today and thought I would have some fun while getting acquainted with the interface. So far i am finding it quite smooth, coming from CS2 lolz. I took two images from Unsplash and put them together. I have done photo manipulation just for fun, so as always, I keep it simple. Any and all thoughts are welcome. Alan
-
Jeremy created a 1 hour course on Portrait Editing and Compositing, that you can get for free today. He is a really great guy and will show you how to adjust a RAW file, correct the channels with curves, remove and replace the background and put some artistic touches on the photo. Get the resource file to follow along with this Youtube video: https://drive.google.com/file/d/1tYCeSJT6824r_08cCfW8Uos4iQRH9gPK/view?usp=sharing Get the FULL FREE COURSE on how to take a portrait from raw to finished composite here : https://bit.ly/2TuiWHS Follow 7th Season studios here: Website: https://www.7thseasonstudios.com/ Facebook https://www.facebook.com/7thseasonstudios/ Youtube : https://www.youtube.com/c/7thSeasonStudios Instagram : https://www.instagram.com/7thseasonstudios/ Support me on Patreon: https://www.patreon.com/sarikas Follow me on: https://www.facebook.com/sarikastutorials https://www.instagram.com/sarikasat/ Join us on Reddit: https://www.reddit.com/r/AffinityPhotoTuts/
-
 I am having performance problems with Affinity Photo 1.7.0 and I had to go back to 1.6.5 until Serif fixes issue. In the meantime, how do I disable the pop up notifying me that there is a new version available? It pops up every time I start Affinity Photo. I am running in a Windows environment.
 -
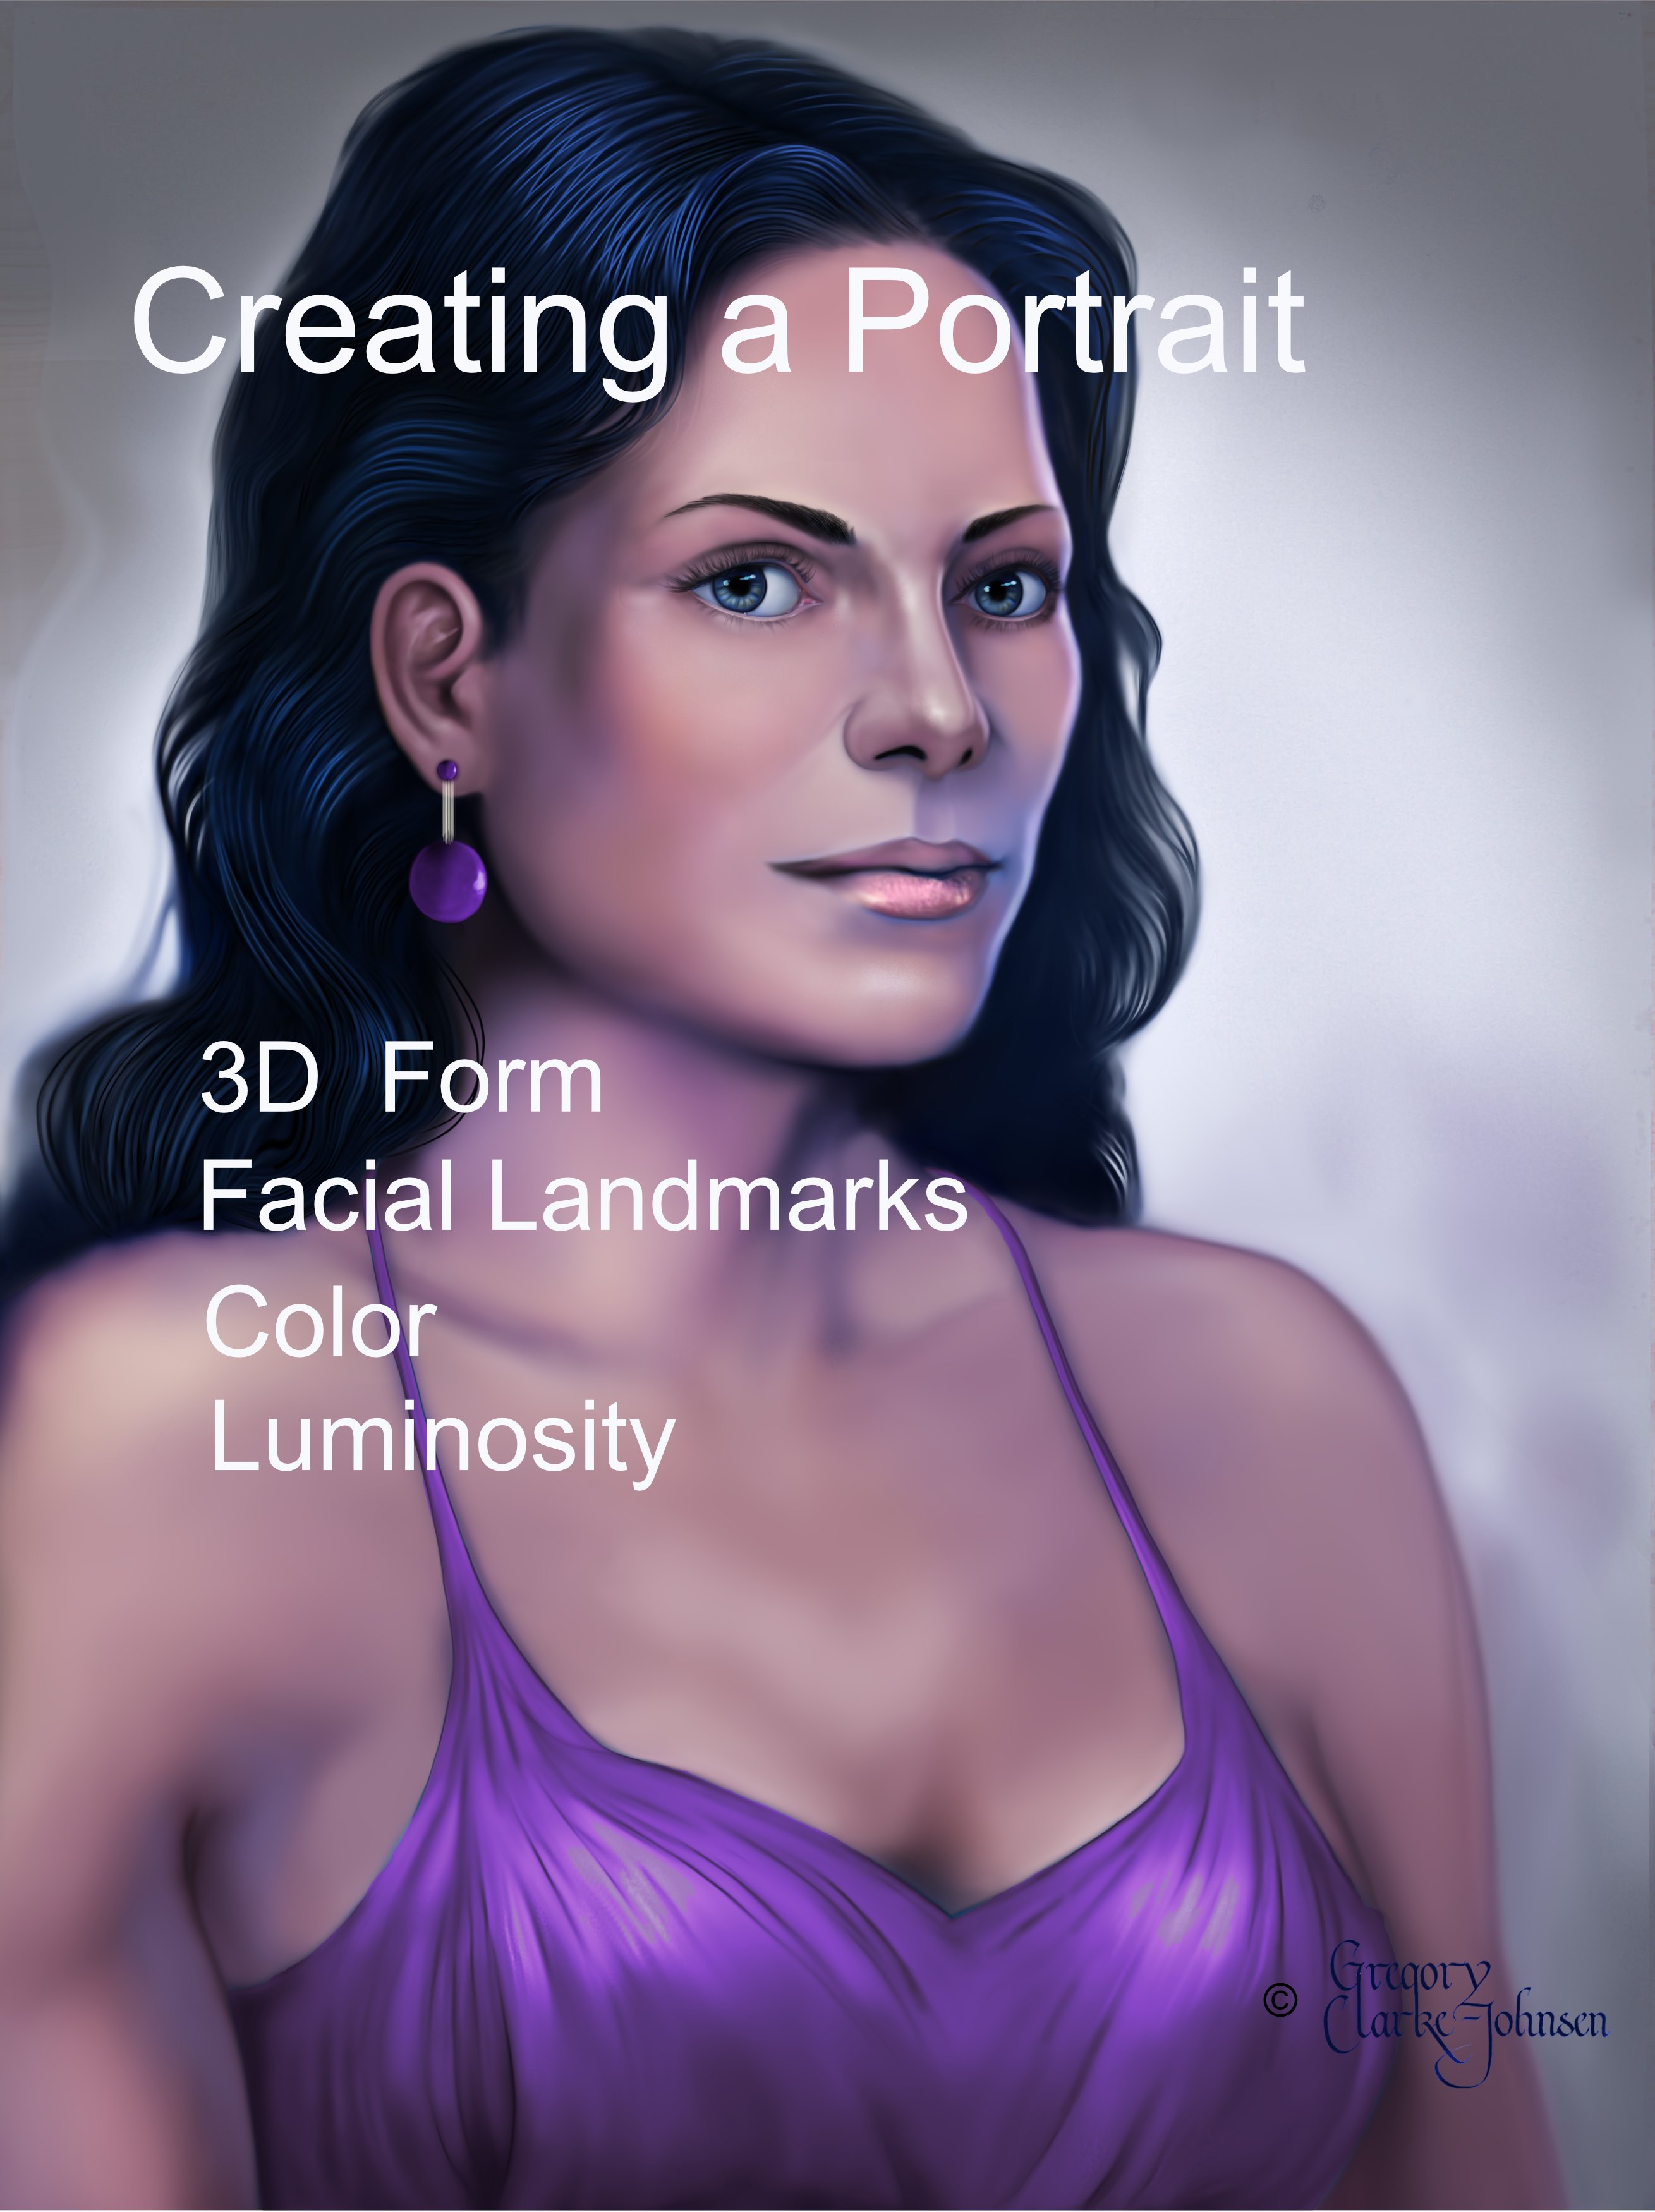
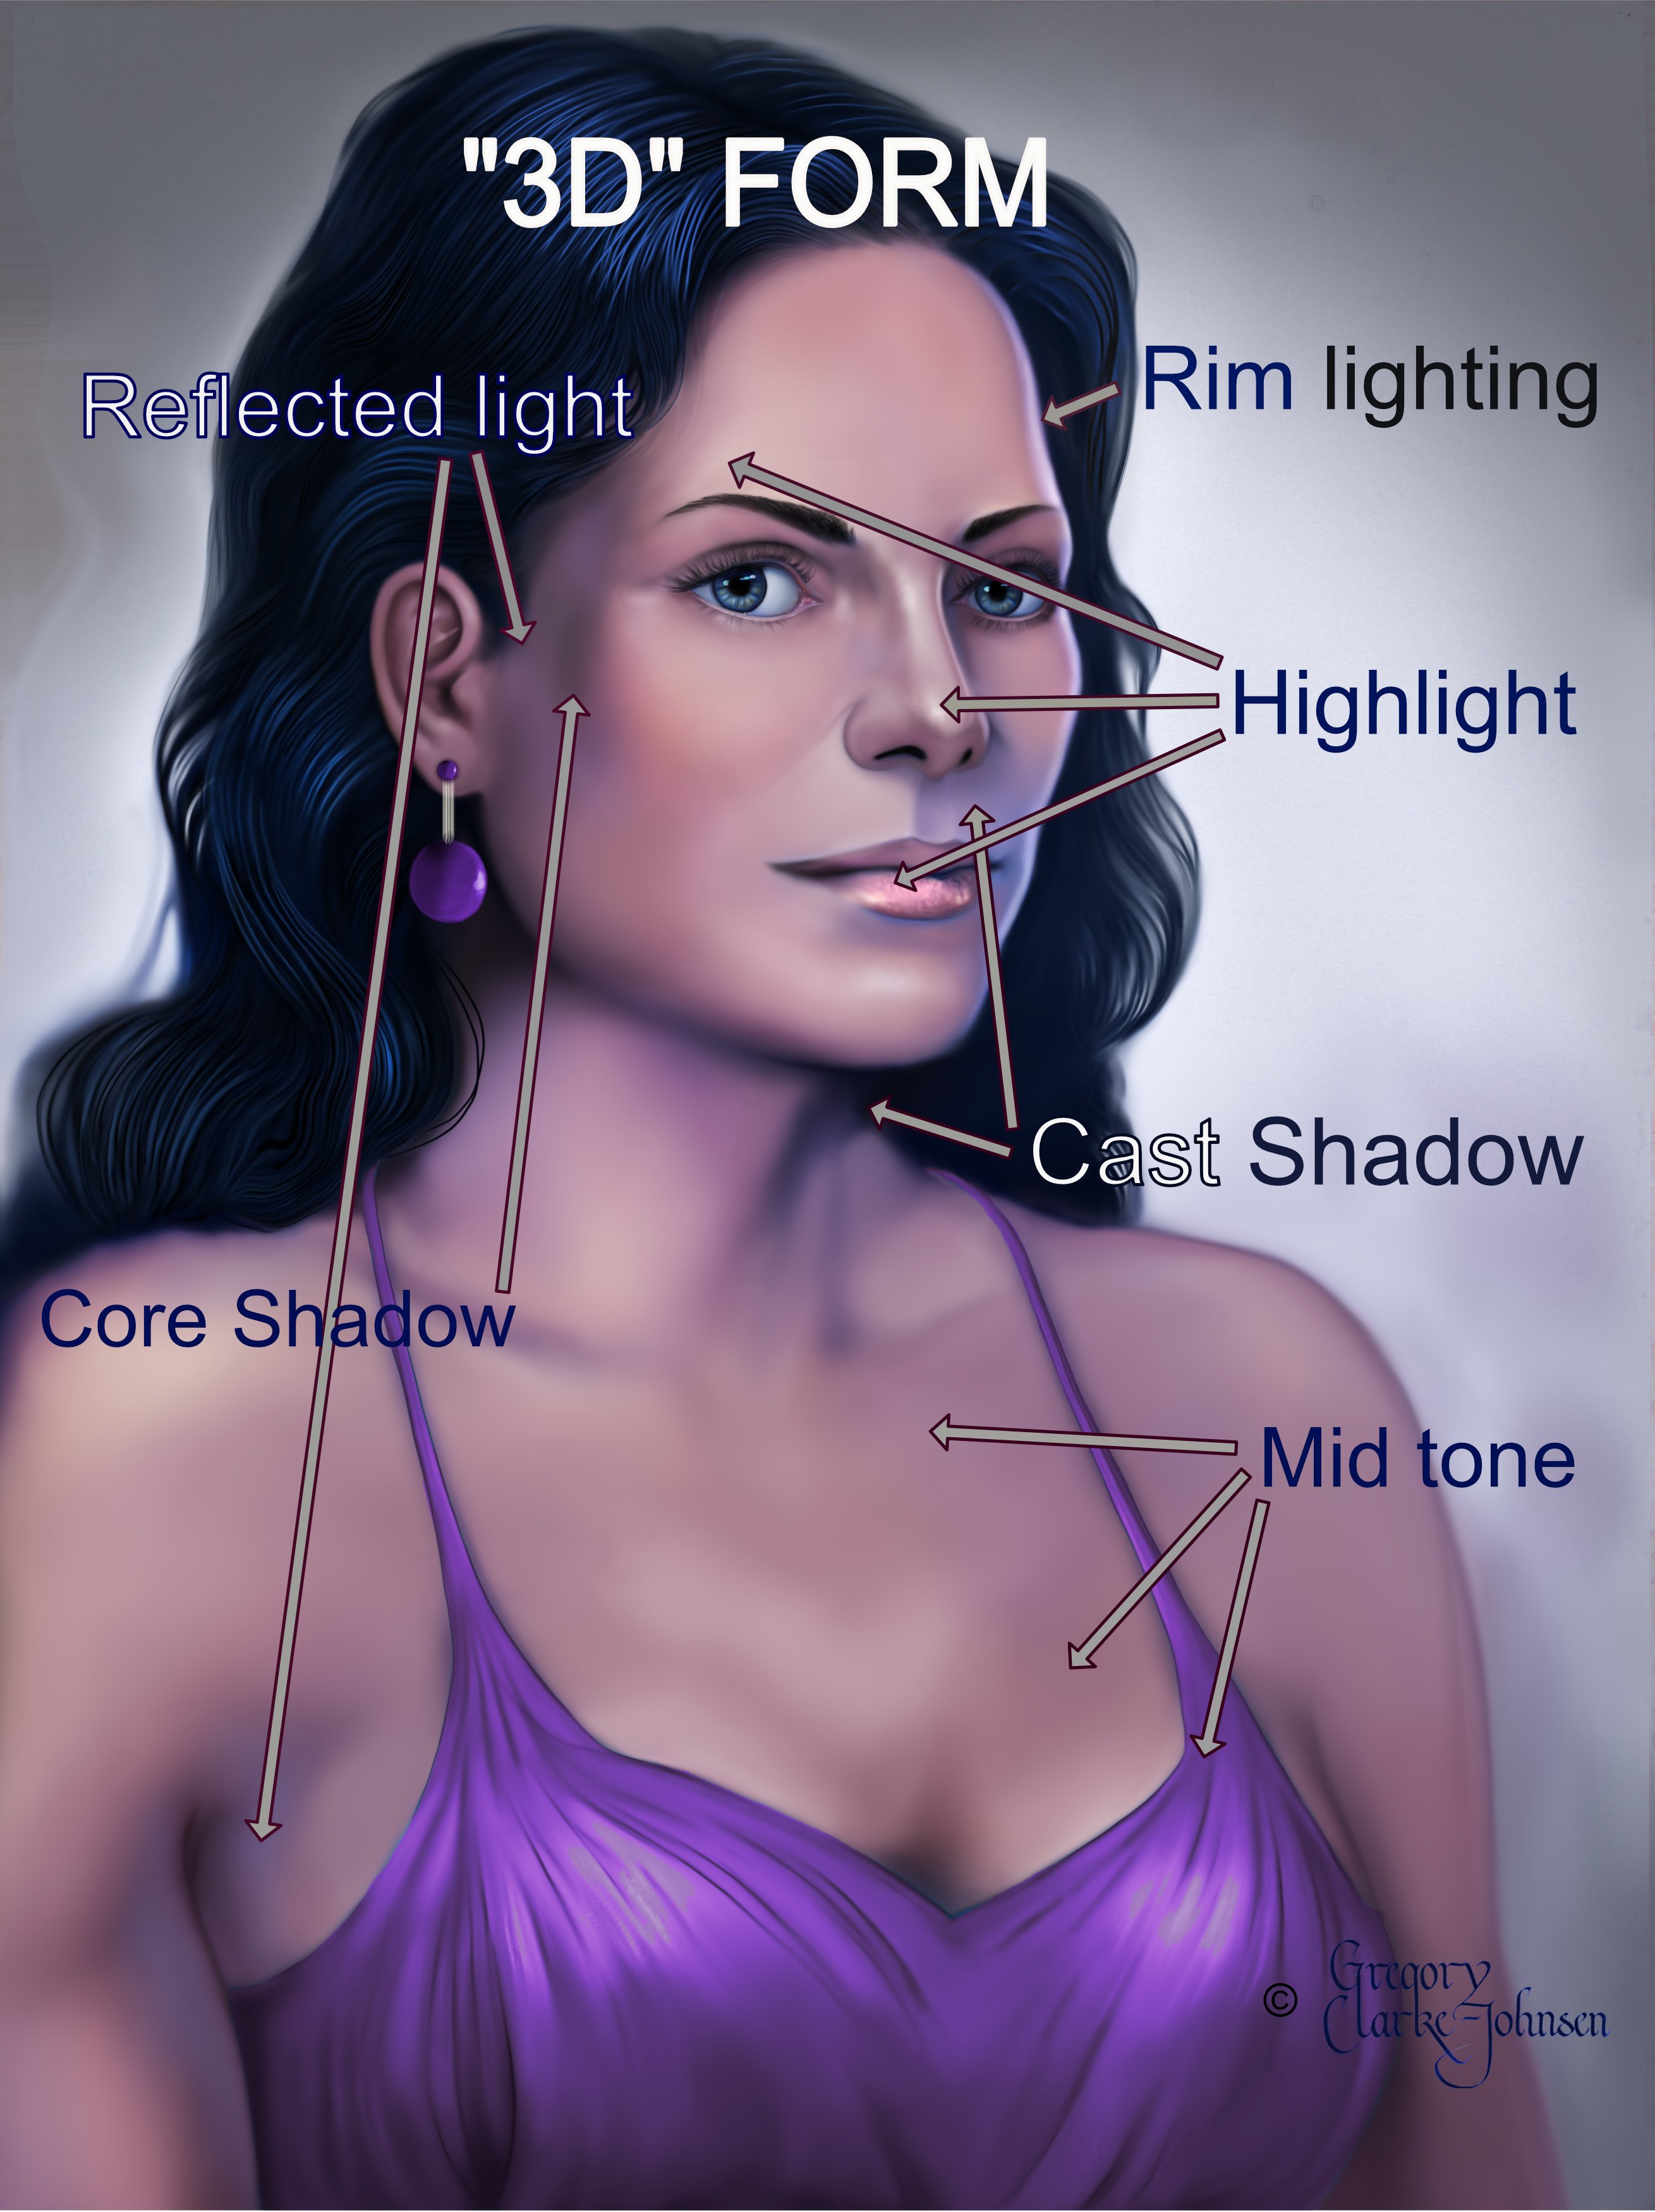
 Here I demonstrate 4 principle elements that make up a successful digital portrait. These include: How 3D form is structured, Facial landmarks, Colour Luminosity Comments welcomed . Instagram> @clarkejohnsen
-
- 1
-

-
- ap- 3d form
- affinity facial color
- (and 3 more)
-
Here’s a look at my Affinity Photo setup, using two views of the same painting that I am working on gives me the flexibility of zooming in on one image to work the details while being able to see the immediate impact on the whole image. This approach really works well given I am using a 5K iMac monitor. Comments welcomed. joined_video_d523871d91bc4ffea3bd7f8bf2663e61.MP4
-
 Updated: Fixed, see last line. Hello, Odd behavior experienced: In a particular file I can no longer move-clone items. To be specific, I mean when using the Move tool and you press Ctrl and then drag an item. The expected behavior is to have the item move-cloned. My resulting behavior is the item is simply moved. The erratic behavior is experienced with many kinds of item: tried with curve, shape and pixel. Only in this document. Affinity Photo 1.7.0.367 on Windows 10 Update: found that I had a document-wide pixel selection ongoing (marching ants). Ctrl-D to deselect and now the Move tool works as expected.
-
Best NEW Functions in 1.7 Affinity Photo Update. Find out the most useful new features added to the Photo Editing Software from Serif. Get the FREE Brushes here: https://gumroad.com/l/freebrushesvol1/freebrushes OR Get 17 Brushes for ONLY 5$: https://gum.co/MJZT OR Get 27 Brushes for ONLY 10$: https://gum.co/UTHqY Full Live Stream (recording): https://www.youtube.com/watch?v=-q6IUn6uVAI Brush Functions Explained (without SubBrushes) https://www.youtube.com/watch?v=k1z8xGFiSLk Support me on Patreon: https://www.patreon.com/sarikas Follow me on: https://www.facebook.com/sarikastutorials https://www.instagram.com/sarikasat/ Join us on Reddit: https://www.reddit.com/r/AffinityPhotoTuts/
-
 If you accidentally switch to separate mode, which I did, I cannot switch back to Merge All Windows. Does not work any longer after the new update.
 -
After the update, everything crashes and I have a deadline! How the hell can I roll back? I am dead in the water. Every file I try to open, the app crashes continually! I just updated and now I need to rollback. This is an emergency as I have a freaking deadline in a few hours. HELP!!!!!!! Update: Found someone with the same issue, it is a bug. Was about to find a temp workaround, I think. Went to preference and saw it defaulted to Metal and I switched to GPU, at least I can open a few of the files. Still testing. I had no issue whatsoever with the previous version and I have been a long time user. Mac Settings: AMD Radeon R9 M370X 2048 MB Intel Iris Pro 1536 MB Complete log attached crash.dmp
-
-
Hello everybody! I just wanted to let you know that FX Monkey's second free pack for Affinity Photo is out! Faux 96: 8 Color presets and 4 Overlay Textures. Click the image below for more info (the website looks pretty cool though, so check it out! It has some hints on whats coming next too...ohh) P.S.: The previous Monkey Pack - Faux 77 is no longer available for download. A thousand thanks to all the people who grabbed a copy! Faux 77 was a teaser for a soon to come premium Monkey Pack: Faux 77 pro (more than 20 macros + Textures), so get your hands on Faux 96 while it's still available :) Enjoy guys!
-
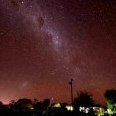
Hi everyone I have recently expanded my photographic hobby into astrophotography. Some time ago I watched a tutorial on the stacking feature in Affinity and thought I would give it a crack with some images I've taken in the last three or four weeks. I have to say that I am very happy with the the very first images I took and ran through Affinity. The process is somewhat quicker than dedicated stacking programs for astro but the results (for me) are very very satisfying. I thought that perhaps those that are interested could post their images and discuss different processing techniques that they have used. So I guess I'll get the ball rolling with my first astro edited with Affinity Clear skies D
-
My first play at Photo 1.7 late last night my time...Enjoy! So far Gobsmacked at the changes.I feel like a kid in a lolly shop! Thank you Affininty! Yes! One Day I may even get to Spelling Affinninty correctly! Photo: Courtesy of NASA...
-
- 2
-

-
-
- moon
- giant leap
- (and 2 more)
-
Brighton beach west pier
-