Search the Community
Showing results for tags 'Affinity photo'.
-
 While working on an image in affinity photo I came to a point where the 'new fill layer' layer menu option would add a new fill layer but without color and the fill color could not be changed. It seems this occurs when the last operation prior to adding the new fill layer is drawing a geometric shape with transparent fill. I don't know but perhaps this happens when other shapes are drawn with transparent fill too. The work around is to either (1) add another geometric shape with non-transparent fill before adding the new fill layer or (2) after adding the new fill layer change the fill type to 'none' then to the desired fill type after which a color(s) can be selected. Is there a better way to avoid adding a colorless fill layer?
 -
 Hi guys, here's a new video about how to create a 3D text in Affinity Photo. I hope you enjoy this video, thank you!
 -
 The [XMP]Subject and [IPTC]Keywords in .orf RAW files are being corrupted when opening them on the develop persona of Affinity Photo V2. The corrupted metadata values are used when exporting the developed image as .jpg files(other save formats not investigated) This behaviour is not present in Version 1 of Affinity Photo, nor is it a problem when opening .jpg files in Version 2 of Affinity Photo (ie, saved versions of the files retain the original metadata tag values in my tests). I add keyword & subject tags to my RAW (.orf) files using a script referencing the ExifTool utility. I add the same list to both tags because different programs seem to reference different tags. As an example, the following file has 4 subject/keywords tags... eT>> g:\tmp\affinityPhoto\221111-1578.orf [XMP] Subject : peak, dark peak, hathersage, fg [IPTC] Keywords : peak, dark peak, hathersage, fg When I open the file in Affinity Photo V2 (APv2) the keywords tag is missing and the subject tag has only one value, as shown in the Raw Data view of the Metadata ... <dc:subject> <rdf:Bag> <rdf:li>fg</rdf:li> </rdf:Bag> </dc:subject> Opening the same file in APv1 gives the following... <dc:subject> <rdf:Bag> <rdf:li>dark peak</rdf:li> <rdf:li>fg</rdf:li> <rdf:li>hathersage</rdf:li> <rdf:li>peak</rdf:li> </rdf:Bag> </dc:subject> ... <pdf:Keywords>fg</pdf:Keywords> So when I save the developed file as a JPG file I've now lost most of my tags if I use APv2 (only 1 tag value is retained)... eT>> g:\tmp\affinityPhoto\221111-1578-orfAPv2.jpg [XMP] Subject : fg [IPTC] Keywords : fg When using APv1 the keywords & subject tag lists are retained as originally entered. 221111-1578.orf
 -

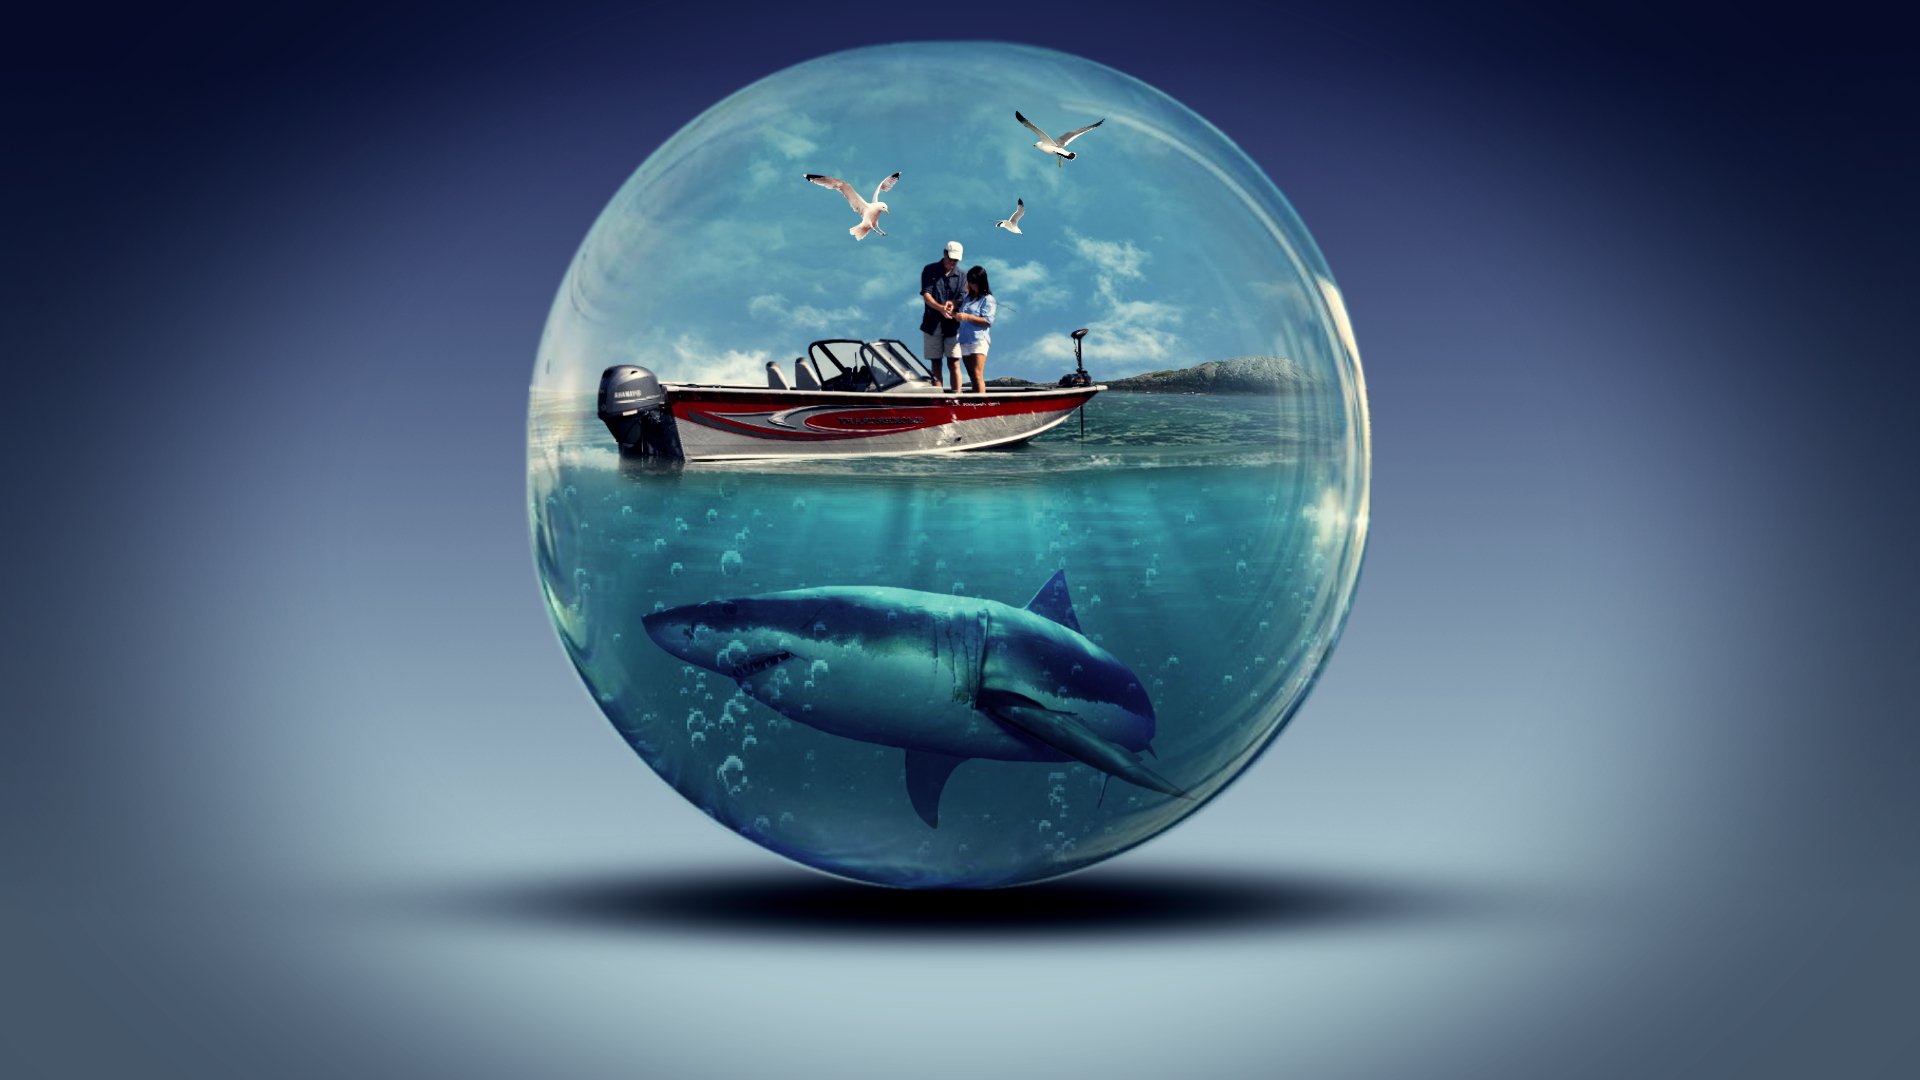
affinity photo ADDICTED TO COMPOSITE ART & AFFINITY PHOTO
zypher69 posted a topic in Share your work
Affinity Photo is a joy to use and allows me to create composite art that helps me stay sane during these uncertain times.
-
-
Steps: 1. I download the file from the official site: affinity-photo-2.0.0 2. install 3. the program does not start. It's fresh install. PC, Windows 10. Events logs: Aplikacja: Photo.exe Wersja architektury: v4.0.30319 Opis: proces został przerwany z powodu nieobsłużonego wyjątku. Informacje o wyjątku: System.UnauthorizedAccessException w System.IO.__Error.WinIOError(Int32, System.String) w System.IO.FileStream.Init(System.String, System.IO.FileMode, System.IO.FileAccess, Int32, Boolean, System.IO.FileShare, Int32, System.IO.FileOptions, SECURITY_ATTRIBUTES, System.String, Boolean, Boolean, Boolean) w System.IO.FileStream..ctor(System.String, System.IO.FileMode, System.IO.FileAccess, System.IO.FileShare, Int32) w System.Xml.XmlDownloadManager.GetStream(System.Uri, System.Net.ICredentials, System.Net.IWebProxy, System.Net.Cache.RequestCachePolicy) w System.Xml.XmlUrlResolver.GetEntity(System.Uri, System.String, System.Type) w System.Xml.XmlTextReaderImpl.FinishInitUriString() w System.Xml.XmlReaderSettings.CreateReader(System.String, System.Xml.XmlParserContext) w Serif.Affinity.Settings.SettingsService.Load(System.Type) w Serif.Affinity.Settings.SettingsService.Load(Boolean) w Serif.Affinity.Application..ctor() w Photo.Application.Main(System.String[])
-
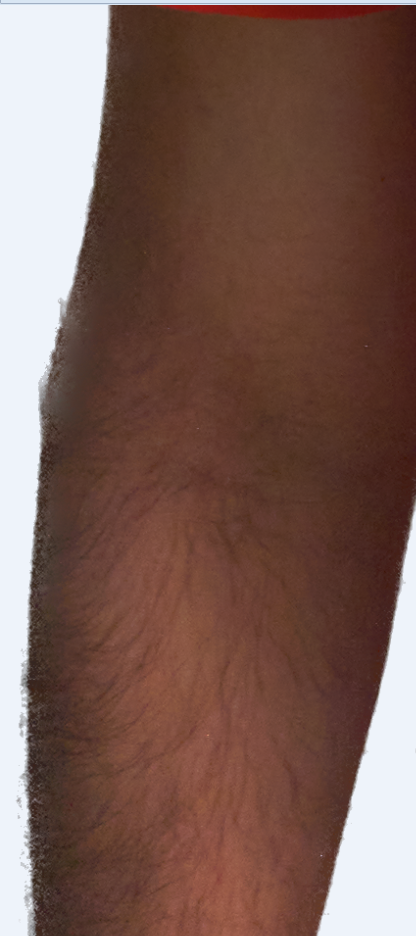
 I always get confused between How much Flow ? and How much Hardness to be kept while using the Paint Brush and when you are trying to paint in something which has been deleted while masking or making a selection.. Especially it is something like for e.g. Parts of a Subject which are missed out after you have made a cut out from a selection and that has not come out to be Razor Sharped Edges. (And there is no Mask to it) So How much Flow and How much Hardness should normally kept for such a scenario when I have to paint back in something. For e.g. This is a cut out from one of the selection that I made on one the Photos that I clicked and when I made the selection and cut out the final cut out has this blurry areas on the Hand. So If I have to Paint with the Hand color back on to the hand what is considered a good and safe Flow and Hardness ? which would not make the Hand having patches and straps of colour layers if I were to Paint in the Hand colour ? I dont have the .afphoto file of it and I have not saved the project with a Mask. (Before someone asks me that) I made the cut out and saved the Picture as PNG so now even this image is permanently like this without a mask. I will add another background to it. So in this case there is no white reveals and black conceals situation in this case. The Mask is gone. Hence I am asking How much Flow and How much Hardness should normally kept ? for such a scenario when I have to paint back in something.
-
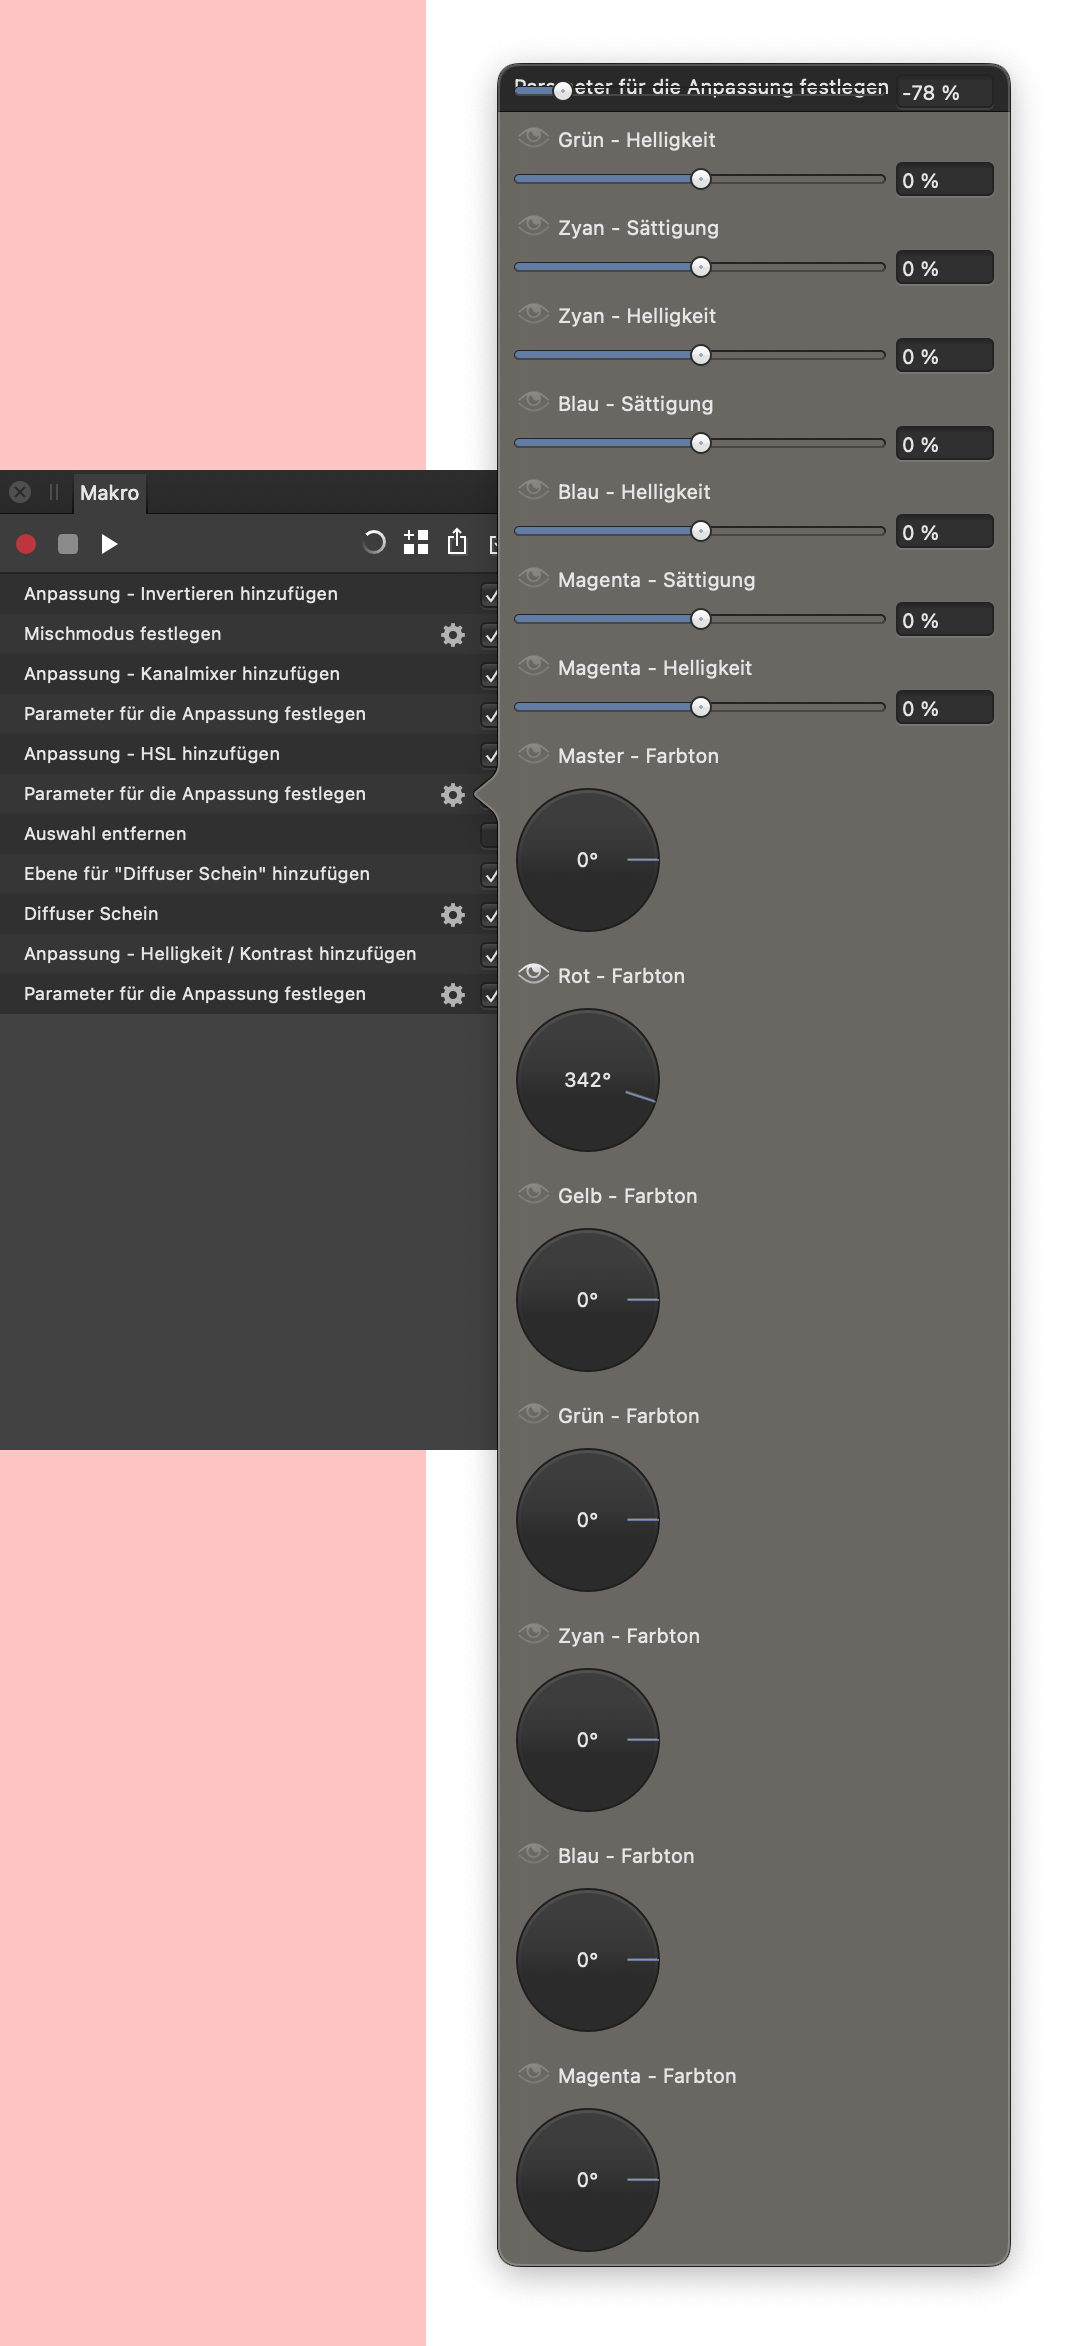
 Hallo, ich habe in Affinity Photo und Photo2 ein Makro erzeugt mit einer HSL Anpassung. Bei der Bearbeitung der HSL-Parameter fehlt der obere Teil des Dialogfeldes. dadurch können die Einstellungen für Gelb und Rot nicht vorgenommen werden. Die Einstellungen für Textgröße sind Standard. Ich arbeite mit macOS Ventura 13.0.1 Hat jemand eine Idee? Hello, I created a macro in Affinity Photo and Photo2 with an HSL customisation. When editing the HSL parameters, the upper part of the dialogue box is missing, so the settings for yellow and red cannot be made. The text size settings are standard. I work with macOS Ventura 13.0.1 Does anyone have an idea?
-
This image is inspired by an amazing crop Circle that developed over three nights. This was night one...
-
Ref: Luis Melendez - Affinity Photo stock brushes
-
 In the desktop versions of Affinity Photo 2, it’s possible to save and restore presets of Live Luminosity Masks. it appears this functionality is missing in the iPad version (or it’s hidden / not easy to find). Am I missing something - or will these capabilities be introduced in a future release? Bernie
 -
 This feature was requested for at least 2 years and was never added in v1, still missing. Does v2 have it?
 -
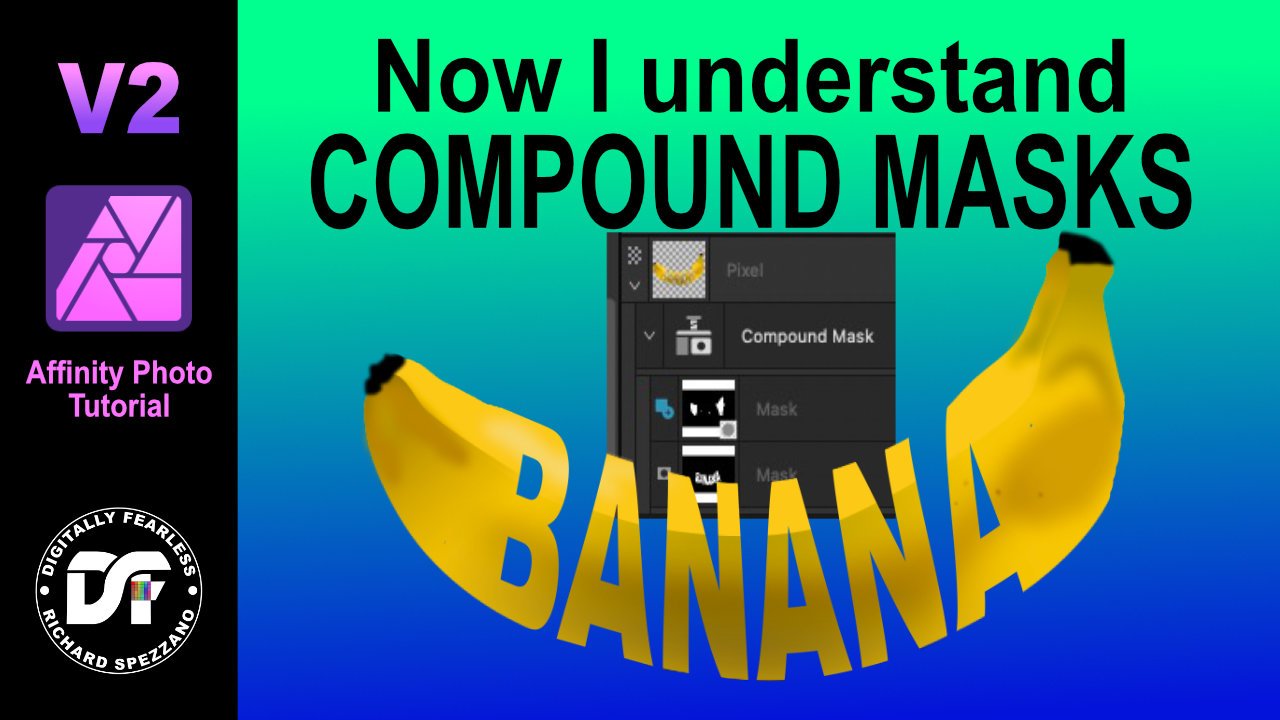
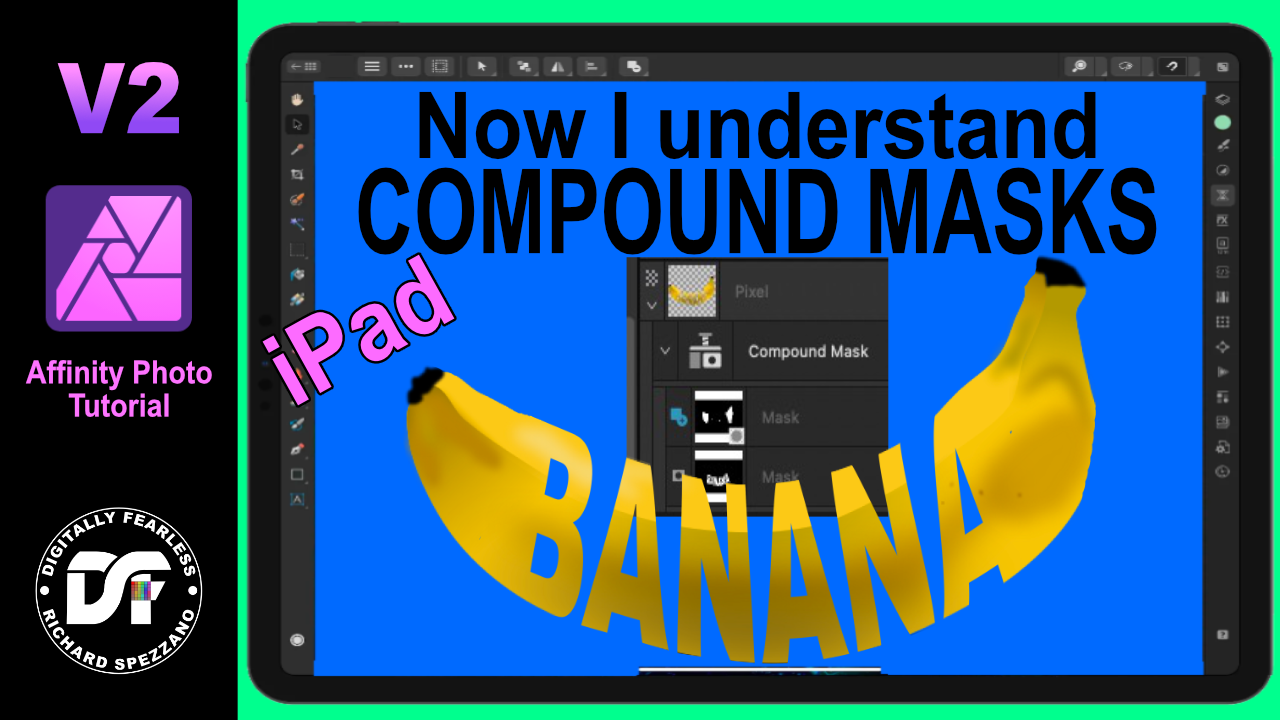
 In this Affinity Photo v2 tutorial I show how compound masks can be so useful in your workflow. I saw this tutorial done on Photoshop by Mood on YouTube, but without compound masks and thought about how much better compound masks makes it in Affinity. https://youtu.be/vuRlbRMUA8k Note I also have an iPad version of this tutorial on y channel
-
- 3
-

-
- affinity photo
- v2
- (and 4 more)
-
 Hi, In this Affinity Photo tutorial I show how to remove haze while preserving the fog and getting the colors back. The haze filter got over the years a new and improved engine and adjustments. I wish you fun and inspiration. Ciao Jack
- 2 replies
-
- 6
-
-
- affinity photo
- tutorial
- (and 6 more)
-
 It would be nice to have gap detection in the flood fill tool. Ideally, you would be able to fill areas that have gaps below a certain, user specifiable threshold.
-
- 1
-
-
- affinity photo
- flood fill tool
- (and 3 more)
-
 Hello Everyone How can I copy a selection of pixels onto the initial layer without creating a new layer for it? Like alt + drag selection in PS. Because not only is it an extra step, which becomes tedious when done repeatedly, but also repeated merging down of the new layer causes the initial layer to blur because of anti-aliasing. Thanks in advance Kind Regards SHA-10
 -
 I have an issue with UI scaling the brush variable settings on the side of the workspace when in my usual landscape orientation (iPad) The three options for hardness, size & opacity bleed off the screen and make them unusable at the higher or lower values (see pictured example) These options fit on screen just fine in portrait mode, however I almost never work in portrait mode, and having to flip my iPad around every time I need to change brush values is annoying. Is there a future fix for this?
-
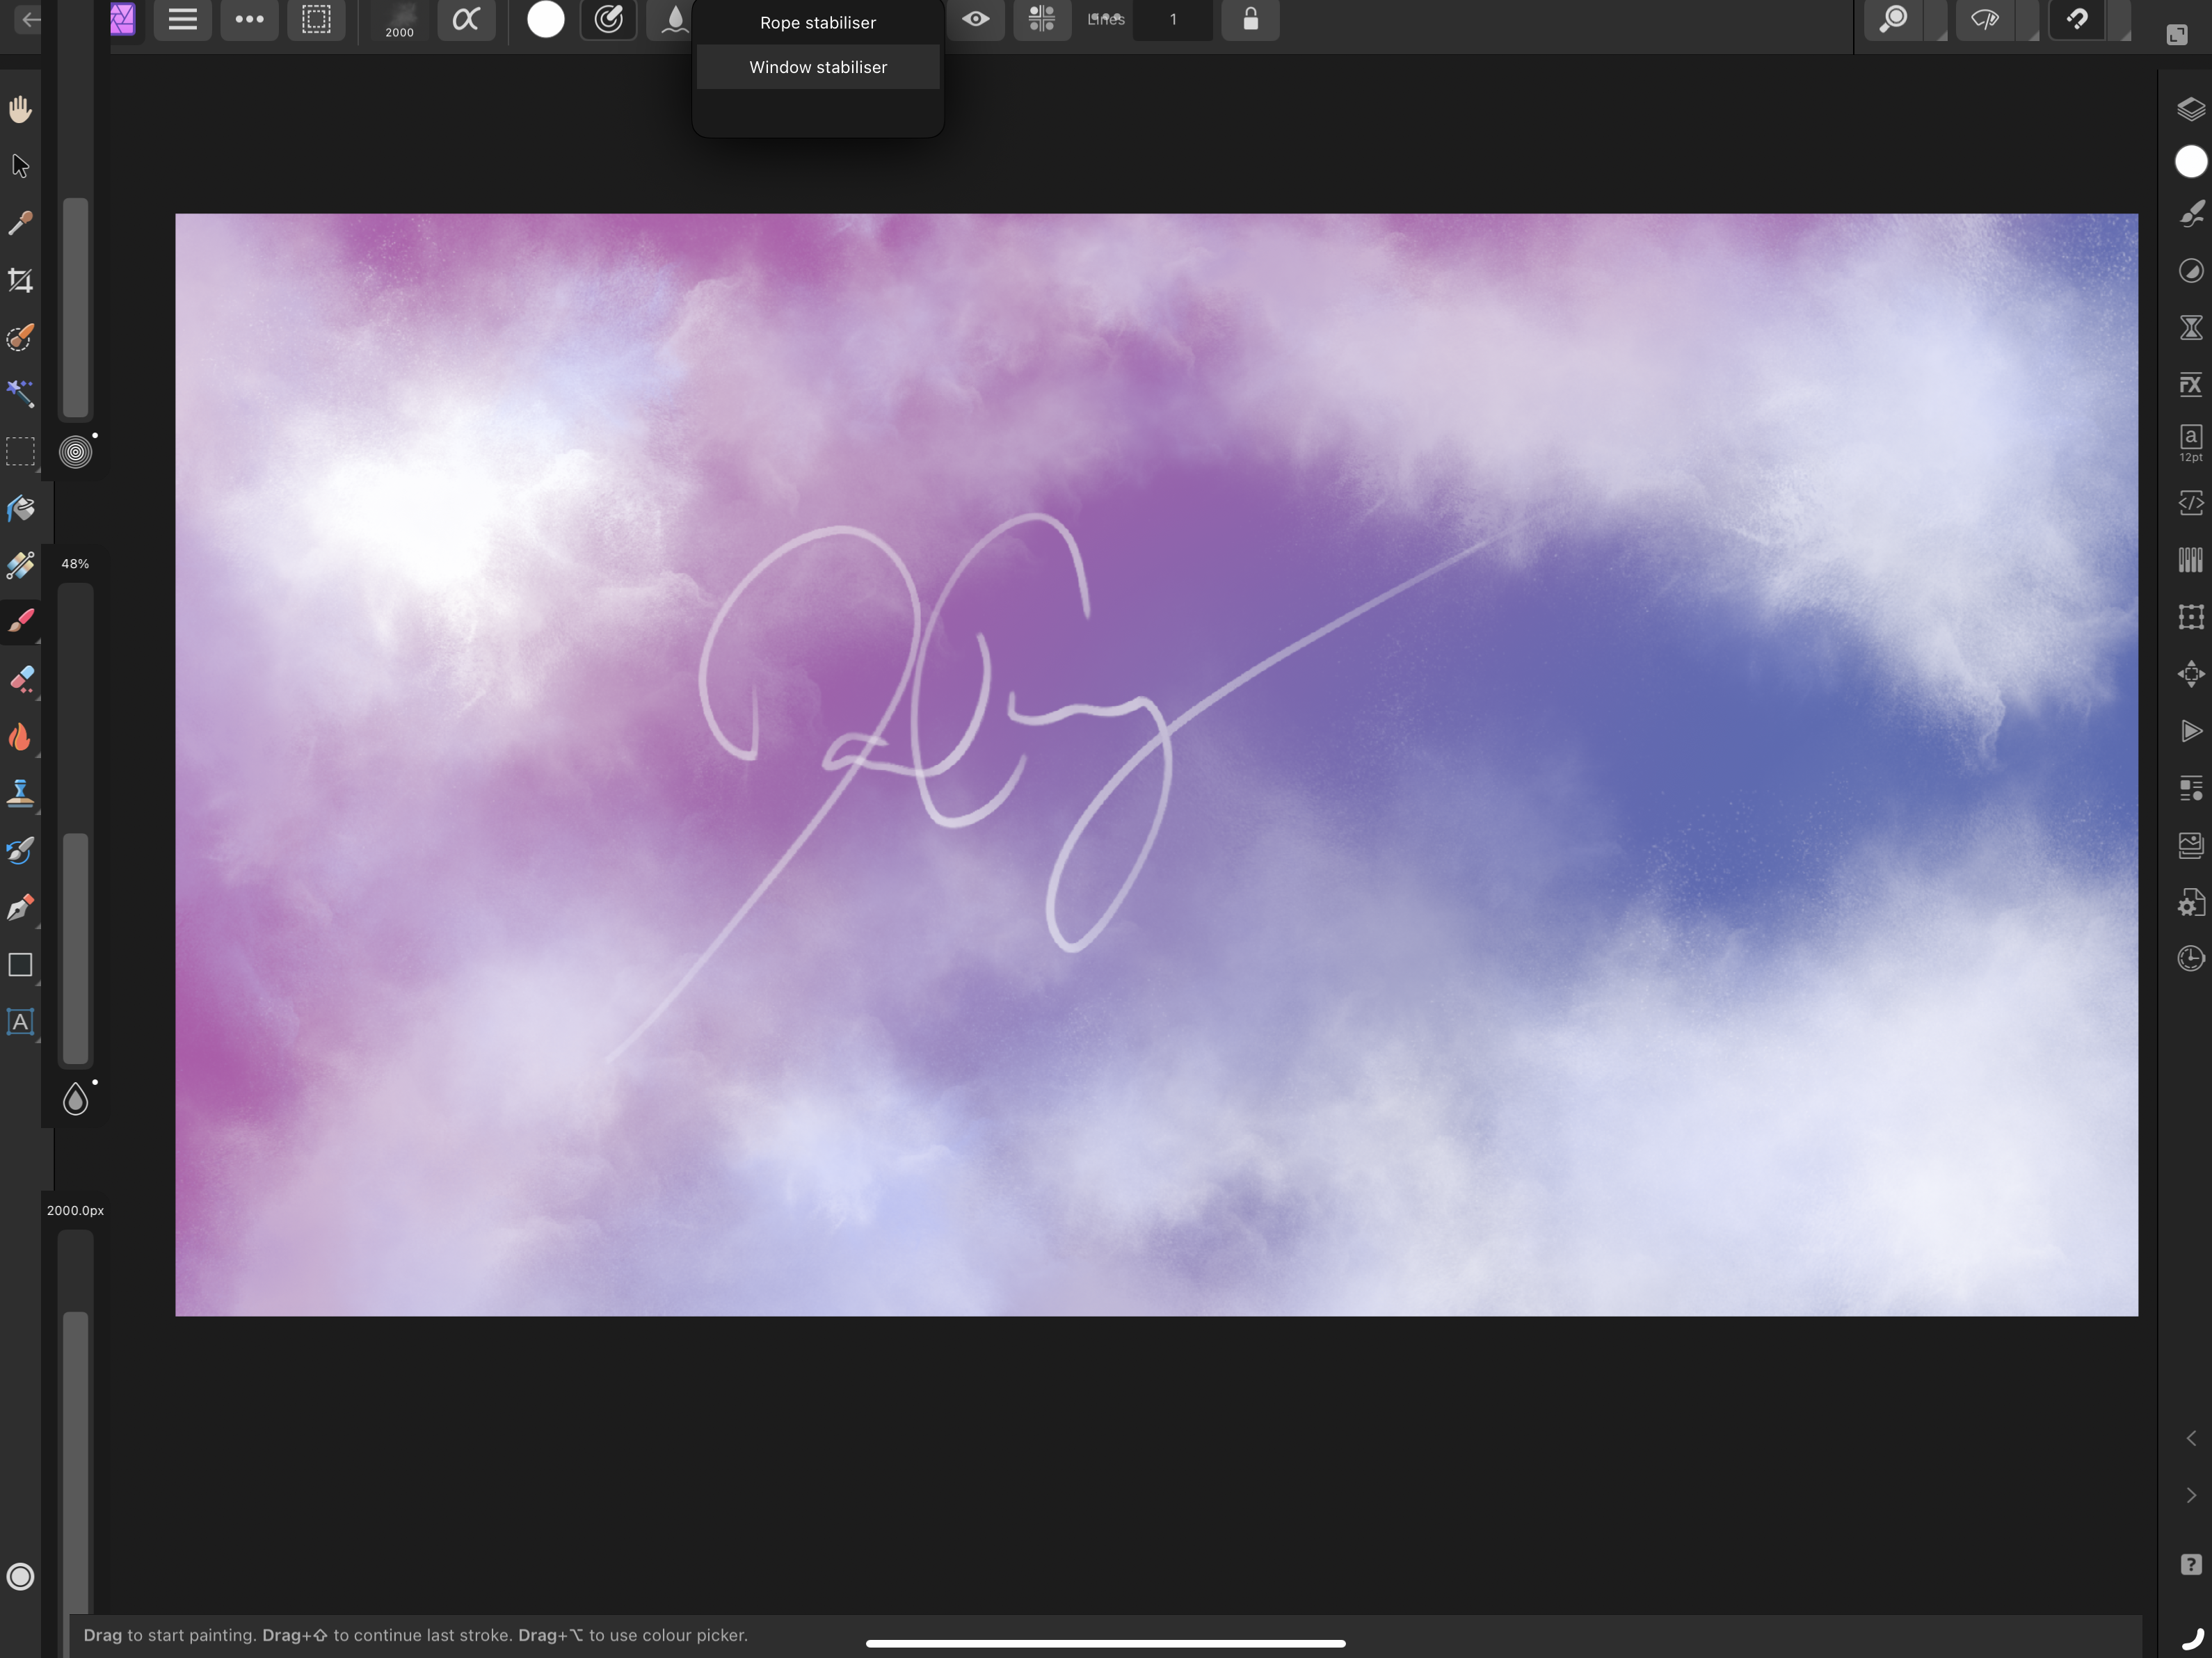
I have recently upgraded my entire suite to V2. Looks great so far, but I can't for the life of me find how to adjust the value for the rope / window stabiliser for the brush? I can see the selection for window, rope & none - I can't find how to adjust the numeric value of each option as I used to be able to in V1? I'm having this problem on the iPad version - can someone please help direct me? Please don't tell me this adjustment option has been removed in iOS?
-
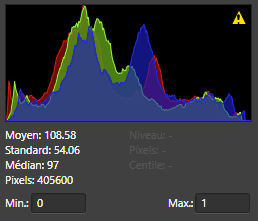
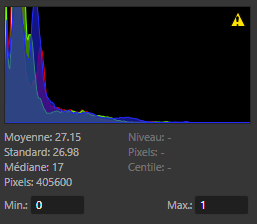
 Hello, Just bought Affinity 2.0 after learning in a class on 1.7. It seems that there is an issue on the histograms representation between version 1.X and 2.0. I am using a Fuji XT-4 and here is the result on the same image (you can find the .dng attached). The DR may have been to 200% or 400% during this photoshoot (I usually leave it to auto) Here is the histogram on the version 1.10.6 And here is the histogram in the version 2.0 _DSF1237.dng
-
I bought the Affinity set. To commemorate the first time. I had the most fun this year. Thank you
-
 Hello, I use Affinity Photo for color editing my 3D rendenrings, so my starting file is a jpg and not a raw file. What I would like to do, is to to apply some development settings to my jpg, export the immage and then be able to open the affinity file after months and keep adjusting the the development settings from where I left them. Let's say I apply +30 saturation, I export the immmage, then if the client ask me for some changes I would like to be able to open the affinity file again, go under the development persona, and find the saturation slider to still be at +30, and be able to move it to let's say +20. I understand that with Affinity Photo 2.0 this is now possible with raw files. But I work with .jpg. Is there something I can do to achieve the same flexibility with jpg? Thank you
 -
Affinity Designer is the program I use most from the Affinity suit and I haven't yet done a lot with Affinity Photo. So I thought it was time to do a little experimenting. I found an image of an occult statue on line, that intrigued me and used it to retouch it to my personal preference. I narrowed its wings and changed its face somewhat (among other things). I have to practice more with Affinity Photo, which I will do when I have more time. Being a vector drawing aficionado this type of work is a little out of my comfort zone, but looking outside of it probably is a good thing to do in this life, bearing in mind that many matters obviously are intentionally induced and imposed, which of course has a certain purpose that does not necessarily concur with my intuition. More info about this in my portfolio blog: https://communicats.blogspot.com/2022/12/occult-image-retouching-experiment.html
-
Here's my third attempt at a single frame story. I'm thoroughly enjoying the ability to use both vector and bitmap techniques together. This allows me to not have to plan too far ahead and go with which technique works best. Not having to worry about workflow issues makes images like this possible for me. I don't really know what I'm creating until it's finished.
- 1 reply
-
- 4
-
-
- affinity designer
- affinity photo
- (and 1 more)
-
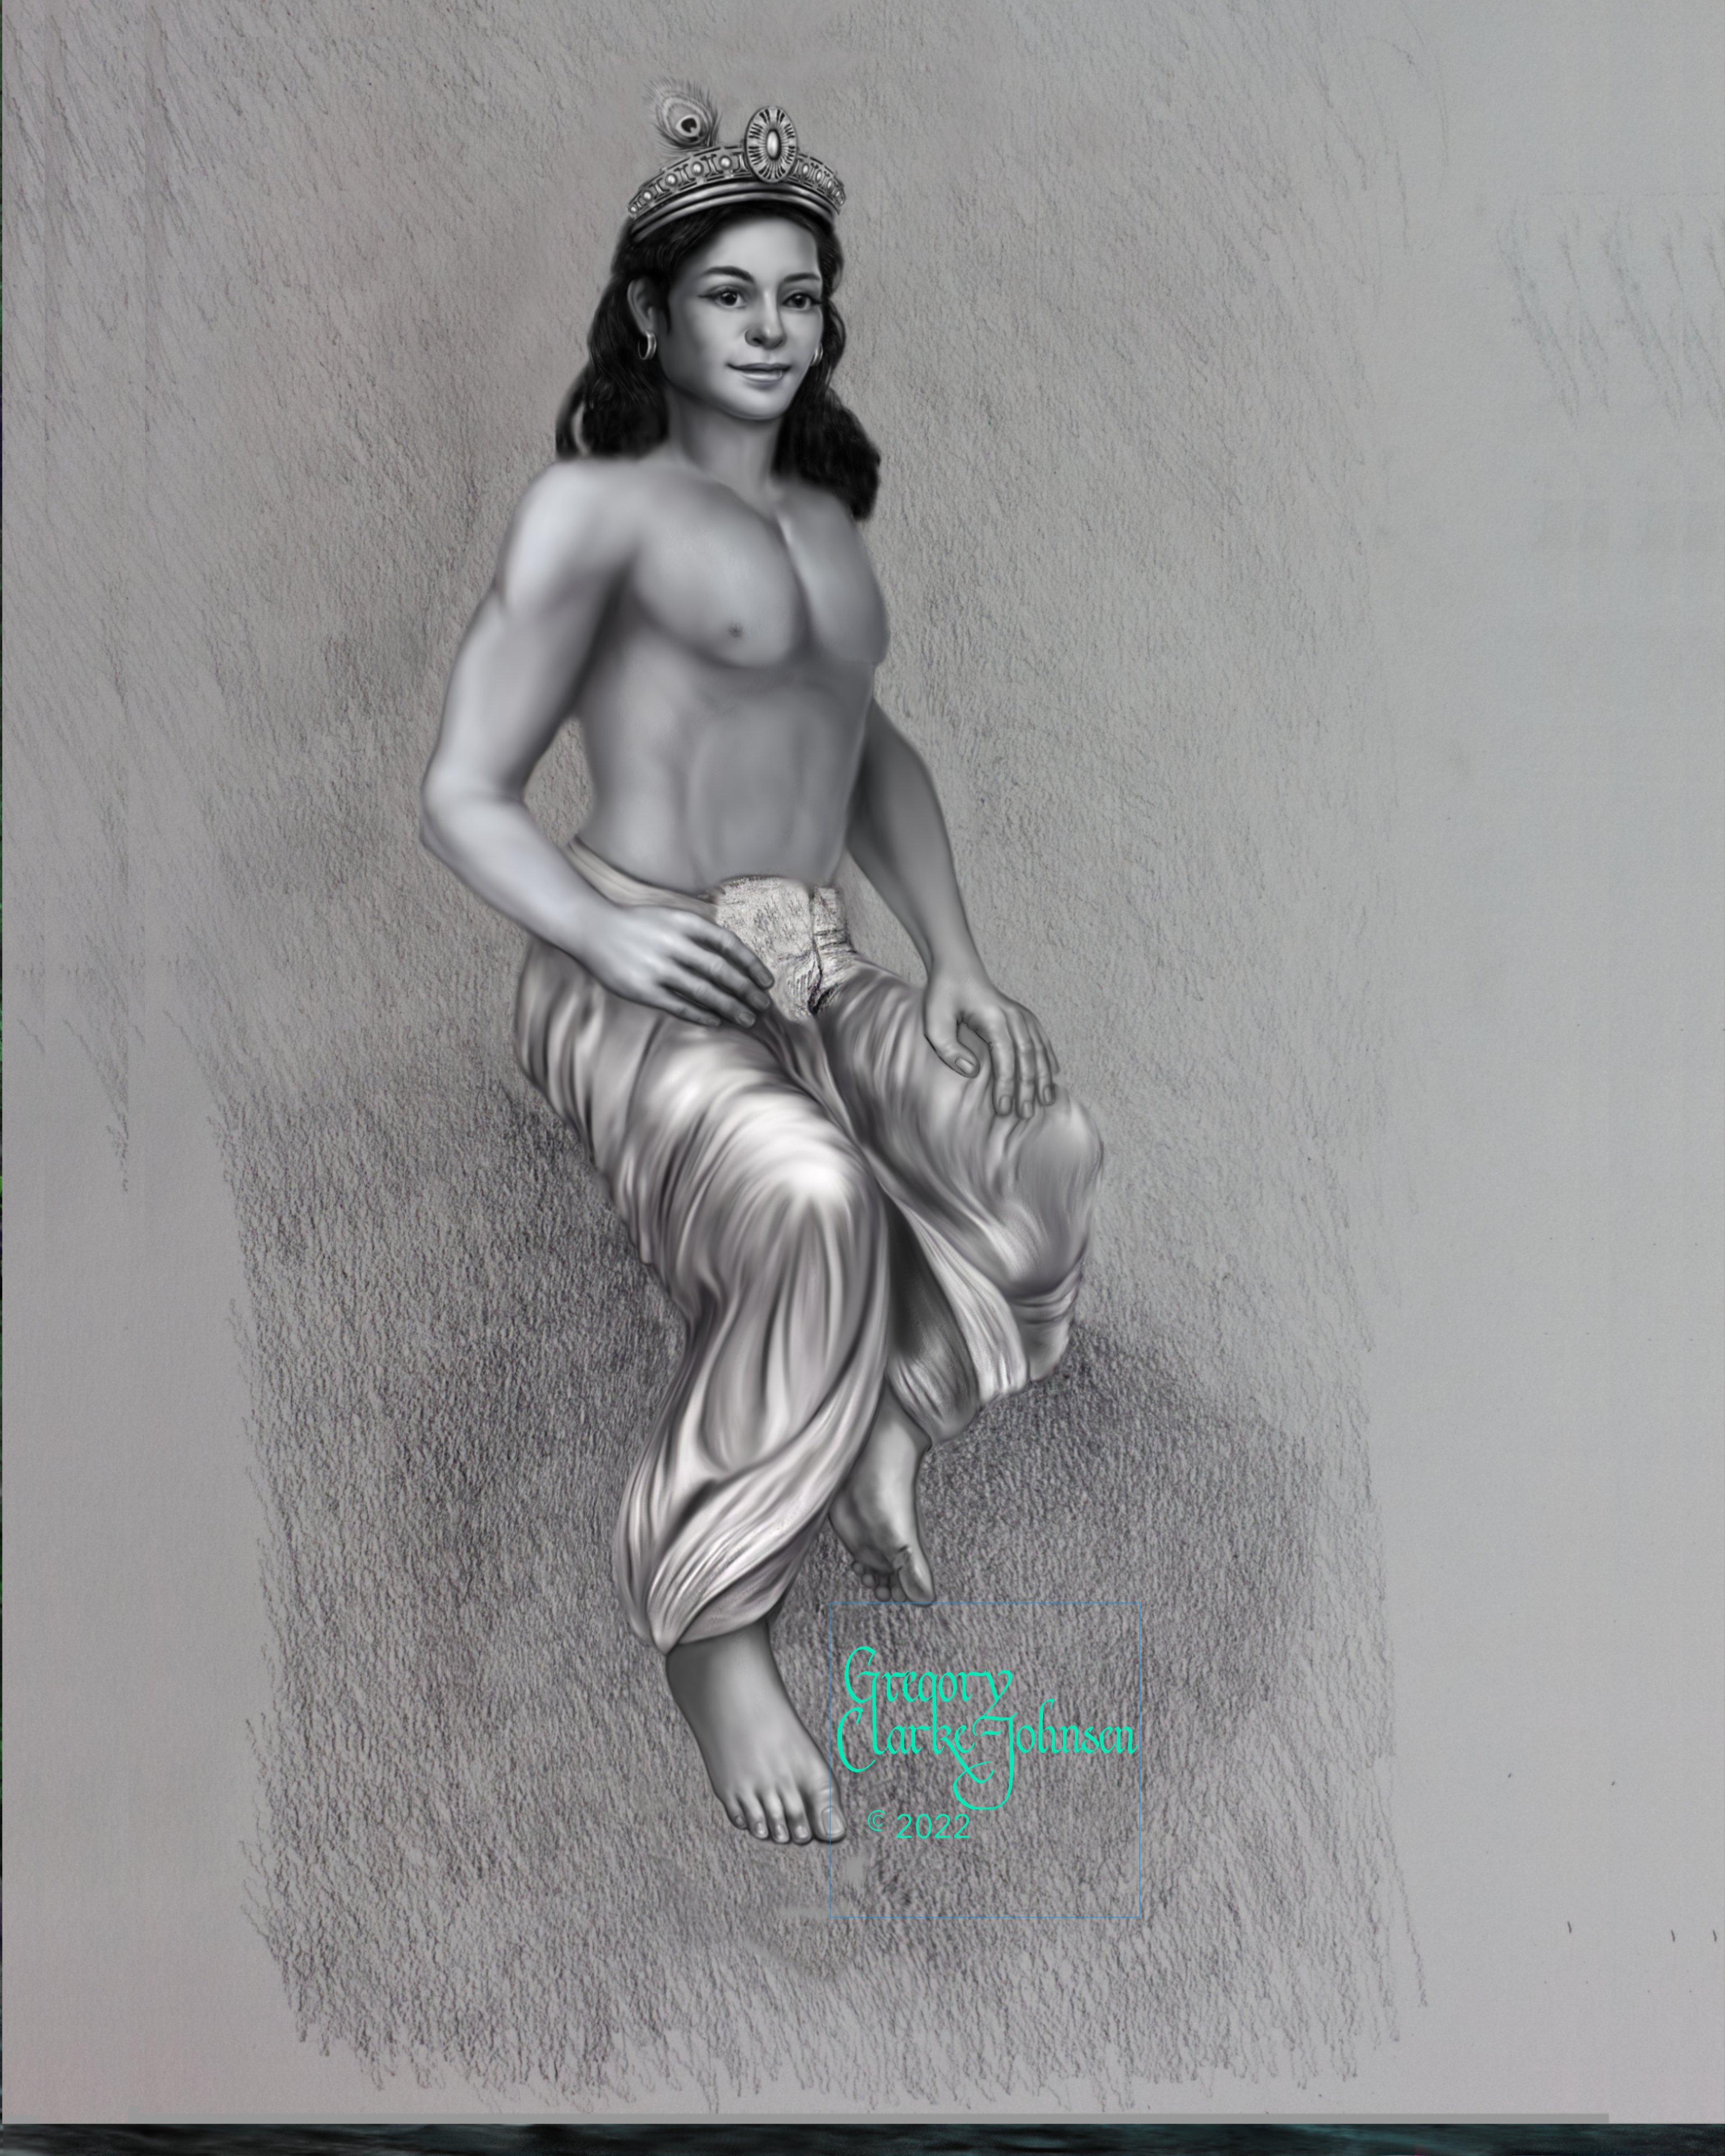
 I just wanted to share my approach to digital painting. I have tried many different approaches over the years and find this one works for me . I initially create a graphite drawing on vellum drawing paper, photograph it and then take the digital file into AP. Using the default blending tools, I blend the previously shaded drawing into a nicely sculpted form ready for the application of colour using gradient maps. Here is a sample of the final stage of the grayscale and its readiness for colour. Comments welcomed.
- 2 replies
-
- 2
-
-
- affinity photo digital painting
- affinity photo painting
- (and 2 more)