ciscrh
-
Posts
24 -
Joined
-
Last visited
Recent Profile Visitors
1,730 profile views


-
I've just bought the OM-5 camera with this lens & Affinity wasn't recognising it. The metadata created in the image files uses a different lens name. So I assume that while the older lenses of this type work with the custom lens profile the newer ones don't. I've created a modified version of David's file, which works for my lens...attached. BTW, lensfun seem to have two XML files featuring this lens: mil-olympus.xml and another file with om in the name & just a single entry for this lens. I'm sorry to be vague, but I find it difficult to navigate the lensfun sites so although I saw & looked at the XML file last night I can't find it today. Having two XML files with slightly different entries for effectively the same lens might cause confusion. om12-45.xml
-
 Dan C reacted to a post in a topic:
Metadata corruption when opening RAW file in Affinity Photo 2
Dan C reacted to a post in a topic:
Metadata corruption when opening RAW file in Affinity Photo 2
-
Metadata corruption when opening RAW file in Affinity Photo 2
ciscrh replied to ciscrh's topic in V2 Bugs found on Windows
Hi, I didn't bother with the beta version. The recent 2.0.3 release has restored the requested tags in developed .orf files saved as .jpg files. Thank you :-)- 4 replies
-
- 1
-
-
- affinity photo
- metadata
- (and 1 more)
-
Metadata corruption when opening RAW file in Affinity Photo 2
ciscrh replied to ciscrh's topic in V2 Bugs found on Windows
In my tests the corruption did not happening when starting with a .jpg file (in this case using the .jpg file created by my camera at the same time as the .orf file)... eT>> g:\tmp\affinityPhoto\221111-1578-jpgAPv2.jpg [[XMP] Subject : dark peak, fg, hathersage, peak [IPTC] Keywords : dark peak, fg, hathersage, peak -
The [XMP]Subject and [IPTC]Keywords in .orf RAW files are being corrupted when opening them on the develop persona of Affinity Photo V2. The corrupted metadata values are used when exporting the developed image as .jpg files(other save formats not investigated) This behaviour is not present in Version 1 of Affinity Photo, nor is it a problem when opening .jpg files in Version 2 of Affinity Photo (ie, saved versions of the files retain the original metadata tag values in my tests). I add keyword & subject tags to my RAW (.orf) files using a script referencing the ExifTool utility. I add the same list to both tags because different programs seem to reference different tags. As an example, the following file has 4 subject/keywords tags... eT>> g:\tmp\affinityPhoto\221111-1578.orf [XMP] Subject : peak, dark peak, hathersage, fg [IPTC] Keywords : peak, dark peak, hathersage, fg When I open the file in Affinity Photo V2 (APv2) the keywords tag is missing and the subject tag has only one value, as shown in the Raw Data view of the Metadata ... <dc:subject> <rdf:Bag> <rdf:li>fg</rdf:li> </rdf:Bag> </dc:subject> Opening the same file in APv1 gives the following... <dc:subject> <rdf:Bag> <rdf:li>dark peak</rdf:li> <rdf:li>fg</rdf:li> <rdf:li>hathersage</rdf:li> <rdf:li>peak</rdf:li> </rdf:Bag> </dc:subject> ... <pdf:Keywords>fg</pdf:Keywords> So when I save the developed file as a JPG file I've now lost most of my tags if I use APv2 (only 1 tag value is retained)... eT>> g:\tmp\affinityPhoto\221111-1578-orfAPv2.jpg [XMP] Subject : fg [IPTC] Keywords : fg When using APv1 the keywords & subject tag lists are retained as originally entered. 221111-1578.orf
-
The metadata functionality seems to have been reduced in V2 compared with V1... I use a script making use of ExifTool to add keyword & subject tags to my RAW (.orf) files. I add the same list to both tags because different programs seem to use different tags. As an example, the following file has 5 keyword tags... eT>> H:\fasttmp\2022\2022-11\221128-1621.orf [XMP] Subject : peak, dark peak, low bradfield, high bradfield, su3a wgh [IPTC] Keywords : peak, dark peak, low bradfield, high bradfield, su3a wgh When I open the file in Affinity Photo V1 (APv1) it retains all the subject tags and just one of the keywords tags... <dc:subject> <rdf:Bag> <rdf:li>dark peak</rdf:li> <rdf:li>high bradfield</rdf:li> <rdf:li>low bradfield</rdf:li> <rdf:li>peak</rdf:li> <rdf:li>su3a wgh</rdf:li> </rdf:Bag> </dc:subject> <pdf:Keywords>su3a wgh</pdf:Keywords> Annoying, but I can live with that, my keyword processing scripts are quite accommodating. When I open the file in Affinity Photo V2 (APv2) the keywords tag is missing and the subject tag has only one value... <dc:subject> <rdf:Bag> <rdf:li>su3a wgh</rdf:li> </rdf:Bag> </dc:subject> So when I save the developed file as a JPG file I've now lost most of my tags if I use APv2 (only 1 tag value is retained)... eT>> H:\imageHinau\photo\2022\2022-11\prints\221128-nrHoldsworthHall.jpg [XMP] Subject : su3a wgh [IPTC] Keywords : su3a wgh When using APv1 the keywords & subject tag lists are retained as originally entered. So APv2 is removing most of my keywords & subject tags image metadata. Please can you modify APv2 to keep these tags unaltered? ------------ chris hailey Windows 10, 16GB RAM, NVIDIA geForce GTX 1050 Ti
-
Hi, Something has happened since I last looked at it in detail, but I'm not sure that it working properly. I tend to use live filters in the photo persona so that I can update or undo the correction. I've got a digital image of a slide I took in the 80s & photographed the slide using a digital camera about 9 years ago. The image has significant blue/orange fringing. If I zoom in to the right chimney area, activate a defringe live filter & click on the yellow fringing not much happens until I reduce the Edge Brightness Threshold to a suitable value (say from 95% to 85%). This removes some but by no means all of the yellow fringe. If I use the mouse wheel in the input value box to modify the value by a few percent either side of 85% the amount of defringing changes but not in a consistent manner, so sometimes it reduces defringing at 85%, but not always. While I'm doing this the fringe colour rainbow tends to move around, as does the circle indicating the current colour (say yellow or red). If the circle is red the defringe effect is usually minimal, but if I click on the rainbow yellow colour in the selector rainbow then the defringing effect may be improved, possibly considerably. I've just done what I described as I wrote this response & it doesn't make much sense to me, but it is what is happening. I would say that the defringe filter is not behaving in a consistent or repeatable manner. Tinker around with it enough & I can remove most of the blue and yellow fringing, usually by applying 2 or more live filters.

-
Hi, Anything changed here? I'm using the Windows 1.10.4.1198 version of Affinity Photo (October 2021): I can access a Defringe dialogue box by three routes and none of them have a Picker option Only the Develop Persona has a numeric input option for the Hue slider, shows the current value & lets you change the value by editing the current numeric value If I invoke the Affinity Photo Help & enter the defringe search term, the top Defringe entry includes the statement "This adjustment is only available in Develop Persona." The second Defringe entry, which I assume applies to the Photo Persona, includes the statement "...This can be manually adjusted as necessary in the dialog, or by sampling the fringe colour on the page to remove it..." Lacking a Picker option I have found no way to sample the fringe colour. Being able to use a picker tool to set the hue/fringe colour would potentially make the tool easier to use, as would being able to note the current Photo Persona fringe colour value & change it directly without using the slider control, as is possible under the Develop Persona.
-
 ciscrh reacted to a post in a topic:
Affinity Publisher for Windows - 1.9.0
ciscrh reacted to a post in a topic:
Affinity Publisher for Windows - 1.9.0
-
Macro with User Interaction
ciscrh replied to ciscrh's topic in Pre-V2 Archive of Desktop Questions (macOS and Windows)
It sounds reasonable & is probably what is happening, but I'm not convinced it's the whole story. Also, I can't see the effect of any chosen radius value without committing to the change. I have another macro that adds a graduated ND filter effect & it is configured to allow you to set the strength, brightness & contrast interactively when the macro is run. It puts up a dialogue box & waits for me to choose the required values (which it does on the fly: I can see what effect changing the sliders has on the image) before clicking the Apply button to get the macro to complete, & at no point is a Preview box displayed. In fairness, I have other macros that don't let me preview their effect. -
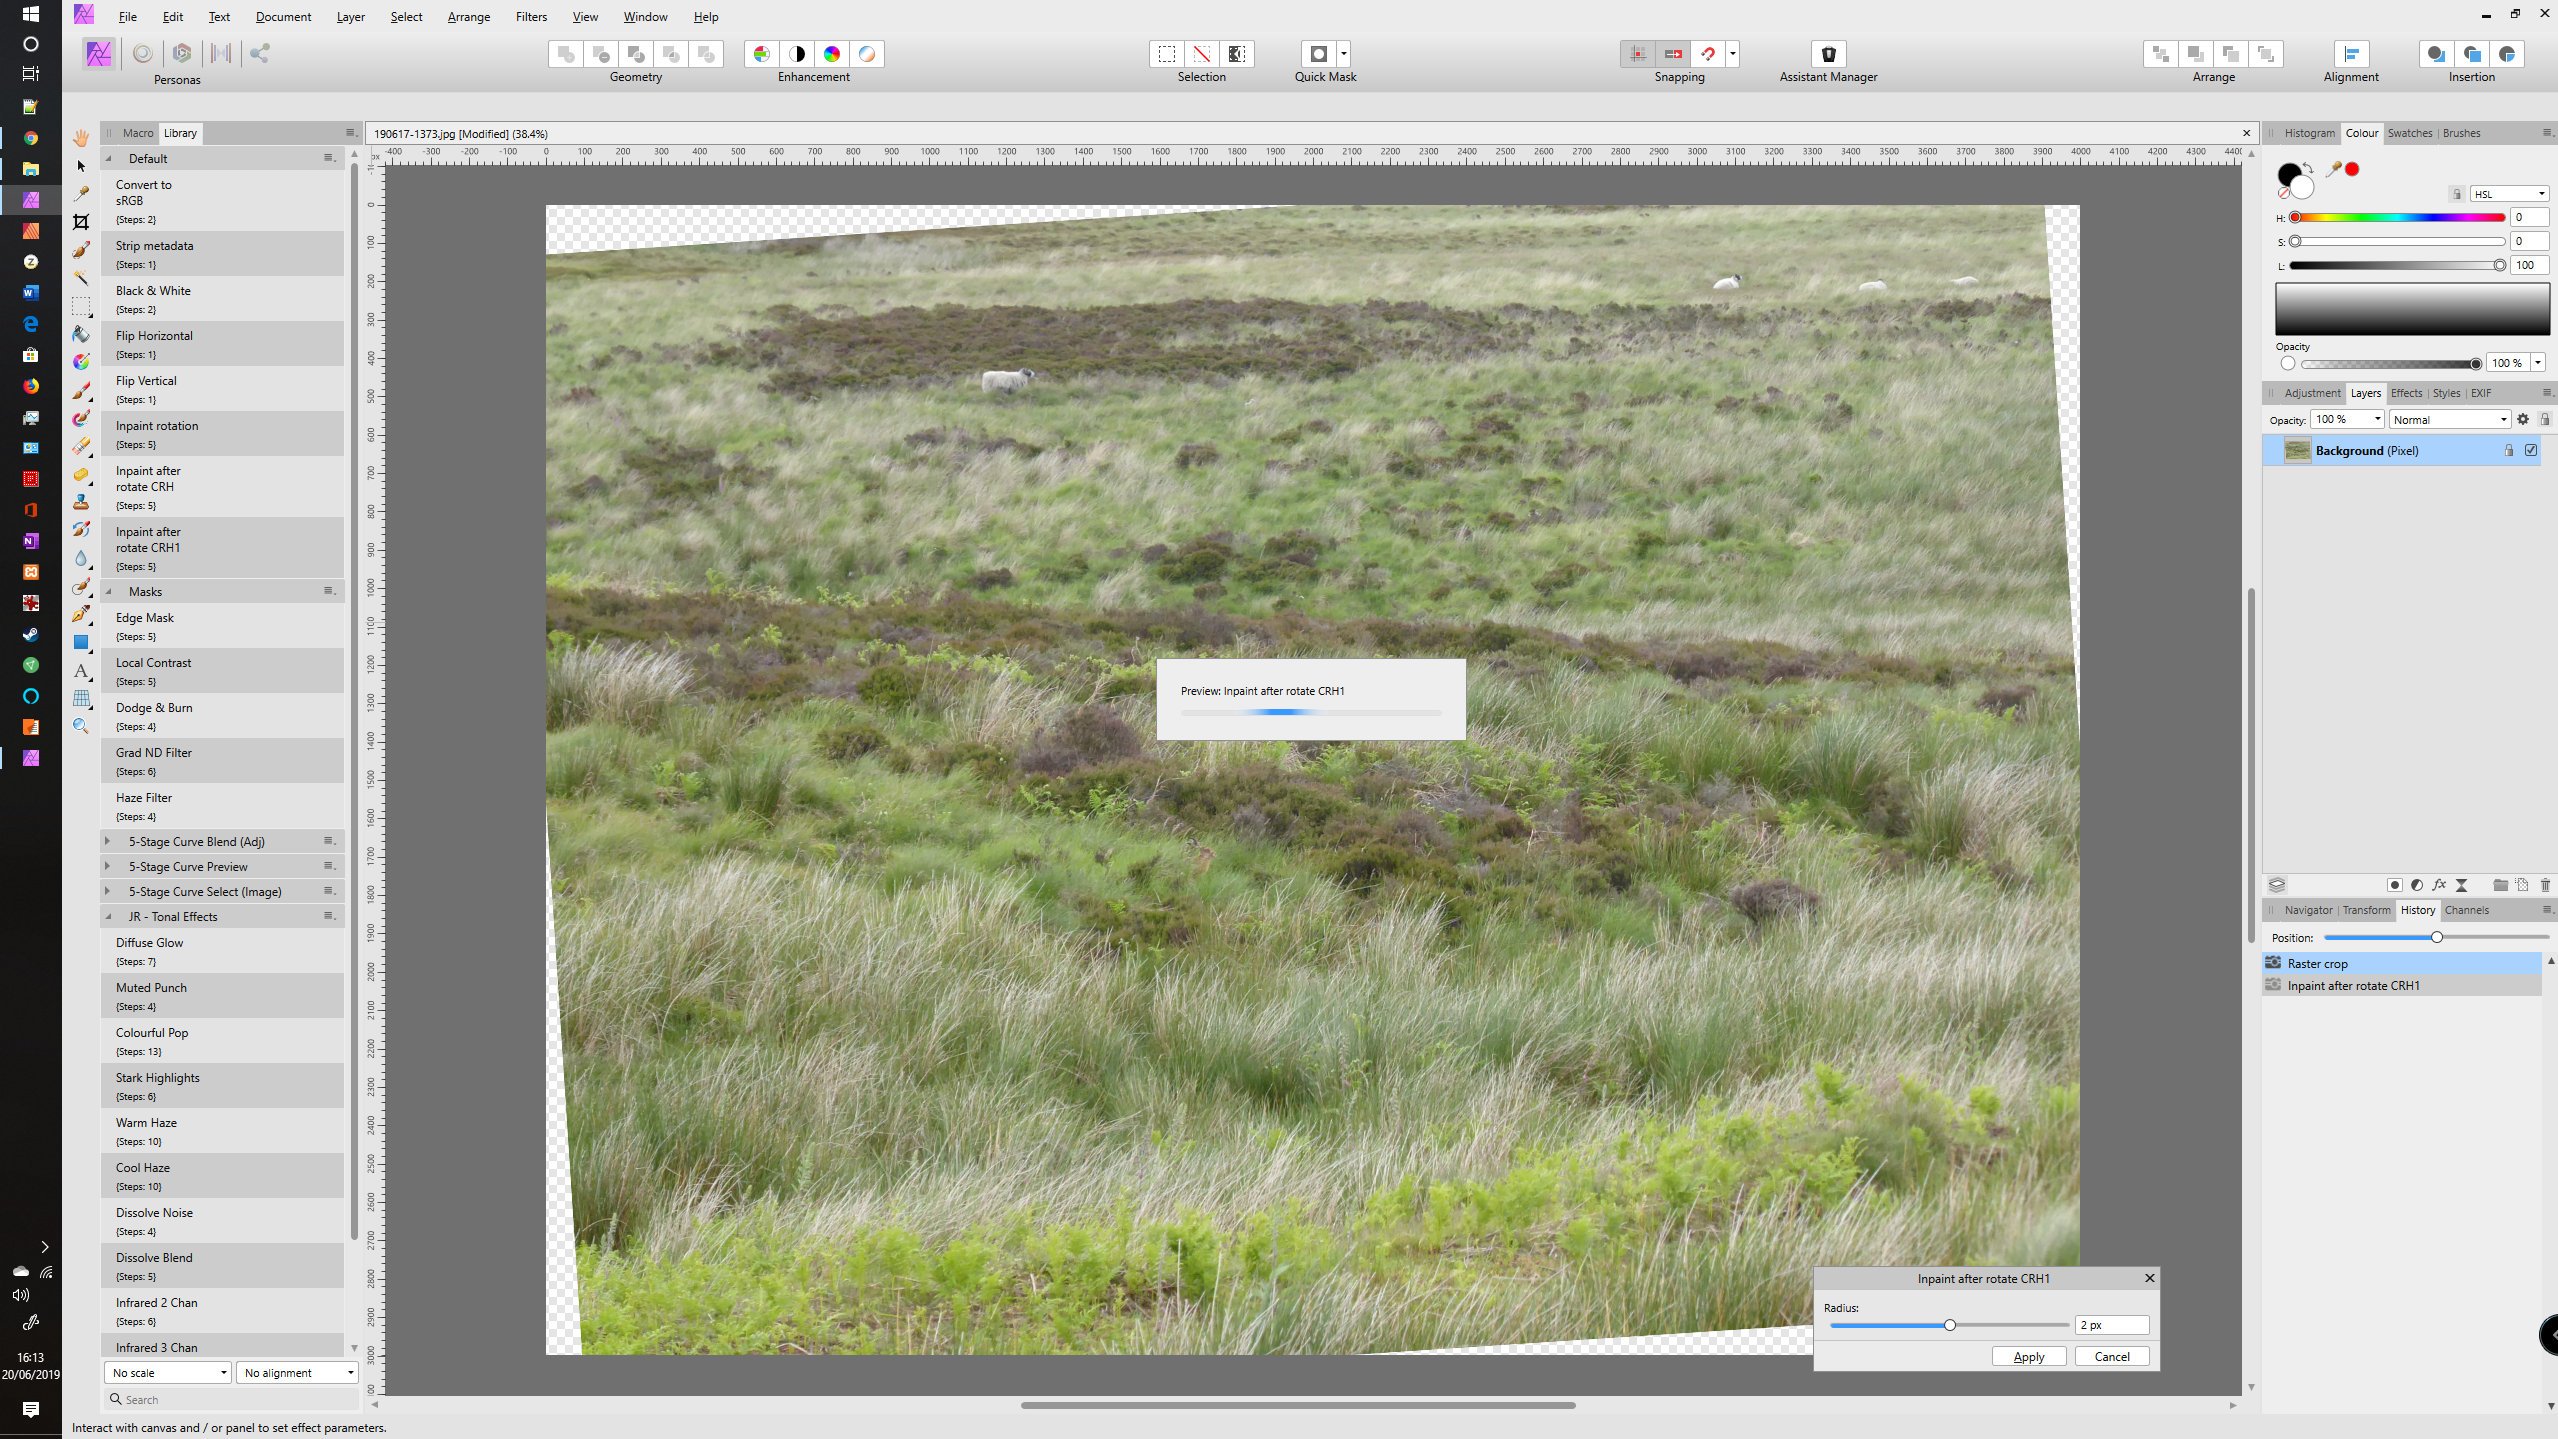
Affinity Photo v1.7.1.404 (Windows) After viewing the macro tutorial video I generated the macro following the steps then clicked the settings icon to activate user interaction on how much to grow the selections before triggering the inpainting process. When I run the macro it displays a box with the text Preview: Inpaint after Rotate CRH1, as well as the Grow/Shrink radius settings dialogue box. However, after a couple of seconds the macro continues without waiting for the user input (that is, I haven't clicked the Apply button) & completes the operation with the settings dialogue still visible. If I then click the Cancel button the macro actions are undone, or if I click the Apply button it seems to run the macro a second time, although nothing changes. In the tutorial video a Preview box is not seen, so I do not understand why it appears when I run the macro. Also, I was expecting the macro to wait until I click the Apply button. Is the macro behaving as expected, & if so, how do I get it to let me change the grow/shrink radius value interactively when running it? I attach a screenshot showing the two boxes as described above, & the .afmacro file of the exported macro. crh1.afmacro
-
Affinity Photo Crop Tool
ciscrh replied to ciscrh's topic in Pre-V2 Archive of Desktop Questions (macOS and Windows)
-
Affinity Photo Crop Tool
ciscrh replied to ciscrh's topic in Pre-V2 Archive of Desktop Questions (macOS and Windows)
Thanks Carl for that useful bit of lateral thinking. I'm busy with other stuff at the moment, but I'll try it out later :-) Later...it works, reducing the clutter by placing the unwanted default presets out of sight at the bottom of the list. -
Affinity Photo Crop Tool
ciscrh replied to ciscrh's topic in Pre-V2 Archive of Desktop Questions (macOS and Windows)
Closed down & restarted my PC. I opened an image file, selected the crop tool & set the custom ratio to 7x5. Selected the cog icon & the option to Create Preset... was highlighted. I was able to create a custom preset in my custom preset category. My custom preset category now appears in the dropdown list & my custom preset can be selected & used as expected. Tried to add a second (5x7) custom ratio following the above procedure, but the Create Preset... option was not highlighted (ie, cannot be selected). Shutdown & restarted Affinity Photo. Tried to add a second (5x7) custom ratio following the above procedure, but the Create Preset... option was not highlighted (ie, cannot be selected). I can of course start from scratch every time I want to apply a crop, but that is not really acceptable. Can someone explain how to add custom presets? And is it intentionally not possible to remove unwanted default presets? -
I recently installed version 1.7.0.367 over an existing version of Affinity Photo and using the tool is causing me all sorts of problems: All my existing custom presets have disappeared; this did not happen in previous updates. The number of default presets has increased greatly, the vast majority of which are of no interest to me. The resulting long list in unwieldy in use. Attempts to delete default presets fail (nothing happens initially), followed by the program instance closing down without any warning or explanatory error message. That is, the options seem to be worse than non-functional. Having read the built-in help I discovered the Presets Manager, but the delete options there are not highlighted (ie, they cannot be selected) for category presets within the categories. So it appears that the long unwieldy default presets list is a permanent feature of v1.7! I can add a custom preset category using the Presets Manager. I can see no way of adding custom presets to my newly created category; There is an option to import presets to the category, but regrettably I did not have the foresight to export my existing crop presets before upgrading to v1.7.x. There is an option to Create Preset... after clicking the cog icon, but it is not highlighted (ie, it cannot be selected). During my attempts to create my own presets I have somehow created a new category without a name in the Presets Manager; I cannot now delete it or give it a name. I did manage to move it to the top of the category list, but cannot now move it anywhere else :-) Never mind, it does not appear main crop tool list of presets. My newly created (named) category does not appear in the main crop tool list of presets...possibly because it is empty (see above). Just clicking on the crop tool cog icon is often enough to terminate the program (no warning or error messages given). Maybe all these problems will disappear if I reboot my PC, I will try that after submitting this report.
-
Thanks, Shift-click seems to work. I was seeing a bounding box surrounding all the selected items and just assumed that it meant all items in the box were in scope of the selection, but as you say, that is not the case. On a page I would have expected the Ctrl-click to work here, but it does something weird: In my experiments it is selecting items within a group and potentially disrupting the existing group, which is not something I want to do accidentally.
-
Alfred reacted to a post in a topic:
Selections
-
Thanks for the comments on Assets, which make them more useful to me :-) The primary purpose of my comment relates to selecting objects & the attached image was just to give an example of my difficulty.