Search the Community
Showing results for 'ROMM RGB'.
-
 It's 2023 and we still get frequent request to "edit the alpha channel as normal color channel", and export / import files where the alpha channel is used for e.g. depth information (z-axis) or something else / not for alpha. I support these feature requests to allow easier editing of alfa channels using all brushes, filters, adjustments etc. Never the less, it is perfectly possible to do this even today with Affinity Photo, Designer both in V1 and V2. Opening a file The key is to separate alpha channel as greyscale layer once you open such a file, and fill the alpha channel to recover RGB pixel values where alpha was 0. Open a TGA, PNG, TIFF file which contains exactly one RGBA layer. Assuming the layer name is "background" Use channels panel, click on background alpha, and "create greyscale layer" Use channels panel, click on background alpha, and "fill alpha" Rename the greyscale layer to "alpha" You can now edit the alpha layer with all tools. Notes: keep the alpha channel in background always at 100% (if not: channels panel->fill). keep the alpha layer in greyscale (all pixel should have identical values for R and G and B channel for one pixel, do not colorise) (if not->HSL adjustment, set SAT to 0, merge down) In case you want to see the alpha channel acting as traditional alpha channel: Create a channel mixer adjustment Choose alpha channel (output) Set "red" input to 100% (all color channels should have identical values) set „alpha“ input to 0 Nest channel mixer layer in masking position to alpha layer Nest alpha layer to background layer You can continue to edit both layers individually, but you see a preview of the document using alpha layer as alpha channel. Exporting the file To export the file: unnest the alpha channel layer from background layer, move it to top rasterise to mask The file should have exactly 2 layers: alpha on top (mask layer), background on bottom (RGB channels, alpha filled 100%) Export as TGA, PNG, TIFF etc Closing notes Gamma is not handled correctly for alpha channel when simply mapping from alpha to color channel or vice versa. RGB channels need gamma correction (normally 2.2), whereas alpha stays linear for rendering. If the difference is critical, you can correct the gamma with help of a procedural texture filter. I have tested the import and export steps repeatedly with TGA files in Photo V1.10, V2.04, V2.1 This method was not invented by me, I simply wrote this tutorial to have a URL which I can use if someone raises questions or feature request concerning this topic. Edge case (added 24.04.2024) It is not possible to correctly export with empty mask (alpha zero for all pixels).
 -
 Hi all, I am trying to use Affinitiy Publisher 2 to create some SVGs that I can then use in my React web-applications in order to beautifully present stuff using SVGs. However I'm having the problem, that the export creates code like this: <rect x="540.635" y="1310.75" width="181.757" height="40.42" style="fill:none;stroke:rgb(7,6,6);stroke-width:19.51px;"/> It seems the TypeScript compiler however would like this to be: <rect x="540.635" y="1310.75" width="181.757" height="40.42" fill="none" stroke="rgb(7,6,6)" strokeWidth="19.51px"/> Is there a way to tell Affinity Designer to use the second format instead? Manually editing bigger files is just not practicable. Chris
 -
Hi @Dan C, Many thanks for your indepth testing here... It's interesting as the Colour Studio has always worked this way since incarnation on macOS... Noted… These are my observations based on your feedback on the macOS side, though all could be wrong... Scenario 1 Colour Studio Colour Sliders Change mode to RGB Using the menu, change this from 8 bit to 16 bit view Change mode to RGB Hex ⚠ Note this is now also using 16 bit I appreciate on Windows this is reset to 8 bit when switching modes resulting in a difference between Mac and Windows but I was trying to understand whether this is just the affinity apps showing a 16-bit representation of the Hex Value... #RGB (4 bits each) #RRGGBB (8 bits each) #RRRGGGBBB (12 bits each) #RRRRGGGGBBBB (16 bits each) or whether, in this scenario the Hex values should be shown using a RGB565 conversion, though if that were the case it would potentially negate transparency support, i.e., Colour Studio Colour Sliders Change mode to RGB Using the menu, change this from 8 bit to 16 bit view Change mode to RGB Hex In 16 bit RGB Mode, i.e., RGB565 #284BFF would appear as #0x2a7f Scenario 2 Colour Studio Colour Sliders Change mode to RGB Using the menu, change this to Percentage view Change mode to RGB Hex ⚠ Note this is now also using Percentage, which shouldn't be possible - the Hex values are also incorrect due to this... See my reply to @garrettm30 in the previous post, if I've understood the conversion correctly in this scenario the value displayed would appear to be correct based on the percentage selection, i.e., #284BFF correctly appears as #101D64 when the RGB values are set to percentage... Scenario 3 Colour Studio Colour Sliders Change mode to RGB Using the menu, change this from 8 bit to 16 bit view Change mode to CMYK ⚠ Note this is now also using 16 bit, which shouldn't be possible I appreciate that Affinity apps themselves don't support CMYK/16 but are we not just seeing a true 16 bit representation of CMYK values ranging from 0 to 65,536... Having said that, this was logged as a bug under AFD-6355 and AFD-6356 back in January 2023... AFD-6355 was shown as fixed in v2.1.0.1703/5 though in the current v2.4.0 when the Colour Palette is set to 8 bit, the CMYK sliders show 8 bit values in the Colour Palette, 16 bit values in the Colour Chooser Sliders and Percentage values in the Colour Chooser list on the right...

-

Mathematical Formulas
lacerto replied to BreathEasy's topic in Affinity on Desktop Questions (macOS and Windows)
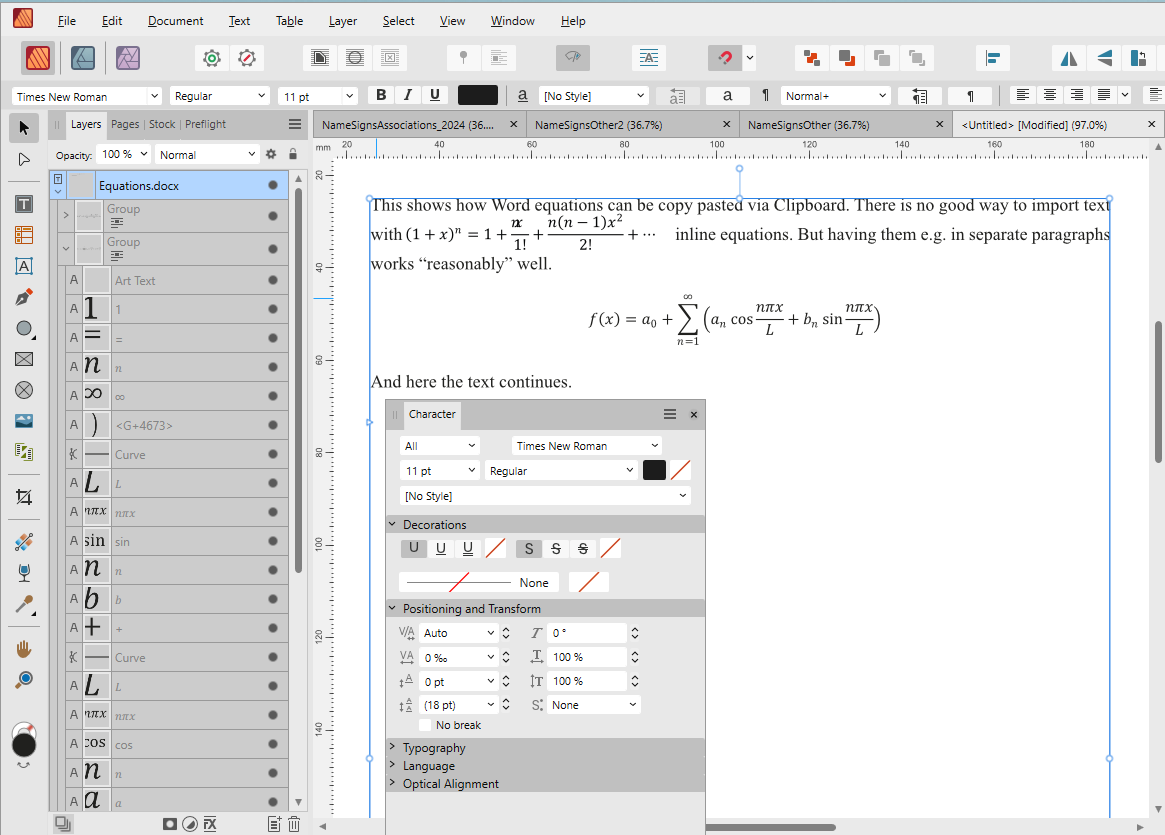
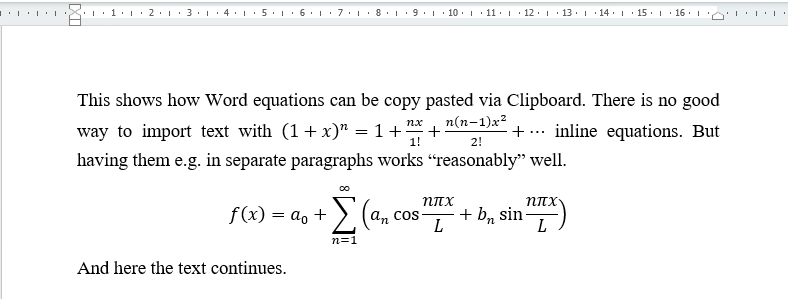
If you are on Windows, you could create Word equations and copy paste them as Windows Enhanced Metafiles (using Paste Special). This works pretty well if you do not have lots of equations: The Word text itself can be imported as a file (equations will be excluded) Note however that there are several catches: The equations will be in RGB 0,0,0 (= Grayscale 0) so if you are going to export to CMYK, you need to convert the equations to CMYK (not an awfully big thing because objects within equations can be edited pretty easily). Some parts of equations might be poorly positioned. These parts, too, can relatively easily edited by selecting them from the Layers panel and setting tracking to 0. You need to resize the equations and adjust spacing manually. The good thing of course is that your equations are text and vector objects, so high quality. Other methods that come to mind are using MathType in context of Word and convert equations to EPS, WMF/EMF or PDF (or raster formats, if you do not mind). This can be done in a batch.
-
As you have a grayscale mode document, you need to ensure that the parts you indicate with red side<line do not have CMYK based color deinition (like K100), but either G0, or RGB 0, 0,0, which both will become pure black (DeviceGray black) at export.
-
Hi @Hangman, Thanks for your report! I can confirm that I've been able to identify a few bugs here - as the behaviour differs across platforms. Firstly, to verify, the expected behaviour of the Colour 'Wheel' option should always display the HEX value in 8bit, regardless of the 'Slider' settings. This means that if you change your 'Slider' RGB HEX setting to 16bit, it's expected for you to see different HEX values when selecting the same colour, using the 'Wheel' vs the 'Sliders. If you'd like to see the 'Wheel' option offered with a 16bit display of the HEX value, this would make for a good feature request. However, I am able to replicate the following on macOS, which is both incorrect and inconsistent with Windows: Colour Studio Colour Sliders Change mode to RGB Using the menu, change this from 8bit to 16bit view Change mode to RGB HEX ⚠Note this is now also using 16bit Colour Studio Colour Sliders Change mode to RGB Using the menu, change this to Percentage view Change mode to RGB HEX ⚠Note this is now also using Percentage, which shouldn't be possible - the HEX values are also incorrect due to this. Colour Studio Colour Sliders Change mode to RGB Using the menu, change this from 8bit to 16bit view Change mode to CMYK ⚠Note this is now also using 16bit, which shouldn't be possible It appears as though the setting 'follows' the Colour mode on macOS in 'Slider' view. On Windows, each Colour mode option has a setting independent of the other colour modes, which is the behaviour I'd expect on macOS. I believe this is the crux of your above report, as Colour modes are being displayed incorrectly in 'Slider' mode, though my first point still applies in regards to the 'Wheel' view and setting RGB HEX to 16bit in 'Slider' view. In my testing, I also found the following issues on Windows: Colour Studio Colour Sliders Change mode to RGB HEX Using the menu, change this from 8bit to 16bit view Change mode to RGB Change mode to RGB HEX ✔Note that 16bit setting is retained, as expected Colour Wheel Colour Slider ⚠Note this is now reset to 8bit Colour Studio Colour Sliders Change mode to HSL / LAB Using the menu, change this from 8bit to 16bit view or Percentage ✔Note that colour values do not change ⚠Note these Colour modes should not offer 16bit / Percentage menu options Colour Studio Colour Sliders Change mode to LAB / Greyscale Select/pick any colour ⚠Note the colour value is displayed with 3 decimal places I hope this helps & if I've missed or misunderstood part of your above report, please don't hesitate to let me know
-
Many thanks for providing that for me and my apologies in regards to @Lee D's previous thread with yourself - I'm not entirely certain what happened there. I've been able to recover your document, however there is a singular layer which contains raster corruption that I have been unable to save, and I believe is the cause of the error message you were seeing. This was the top-most layer "View Layer.Denoising Albedo.RGB." and although the layer itself still present in the recovered document, you will see this contains pixel colour corruption which cannot be resolved, however I felt it best to leave this layer so you can remove/replace it as required. I'll be returning this document to you now via Dropbox, to the email address associated with your Affinity Forum account. I hope this helps
-
Artefacts using Natural Pencil brushes - Affinity Photo
NotMyFault replied to Art51's topic in V2 Bugs found on macOS
Did you try RGB/16 instead of RGB/8 for document color format? -
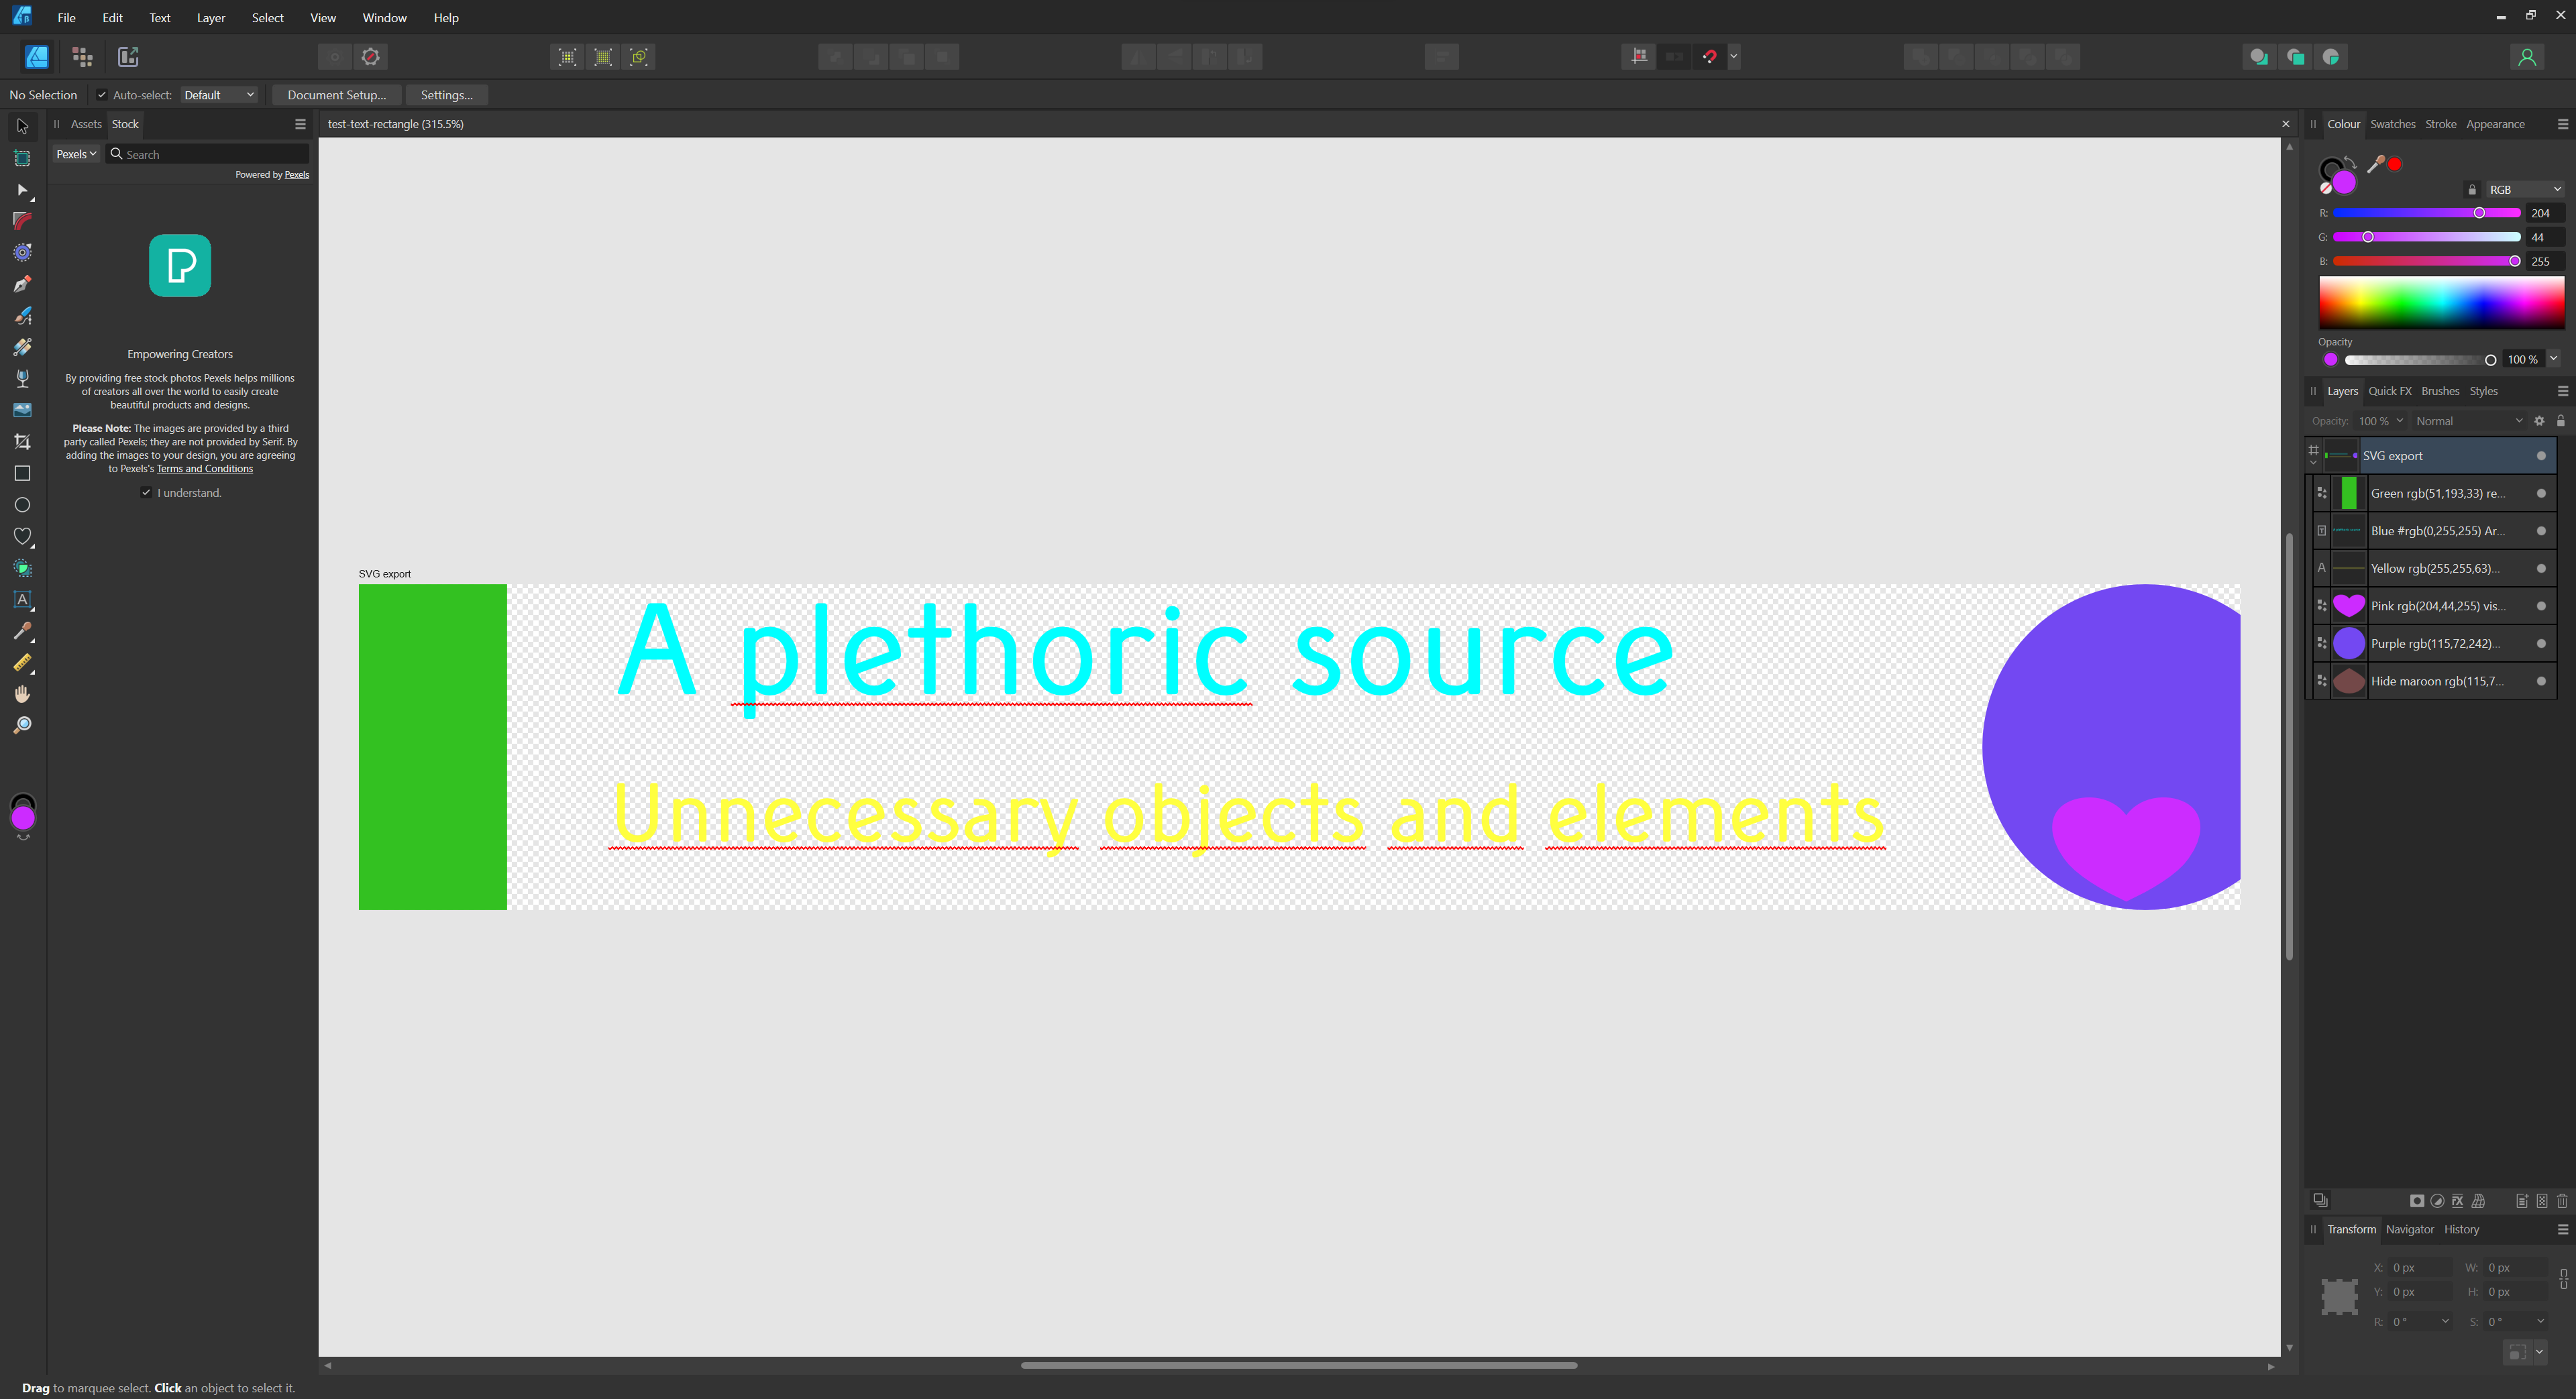
 Hello everyone, v2.4.0.222 With the arrival of version 2.4 of Affinity Designer, it is crucial to pay more attention to the needs of web designers. Exporting AFDESIGN files in SVG format reveals a major issue: the excessive presence of superfluous elements in the source code. This can cause problems when SVGs are used on websites. Issues test-text-rectangle.afdesign Current export vs. ideal export: Here is a concrete example to illustrate the problem, based on a very simplified situation: Current SVG source (Exported by Affinity Designer 2.4.0.2222): 3184 bytes <?xml version="1.0" encoding="UTF-8" standalone="no"?> <!DOCTYPE svg PUBLIC "-//W3C//DTD SVG 1.1//EN" "http://www.w3.org/Graphics/SVG/1.1/DTD/svg11.dtd"> <svg width="100%" height="100%" viewBox="0 0 889 154" version="1.1" xmlns="http://www.w3.org/2000/svg" xmlns:xlink="http://www.w3.org/1999/xlink" xml:space="preserve" xmlns:serif="http://www.serif.com/" style="fill-rule:evenodd;clip-rule:evenodd;stroke-linejoin:round;stroke-miterlimit:2;"> <g id="SVG-export" serif:id="SVG export" transform="matrix(1.05833,0,0,1.1,0,0)"> <rect x="0" y="0" width="840" height="140" style="fill:none;"/> <clipPath id="_clip1"> <rect x="0" y="0" width="840" height="140"/> </clipPath> <g clip-path="url(#_clip1)"> <g id="Hide-maroon-rgb-115-72-72--tear" serif:id="Hide maroon rgb(115,72,72) tear" transform="matrix(0.944882,0,0,0.909091,76.9626,-7.27273)"> <path d="M774.428,41.82C774.428,41.82 807.548,60.083 807.548,67.91C807.548,82.31 792.708,94 774.428,94C756.149,94 741.309,82.31 741.309,67.91C741.309,60.083 774.428,41.82 774.428,41.82Z" style="fill:rgb(115,72,72);"/> </g> <g id="Purple-rgb-115-72-242--circle" serif:id="Purple rgb(115,72,242) circle" transform="matrix(1.19876,0,0,1.31455,-195.447,-62.4413)"> <ellipse cx="828.307" cy="100.75" rx="60.693" ry="53.25" style="fill:rgb(115,72,242);"/> </g> <g id="Pink-rgb-204-44-255--visible-heart" serif:id="Pink rgb(204,44,255) visible heart" transform="matrix(0.944309,0,0,0.908621,-17.4437,0.166044)"> <path d="M853.979,109.074C861.352,98.868 876.097,98.868 883.47,103.971C890.844,109.074 890.844,119.279 883.47,129.484C878.309,137.138 865.038,144.792 853.979,149.895C842.919,144.792 829.648,137.138 824.487,129.484C817.114,119.279 817.114,109.074 824.487,103.971C831.86,98.868 846.606,98.868 853.979,109.074Z" style="fill:rgb(204,44,255);"/> </g> <g id="Yellow-rgb-255-255-63--Artistic-text" serif:id="Yellow rgb(255,255,63) Artistic text" transform="matrix(0.944882,0,0,0.909091,21.9758,16.3877)"> <g transform="matrix(37.5,0,0,37.5,698.358,103.622)"> </g> <text x="95.08px" y="103.622px" style="font-family:'SimplySans-Book', 'Simply Sans', sans-serif;font-size:37.5px;fill:rgb(255,255,63);">Unnecessary objects and elements</text> </g> <g id="Blue--rgb-0-255-255--Artistic-text" serif:id="Blue #rgb(0,255,255) Artistic text" transform="matrix(0.944882,0,0,0.909091,14.1732,1.81818)"> <g transform="matrix(58.3333,0,0,58.3333,607.818,50.0094)"> </g> <text x="107px" y="50.009px" style="font-family:'SimplySans-Book', 'Simply Sans', sans-serif;font-size:58.333px;fill:rgb(0,255,255);">A plethoric source</text> </g> <g id="Green-rgb-51-193-33--rectangle" serif:id="Green rgb(51,193,33) rectangle" transform="matrix(0.220472,0,0,0.233333,0,0)"> <rect x="0" y="0" width="300" height="600" style="fill:rgb(51,193,33);"/> </g> </g> </g> </svg> Ideal SVG Source: 1555 bytes (1493 without spaces) <svg viewBox="0 0 889 154" xmlns="http://www.w3.org/2000/svg" xml:space="preserve" style="fill-rule:evenodd;clip-rule:evenodd;stroke-linejoin:round;stroke-miterlimit:2"> <g transform="scale(1.05833 1.1)"> <clipPath id="a"> <path d="M0 0h840v140H0z"/> </clipPath> <g clip-path="url(#a)"> <path d="M774.428 41.82s33.12 18.263 33.12 26.09c0 14.4-14.84 26.09-33.12 26.09-18.279 0-33.119-11.69-33.119-26.09 0-7.827 33.119-26.09 33.119-26.09Z" style="fill:#734848" transform="matrix(.94488 0 0 .9091 76.963 -7.273)"/> <ellipse cx="828.307" cy="100.75" rx="60.693" ry="53.25" style="fill:#7348f2" transform="matrix(1.19876 0 0 1.31455 -195.447 -62.441)"/> <path d="M853.979 109.074c7.373-10.206 22.118-10.206 29.491-5.103 7.374 5.103 7.374 15.308 0 25.513-5.161 7.654-18.432 15.308-29.491 20.411-11.06-5.103-24.331-12.757-29.492-20.411-7.373-10.205-7.373-20.41 0-25.513 7.373-5.103 22.119-5.103 29.492 5.103Z" style="fill:#cc2cff" transform="matrix(.9443 0 0 .90862 -17.444 .166)"/> <text x="95.08" y="103.622" style="font-family:'SimplySans-Book','Simply Sans',sans-serif;font-size:37.5px;fill:#ffff3f" transform="matrix(.94488 0 0 .9091 21.976 16.388)">Unnecessary objects and elements</text> <text x="107" y="50.009" style="font-family:'SimplySans-Book','Simply Sans',sans-serif;font-size:58.333px;fill:#0ff" transform="matrix(.94488 0 0 .9091 14.173 1.818)">A plethoric source</text> <path style="fill:#33c121" d="M0 0h300v600H0z" transform="scale(.22047 .23333)"/> </g> </g> </svg> A comparison of the two versions highlights the overabundance of unnecessary information in the current export. Suggested improvements Automatic code clean-up: Implement an automatic clean-up function during export to eliminate superfluous elements. Export in Two Formats. Offer the option of exporting the SVG in two versions: Standard SVG file. SVG source optimized for integration into a web source. <g id="" viewBox="0 0 889 154" transform="scale(1.05833 1.1)"> <clipPath id="a"> <path d="M0 0h840v140H0z"/> </clipPath> <g clip-path="url(#a)"> <path id="Hide-maroon-rgb-115-72-72--tear" d="M774.428 41.82s33.12 18.263 33.12 26.09c0 14.4-14.84 26.09-33.12 26.09-18.279 0-33.119-11.69-33.119-26.09 0-7.827 33.119-26.09 33.119-26.09Z" style="fill:#734848" transform="matrix(.94488 0 0 .9091 76.963 -7.273)"/> <ellipse id="Purple-rgb-115-72-242--circle" cx="828.307" cy="100.75" rx="60.693" ry="53.25" style="fill:#7348f2" transform="matrix(1.19876 0 0 1.31455 -195.447 -62.441)"/> <path id="Pink-rgb-204-44-255--visible-heart" d="M853.979 109.074c7.373-10.206 22.118-10.206 29.491-5.103 7.374 5.103 7.374 15.308 0 25.513-5.161 7.654-18.432 15.308-29.491 20.411-11.06-5.103-24.331-12.757-29.492-20.411-7.373-10.205-7.373-20.41 0-25.513 7.373-5.103 22.119-5.103 29.492 5.103Z" style="fill:#cc2cff" transform="matrix(.9443 0 0 .90862 -17.444 .166)"/> <text id="Yellow-rgb-255-255-63--Artistic-text" x="95.08" y="103.622" style="font-family:'SimplySans-Book','Simply Sans',sans-serif;font-size:37.5px;fill:#ffff3f" transform="matrix(.94488 0 0 .9091 21.976 16.388)">Unnecessary objects and elements</text> <text id="Blue--rgb-0-255-255--Artistic-text" x="107" y="50.009" style="font-family:'SimplySans-Book','Simply Sans',sans-serif;font-size:58.333px;fill:#0ff" transform="matrix(.94488 0 0 .9091 14.173 1.818)">A plethoric source</text> <path id="Green-rgb-51-193-33--rectangle" style="fill:#33c121" d="M0 0h300v600H0z" transform="scale(.22047 .23333)"/> </g> </g> Conclusion Implementing these improvements in Affinity Designer would enable greater compatibility with current web practices and significant performance optimization for sites incorporating SVGs. This would represent a considerable advantage for web designers using Affinity Designer. See also: Iconify: https://iconly.io/tools/svg-cleaner SVGom: https://svgomg.net/ SVG Minify: https://www.svgminify.com/
-

Designer 2.4.2, pdf export bug
Hangman replied to mousecompanion's topic in Affinity on Desktop Questions (macOS and Windows)
@mousecompanion, does the .afdesign file you uploaded with the four artboards use the same Colour settings and profile as your original file? I ask because the uploaded file uses an RGB colour space but all the colours specified in your 'Original' artwrok are defined in CMYK as are the FX and the exported PDF also indicates the flattened elements are CMYK so I'm assuming your original source Designer file was set to CMYK U.S. Web Coated (SWOP) v2, would that be the case? -

Curves Adjustment: LAB Mode -> Desaturation Bug
Ldina replied to stevenmiller's topic in V2 Bugs found on Windows
@stevenmiller The Lab readouts report 0a* and 0b* values in the Info Panel when flattening the a* and b* curves to 0.5 for both black and white. You are correct that there seems to be a very slight cyan reported in the RGB readouts. I saw that using the RGB samplers in the Info Panel that the red channel is sometimes 1 to 2 points lower than green and blue channels, depending on the density. I can't see it with my eye, but that's what the RGB sampler shows. I didn't download your image because I was nearly done typing this message before you uploaded it, and I saw it in my own version. I'm guessing that could be the CMS module they are using, 16 bit Lab vs 8 bit RGB rounding errors (even just for reporting RGB values in the Info Panel). I'm not sure, but if I can't see it, I'm not too worried about it. Besides, if I'm looking for a dead neutral B&W, I'd never use that method to desaturate an image anyway. -
 Good morning @Hangman, Yes some photos are used twice because the English can't choose what name they want to give a colour of a chicken. To accommodate their indecision, I gave both options. The printer & me, already did a 12 pages printing test, which I needed because I've never sent them pdfs from Affinity Publisher and the standard .pdf from Publisher give perfect printing results. Zero issues. Consistency is not my thing, throughout the book (some 260 pages) cmyk and rgb (new photos in rgb) and .eps .jpg .afphoto are mixed and I never looked what colour space is used for the Publisher documents because only the pdf matters. RIGHT > just checked, all Publisher documents of the book are cmyk US swob-something, haha. I do remember I 'discovered' the colour space when making a new Publisher document and put it to rgb, hoping for a smaller file size. I don't use the book feature, because InDesign-trauma 😅 Now continue the images/texts in your fixed document, thank you!
-
Hi @Sigs, That's no problem at all... There are several images not sitting in a picture frame which isn't a problem, some but not all don't have the thin black border so you may want to drop them in picture frames for consistency and to add the border. but it's not essential when they already include the border... The duplicate image that appears on pages 5 and 19 is RoodWitgezHa.afphoto. On page 5 it is under the heading 'Chamois - (Gold dominant white laced) On page 19 it is under the heading 'Gold white laced, Chamois' If you're not already you use Publisher's Book feature which would allow you to split the book up into Chapters... The version I've sent you is, as mentioned CMYK using the U.S. Web Coated (SWOP) v2 profile but if you're moving forward with everything in RGB you can open the .afpackage file, change its profile back to sRGB, move it to a folder alongside your RGB images and relink the RGB versions. Let us know how you get on and whether you encounter any issues. I didn't see any error messages when working with your file so hopefully, all is good.
-
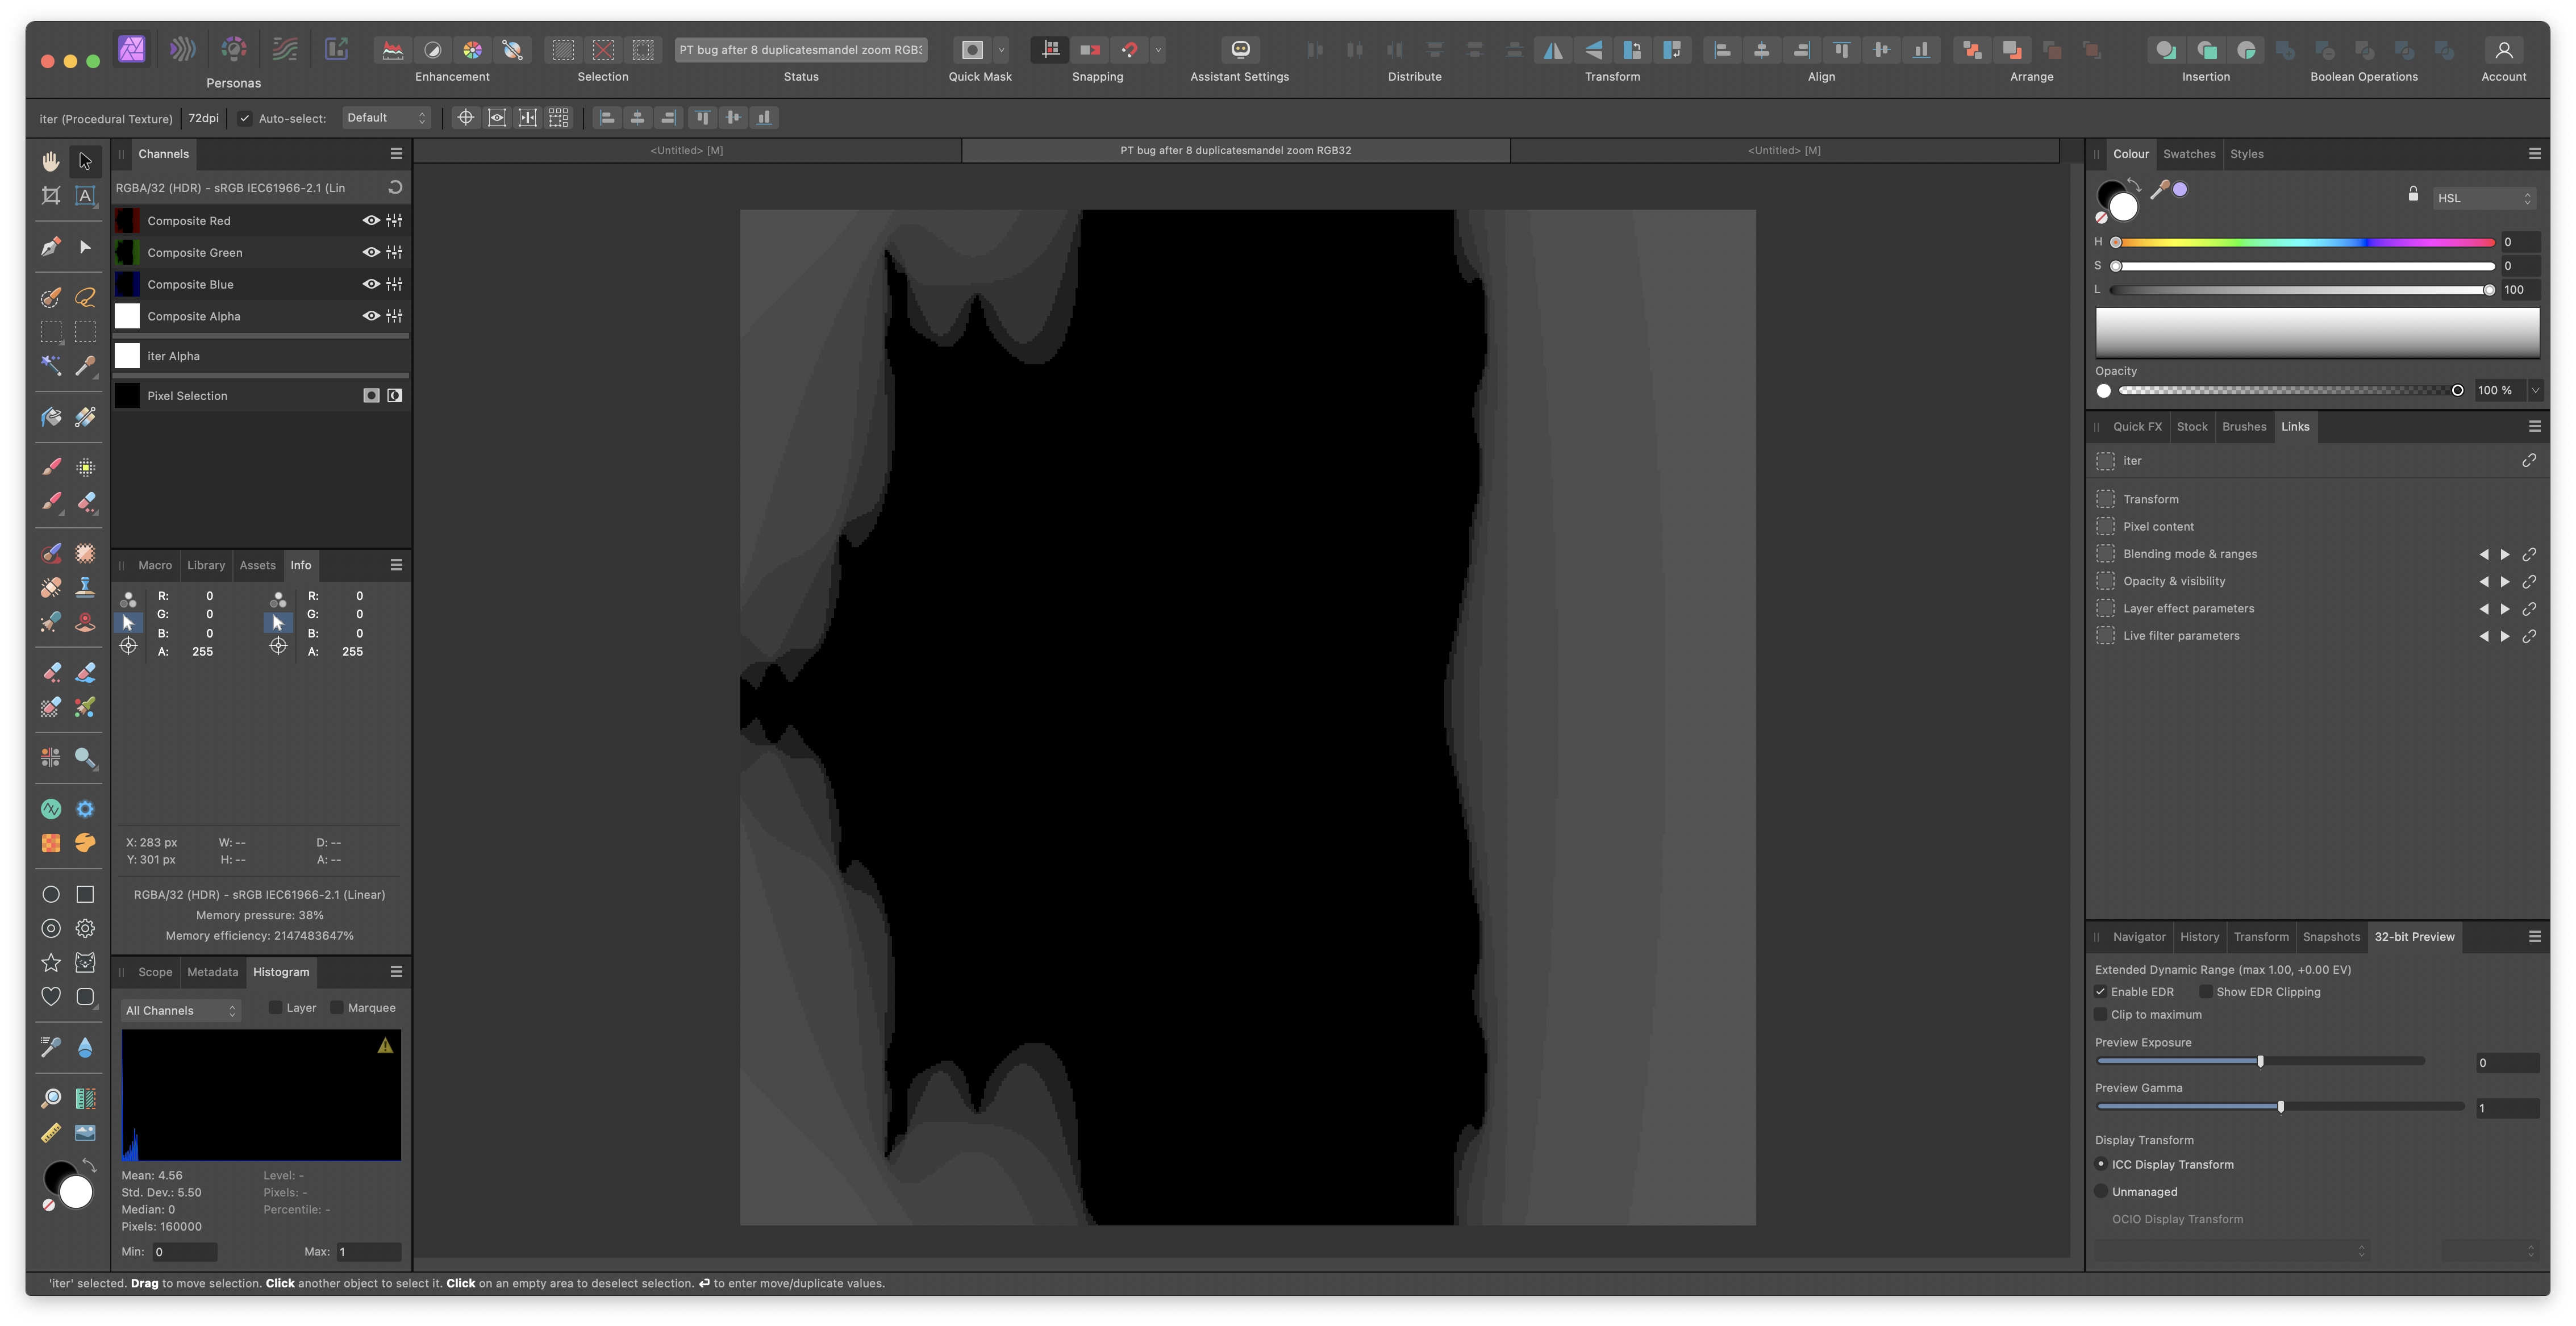
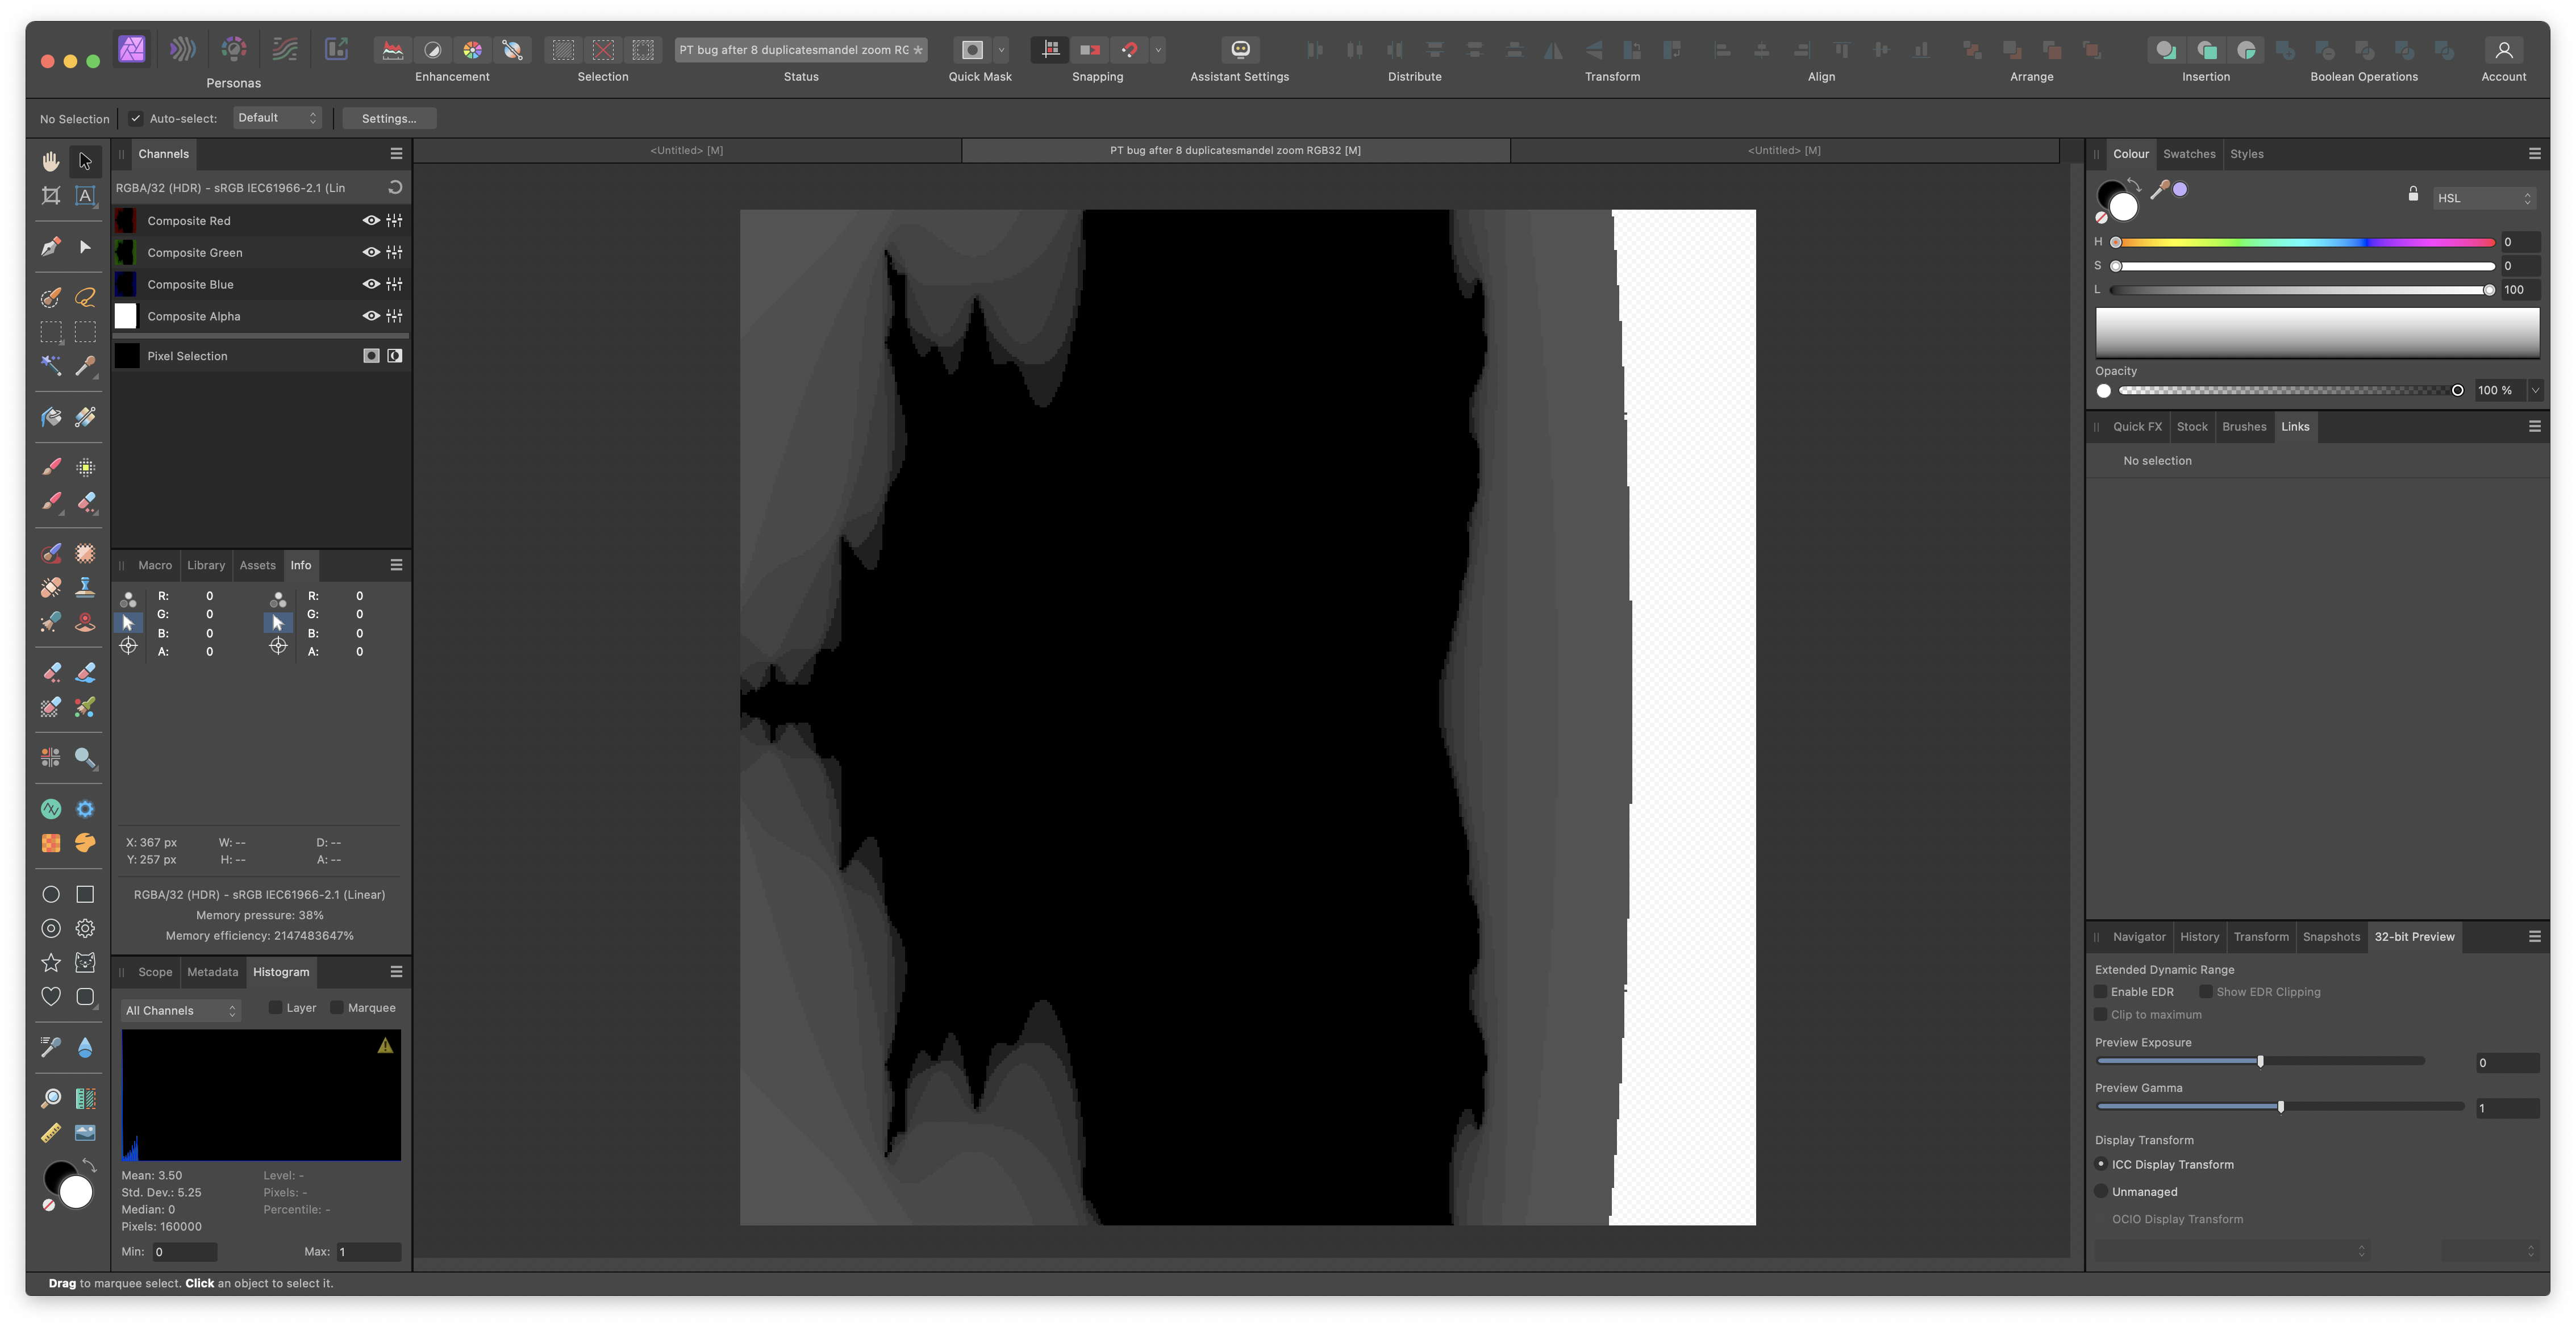
Hi, I made a PT filter to generate the Mandelbrot set. It works in RGB16. After converting to RGB/32 and slightly adjusting the formula to "unbound" color values (becoming larger than 1.0), strange thinks occur: Whe I duplicate the PT filter layer multiple times, the alpha channels becomes 0 after 9th copy, despite alpha channels is never changed in the PT filters (except the base PT filter which creates "1" for all pixels. I assume an overflow situation. Depending on EDR active or not in 32-bit-preview panel, the transparent areas are shown with checkered board, or black which is another bug on its own. Happens with 2.3 (latest retail) and 2.4 beta (2.4.0 2256) Image 1: 8 copies of PT filter, all well Image 2: 9th copy leads to transparent areas (checkered board visible) PT bug after 8 duplicatesmandel zoom RGB32.afphoto
-
I could provide a procedural texture filter which generates RGB black from cmyk K only black, and leaves all other colors for Affinity default conversion. Assuming that the document color format is cmyk and jpg export is RGB.
-
 I don't think there is "a" setting to do that, because 0/0/0/100 is not RGB #00000000 in general. For an sRGB document, for example, RGB 00000000 is CMYK 72/68/67/88.
-
@Max89 Max, Welcome to the Affinity Forums. I don't do a lot with HDR, but I gave your images a shot. After doing a standard HDR Merge, I went into the Tone Mapping Persona and tweaked a few settings (your choices may be very different). When applied, this remapped all the tones to Standard Dynamic Range (0-1). I had EDR (Mac terminology for Extended Dynamic Range) turned off in the 32 bit panel, which limits you to the standard 0-1 range (0-255 in 8 bit RGB terms). I assumed, perhaps incorrectly, that your final image would be a standard dynamic range PNG, TIFF or JPG, so I immediately converted the file to RGB/16 and used my standard RGB profile, which is Display P3 (sRGB is probably the safest for the internet). I added some adjustment layers and left them intact in the attached AfPhoto file. I don't know what the colors looked like in real life, so again, your choices may vary considerably, but HDR definitely works. The attached file is large because it is 16 bit and has multiple layers. HDR Merge.afphoto
-
 I've just checked this in adobe bridge and can see that too. That's quite the spot there. I'll try and add this or rerender this and try and have the data embedded and give it another go. But I gave this reference tiff I found on this forum a go by making a new file and setting it to 96 dpi (same as the image) and RGB HDR 32bit. I then dragged and dropped the image into the file but it didn't turn out how I expected it too. On the right is Houdini's Mplay showing the image which is greyscale, and on the left is the tiff in the 32bit rgb document. This has the same appearance as if I dragged the tiff into it's own file where affinity then turns it into a 16bit greyscale. Is that what it would be doing? instead of showing the greyscale tiff image as red with green and blue empty, it's converting it to 16bit first then going RGB? As both the green and blue channels has this sphere image present. rec_1797.tif
-
Steps to reproduce create new file in RGB/32 (in V1, create RGB/16 and then convert to RGB/32) create a rectangle over full canvas set black to white gradient (from default swatches) switch between ICC managed and unmanaged. Expected: rendering must differ. ICC managed shows „normal“ gamma 2.2 gradient, „unmanaged“ shows typical gamma 1 gradient Observed: rendering is always „icc managed“ Tested on M1 IPad (2020) with V1 (correct rendering) and V2 (2.4.2 beta and retail, wrong rendering) RPReplay_Final1713373061.mov RPReplay_Final1713373041.mov
-
 Thanks Lacerto. I'm going to send to the printer with the mix and see what they come back with. I've also encountered the problem where Affinity Photo will not convert some images from rgb to cmyk after I've done my colour correction and placed the image, so I'm getting VERY frustrated. I've seen others have this issue too.
 -

Over saturated images
iconoclast replied to BohoYve's topic in Affinity on Desktop Questions (macOS and Windows)
In opposite to RGB,which is a colour space for colours of light, CMYK is a colour space for body colours (colours for print). CMYK colour spaces contain less different colours than RGB colour spaces. So if you export a CMYK image as a PNG or JPEG, which don't support CMYK, the image will be converted to RGB automatically, and the colours will change at least a little bit. As I tested it on my computer, the effect was very small, but in fact the PNG was a bit more saturated than the CMYK original. The strength of the effect may be defined by the certain colours you chose. But I'm not really sure if this could be the reason for your problem. As an additional information: for professional printing, colours always must be converted to CMYK. But usually you should do that well controlled to prevent unwanted changes of the colours. You can see if your original image is CMYK if you open "File" > "Document Settings" Colour". There must be a drop down menu called "Colour Settings" or so. -
Black ink fill rate control in CMYK?
lacerto replied to mykee's topic in Affinity on Desktop Questions (macOS and Windows)
Yes, I agree that it would be appropriate to default the effect color to the document color mode (I guess the app just remembers the last used color model?). The preflight calculator should of course also apply color profile based conversion instead of naive conversion RGB value to CMYK, and should naturally consider the effect of opacity and blend mode. As it is now, the warning is, as demonstrated, often given for an RGB based effect color using an opacity setting, and even if there is no overlapping (that is, when the color is not blended with underlying colors), but not when the color (even with a K value) actually causes exceeding of the TAC limit because of the blending effect and underlying colors. -
 I'm used to using Photoshop where I find that some of these manipulations mentioned below were solved more intuitively, and wonder if this could be improved in Affinity Photo (which is great!): I'm a scientist, and often obtain several single-channel/grayscale images from a CCD camera or a microscope (ie an 8-bit grayscale image), which I then need to combine into a single RGB image. So basically I start with two grayscale/single-channel images and I want to put one into the green channel of an RGB image, and the other into the blue channel of the RGB. With Photoshop, it was easy: I would first convert one of the grayscale images into an RGB. Then I would click on the other grayscale image and 'copy' it. Then I would go back to the RGB image, select the red channel and delete (because in this case, for instance, I don't need it), then click on the blue channel, 'paste', and be done. (ie the copied grayscale image would be pasted into the blue channel only). This approach does not seem to work in Affinity photo. Instead, I found the following solution: 1. open the two single-channel TIFF files in affinity photo 2. convert one to RGB by going to Document > Convert Format / ICC profile and then select RGB/8 as the color format 3. click on the ‘Channels’ panel. 4. Select the channel you want to delete (e.g. Composite Red), then use the markee tool to select everything, and hit the delete key. (Selecting everything with “Select All” / Command-A will cause everything to be deleted). 5. Go to the other file containing the grayscale image that you want to paste into one channel of the RGB image, copy, then go to the RGB, click on “Layers” and paste. This should create a new layer with a black & white version of the channel you want to add. 6. Make sure you select this new layer in the ‘layers’ panel, then click on ‘channels’, select the channel you want (e.g. blue), right-click and select “create spare channel”. 7. Go back to the ‘layers’ and delete the new layer that you added in step 5 8. Go back to ‘channels’, right-click on the spare channel (which is still there after deleting the original layer) and select ‘load to Background blue’. 9. In the upper right corner of the ‘channels’ panel is an arrow that goes around in a circle. Click on this to ‘reset’ and see all the channels. Since I am fairly new to AP, there might be a faster/easier way to do this? If so, I would be happy to hear about it ! Otherwise, I would suggest the following change to make it more intuitive to work with channels: if I select only one channel for editing, then all copy/paste/delete operations should apply only to this channel. (Otherwise, what's the point of having the other channels not selected for editing?) Currently, in AP, the following things seem un-intuitive: 1. if I select only one channel for editing (e.g. "Composite Red") and do "Select All" and hit delete, then the entire layer gets deleted (ie all three channels), rather than only deleting the information from the red channel. The work-around for this currently is that selecting everything with the markee, rather that saying 'select all', works. 2. if I have only one channel selected, and then click 'copy', for some reason the entire layer (ie all three channels RGB) gets copied into the clipboard. Instead, I would suggest that if only one channel is selected, then only the information from that one channel should be copied, yielding an 8-bit grayscale image in the clipboard. 3. if I have only one channel selected, and I paste from the clipboard a single-channel 8-bit grayscale image, then for some reason this image gets pasted into all three channels. I would suggest that the data from the single-channel image in the clipboard should only go into the single selected channel. I think these changes would make it much easier to both split channels and combine channels to make RGB images... Thanks !!
 -
I don't think this is a bug. If you Develop to a Raw layer (embedded or linked) rather than a pixel layer, then when you go back into the Develop Persona again you are re-developing your original Raw image. And part of Developing is changing the color space (to RGB-16 or RGB-32) and setting the color profile to the default color profile you've specified in your application Settings/Color. But perhaps there is room for improvement. I will be interested in seeing the thoughts from the Serif staff when they respond to your report.
-

Black ink fill rate control in CMYK?
mykee replied to mykee's topic in Affinity on Desktop Questions (macOS and Windows)
@lacerto In the case of Soft Proof, if I select an ICC of 300 that is similar to the original, it does not noticeably degrade the colours (e.g. you can see in the video that if I select Fogra39, which is not 300) it already improves the shadows. Although it's strange, because the point of Fogra39_VIGC_300 is exactly that it takes the richness back to 300 compared to the plain Fogra39, it's still the wrong one. For shading, however, it might be interesting to switch to CMYK color and not use rich black shadows. Although the ICC profile is supposed to soften, it doesn't for multiply. Or the other is that for a CMYK project, the program should offer CMYK black by default for effect shading, not RGB. Or convert them to ICC profile when exporting. Here's the video where it turns out that you should work in CMYK for shadows too, not use the default RGB as a routine. 20240425-152641.mp4 I must admit, until now I thought that if I worked in ICC 300 profile, whatever colour I specify, Affinity would convert it to the correct colors. Apparently it doesn't.