telemax
-
Posts
928 -
Joined
-
Last visited
2 Followers

-
 damdam reacted to a post in a topic:
Distribute objects along path
damdam reacted to a post in a topic:
Distribute objects along path
-
 Hilltop reacted to a post in a topic:
Frosted glass / Background blur
Hilltop reacted to a post in a topic:
Frosted glass / Background blur
-
telemax reacted to a post in a topic:
Affinity for Game VFX - Step Animation w/ Live Procedural Texture
-
telemax reacted to a post in a topic:
Live pixelate filter (almost)
-
telemax reacted to a post in a topic:
Live pixelate filter (almost)
-
NotMyFault reacted to a post in a topic:
1 bit TIFF/Bitmap support please
-
 jAffinitySerif reacted to a post in a topic:
How to apply color to Rectangular Marquee Tool
jAffinitySerif reacted to a post in a topic:
How to apply color to Rectangular Marquee Tool
-
telemax reacted to a post in a topic:
Painting with Gradients
-
Hamza Abu Muhammad reacted to a post in a topic:
How do I export layers that are cropped to the document in Affinity Photo?
-
Hamza Abu Muhammad reacted to a post in a topic:
How do I export layers that are cropped to the document in Affinity Photo?
-
lharby reacted to a post in a topic:
Blur part of vector image
-
Laura Roy reacted to a post in a topic:
Proper Gradient Progression on Stroke
-
telemax reacted to a post in a topic:
Normal Map Generator
-
sbgraphic reacted to a post in a topic:
Non-destructive Mask
-
sbgraphic reacted to a post in a topic:
Brushes | Stars
-
telemax reacted to a post in a topic:
How to align three circles at their tangent points
-
telemax reacted to a post in a topic:
How to align three circles at their tangent points
-
telemax reacted to a post in a topic:
Fotosketcher 3.95 has just been released with new painting styles and script options
-
telemax reacted to a post in a topic:
Blend Ranges - Tutorial for Affinity Photo and Affinity Designer
-
telemax reacted to a post in a topic:
Always noise in gradient.
-
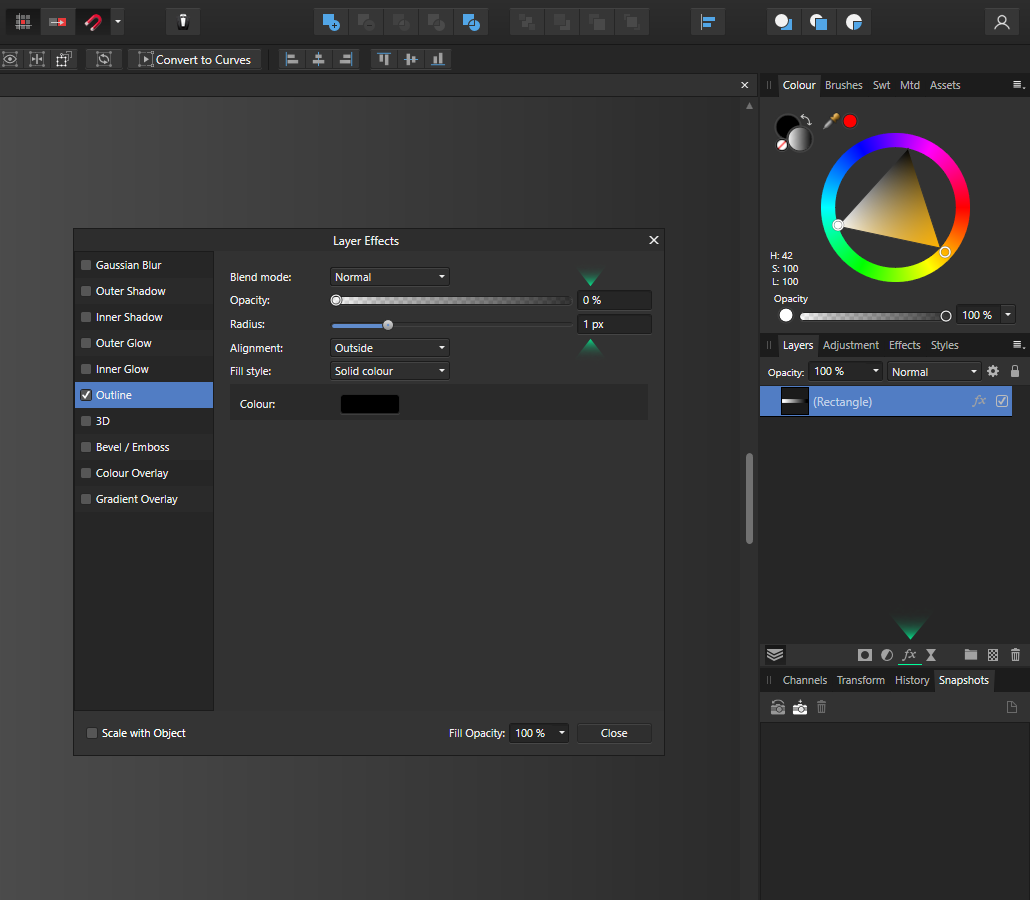
Hi, There's a trick that works at least for V1. 1. Select your gradient layer. 2. Apply FX (located in the layers panel at the bottom). 3. Use Outline FX. 4. Set any value for radius, and zero for opacity. Thanks to @NotMyFault, he hid it somewhere in the bowels of this forum, in an easter egg.

-

Pixels and Images and Alphas, Oh My!
telemax replied to Ldina's topic in Desktop Questions (macOS and Windows)
By the way, channel editing is not available for the "image" layer. At least in AP V1. -
Pixels and Images and Alphas, Oh My!
telemax replied to Ldina's topic in Desktop Questions (macOS and Windows)
In simple terms, the "image layer" tries to preserve as much information about itself as possible. -
It is based on the Lighting filter with the "bump" parameter. The information automatically used from the layers below will create an incorrect dark normal map from any layers below, except white. Therefore, to get the correct result, you need to load the image by clicking the "Load bump map" button.
-
It doesn't work for me with hardware acceleration turned on or off. AP 1.10.5.1342 Healing_Brush.mp4
-
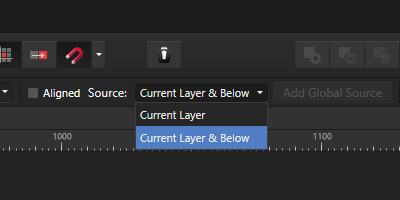
The problem seems to be caused by the "Current Layer" mode. Select another "Current Layer and Below" mode.
-
Non-destructive Mask
telemax replied to telemax's topic in Tutorials (Staff and Customer Created Tutorials)
Both methods do the same thing. The main concept is to make the contents of the group work as a single mask. The main advantage is keeping the contents of the group in their original state. -
Normal Map Generator
telemax replied to telemax's topic in Tutorials (Staff and Customer Created Tutorials)
Removing the logo will make the Asset invisible in the Asset panel, but you can do it. It is not possible to automatically load and update the bump map, unfortunately. -
Pattern Layer can be larger than 1024px. 1 Create a rectangle of the desired size in pixels 2 rasterize it 3 Layer > New Pattern Layer From Selection Pattern_Layer.mp4
-
Yes, masks can consist of several parts, and can also be non-destructive:
-
Wow, I didn't know it was possible to fill any pixel layer with color using the "Gradient Tool" (G) and just choosing a color!
- 5 replies
-
- 1
-

-
- affinity photo
- tutorials
- (and 6 more)
-
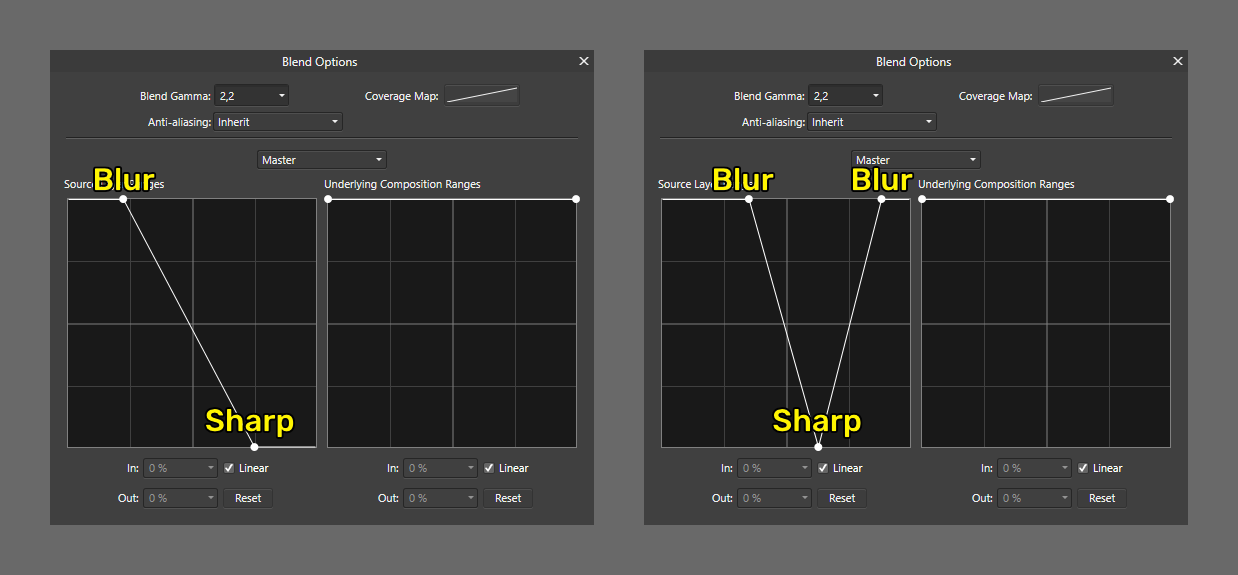
An additional faster and more convenient way. 1. Add Non-destructive Blur. 2. Add a Mask (z-depth layer) for the blur effect. 3. Adjust the "Blend Ranges (cog icon)" curves for the mask. Levels adjustment of the z-depth layer is not required. The distance between two points in the "Blend Ranges" can be represented as a field of focus. 3.mp4 -
-
Hi, The z-depth layer must be rasterized into a mask: 1.mp4 In this case, the mask will determine transparency rather than the strength of the blur effect. Therefore, it will be somewhat similar to the Orton effect. In some cases, the "Depth of Field" filter can be useful: 2.mp4 -
-
Boolean problem
telemax replied to mate64's topic in Pre-V2 Archive of Desktop Questions (macOS and Windows)
Hi, Try a non-destructive boolean. Hold down the Alt key before the boolean operation. -
affinity photo Hi I am new here, introducing myself
telemax replied to Nebie1's topic in Share your work
I think if you add a wireframe view, it will be clearer to many people.