lepr
-
Posts
5,563 -
Joined
Everything posted by lepr
-
I agree. This is the 'Share your work' forum, not the 'Tutorials' forum, and the OP was merely showing their work and how they did it, rather than posing as a tutor. I also agree with Ash, that there are many misleadingly overcomplicated tutorials on the Web, but the OP was not presenting a tutorial and so the comments about poor tutorials would have been less potentially offensive if made elsewhere.
-
Easy method using Shape Builder Tool and Contour Tool: triquetra.mp4
-
 No, the pasted objects are always together, with no option for replicating the parent Layers structure of the source objects.
 -
Pentagrams v Heptagrams
lepr replied to cdw's topic in Affinity on Desktop Questions (macOS and Windows)
An alternative method using Spiral Tool and not requiring Point Transform Tool: heptagram.mp4 -
To be considered:
-
I was hoping you would see my earlier post as it is now. I edited it only 2 minutes before you responded, so I understand why you were not aware of that. I could, but will not, provide details. Many regulars here will know why. No. End of my participation in this discussion.
-
[deleted because my initial comment would have led to a near endless argument that the forum doesn't need]
-
I think what's happening is the objects are staying grouped, but you have enabled the option which makes the individual objects be directly selectable as if ungrouped. In the Context Toolbar of Move Tool (and many other tools) is an Auto-select control; in its drop-down list, select "Default" instead of "Objects" to get the selection behaviour to which you are accustomed.
-
Gradient Following Spiral?
lepr replied to HT_5634's topic in Affinity on Desktop Questions (macOS and Windows)
For the stroke of the spiral, use a 'vector brush' with texture that is a linear gradient. You might want to use a greyscale gradient and then apply a Gradient Map Adjustment to the spiral to colour it. -
When you have at least 3 screenshots, a Live Stack Group with its mode set to Outlier should give the required result.
-
You're welcome!
-
Welcome to the Affinity forums The destructive Filters have never had a blend mode drop down, as far as I'm aware. I think you must have been using Live Filters when you previously saw the drop down.
-
I know, and that is exactly why my second sentence, which you quoted, suggested providing an option rather than forcing something on people.
-
Yes, I'd prefer it returning to how it was in v1 - white text on black. There could be an option so the user can choose the v2 style (but with improvement) or the v1 style.
-
macOS 12.7.1
-
I did misunderstand.
-
A preset must have a unique combination of settings. You already are using a preset named 'WB-20231125', so you will need to change some setting before the option to create a preset will become available.
-
It can be almost unreadable for dark colours, too: In my opinion, v1 was far more readable - white text on a black capsule, regardless of the colour being sampled. There are some bizarre software design decisions.

-
Divide objects below
lepr replied to Washishu's topic in Affinity on Desktop Questions (macOS and Windows)
That sounds like the Expand Stroke command. There have been changes to the geometry commands since v1. They have been significantly improved, in my experience. That arrived in v2. -
Sean, your example contradicts your explanation for the use of percentage instead of angle, which was "it is a distance along those cusped segments". I'm struggling to see how you came up with that explanation. That example has 0 full turns and a 'partial turn percentage' (note the word turn that is in the tooltip) of 83% producing about 2.2 segments, not 83% of a single segment.
-
No, not in the AD beta on macOS in front of me. The partial turn percentages are relative to a full turn with 100% being equivalent to 360 degrees, 25% equivalent to 90 degrees, and so on. A cusped versus smooth version of a given Spiral has no difference except the underlying nodes are cusped versus smooth and the segments are linear versus curved. Or am I missing something?
-
Affinity Designer 2: PDF export has wrong dimensions
lepr replied to FelixK's topic in V2 Bugs found on Windows
yes -
That prompts the question "why?"
-
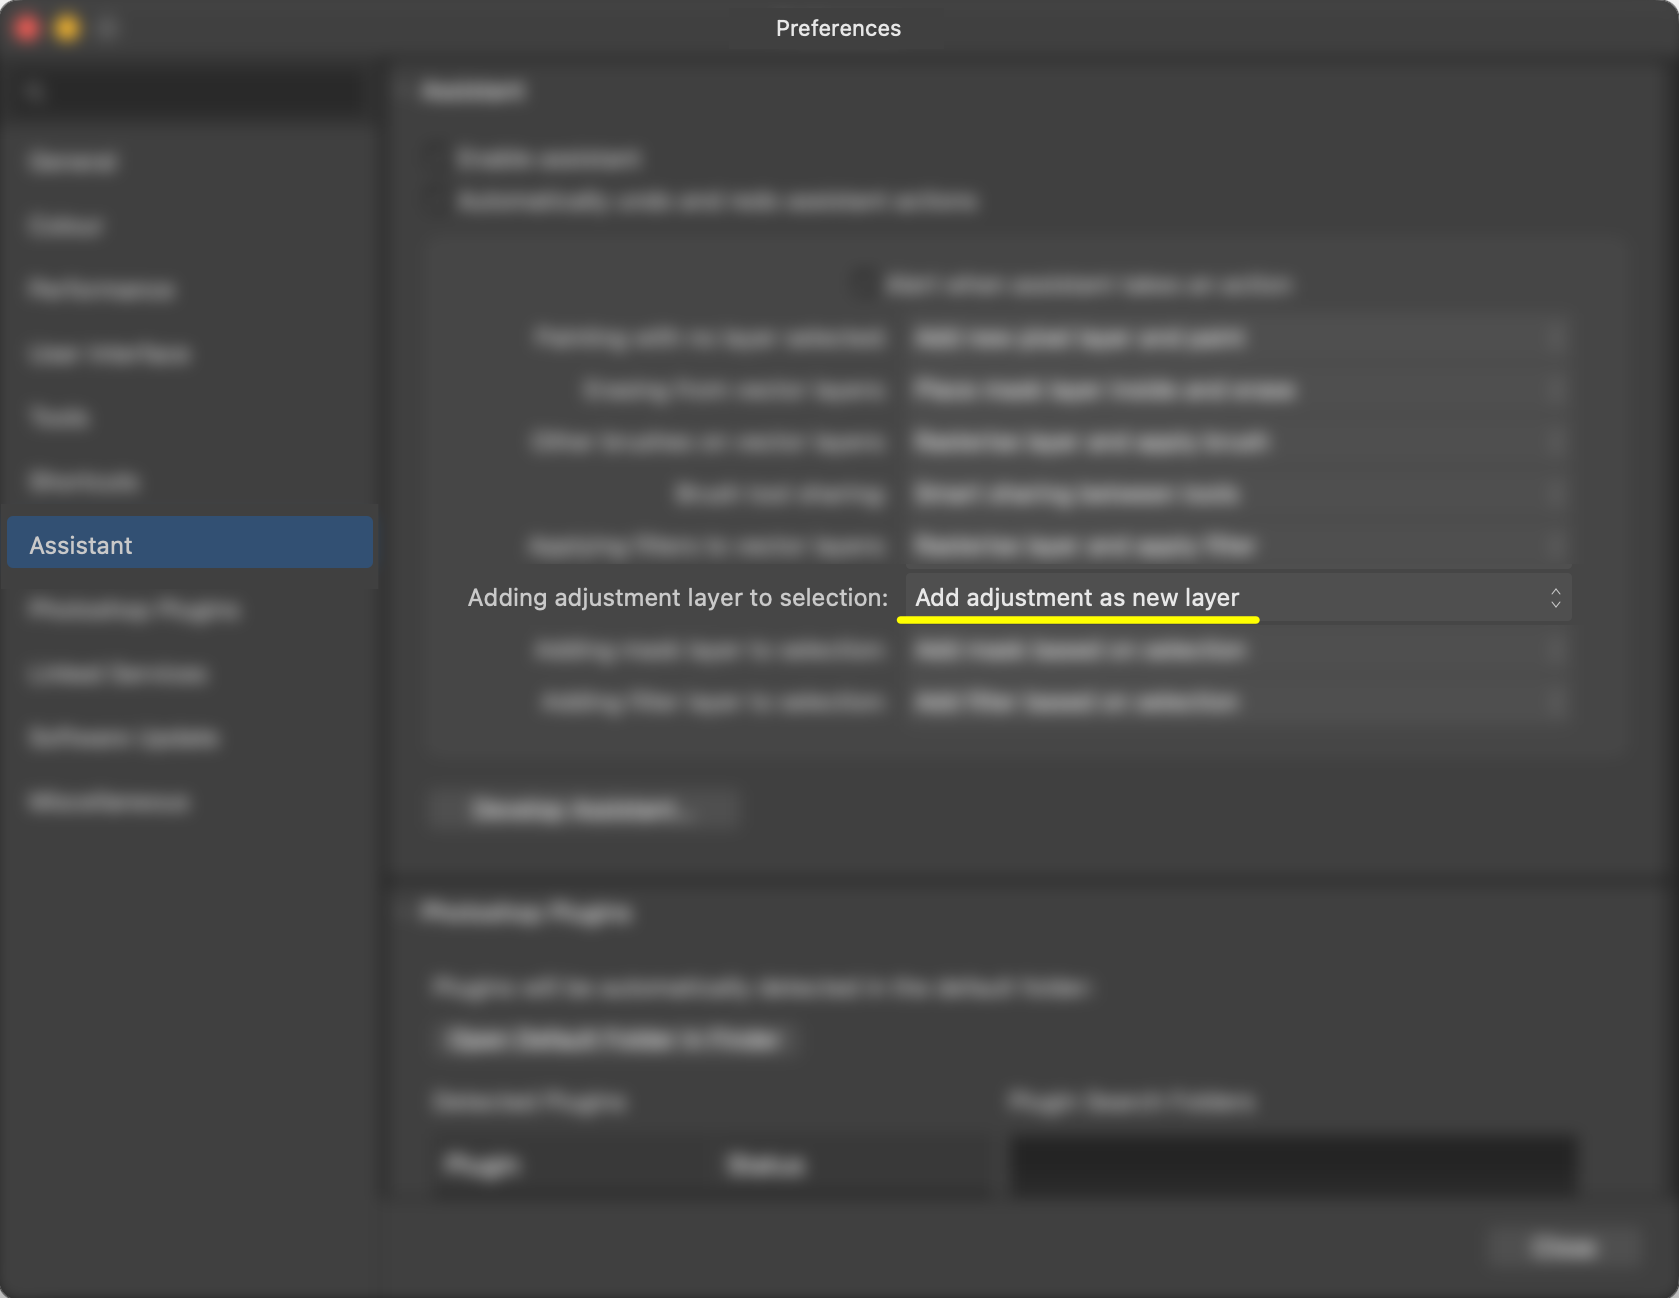
The app preferences has a control for the placement of new Adjustments. You probably want it set as shown below:
-
I don't remember - it was years ago when I noticed Merge Curves creates a new object with identity transformation matrix. The new unscaled object that is created by Merge Curves is given the stroke properties of the source object with the lowest position in the stack. If that source object is being scaled by its transformation matrix and has 'Scale with object' enabled for its stroke, then its apparent stroke width on canvas and in Stroke panel differs from its underlying stroke width. It is the underlying stroke width which is given to the product of Merge Curves. By the way, the underlying stroke width of an object can be found in Appearance panel.