toltec
-
Posts
3,560 -
Joined
-
Last visited
Everything posted by toltec
-
 On 1/4/2019 Guest said: For those who haven’t come across this already here’s an article that maybe helpful https://photographylife.com/dpi-vs-ppi If you are going to quote articles to try and prove your case, try and make sure they are technically correct, or at least explain things properly rather than glossing over them. "Let’s start with some definitions. DPI stands for dots per inch and refers to the resolution of a printer. It describes the density of ink dots placed on a sheet of paper (or another photographic medium) by a printer to create a physical print." That is a poor description. Dots Per Inch refers to the the number of dots the printer can apply (the resolution), but when it comes to halftone images (which we are talking about) , they are made by varying the quantity of 'printer' dots. A typical imagesetter has a resolution of 2540 DPI (mine did) so the dots in a typical 150 LPI are made up of many smaller dots.
 -
On 1/3/2019 Guest said: You can call them ‘sardines’ and ‘rainbows’, it doesn’t matter. It’s about communication and ensuring everyone understands the language. NASA’s Mars Climate Orbiter failed because the wrong units were used - give a printing lab the wrong info and they don’t pick up the error you’ll crash and burn-up. PPI refers to the pixel resolution of a digital image, DPI refers to the density of ink dots on paper. The nuances of the terminology can be discussed ad infinitum but the bottom line is this is the industry standard. To suggest the terms are ‘interchangeable’ is incorrect and lazy. The developers should set a good example and use the correct terminology. But why is Pixels Per Inch the correct terminology ? Most of the world uses millimetres, all of Europe, China, Japan etc. They don't use the out-of-date imperial inches. Why should they be forced to ? I would say that far more people use digital images for display on a screen or some sort, rather than for printing and certainly not for for printing using inches. Inches are irrelevant for screens. Lines Per Inch or Dots Per Inch were being used in printing for hundreds of years before pixels existed. So who decided Pixels Per Inch was the standard and should take over the "per-inch" bit, which is unsuitable for measuring pixels. I'm betting it was a printer in America
-
Hi @Gareth Humphreys Make sure the ellipse is still selected, select the Artistic Text Tool and tap on the path of the ellipse, not inside. i.e. where the green starting triangle is showing below. You can swipe upwards to set the size of the text.

-
Why? Pixels Per Inch is total nonsense for a screen measurement and there are no pixels on paper, only dots. So why use a measurement that is so totally incorrect? All the other programs are wrong, why do something that is wrong just because everyone else does?
-
Try going View > Studio > Reset Studio. That should put everything where you expect.
-
Where did you inform us …
toltec replied to Oval's topic in Pre-V2 Archive of Desktop Questions (macOS and Windows)
Not to mention information about the beta being plastered all over the www.serif.com or www.affinity.serif.com websites Wrong. There has been talk about Publisher for years but no firm launch date. I’m sure someone will probably mention it when the time comes -
Keyboard shortcuts
toltec replied to bill hansen's topic in Pre-V2 Archive of Desktop Questions (macOS and Windows)
If you go to the Affinity help files inside the app. Help menu > Help (or F1) and search for ‘keyboard shortcuts’ every single keyboard shortcut (dozens of them) is listed in there, arranged in the same order as the top menu bar. There are no shortcuts to the ones you asked for (except Ctrl + M for Curves) It is very easy to add your own though. Go to Edit > Preferences > Keyboard Shortcuts and the various Adjustments are in the Layers section of the second dropdown menu, as is shown in the screenshot posted by @R C-R -
I'm not sure why you are doing all this copying and pasting? If you make a page (e.g. 120px x 120px) Go File > Place and that will open the filer for you. Double click on an image... Use the pointer to drag the image to about the right size on the page You can then use any of the handles to resize it. Because the image will be bigger than the physical page, that does crop it as you resize it. As you can see above from the bounding box, it is being cropped on both edges. There is no need to Flatten it, if you just Export it as a JPEG (File > Export) and it will automatically be flattened. You could use the same page more than once, just keep loading (placing) new images on top of the existing one, before exporting them. They will be loaded as different layers and only the top one will be exported as a JPEG.
-
Circle crop
toltec replied to shazkol's topic in Pre-V2 Archive of Desktop Questions (macOS and Windows)
I think that technically, cropping has to be square but you can use a shape to clip an image. Draw an ellipse shape then drag the image to the shape nesting (or clipping) position, which is at the bottom of the layer, but not completely below it. There will be a blue highlighter at the bottom of the layer when it’s in the right position. If you want the background to be transparent, you will need to export the image as a PNG or a TIFF as JPEGs can not have a transparent background, so they will be white.
-
Divorced, probably
-
I have Mac and Windows versions, Windows beta versions and both iPad apps. What do I get ?
-
You can set any fill, line etc to be the default colours. Although you didn’t say which app you are using, it works the same for this. Set them how you like, then go Defaults > Save (Document menu). Everything new will use those settings.
-
If you click on the fx button on the bottom of the Layers panel in the Studio. there is a Bevel/Emboss effect in there.
-
Hi @Jim Radford From the Document menu, go Export, then when the EXPORT panel appears, tap Share (bottom left hand corner) and then tap Save Image. That will save it into Photos, which most apps can access.
-
How to deselect a line drawn with the pen tool ?
toltec replied to Nadar's topic in Pre-V2 Archive of iPad Questions
You would normally double-tap to create the very last node but, if you have already created it, double tap on the last node. -
Use middle mouse to pan?
toltec replied to Epaenetus's topic in Pre-V2 Archive of Desktop Questions (macOS and Windows)
If it’s a Windows PC you can press the middle button down and pan. Not sure about a Mac The spacebar temporarily selects the Hand Tool so you can drag to pan. Release the spacebar and the previous tool is selected. -
Try Text Studio > Positioning > Baseline
-
Make sure you have New or Add selected and also check that the Feather is not set to something very high.
-
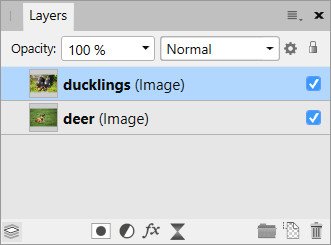
In the screeengrab you posted, the Diamond layer is selected. If you paint on the diamond the strokes would show. It is grey (selected) where all the other layer are black (not selected) Actually, the strokes would not show on the diamond either as you are painting in the same colour.
-
You are trying to paint on the Diamond layer or Is that what you mean to do? If you want to paint on the image layer, (Background) or a pixel layer, you need to select it.
-
Zoom shortcut
toltec replied to CarlosMtnez's topic in Pre-V2 Archive of Desktop Questions (macOS and Windows)
I prefer to press the spacebar (hold it down) then press Alt. You can then drag a marquee to zoom to. You must press the spacebar first. Spacebar + Alt + click zooms out -
Copy a Slice
toltec replied to michele's topic in Pre-V2 Archive of Desktop Questions (macOS and Windows)
If they are vector objects, in Preferences > Tools, tick this option, then drag a marquee around the object. If it is a big bitmap, in the Pixel Persona, draw a selection marquee around it then press Ctrl + J, that duplicates it onto a new layer.
-
AP IPad - How to see mask as greyscale image?
toltec replied to Leonardo Fiori's topic in Pre-V2 Archive of iPad Questions
To view the mask as greyscale, in the Channels studio, tap the Composite Alpha thumbnail. Tap the 'return' arrow at the very top of the Channels studio to view all channels again. You can also select the mask layer and in the Layers studio, tap the Layer options button (ellipses in a circle) and then tap Solo. If you want to edit the mask channel, you must select it ! To load to a selection, open the Channels studio, tap the ellipses for the Composite Alpha channel and then Load to Pixel Selection. -
You can use the transform panel. Either swipe across the X Y controllers or tap and enter a value in the keypad.
-
The 'Not' is actually Transparency. Click on that to turn the active colour transparent. Which you don't want to do! You do not need to rasterise anything. You can mask Image layers without rasterising them first. Paint on the Mask layer with black paint to reveal the image below, like my birds example below. Just select the paint brush tool and paint. Paint with black on the flamingo's mask layer to reveal big bird below. As @MEBsays, make sure the brush Opacity and Flow is 100% and make sure Protect Alpha (Context Toolbar) is not ticked.