

decimate555
-
Posts
106 -
Joined
-
Last visited
Posts posted by decimate555
-
-
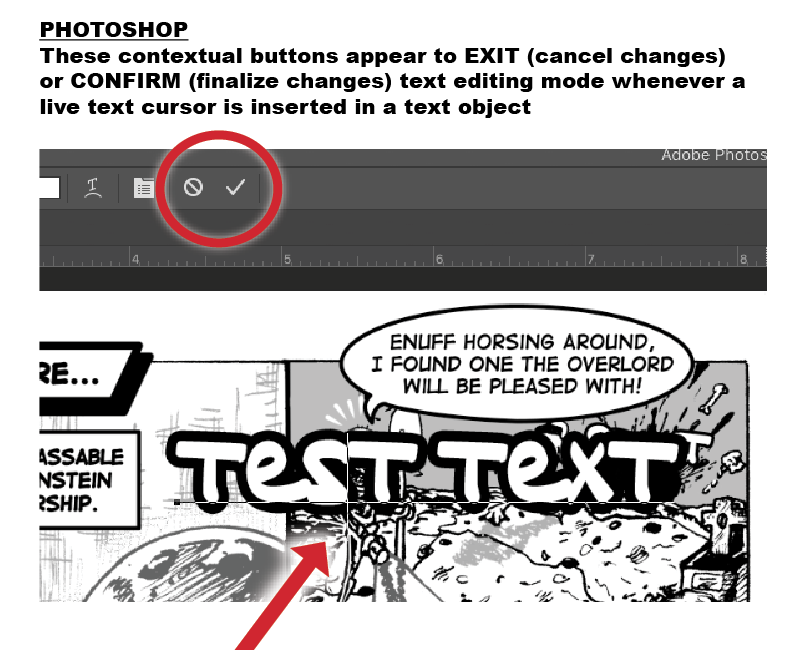
Hello, I've noticed the Affinity suite programs lack a dedicated text ending of edit mode button (not sure what to really call this)… for example when editing text, I have to either press the ESC key every time to get out of editing mode, select the move tool directly from the tools bar or select another text box to edit. (pressing the move tool shortcut key while in editing mode will simple input the "V" character)
Something like what Photoshop has works really well and it's more of a intentional action and purposeful function when using a dedicated button on the control bar made specifically for it, with Photoshop, they also have a keyboard shortcut for it if not using the UI (command + enter / control + return)… but for Affinity that keyboard combination instead turns the text in the box into curves which is not the desired result, I just simply want a purposeful action that lets me know I'm out of editing mode and the containing box itself is selected, not the text.
Also I just find it odd when done editing text in a box and I press the ESC key it applies the text changes and selects the container object, when the expected behavior of pressing the ESC key is to cancel editing the changes altogether, however the Affinity programs instead confirms the changes seemingly the reverse approach to the canceling behavior the ESC key was formally designed to do on a keyboard.

-
Hi, is there a way to move an artistic text or text frame object while it's still in editing mode (while text editing cursor still active inside the box), there are times I do not want to press escape or select the move tool while editing text and then have to select the text tool yet again to continue editing, it seems like another extra step to moving in and out quickly while editing many text objects while simultaneously repositioning (e.g. many comic book speech bubbles on a page project), I just want to reposition the text object quickly elsewhere on the artboard and continue typing from there without having to do the constant back forth tools selecting.
Perhaps being able to hold down a certain key while live text cursor is still enabled in the box to put it in a "temporary move mode" until that key is released?
-
Thank for all the suggestions, while using the shift, option keys, etc. does help shortcut to smaller values faster for certain uses. I suppose like most using Publisher for the print world increments taking actual physical rulers of measurements into account would be ideal, whereas yes for American units, 1/8" (or 1/16") steps are quite common, centimeters, etc.
I'd imagine the metric system units could be approached in a similar manner regarding common divisions.
-
I forgot to include, same recommendation as mentioned but of course I am not only referring to just inches, same idea with other units of measure perhaps 3mm for millimeters, etc.
-
Hello…
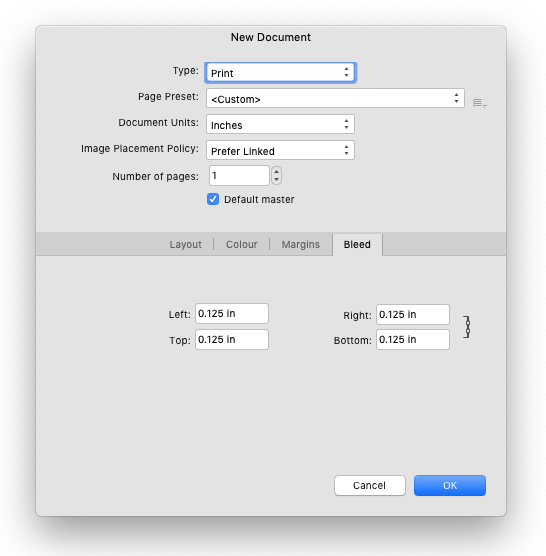
I enjoy using the arrow keys to quickly jump numbers on the value fields… however to pick one example, with Publisher the bleed setting default increments for setting up bleed using the keyboard arrows jump complete inches at a time, MOST of the time it's quite unrealistic for bleeds to be whole inch increments unless possibly one is creating gigantic billboard art or something related. I'd suggest 1/8" increments for a more truer default to be more in tune to how most of the printing industry set their bleeds sizes. This would speed up setup for very keyboard oriented people like myself.
Yes, I am aware one can simply use their mouse and click into the field and type in whatever precise measurements… I'm only bringing this up for a better user experience with the software.
-
I am using AP latest app store version 1.6.7… when multiple files are opened I noticed that one cannot access other opened documents through the "Window" menu as it only lists the single current tab in focus, but when going into separated mode, it functions normal as expect, going to the "Window" menu lists all the opened document to access.
Yes when using tabbed mode interface, once can simply click the tab itself to access the opened file, however some of us prefer the listed option through the "Window" menu to navigate and it can be unnecessarily cumbersome to switch over to separated mode everytime to use the "Window" menu if the user prefers to never use separated mode to begin with. Also some of us prefer to stick to dark color interface, but often using the "Window" menu to select a document is easier to read as Mac OSX default menu colors are much lighter with larger text making it easier to identify at a glance.
Please consider, adding a way to list all opened documents through the "Window" menu when not only in isolated mode, tabbed mode would be great too.
-
One feature I use extensively with InDesign is the overall graphic preview while resizing an image frame which is very useful for knowing on the fly how much to shrink or expand the frame or to get an idea of how much clipping is on the image without having to resize everything out. It works by holding down the handles a second longer to activate that mode.
Has something like this already been considered for Publisher? If not, I'd like to at least put it out there as a possible feature that I know many would love.
-
Has there been discussion/progress on implementing simple 1 Bit color mode for graphics within Photo? For now, pretty much have to stick with PS in order to convert my art to this mode, as of the latest version of Photo, I'm still quite shocked this is still missing, particularly for when Publisher comes out, using these graphics for certain kinds of graphics are smaller (low memory resource) and great for colorizing the graphic within the page-layout app itself as InDesign and Quark have had for years.
Thank you
-
Would love a way to auto import or have an option for immediately bringing in global swatches into or from an embedded image for a current working open file without having to do the whole export/import/clipboard palette workaround.
Thanks!
-
Super Vectorizer is how I've been getting by, but it's only available from the Mac app store (meaning OSX only)… it's $20, but stupidly easy to use and FAST… almost real-time rendering and very accurate.
-
I am wondering if any further improvements are planned for the crop tool?
One trick I enjoyed from PS is proportionally cropping by holding the "alt" key, I noticed that as of betas 1.5.x that this is still not possible.
Hopefully the gif demonstrates what I am referring to.
Thanks
-
Hello,
I am trying to open a PDF as currently cropped and saved as a raster directly through Photo or Designer, but it doesn't seem to provide that option with the open dialog options, am I missing something?
Thank you
-
Thank you ABC!
That did the trick, basically to affect only the stroke or just the fill to get the see-through effect, the workaround is to treat the gradient tool as if were also transparency tool.
It would be great if the "Context" dropdown box part of the gradient tool was also a native option with the transparency tool. Another thing that would be such a timesaver without having to mess with nodes in the gradient too… although admittingly the gradient tool method offers more control.
Cheers
-
Is there a way to use the transparency tool to only apply on the fill or just the stroke of the object… I cannot seem to find a checkbox or setting for this to only affect a particular attribute.
Thanks!
-
-
+1 this, it's a constant extra step for me, a dedicated function would be such a boost.
-
I just tested this as of latest beta 1.5 (b2)… does not work yet, although quickly accessing the guides manager this way would be very useful.
May I add that it would also be very useful to include some way to make the guideline opposite orientation (e.g. vertical to hortizontal) by holding down a key (option?) while dragging into a document in real time. This would save some effort having to avoid re-dragging into canvas via opposing ruler side.
-
+1
I deal with a lot if instances where I NEED to transfer assets between grayscale documents and every now and then, a preflight might fail because something got through that was not 100% black. This would save so much time and it's nice to have one less thing top worry about in an art production workflow.
Perhaps adding an option for a "hard" grayscale mode that forces objects to that color mode or something like it?
-
Hello…
As I read this thread from more than a year ago, it's not clear if it's part of a roadmap to add this ability to Affinity apps, it would be GREAT to be able to create a rasterized layer based from an applied effect from another layer in order to make it independent so that we are free to manipulate it independently.
This would save me so much time when further creating perspective tricks with shadows.
Thanks!
-
Thank you reminous, that has truly helped a whole lot, your video post very appreciated, I'll actually be using your method for my final version of the logo with curved waves.
decimate555
-
Thank you Hokusai for your input,
I did not consider the donut tool, it's another good option for setting this up, however after trying, even this method is not completely perfect as getting the result I'm looking for took more steps afterward, such as rounding the ends which is not a built-in parameter of the donut tool, it would be great if the developers added this option to the tool in the future.
-
I was looking around and could not locate a way to create permanent vector shapes based on the cropped view of a vector object.
However in my specific case, I have cropped a group of stroked circles made to appear like sonic waves, I want to now make them into a single compound element, to finally round the end caps of each stroke as they should then be free from just being hidden from a crop itself.
Is there an easy way to do this task without a ton of other steps? Does an equivalent function like "expand appearance" that AI has exist for AD?
I thought "convert to curves" was it, seems like the closest thing to this, but that command does not result in the solution I seek.
Thank you
-
@evtonic3
Interesting idea… matter of fact, I'd be very curious to know how many people on these threads work in print houses themselves that use or are just aware of Affinity software………… anybody?!
All we really hear from are creatives. Would love to hear print vendor success stories of jobs produced with PDFs made directly from Designer or Photo… should this topic be it's own dedicated thread as it will be ever more important once Publisher is ready for prime time?
-
+1
If I had a nickel for every time I hit that enter key expecting a response and nothing happens, still catches me off guard. Also, the programs(s) are way too dependent on the keyboard oriented user using the escape key for the opposite effect, cancel buttons would be great too. For example, when inputting text, there's no confirm button to apply what was typed, I usually use the escape key, often pressing it twice to really get out of it.


AP: Proportional Cropping
in Older Feedback & Suggestion Posts
Posted
It's about June 2020… has implementing this seemingly simple feature been considered at all yet?