R C-R
-
Posts
29,823 -
Joined
Everything posted by R C-R
-
 Also, in any field that includes units you can use any units you want by explicitly including them. So for example, in the Transform panel an existing value might be expressed in mm but you could change it to inches by entering the numeric value with an "in" suffix.
 -
Affinity Publisher Public Beta - 1.7.0.58
R C-R replied to AdamW's topic in [ARCHIVE] Publisher beta on macOS threads
To me, anything that would be printed is inherently part of the canvas. Trimming part of it away afterwards does not change that, just as it would not if an artist hand painted a physical canvas & then someone trimmed it to a smaller size. EDIT: But maybe that's just me. I don't really have any objection if Clip to Canvas is changed to hide the bleed, as long as there is some way to see the bleed when desired. -
Affinity Publisher Public Beta - 1.7.0.58
R C-R replied to AdamW's topic in [ARCHIVE] Publisher beta on macOS threads
Isn't bleed just the part of the canvas that extends beyond the trim lines? -
That would not happen if you were in text entry mode (anywhere the text caret/insertion point is visible). Since that is the only way to enter any text in the app, this would never be a problem. It also means you have a lot more keyboard shortcut combinations available than you might think, since if you are not in text entry mode the shift key combinations can be assigned to other functions.
-
Text frame panel
R C-R replied to Philcinbath's topic in Feedback for Affinity Publisher V1 on Desktop
Having them available in tabs is not the same as having all of them visible at the same time. If you dragged each of those tabbed studios out so they were all visible without switching between tabs, I doubt there would even be room for all of them, much less leaving any screen space for your document. -
Apple Photo Stack
R C-R replied to Erwe's topic in Pre-V2 Archive of Desktop Questions (macOS and Windows)
Assuming I understand what you want to do, this works for me: In the New Stack window, click Add, then in the window showing files & folders that opens, in the sidebar, look for an item named "Media." It may be near the bottom if the sidebar has a lot of items in it. Indented below Media there should be an item named "Photos" with a camera icon. If you do not see that, hover the pointer over the Media item & click the "Show" text that appears. Click on the "Photos" item, wait a few seconds for the items in your Photos library to appear, & then select as many of them from the lower part of the window as you want. -
Edit Guides button in Toolbar not working
R C-R replied to lexislav's topic in [ARCHIVE] Publisher beta on macOS threads
A new one that appeared in the 58 build, IIRC. -
Crash after closing document
R C-R replied to MTauveron's topic in [ARCHIVE] Publisher beta on macOS threads
I see the same issue with High Sierra 10.13.6 after editing & closing a document & then hiding APub (using CMD+H or the main menu equivalent). It does not always crash, but it does more frequently than not, usually within a second or two of hiding it. If I do not hide the app, it does not crash, so it is something about hiding it after editing, saving, & closing a document that does it. -
AFAIK, Designer & Publisher do not share Assets -- each app has its own Assets categories that can be exported to .afassets files that can be imported into the other app, but you have to do that manually. Each app maintains separate categories, so adding an asset to one app does not add it to the other app.
-
What does Rasterize do?
R C-R replied to ngineergeek's topic in Pre-V2 Archive of Desktop Questions (macOS and Windows)
The 10.2 MB flood_select.jpg from the download for the workbook is a very good image for this exercise. Depending on where in the clouds I start the drag, at between about 19 & 26% tolerance, the clouds are easy for me to select without selecting anything else. The screen going blank suggests there is something wrong with the installed Affinity Photo app. -
I can't even get that far. As soon as I drag a preexisting symbol into a master page & drop it there, APub immediately crashes -- there is no time to invoke a save or anything else. FWIW, my crash report shows that the same thread crashed (Dispatch queue: com.apple.root.default-qos), with the same Exception Type, codes, notes, etc. as yours.
-
Control+W works fine for me. I am running macOS High Sierra version 10.13.6. What OS version are you running?
-
Text frame panel
R C-R replied to Philcinbath's topic in Feedback for Affinity Publisher V1 on Desktop
As it is, on my 27" iMac it is hard to find an arrangement that has just all the 'most used' panels visible at the same time & still have more than a tiny area left for the document. -
Text frame panel
R C-R replied to Philcinbath's topic in Feedback for Affinity Publisher V1 on Desktop
FWIW, it was very easy for me to find its View > Studio menu entry when I type "Frame" into the Help menu search field. Once I opened it from the menu as a floating panel, I decided that for me the best place for it was in the 'left studio' tab group, along with the Pages & Assets panels, so I dragged it there. I have done the same with the Table Studio panel, & probably will make other changes as well. As I have done with the other Affinity apps, I also made a custom keyboard shortcut for "Hide Left Studio." That allows me to quickly show or hide that whole Studio area as needed. -
Can't scroll pages panel
R C-R replied to ConnectCreative's topic in [ARCHIVE] Publisher beta on macOS threads
From the screenshot, it does look like the Table & table Formats Studio panels are grouped & floating, obscuring the lower part of the Pages Studio panel. The giveaway is the x in a circle on the left of the floating panel group, used to close a floating panel group. Since floating panels are always displayed above the workspace & its docked Studio panels, the solution is to drag the floating group somewhere else, so it does not obscure the docked panels below. -
Bleed margins too faint - 1.7.0.58
R C-R replied to wonderings's topic in [ARCHIVE] Publisher beta on macOS threads
Control-W's "Hide All Guides" function does not prevent you from seeing the current page size. It is just a simple toggle function to quickly turn off & on the guides so you can see the page with or without the clutter. -
Bleed margins too faint - 1.7.0.58
R C-R replied to wonderings's topic in [ARCHIVE] Publisher beta on macOS threads
It hides all guides, including grids, guides, text flows, margins, & bleeds, the latter being the subject of this topic. -
Affinity Publisher Public Beta - 1.7.0.58
R C-R replied to AdamW's topic in [ARCHIVE] Publisher beta on macOS threads
For me, the progress bar remained stalled for quite some time, but eventually started moving again. Try again, waiting a few minutes before giving up, & see if does the same for you. -
Thanks for discovering this. I get the same behavior on my Mac. I think it is probably related to some of the other 'wrong focus' behaviors, like with Quick Look spacebar activation, which doesn't work at all for me for the Open operation with another pub document open, & only shows but does not hide a Quick Look preview for the Place command.
-
Bleed margins too faint - 1.7.0.58
R C-R replied to wonderings's topic in [ARCHIVE] Publisher beta on macOS threads
Try Ctrl+W. -
Pasting without scaling
R C-R replied to abject39's topic in Pre-V2 Archive of Desktop Questions (macOS and Windows)
From what I can tell, this may be a Windows only bug, at least for Designer. However, this is what I get with Photo: (Just noticed the misspelling of scale in the screenshots; should not matter for clarity)
-
Pasting without scaling
R C-R replied to abject39's topic in Pre-V2 Archive of Desktop Questions (macOS and Windows)
That is definitely not happening for me in Designer. As I said, if "Scale with Object" is not ticked, the pasted FX is not scaled. If "Scale with Object" is ticked, then the pasted FX is scaled. This seems the same or similar to what @firstdefence mentioned in this post above, except for the part about "Scale with Object" not having an affect. My system & application specs are as in my sig below. -
Pasting without scaling
R C-R replied to abject39's topic in Pre-V2 Archive of Desktop Questions (macOS and Windows)
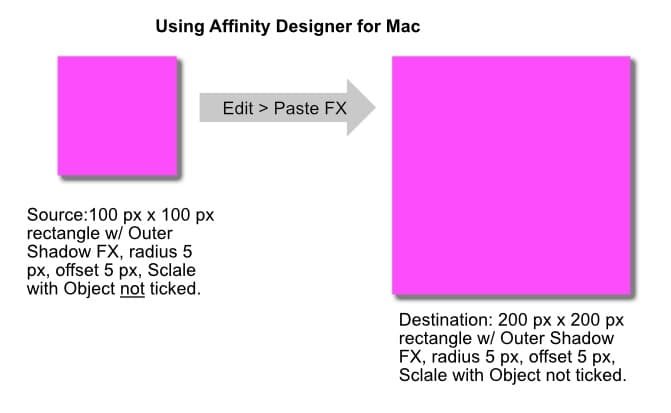
That is not happening in Designer for me -- there is no scaling. For example, my 10 px radius Outline FX is applied with the same 10 px radius to the destination object. -
Pasting without scaling
R C-R replied to abject39's topic in Pre-V2 Archive of Desktop Questions (macOS and Windows)
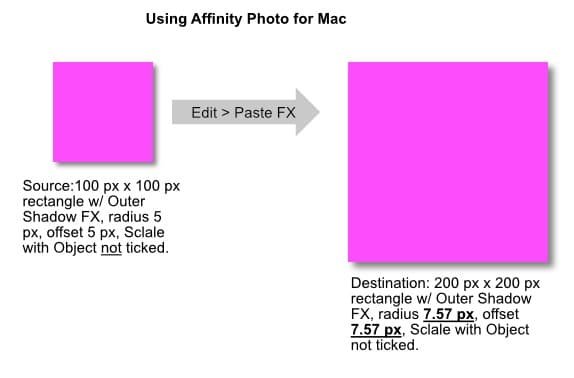
Everything works as expected for me, except in Photo, where with "Scale with Object" not ticked on the copy source object, I get oddly scaled pixel values on the pasted one. For example, I copy 100 px x 100 px square rectangle with a 10 px radius outside Outline FX. When I use Paste FX on a 200 px x 200 px square rectangle, the radius pasted is 15.13 px. -
Pasting without scaling
R C-R replied to abject39's topic in Pre-V2 Archive of Desktop Questions (macOS and Windows)
I get different results in Photo & Designer, depending on if Scale with Object is ticked or not in the copied object.