rhumbrecht
-
Posts
22 -
Joined
-
Last visited
Recent Profile Visitors
925 profile views


-
 Starfire reacted to a post in a topic:
[ADe] Is there any line smoothing? (implemented)
Starfire reacted to a post in a topic:
[ADe] Is there any line smoothing? (implemented)
-
rhumbrecht reacted to a post in a topic:
Need a Quick Answer to a Silly Problem
-
 Perfect. Thank you!
 -
I've had this problem before and I thought I had found the answer in the past, but I'm having a hard time tracking it down... Sorry if this is a repeat. I accidentally hit some keyboard shortcut a few days ago that made all of the crap outside of my document boundaries show instead of "cropping" it to the art board. Does anyone know what keyboard shortcut I need to use to reverse this? I can't stand working on website mockups when all of this is showing. :blink:
-
rhumbrecht reacted to a post in a topic:
Affinity Designer Customer Beta (1.5.2 - Beta 3)
-
Peregrin reacted to a post in a topic:
[ADe] Is there any line smoothing? (implemented)
-
Bri-Toon reacted to a post in a topic:
[ADe] Is there any line smoothing? (implemented)
-
Thanks MEB! I figured it was super simple, I just wasn't finding the answer.
-
I feel like this is a dumb question, but I made some document guides by dragging over from the rulers, and now I can't seem to figure out how to delete them. :wacko: How do I do this quick and easy?
-
cadobir reacted to a post in a topic:
[ADe] Is there any line smoothing? (implemented)
-
sambader reacted to a post in a topic:
[ADe] Is there any line smoothing? (implemented)
-
MacGueurle reacted to a post in a topic:
Create a Friendly, Futuristic Robot in Affinity Designer
-
Thanks for sharing this tutorial! I've been having a hard time adjusting to the new workflow of AD from Illustrator and simple tutorials like this are great for getting the hang of using the tools.
-
Yay, artboards! :wub: Thank you guys for these feature additions. So far, they are great!! One thing I've found with the artboards in AD... This isn't much of an issue - more of a convenience type of thing - but it would be nice if there was some sort of indication of which artboard I have "selected" when working with multiples. This is especially helpful when using the Arrange tools. For example, if I have a shape that I need to move to the vertical center of another artboard, it would be nice to be able to "select" that artboard and the arrange tools then apply to that artboard. I used to do this in Adobe Illustrator all the time, and the "selected" artboard was outlined in solid black, while the rest were outlined in a lighter grey. It was just nice to have that visual indicator of which artboard I was working with!
-
Perfect! Thank you so much! :)
-
MEB, Thanks for your quick reply. I feel really silly about this one haha. Maybe I'm not in the right mode or area, but I don't see any "Selection" button in the contextual menu for the Pen Tool.. Here's a screenshot of my Pen Tool menu:

-
This is probably a pretty silly question, but I'm having a pretty hard time with it... I have a custom vector path on top of a rasterized image. I want to use that custom vector path as a selection outline... How do I convert that veto into a selection marquee? I feel like I'm either overthinking this or it's not possible in Affinity... I tried using the selection brush and lasso tool, but I'm not able to produce the same results with my shape, effectively. Any thoughts?
-
[ADe] Is there any line smoothing? (implemented)
rhumbrecht replied to GRScott's topic in Older Feedback & Suggestion Posts
I'm definitely missing my smooth tool from Illustrator right now. I love the amount of control I have over the individual anchor points in Designer, but sometimes its very hard to get them exactly where they need be for a smooth shape! Some sort of smoothing feature would be a great addition! -
rhumbrecht reacted to a post in a topic:
[APu] Text wrapping
-
[APu] Text wrapping
rhumbrecht replied to Matthias's topic in Feedback for the V1 Affinity Suite of Products
Just ran into a need for this today... I make website mockups in Designer, and wrapping paragraphs of text around images is very common in my workflow. I don't do much print work, so I have no real need to buy Publisher along with Designer. -
Drag from Fill Color to Swatches
rhumbrecht replied to rhumbrecht's topic in Older Feedback & Suggestion Posts
LilleG, that worked, thank you! I always forget that there are extra options when using the "fill" tool. -
Drag from Fill Color to Swatches
rhumbrecht replied to rhumbrecht's topic in Older Feedback & Suggestion Posts
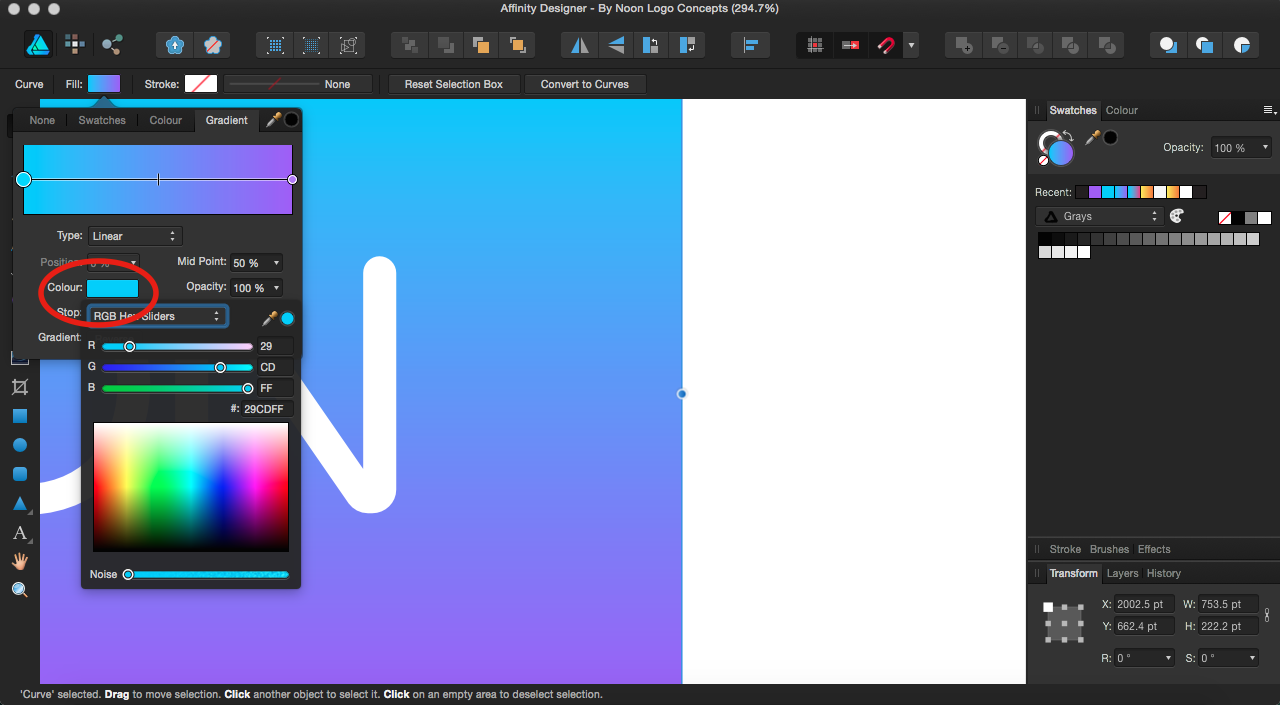
Great! The contextual menu is definitely helpful. Thank you, Hokusai! My current issue is that I have a gradient of which I want to create a swatch of each endpoint color. When I pick the colors for the endpoints, I was trying to drag the endpoint color from the gradient color picker panel over to my document swatches... Check out my screenshot for a better explanation :unsure: You can see that I circled the color that I want to make into a swatch in red, on the left. I haven't found an easy way to move those endpoint colors over to the swatch panel, and I figured drag & drop would be the most convenient feature to add!
-
I'd like to be able to to select an object, then be able to click and drag its fill or stroke color down into the swatches. Likewise, being able to drag a shape with a certain color into the swatches and it creates a new swatch would be very useful. Maybe there is a way to do something similar to this and I just haven't found it? I've been having the hardest time with creating new swatches.
-
Currently, I paste my text into my Terminal or Text Edit program and that strips all formatting. That seems to work ok, however I'd like to not have to take that extra step. Like I mentioned before, I used to create a text style in Illustrator, then anything I pasted into that paragraph would adopt those styles automatically. This was a huge part of my workflow and sped it up quite a bit. At the very least, I'd like to have a very quick "remove formatting" or "paste as plain text" button in Affinity. That would take out the extra step of pasting my text into another program first.