Luca H
-
Posts
19 -
Joined
-
Last visited
Recent Profile Visitors
1,316 profile views


-
 wesleyb reacted to a post in a topic:
Grid gutter decimal places limited to 3
wesleyb reacted to a post in a topic:
Grid gutter decimal places limited to 3
-
Dazmondo77 reacted to a post in a topic:
Multi-Page Tables
-
Tom McGrath reacted to a post in a topic:
Multi-Page Tables
-
Luca H reacted to a post in a topic:
Object creation data entry
-
Luca H reacted to a post in a topic:
Variable font support, please!
-
Luca H reacted to a post in a topic:
Variable fonts support
-
Luca H reacted to a post in a topic:
Variable fonts support
-
Luca H reacted to a post in a topic:
Variable fonts support
-
Luca H reacted to a post in a topic:
Dashed lines / stroke panel Improvements
-
Luca H reacted to a post in a topic:
Dashed lines / stroke panel Improvements
-
loukash reacted to a post in a topic:
Suggestion: Multi-select Master Pages in panel
-
Basically what the title says. It would save me some time if I could select more than one master page in the panel and delete or duplicate them all at once.
-
- 1
-
-
Hi everyone, I would imagine that the following feature would be very helpful in keeping documents tidy. I'll explain it using text styles, but it could be applied to anything from master pages to color swatches to styles. The text style panel has a handy feature called "Delete unused styles". The problem is that I have some styles set up that I haven't used or applied (yet), but they are part of the document and style hierarchy. If I were to use "Delete Unused Styles", all of those styles would be gone. So what I would like to see is a function that would allow me to lock/protect the styles from being deleted by "Delete unused". That way I could always protect the styles I need to keep, and it would be easy to get rid of all the other styles that were created but aren't really needed anymore or were automatically created by copy and paste (duplicated). This could also help to quickly clean up the master pages after a book has been synced or pages have been imported from other documents and many duplicates have been created. So what I wish for is basically that the function "Delete unused" is available everywhere, where a kind of style is created, and that I can select which styles/masters/swatches are always protected from this function.
-
I also struggle with this problem on a regular basis. My document uses nested styles, so when I accidentally duplicate a style, the parent style is also duplicated and so on. If I'm not careful, I can quickly accumulate a huge amount of duplicated styles. (There must be a bug here that is causing this duplication, but that is not the topic of this thread.) The problem then is that you don't know if the duplicate style is applied to the text or the original. You can use Find and Replace to find out, but if there are too many styles in the list, part of it will be truncated. It is possible to navigate to the truncated styles with the arrow keys, but you can't see what you are doing. This happened to me in 1.10 (and probably before), as well as in 2.0 If it's not possible to make the list scrollable, and also not possible to prevent (accidental) duplication, I'd like to see the following feature implemented: Locking a style against deletion by the text style panel function "Delete unused styles". This way I could lock all my original styles. Then when I select "Delete Unused Styles", all duplicates that are not applied to text are automatically deleted. What's left are the duplicates that are applied to text, and all my original styles (applied to text or not). This would make it much easier to keep control. Edit: I created a topic for that in the suggestions section of this forum.
-
Hi everyone, I have a few questions regarding books and packaged files. I would like to know the following: Is it possible to package complete books? If yes, how? Or do you have to package each chapter-file separately? Since packaged files can't be added to the book, after opening them, you have to save them again to add them to the book. So what is the best way to archive and manage books and all associated files, fonts and resources? How are books and packaged files supposed to be used together in a meaningful way? What are your workflows?
-
Bonteburg reacted to a post in a topic:
Multi-Page Tables
-
Impossible to edit or delete Mask and Adjustment Layers
Luca H replied to Luca H's topic in V1 Bugs found on macOS
Hi @walt.farrell, thanks for the super quick reply. I didn't think about this possiblity but that works! -
 Luca H reacted to a post in a topic:
Impossible to edit or delete Mask and Adjustment Layers
Luca H reacted to a post in a topic:
Impossible to edit or delete Mask and Adjustment Layers
-
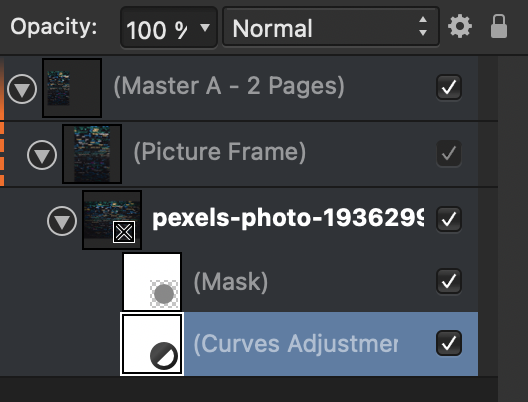
Hi everyone, I've found the following bug: 1. Create new Publisher file 2. Place an empty Picture Frame on a master page 3. On a normal page fill the picture frame (that is automatically placed by the master) with an image. 4. Add a Mask Layer or an Adjustment Layer to the Image inside the Frame in the Layers Panel. 5. Try to remove or edit the Mask or the Adujstment Layer in the layers panel. Nothing works. My workaround is to just delete the image from the frame which then deletes everything with it. But that's not ideal, because this way I don't just loose the adjustment layer I wanted to get rid off, but every other adjustment layer or mask as well. I hope this can be fixed soon! Thanks in advance. I used Affinity Publisher 1.10.4 MacBook Pro 15" 2019 (2,6 GHz 6-Core Intel Core i7, 16 GB 2400 MHz DDR4) MacOS 11.6.3 (Big Sur)

-
Baseline Grid - First Line Only
Luca H replied to benin's topic in Feedback for Affinity Publisher V1 on Desktop
+1 -
Align Text to Baseline Grid -- First line only
Luca H replied to 000's topic in Feedback for Affinity Publisher V1 on Desktop
+1 -
Luca H reacted to a post in a topic:
Align Text to Baseline Grid -- First line only
-
PaoloT reacted to a post in a topic:
Multi-Page Tables
-
Hello everyone, today I created a table that is longer than my layout and would span over several pages. So I had to split it. It is simply very inconvenient to have to split the table, especially if you insert or edit rows later and want to re-sort the table. Therefore here's my +1 for multi-page tables.
-
Hi @Patrick Connor, thanks for the quick reply, you are right, the value is correctly stored. What must have confused me is the rendering of the grid. I attached a video to show the grid rendering confusion. In the beginning the gutter is set to 0, then I paste the exact location of my object and then the rendering of the grid makes it seem like there is a rounding error, because the lines don't align, but then I discovered if I play around with the decimal place numbers the rendering of the grid is not correct or precise enough. Bildschirmaufnahme 2021-05-26 um 12.04.31.mov
- 4 replies
-
- 1
-
-
- grid
- decimal place
- (and 2 more)
-
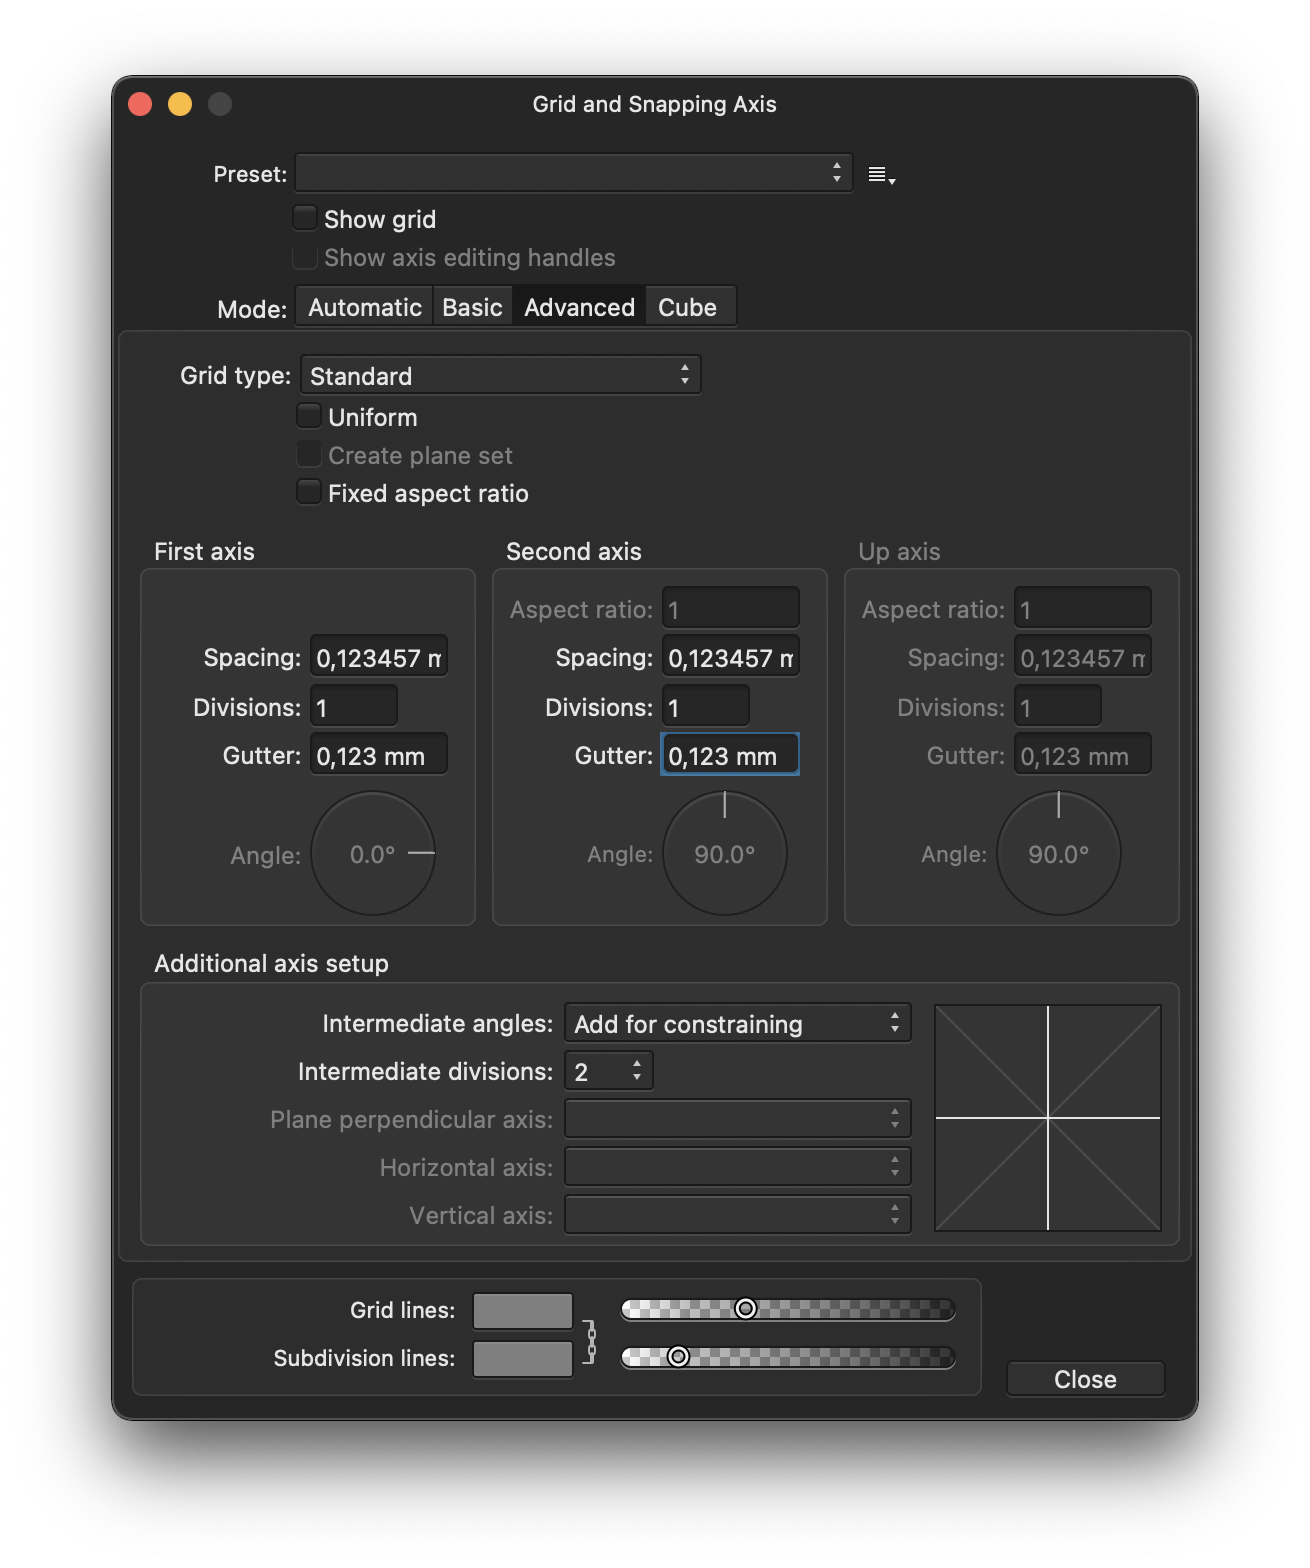
Hi everyone, I set up a custom grid with the spacing set to a value with 6 decimal places. My problem is, that I can't have the same precision of 6 decimal places for the gutter parameter, which is limited to 3 decimal places. For my custom grid to work properly I need at least 4 decimal places. Now I'm not sure, if this is a bug or if that is an intentional restiction, but it's confusing because it renders the precision of the spaceing useless if the gutter can't match it. I created a screenshot to show the problem. I made sure that in settings > user interface > decimal places for unit types: is set to 6 for every unit type I typed the value 0,123456789 in both flieds (spacing and gutter). In spacing it was correctly rounded to 0,123457 In gutter it was only rounded to 0,123 It would be very helpful if the gutter decimal places could be extended to 6. Thank you Luca Tested with Affinity Publisher 1.9.2 Affinity Publisher 1.9.4 (1076) on macOS 11.4 MacBook Pro (15 Zoll, 2019)
-
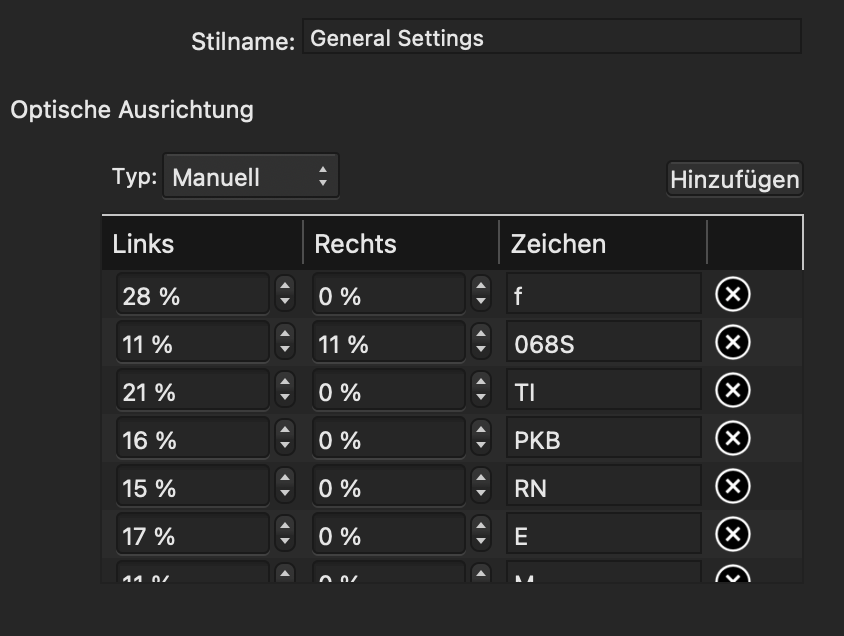
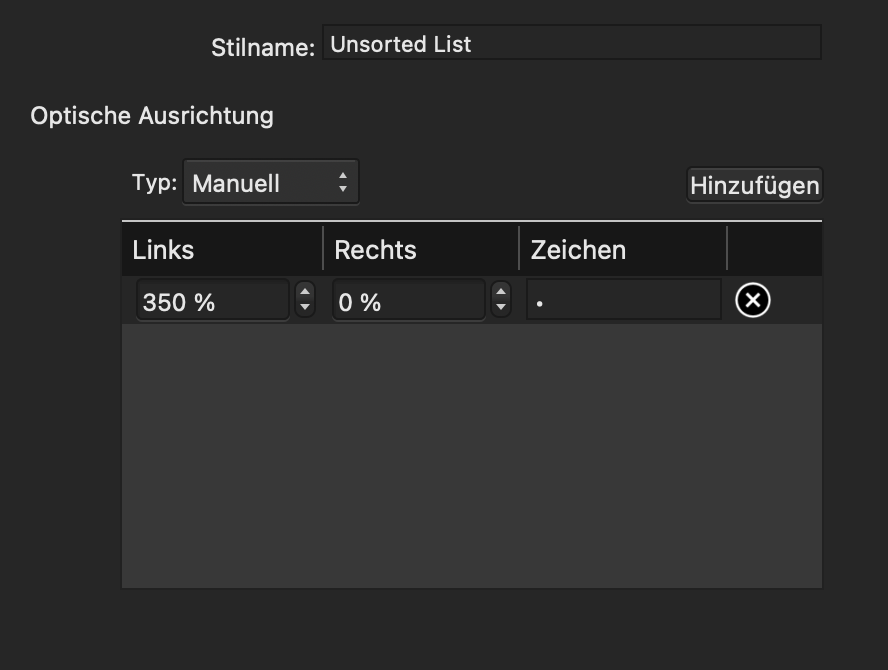
MacBook Pro (15", 2019) macOS 11.2.3 Publisher 1.9.2 Hi everyone, I set up a document in Publisher and organized my text styles in groups in the following way: Group Style (General Settings) Group Style (01 Body Texts) Paragraph Style (Body Text) Paragraph Style (Unsorted List) … … … The group style "General Settings" acts like a master style. Here I setup all the things that should stay the same across all further subordinated paragraph and group styles. As those things work, the settings I make in "01 Body Texts" should override the settings from "General Settings" and "Body Text" should override the settings of "01 Body Texts". So far that has always worked well for me, except in one case. For the paragraph style "Unsorted List" I changed some optical alignment settings and as expected, these settings override the settings of "01 Body Texts" and "General Settings". The problem here is, that it doesn't just override the optical alignment for the characters where I adjusted it, but also resets all other characters that I previously setup in "General Settings". This kind of breaks my workflow, because now if I want to change the optical alignment of a character, I have to do it in "General Settings" and in "Unsorted List" which ultimately will lead so some inconsistencies down the line. So my question here is, am I doing it wrong? Is it a bug? Or if everything works as intended, could it be implemented that the optical alignment of characters can be overridden character by character instead of resetting all characters that are not adjusted in the overriding paragraph style? I hope my writing is not too confusing. Thanks for the help in advance! Here is an Example: In "General Settings" I set "f" to 28% left and in "Unsorted List" I only set "•" to 350% left. My wish would be that the character "f" is still pushed 28% to the left when the paragraph style "Unsorted List" is activated, without having to manually add it as a setting. Mabye this example makes it more clear?
-
natassiaashley reacted to a post in a topic:
Colour palette sub-groupings
-
Luca H reacted to a post in a topic:
Colour palette sub-groupings
-
Colour palette sub-groupings
Luca H replied to natassiaashley's topic in Feedback for Affinity Designer V1 on Desktop
Hi As already requested by you and (among others) here, here and here I also cast my vote on this issue. It would help me a great deal with organizing UI Kits with several color themes!- 2 replies
-
- 1
-
-
- feature request
- color palette
- (and 1 more)
-
My current workflow is to use the grid only as a rough estimate where the object should be placed and then enter / calculate the correct position in the transform panel. The test showed that snapping is not 100% accurate. On the y-axis the snapped object was 0,000086 pt off in comparison to the mathematically placed object. So snapping is not an option. On top comes the inacurate rendering of the grid. Both grid rendering and snapping are not 100% accurate so I stopped using the snap to grid and only use the grid as a guide to see where an object would be roughly placed.
-
We're actually trying to do something in this level of precision. 😅