Search the Community
Showing results for tags 'Layers'.
-
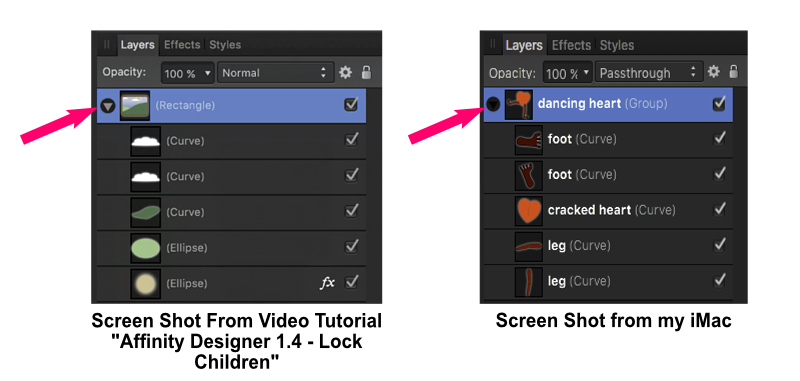
 For some reason, the triangle icon that shows whether or not a layer is expanded does not look the same as in any recent tutorial video or screenshot here or on the web. The attached file shows the difference. It is the same for AP & AD -- in both of them on my system the triangle is black on a very dark grey circular background, almost impossible to see because the contrast is so low. I am currently running OS X 10.11.3 & the latest 1.4.1 Affinity versions, but the triangles have looked like this ever since the circular background was added to the UI. Changing the UI Gamma & Background grey level has no effect on this.
-
 Can anyone tell me how to do a proper dodge and burn layer? All I seem to be able to do is to duplicate a background layer and then burn or dodge on it. Is this the only way? I can't seem to figure out how to do a proper 50% grey layer and use that for dodging and burning. Maybe that way isn't the way it's suppose to be done...I'm not sure. Any help would be greatly appreciated. cheers, Jason
 -
 Hello, I am wondering if there is a way to quickly edit a raster layer that is in Affinity Designer in Affinity Photo. I use this feature in Illustrator all the time. I select an Illustrator Layer that is a raster and select it to edit in Adobe Photoshop. As I am updating/editing the image in Photoshop, I can watch it change/edit in Illustrator. I am sure this must be possible, just can not find the obvious way of doing this in Designer. Thank You!
 -
 Hello, I need to send large vector images (9ft high x 4ft wide) to a printer. I export files as pdf, send them via dropbox, or sometimes hightail, and when he opens them the image seems to have the ground colour missing. And image looks transparent. If anyone has any ideas to help me overcome this issue, I would be most grateful. Many thanks, Tigerfeet
 -
 The Healing Brush, Patch, Blemish Removal and Inpainting Tools will not work after I apply a layer. For example, I attempted to use the Frequency Separation as outlined in the Affinity tutorial: https://affinity.serif.com/en-us/tutorials/photo/ As soon as I applied the Frequency Separation Filter, however, the tools would not work. I followed the instructions to the letter and every time I added a layer the tools stopped working. I had the same issue whenever I opened and worked with other layers. The tools only worked if I used them on my photo before opening any layers. What am I missing or doing wrong?
 -
 I am new to this software. My problem is that when I want to make child layers on selected layer the program just groups my objects together on the same layer. I have no access to the grouped layers. The layer menu does not make sub-menus for me to access them so I can not select the objects. I have watched and followed all the tutorials and it still won't make child layers. Any help would be great thank you.
 -
As it says above, keep the document's layer structure when the file is exported to pdf format. Thanks
-
 Hi, I'm a newbie to Affinity, so please bear with me as this is probably a really dumb question.. When I have two layers and want to partially add some transparency to the top layer, so that it fades into the background layer, I can use the eraser tool. So far so good, but how can I get the opposite effect? I mean, adding opacity to my top layer. It must be so easy but I can't seem to find it! I have seen tutorials to paint an effect using the paintbrush, but when I use the paintbrush, I can only paint in the selected color. What do I overlook? Please help! I've attached an image of the edit to make my issue more clear. The elephant should have looked like it's just coming out of the mist. I've managed to finish it using the eraser tool really careful and undo when I erased too much.
-
 I'm new to Affinity and I'm hoping y'all can help me with this. I've traced a sketch in AD which includes a lot of lettering. I'm running into a problem with letters that have empty spaces inside them (like R, A, O, etc. - letters that have an empty space entirely surrounded by the letter form). I've created these letters with the pen tool by drawing the outside of the letter, then drawing the outline of the inner empty space, but this seems to create one shape on top of another, so that when I go to fill in the letter shape, I can't get the space in the middle to be completely empty, revealing the background behind the letter. I can only "empty out" one layer, as it were - I can make that inner space empty to reveal the fill color of the letter itself, which obviously isn't what I want. I guess what I'm looking for is a way to draw a shape and fill it in with a color, and then cut out part of that shape to reveal the background color behind it. Seems like there has to be an obvious way to do this that I'm missing, but I've been stuck on this for almost a day now. Thanks!
 -
 Hey, I've been editing a PDF file on Affinity Photo (the software treats each page as a layer), but now I can't export them back to the format they were before, because all the layers are becoming a single page. Can Affinity Photo make every layer a page again when exporting to PDF? What do I need to do? Thanks in advance!
 -
 Hi, I've recently bought Affinity Photo, and I am quite pleased with it. It feels very solid and snappy. At the moment there's one thing I can't get to work, and that's layer boundary snapping, in order to align two layers against each other. I've turned on all snapping options, but when I move a layer towards another layer, they simply overlap, no snapping occurs. A snapping line does appear when a layer nears the center of the canvas, and snapping works in that case. The same goes for canvas boundaries, that also works as expected. I'm using El Capitan and a consumer level Wacom tablet. Could the Wacom tablet be the culprit, as the driver takes over pointer control? Or am I just doing something wrong? Many thanks in advance for any replies.
 -
 I am getting the message: Please select an RGB pixel layer before entering Develop, when I either attempt to close out photo project or access development persona. I'm new to Affinity and am basically listening it via on-line Vimeo videos and playing around with it. I have no idea how to address this or how to cancel it out. Help appreciated.
 -
 I want to change a dull sky in a photo with a blue Skyrail with clouds. I can do this with Photoshop and I believe affinity can do this. Could you help me Thanks. Ron
 -
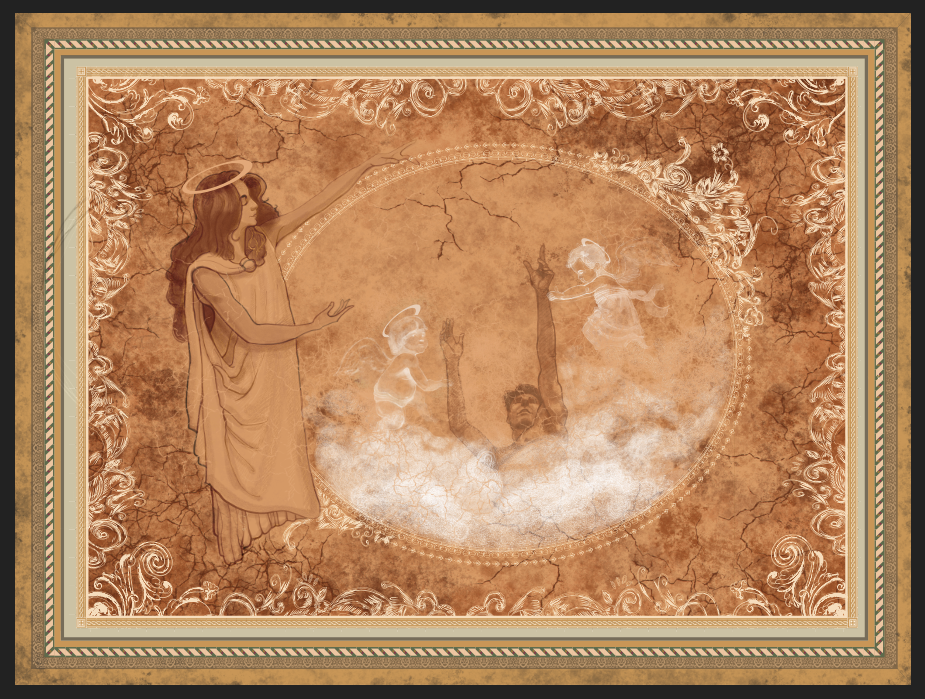
Hi, everybody! First some background: My name is Josh & I am an illustrator, graphic artist, and graduate from the Academy of Art University, SF CA. If anyone has read the news AAU students are given an Adobe license for the Adobe Suite along with their attendance . I worked with the Adobe master suite for my entire tenure. But, due to Adobe changing their software into a monthly charge, hundreds of graduates have gotten their Adobe licenses revoked; leaving illustrators, graphic designers, and artists of all types without the tools to do their jobs. That being said, I found Affinity Designer & Photo. Ever since downloading I have not been disappointed and can easily say that Affinity software is a very big threat to Adobe. I love the software and its professional quality for a great price & no monthly subscription! it is so dependable that i have done away with Adobe Illustrator & Adobe Photoshop. And that is one relationship that is hard to break! Feature Request: So my feature request is as titled above. Attached to this post is a digital vector painting I did with Affinity Designer (I plan to do more). The filigree is separated into separate paths for editing as well as most of the border. The process of going back in and finding what is locked is arduous. I wish that there were some way to unlock all layers and to quickly lock them. For example, in Illustrator you can click and drag down the menu of layers to quickly lock or unlock all layers. Then, if you have some locked and some not, you can SHIFT + CMND + A to select all and then OPT + CMND + L to unlock all and any layers that may be locked. That is one feature I would love to see in the next update. It would make intricate and files with many layers so much more workable and less frustrating. I look forward to participating more with this forum and learning more about the incredible Affinity Suite. ~ Josh
-
 Hi, I just got Affinity Photo and I was following one of the tutorials online but I noticed that I could not find the layers select, layers delete, etc. in my sidebar. Is it a different version in the tutorial or did I do something wrong?
 -
 HI :) First of all... Im amazed that you have made what I thought would never happen. A photoshop competitor. Like a REAL competitor. Crazy. And to the feature request: I would love to be able to organize layers in groups, but still be able to select an area on the canvas with things from different layer groups: effectively ignoring groups momentarily. I dont this this is possible now without using the layers pallette to select? Best regards Soren
 -
 Hello, After doing my work up on layers, I wish to "flatten image" (PS) in order to save it as tiff. Right now, I am doing "merge down" on each layer. Which is pretty boring. Is there any "flatten image" fonction ? Or I missed something. Thanks!
 -
 Hi, I'm pretty new to Affinity designer and I keep stumbling on the same problem. I want How can you stack layers that have no fill in such a way that the layers underneath don't 'shine' through. Thank you in advance!
 -
 i am working on an image that is pretty simple. How would i make this overlap white? I've attached a screen shot of the text I'm trying to do this with. i have them in two separate layers. any help would be much appreciated! Sorry if this is a noob question.
-
Downloaded the RC and banged out a multi layered PSD to the Final Cut Pro X setting and all I can say is "Thank Heavens!" Great Job, full control on the layers and now I can really start spending CC money on getting a new MacPro! Thank you. Lawrence Pro Certified
-
 Hi, I guess is something simple but I just was using Affinity and the window on my right, with layers where you can see, mark and unmark changes disspear. I do not know whay to do to get it back thanks.
 -
 I am having problems with layers of different colours and strokes, ill try and explain say you have red shape with a black stroke around it, then you want to make part of it blue, and keep the black stroke of the original red circle without the blue colour overlapping the stroke, how can this be done? right now, i am making a coloured shape with a black stroke, then duplicating it and making the top layer just the black stroke, then between these layers i draw another shape making sure it hides behind the stroke on top. Surely there is an easier way to do this. I have tried dividing the shapes in the icons on the top right but then stroke then changes, I hope you can understand what i was trying to explain, and help me out
 -
 It would be most beneficial to have a toggle icon in the Layers panel to automatically select an item both on the Layers panel AND in the document view itself. So if one clicks on an object in the document, the appropriate item is selected in the Layers panels, and AD/AP would automatically scroll and open all appropriate layers and groups to show the selection in the layers panel. I know you can right-click and select Find in Layers…, but a toggle would be more useful in many use cases. thanks for your consideration. REALLY looking forward to next beta, it's been a while since 1.3.5 :)
 -
 Hello. Is there a method for adding a new layer below, instead of above the selected? For example, Option + Click to insert the layer below, or something similar. Thanks
 -
 I'm in the process of evaluating Affinity Designer as a tool for combining multiple versions of the same photograph into a single deep image. I've been using this technique for several years using a combination of several applications, and I'm hoping AD may make the step of "squishing" all of these photos together a bit easier. As I am brand new to AD, I'm running into a problem working with multiple layers that I'm currently attributing to the ignorance associated with pilot error. :-) I'm working with 20mp images and lay down the first 5,472 x 3,648 TIFF image in the background layer. This image is basically full frame with no transparency. I then drop in the second image, which is also 5,472 x 3,648, but this image contains only those items which are in focus for that layer — so much of the TIFF is transparent, with the edges around the opaque objects feathered to be gradually blended into the background image. The net effect is to overlay objects in the background, with those in this second layer. (As a side note, this TIFF with transparency is created using Apple's Aperture and Lemke Software's GraphicConverter). However, when I drop the second image into Affinity Designer, the feathered edges that are supposed to blend into the background appear as very prominent gray lines when Opacity is set to 100% and the blending mode is set to Normal. This is different than what I see in other apps, so I'm sure I'm missing something when adding layers in AD. I've attached three image to illustrate what I'm seeing. The first shows a portion of a TIFF with transparency where the edges of the devil figure are feathered into the transparent background. The second shows how this same cropped image appears in AD, and the third is the result of laying this layer over the background, where what should be a completely undetectable transition is very obvious. Layer (in Preview).tiff Layer (in AD).tiff Combined Layers.tiff As I said, this works as I would expect in other apps, so I'm curious about what I'm doing wrong within Affinity Designer. Thanks!!