Search the Community
Showing results for tags 'How To'.
-
 I have a client who I have done two shoots for of the same subject, an updated renovation project for an art museum. They are asking me to take the new photos and align them to perfectly match the perspective and angle of the old photos I took. I am not sure how to begin this, my intuition tells me the perspective tool, but if its a 3 point perspective interior shot, would that actually work? The attached shots are the first pair that I am working on, but I think also the most difficult.
-
 Hey there, I'm new to affinity photo. Was looking around on the forum, youtube wasn't much help either. I figured out how to create a brush, and edit brushes that are already installed. But how do I create a new category (e.g. Basic, Acrylics, Dry Metal, etc.) inside the brushes menu for my new brushes? or how do I compile a brush pack?
 -
 Hi guys, in this video, I will show you how I usually create a vintage look on my photo. One tip for you, it's easier if the photo you're editing vintage kind of looked vintage already. I hope you enjoy this video, thank you!
 -
Hi guys, so I found a photo that was taken 3 years, in 2018. Back then I haven't started to shoot in Raw, that photo was taken in JPEG, and the sky is overexposed. So in today's video, I'm going to fix this overexposed photo. I hope you enjoy this video, Thank you!
- 2 replies
-
- 1
-

-
- affinity photo
- tutorials
- (and 5 more)
-
 Hey everyone, In this video I will walk you through the process of creating a poster design using thumbnail sketches with Affinity Designer. Before I begin working on a design project, I always felt that creating thumbnails is an essential part of the creative process because by sketching out thumbnail layouts, I am able to play around with different layout ideas and work more efficiently later in the design stage. It may not be for everyone but I hope that this video tutorial is helpful 😊. Thanks, Mike
 -
Hey everyone, I'm back with another video tutorial. This time, I've decided to create a minimalist vector illustration using Affinity Designer (Desktop version). I will be covering a few things in this illustration such as shape tools, pen tool, and geometry functions. Feel free to leave any feedback and I hope it will help you on your design journey. How to turn a sketch into a vector illustration in Affinity Designer (Desktop) Thanks, Mike
-
Hi Everyone, I am getting back into creating content for my youtube channel again after a hiatus from it so I made this tutorial video on how to create a design system in Affinity Designer (desktop). Feel free to leave any feedback and I hope it will help you on your design journey. Thanks, Mike
-
 Hello guys, I just got Affinity Designer on my macbook because I'm interested in learning graphics design, and this seems like a great app to start with. I am stuck at how to cut inside a curve shape. I looked but can't find the answer, please help me understand how to do it. I attached a screenshot of the curve line where I want to cut the curve shape. I appreciate your time! Luca
-
I would like to purchase this as a christmas gift. Is it possible to obtain a hard copy?
-
Hi guys, I just uploaded a new tutorial video. It's about a quick way to make your photo looks dramatic. I hope you found this video useful, thank you!
-
Anyone knows how to edit like this? I have been playing around affinity for 3 days and i just cant figure out 😭
-
 Hello everyone this is my first post. I sincerely hope it's the right place/section… I also made a search on forums but I'm not sure to find the answer to my problem.... So, I’m not a pro in graphics, but I use Affinity Designer for a while now; I use it both for prototype software GUIs, and for print projects. When I do a print project, usually is for an indie music label I collaborate with: I download the template PDF file from print company website, I open it in AD, and I work on it.. I export… etc. I already did this several times. Now, I’m working on a new music release, but it looks like now AD opens the PDF without showing the crop marks and bleed. I’m not talking here on how to set up/view bleed on export etc: I imported a PDF already coming with this, but AD shows just the page. This is new, cause for previous projects AD displayed the full area. Some screenshots to explain myself: - PDF file.png - the PDF as I want to see it in AD :) - PDF in AD in older projects.png - in my older projects, this PDF file opens in AD with all crops and bleed stuff - I can view/hide these in layers - PDF in AD now.png - crops and bleed layers are still here (selected layers), but the page is "smaller" Is something changed with an update? Or I'm missing something? Maybe something stupid :p How can I set up things in order to see the PDF as it was in "PDF in AD in older projects" screenshot? I use Affinity 1.8.3 on Mac. Thanks for your help!
-
Hi guys, I just uploaded a new video about how to make an object floating in your photo. I hope you found this video helpful, thank you!
- 1 reply
-
- 3
-

-
- affinity photo
- how to
- (and 3 more)
-
Hi guys, I just uploaded a new video about how to remove anything from your photo. In this video, I will show you 3 ways of how I usually remove an object from a photo. I hope you enjoy and learn something new from this video. Thank you!
-
- 2
-
-
- affinity photo
- tips & tricks
- (and 3 more)
-
 Hello Designer! Check out my Affinity Designer Tutorial on how to use the corner tool and corner type with lots of tips along the way. Hope this helps
-
- 2
-
-
-
- affinity designer
- tutorial
- (and 8 more)
-
 Using Affinity Publisher on Windows, my panels suddenly disappeared. I can only see the Master page that I had open at the moment. I am not able to go to any of the pages in my document. It is not only the pages panel that disappeared but all the panels on the right are also gone? How do I retrieve them? What did I do to cause them to disappear?
 -

Affinity Photo Basics
Dan freeman posted a topic in Tutorials (Staff and Customer Created Tutorials)
https://youtu.be/ksG9BoNTdso -
https://youtu.be/uFhv1_qtpME
-
- 3
-
-
- ipados
- photo manipulation
- (and 1 more)
-
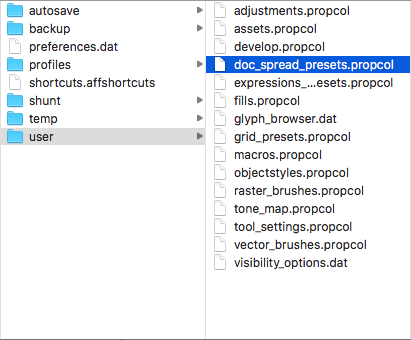
Affinity Store version: For Mac users - A) FInder > Go > Library > Application Support > Affinity (Photo/Designer/Publisher) > user > doc_spread_presets.propcol Mac App Store version: For Mac users - A) Finder > Go > Library > Containers > com.seriflabs.affinity(Photo/Designer/Publisher) > Data > Library > Application Support > user > Affinity Store version: For Windows user - A) > %appdata% > Affinity > (Photo/Designer/Publisher) > 1.0 > user > Microsoft Store version: For Window user - A) > %appdata% > Affinity > (Photo/Designer/Publisher) > 1.0 (Store) > user > For more information (https://forum.affinity.serif.com/index.php?/topic/98906-faq-what-exactly-do-the-clear-user-data-options-clear/)
-
 Apologize for the confusing post below, but this has been a confusing introduction to Publisher. Soooo happy to be using Publisher and not having to boot to an external drive running Mavericks just to get to Adobe InDesign 5.5. However, for reasons still not uncovered, Publisher has had serious and consistent crash problems since the beginning. I now see that Affinity Publisher is available on the App Store. When I purchased Publisher on original release day, it was only available through the Affinity website as a download. Going through other areas of this support forum (beta, bugs, etc.), one can find my numerous posts regarding consistent crashes. Currently, I have achieved a workaround to the crashes (generally regarded as a unique, user-oriented issue rather than the software itself). This workaround has me setting up a separate user account and using a beta build (1.7.3.475). The beta builds were suggested prior to the suggestion of setting up a separate user account. If you are confused reading this, believe me, I have been confused on my end ten-fold. No matter, at this point I am working towards updating my OS to Catalina and considering what to do about the user accounts, beta builds and basically consolidating everything back to a normal setup. In this regard, I am also wondering if I should (or could) be using the App Store version, although since I originally downloaded from the Affinity website, the App Store is listing Publisher as a purchase. How would it work to download from the App Store? I do have my Product Key and all the particulars, but don't want to be charged additional money. Just want to set Publisher up normally as I have with Affinity Photo (downloaded from the App Store) and hopefully delete this separate user account that has been preventing the crashes from happening.
 -
 In this Affinity Photo Tutorial, You will see, How to create Neon Glow Line around persons in Affinity Photo. In this tutorial, I used the Pen Tool and Node Tool for creating the line. I hope you like the video. Thanks #affinitytuts, #neongloweffect, #affinityphoto
- 2 replies
-
- 2
-
-
- affinity photo
- neon
- (and 3 more)
-
 Dear Friends, The actual reproduction of this design is not important, it more 'how to' tackle something I first thought was very easy but still can not find a good way to reproduce. Basically I can see 4 vector wavy lines each with a gradient falling away on one side that is consistent whether the line is rising or falling. Interaction between the lines can be taken care of by overlays or whatever, its really the process forming a line by either using gradients that follow the line or create a brush that will do the job. The concept can then be used on backgrounds, letterheads etc This is probably something I will kick myself about but at present I am baffled. Thanks for all your help, Graham
-
 https://youtu.be/YqrDl8k8tTg Is their a youbrew code for inserting YouTube video links ? Regards Rob
 -
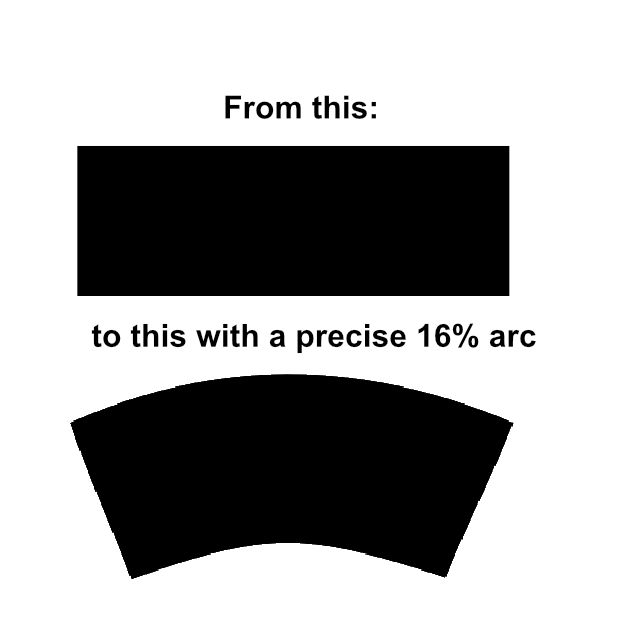
 I have template that I'm working with to create a tumbler wrap. It shows that after designing within the rectangle, that you need to arc the rectangle design 16% to have it correctly wrap. The only thing close to an arc option I've found is in photo with the mesh warp tool. I don't like this option of rasterizing and not having vector elements. I also don't see where it can be precise in creating the arc. Anyone know how to do this? Especially keeping the elements vector?