Search the Community
Showing results for tags 'Affinity photo'.
-
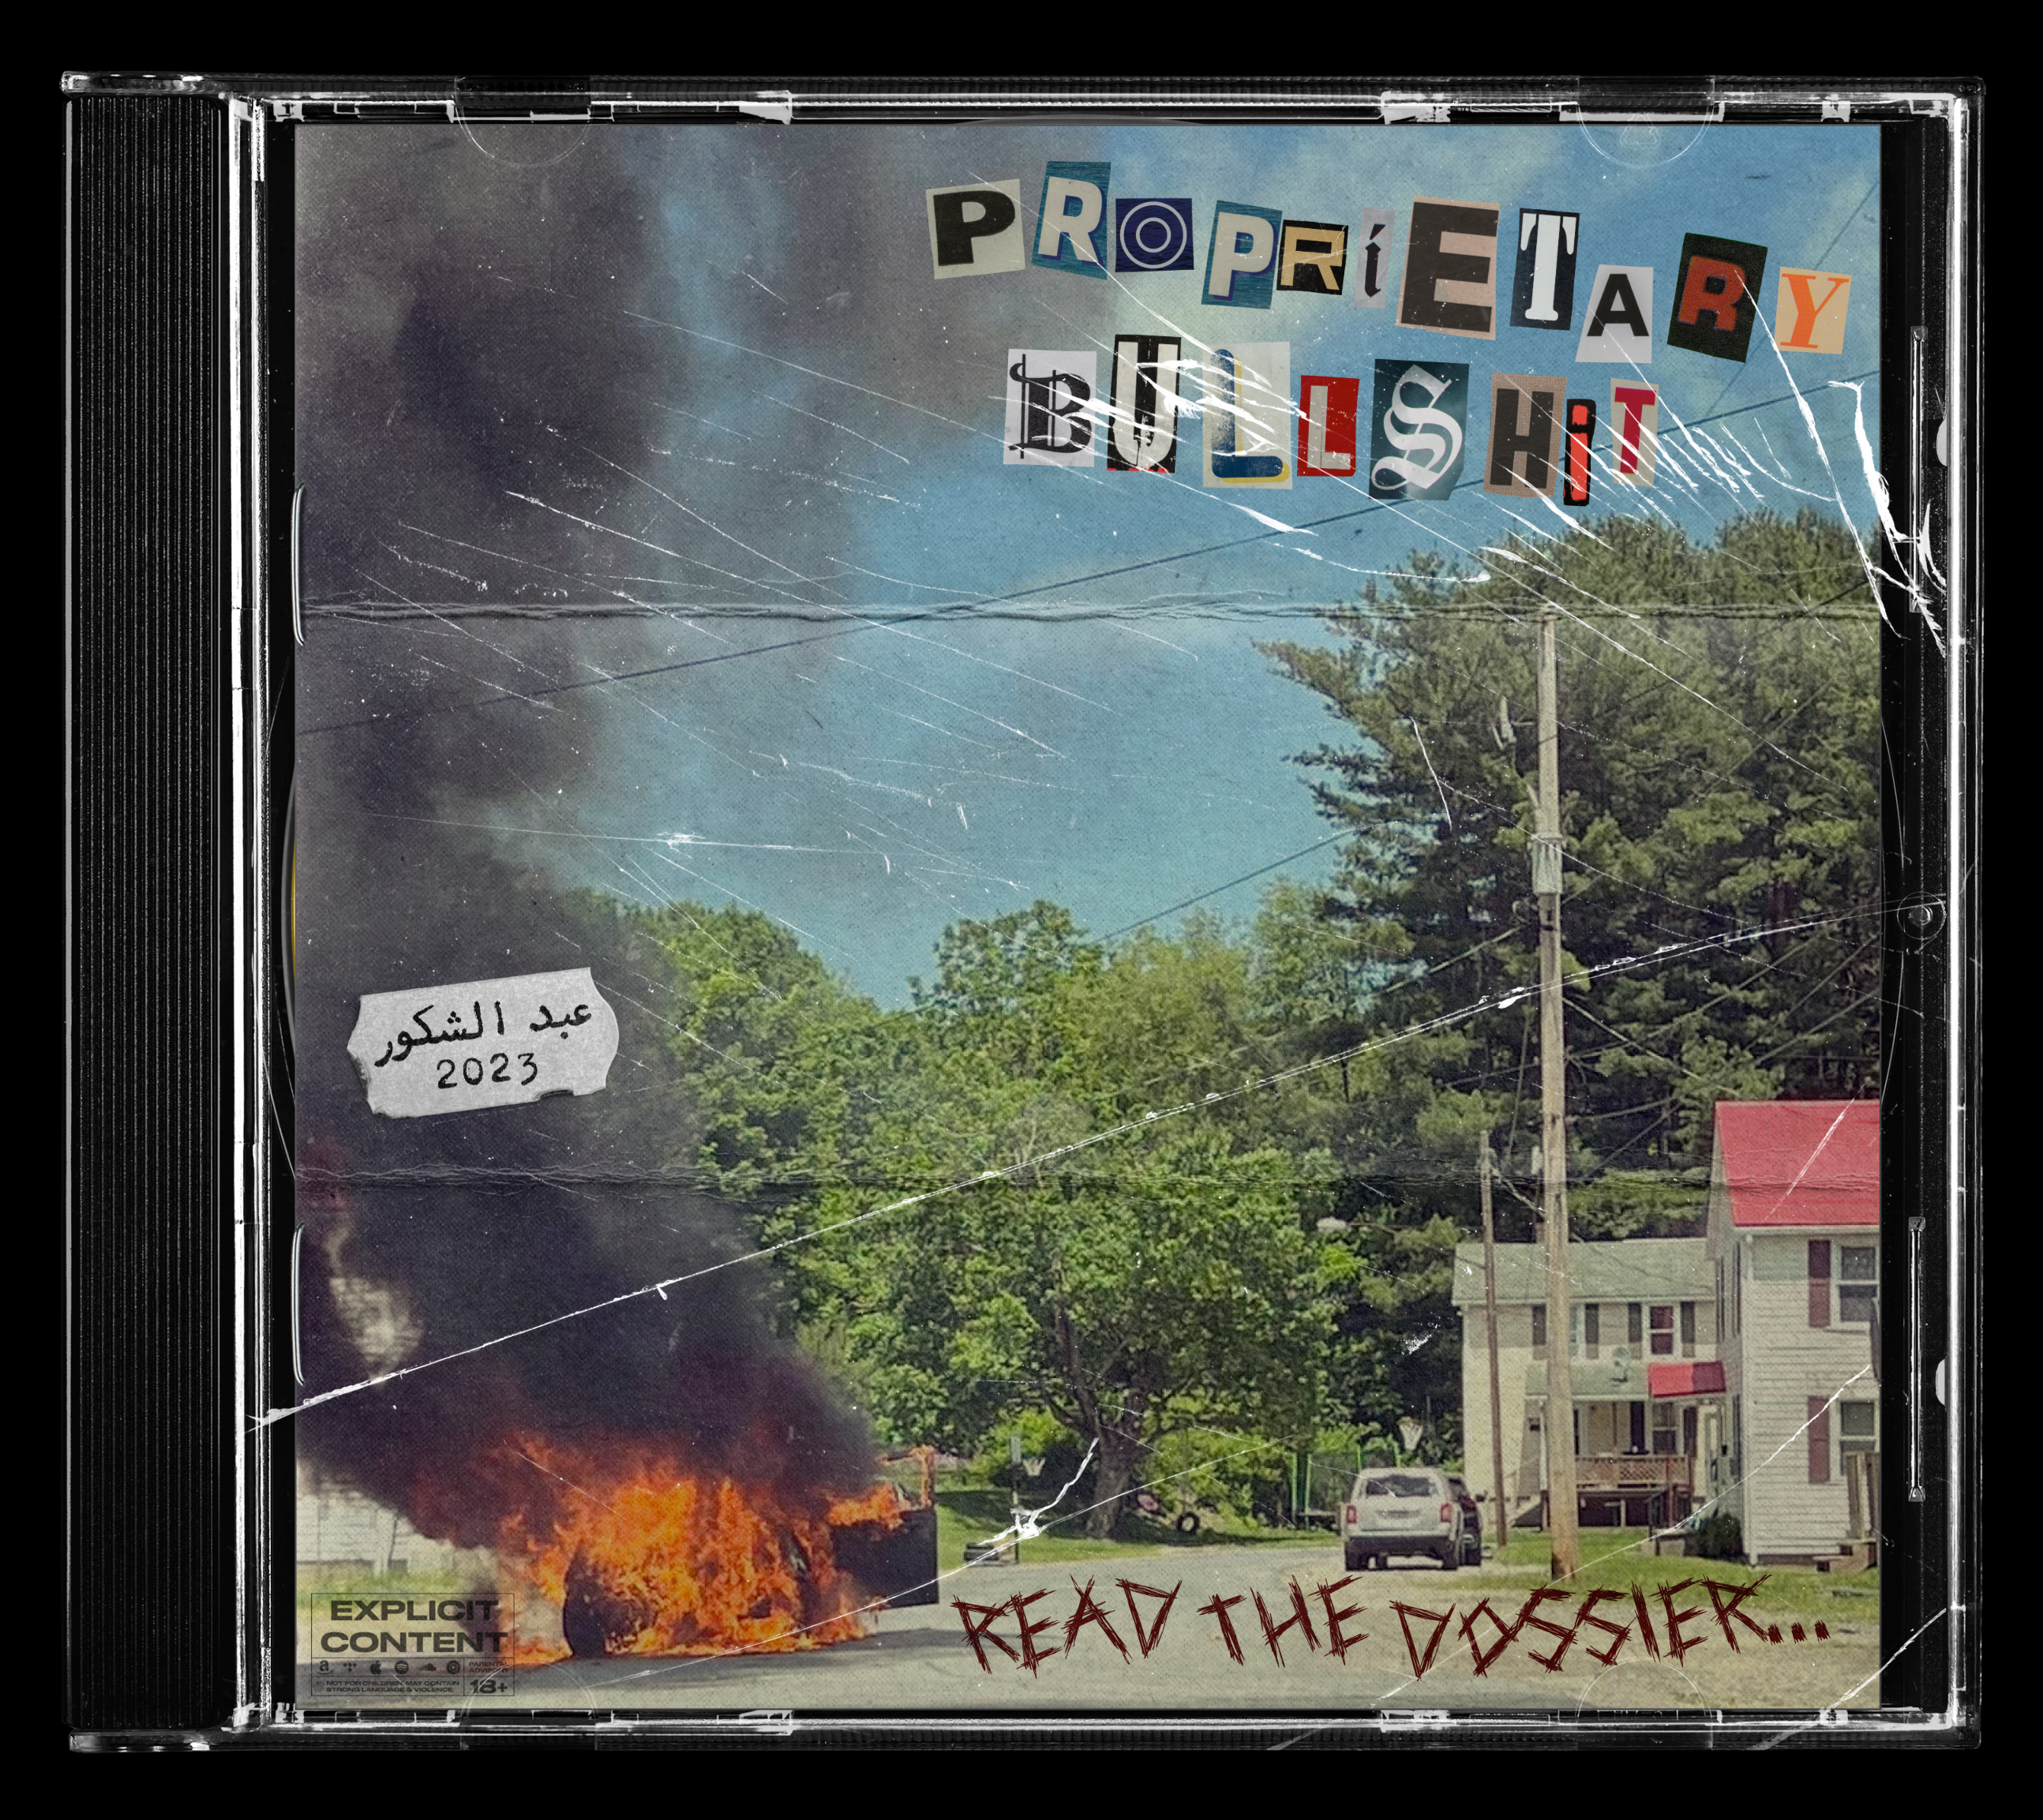
Inspired by the vinyl record centre label posted on Sunday I thought I have a go at trying to create a reasonably-decent vinyl LP. It’s not perfect by any means but it’s probably usable for most general one-off at-a-glance cases. I haven’t measured anything so the proportions are probably a bit off but it’s just for fun. (It looks a bit ‘smudgey’ at some viewing angles on my monitor so I don’t know how it will look for you.)

-
-
 Out of curiosity, I've dug out Version 3 of Knoll Light Factory, that was originally supplied with a Serif Photoplus bundle. Although it's installed, Affinity Photo doesn't recognise the plugin. Does anyone know if it's compatible with AP, and if so, how did you get it to work? (All my other plugins Like Nik Collection and Topaz Labs work fine) Thanks
 -
 Affinity Photo 2 macOS By pressing ctr + alt and dragging vertically and horizontally I can change the size and hardness of the brush. At one point, this behavior changed. The same keys served to modify the spacing and shape. I don't know how it changed. Closing the file and reopening it returned the modifier to its original behavior: from spacing and shape to size and hardness. Now I know that the behavior between the two options can be modified, but I don't know how. How do I change this behavior? Thank you very much. Grabación de pantalla 2023-06-06 a las 11.28.57.mov
 -
 Hi everyone, I’m fairly new to the iPad version of Affinity Photo. Is it possible to disable Anti-Aliasing for creating shapes? Being completely honest Affinity Photo for iPad seems like a great candidate for Pixel Art but that is getting in the way.
 -
Is there a reason why the attached PDF is imported incorrectly into the trio? (2.1) Acrobat opens it correctly. Sample_page.pdf
-
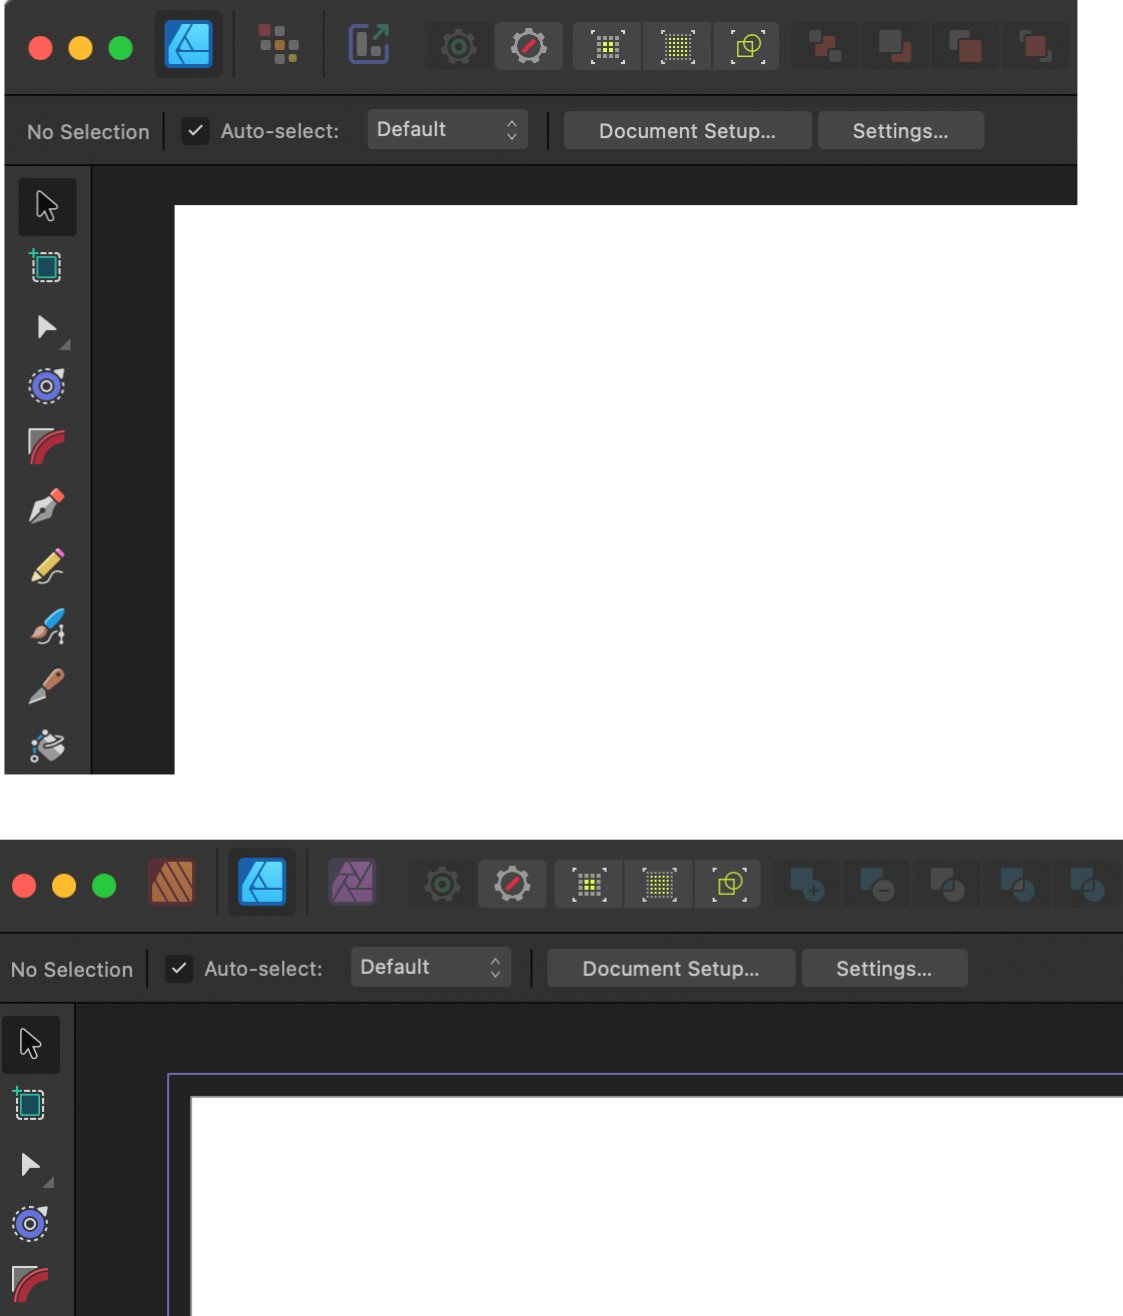
 The most I love application from Affinity is Affinity Publisher. I don't know much about Affinity Publisher like what it does and how it does. The only one reason I love about is It can open Affinity Designer and Affinity Photo. It is so much simple and very helpful. However, When I open Affinity Designer, for example, I notice there is called Pixel Persona and Export Persona but cannot see those when opening in Affinity Publisher. Just want to know whether there are differences between opening those application by itself and opening through Affinity Publisher.
-
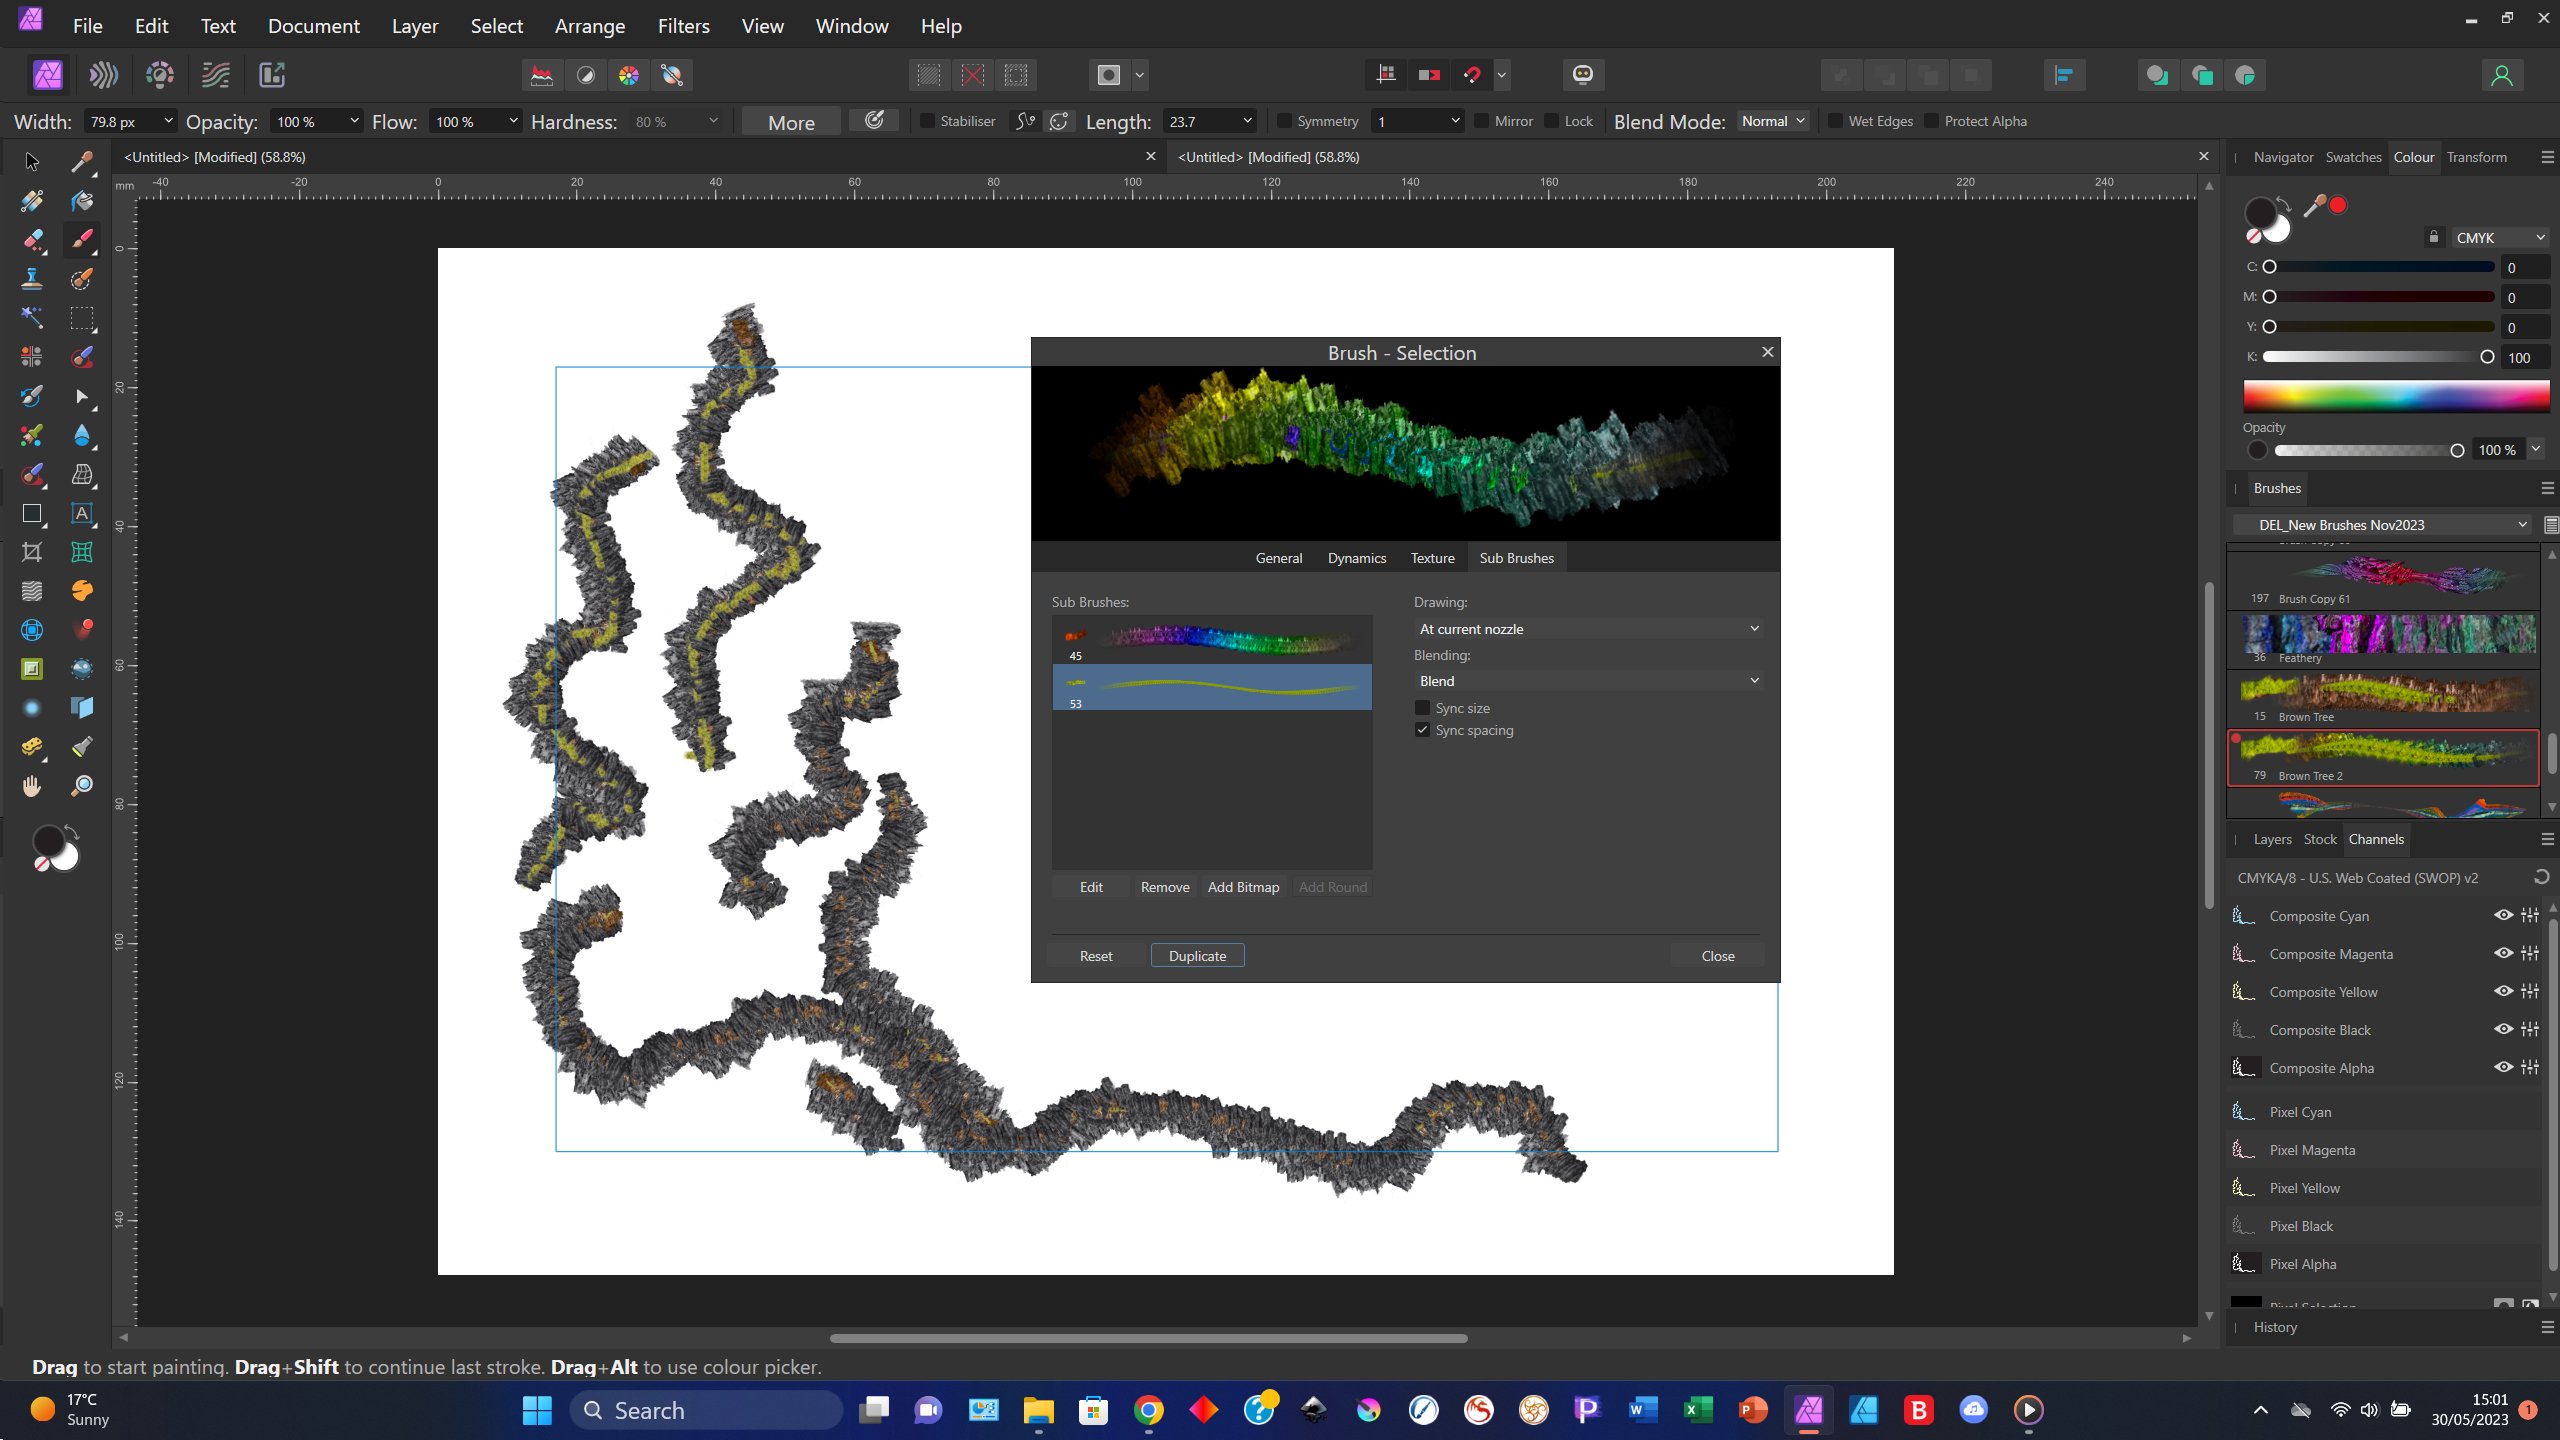
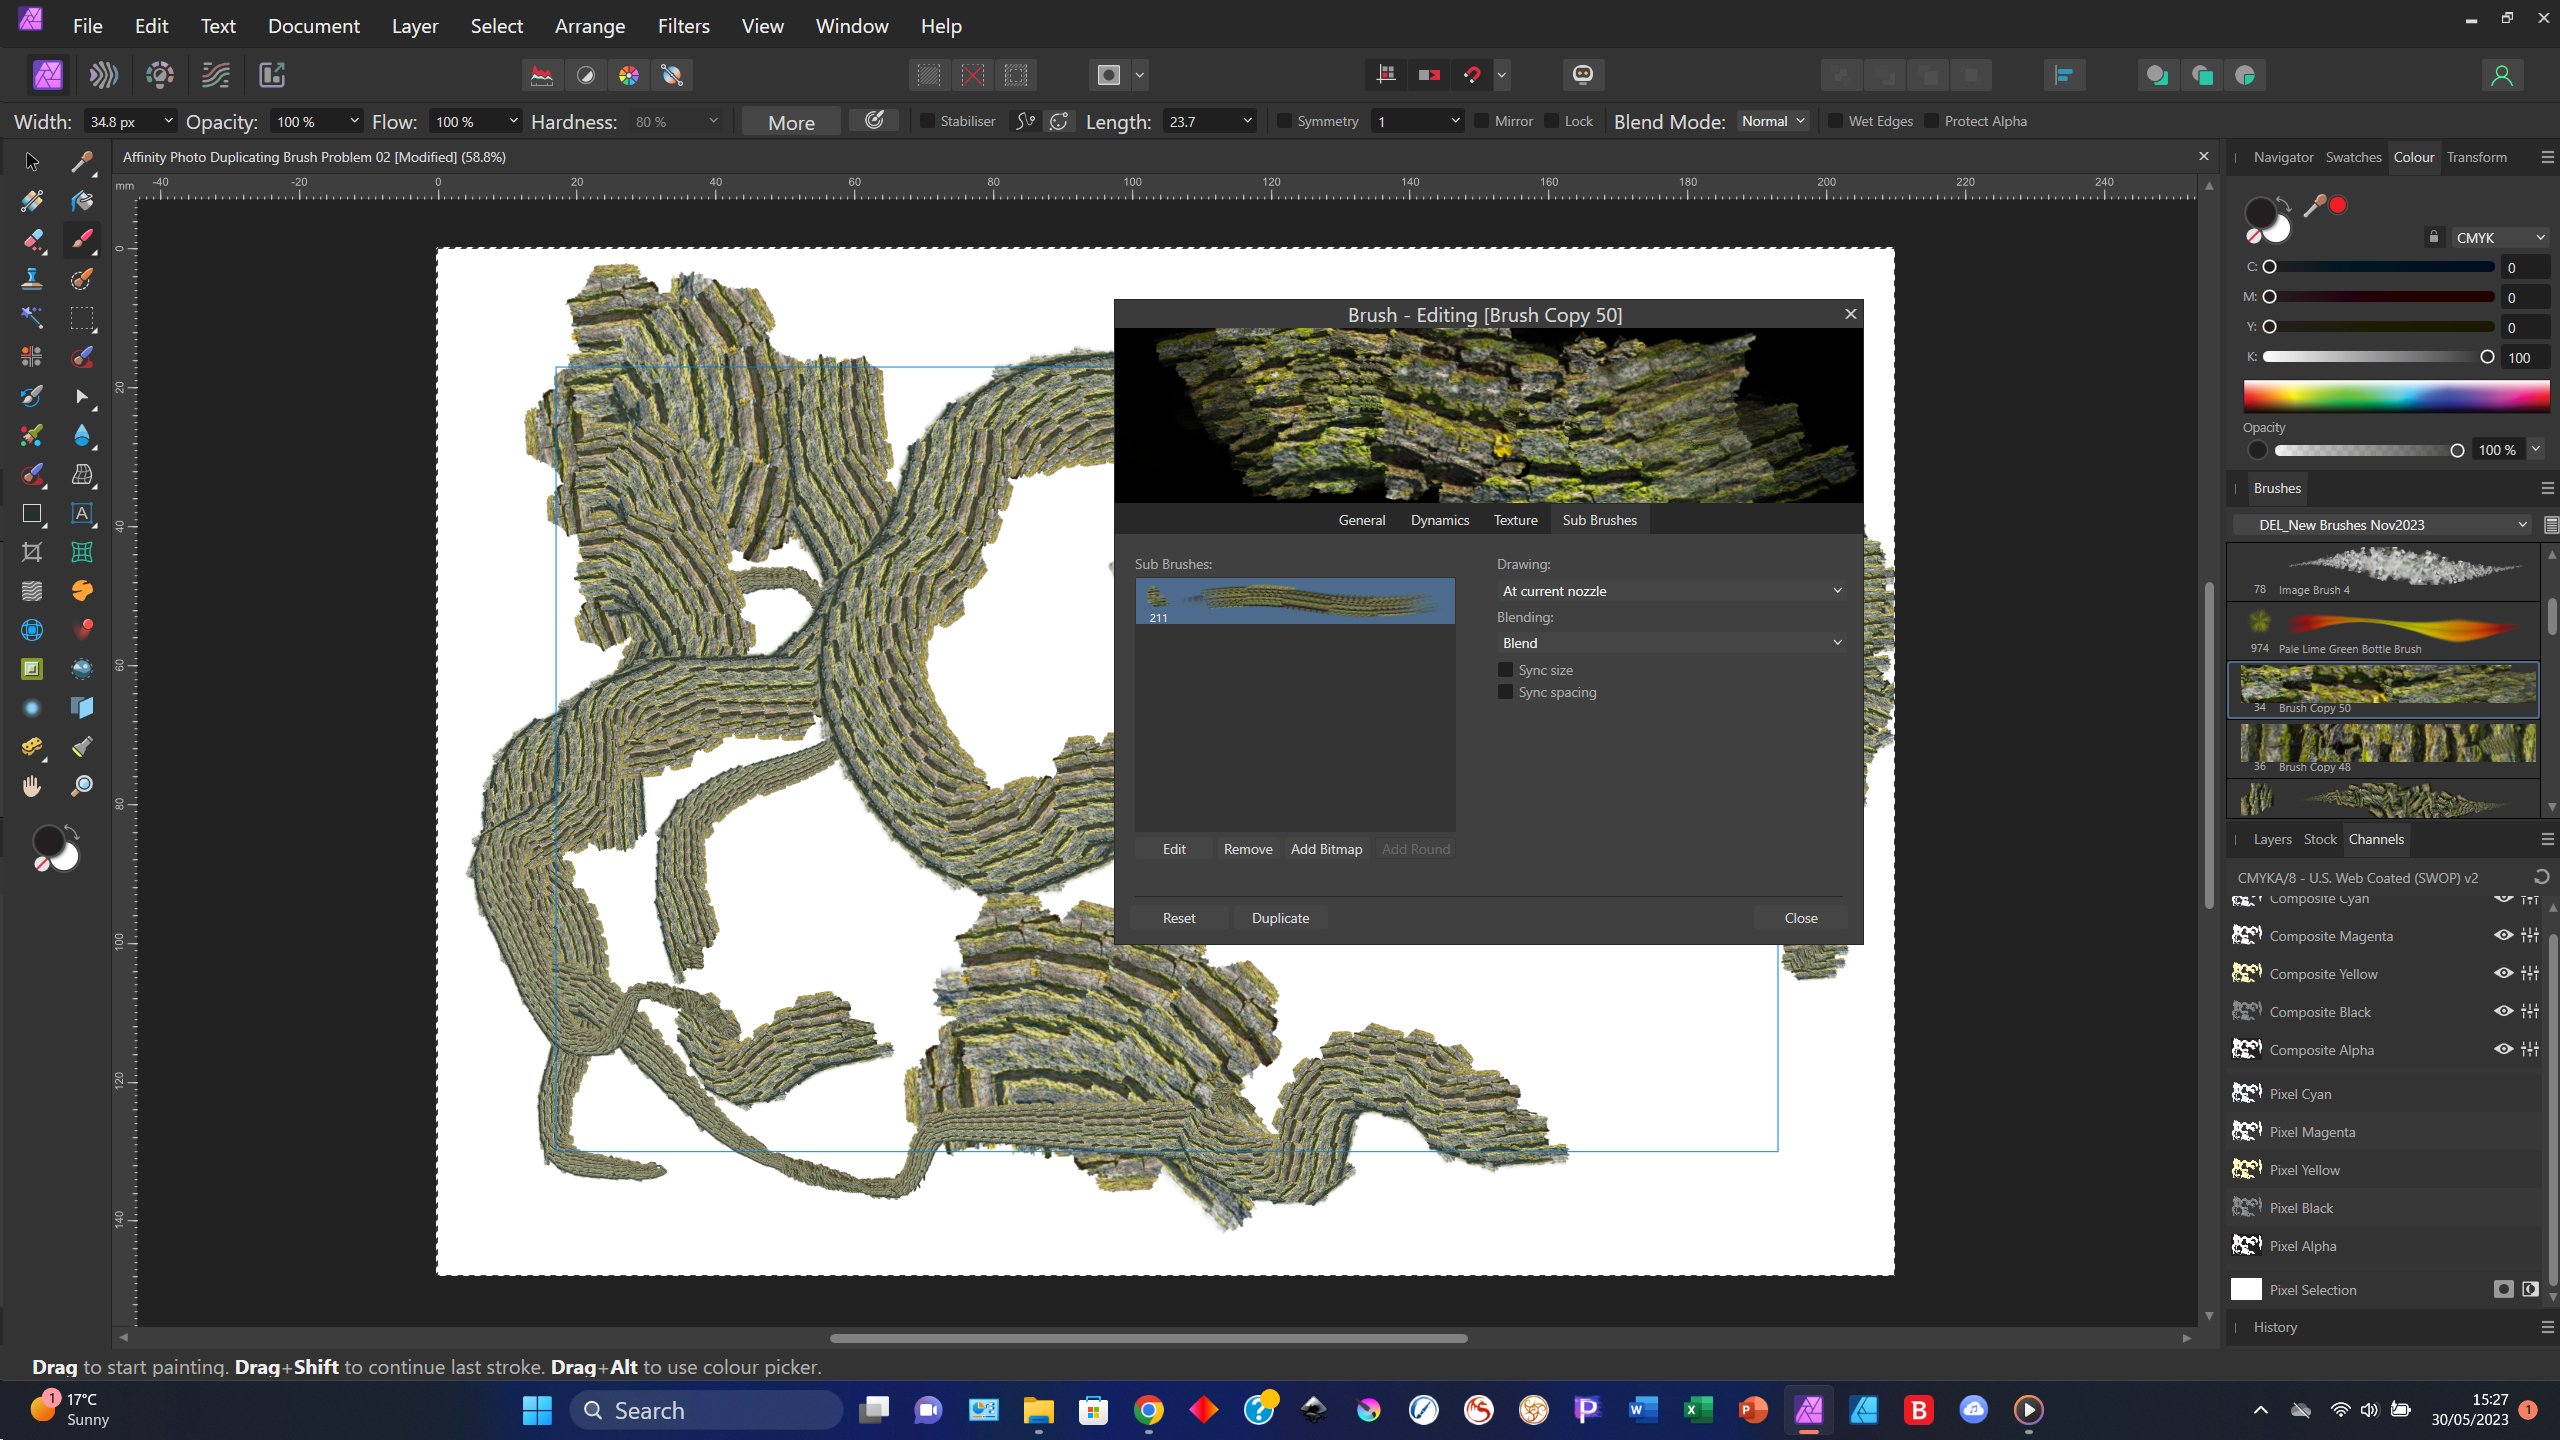
Hi, I wonder if you can help with an Affinity Photo v2 issue I am having... I am using Affinity Photo v2.1.0 I have been trying to amend a brush, then save it as a Duplicate, which I have done in v1 many times. But v2.1.0 won't duplicate the brushes that I create, so I can't save the new versions of the brushes. I am in an unsaved, new document. I am in the Edit Brush dialog box. I can duplicate a brush if I am not in the Edit Brush dialog box, but then I can't make the changes I want to make to the brush. I attach the documents, also the screengrabs. i can reproduce it as it happens every time I make changes to a brush and try to save it as a Duplicate. i am using Windows 11. I am just using a mouse, no tablet. What I do when it happens... I select the brush in the Brushes panel Right-click the one I want Click Edit Brush The Edit Brush dialog box is displayed Then I make the changes to the brush, add a bitmap, edit the bitmap, turn off Sync Spacing and Sync Size, then when I try to Duplicate it, I find that it does not duplicate the brush and I have lost all the changes because I cannot save them. Hope this helps. Thanks. Del Affinity Photo Duplicating Brush Problem 02.afphoto Affinity Photo Duplicating Brush Problem.afphoto
-
 Hi, I've checked around the forum and I've seen this question come up before, so I'll mention it again. Can we please have the ability to have "Save History with Document" as a default in app preferences. I like to have my history saved with my work so I can backtrack if I don't like something in the future, and often forget to click it before I save. Thanks!
- 7 replies
-
- 2
-

-
- preferences
- preferences panel
- (and 5 more)
-
When painting quick strokes with my Wacom (Intuos 3) I experience some unwanted straight strokes (as if shift button was pressed in between) and after a few ones the pointer gets stuck on the brush circle and the full interface, except the canvas where I can keep painting, becomes unresponsive. Keyboard shortcuts seem to work. Some times pressing Alt button "revive" the app, otherwise I have to make AP windows inactive some way. Conditions for this to occur seem to be: There are plenty of layers in the document (or at least the more the easier) Tablet Input Method is set to High Precision The problem doesn't occur setting input method to Low Precision and Windows Ink. Affinity Photo 2.10 (and previous versions) on Windows 10. High Precision.mp4 .
-
 In Affinity Photo my studio windows and panels disappeared, and I already checked if I had hidden the studio, but I didn't. Then I tried to just reset the studio but no luck there either. Could someone please help me? Thanks in advance.
 -
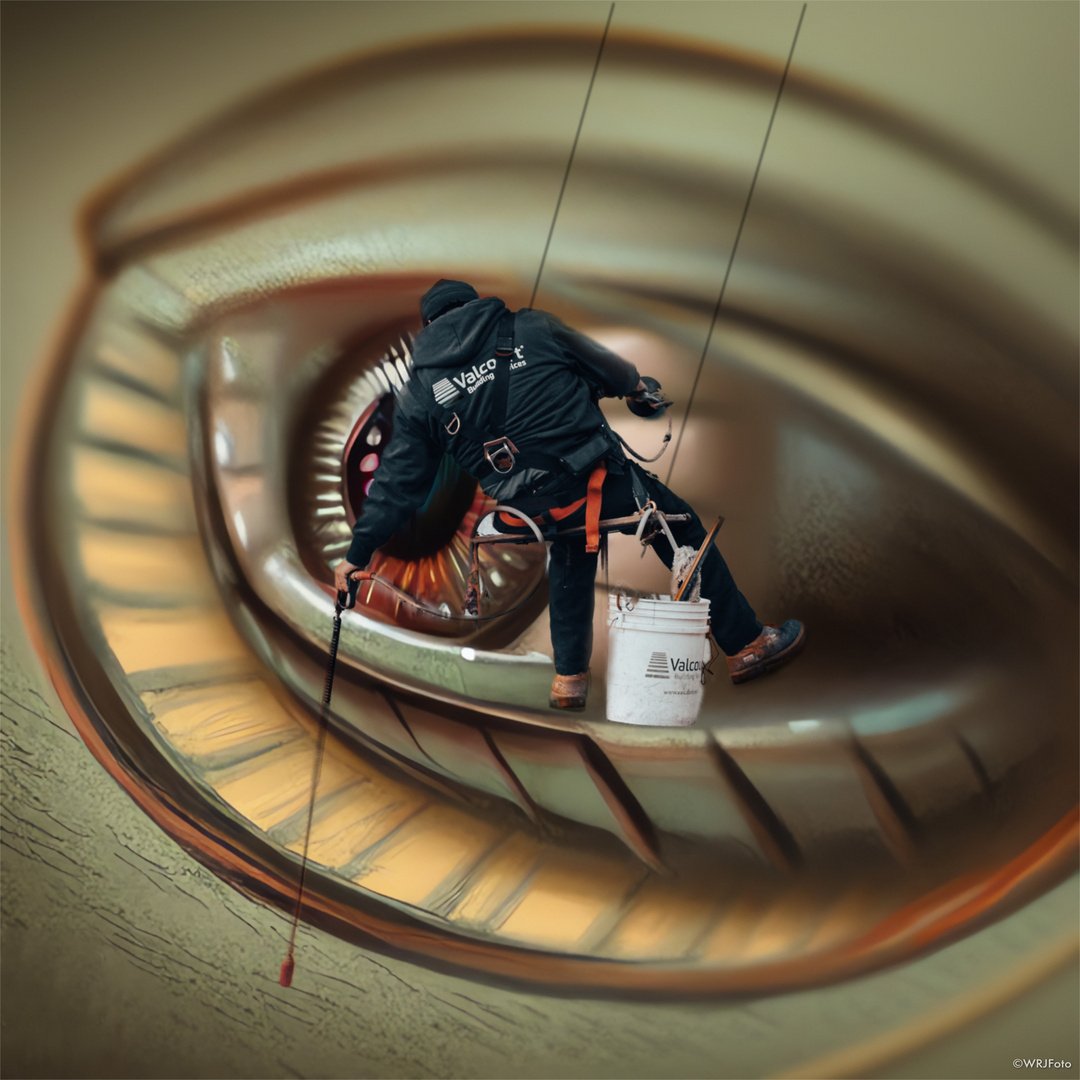
Composing with an AI generated picture and a stock photo from unsplash. Merging in Affinity photo
-
 When I load the attached TIFF file into AP 2.1.0, I only see black. However, this file has an alpha channel, and it should appear like a fuzzy black blob on a transparent background. I would expect that transparency to look like a checkerboard, like I see when loading the file in Photoshop.MetalPaint.tiff Please refer to the discussion here:
 -
Hello, When I load the attached tiff into macOS Preview or Photoshop, I see a transparent background. When I load it in AP it shows solid black. How do I get it to show the transparency? (Or, why doesn't it show transparency in the first place?) I'm using AP 2.1.0 on macOS. Thank you very much. Michael MetalPaint.tiff
-
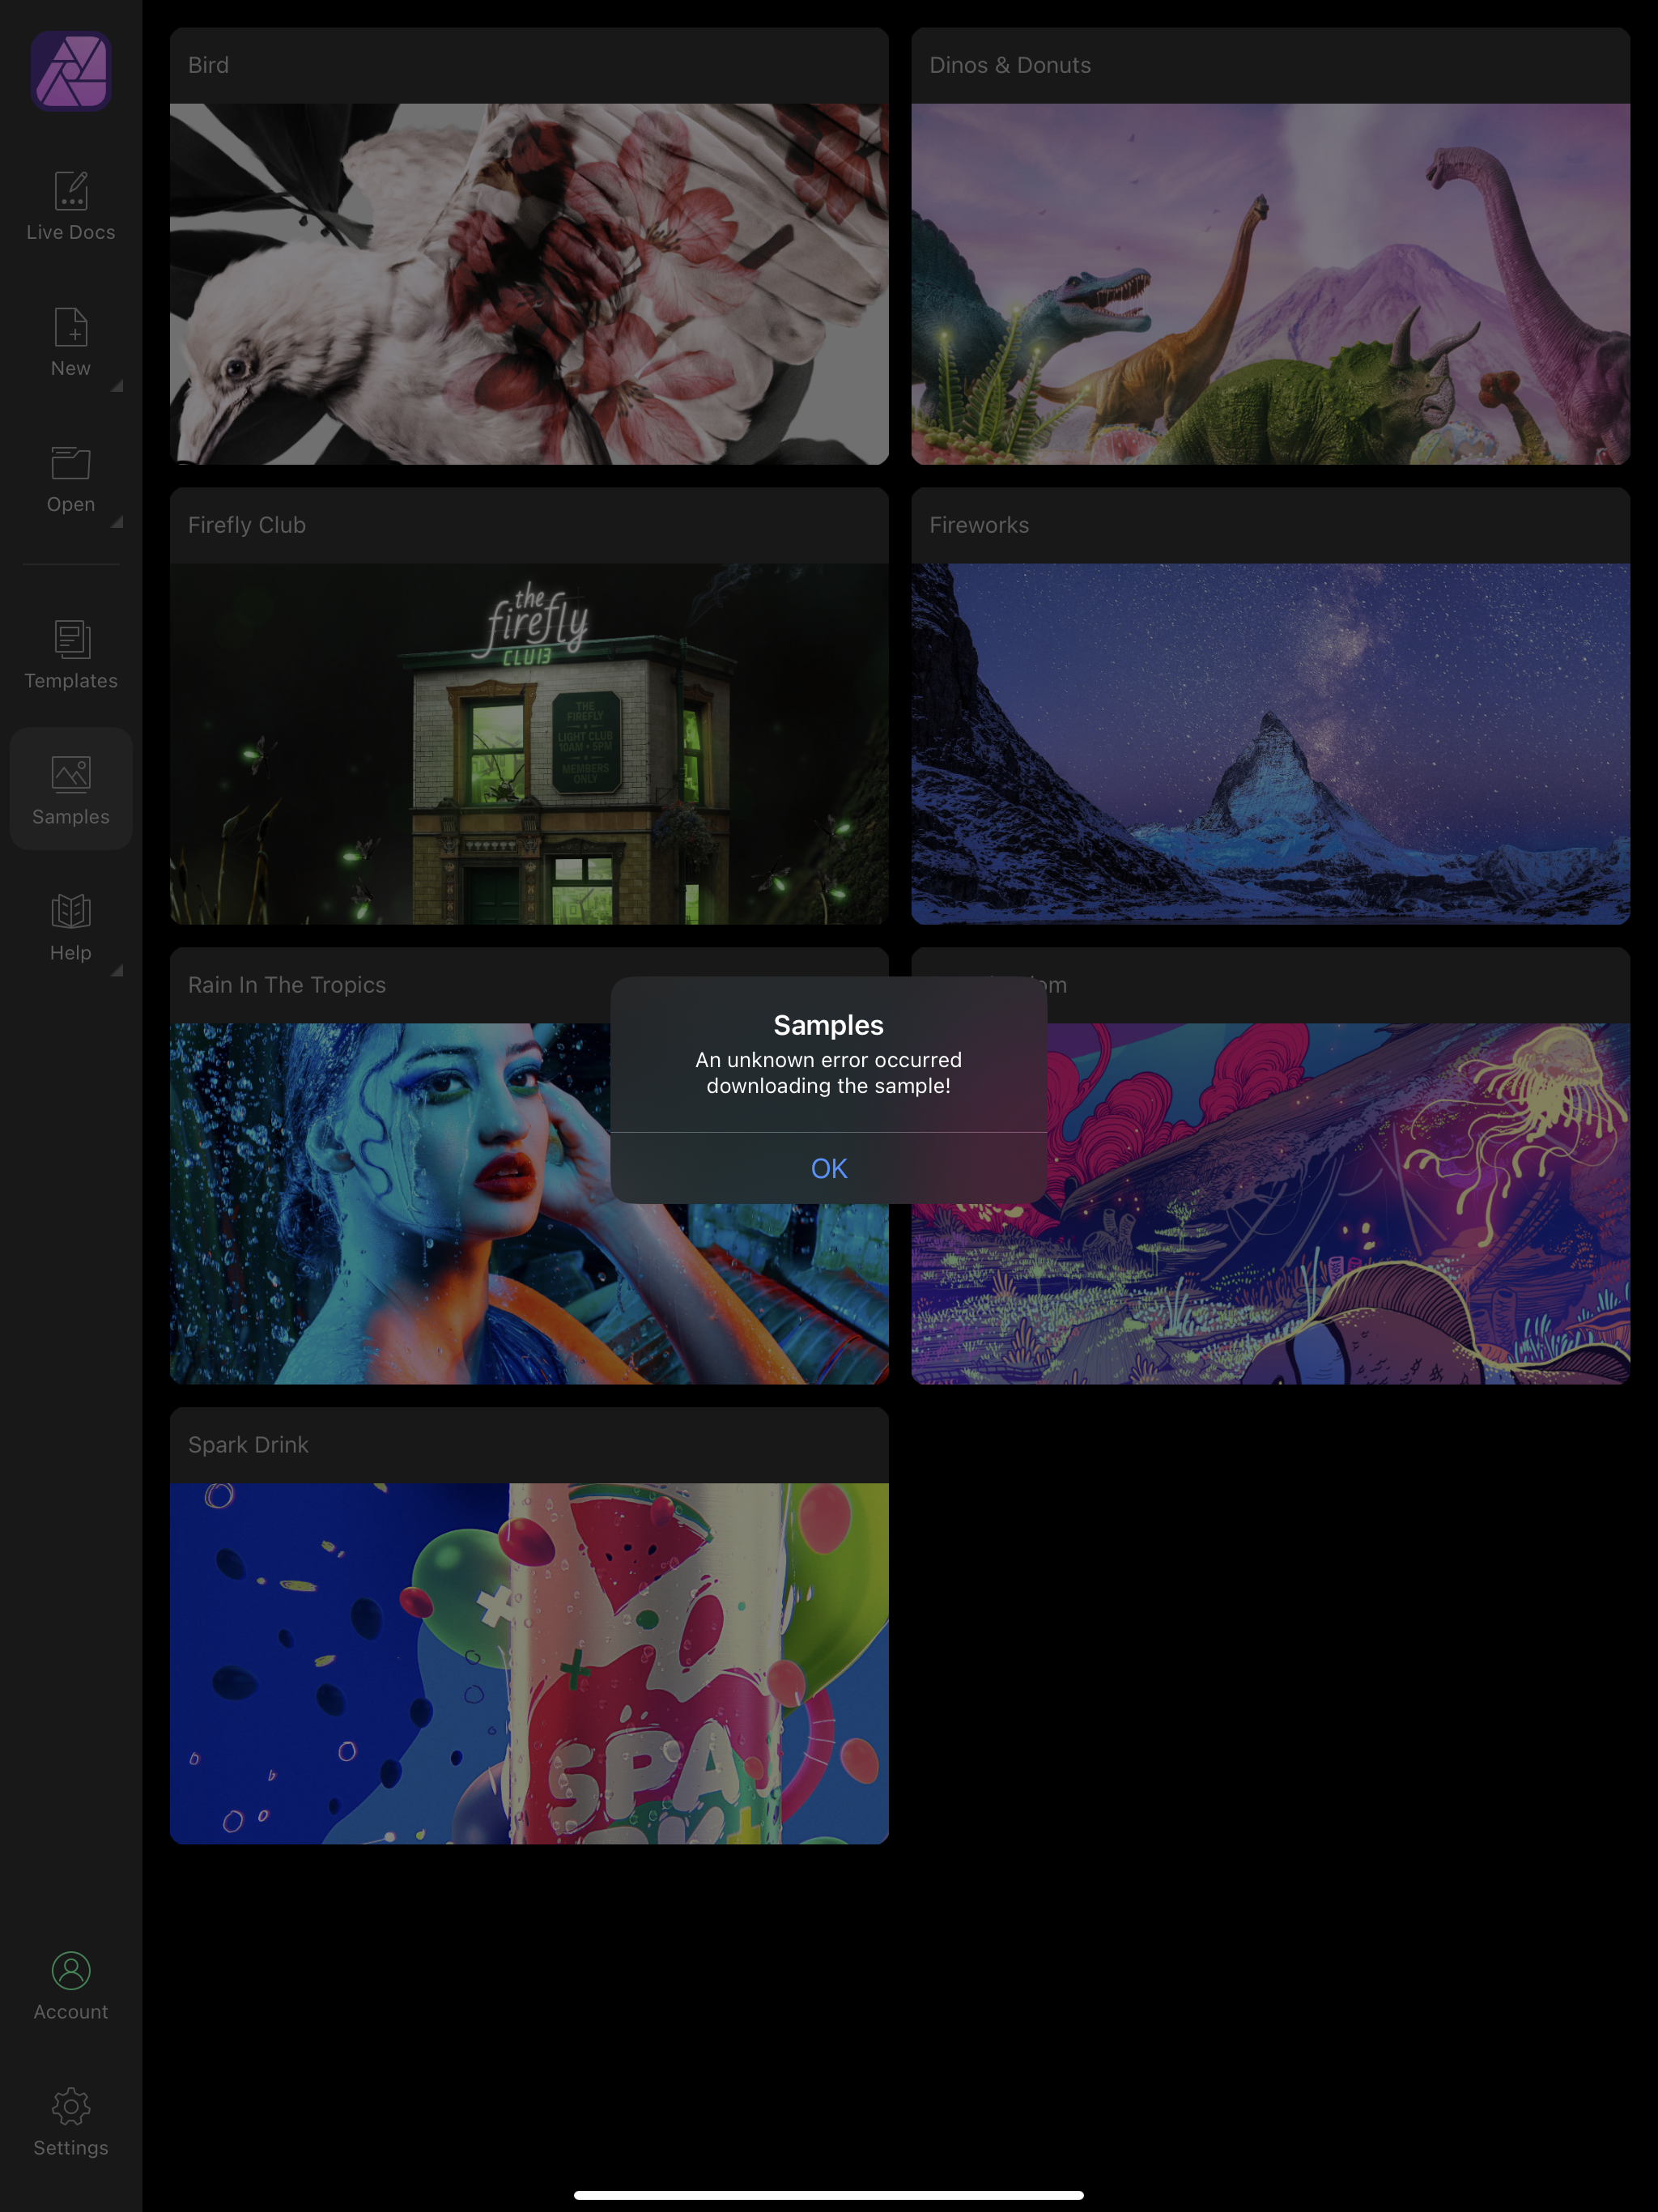
 Thought it would be a good day to start learning Affinity, but I can’t even open the sample artworks. I get the message that an unknown error has occurred downloading samples. Frustrating. I’m on an iPad Pro 12.9” with more than 100GB free. My internet is working. I have tried everything I can think of, from restarting the app to deleting and re-downloading. The app has been on my device since December when I purchased it, but this is the first time I’m trying to use it. Screenshot attached. I would appreciate it very much if someone could help. Thanks
-
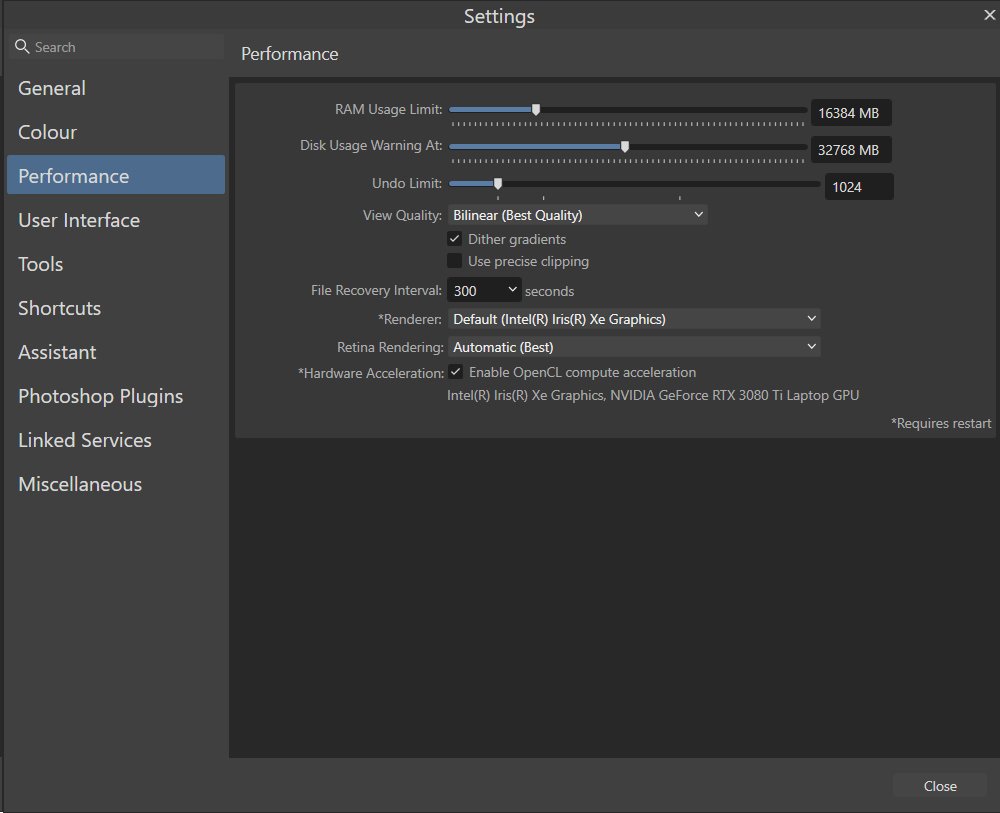
I made a post about this on Reddit and I was recommended to move over here instead. I'm playing around with the free trial of the affinity suite before jumping off the Adobe bandwagon, but I seem to be having an issue that I'm not seeing many other places. Mouse or tablet, I get this awful lag when trying to draw with the brush tool. Even with no other applications running on my desktop. https://www.youtube.com/watch?v=ytCJtuLRWhk (Unlisted example video) This computer has plenty of head room when using the program, so I'm not sure what the issue is. Other programs like Clip Studio and Photoshop work fine! I'm using a Huion H610 PRO V2 tablet, in case that helps. My Specs: 32 gigs of ram, Ryzen 5 5600X, RX 580 (8 gigs) Solutions I have tried: Disabling Hardware Acceleration Changing the Retina Rendering Increasing the RAM limit Reinstalling the program
-
Now the same problem happens in the 2.1. release. Very bad I lost all my settings ... :-(( https://forum.affinity.serif.com/index.php?/topic/185766-cant-save-curves-preset/
-
 Here's a contribution in case it's possible to add it as a future feature (Affinity Photo and Designer) "It would be interesting if they would allow the use of brushes and tools like the eraser with the pen tool in Affinity Photo and Designer, using paths as Photoshop currently allows. I hope this can be understood with this video." "All the strokes were created in Designer, and the final file was exported to PSD for use in Photoshop." "There are brushes obtained from external sites in .abr format that one would like to use, but it is not currently possible to use them in Affinity applications with the pen tool." (Photo and Designer) Video Suggest.mp4
- 1 reply
-
- 1
-

-
- new feature
- affinity designer
- (and 3 more)
-
Hi all ! There are 4 essential things missing: - The possibility of rotating a document with a keyboard shortcut (which can be configured), but it is not always possible unfortunately. - The ability to select the element and have it select the whole subject like Photoshop (but I wish you were better and more powerful than Photoshop). - Saving a mockup in PSD and when you drag the PSD file, it becomes all white or all black. No visibility of a layer, rendering, nothing! It's time to fix this problem. The only thing possible is to save as an Affinity Photo file to work on it again. - AI recording is missing. - It lacks the ease of selecting vector elements, at the moment it's not as simple as Illustrator and it's annoying ! There you have it, the list of missing duggestions to add.
-
Hello, these are some title pages from web site shopping mall product presentations created in APublisher. Thanks. https://www.behance.net/gallery/170509823/Graphic-Design-Product-pages https://www.behance.net/gallery/170510013/Pen-Case-Graphic-Design-development
- 2 replies
-
- 2
-
-
- affinity publisher
- affinity designer
- (and 1 more)
-
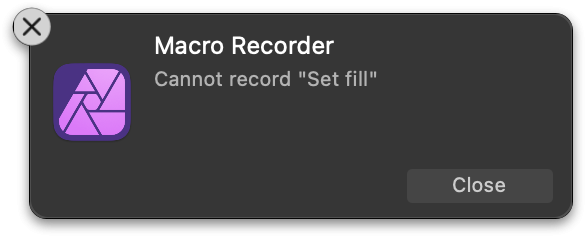
 Hey everyone, This is a bit niche and I have not checked if a topic like this already exists. What I'm looking for is a compatibility guide with workarounds for creating macros. For the past few days I have been trying to create macros but keep getting stuck because its so unbelievably cumbersome. One big PIA is the level selection. It’s a mess with all its confirmation prompts – just select the damn level I clicked on already! Anyway, I already got used to that by now, that’s not the issue. These two are my current questions, and I haven’t found a solution for it, maybe some of you have ideas? Creating a fill layer and changing its colour It's just not possible, you'll get this warning and the colour will be reset: Select all (as in an unspecified number) layers (to group them or similar) There's no keyboard shortcut or menu item that does this, as far as I know. Anyway, for some reason I didn't notice the option in the menu. It even has a shortcut! 🤦♂️ Solution: Select → Select all Layers or ⌥⌘A Do you have similar questions? Is there maybe already a place where questions like these get asked and answered? Does someone know how to get these operations to work or how to work around them? Have a nice weekend Dennis
-
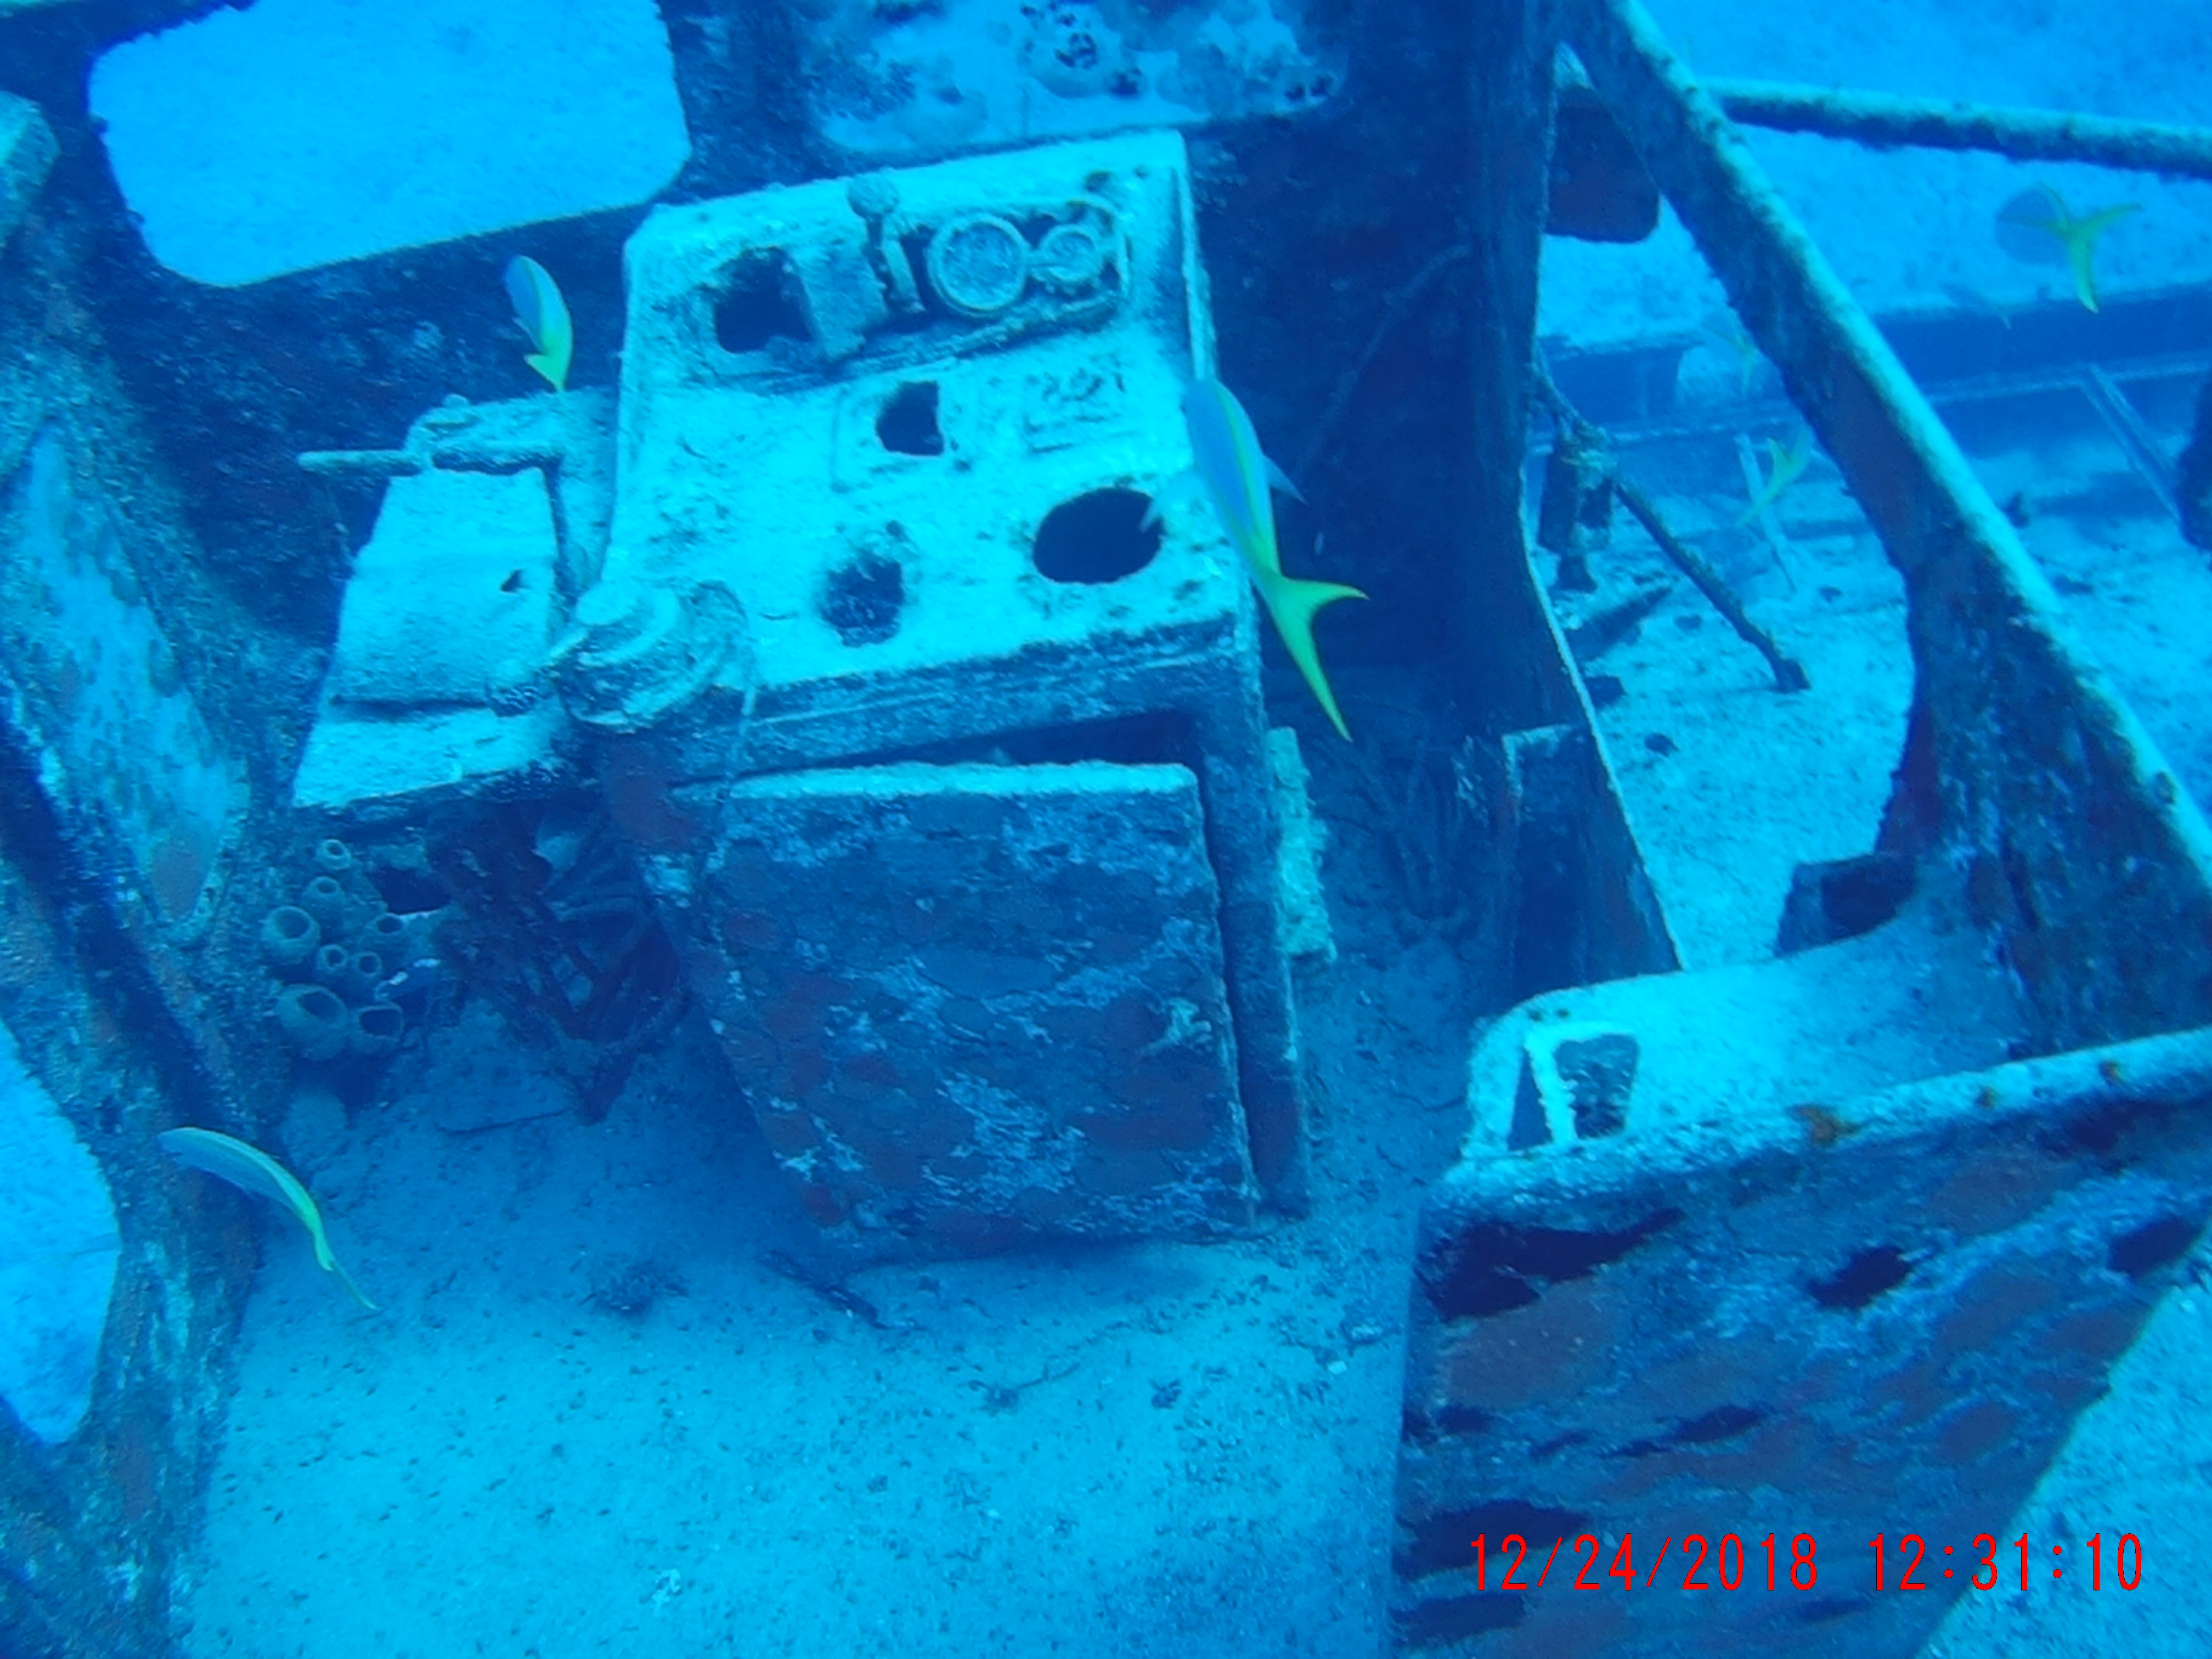
 Greetings, I know what you're thinking - "this guy didn't search the forums before posting"…. I actually have been researching extensively for several weeks now, including several similar posts in this forum, and I've concluded that either my situation is unique or I'm just more dense than your average user (these may not be mutually exclusive lol). So, as the title suggests, I am searching for guidance on color correction on underwater photos. I'll preface by stating I am NOT a photographer, so my knowledge of post-processing technique is frustratingly minimal. It is for that reason that I had previously just written off my failures, just accepting really dismal diving photos. That changed when I was recently introduced to an iOS app called "Dive+". On a whim, I decided to run its color correction function on several shots I had on my phone, and I was blown away by the results! In more than one case, I actually "discovered" fish and corals in my photos that were previously invisible! The ease with which the shots were transformed has inspired me to re-visit touching up many of my underwater shots, but as you can imagine - iOS is certainly not the best or most efficient environment to do it. Re-visiting all the tutorials and articles on the topic, however, has brought me right back to where I began - slightly less crappy photos and a lot of swearing. It seems the majority of the methods described in tutorials (even those for photoshop or other editors) just don't produce similar results for me as they do in the examples shown. For instance, the vast majority of underwater correction guides suggest beginning at adjusting white balance. In the examples, adjustments produce immediate color and contrast improvements, while my photos simply turn from "all blue" to "all green". Additionally, suggested techniques using levels invariably begin with minimizing black levels and maximizing white…. In all my photos, these positions are already selected (and moving them in opposite directions only worsens the output). While I'm certainly willing to tackle a mild-to-moderate learning curve, I have no aspirations of professional photography. What's nagging me is the ease with which this free phone app is able to drastically improve my photos, as well as my inability to determine exactly HOW it corrects the images so I can replicate the process. Below is a random photo from my collection that I hope will better clarify what I'm attempting (and failing) to achieve: This is my original photograph: This image shows the output from the Dive+ iOS app: Applying "Auto" White Balance to the image in AP makes no discernable difference. When manually selecting a neutral area (white dot indicates the area I selected) using the white balance "picker" as most tutorials suggest, a green overlay appears as shown below: This final image shows my sliders for the Levels adjustment layer. Note that the sliders for black/white levels are already at opposite extremes, negating the ability to adjust in the way most tutorials have suggested. The sliders for master/red/blue/alpha all have identical positions. I've attached the original photo in case anyone is feeling gracious enough to play around with it. The edits described above are certainly not the only ones I've tried - I've been playing with pretty much every setting I can find in photo, develop, and tone mapping personas. While I am able to make some minor improvements to my underwater shots, they still don't compare to the difference I get with one tap on the iOS app. Furthermore, the results are very inconsistent compared to the app. For instance, I have freshwater dive photos that have a green saturation in place of the blue shown in this example. Results from the app on those photos are equally impressive, yet the only similarity in my manual edits is the lackluster result. I'd love to know what type of algorithm this app is using so that I can create some type of similar macro or workflow for editing in AP. Heck, I'd even gladly pay to add Dive+ to my workflow if it were available on the desktop, but it is iOS/Android only. If anyone can offer guidance on what I'm doing wrong, or direct me to any tutorial resources that are Affinity-specific, I would greatly appreciate it! Sincere thanks in advance for any advice you have! Best, Kirk ***NOTE: I have no affiliation with the Dive+ app, nor any software mentioned. It is not my intention to present Dive+ as an alternative or competitor to Affinity Photo; my impression is that the latter is a much more capable product in the hands of a knowledgeable user (which I am obviously not!).
-
Hey all, Is this behaviour intentional and if so, why is there no difference between the content types? Scenario: I'm working on a design I started in Designer with multiple artboards. I decided to add some pizzazz with a raster brushes on a designated pixel layer – either in Designer's Pixel Persona or via File → Edit in Photo (either works, behaviour is the same). I add a pixel layer and draw something. I realise that I have made a mistake and want to clear the layer and start again. I usually do this with a short succession of shortcuts: ⌘+A (in the History palette this is called »Raster select all«) to marquee the whole (visible) canvas and backspace or delete/⌦. Expected Result: The (visible) content of the pixel layer is removed. Issue: In my case, for some reason, the shortcut ignores the fact that I am currently working on a pixel layer, and instead of creating a marquee selection of its contents and deleting it, it selects the parent pixel layer itself and deletes it. Now this might not be a big deal if it's a single layer, and you might argue »Why don't I just delete the layer and create a new pixel layer (⌘+⇧+N)?« And I'd say »Sure, that might work for single, regular layers.« The real problem is that this also works (or rather doesn't work) for linked pixel layers. If a single linked layer is deleted, it's not so easy to fix afterwards and involves copying, pasting, positioning if you've placed them in several different groups, shapes and so on – a bit of a PIA. I also considered »Invert Pixel Selection« (Select → Invert Pixel Selection or ⌘+⇧+I) as a different approach, as this works with photo documents. But to no avail. But I've noticed that this behaviour works for new documents, so I'm not sure why it doesn't work for my existing document. Any help with this? Am I doing something wrong? Is the document somehow corrupt? I’ve attached my document, feel free to try the scenario, try to select the whole pixel layer content and delete it with the designated shortcuts while maintaining the linked layer/s itself. Cheers Dennis Raster_select_all_bug.afdesign
- 5 replies
-
- 1
-
-
- affinity photo
- affinity designer
- (and 6 more)
-
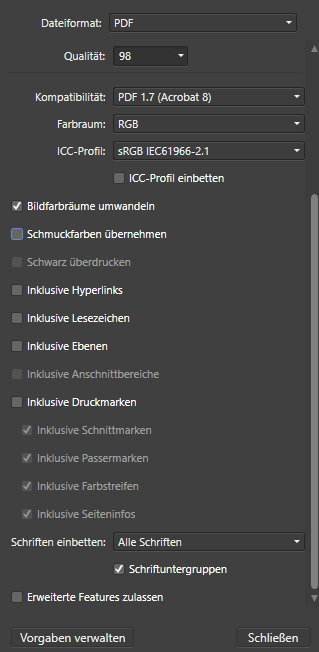
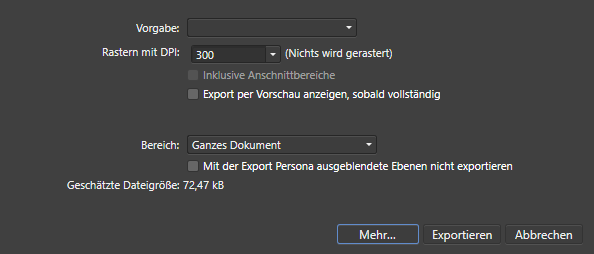
 Hi there, today I came (again) across a weird phenomena. I blacked out some parts of my current bank account statement. To prevent, that the recipient is able to remove the black bars by simply importing the document into a program like Affinity, I exported the PDF using these settings: The part "Inklusive Ebenen" means "Including Layers". Unfortunately, the exported PDF still includes all layers and hence the function seems not working. Is there anything I do wrong, or is this a bug? Version Number: 1.10.6.1665
-
 I've been encountering a recurring issue with RAW development, but the issue happens inconsistently and seemingly at random. After loading a RAW file, I make some of the color and lighting adjustments I want to make to the file. But then I click "develop" and the edits are not preserved, leaving me with a developed image without any of the RAW edits I made. I use the same process for developing images every time, but the results have been inconsistent. Perhaps I'm experiencing a PEBCAK problem, but I'm not sure what exactly I would be doing wrong that causes inconsistent development results.