CartoonMike
-
Posts
453 -
Joined
Everything posted by CartoonMike
-
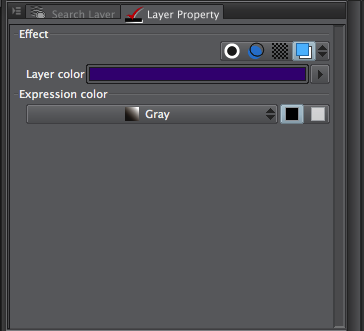
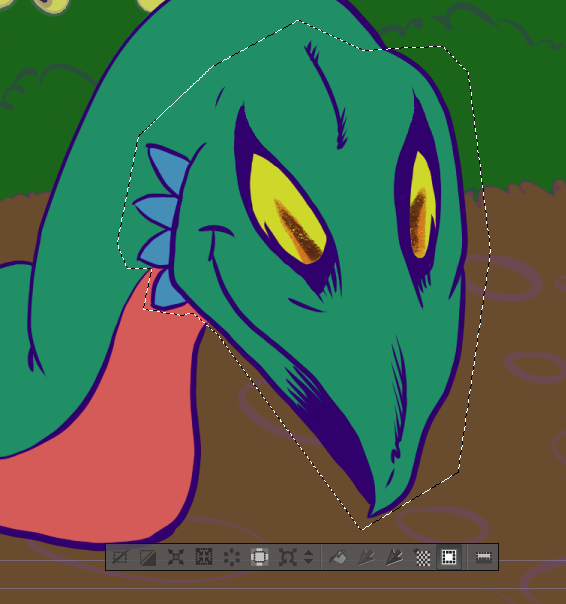
Thanks for the reply, Andy! The problem with the Overlay fx and the Recolor Adjustment is that it doesn't seem to change black strokes or fills. I've attached screen caps of how the Layer Color Effects work in Manga Studio. The Layer-color-fx.png image shows the layer properties palette. The highlighted button on the top row, all the way to the right, is the single button that's clicked. Below the row of buttons is the color swatch that can be clicked on to change the color effect. The next image cuddles-color-fx.png shows this color effect in action. The top copy has it turned on, the bottom copy doesn't. See how the black strokes and fills are a darker (but not black) shade of blue. If this was in AD, those strokes and fills would still be black. I haven't found the "recipe" to do this in AD, yet. What I've been doing is just dropping the opacity down on layers I'm not working on, but changing the color would be better as then I won't be seeing ghosts of everything. If the Color Effect/ Layer tint could work like an analog artist's tracing paper, only in this case in additon to the original artwork being lightened by the tracing paper, it's also tinted by the selected color. Maybe a new class of FX? Tinted Tracing Paper, perhaps? Again, thanks for the reply and assist. Hope I've been clearer about this suggestion.

-

Gradient along strokes
CartoonMike replied to antonkudin's topic in Older Feedback & Suggestion Posts
This could be a great feature. Create a gradient with 5 colors with the fifth one being mirrored on the beginning and ending of the gradient, then create a star shape and with just a bit of tweaking, a star with a rainbow stroke that has the pure color at each point. To quote a philosopher in this summer's movie of the year: "oh yeeaah." -
This is something that Manga Studio has had since it's US debut (version 3.x). It currently called Layer Color Effect. What it does is automatically tints the layer with a color. It defaults to a Non-Photo bluish color. The same effect can be done in Photo editing apps by creating a color screen layer and filling it with a color. However in Manga Studio it's a non-destructive and non-creative (meaning that no layers are changed or created in the operation of the effect, like with animals in TV and movies :D ). When it comes to doing this to a layer that contains curves and closed curves that have many colors and gradients, it just tints the contents of the layer with the color as if the layer is transformed into grey-scale with the color subbing for black/grey. While this isn't an isolation mode, it allows me to create many layers, color-code the color effect (blue are roughs, teal are pencils and mocha are finished pencils). I can see ways that this could be useful in Affinity Designer. When hand-drawing letters I can have the layer that contains the curves of the letters be one color and then work on the artwork and not be so distracted by all the black lines of everything. Then with a click of an option, the effect could be turned off (on a layer-by-layer basis) for final export/printing. Personally, I would use the heck out of this feature, I could "drop" other layers into the background and work on one that doesn't have the color effect or work on the only layer that has a color effect turned on. This also could be a great way to create duo-tone illustrations. A number of comic artists (like Cameron Stewards Sin Tulio [<-- I think I spelled it right], for example) use this feature in Manga Studio for the final art.
-
I would prefer a separate product, but linked to AD as the roadmap suggests the photo and publisher apps will be. If it was included in AD as a persona, it would just be "there" and not used by me at all except as a novelty/toy kind of thing.
-
Fun thread to read, but basically nothing more than a wouldja-couldja collection of opinion posts. Here's mine. IMHO, Affinity Designer being Mac only is what it is. If the usability and feature set (even in its 1.x incarnation) is any indication, a metric ton of thought was put into the app and the direction of development. Right now, anything outside of feature requests (which doesn't include OS migration/porting) or bug reporting is just idle speculation and not really productive at all. I'd rather see AD develop into a killer vector drawing app and then expand its range. Having a sound foundation before adding on that extra bedroom, so to speak. But then my vector drawing needs are modest, lettering comics, creating art for fliers, stickers, posters and such. I'm sure that, in time, AD will excel at a lot more than my meager needs. At that time, it's Affinity's call to port to another OS or not. We have a newborn baby here and this thread is all about which degrees and colleges he/she will go to. It's too early. Let AD grow up a bit and then see where it (Affinity/Serif) wants to go.
-
Along with what Aboutle said, may I add that some apps (Like Corel Painter) detects different styli. I have two: one with a "pen-nib" (it has a spring so it emulates a dip-pen point) and another with a felt nib (which is good for drawing smooth lines by hand -- less slippage than with plastic nibs). Painter detects each one separately, so I can have one that will use a pencil brush and the other will use a watercolor brush. Painter will automagically detect which stylus I'm using and switch to the tool that was last used for that specific stylus. So it would be great if I could, for example, have one stylus using the brush pen tool in AD and the other using the gradient tool. About pressure sensitivity, both Painter and Manga Studio/Clip Studio Paint has a menu option that allows for specific set up for the app. However, it's a bit of set-up to do because each specific tool can have its own pressure settings. This, while granular, can be good to customize the UX for the user's individual pressure use. I'm a bit of a hard-hand, so my settings reflect that. I'm in the process of training myself to have a lighter touch, so having a app-wide setting is good, as I only have to reset once and not for each tool.
-
It's spellchecking. Right click on the word and you should get a menu where it suggests alternative words, accept the spelling as is or learn the spelling. In my test, "Coaching" wasn't flagged as a misspelling, but it depends on the dictionary that's in use. (Simultaneous postings, Dave's post is more complete than mine.)
-
Adding some way to tile the symbols would be a great.
-
The move puck is, in Sketchbook pro, context sensitive. Meaning that if there's a selection, there's areas to proportionally scale, non-porportion scale, to scale only on the width/height, etc. The Color Puck (in dlittlefair1's screen cap) in the upper left corner does adjustment on the current color. Clicking and dragging up will change the Luminosity of the current color, left-right will decrease/increase the saturation. There's another puck that is for brushes, up/down affects the opacity, left/right the brush size. For the move puck, it appears right where one's stylus/cursor is. It's convent, but took me a bit of getting used to. Manga Studio has what it calls Selection Launcher, which I really like. It appears below the selection and has buttons for common actions: invert selection, expand selection and even one for selection launcher options. That button allows more functions to be added to the launcher. I added hide selection marquee, as it is good, sometimes to not see the marching ants (or in a vector app's case, the selection rectangle) and focus more on the art itself. The presence of the launcher bar is a visual cue that there is a selection. And Blender has implemented something they call "Pie selectors" where a key-combo or mouse gesture (not sure -- haven't played around with it yet) pops up a pie selector that looks like the more recent (intous 5 or Pro) menu thingie that Wacom has for their tablets. For me, the take-away on these gizmos is that anything that allows me to continue with the action I've started with a minimum of menu/palette/toolbar hunting is a good thing. Like dLittleFair1 wrote, when hitting the spacebar in Sketchbook, brings up the move puck and then movement of the canvas can be done and then with a mouse/cusor/stylus press puck goes bye-bye and we can keep on drawing. One step further, I have a few nodes selected (not the entire path), the selection gizmo appears. There I can choose to just copy the selected nodes, delete/cut( as in maligning an opening in the closed curve or just eliminating the nodes and forming 2 other curves), change line width, hide the selection box or move the nodes. But keep the way AD works with the Apple wireless trackpad, please! I've gotten addicted to the way it works and wished other apps used it as well!
-
see if you can activate "Family Sharing" -- according (IIRC) to the Mac app store AD allows it.
-
Rounded Rect Corner Type: Superellipse
CartoonMike replied to jake's topic in Feedback for Affinity Designer V1 on Desktop
@Matt: true, but in my explorations I discovered that the rounded rectangle does the trick a bit faster (no expand stroke) for me. There's so many "nooks and crannies" in this app to explore. It is really good (imho) that there's many different ways to get the same results, in my mind that's a sign of a good app. -
Rounded Rect Corner Type: Superellipse
CartoonMike replied to jake's topic in Feedback for Affinity Designer V1 on Desktop
How about a "capsule" shape? The left/right or top/bottom are always a semi-circle and the sides are straight. Most times I have to create 2 circles and a square (or rectangle), get them so that all the points are aligned just so and then merge. To be able to do that in one step would be grand! Unless the capsule is what the "super ellipse is" (was the super-ellipse rocketed to earth from its destroyed home world? hmm?) -
New User Help Please...
CartoonMike replied to Darren's topic in Pre-V2 Archive of Desktop Questions (macOS and Windows)
I'm gonna call this feature "Super-Duper" in my mind. :D -
New User Help Please...
CartoonMike replied to Darren's topic in Pre-V2 Archive of Desktop Questions (macOS and Windows)
First, right click on an empty part of the top toolbar. Choose customize toolbar. In the windowpane that appears, drag the set called "Operations" to the toolbar. (you can also drag out another adjustable spacer if you want). Click OK. The operation tools allow for different objects to be merged, subtracted and such. Hold your cursor over each button and a tooltip will appear with the button's name. We'll want to know where the subtract button is. The largest ellipse should be at the bottom with the smaller ones at the clock positions within the larger ellipse. It's easier if all the inner ellipses have been created already*. Select all of the ellipses. Click on the subtract button. You should have the large ellipse with holes cut out. For learning purposes, until we're familiar with Designer, go back to the toolbar, right click on an empty area and in the menu choose Icon and Text. This will make the toolbar taller (to make room for the text), but it makes up for it by giving us names for each set of tools. Once we're used to the tools, then we can go back to the Icons Only setting for the toolbar. To move/adjust the ellipses, select each node with the shift key pressed until every node in the "sub shape" is selected. Then click on a selected node and move the shape around. We can also use the cursor keys to move the shape around. *This is important, we should have a clear idea of what we're working on so all the parts are in place before we perform an operation on it. Then only one operation can be done at a time and it makes for a simpler and faster workflow, imho. Hope this helps. -
I got 99 problems and as of Oct. 2nd, Adobe ain't one of them. :D
-
If you guys do make it to SF, then check out the Exploratorium. It's worth the admission and the day you'll spend exploring (see what I did there? :P) all the sciencey goodness it has. Or go south to Half Moon Bay and see the part of the coast that inspired the name of Mac OS X 9.x
-
Manga Studio 5 (or Clip Studio Paint 1 -- same app different sellers. Don't ask.) may have vector drawing abilities, but they are limited to use only within the app. Export only as raster (PNG, JPG, TIFF, PSD, and so on). And having used the vectors in MS5, they are kludgy and hard to learn how to use well. MS5 is more of an replacement for Photoshop, Painter or any raster-based painting app and not an alternative in any way to Illustrator. Despite the name, Manga Studio, it is tailored to create comics with. Niche market, true, but it can also do stand-alone illustrations just fine with a brush engine that is better than anything Photoshop can do and easier (read less complex) than Painter. However, the text abilities of Manga Studio are very, very lacking. Hell it doesn't even have word wrap. Have to do a hard return after each line. It's like living in the '80s! --- I think that the furor over "cross-platform"(IOS, Mac, Windows, etc) is a waste of time and effort. I would rather see cross-application support. I think that the days of Monolithic software may be ending. I can do everything that Photoshop and Illustrator does (or at least the parts of those apps that I use) with a few other apps. While I understand the "it's the craftsperson, not the tool" concept, it's also true that sometimes I need a philips screwdriver and not a flat head one. Sometimes the best part of any journey is just to let the driver drive, sit back and enjoy the ride.
-
I had the same no pressure sensitivity problem. A quick visit to the Wacom Control Panel in System Prefs and tested the sensitivity there, was okay. Then closed the prefs panels and went back to AD. Pressure worked. Rebooted and restarted AD, pressure still works. I did create, in the Wacom Panel, a custom setting for AD. There seems to be a lag/jerkiness to the pressure when making the lines. Hope this helps.
-
Peter, I won't have time to do any Video tutorials until I finish the ones already in my queue (they're for the book on Manga Studio that I wrote) same goes for full blown written ones until I wrap up the ones I've promised to do for a few websites that are for Manga Studio. And in what time my day has left, I kinda would like to work on my comics ( my websites www.crtoons.com and www.quantumgumbo.com are getting all dusty and cobwebby from lack of updates) and prepare for some conventions coming up in a few weeks and a big one in January (SuperSacCon and Sac-Anime respectively in Sacramento CA). Thanks for the kind words, I appreciate them. :) Quick tip for drawing straight lines with an analog pencil: put dots where you want the line to start and end. Put your pencil on the starting dot and fix your eye on the ending dot. Move the pencil quickly to the end dot without moving your eyes from the dot. It's okay to miss the mark, the point is to improve the old eye-hand coordination. With some practice you'll be drawing straight lines in no time. Circles, well that takes practice. Keep in mind that most artists do warm up exercises before doing "serious" work, just like an athlete. So just spend like 10-15 every day and just practice drawing straight lines, circles, ellipses and squares. Don't worry about perfection, this is just a warm-up. If you do these warmups every day, you'll see improvement in mere weeks. Be mindful that you're learning muscle memory, so there's no such thing as a bad warm up or drawing. That's why we have erasers and tracing paper. There's a book, Thinking with a pencil, that I got when I was a wee sprout that was instrumental to my development as an artist. It's on Amazon ( http://www.amazon.com/Thinking-Pencil-Henning-Nelms/dp/0898150523 ) for under $10 US. Try some used bookstores (support your local economy and not the octopus that is Amazon if you can help it ) to see if they have a copy. This book is made for those who think they're not "artists" and it breaks down a lot of stuff nicely. And since it was written in the '50s, it's a retro blast from the past. :D
-
Haven't seen this mentioned (If it was, I apologize): with an apple wireless trackpad a two finger movement will scroll the canvas (much like the Hand tool will via the spacebar) and a two finger pinch can zoom in or out. Took me a bit of time to get used to it and now I like it better than the spacebar+Cmd method. I have my trackpad on the right and when I'm working on my wacom with my left hand, my right performs the scrolling and zooming and no looking a the keyboard for the keys. Much smoother. I can scroll to the location I want and zoom in or out very smoothly. This is a wireless trackpad I use with my iMac. Some other apps do wacky things when the trackpad gestures are used, but not AD, it maintains consistency with the intended purpose of trackpad gestures. It's the little touches like this is what makes AD so great, imho.
-
Export a Slice
CartoonMike replied to Dale's topic in Tutorials (Staff and Customer Created Tutorials)
So, Affinity Designer is great for exports... ... any way you slice it? (ducks and runs). :P -
Wake up Marketing/PR guy's spouse. Check. Next... world domination. Or supper.