James Ritson
-
Posts
908 -
Joined
-
Last visited
Everything posted by James Ritson
-

AMD Radeon RX Hardware Acceleration
James Ritson replied to Mark Ingram's topic in V1 Bugs found on Windows
What issues are you having with Affinity Designer? OpenCL is only used to accelerate raster paint brushing in Designer, all the vector operations are performed on CPU anyway. As far as I'm aware there are no issues with DirectX view presentation on Navi cards. -
AMD Radeon RX Hardware Acceleration
James Ritson replied to Mark Ingram's topic in V1 Bugs found on Windows
Just to clarify this slightly, OpenCL is not utilised widespread across an entire app and is mainly used for specific functionality—e.g. Photoshop uses hardware acceleration for a small subset of its functionality like the blur gallery, camera raw development, neural filters and some selection tools (source: https://helpx.adobe.com/uk/photoshop/kb/photoshop-cc-gpu-card-faq.html). In fact, on that page OpenCL appears to be used very sparsely: Affinity Photo leverages hardware acceleration for practically all raster operations in the software—from basic resampling to expensive live filter compositing—requiring many different permutations of kernels to be compiled on the fly. Every time you add a new live filter or apply a destructive filter, paint with a brush tool, add an adjustment layer or perform many other operations, these all need to load kernels for hardware acceleration. With the majority of GPUs and driver combinations, this kernel compilation time is more or less negligible, but as Mark has posted previously with benchmarks, the Navi architecture with its current drivers appears to be problematic here. Any kind of comparison to Photoshop's OpenCL implementation is not appropriate, as the two apps use it very differently. I previously had a 5700XT, and loading a single RAW image was painfully slow because a number of kernels needed to be compiled simultaneously (for all the standard adjustments you can apply in the Develop Persona). We're talking almost a minute from loading in a RAW file to being able to move sliders around. The previous Polaris generation of cards are, to my understanding, absolutely fine with OpenCL kernel compilation. -
Hi @ABSOLUTE Drone and others in the thread, I've developed some non-destructive tone mapping macros that may help here: they're spatially invariant so are very useful for HDRIs/360 HDR imagery. You just apply the macro and it adds a new group, you can go in and set the base exposure/white balance among other things. They're available for free (just put "0" into the Gumroad "I want this" box) from here: https://jamesritson.co.uk/resources.html#hdr It may also be worth having a look at the Blender Filmic macros, available directly underneath the HDR tone mapping macros. They effectively do the same thing but are designed to emulate the Filmic transforms within Blender, so you have different contrast options. Hope that helps! Video tutorial here, at 11:38 in the video you'll see the 360 seam-aware tone mapping:
-
Hi @Pikzels, this is the automatic brightness adjustment issue—please see https://forum.affinity.serif.com/index.php?/topic/152108-m1-mac-monterey-affinity-photo-etc-now-has-the-wheel-of-death-quite-a-lot/page/2/#comments and I also did a video demonstrating how to fix it here: Affinity Designer is exempt from the issue because by default it still uses an OpenGL view. The issue is with the Metal view used in Affinity Photo (querying the maximum EDR/HDR brightness for the 32-bit preview panel). Disabling "Automatically adjust brightness" in the macOS system preferences will fix the issue. Hope that helps!
-
It's been there since 1.5 (when 32-bit support was introduced), but unfortunately there isn't an explicit preset for it, so it's somewhat hidden...

-
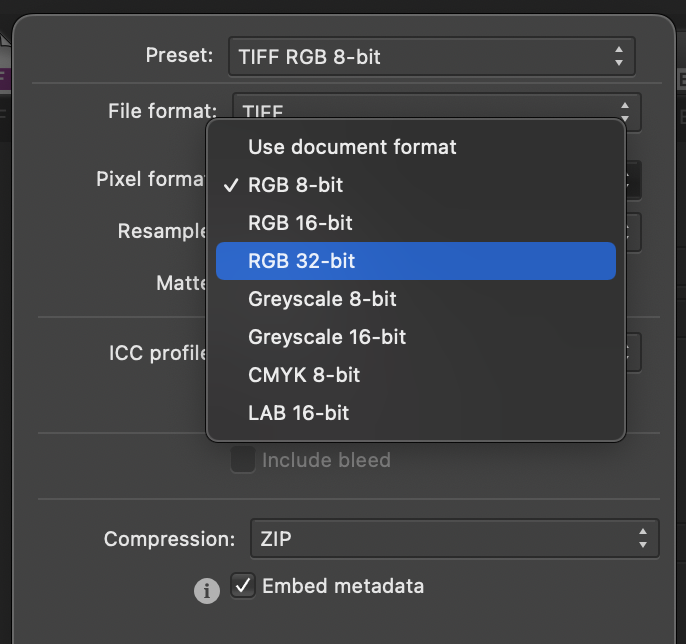
Hi @Michael Allman, have you tried using the File>Export dialog and clicking the More button? This allows you to export 32-bit linear floats with the TIFF format. Presumably you are referring to write back when using File>Save? This should probably be looked at if it’s not writing the correct pixel format back… Hope that helps, James
-
Hi @Reflex, hope I can help. This right here: Is where you might be going wrong—applying the tone curve is a bounded operation and it will clamp values to between 0 and 1, so you won't be seeing any extended brightness values. This is why it defaults to "Take no action" when you change from RGB/16 to RGB/32—it's not intended to be applied if you wish to retain HDR values. Secondly: Will also be wrong: you want ICC Display Transform otherwise your document will not be colour managed. Unmanaged means you are seeing the linear scene referred values, which you don't want in this case as things will look dark and "crushed". Have you tried using the Apple Core Image RAW engine but with no tone curve and ICC display management applied? You mention that the tone curve being off results in the image looking too dark, but then at the same time you're using an unmanaged linear view—which will indeed look dark because it doesn't have a gamma transform correction. Try: Apple Core Image RAW engine / SerifLabs engine Tone curve set to Take no action 32-bit Preview set to ICC Display Transform And see how you go from there—it's possible that we don't apply some exposure corrections or other parameters stored in the ProRAW format, so you may have to experiment. Possibly the Apple Core Image engine will handle this better than the SerifLabs engine. It's no bad thing that you should have to push the exposure slider up: it's kind of the intention that users should shoot to capture highlight detail (underexposed if needs be), then be able to simply push the pixel values linearly and still see those bright highlights rather than having to tone map them using highlight recovery and other techniques.
-
Are you using a bespoke display profile, perhaps one that you have created with a calibration device using DisplayCAL or i1Profiler? Affinity Photo itself isn't doing anything outrageous to corrupt the display like that—I previously had an issue with a Monterey beta that corrupted the screen if a custom display profile was in use. Looks like they are still ironing out issues with the M1 GPU. In System Preferences>Display do you have any other settings that are not at their default, e.g. have you changed from the default P3 1600nit profile? I believe the only thing we're doing different from other apps is querying the Metal view for the panel's maximum brightness so that 32-bit HDR documents can be mapped to the display accordingly—if we were able to reproduce it here, that would be a good step towards identifying and solving the issue.
-
Hey all, just wanted to give you a heads-up that tomorrow (Thursday May 26th) I'll be doing an Affinity Photo live stream and it's going to be an astrophotography special. Even if you're not interested in astrophotography, it may be worth a watch anyway as I'll be covering techniques that could be applicable to other workflows. It's also a chance just to have a good geek-out! I'm really looking forward to it. Please do feel free to come along and interact in the chat if you're interested, it would be lovely to spot some familiar usernames 😉 Here's the link, you can also set a reminder ahead of 4pm tomorrow: Thanks, James
- 1 reply
-
- 1
-

-
ASIAIR master flats not correctly imported
James Ritson replied to talktogreg's topic in V1 Bugs found on macOS
Hi @talktogreg, thanks for posting and hope you're finding the macros useful. There are two things Affinity Photo does that will account for the result on-screen looking stretched: Internally, within the Astrophotography Stack persona, it adds Curves and Levels nodes to the invisible layer 'stack' for the FIT file preview. This is just to help boost the tones so you can inspect the data. A non-linear gamma transform is performed during the view presentation. Everything is composited internally in 32-bit float linear, but by default the view is colour managed (based on your display profile) with a gamma transform so that you're seeing the result you would get when exporting to a gamma-encoded format such as 8-bit JPEG, 16-bit TIFF etc. The actual data itself is always treated linearly. To test this, you could try the following: Load your f_EXTREME.fit file up individually, and you will see the Levels and Curves layers added. Turn these off. Go to View>Studio>32-bit Preview to bring out the 32-bit Preview panel if it isn't already active. Switch from ICC Display Transform to Unmanaged: you are now seeing the pixel values in linear light with no colour management. The result should hopefully be in-line with what you're seeing with other software. Be aware, however, that you should keep ICC Display Transform on. This ensures that your view when compositing in 32-bit linear will match the exported result when you finally save out a JPEG or other interchange format. It's also worth noting that the histogram will always display the linear values, even though the view presentation is being managed with the non-linear transform. We should perhaps have a toggle for this... Apologies for the slight technical ramble, but it's difficult to clarify without venturing into linear/non-linear and colour management discussions. I think the bottom line is that your data files are being treated as linear internally, so there shouldn't be anything to worry about. Hopefully your master flat should just calibrate as expected with the light frames and everything just works! Hope that helps, James -
Hi @Marcel Korth, both of these features are present in the Affinity apps. Alt-clicking (Windows) or Option-clicking (macOS) on a layer isolates it: https://affinity.help/photo/English.lproj/pages/LayerOperations/isolating.html — the only difference here is that you must click onto a different layer to exit isolation mode. As regards alt-clicking layers to clip them, Affinity has a concept called child layers. You can click-drag a layer and offer it to another layer, but there are two distinct behaviours here: Offering your source layer over the target layer's thumbnail makes the source layer act as a mask. Offering your source layer over the target layer's text/label will clip the source layer to the bounds of the target layer. Once a layer is inside another layer, it is referred to as a child layer, and the top layer is referred to as the parent layer. To replicate the example in your video, you would click-drag that image layer onto the text/label of the text layer and release the mouse button. An alternative way to do this is to use the menu option Arrange>Move Inside. You can also create a shortcut for this—I use Shift+Alt+I—to speed up compositing workflows. You will also find an option in the shortcuts for Insert Inside—I like to shortcut this to Shift+I. Once it is toggled, the next layer created will automatically be placed inside the currently selected layer, so this is really useful for quickly clipping adjustments/live filters inside the current layer. Hope the above helps!
-
Hi @Laurens, if you show the 32-bit Preview Panel (View>Studio>32-bit Preview), is Enable EDR checked? If so, this will use your display's extended brightness range to display HDR colour values (i.e. outside the range of 0-1). Whilst this is a really nice feature, you currently can't export to any kind of HDR format outside of OpenEXR/Radiance HDR, so you would instead need to work in SDR and tone map the HDR values down to that range. The reason your images look different, I suspect, is because you're able to see values >1 on your display, but when you export to a bounded format such as JPEG, those values are simply clipped at 1. To solve this problem, start by disabling Enable EDR, then use the tone mapping persona or a set of tone mapping macros to bring those brightness values to within SDR range. Once you have done the tone mapping, do any further edits as usual, then try exporting—you should find that the exported image now looks the same as the working copy in Photo. In Preferences>Colour, you will find a checkbox called "Enable EDR by default in 32bit RGB views". Unchecking this will prevent the issue from reoccurring in the future. Hope that helps!
-
For anyone in the thread experiencing beach-balling, it's worth noting that there is currently an issue with variable brightness on M1 MacBooks and I presume M1 iMacs as well—anything that uses a sensor to gradually change the brightness based on lighting conditions. Photo, with its Metal view, queries maximum brightness for HDR purposes, and this causes a bottlenecking issue at the moment when macOS gradually changes the panel brightness. The solution is to go to System Preferences > Displays and disable "Automatically adjust brightness". Disabling Metal Compute will severely hamper performance—the reason it works for most people is because it also switches the view back to OpenGL, which does not query the brightness as it does not support HDR/EDR views. The issue will be fixed in the future, but the workaround for now is to disable the automatic brightness adjustment within macOS. Hope that helps!
-
Hi @eobet, if you're just taking SDR-encoded images and using them as a lighting model, it almost seems pointless encoding them in an HDR format—I think the majority of 3D authoring software lets you use SDR-encoded formats as well? (With the understanding that lighting will be substandard) However, if you want to artificially expand the range into HDR, you could convert your document to 32-bit HDR using Document>Convert Format / ICC Profile. This will convert the values to floating point, with 0-1 being the range for SDR values. What you could then do is add an Exposure adjustment and push the exposure up linearly for all pixel values—try +1 or +2 to start. You could then use a Brightness / Contrast adjustment and bring the brightness down and also experiment with the contrast. The Brightness / Contrast adjustment only works on the 0-1 range of pixels, so you leave the HDR >1 pixels as they are. This would allow you to artificially expand the dynamic range of the scene. The Curves adjustment, by default, also works between 0-1, so you could also use this to manipulate contrast of just the 0-1 SDR pixel values. However, on the Curves dialog, you can set the min/max values—so you can use a max greater than 1 and it will now also affect HDR values. Then of course you would export to OpenEXR or Radiance HDR and bring that into your 3D software. The 32-bit Preview Panel options are purely for the final display presentation only, so as you've discovered they will not modify the pixel values in your document at all. If you have an HDR/EDR display you can enable HDR/EDR preview to see pixel values >1. Otherwise, you can move the Exposure slider down to see those bright values. Hope the above helps!
-
Hi @lysynski, is this when running the macro from the Library panel? Try taking your mouse off the desk/surface and single clicking on a macro entry. There's a really fine tolerance on macOS for testing between a single click and a drag, and it's probably this that is causing the issue. The developers are aware of it so hopefully it can be addressed.
-
Hi @MxHeppa, the selection tools do have anti-aliasing options available on the context toolbar—see "Soft Edges" for the Selection Brush Tool, and "Antialias" for the marquee and freehand/polygonal/magnetic selection tools. Hope that helps!
-
Hi, yes, it's an intentional behaviour as we don't know explicitly which colour space to convert from—at the time of implementing EXR support, we were aware that the format could specify chromaticity values and white point but didn't have any documents that contained them. It was always designed to be used in conjunction with OCIO for explicit colour management. Essentially, Photo doesn't touch the pixel values and just sets the document profile to whatever is specified in Preferences>Colour, which by default is sRGB. This only bounds the pixel values at the final presentation stage, so internally everything is being composited with linear unbounded floats. Doing a specific profile conversion via Document>Convert Format / ICC Profile, however, will change the pixel values (but remain unbounded). Ideally, you would have an OCIO configuration set up within Photo, then append the colour space of your EXR to the end of its file name. Since Photo always works internally in scene linear, it would then convert from that colour space to scene linear. Again, though, this is mainly intended to be used with the OCIO device and view transforms to ensure accurate colour rendering. tldr; Photo doesn't touch pixel values unless there's a valid OCIO configuration and the EXR filename contains a colour space name (e.g. "filename acescg.exr")—if this is the case, the pixel values will be converted from that colour space to scene linear. Changing the 32-bit colour profile in Preferences>Colour is essentially the same as assigning a colour profile. Hope that helps!
-
Hi @anim, I'll do my best to break down the reasoning for this approach, hope it makes sense. I think this is the key part to explore: EXR files should usually contain scene linear encoded values—the colour space is arbitrary here and Photo doesn't touch the colour values. Those linear values are then view transformed based on your document profile (when using ICC Display Transform) or based on a mandated device and view transform combination (when using OpenColorIO transforms). We don't do anything with this and always bring EXR files in as scene linear. OpenColorIO integration is designed to help with colour management—for example, you would set up the configuration that you wish to work with, then you can 'tag' your EXR files by appending a colour space to their filename. If I had an EXR whose primaries were in the ACEScg colour space, I would append "acescg" to the filename. Affinity Photo would then give me a toast to let me know that it had converted from 'acescg' to scene linear. OCIO isn't really applicable in your case, so it leaves us with the mismatch you are seeing when using the traditional document-to-display profile colour management. Sorry if I'm just being slow (it is the morning here 😉) but you've said here: Then later on have said: I'm not sure where ROMM comes into the equation—why are you wanting to use ROMM as a default working colour space? It sounds like within iRay you were just working with scene linear values and previewing with a standard sRGB non-linear device transform. The EXR should not contain any particular colour space encoded values. I believe this should be evident when you switch to Unmanaged and non-destructively transform the gamma and exposure values. If the EXR contained values encoded in a wider colour space, the result should look very different to the tone mapped PNG in sRGB, but it doesn't (there are some slight differences, probably due to small variations in the transform curve etc for the gamma-encoded sRGB values in the PNG). I'm checking with development whether it's just an oversight that we don't explicitly 'convert' the linear colour values to the working profile that is set in Preferences>Colour (and seemingly assign the profile instead). I'll hopefully be able to update you on this.. You likely know this already, but it's worth mentioning that the EXR document is imported and converted to a working format of 32-bit unbounded float—all compositing is done in linear space (as it should be), then those linear values are view-transformed based on the document colour profile, which defaults to sRGB. This will 'bound' the linear values during the transform, so you will only see colours inside the range of that profile. You can bring in an EXR document using the default sRGB profile, then convert to a wider profile such as ROMM if you wish. Internally, the linear values are stored as unbounded floats, so you don't lose any information by importing with an sRGB profile and can simply choose to display a wider range of values when converting to a wider profile. Hope the above kind of helps—I think the takeaway is that you should just use the default sRGB working profile and convert to a wider profile if you want to use it for compositing. Just be aware, however, that if you choose to export back to EXR those linear values will now be encoded specifically for that linear profile, and other software may not recognise this. If you are simply exporting from Photo to a final gamma-encoded delivery format however, this will be fine. For more advanced colour management, such as using Photo in a VFX pipeline, you should definitely look into using the OpenColorIO integration...
-
Hi @udoo, a couple of things to note: For sigma clipping to be effective, you need to provide at least three images so that the pixel ranges can be evaluated, and outlier pixels can be rejected The default sigma clipping threshold of 3 is usually too conservative for most mono image data—try reducing it to 2 before stacking Pre-calibrated data does not require additional calibration frames, but you will often find that the calibrated frames (e.g. from iTelescope, Telescope Live) still contain a myriad of hot pixels and inconsistent pixels. That's where sigma clipping comes in—as noted above, the default value of 3 will probably leave you with unwanted hot pixels, so try reducing the value and stacking again until you get a good result. When you repeat the stacking process, it will be significantly quicker since Photo has already registered and aligned the data for stacking. You will really need more than three images for effective outlier pixel rejection—have you got a sufficient amount of captured data for this? Hope that helps, James
-
Hey again. I wouldn't go anywhere near OpenColorIO to be honest, that's more intended for a VFX/rendering pipeline. The OpenColorIO view transform in Affinity Photo is non-destructive anyway, and will not match the view you get from EXR previews in Finder or other macOS software that can interpret the format. I'm afraid there is no elegant solution at the moment!
-
Hi @julianv, unfortunately I believe your saturation issue does come down to the issue that I brought up in a previous post: lack of a decent delivery method for HDR/EDR images with appropriate metadata. The formats are kind of half-there, but OS level support needs to mature significantly. EXR documents are a way of interchanging lossless information and allow unbounded, floating point precision for pixel values, making them ideal for storing HDR content but not particularly for visualising it. EXR files have no real concept of colour space, and are not tagged with colour profiles. The pixel values are usually encoded as linear scene-referred values, as opposed to gamma-corrected values in a particular colour space. This is why colour management solutions like OpenColorIO are typically employed when dealing with EXR files, to ensure accurate colour conversions between the linear values and the intended output space. I'm not sure what macOS does with its EXR integration—I'm assuming it would just convert from the linear values to sRGB in order to preview on-screen, which may explain the loss in colour intensity because you are working with the Display P3 profile within Affinity Photo. As a quick experiment, you could try using Document>Flatten, then Document>Convert Format / ICC Profile and choosing sRGB (stay in RGB/32 for the actual format). Now export your EXR and see if the result in Finder/Preview looks more consistent with what you are seeing in Affinity Photo. If so, it is unfortunately a limitation where you cannot mandate a colour profile for your exported EXR document—for now, the only real workaround would be converting to sRGB before exporting. Hope that helps!
-
Photo Benchmark 11021 Results
James Ritson replied to MikeTO's topic in [ARCHIVE] Photo beta on Windows threads
Happy New Year! That's an impressive benchmark score. The reason the combined score is so low, however, is exactly why Apple's M1 chips are so beneficial—since they have UMA (unified memory architecture), there is no penalty when copying data between the CPU and GPU. The combined score benchmark measures a combination of operations that must be performed on CPU and GPU separately. For example, you may have operations on the CPU (general compositing, vector calculations), then operations on the GPU (raster processing with pixel content). Data has to be copied to and from both devices, which incurs a bandwidth penalty if they are separate rather than unified. That is why you are seeing such a dramatic drop in the combined score: it is factoring in CPU operations, and the memory transfer is clearly quite a bottleneck for the GPU in this instance. I can give you a practical example using Affinity Photo. Let's say you take an image, then add a few adjustment layers and live filter layers. These will compile kernels that then run on the GPU, so all your compositing is done in 'hardware' and you will see the effect of a faster GPU very clearly. However, let's say that you then add a vector layer above those layers—for example, a rectangle quick shape, piece of text, or poly curve using the Pen Tool. These vector layers are then going to be processed on the CPU, so the compositing result held in memory must be copied back to the CPU in order to continue compositing. If you then added some more pixel layers, adjustments etc above that vector layer, the compositing data must once again go back to the GPU. Although it may be less frequent in Photo and Designer, you will continuously run into this scenario with Publisher, since page layout design is the very definition of mixed discipline. At this point, you are at the mercy of whichever component is causing the memory bandwidth bottleneck. Another advantage of unified memory is that the memory is shared. I do a lot of rendering with blender, 3ds Max and V-Ray etc, and I will often have to render more complex scenes on CPU because they exceed the available VRAM on my GPU (8GB)—especially with V-Ray and archviz scenes. This means I can't take advantage of OptiX rendering on the GPU which is significantly faster. With shared memory, the GPU can just allocate as much memory as it requires rather than having its own discrete pool that you are limited to. I have, on occasion, gone beyond 8GB when compositing in Affinity Photo, so having a shared memory pool of 16/32/64GB is potentially very useful. A final thing to note: although the M1 scores are technically lower, the increased memory bandwidth as a result of the unified architecture helps everything to 'feel' snappier as well. I now work on an M1 Mac Mini—although the GPU scores around 8000-9000, which seems somewhat pitiful in the face of M1 Pro/Max and the latest discrete GPUs, it still feels incredibly quick with the majority of everyday operations, and all the Affinity apps have some very good optimisation which helps the hardware punch above its technical weight. -
Hi @soulearth, there isn't a problem with Affinity Photo—rather, there are two things that are contributing to your FIT file appearing brighter and washed out: When opening FIT files, Affinity Photo automatically adds a gamma transform and tone curve as non-destructive adjustment layers. These can be disabled or deleted and you can add your own adjustments for tone stretching. GIMP and SIRIL are showing you the linear colour values with no colour management applied. With 32-bit linear documents, Affinity Photo will non-destructively add a view transform so that your document view is gamma corrected and colour managed (sRGB by default). If you go to your 32-bit Preview panel (View>Studio>32-bit Preview if it is not already present in the bottom right), you can switch from 'ICC Display Transform' to 'Unmanaged' and then your image will appear consistent when compared with what you are seeing in GIMP and SIRIL (assuming you have already disabled the Levels and Curves adjustments). Be aware, however, that you should always be using 'ICC Display Transform', otherwise your editing view will not match the exported result (when exporting to 8-bit or 16-bit JPEG/TIFF etc). The reason Affinity Photo does this, rather than just show you the linear unmanaged colour values, is that you can freely edit in 32-bit and then not have to do any tone mapping or adaptation when converting or exporting to 16-bit/8-bit bounded formats. To clarify, your pixel colour values are still linear, and all operations in 32-bit are performed in linear space. A final, non-destructive view transform is applied based on the document colour profile (e.g. sRGB) and the final image you see as your view is gamma-corrected. When you change from 'ICC Display Transform' to 'Unmanaged', you disable this view transform, enabling you to see the linear colour values. This is however just intended as a preview capability, and will not affect the exported result. Hope the above helps!
-
@Andrew Buckle thanks for your post, the general lagginess and delay is due to something macOS Monterey has introduced that impacts the way we load certain UI elements. Do you have the Channels panel visible in the bottom right? If so, try switching to another panel such as Navigator and you should find that some of the hitching and lagginess disappears. Unfortunately, startup time will be impacted, and opening certain dialogs (e.g. Crop Tool presets, Fill and Stroke colour dialogs, macro libraries) will have a delay. We are trying to work towards a resolution by communicating this with Apple—apologies that we don't have more news at this point.
-
Selection brush tool is now laggy while doing the selection
James Ritson replied to YeYoung's topic in V1 Bugs found on macOS
Hi @Narwhal, we're currently investigating an issue with Monterey and the way the Affinity apps create some of the interface elements. One issue at the moment is the Channels panel, where the thumbnails are constantly being redrawn. You will probably find that other tools such as adjustments and filters will cause hitching with it open. The temporary solution is to switch across to another panel, e.g. Navigator, History etc so that the Channels panel is not being viewed. You will probably find your Selection Brush now behaves without any lagginess. Hope that helps and rest assured we are trying to communicate this issue directly to Apple for a potential OS fix.