.jpeg.1b727463d44a0d52bc3499597e28d11c.jpeg)
James Ritson
-
Posts
855 -
Joined
-
Last visited
Everything posted by James Ritson
-
.thumb.jpeg.6f143e8223547aba974205ef53397036.jpeg) Good morning all, Two new videos (one inspired by a recent thread) for you: Graduated ND Filter Effect Defeating Filter Limits Hope to be doing a few more before restarting on 1.5 videos, so watch this space! Madame, are you still having the issue with the Liquify video?
Good morning all, Two new videos (one inspired by a recent thread) for you: Graduated ND Filter Effect Defeating Filter Limits Hope to be doing a few more before restarting on 1.5 videos, so watch this space! Madame, are you still having the issue with the Liquify video? -
Hello, Just to let you know I recorded the video this morning and it's now live on Vimeo here: Graduated ND Filter Effect Hope that proves to be helpful for you! Thanks, James
-
Hi, I realise this doesn't immediately solve the issue but I'll add a video to my planning list that covers several ways of achieving this effect. Whilst the other videos cover masking and working with gradients I haven't done any that explicitly cover an "ND" type effect. Will hopefully have time this week to plan and record it!
-
Just to build on this, you needn't add a layer mask to an adjustment layer or live filter layer - they inherently have their own masks. So you could add a Levels or Curves adjustment, tweak it to get the result you want for your sky, then select the Gradient tool and just click-drag from the sky down to where the foreground begins. You can then tweak the gradient "stops" so that the stop near the foreground is at 0% opacity, meaning the adjustment effect will gradually fade out from the sky to the foreground. Hope that helps! Such a topic might actually provide a good subject for a video tutorial - different ways to apply an ND-type effect. Food for thought!
-
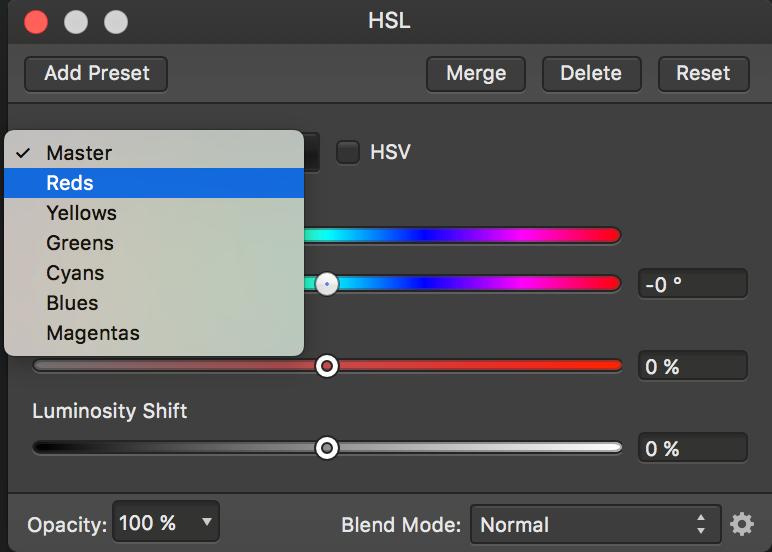
Hey there, yes, under the HSL adjustment in the Photo persona you can select a colour range from the dropdown box (see the attached image). Hope that helps!

-
Liquify Persona in Beta 6
James Ritson replied to LilleG's topic in [ARCHIVE] Photo beta on macOS threads
Hey LilleG, there's been the occasional discussion about this internally - I believe the naming convention for these two tools is supposed to be correct: imagine "pinching" pixels with your fingers and bringing them towards you. Now imagine "punching" pixels away from you with a clenched fist. With this mindset the naming makes more sense - hopefully! -
Clone problem V1.5 Beta 6
James Ritson replied to EdD's topic in [ARCHIVE] Photo beta on macOS threads
Hey Ed, the issue seems to be that your clone brush is referencing the "HDR Image" source in the Sources panel - as a result of HDR merge, the clone sources panel is populated with the individual images and the merged result for manual deghosting (if you choose to automatically deghost you'll also get a "Deghosted HDR Image" source in this panel). Try closing down the Sources panel, then try Alt-clicking again to set a source point. If this still isn't working you may need to "juggle" the source type in the context toolbar (where it says Current Layer) - set it to something else like Layers Beneath then set it back. If you need to do this second step then it's likely a bug that needs squashing! Hope that helps.. -
360 HDR editing issue.
James Ritson replied to doobox's topic in [ARCHIVE] Photo beta on macOS threads
Hi doobox, that's definitely an issue with 32-bit live projection, the solution I've found for now is to remove live projection and apply it again (I can't remember at the moment whether I stepped back through the history or simply removed it from the Layer menu though) - that should get rid of the visual corruption. Is it actually present on the exported file or does it just reappear when you apply live projection to it? Out of interest, how do you create your bracketed exposures with the Theta camera? I've just been using the smartphone app and varying the shutter speed, is there a bracketed shooting mode I've missed somewhere? What caught me out several times was the time it takes for the gyro to stabilise - often the first shot varied from the rest and so would never align properly... -
Hey Merle, As a first port of call I'd recommend heading over to the official Photo tutorials thread (http://affin.co/PhotoTuts) as it contains a structured list of video tutorials including a dedicated beginners series. For straightforward photo edits you'll likely be using adjustment layers, so it's worth investigating them - the beginners series covers them, and they're used frequently throughout the other tutorials. You should find a healthy mix in the tutorials list between tools and techniques (like cropping and masking) and achieving specific results (like sky replacement, content removal, black & white conversions). Hope that's enough to get started, but please do ask if you have any further questions. We also plan to write and publish a printed workbook that will help immensely in learning the app, but that may certainly be sometime into next year before it's released. Regards, James
-
Raw files
James Ritson replied to crosspick's topic in Pre-V2 Archive of Affinity on Desktop Questions (macOS and Windows)
Hi justdraw, this could be either exposure compensation settings not being applied or the default tone curve pushing the image into overexposure, both of which can be tackled through the Develop Assistant. You might want to try disabling the tone curve and applying your own to make the most of your camera's latitude. There's a couple of videos on this - Maximising Raw Latitude and Raw Conversion Quality. Alternatively, if you don't like the way Photo's raw engine is treating your raw files, you can always switch over to Apple's Core Image decoder - again, this can be done through the Develop Assistant. Both videos will show you how to get to that dialog. Hope that helps! -
Hey, sorry, I meant would it be possible to attach an image that isn't decoding properly (rather than a screen grab of what's happening) - that way I can get a better idea of what might be causing the visual corruption. Do you know if the computer at the camera club has the latest version of Faststone viewer?
-
Hi Rigger, I can't reproduce this at all on my Windows box, I've tried exporting both simple and complicated edits with no issues - are you adjusting any settings in the "More" tab on the export dialog? What colour profile are you working in, just standard sRGB? Is there any chance you might be able to attach a JPEG that's causing issues for the viewer? Also, are you using the latest version just in case it's a known issue that has been fixed? (The version I downloaded today is 5.9) Thanks
-
Hello all, Just a quick post to let you know that, in the midst of recording some early Photo 1.5 videos, I've started to re-record some older videos as well. This time around, Liquify and Sky Replacement have been revisited and (hopefully!) improved. Look out for more videos soon...
-
Hello, I believe that's achieved with the Mesh Warp tool. There isn't a tutorial that covers using it for a subject like the vase, but do take a look at Panorama Distortion Correction - it will show you how to set "source" points, then manipulate them as "destination" points. You can apply the technique seen in the video to any subject. Hope that helps in the short term! [Edit] Also, Rigger, I haven't forgotten about the radial blade blurring, just been very busy and planning 1.5 tutorials. It's still on my list!
-
Opening a RAW image shot in portrait
James Ritson replied to Jurriën's topic in [ARCHIVE] Photo beta on macOS threads
Hi Jurriën, I believe this was a bug introduced in beta 5 - it's been noted and I think should be corrected for beta 6. Hope that helps! -
Hello all, I suspect the issues mentioned here with noise reduction appearing to not work or "stick" are related to the fact that you might be previewing the effect on a mipmapped (lower resolution) version of the image - this occurs when you're not zoomed to 100%. If you're at a lower zoom level - say, 50% or 75% - you're effectively viewing a lower resolution version of the image. Therefore, with a lower number of pixels, the noise reduction will work differently compared to when it's applied to the full resolution image. When you then apply the filter, it's applied to the full resolution image, and the mipmaps (or lower resolution versions) are re-created. This explains the phenomenon of the "disappearing" noise removal, whereby after clicking Develop (or applying the filter individually in the Photo persona) the noise seems to "come back". The noise reduction has still been applied, but the settings used to adequately remove noise for the lower resolution version were likely not strong enough for the full resolution version - hope that makes sense? There's more information in this thread: Noise filter preview inconsistencies - the solution is simply to view at 100% when you're applying particular filters (namely noise-based ones) for the most accurate preview. If this doesn't solve the issue then do let us know. Thanks!
-
Hey, in that case you're experiencing the same issue as myself, and it's being looked into by the developers. Do you do much additional pixel work on new layers at all? (I do a lot of colour painting with blend modes on pixel layers - these are stored as bitmap fills and do increase filesize). You mentioned you had no snapshot at all though - are you sure this is the case when developing a new raw file? Photo should always create an initial snapshot from the develop process. Thanks for your help!
-
There are a couple of things you can definitely address to reduce filesize: Raw files are developed to 16-bit documents, which will increase filesize quite significantly (JPEGs are 8-bit). If you don't need the extra precision, you can convert it to 8-bit. Try this in conjunction with the next step... Photo stores a Snapshot of your image in its initial state so that you can always restore it later. In 16-bit this can add 50-70MB to the filesize. If you bring up the snapshots panel (View>Studio>Snapshots) you can delete it. There is also a filesize bloat issue that seems to affect images developed straight from raw to 16-bit and then having additional work done on them - converting colour format does little to reduce filesize at this stage. I believe this is being looked into. Finally, the reason documents saved with JPEG images are so small is because Photo will store the compressed image - as long as you don't do anything to it. If you did some destructive work (filters, brushes etc) then saved to a document you would see the filesize increase dramatically (as it's no longer storing a compressed image format). Hope that helps a little!
-
Pretty much - luckily though, Photo doesn't have to decode complex video frames with temporal and spatial compression ;) , so its "proxy" generation goes unnoticed in the background when you open an image. For what it's worth, you'll encounter this issue with other software - some present a warning or tip about it, some don't. Hopefully, though, providing an in-app explanation is something we'll consider, as it's an issue that crops up for many users (as mentioned before, particularly with noise reduction)..
-
Yes and no ;) If you're not zoomed to at least 100%, the filter preview is actually applied to a lower resolution version of the image. With some filters the difference is negligible, but with others, their results may vary. Think of it as the filters being applied to a sparser, less dense set of pixels. (Long winded bit coming up...) A more concrete way of actually seeing what's going on here is to take a copy of your image (Select all, copy, then File - New from Clipboard) and resample it to exactly half the resolution, preferably using bilinear resampling. Then, apply a destructive filter to both of them through the Filters menu: convolution filters like blurring, sharpening/clarity will illustrate this best. Use the same filter values for both images. By using a destructive filter which "bakes" the filter effect in, Photo will recreate the mipmaps and you'll be able to see (however subtle) how the resolution has affected the filter outcome. You could zoom the full resolution image to 100%, then zoom the half resolution image to 200% and switch between them - you should at the very least observe some difference between them. Using unsharp mask with a moderate radius and factor should yield quite a noticeable difference. Apologies for the waffling, hope that's helped clear it up? :ph34r:
-
Hi David, what MEB said is the case. Photo generates a set of mipmaps for each image you open so it can improve performance by using lower resolution versions at different zoom levels. The downside of this is that you can end up previewing particular filters (noise-based filters especially, as well as defringing) on a lower resolution version of the image - therefore, the previewed effect will not represent its behaviour when applied to the full resolution version. Previewing at 100% will ensure the filter preview is being applied to the full resolution image. Many users encounter this with noise removal, where they comment that the noise "returns" once they actually apply the denoise filter. What's happening is that the noise removal settings they're using, whilst suitable for the lower resolution image, are less aggressive when applied to the full resolution image. Apologies that this isn't made clearer within the app itself. However, this preview issue has been mentioned and an in-app clarification/explanation is being considered by the developers. Hope that helps.
-
The clone brush is only present in Affinity Photo, not Affinity Designer - currently there's no Windows beta of Photo available to download. We're aiming to get the Photo beta out before the end of the year, sorry for the confusion. Diggs, not sure I follow what you mean regarding consistency - what I tend to do is Alt + Click as usual then release the click ever so slightly sooner than Alt. This ensures that the click (choosing the actual clone source) actually registers. As far as I can tell, that's how I would expect the clone brush to work; the modifier (Alt) to enter the source picker mode, then a full click and release of the left mouse to pick the source. Holding Alt after the click will of course cause it to remain in source picker mode - is that what you're referring to?
-
Hey Bill, the denoise issue might actually be related to the dynamic preview. Unless you are at 100% zoom level, the noise preview will not be representative of how it will look when fully applied because you're seeing a downsampled version (or different mipmap level) of the image. Many people see this when they preview denoising at fit-to-screen or a lower zoom level, and once it's applied, they observe that the noise seems to "come back". The denoising has actually worked, but in order to have an accurate preview, you must be at 100%. You can also observe this with other filters, especially other noise filters like Add Noise, Diffuse, etc. Additionally, it's worth noting this when using live filters. Having live filter layers is incredibly handy for a non-destructive workflow, but since they have to constantly re-draw whenever you zoom (and subsequently change the mipmap level) you can end up with a skewed representation of your image. Just bear in mind that you should try and preview filters at 100% for the most accurate representation of what they're doing. For what it's worth, this phenomenon is also present in other software, although most software (including ours ;)) doesn't go to great lengths to explain it within the app itself.. If that's not the issue then it's certainly worth exploring; any more detail you can provide as to workflow would be very valuable. Hope that helps.
-
Hello, still here, just busy between various tasks - tutorials are only a part of my job! All I can say is that there will be plenty of 1.5 tutorials - by my last count, there should be at least 20 for launch, probably more as features are still being added and refined (and I still have some unplanned ideas). A few older videos will be revisited as well to bring them in line with 1.5's functionality. Photo 1.5 is going to be a beast when it hits! Don't worry, there will be plenty of tutorial content to help people get to grips with it.
-
Hi, presuming that you've already stitched your 360x180 image (Photo doesn't do this type of stitching yet), try Filters - Distort - Rectangular to Polar. Hope that helps!
- 5 replies
-
- 1
-

-
- panorama
- stereographic
- (and 1 more)