EdD
-
Posts
95 -
Joined
-
Last visited


-
 AdroitAndroid reacted to a post in a topic:
Hiding parts of an image and shape
AdroitAndroid reacted to a post in a topic:
Hiding parts of an image and shape
-
I suggest looking at Simon Foster's courses on Udemy or search for him on Google as Drippy Cat. Simon is particularly good at explaining why to do something and also to offer suggestions of differing ways to get the results you want. Also check out lots of video courses by Olivio Sarikas (Multi4G) and also a site called InAffinity. All three of these content creators are members of this forum. If you want still more try Affinity Revolution too. All of these folks offer free instruction as well as paid. Hope this'll steer you in the direction you want. Enjoy.
-
kia reacted to a post in a topic:
How do you create a line drawing from a photo in Affinity Photo?
-
What does this mean?
EdD replied to EdD's topic in Pre-V2 Archive of Desktop Questions (macOS and Windows)
Thanks Walt, Ed -
I've selected a layer and the move tool but instead of the usual blue outline with the blue dot handles I'm getting this magenta outline with the little blue 'x'. What am I missing?

-
Looking forward to seeing tutorials on the new release of Photo. Is there a way to tell which of the tutorials are new?
-
AP B&W conversion problem
EdD replied to EdD's topic in Pre-V2 Archive of Desktop Questions (macOS and Windows)
Thanks for the help guys. I restarted the process with the RAW file and did the conversion, twig removal and sharpening and couldn't reproduce the problem - it worked just as I'd originally intended. Must be the universe getting back at me for past indiscretions or maybe one of my cats 'helped'. Either way the problem has disappeared and I haven't found a way to make it happen again so I'll just carry on. Ed -
AP B&W conversion problem
EdD replied to EdD's topic in Pre-V2 Archive of Desktop Questions (macOS and Windows)
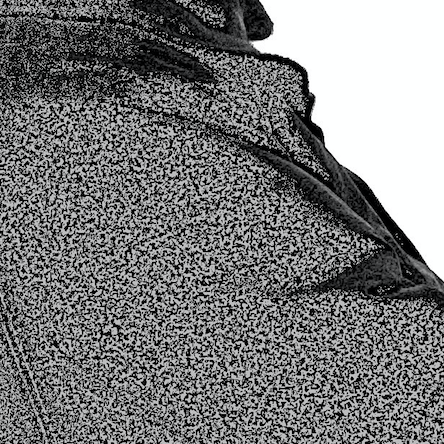
Where I'm getting these strange results is when I export the image. Inside AP it looks fine but the file I output has the 'grainyness' showing when I try to open it in Finder or send it through email. Any idea why that's happening? -
AP B&W conversion problem
EdD replied to EdD's topic in Pre-V2 Archive of Desktop Questions (macOS and Windows)
Hi Firstdefence Thanks for replying. Here's the file I'm struggling with. Ed IMG_8025TH_AliceLk_Ice_BW_test.afphoto -
I seem to be having a case of brain freeze. I've taken an image and converted it to B&W. So far so good. After a bit of sharpening an adjustments to the colour channels (via the BW filter) everything looks as I want. Exported the image and then when I open it in Finder or attach it to an email the solid black areas are 'mottled'. I remember something about colours showing up with red or blue areas to indicate if they're oversaturated but it's been a long time and I can't remember what to do or even if this is what's causing my problem. Any suggestions? I've attached a small sample to show what I'm getting rather than solid black. Thanks Ed
-
You might find Simon Foster's (aka Drippy Cat) free tutorials for beginners of help. My apologies if this is too basic - from what I understand you're new to photo editing so his free courses and/or his courses on Udemy might address your questions about a fundamental workflow.
-
An education needed
EdD replied to jimfastcar's topic in Pre-V2 Archive of Desktop Questions (macOS and Windows)
I'll add my recommendation to Drippy Cat's (Simon Foster) tutorials. He offers a series of beginner tutorials free on You Tube which will get you going and give you a sense of how his teaching style fits you. If you like his approach have a look at his Affinity Photo Basic Foundations course on Udemy - it's very thorough, aimed at a newbie (which we all were) and gives explanations not only of how (as in which button to press) but also why you do things in a particular order. Sections of the course are available for free preview. The courses are also on sale at the moment. -
Just clicked the link (on Safari) and it worked fine . Also it identified my country (Canada) right away.
-
CircularWebs reacted to a post in a topic:
Border boredom
-
I doubt it can get much simpler than this :
-
1.6.7 RC1 Beta problem. Found a problem with High Pass filter. If I apply it by using Filter > Sharpen > Highpass it puts the grey mask over the image as expected but when I try to adjust the layer blend mode the grey mask flashes off very briefly but stays on. This means I can't see what effect the filter has. Applying the filter doesn't change that - the grey mask stays on the image rendering the image useless. When I use the non destructive method with a Live Filter Layer everything works normally.
-
DM1 reacted to a post in a topic:
Hiding parts of an image and shape
-
Hiding parts of an image and shape
EdD replied to ColtonW's topic in Pre-V2 Archive of Desktop Questions (macOS and Windows)
Here's a simple tutorial on how to do this: -
Hi SF, Think of the RAW as your negative (digital negative). When you open a RAW image you'll find yourself in the Develop Persona. There you can make a variety of changes like for example adjust your exposure, and contrast. There's a lot more you do there but for this example those are simple. When you then click on Develop (upper left) you'll switch over to the Photo Persona. There you can get started into doing whatever manipulation you like. Your RAW image always remains untouched. The analogy might be to say you've projected your negative (RAW) onto a print paper (develop) and now in Photo you're starting to work on that print. Your RAW image stays where it was when you put it into your computer. Now that you're in Photo persona any work you do will be saved onto a .afphoto file. If you decide to use Save As a window will ask you to confirm the file name and where you want it stored (first pic). On my example shot I selected Desktop. Put your image wherever makes sense to you. Start making any and all sorts of adjustments now and you'll get a feel for what Affinity Photo can do. When you've played enough you can Save your file again or delete it or export it as a jpeg, tiff or a variety of other formats. The important thing is that you can never alter your original RAW image. If your original was a jpeg, saving or exporting it with a new name is a good idea if you want to keep your original as shot. Another option you have when you open an image or develop a RAW is to select the Background image and duplicate it. The select your duplicate and do your work on it. Your original Background image will stay untouched. If you work with a duplicate (CMD J will duplicate your layer) you can uncheck the original Background layer which will have the little lock icon on it and it'll remain unchanged by your edits (second pic). I think you might find the tutorials by Drippy Cat and also Affinity Revolution will help get you started. It's a confusing process at first but I bet you'll be up and running quicker than you expect. I hope this makes a bit of sense. Ed