jenkm
-
Posts
42 -
Joined
-
Last visited
Everything posted by jenkm
-
create svg file with polygon tag
jenkm replied to 4cari's topic in Pre-V2 Archive of Desktop Questions (macOS and Windows)
You use a wrong tool, you need to use Divide operation to split the shape into pieces. -
Try SVG Optimizer to reduce the size: https://jakearchibald.github.io/svgomg/
-
Export to PSD, why do you need SVG.
-
Blend mode on layer group
jenkm replied to shojtsy's topic in Pre-V2 Archive of Desktop Questions (macOS and Windows)
It seems this is a bug. If you select a group (in the Layers panel) and set the color (in the Color panel or by Color Picker Tool) then all pixel layers in the group will be filled with this color. -
DPI (dots per inch) Problem
jenkm replied to Kamoon's topic in Pre-V2 Archive of Desktop Questions (macOS and Windows)
If you have the 216x162mm at 300dpi image that is equivalent to 2551x1913px. It can't turn into 5152x3864px. -
There are issues with declarations CSS classes separated by commas. .bs, .bm, .cr, .gt, .ky, .ca, .fm, .ni, .pr, .us, .ve { fill: #df2929; } And it seems also with CSS comments.
-
SVG Export - Differences - AD
jenkm replied to TamaraMtz's topic in Pre-V2 Archive of Desktop Questions (macOS and Windows)
To be precise, SVG (for the web) is not an option, it is a Preset (set of export options). Click the More button to see options. For example, without Flatten transforms: <g transform="matrix(0.922466,-0.386079,0.386079,0.922466,-87.7666,149.969)"> <rect x="256" y="256" width="128" height="128" style="fill:#ffffff;"/> </g> With this option, the transformation will be applied to the rectangle: <path d="M360.879,216.95l-107.929,45.171l45.171,107.929l107.929,-45.171l-45.171,-107.929Z" style="fill:#ffffff;"/> -
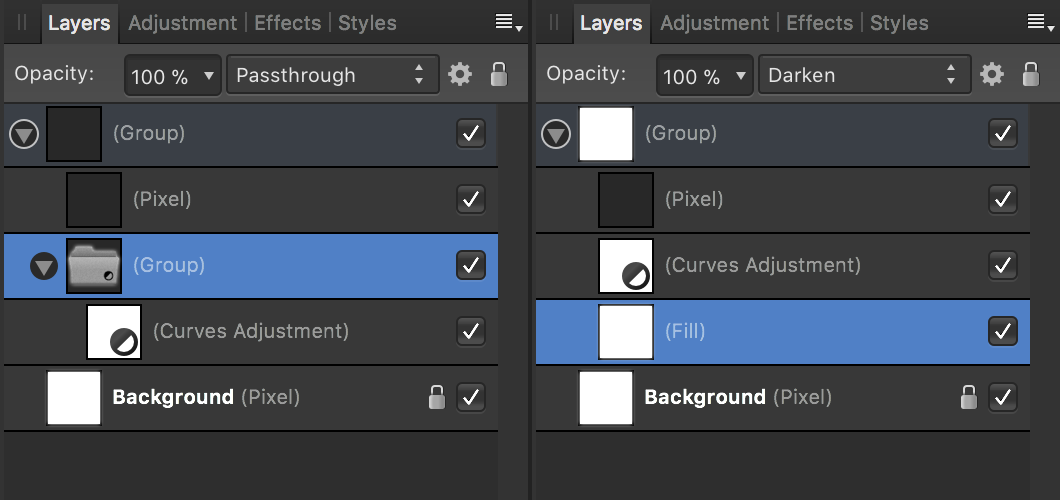
There are two ways to work around this limitation: just place all adjustments layers into an additional group add fill layer which does not change the image (white in Darken mode)

-
Blend mode on layer group
jenkm replied to shojtsy's topic in Pre-V2 Archive of Desktop Questions (macOS and Windows)
In Photoshop everything works in an obvious way: if a group is in the Passthrough mode it is as if there is no group, the blending order is not changed if a group mode is Normal, first blended all layers in this group (nothing interacts with the layers outside of the group) then group is considered as a single layer in Normal mode if a group mode is Multiply (for example), also the layers in this group are not interacts with the layers outside of the group, group is considered as a single layer and blend down in Multiply mode That is, if the group mode is not Passthrough, for example adjustment layers in the group do not affect the layers below the group. In Affinity there is two difference: If a group contains both adjustments and pixel layers, these adjustments only affect layers in the group. Adjustments would like to ignore Passthrough mode, how would masking by layers. And if a group has only adjustments in it (so it shows the folder icon) it will affect the elements outside the group. If you have a group not in Passthrough, the layers inside the group are not interact with the layers outside of the group. If the bottom layer in the group has its own blending mode it just ignores. -
Blend mode on layer group
jenkm replied to shojtsy's topic in Pre-V2 Archive of Desktop Questions (macOS and Windows)
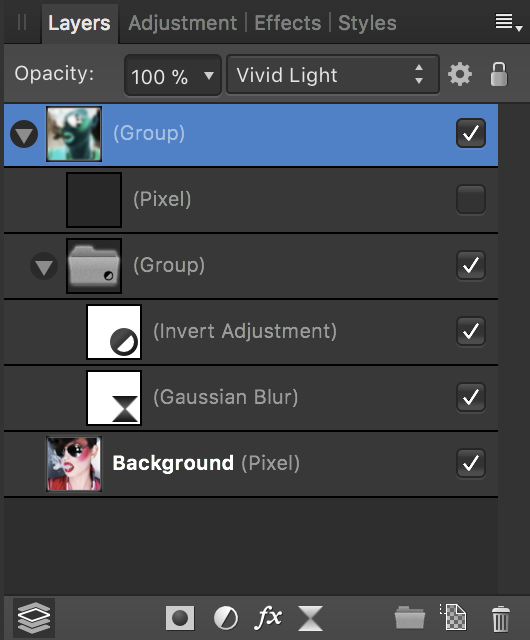
to @R C-R When you apply a blending mode to an adjustments layer it works in the following way: 1. adjustments are applied (in the Normal mode) to the background 2. the result of step 1 is blended (in the selected blend mode) with the background When you apply a blending mode to a group that contains only adjustments it works the same way: 1. all adjustments are applied in the Normal mode 2. the result of step 1 is blended with the background That is, the blending mode is applied only once, it is logical that in the case of live filters it must work the same way. For example, if you create a group of three Blur filters, each filter should be applied in the Normal mode, and then the blured result blended with the original image in the group’s mode. But now it looks as if first the image is blended with itself, and then apply filters each with a blending mode. (this is what I said "applied twice") to @shojtsy I created the bug report: https://forum.affinity.serif.com/index.php?/topic/53376-blend-mode-on-group-of-live-filters/ About this layer stack and what does the empty layer: The empty layer need to change the behavior of the group: So, there is a strange behavior, the second group of adjustments and filters see outside the parent group (group with the Vivid Light mode). And then the parent group blend down the result of second group in Vivid Light mode. And yes:
-
Blend mode on layer group
jenkm replied to shojtsy's topic in Pre-V2 Archive of Desktop Questions (macOS and Windows)
When you apply a blending mode to a group that contains only adjustments it works exactly as you want. First all adjustments are applied to the background (as if to copy) and then the result is blended with the background. As on your screenshots in the first post. The problem is that you apply live filters. It seems that there is a bug, and the blending mode is applied twice to the live filter layers. You can try this tricky layer stack with an empty layer: -
Reflect Blend Mode
jenkm replied to Scott Williams's topic in Pre-V2 Archive of Desktop Questions (macOS and Windows)
It's correct to say that the blend modes (all of them) don't work with transparency, there's just nothing to blend. But by itself, the Average and 50% Opacity are equivalent. They don't publish the formula because it's not useful to the average user. Looking at formulas you do not understand what will happen with the image. If you want, you can find formulas here: Adobe PDF reference, W3C CSS specification, perhaps even the source code of the GIMP and so on. To understand blend modes, you need to look at their graphs (like on the Pegtop website), think of it as the Curves adjustment. -
Reflect Blend Mode
jenkm replied to Scott Williams's topic in Pre-V2 Archive of Desktop Questions (macOS and Windows)
Check the Document ▸ Transparent Background. -
Reflect Blend Mode
jenkm replied to Scott Williams's topic in Pre-V2 Archive of Desktop Questions (macOS and Windows)
You're wrong, you get different results because your white background is not actually white, it is transparent. Blending with transparency is always performed in the Normal mode. -
HSL Performance
jenkm replied to Sullyman's topic in Pre-V2 Archive of Desktop Questions (macOS and Windows)
I think you can achieve the same result as in Photoshop with the other settings in Affinity, you can't just copy the settings. It is also possible (theoretically, I have not tried it) to create a LUT in Photoshop to copy the effect and use this LUT in Affinity. -
All layers option for Flood Select Tool
jenkm replied to jenkm's topic in Older Feedback & Suggestion Posts
Just noticed that the other selection tools also work on only one layer: Select Sampled Color Color Range Tonal Range Alpha Range I think they should work on the composite layer, as in Photoshop. -
HSL Performance
jenkm replied to Sullyman's topic in Pre-V2 Archive of Desktop Questions (macOS and Windows)
The HSL’s Reds has a maximum effect only on pure red. That is, darker or lighter colors, or red colors with less saturation will have a smaller impact. To understand the logic (in my opinion) of this, take for example a photo of a man in red clothes: in the case when you are using HSL’s Reds you operate only on bright (saturated) clothing, keeping the skin and deep shadows untouched when you create a mask of all the red colors (Select > Colour Range > Reds) and then use HSL’s Master, it will also affect skin color and will bleach the shadow -
@Sullyman Can you post a screenshot or describe which mode you're using and how.
-
HSL Performance
jenkm replied to Sullyman's topic in Pre-V2 Archive of Desktop Questions (macOS and Windows)
Yes, they work quite differently. (I think this is intentional.) It seems like Photoshop’s Lightness also desaturates color, while the Affinity’s Luminosity trying to keep the color saturation unchanged. -
Also the possibility of using options "Don’t Save" or "Save" for all at once would be useful.
-
What are exactly raw images?
jenkm replied to codelearner's topic in Pre-V2 Archive of Desktop Questions (macOS and Windows)
Actually, a RAW file is not an image, it's just the recorded data of the sensor. There's no image to see. You can imagine it as the voltage values of sensor pixels. -
Add the All layers option for the Flood Select Tool, similarly as the Selection Brush Tool already has. Currently this basic tool is unusable for multi-layered files. Looks like a bug.
-
1. The blend modes do not depend on the color profile, they operate with color values i.e. just numbers and not what color they represent. 2. I think there is no difference in the blend modes math, at least significantly visible. So perhaps, you are using Fill (in Photoshop) instead of Opacity, or Convert to Profile vs Assign Profile when you open the file.
-
HSL Performance
jenkm replied to Sullyman's topic in Pre-V2 Archive of Desktop Questions (macOS and Windows)
Maybe you have enabled the HSV checkbox in the HSL Adjustment panel. Perhaps this is because the Lightness (Photoshop) and Luminosity are two different things. Or it’s because Photoshop has adjustment sliders to modify the range of colors, and you have a wider range of what to count as red (or other) color. -
Luminosity Blend Mode - Help!
jenkm replied to smadell's topic in Pre-V2 Archive of Desktop Questions (macOS and Windows)
The HSL in the Info panel (Color panel, HSL Adjustment) and the "HSL" blend modes use different color models. The "Luminosity" for blend mode it’s just a name, actually it's a kind of luma: Lum = 0.3R + 0.59G + 0.11B The values of the Saturation are also different, despite the same names. So you can't check the HSL blending modes focusing on the Info panel.