greyscale
-
Posts
69 -
Joined
-
Last visited
2 Followers


Recent Profile Visitors


-
 greyscale reacted to a post in a topic:
Affinity Photo - Convert a mask to pixel layer
greyscale reacted to a post in a topic:
Affinity Photo - Convert a mask to pixel layer
-
SamMark reacted to a post in a topic:
Sewing patterns via multiple artboards
-
greyscale reacted to a post in a topic:
How to create a gradient mask?
-
Sewing patterns via multiple artboards
greyscale replied to greyscale's topic in Older Feedback & Suggestion Posts
@LionelD Thanks! I happy to report that this issue has been fixed. The solution is, rather than placing all printable elements inside the artboards, you should draw them above the artboards in the layer stack. Then everything prints out on all pages. I think this is what you've done in your file, Lionel. Not sure if Affinity has fixed this, or if I simply hadn't tried this approach before! Either way, it's very easy to do now 😃 -
KPM Designs reacted to a post in a topic:
Sewing patterns via multiple artboards
-
Sewing patterns via multiple artboards
greyscale replied to greyscale's topic in Older Feedback & Suggestion Posts
That's excellent! Thank you for sharing, KPM. -
KPM Designs reacted to a post in a topic:
Sewing patterns via multiple artboards
-
Jpburns reacted to a post in a topic:
Rounded corners on text frame
-
Thomaso, I think you're talking about something different. We're discussing the Lock Children checkbox that is found at the far right of the Contextual Toolbar. It most definitely affects only the selected layer.

-
 DressCodeless reacted to a post in a topic:
Sewing patterns via multiple artboards
DressCodeless reacted to a post in a topic:
Sewing patterns via multiple artboards
-
DressCodeless reacted to a post in a topic:
Sewing patterns via multiple artboards
-
Sewing patterns via multiple artboards
greyscale replied to greyscale's topic in Older Feedback & Suggestion Posts
Very happy to help! It's actually my partner who is making the patterns, and she hasn't made the full transition to AD yet. So I don’t think I have an answer for measuring a curve. The only thing I can think of is setting the view to actual size and measuring with a real ruler, or printing it out and measuring on the paper. Probably not ideal solutions though… -
ra.skill reacted to a post in a topic:
Sewing patterns via multiple artboards
-
ra.skill reacted to a post in a topic:
Sewing patterns via multiple artboards
-
Sewing patterns via multiple artboards
greyscale replied to greyscale's topic in Older Feedback & Suggestion Posts
Ah, maybe that's the issue I was also having and I didn’t realize it It seems that objects will automatically snap into an artboard … unless you switch on the Edit All Layers button at the bottom left of the Layers panel. I think that will solve the issue.
-
View Menu Studio
greyscale replied to polochon's topic in Feedback for Affinity Publisher V1 on Desktop
+1 on not having the panels buried in the View menu, Either a Toolbar button or right-clicking on the Toolbar to access a Studio menu would do it for me.. -
Sewing patterns via multiple artboards
greyscale replied to greyscale's topic in Older Feedback & Suggestion Posts
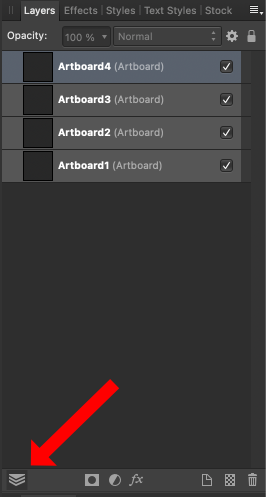
I think the artboards issue has been resolved. I did a quick trial exporting an image over multiple artboards, and it worked. There's also now at least one online tutorial about pattern making with AD: https://haberdasherbee.co.uk/blog/designing-sewing-patterns-in-affinity-designer/ In order for objects to print on all pages when you generate the PDF, you need to make sure that they are placed above all the artboards in the layer panel. See the attached screenshot. Placing objects inside a specific artboard will restrict them to that artboard/page on export. Thanks for fixing this, Serif!
-
Fun Art Sam reacted to a post in a topic:
Lock children – Context Toolbar / Menu bar / Shortcut / Help
-
+1 for Object Styles that behave like Text Styles
-
greyscale reacted to a post in a topic:
Rounded corners on text frame
-
Rounded corners on text frame
greyscale replied to ConnectCreative's topic in Feedback for Affinity Publisher V1 on Desktop
Thanks for sharing your cool workarounds, Matthew and loukash! -
Rounded corners on text frame
greyscale replied to ConnectCreative's topic in Feedback for Affinity Publisher V1 on Desktop
Thanks for the workaround! I have to say that I've been using page layout apps for 20 years, and I don’t think I ever wanted text to follow the shape of a rounded rectangle. A circle, yes, A triangle, yes. But never a rounded rectangle. A rounded rectangle is first and foremost a rectangle, and from my perspective having text follow the rounded corners should be an option, not the default behavior. InDesign will do this, but not perfectly. You have to inset text more than the corner radius in order to avoid a rounded text margin. It's usually not a problem, but it occasionally annoys. So Serif, you have the chance to one-up Adobe here -
 greyscale reacted to a post in a topic:
Rounded corners on text frame
greyscale reacted to a post in a topic:
Rounded corners on text frame
-
Rounded corners on text frame
greyscale replied to ConnectCreative's topic in Feedback for Affinity Publisher V1 on Desktop
You beat me to it, MEB! And you didn’t upload a stupidly ginormous image like me. A tip of the hat to you -
Rounded corners on text frame
greyscale replied to ConnectCreative's topic in Feedback for Affinity Publisher V1 on Desktop
Yes, but the whole thing breaks down when the corners are only very slightly rounded. In my example below, I want all the text to be left-aligned. But because of that corner, it's impossible to achieve – even with the huge amount of margin I've added around the text.
-
walt.farrell reacted to a post in a topic:
Rounded corners on text frame
-
Rounded corners on text frame
greyscale replied to ConnectCreative's topic in Feedback for Affinity Publisher V1 on Desktop
Wow, that was fast. And easy 😊 Thanks, Walt and MEB! -
Rounded corners on text frame
greyscale replied to ConnectCreative's topic in Feedback for Affinity Publisher V1 on Desktop
So then, at the moment we need to use a text frame on top of a rounded rectangle if we want full control over the indents? That's just not right in a professional page layout app. -
Rounded corners on text frame
greyscale replied to ConnectCreative's topic in Feedback for Affinity Publisher V1 on Desktop
When I use the suggested workaround, the rounded corner appears to indent the first line of text. When I remove the rounded corners, the indent goes away. Anyone else having this problem? +1 for rounded corners on text frames and full control over the indents.