Aammppaa
-
Posts
1,808 -
Joined
Posts posted by Aammppaa
-
-
@Chris B - This happens for me every time.
Anything further I can do to help?
Video rather than GIF?
Some sort of debug info?
Driver version numbers?
-
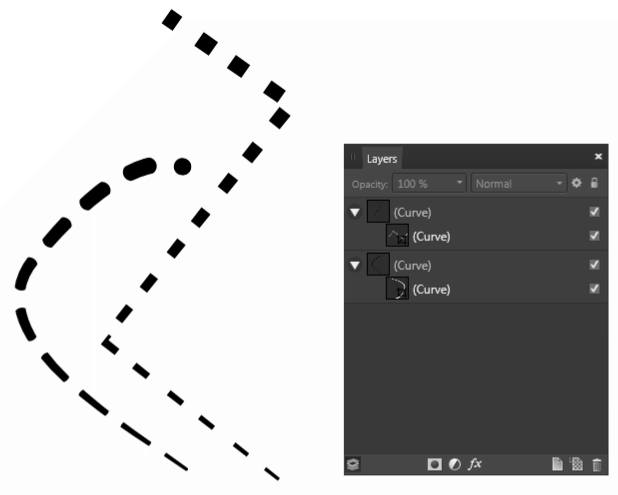
This doesn't seem to be supported natively, however I have a suggested work around...
- Draw curve.
- Make it dashed.
- Duplicate.
- Make copy solid and add taper.
- Use the tapering copy to mask the dashed original.
Looks better with square ends than rounded, and is a hassle to reshape curve (as the mask doesn't reshape at the same time).

But it kinda sorta almost works, and may get you out of a scrape.
- thedrewdarrow, artistraman and gdenby
-
 3
3
-
I get the same bug in AP too (just happened to have AD open when I replied to the thread).
AP and AD share their backend code and the UI code is OS specific (this seems to be a Windows bug).
@harrym 1280 x 1080 [x 2 screens]
Bug occurs on both monitors, though the popup always appears top left of the primary monitor.
-
It looks like AD snaps both to the baseline and the bottom of the object.
Since these can be very close to each other, it makes the snap that you want hard to achieve, unless you zoom in.
-
@harrym Confirmed I see that behavior too.
AD 1.5.1.43
Win7 x64
-
Post your file and someone might be able to take a look?
-
Snapping with grouped objects is something I am struggling with too.
In my simple example (attached) I want to be able to snap the center of any of the small green squares to the corners / center of the large red diamond.
Can't do it!
The best workaround I found was to snap the Diamond to the small Squares, which sometimes gets better results.
I have come to Affinity from Xara Designer, which has a toggle to treat groups as a single or multiple objects. AD doesn't yet seem to have the same ability :(
-
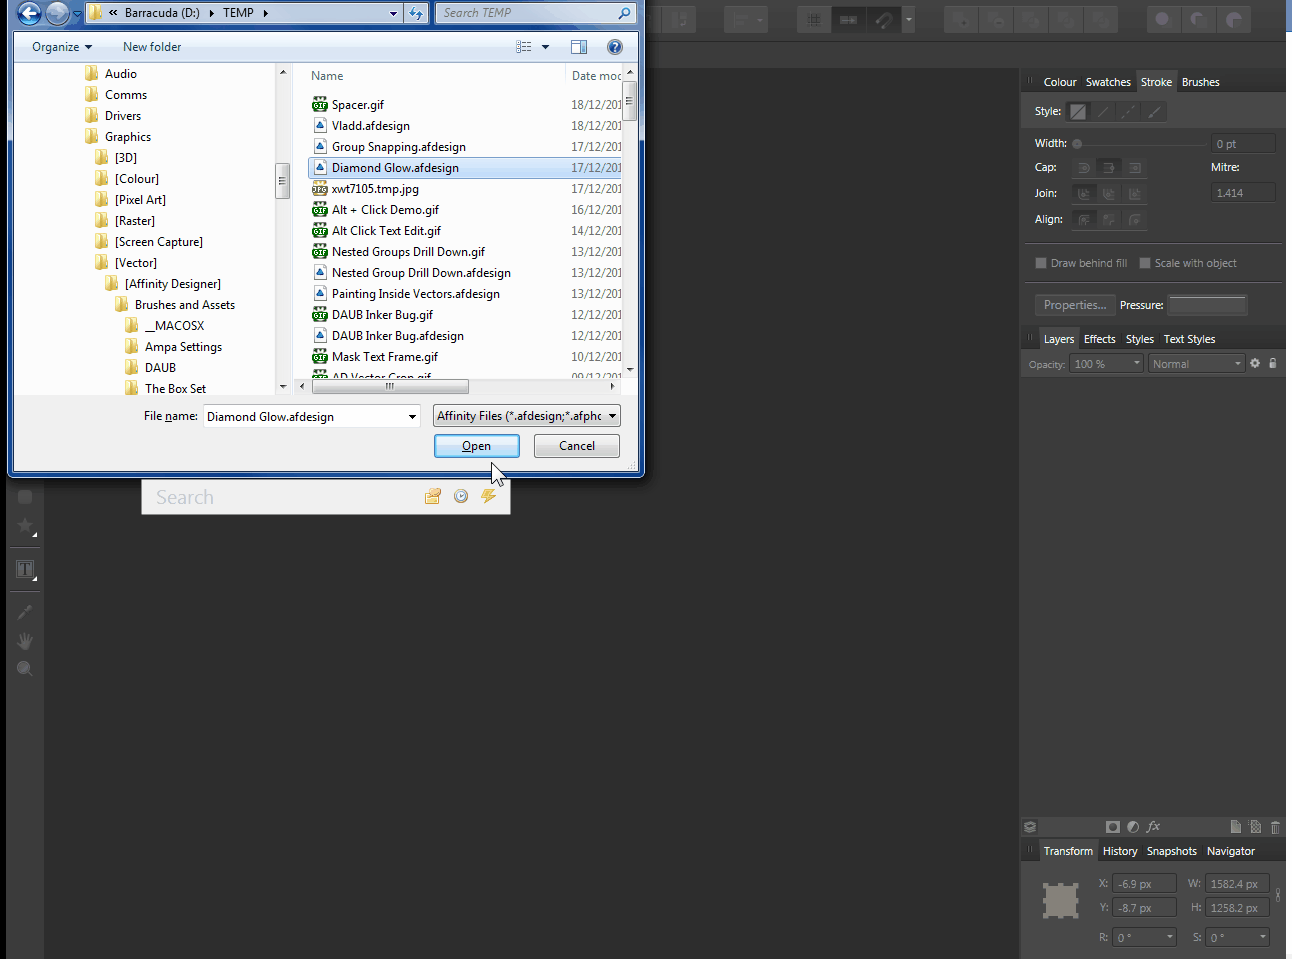
The diamond you are aiming for has a wider (bigger radius), softer (less intense) Outer Glow.
And it also has an Inner Glow.
Remember that you can click the little cog icon by a layer effect to get more controls.
See my attached file to see what I did to make something similar.
I also added a shadow, a sparkle, some shading with a Gradient Overlay (radial), some adjustments to increase Contrast and Vibrancy.
In each case I tried various Blend Modes to see what looked best.
-
-
Alt + Click on an object / layers thumbnail to isolate it!
Hit Escape (or click off the isolated object, or click another layer in the layer studio) to get everything else back.
Edit: cross post with MEB (but I spelled Alt correctly ;) :P )
Edit 2: Not fair!!! Now he's done an edit, making me look like an idiot! Oh well.... mustn't grumble!
-
@MartinK Wow, have not played with Photo much so far, so hadn't noticed that the separators don't exist.
How strange.
Hope the devs can add them.
And perhaps a transparent separator while they are at it?
-
Go to the thread on the forum, and click "Unfollow this topic", top right of the original post.
-
@MartinK I know you asked for space, but do you realise that you can add a Horizontal Line to break sections of tools?
View > Customize Tools... > Bottom Right icon > Drag to Toolbar
This might be enough?
-
@clandestine both actions seem to work for me on Win7.
Cursor keys move up and down, and typing jumps me to the correct font.
-
Both agree and disagree... usually I do want to name a layer (in which case the extra click is annoying)
But sometimes I just want a layer as a temporary dumping ground, in which instance having to name it would be a pain.
So, I suggest...
Click new layer, creates layer and inserts cursor for instant entry of name.
Alt + Click new layer just creates layer with default Layer1 type name.
Or vice versa.
-
Really nice, and wonderfully baffling... it looks like a photo, but also a little too perfect to be real.
-
@jaydonteh: Have to agree that the 2 steps are a little frustrating.
I would like to make a feature request that the Insert option is 'sticky'.
Once you've chosen to Insert > Behind (for example), I think that should be the default, until you chose to change the behaviour.
This could be and alternative mode, so that left clicking the button works as now, the next operation in inserted at front / behind / inside. BUT if you Alt + click the button, then all future inserts follow the selected rule, until the user explicitly chooses to to otherwise.
(Don't know if devs will find this buried in an existing thread - perhaps I need to make a new post?)
-
By default the number keys set opacity - which is fine. BUT AD doesn't distinguish between the standard numbers and the numeric keypad, to which I'd really like to assign a bunch of other shortcuts.
With 15 keys on the numpad, and at least 3 different modifiers, there are >45 keyboard shortcuts going to waste here!
Also, under the current system, if I do set a numeric keypad numeral as a shortcut, it doesn't warn me that there is an existing clash with the opacity function... worst of both worlds!
Thanks for your consideration.
- Wosven, Intuos5, Mr. Doodlezz and 2 others
-
5
-
Ah crap, my mistake re: document setup - this is what it is called in Affinity Designer. In Photo the places to change it are using the Zoom Tool or View Tool.
Yes - odd that the ruler can't be in percent, since all the input boxes will accept percent (% or pc) as a valid unit type.
It's alt+ right + left mouse button.
Yep - left and right resize, up and down change hardness.
Happy painting.
-
1. From the Help file (search for "Ruler")…
- With the Zoom Tool selected, choose a unit of measurement from the pop-up menu on the context toolbar.
- From the File menu, select Document Setup, and in the dialog choose a unit type from the Document Units pop-up menu.
Changing the units will automatically change the units on displayed rulers.
2. At present I don't think you can change the origin. Has been requested and will no doubt come in a future update.
3. You can hit Escape to restore other layers, or click outside the isolated layer (eg the pasteboard).
4. From the Help (search "Brush Size")…
- Press the right mouse button, then left mouse button and drag on the page. Dragging left or right will decrease or increase the brush size, respectively.
Have to say this is a very cumbersome move for me!
Hope this sets you on your way :)
-
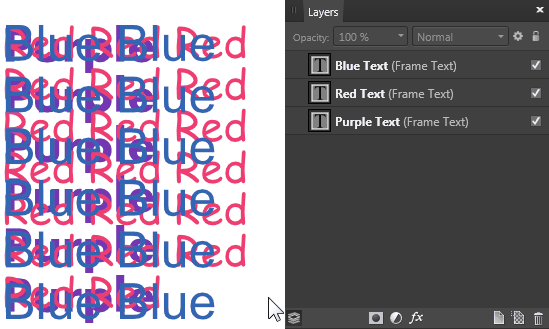
See GIF.
I have three text layers.
I Alt + Click to select behind the top layer.
Once back most layer selected, I press T to switch to text tool.
Then am able to drag to select (or click to insert cursor) directly into the selected text frame (in this case the back one).
I then type a load of garbage ;)
-
Already possible.
From the Help file (search for "replace")…
To replace an image:- Select an image.
- From the context toolbar, select Replace image.
Hope this helps.
-
Jaydonteh
You can set shortcut keys for insert > inside / front / behind from the Keyboard Shortcut options in Preferences.
You'll find them under Draw > Layers > Insert
Having set the mode, you just Ctrl + V to paste and it will follow the rule you chose.
-
>> Alt + Click selects objects individually that are covered by other objects.
> This doesn't work for me.
Works fine here.
Stack of 5 circles, Alt+Click 5 times and the circles are selected one by one, from top to bottom.
There is a much faster way to do this... Holding Ctrl for Windows or Cmd for Mac will select objects inside another.
Indeed but I didn't think this was the question.
I thought it was asked how to get the clipped object out of the containing object.
Ctrl + Click will select it, but not get in outside, where any of my methods will.


silly little bug
in [ARCHIVE] Photo beta on Windows threads
Posted
nvidia driver: 376.09
I do have Huion 1060 tablet, which is plugged in, but not in use when the bug occurs.
Even if I unplug the tablet, quit the driver helper app, then quit and relaunched AD, the bug still occurs.
By menu alignment I assume you mean Handedness, in Tablet PC settings?
I have tried both Right and Left handedness, and the bug still occurs.
The exact position in which the context menu opens on the first right click does vary slightly depending on the Handedness setting...
Left: opens roughly 40 pixels out from the top left corner.
Right: opens in the top left corner with no offset.