mr.burns
-
Posts
40 -
Joined
-
Last visited
Recent Profile Visitors
1,132 profile views


-
 Guanche reacted to a post in a topic:
UI too small
Guanche reacted to a post in a topic:
UI too small
-
Jawbones reacted to a post in a topic:
UI too small
-
Jawbones reacted to a post in a topic:
UI too small
-
Artist in Illinois reacted to a post in a topic:
UI too small
-
2989 reacted to a post in a topic:
UI too small
-
Zox reacted to a post in a topic:
UI too small
-
Zox reacted to a post in a topic:
UI too small
-
IPv6 reacted to a post in a topic:
Easy way to combine masks
-
JohnM reacted to a post in a topic:
UI too small
-
Jowday reacted to a post in a topic:
UI too small
-
Hi Murfee, thanks this is exactly the experience I made. The background color influences the outline / stroke. OK than this isn't a bug - its a feature ;-)' Thanks...
-
Hi, there is no style applied to the text. And using the 'default' buttons made no difference. I recorded a screencast where I created a simple text and just by modifying the foreground color / background color the outline gets visible. If I set the foreground color (fill color) to 'no color' (which means I selected the small white circle with the red line in it) the issue gets clearly visible. Just take a look here: Screencast
-
Hi, thanks for reply, but I never used any kind of stroke/outline for text so Affinity cannot remember this. If I use P to open the pen settings It shows a white rectangle with a red line in it - this means there is no stroke applied. But eventhough the text shows this kind of border - this is weird. May you can play yourself with the text. Just create some text (size around 48pt to make it clearly visible) and choose a font color from the settings bar at the top of AP. Then go to the right where the front and back color and colorpicker resides and choose a different color for the background. Then you will see there is this kind of border/outline even if stroke (under Pen settings (P)) is disabled. But there is / can be a button in the toolbar where you can revert to defaults. I cannot find this button :-(
-
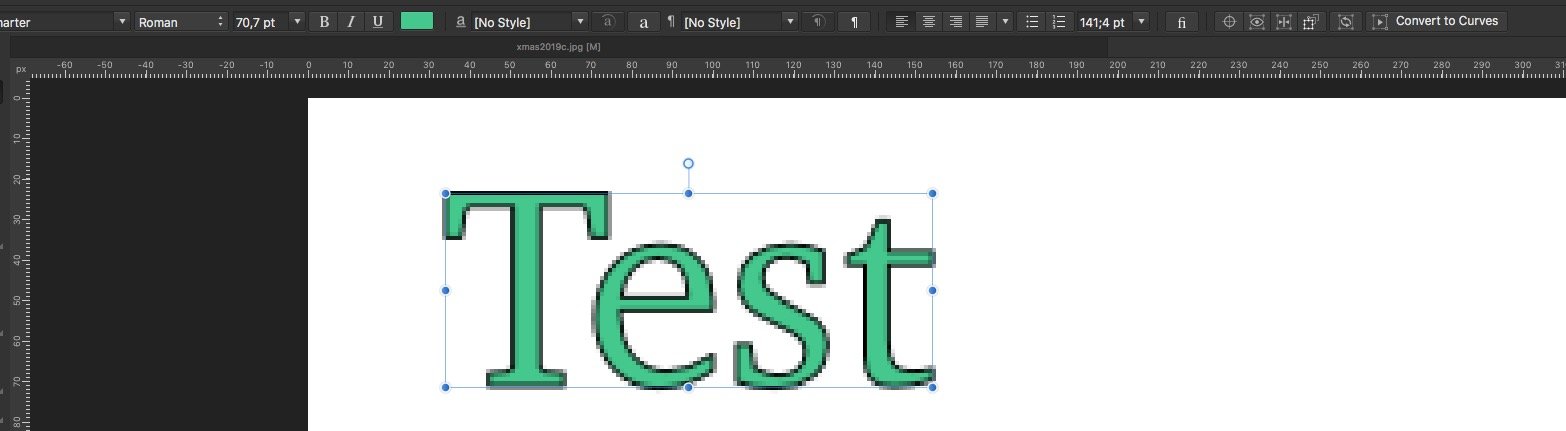
Hi, In the attached image one can see that the text has some kind of outline/border in black where the text itself is green. The black color comes from the background color and the green one is the text font color. I just want to know: 1. Does the text per default has some kind of border/outline inside Affinity Photo? 2. Can I adjust the thickness of the border? 3. How can I get rid of this border? Thanks...

-
Arbitrary canvas rotation (angle) without trackpad
mr.burns replied to mr.burns's topic in Older Feedback & Suggestion Posts
Hi MEB, thanks - I wonder what this function is for if we cannot set an arbitrary angle!?! Will this feature be added in the future? -
Are there shortcut keys for refine mask preview?
mr.burns replied to mr.burns's topic in Older Feedback & Suggestion Posts
Hi MEB, OK - thanks! -
Thanks to all - that helped. (sorry for answering so lately)
-
Arbitrary canvas rotation (angle) without trackpad
mr.burns replied to mr.burns's topic in Older Feedback & Suggestion Posts
Hi bleduc and MEB, thanks for reply I found this feature now. But I don't have a trackpad. How can I rotate the canvas in arbitrary angle without trackpad? Any fixed angle is useless for me since I need to rotate my canvas to align eyes horizontally. Thanks for further help. -
Hi, I often use the refine mask tool to separate hair from background. I often need to switch between the different preview types like Overlay, Black matte, white matte, black and white and Transparent to judge the quality of the refinement. Using the mouse to switch between these modes is really annoying. Are there any shortcut keys to switch between these modes? Thanks
-
Hi, sometimes it is easier for drawing if you can rotate the canvas (I don't mean rotate document!). Is there any way to rotate the canvas temporarily? E.g. using 'horizontal flip' function of the clone tool for portrait retouching eyes in a potrait. It would be very helpful if I could rotate the canvas to align the eyes horizontally. Then I could use the 'horizontal flip' function of the clone tool to easily clone the right eye to the left eye and vice versa. Currently I can get this only using the 'Rotate' function of the clone tool, but it is not so easy to get the right angle since you can see the rotation only in the small brush. And if you use a transparent brush it is even worse to see the rotation of the brush. So much easier would be to rotate the canvas instead of the small brush. So again the question, can I rotate the canvas in Affinity photo? Thanks...
-
Hi, I have two masks in my project. Each mask selects different parts of my image. Now I want to combine them to a new mask (add operation). Currently I only can do this by CTRL-selecting first mask and create a spare channel of it. Then select the other mask, go to channels, right click the previously created spare channel and choose 'Add to pixel selection' and then click the 'Mask layer' icon. These are many steps to just combine two masks. :( Why there is no way to just select multiple masks and by right click providing a feature to combine them as add/substract/exor? Will this feature be added in the future? Thanks...
-
Hi MEB, thanks for reply. Just to make it clear, I need it for Affinity Photo (Designer/Publisher I don't own). So again, is it planned for Photo as well?
-
Hi, is there any update on this issue? When we will get reasonable UI for HiRes screens?
-
Hi, thanks for reply. @MEB: Did you try to edit a horizontally and vertically flipped text on screen? This is really annoying! Is this planned as coming feature?
-
Dear all, I have some text in my document which is flipped horizontally and vertically. If I want to edit the text on the screen it is very difficult since flipped text is not easy to read and Backspace and Del keys work in opposite direction on screen which is little wierd to follow. My question is there any edit box I can use to edit the text written left to right as usual? Thanks...