markw
-
Posts
1,332 -
Joined
-
Last visited
Everything posted by markw
-
Affinity Designer 2 help needed.
markw replied to NaSn's topic in Desktop Questions (macOS and Windows)
Do you mean Edges or Ends? The type of end or Cap that happens at the end of a Stroke, as per the left end of the horizontal line in your screenshot, can be set in the Stroke panel. For cutting the Stroke of the Circle you can use the Knife tool. Hover the cursor over where you want to cut and wait for the cursor to change to a Scissors icon before cutting the stroke. Knife Tool.mp4 -
@kat If all pages in the PDF are to still be on separate pages in the Affinity document, could you perhaps use the File command; ‘Add Pages From File…’ to bring the PDF in. Would that work?
-
@GarryP Thanks for the sample 🙂 Seeing how you have constructed your document I think the results you saw might be by design. Each Artboard becoming one page of a multi page PDF when export ‘Whole Document’ is used via the File menu. In my earlier testing I created the first Artboard at the overall desired poster size and then nested all the subsequent smaller Artboards within it. Choosing 'Whole Document' then dose work as expected producing a one page PDF of all the Artboards.
-
@AlanPickup, @GarryP, I’m struggling to reproduce this problem… I may not have the setup correct for it to fail or it may be OS specific? Do either of you have a test document that consistently fails for you that you can post for others to try?
-
Not sure why, when using an “open” terminus, it overshoots the last node like it dose when it’s supposed to be centred over the node? Is it a bug or by design? One manual workaround is to switch to the Node tool and reposition the nodes which use the Open Circle terminus so that the Open Circle is visually where it should be.
-
What happens when you click on the 'Customize...' button? That should bring up the pressure curve graph.
-
Thanks @Old Bruce, @MEB! Now how did that get ticked!!!???
-
Hi @MEB, here’s a recording of what I’m seeing. Have also restarted Designer 2 and the problem persists…? Mask Test.mp4
-
While I can add a Mask Layer while in Designer (using the add Mask button, bottom of the Layers panel) I can not actually paint on it with any Pixel brushes in Pixel Persona to mask anything. Using; Edit In… and swapping over to Photo the recently added mask works as expected and I can paint on it. Swapping back to Designer and the Mask again refuses to let me paint on it in Pixel Persona. Is this a know bug or something new?
-
I use my old Intuos4 Medium every day and have loved using it from the day I got it years ago. I use it even when not drawing, haven’t touched a mouse in years! Never experienced any form of “disconnect” while drawing on the tablet and looking at a screen. In fact I find it somewhat magical at times just because I can’t see my hand or stylus as I work. It’s a bit like I think of the strokes and marks I want to make, and there they are, on the screen before me! A bit akin to touch typing in it's way! Yes some artists do find screen less tablets disorientating and don’t like them which is fair enough. But then again there are just as many artists who do like using them. There is no right or wrong here each artist must find the tools that work for them. Now there are some very cheep tablet options out there, which genuinely are “garbage” but that is because of poor build quality and flaky drivers not solely because they lack a built-in screen.
-
Remove white from imported document
markw replied to Ecivon's topic in Desktop Questions (macOS and Windows)
Another quick and dirty method; set the music score layer’s blend mode to ‘Multiply’ and place it above the background paper layer. -
Bug Report - Decaying Spiral
markw replied to Michael Mooney's topic in Desktop Questions (macOS and Windows)
For what it's worth the above is my experience too. I'm running Monterey but it might be interesting to hear from someone else who is running the same OS version as the OP, i.e. Ventura, just in case this is an OS specific bug. -
Not entirely I'm afraid Callum😧 Just tried it myself on my Mac and saw the same as in TrentL's video.
-
Publisher: Zoom Options on Bottom Toolbar?
markw replied to Ali's topic in Desktop Questions (macOS and Windows)
What about using the Zoom tool, would that work for you? If it’s not visible in the left Toolbar (looks like a magnifying glass) then go to; View > Customise Tools and drag it into the left Toolbar. Once activated click and drag Left or Right in the work area to zoom Out or In. The zoom will be centred on where you first click with the tool. -
Using the Control key as in the video dose work but it actually puts the pen tool temporarily into Strait Line mode, which by default uses sharp nodes. If you are just wanting sharp nodes in an otherwise “curvy” line, hold down the Option key as suggested by Ron.
-
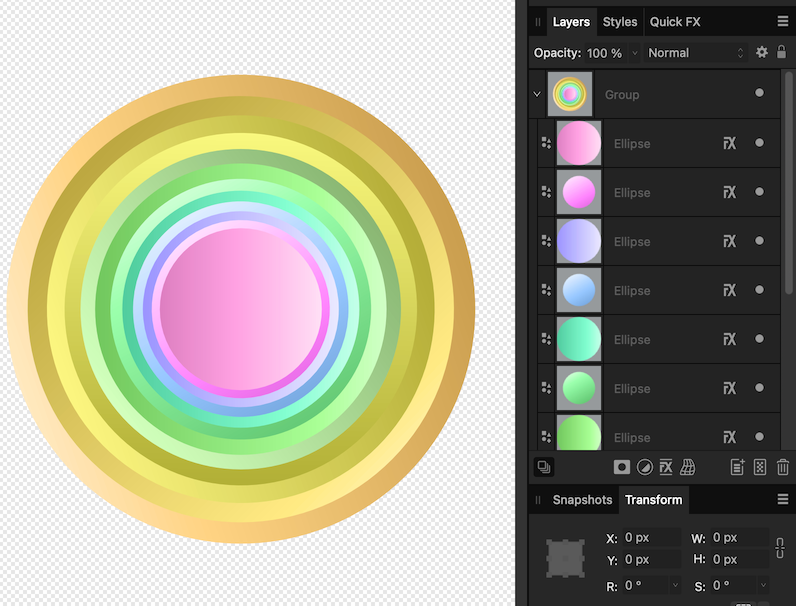
Thinking on it some more, something along the lines of Garry’s grey scale suggestion may work too… In the attached very rough test file; each Ellips has a grey scale gradient with a Colour overlay applied to it set to Colour Blend Mode. Each Ellipse is also slightly rotated and or flipped so it’s gradient is not visually in the same orientation as it’s neighbour. GradientTest.afdesign

-
I would note that in the original sample image each arc of colour appears to not be a solid colour but rather a Gradient clearly transitioning in Hue from Left to Right. Manually stacking uniformly slightly smaller/larger ellipses, each with it’s own linear Gradient, on top of each other may well be the only way to achieve the correct look. I do very much like the effect though!
-
@Ldina Ah, sorry my misunderstanding, I see what you mean now. Unfortunately no I can't see any way of turning that grid Off either. Wonder what the thinking behind it being permanent during rotation is...?
-
@Ldina With the Crop tool active, in the Context toolbar go to 'Overlay' (its right next to the 'Straighten' button) and select; None.
-
Another possibility is not to bother with the Straiten option in the Crop Tool at all. Activate the Grid view and just rotate the image layer by hand to straiten it out using the Grid as reference as to what is strait. Or you could drag in one or two Guides to show true horizontal or vertical and align to those.
-
My assets disappeared and won't come back
markw replied to Mulan's topic in Desktop Questions (macOS and Windows)
In my case the loss of assets did happen during or immediately after the update to 2.6.2. I always update all three apps together, one after the other; Designer, Photo, Publisher. It was immediately after doing this, when I then went back to Designer that I noticed my Assets had all but disappeared. All I was left with one asset in there! This is the first and so far only time this loss of assets has happened to me. As the Assets file is shared by all three apps the loss could have potentially been caused by the update to any one app. How prevalent this loss of assets is, is hard to say? I think most users do not frequent these forums so we will never know how many are affected globally. Of the few that do report here it seems to me that most report it after an app update. But some of those could just be coincidental, as it may have been for me…? In short without a demonstrable set of steps to recreate the problem for developers to probe, it will I think remain an irritating mystery for the unfortunate few for now. -
It’s not just Affinity documents not showing there for me on Monterey, I have noticed other app specific file types also don’t show up there, for example; ArtRage Vitae and Glyphs, even Numbers which is an Apple app is absent. It only seems to show common “standard” file types that aren't created and used by just one app.🤔
-
how to fill pixel layer (AP)
markw replied to wintermute's topic in Desktop Questions (macOS and Windows)
For strait recolouring of text as in your original example Recolour works fine. If you can post an actual example of what you are trying to recolour that might help others give more relevant and focused answers. -
how to fill pixel layer (AP)
markw replied to wintermute's topic in Desktop Questions (macOS and Windows)
If just typing the text a new with the Text tools is not an option, you could use; Layer > New Adjustment Layer > Recolour, on the text bitmap image you have. -
can't drag the crop marquee (Mac) up or down
markw replied to drmajorbob's topic in Desktop Questions (macOS and Windows)
There's a Technical Support request page here; https://support.serif.com/hc/en-us/requests/new