kirkt
-
Posts
440 -
Joined
-
Last visited
Everything posted by kirkt
-
Window Pulls in real estate photography
kirkt replied to mblue's topic in Feedback for Affinity Photo V1 on Desktop
You cannot set a mask to Darken or any of the other layer blend modes, in PS or in AP. (Note: in AP, you literally can set a mask to Darken mode, but what is it darkening or blending with?). A mask is just a grayscale image that controls layer opacity. To composite the Window Pull, you are simply setting the Window Pull layer's blend mode to Darken and then painting in white on the inverted (black) mask to reveal the Darken effect in the area of the Ambient, blown out window. The bright, flash-illuminated edges around the window in the Window Pull are lighter than their Ambient counterpart, so the Darken layer does not appear in these areas, as intended, making painting the mask a pretty straightforward, loose process. If shot correctly, you almost do not even need to mask the Window Pull in Darken mode, but most images have a large FoV, so there will be areas in the Window Pull outside of the window area that will comp into the Ambient without a mask, requiring you to paint a loose mask for the window. It works just like PS. Kirk -
post deleted
-
Look in the info bar above the image (red arrow in attached screenshot). If this info is not displayed, select the Hand tool from the tools on the right side. The bar is context sensitive. Kirk

-
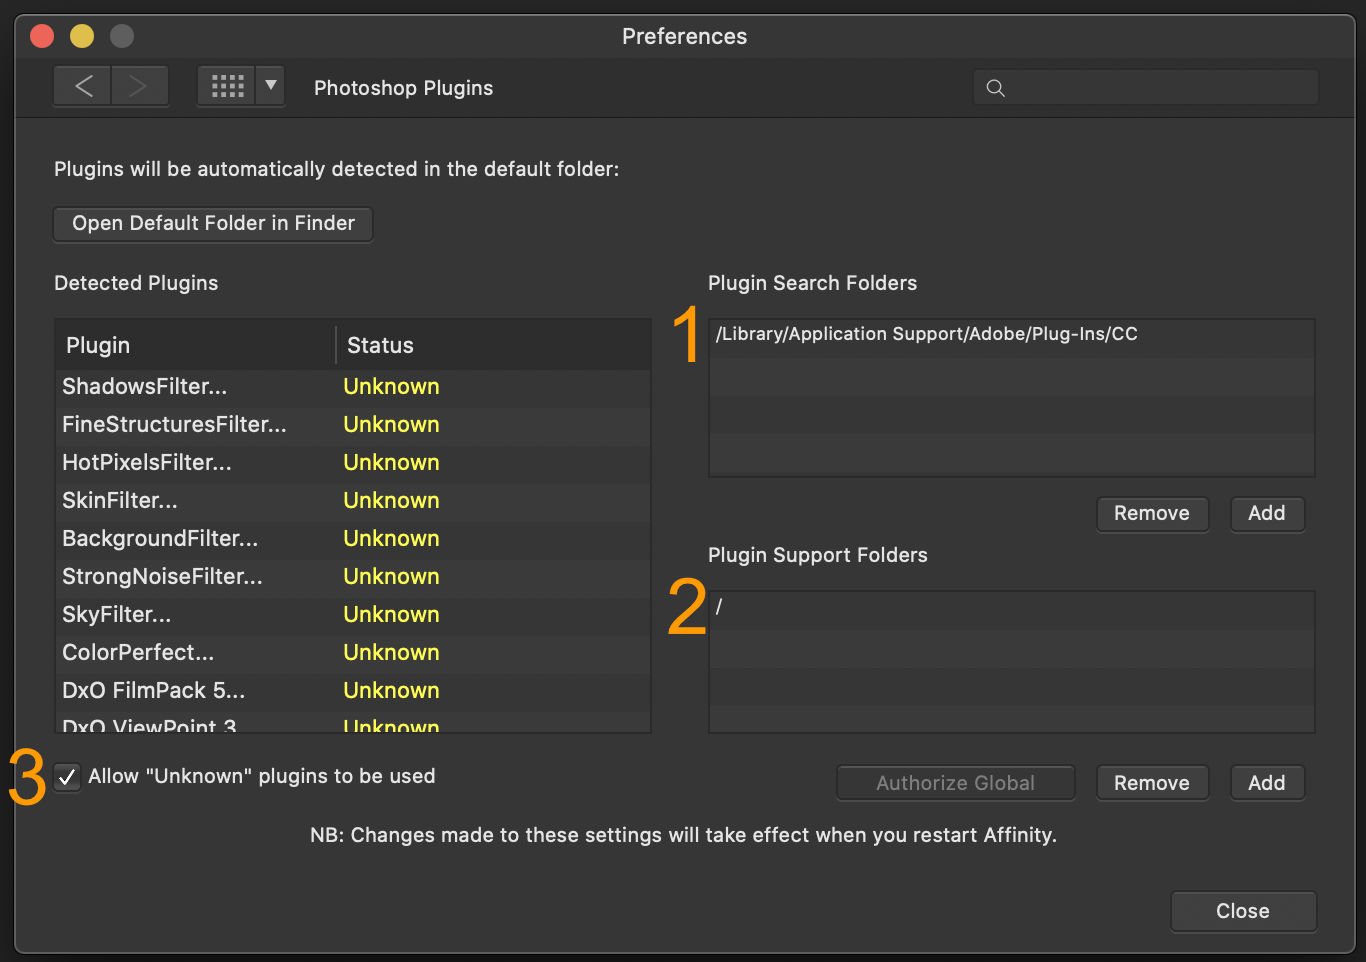
Go to Preferences > Photoshop Plug Ins and take a look at the attached screenshot. (1) - Add the folder that has the Nik PS plug ins (in CS6 it is probably in the Plug Ins folder inside the Photoshop application folder). (2) - Authorize Global - this will permit Affinity Photo to search for and use whatever support files are required for you plug ins. (3) - Enable "Allow 'unknown' plug ins to be used" You will need to restart Affinity Photo to enable these changes. The plug ins should appear in the "Filters > Plug Ins" menu Have fun! Kirk.
-
You can run Topaz Sharpen AI as a plug in from AP. Why reinvent the wheel? There are a few different ways to try to analyze an image for shake and correct it, but building an AI model and implementing it is probably time better spent by the AP devs. Kirk
-
Help screens should say HOW not merely WHAT
kirkt replied to nick graham's topic in Feedback for Affinity Photo V1 on Desktop
And, for a more applied approach to the tools within AP, consider the vast and easy to digest set of video tutorials: kirk -
Paste Grayscale Image Into Channel
kirkt replied to foehammer's topic in Feedback for Affinity Photo V1 on Desktop
@foehammer Let's assume that your three textures that you want to pack are called X, Y and Z. They are 8bit grayscale images that you want to pack into a single RGB file like that shown in the video about channel packing. Let's also assume that each texture file has the same pixel dimensions. Maybe try something like this: 1) Create a new RGB file in AP, with the desired pixel dimensions and bit depth/color space. 2) Make sure that you create a new pixel layer in that file and fill the alpha of that layer (as in the video). Make sure this layer is active (selected in the Layers panel) for the following. In the following discussion, the "Source" will be the X, Y or Z texture file and the "Destination" will be the working new RGB file into which you want to channel pack your textures. 3) For each texture (X, Y and Z) you will use the "Apply Image..." filter to take the grayscale image from X, Y or Z and insert it into the R, G or B channel of the working document. To do this, let's assume that you want X -> R, Y -> G, and Z -> B. For X -> R: a) In the Apply Image... dialog - select "Load Source from File" and choose the X file from the file dialog. b) In the Apply Image... dialog leave everything as default and tick the "Equations" check box. c) To put X into the RED channel, you will use the following equations: DR = SR DG = DG DB = DB This tells AP to put SR (Source Red Channel) in DR (Destination Red Channel) and keep the DG and DB the same (i.e., do not change Green or Blue in the destination). As you might have already figured out, to put Y -> G, you repeat Step 3, but select the Y file as the Source file and use the equations: DR = DR DG = SG DB = DB and for Z -> B, choose the Z file as Source and use the equations: DR = DR DG = DG DB = SB. 4) Save as an RGB file. See if this works for you. NOTE: Sometimes the image you see in the thumbnail in the layer stack for a pixel layer is different than the composite thumbnail or what you see on the canvas - if this is the case, look at your Channels palette and make sure that your are displaying all of the channels (hit the clockwise arrow icon in the upper right of the palette to reset the channels view to all channels). This can get confusing if what you think should be happening is not reflected on the screen. Kirk -
Affinity Photo Rendering Intent
kirkt replied to pauldev's topic in Pre-V2 Archive of Desktop Questions (macOS and Windows)
With working color spaces like sRGB and ProPhoto, conversions between them are always relative colorimetric (at least in PS). Even in PS, where you can specify rendering intent, relative colorimetric is always used under conditions where you are converting from one working space to another. Conversion from a working color space to an output device, like a printer, will provide rendering intent choices that will potentially make a difference in how the color data are remapped during conversion. Kirk -
Feature Request - Alpha Channels (AGAIN!)
kirkt replied to rui_mac's topic in Feedback for Affinity Photo V1 on Desktop
Agreed. kirk -
Feature Request - Alpha Channels (AGAIN!)
kirkt replied to rui_mac's topic in Feedback for Affinity Photo V1 on Desktop
@Gregory Chalenko If you want to create a grayscale image from the Spare Channel there are a couple of ways, one of which may be better than the other for your application: 1) Make a new pixel layer and fill it with White - we will call this new layer "BlankLayer." 2a) Right-click on the Spare Channel that you have stored and select "Load to BlankLayer Red" - repeat but select "Load to BlankLayer Green" and ""Load to BlankLayer Blue." Now you have a grayscale pixel layer that is a copy of the Spare Channel. You can make a Macro that will do the sequence of steps. or 2b) Right-click on the Spare Channel and select "Load to BlankLayer Alpha." The Spare Channel will be transferred to the BlankLayer Alpha channel. In the Channels panel list, right-click on the BlankLayer Alpha channel and select "Create Grayscale Layer." In this case, the BlankLayer is a temporary layer that you use to hold the Alpha channel so you can make the grayscale image from it. I suggest that you right-click on all of the channel thumbnails in the Channels panel and see what options each one has - there is a lot going on there, but it is sort of hidden until you realize that the options exist! Also, even though these work-arounds require additional button presses and steps, I think that all of the steps are able to be recorded in a macro, so you could automate the process by recording a Macro. Kirk -
Feature Request - Alpha Channels (AGAIN!)
kirkt replied to rui_mac's topic in Feedback for Affinity Photo V1 on Desktop
You're welcome. It has taken me a while to get my brain around how channels in AP work and redo a lot of muscle memory from using PS for decades. I still use both applications, and I understand how you feel! kirk -
Feature Request - Alpha Channels (AGAIN!)
kirkt replied to rui_mac's topic in Feedback for Affinity Photo V1 on Desktop
@Gregory Chalenko A couple of thoughts in the meanwhile - 1) You can reset the view from individual channels to the composite by clicking on the clockwise circular icon with the arrowhead in the upper right of the channels view. 2) You can replicate your mask construction process in AP but it works a little differently, partially because channels and masks work differently in AP compared to PS. a) Starting with your source image, make a duplicate of the image layer upon which you want to base your mask (CMD-J) and make this layer active. We will call this the "LayerForMask" in the layer stack. b) Inspect your channels to see which one (or a combination of more than one, in overlay mode as you demonstrate in your YouTube clip) you want to use as the basis for your mask. c) If you want to combine channels in Overlay mode, for example: With the "LayerForMask" as the active layer, go to Filters > Apply Image... and choose to "Use Current Layer As Source." Set the Blend Mode to "Overlay." Finally, select the "Equations" check box - let's say in this example, you want to combine the Green and Blue channels in overlay mode like you do in PS using Calculations. Here you will set "DG = SB" [Destination Green equals Source Blue) and "DB = SG" - you are basically switching the two channels and combining the result in Overlay mode. This will give you a high-contrast result in the G channel that you can use as the basis for the mask. d) Click on the Composite Green channel in the Channels panel of the resulting image that now occupies the LayerForMask layer - this will display the grayscale result of the operation you just performed, and you can inspect the result to see if it is satisfactory to use as a mask. This is because the top layer in the stack is the result of the Apply Image process (therefore, the Composite layer is the top layer and you can view its channels). Also take a look at the Blue channel. In this example, suppose you want to use the resulting Green Channel as the basis for your mask. e) Below the Composite layer channels in the Channels panel will be the LayerForMask channels listed. In this case we want to use the Green channel for our mask, so Right-Click on the Green channel for this layer and select "Create Grayscale Layer" - this will create a grayscale copy of the Green channel at the top of the layer stack. This is a pixel layer that you can edit with all of the tools like dodge and burn, etc. to construct and refine your mask. We will call this "WorkingMaskLayer." f) Once you have perfected your mask on the WorkingMaskLayer, this pixel layer can stay in the layer stack for further editing if you want, or stored as a spare channel, etc. In any case, in the Channels panel, Right-Click on any of the channels in the WorkingMaskLayer and select "Create Mask Layer" - this will create a new Mask Layer out of the grayscale image from WorkingMaskLayer and you can drag the new mask layer onto the layer to which you want to apply the mask. A Mask Layer is a special kind of layer in AP - it is similar to the layer mask layer that is attached to a layer in PS, except it is a separable element that you can move up and down the layer stack and nest with other layers. You can edit and paint on a mask layer as well, if you prefer to refine your mask that way - you can view the mask itself (instead of its effect on the layer stack) by OPT-Clicking (ALT-Clicking) on it, just like in PS. Kirk -
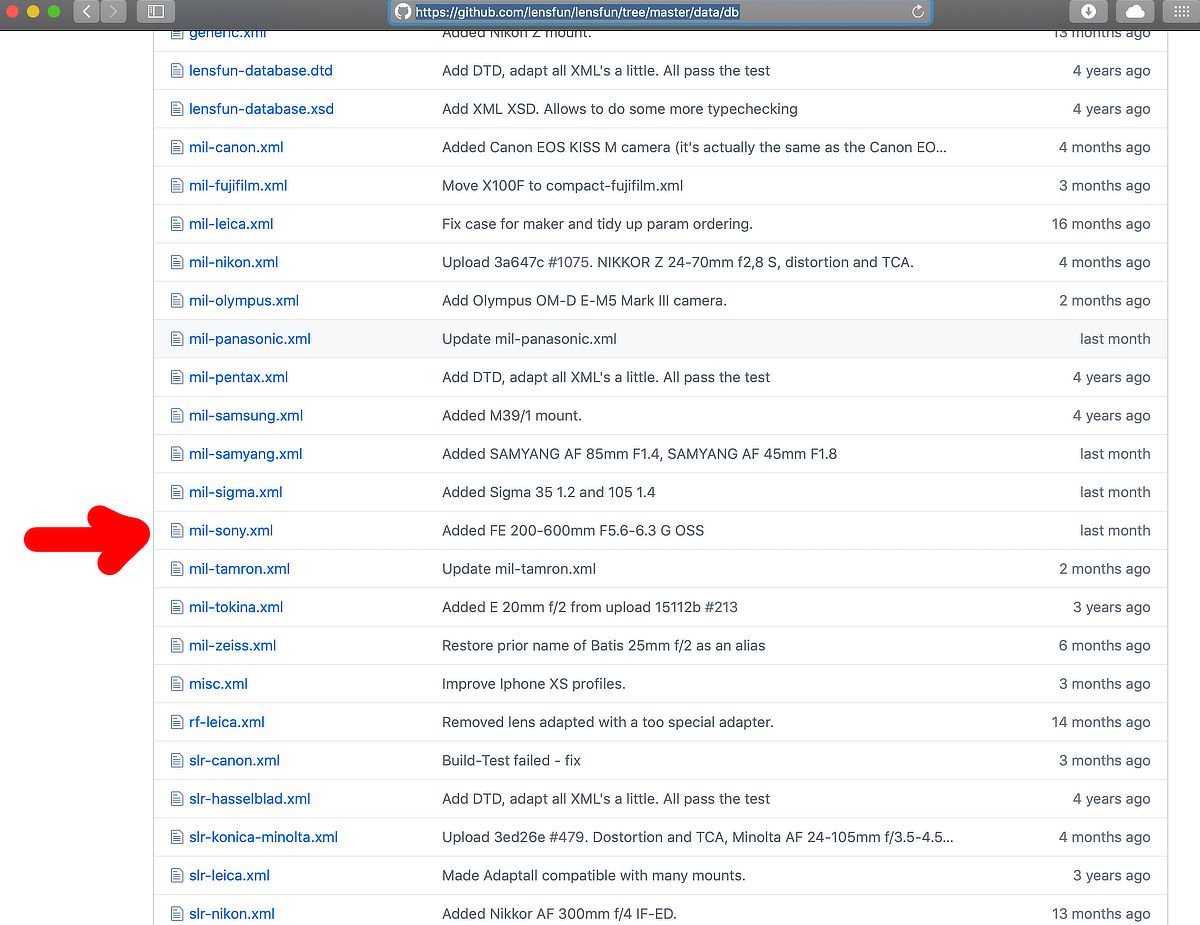
It is available in the lensfun database, just add it yourself! See: https://affinity.serif.com/en-gb/tutorials/photo/desktop/video/330446061/ Here is a link to the GitHub lens fun database: https://github.com/lensfun/lensfun/tree/master/data/db Incidentally, how much distortion is there at those focal lengths? Kirk
-
In the meanwhile, it is easy to do with exiftool: exiftool -ProjectionType="equirectangular" photo.jpg # 'photo.jpg' is the photo you want to tag See: https://facebook360.fb.com/editing-360-photos-injecting-metadata/ Kirk
-
You should take a look at 3D LUT Creator. It does exactly what you want. It is currently designed to integrate with PS to pull images from and pass LUTs to the working PS document. I will email the app’s creator and see if he can include the same integration with AP. See this example: kirk
-
Request: Matching Colour
kirkt replied to DuctTape's topic in Tutorials (Staff and Customer Created Tutorials)
It's not fully automagic, but may work for you: -
Having read through the entire thread, maybe the folks requesting "support" for a CC card could be more concise about what, exactly, they mean. There appears to be at least two different requests in the thread: 1) Support for making, or at least implementing previously made, custom DCPs or ICCs in a manner similar to how Lightroom/ACR and similar applications support custom camera profiles for raw image conversion; 2) Support for live color correction based on importing an RGB (i.e., not raw) image of a CC card and placing a grid over the card patches, resulting in AP's automagically performing color correction based on known reference values (or custom values provided by the user) of the card (like Davinci Resolve does). Obviously these are two very different things and there are solutions outside of AP that will perform these tasks with results that can be brought into AP for further editing. Maybe the folks with an interest in this request can elaborate on what they mean when they are asking for AP to "support" a CC card. Make and import/use DCPs or ICCs during raw conversion based on a raw image of a CC card? Produce a live LUT based on an RGB image of a CC card and be able to apply/export that LUT for batch processing? Both? As it currently stands, the Develop persona in AP is a weak point in the grand scheme of the application, so one is probably better served by converting raw files in another application that supports DCP/ICC profiles, batch processing, etc. In terms of providing live color correction based on a reference RGB image of a CC or similar card, it would seem like this would be a great addition to the LUT adjustment layer - a button on the layer dialog that would permit you to load a reference CC image, specify that reference card from an AP database of cards (for example the CC Passport), place a grid on the reference image and hit the "OK" button. The result would be a LUT in the layer stack with the custom adjustment applied via the layer. It would be great if you could also export that LUT for future use, batch processing, etc. directly upon construction of the LUT, as opposed to the Export LUT... option that currently exists (to avoid extra steps). It would be useful if the user could provide a .CIE file for custom reference targets and add the CIE file and the grid configuration for that custom reference card to the database of reference cards. kirk
-
Can I extract masks from adjustment layers?
kirkt replied to Roland Rick's topic in Feedback for Affinity Photo V1 on Desktop
@Roland Rick Nothing happens when you offer the levels adjustment to the recolor adjustment because it makes no sense to adjust the levels of the recolor adjustment. All adjustment layers have a built-in mask, as you know; however, you do not need to use that built-in mask to dictate where your adjustment gets applied selectively. You can add a mask to the adjustment layer that behaves just like a regular old mask on a pixel layer and sits in the adjustment layer as a child of the adjustment layer. In your case, let's say you want to change the color of the insect's eyes with a Recolor adjustment - apply the Recolor Adjustment layer in the layer stack, tweak the settings and then - INSTEAD of painting on the built-in layer mask, ADD a mask to the Recolor adjustment layer just like you would with a pixel layer mask. That mask should appear as a child of the Recolor Adjustment. Cool. Even easier, OPTION (ALT) - Click on the add mask button to add a mask that is all black so you can hide the adjustment by default and then just paint with white to reveal the Recolor adjustment on the eyes. OK, so far so good. Now, you decide you want to add some extra adjustment to the same exact region - for example, your Levels adjustment, again, just to the eyes. Add the Levels adjustment to the stack and make the tweaks to the eyes. Of course, this affects everything in the stack below the Levels adjustment. Select the Levels Adjustment and the Recolor adjustment and make a new Group out of those two layers. Because the mask you created for the eyes is a regular mask and not the built-in mask, you can just drag the mask out of the Recolor layer and drop it onto the Group icon. Now it masks the entire group. It does not matter if you offer it to the group folder thumbnail (a clipping mask) or to the Group text (a regular mask). It will act the same. If you do not want to group the adjustments and use a single mask applied to the group folder, you can just select the mask in the Recolor layer and copy it (CMD-C) and paste it (CMD-V) and then drag that new copy of the mask to the Levels layer, if you want each adjustment to have its own copy of the mask applied. In PS, you would just hold down OPT and drag a copy of an existing mask on an adjustment layer to a new adjustment layer - AP does not offer this shortcut as far as I know. Bottom line - add a mask to an adjustment layer, instead of using the built-in mask, and then you don't need to mess with creating spare channels and targeting the alpha channel of each adjustment layer's built-in mask. Even with the added mask applied to the adjustment layer, you can paint on the built-in mask to add to the selective application of the adjustment. This is similar in PS to applying an adjustment layer, adding a mask, painting on the mask and then adding just that single layer to its own group so you can add another mask to the group. This was a very wordy description for a very easy and quick process, but it gets to the heart of the issue, which is that Affinity Photo's masking and layer structure behaves differently than Photoshop's, and reprogramming muscle memory from PS to AP takes some effort - I'm still trying to undo decades of PS thinking and wrap my head around AP's different process. Have fun! Kirk Here are some tutorials that will help: -
Your Affinity 2020 wishlist
kirkt replied to AITCH's topic in Feedback for Affinity Photo V1 on Desktop
Node-based UI and workflow for AP. It would be so good. Kirk -
Node-based UI for AP. Please?
kirkt replied to kirkt's topic in Feedback for Affinity Photo V1 on Desktop
Good to know I’m not alone. kirk -
While I do not profess to know how AP is structured under-the-hood (bonnet!), it seems like a lot of the tools are implemented in a real-time, live way that seems as if they would work in a node-based workflow. For example, the node editor in Blender or Davinci Resolve. If this is the case, it would be an incredibly terrific feature if the user could select between the current "traditional" interface and workflow for AP, or a node-based interface. I would love to be able to create an image-processing pipeline with a network for nodes with preview renders along the way to see each stage of the workflow and variations of the node chain. It would be terrific if node groups could be saved as "presets" that became single nodes themselves, which could be expanded and the contents exposed for tweaking and customization. Please consider this approach, if it is possible. Rendering low-res preview proxies during node assembly would hopefully be a lot less taxing on the interface than the current full-res rendering of Live Filters that tends to get laggy when there are even a modest amount of layers in the stack. You could save full, non-destructive workflows as a pre-built node chain, you could have a single node chain branch into multiple variants, and have a batch node that feeds an entire directory of images into the node chain for processing. Maybe even macro nodes, etc. It would be so much more flexible and serve to further differentiate AP from PS. The output of the node-based workflow could be fed into the "traditional" photo persona (a Photo persona node) for local, destructive edits, painting on masks, etc. One can dream.... LOL Thanks for pushing the boundaries with your applications. Kirk
-
Straight-forward Image Duplicate
kirkt replied to WorthIt's topic in Feedback for Affinity Photo V1 on Desktop
Thee are usually a bunch of different ways to do things, I agree. Apply Image must be partially broken in Lab equation mode on the Mac in V1.7.2. I can use Lab equations (DL = SL, Da = 0.5, Db = 0.5 - if you do all SL, you get a color image that reflects the mix of the a and b channels) to generate the equivalent of the L* channel. Let's say I want to apply a Curves adjustment through an inverted L* mask, a typical task to boost shadows or target shadow tones for color correction, etc. So I have a layer stack that has the working image (background layer) and a curves adjustment layer above it. Recall that adjustment layers have their own inherent mask built in. So, I select the Curves adjustment layer to make it active (the target of the Apply Image command): 1) Open the Apply Image dialog (Filter > Apply Image) 2) Drag the background layer onto the dialog box to make it the source of the Apply Image operation 3) Use Equations - DL = SL, Da = 0.5, Db = 0.5, DA = SA And apply image. The result gets applied to the mask of the Curves adjustment, but the resulting image is distorted and scaled up and is not the L* channel of the background. (see attached screenshot). To make this work properly, I have to create an empty pixel layer and generate a pixel-based representation of the L* channel - i.e., new pixel layer, fill it with white, then do the apply image operation to generate the L* channel on this pixel layer (the second screenshot is what the L* channel should look like). Then I have to rasterize it to a mask, then drag it to the curves layer. That is a lot of steps for a simple operation. The use of the Levels filter with your settings at the top of the stack will also generate the desired L* output, but then you have to stamp the layer stack, rasterize the resulting pixel layer and then apply it as a mask. It is a nifty way of doing things though. I prefer the Duplicate Image method because I can work in Lab mode with Lab tools to choke the mask, etc. and then simply apply the L* channel to the working master image (to an adjustment layer or as a pixel-based layer, etc.) when I am finished in the duplicated image. I can also leave the duplicate image open and tweak the operations and reapply the result to refine or edit the result for use in the original. Kirk
-
Straight-forward Image Duplicate
kirkt replied to WorthIt's topic in Feedback for Affinity Photo V1 on Desktop
I second this request. The Photoshop equivalent is Image > Duplicate and is useful for myriad tasks, especially when you want to perform an action or a color mode change for a particular purpose and then introduce the result back into the master working document without having to Save As... and create another file in the OS (for example, you would like to create a mask from the L* channel of your current RGB document - dup the current RGB document, change the dup's mode to L*a*b*, and Apply Image > L* channel to the RGB doc's active layer as a mask). The duplicated version is simply a document that exists in memory and is usually something that is temporary or can be saved after the fact if that is its intended purpose (for example, if you create an action that duplicates the master document, flattens it, reduces the size and performs output sharpening and color space change for output). This seems like a no-brainer and I am repeatedly surprised after major updates that AP has not implement this. Kirk -
You can export 16bit TIFFs of each channel from Raw Digger, using the option to fill in the missing pixels with zeros (black). Then you can open each of the four channel TIFFs (R, G1, B, G2) and convert them to 32bit (they are linear) and stack them in linear dodge (add) mode - for each of the four layers, you can clip a recolor layer to add the CFA color that corresponds to that layer. This will effectively give you a UniWB image - you can clip an exposure adjustment to the R and B layers and adjust the exposure of R and B to white balance the image. kirk
-
Affinity can't handle shadows...
kirkt replied to Southwest_Visuals's topic in [ARCHIVE] Photo beta on macOS threads
Good insights, re: the Develop persona. I have a feeling that if the Photo app gets a DAM-type auxiliary app, the raw converter will get spruced up too. I do not use or depend upon DAMs for my work, but I can imagine that a DAM will place more emphasis on getting a larger portion of the heavy lifting of raw to RGB image editing done at the raw conversion stage, as many folks prefer in applications like LR and C1. I agree, these suggestions have been floating around for while and a gentle reminder is always good - considering what the Serif team have managed to push out in the last few years, I have no problem cutting them some slack in the priorities department. If any Mac users are looking for a raw converter that offers exceptional control over tone and color, consider the free (upgraded features for a donation) application called Raw Photo Processor (RPP). Do not let its spartan interface fool you into thinking that it has limited functionality - it is, hands down, one of the best raw converters I have used and produces exceptional output (including 32bit if you prefer). The interface and workflow take some time to get used to in the GUI world of sliders and instant previews, but once you get the hang of it, it is so much more efficient and gets you to the converted output quickly and efficiently. See: http://www.raw-photo-processor.com/RPP/Overview.html kirk