David in Яuislip
-
Posts
1,429 -
Joined
-
Last visited
Everything posted by David in Яuislip
-
 If you size the bitmap smaller than its container then you can see the effects more easily Hope this helps GradienntBitmapFill.afphoto
-
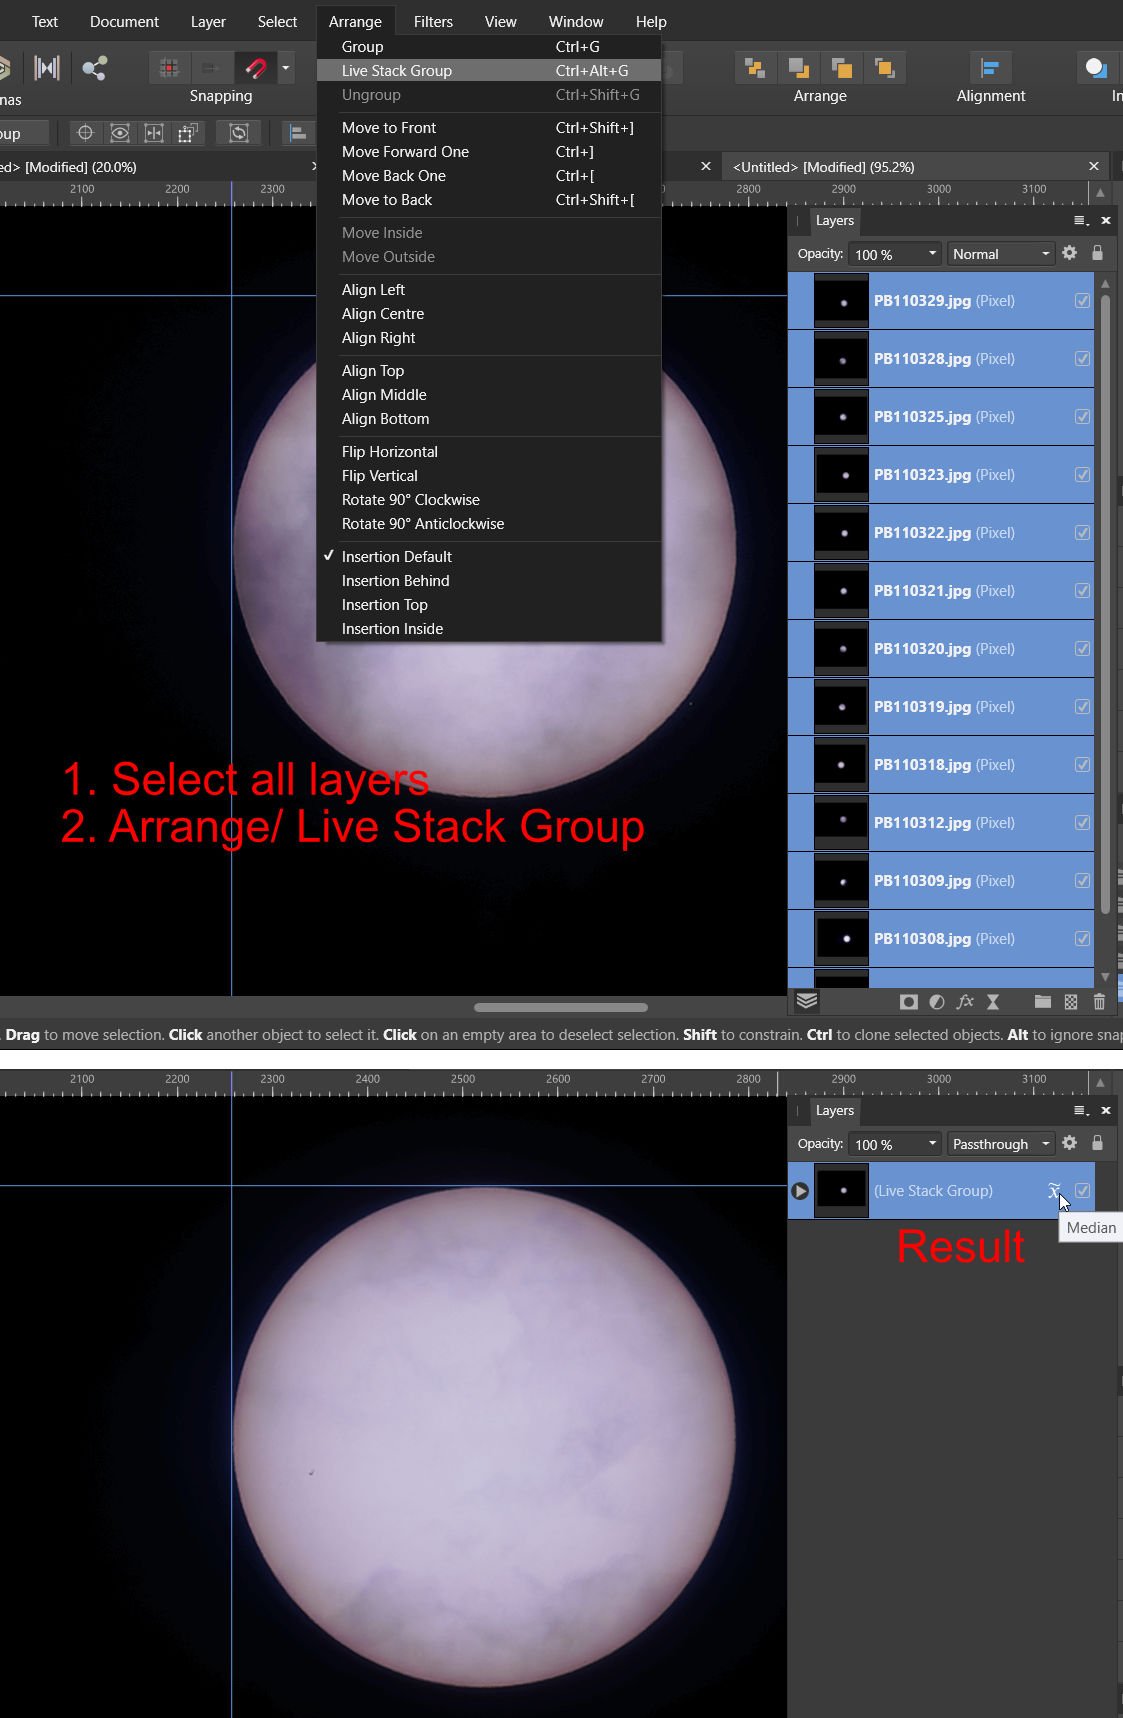
Yep 1. Select all layers 2. Arrange/ Live Stack Group
-
Good spot, I hadn't noticed that. It works perfectly
-
Try creating a rectangle, apply the gradient then drag the colour picker over your required colour
-
Open the LUT file in a text editor and delete the line LUT_3D_INPUT_RANGE 0.0 1.0 It works here, good luck
-
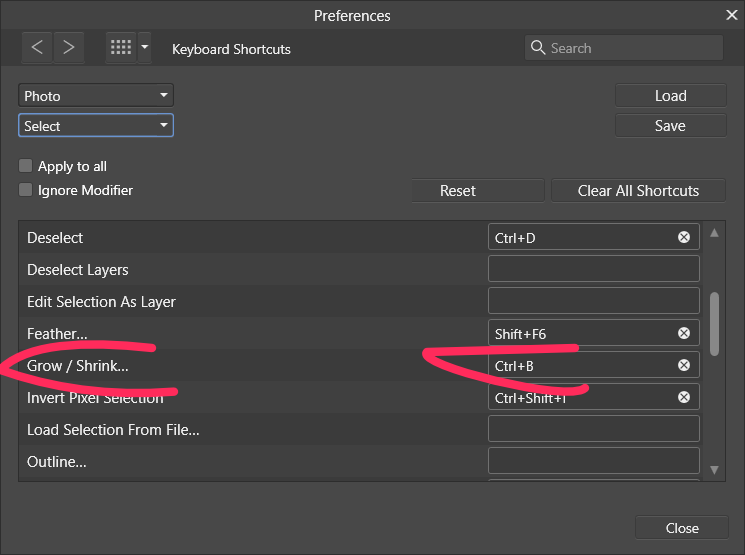
<ctrl>B is a standard shortcut. You'll need to delete that before reassigning it to your preference The shortcuts are stored in C:\Users\<your user name>\AppData\Roaming\Affinity\Photo\1.0\Workspaces\Photo\Shortcuts.xml and I would advise making a backup of that because if you ever do a reset as Alfred described above all shortcuts will revert to standard
-
kirkt beat me to it Here's a quick macro that does just that It needs three images which must be rasterised Pixel layers. It copies the Red channel from the lowest layer, the Green from the middle, the Blue from the top. Then it creates a new Pixel layer called Final, pastes the channels into that then deletes the spare channels You'll get different effects by reordering the layers before running the macro Hours of fun! dcHarrisShutter.afmacro
-
Using Windows the Marquee can extend a selection by using both mouse buttons Help is here file:///C:/Program%20Files/Affinity/Photo/PhotoHelp/Contents/Resources/English.lproj/pages/Selections/selections_marquee.html and it says, "Drag with left and right button down (Marquee and Freehand Selection tools) to automatically add areas to the current selection." What it doesn't say is release the left button first The shortcuts are stored in C:\Users\<your user name>\AppData\Roaming\Affinity\Photo\1.0\Workspaces\Photo\Shortcuts.xml and this <Item type="Command" command="Serif.Interop.Persona.Commands.TogglePixelSelectionCommand, Serif.Interop.Persona, Version=1.8.3.641, Culture=neutral, PublicKeyToken=null" key="H" modifierKeys="Control" /> is the entry for my preffered shortcut <ctrl>H which Hides/Shows the selection like I am used to. I did that as Ron P. explains above, I wouldn't edit the .xml directly
-
Presets
David in Яuislip replied to cinchy's topic in Pre-V2 Archive of Affinity on Desktop Questions (macOS and Windows)
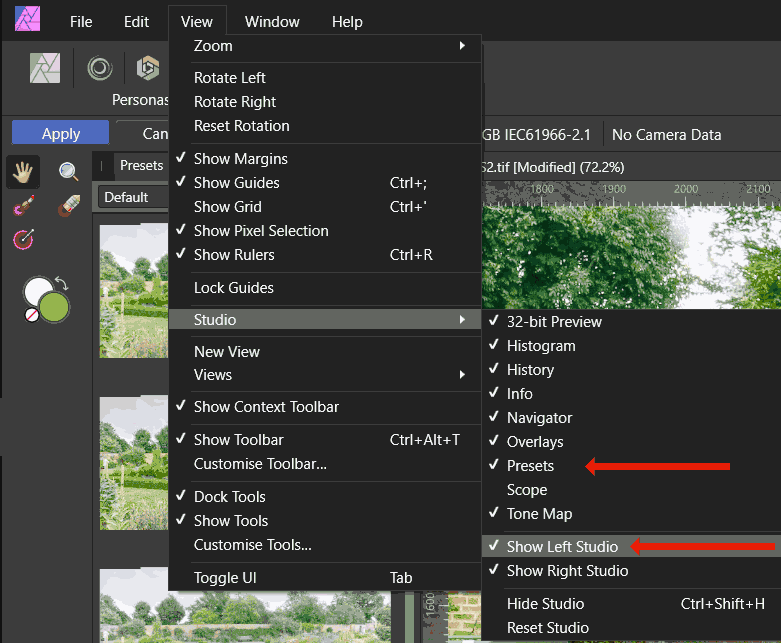
Is Show Left Studio also checked?
-
Quick and dirty Rasterise, note dimensions in Transform studio, Undo
-
OK, I started again Create the effects, rename them in the Layers panel, add to Assets, delete the Layers and re-apply by dragging from Assets. It works Next rename the Assets in the Assets studio, apply them and it remembers the old name It's good that it is by design and not a bug. I would be inclined to change the design, I cannot see a reason for allowing a change of name in the Asset studio because it is too late and does nothing Hope the graphic explains it, I am off for some beer
-
I think we could all use larger screens, this one is a pain at the right edge of the Context Toolbar where I have to click a » symbol to see some options yet there is plenty of space I have just realised that the Layer names are not the same as the assett names.....hey ho
-
Thomaso, interesting. I have just deleted those two assets, reloaded them and they work properly, well as a proof of concept, otherwise they are fairly useless. I loaded a new image, applied both assets by dragging, clicking on the layer panel opened the option boxes which functioned as usual. It's a shame you're on a mac as I suppose my .afassets file is of no use
-
It's possible to load an Adjustment Layer into the Assets panel, export that then import elsewhere. I've had a brief attempt at stacking & grouping them but failed so far Assets-Adjustments.afassets
-
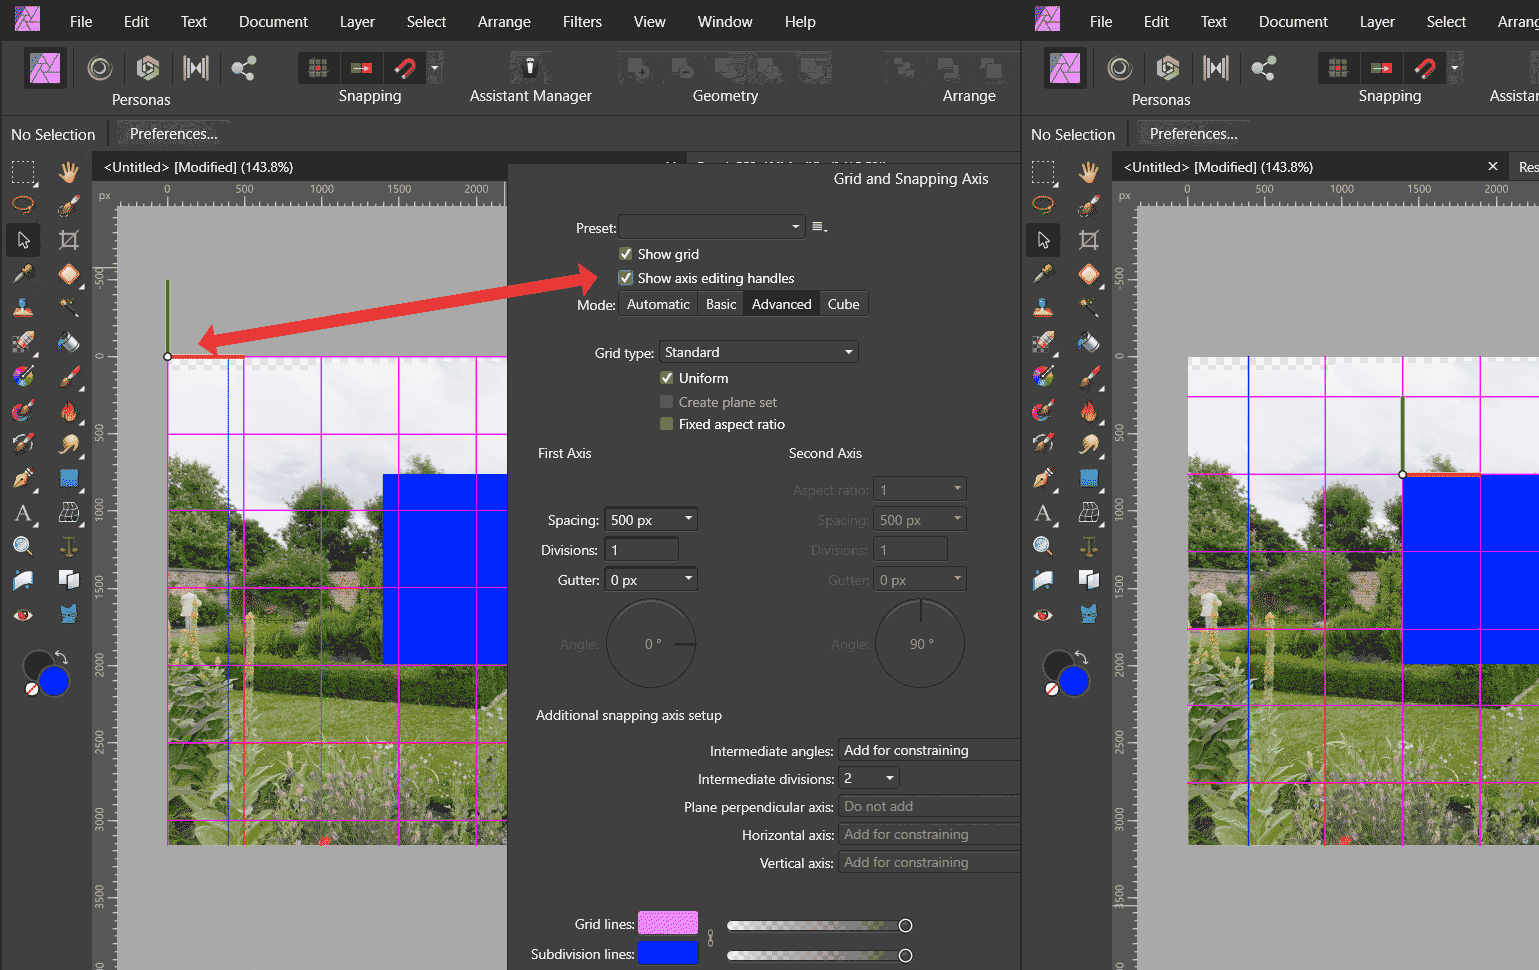
See if this helps: Enable Show axis editing handles in the Grid Manager Drag the black circle to your required position Double clicking the black circle will position it at the Guides origin (0,0)
-
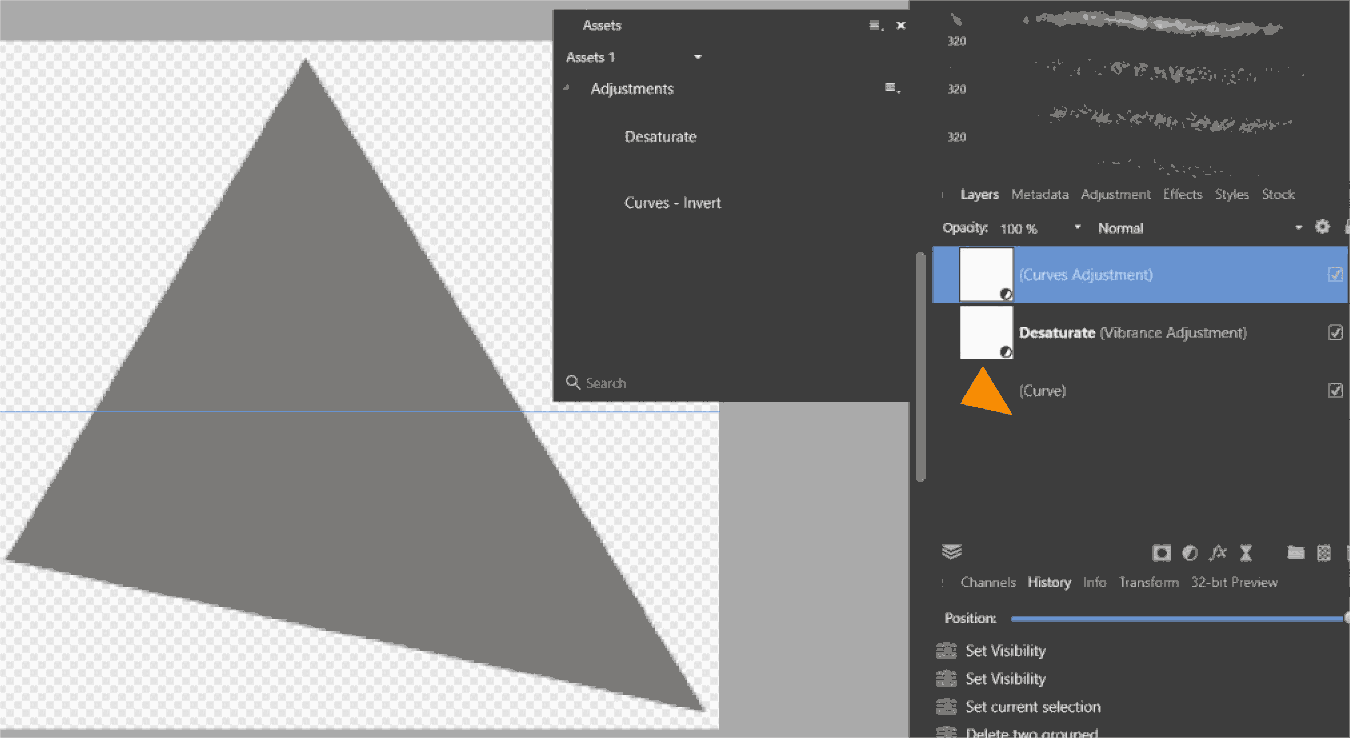
That's an innovative image. The RG & B channels are black, the shape is defined in the alpha channel
-
Well I couldn't do it and this thread confirms it. All you have is the stroke option in the Context Toolbar. Solid and Dashes work, I failed with the Texture Line Style, it's the same as solid. Hey ho.
-
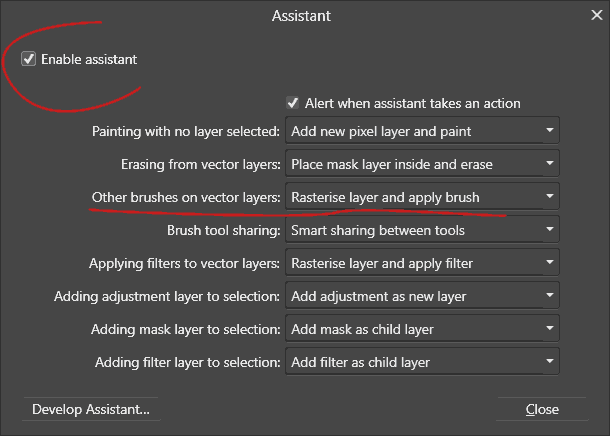
It works properly here, Windows 10, Photo v1.8.3 Note that the layer must show Pixel and not Image I'd check your Assistant Manager settings (View/ Assistant Manager) because here the Assistant automatically rasterises the layer. If you're not using the Assistant you'll need to Rasterise the layer yourself
-
It can't be docked to the right, it will have to be floating to move it to the right but under View/ Customise Tools you can force it to be 1 column wide
-
On Windows you can do this if documents are floating, personally I prefer copy and paste
-
Thank you. Hints and advice are always appreciated By the way, I've added <link rel="shortcut icon" href="../shared/ui/PhotoPersona.png" type="image/png"> to the index file so I now see a nice logo in the browser tabs regards, dc
-
Not so much a question but a suggestion Overall the help is excellent but it's limited running within the program As it's written in html it can be displayed by a browser and where some graphics are a bit small they can be opened in a new tab On Windows 10 the English version is here C:/Program Files/Affinity/Photo/PhotoHelp/Contents/Resources/English.lproj/index.html One caveat for version 1.8.3.641 Choosing Stitching panoramas causes a script error. The online version is fine so I copied the online tabbedimages.js now it’s ok. That file needs to go into C:\Program Files\Affinity\Photo\PhotoHelp\Contents\Resources\resources\js I won't attach the file in case it's not the latest but if a Mod reads this they may
-
Cropping - help page js error
David in Яuislip replied to Subclavius's topic in V1 Bugs found on Windows
Choosing Stitching panoramas causes the same script error The Online version is fine so I copied the online tabbedimages.js now it’s ok It needs to go into C:\Program Files\Affinity\Photo\PhotoHelp\Contents\Resources\resources\js -
With APhoto I would use a landscape A7 and print 2 across and 4 down on portrait A4 using Model: N-Up You can see from the Transform panel that the document size is 105mm x 74mm, the print dialog handles the rest Good luck
-
Multiple page PDFs can be created in APhoto For example 4 pages of A4 Create a new A4 but change Document height to 4 x 297 = 1188 mm Set Guides at 25%, 50%, 75% to delimit page extents Add content Print to PDF using the following in the Print Dialog: Printer: Microsoft Print to PDF Range: Document Layout – Model: Tiled Multiple page PDF pages can be edited, deleted, rearranged Each page opens as a Layer in APhoto annotated Artboard Add shapes, text, images whatever Printing order is defined by Layer order, page 1 is at the bottom Print to PDF using: Range: Artboards Layout – Model: doesn't matter OR use Export to PDF but the file sizes are larger MultiPagePDF.afphoto