vitaprimo
-
Posts
92 -
Joined
-
Last visited
Recent Profile Visitors
1,732 profile views


-
 emmrecs01 reacted to a post in a topic:
Questions on Canva acquiring Affinity
emmrecs01 reacted to a post in a topic:
Questions on Canva acquiring Affinity
-

Questions on Canva acquiring Affinity
vitaprimo replied to kaffeeundsalz's topic in Customer Service, Accounts and Purchasing
I was still debating if I should purchase v2, since I never wanted to upgrade post-Mojave (needed on Affinity v2) and I only use Windows in RDS RemoteApps. But this with this I'm out for good. I read in the blog (on Affinity's site, I think, it doesn't matter since they're the same I guess) that there would be a free version. We all know what that means. It said it's going to be for or start with the education segment, I believe, but you have to start creating dependency where it's most needed, right? After witnessing (and living since I'm one of those small customers Broadcom doesn't give a fxck about) I'm not waiting out to see if maybe it gets better or how long does it take for promises to be broken. I'm out open for new things right away. I'd advise anybody to do the same but I'm not a real designer, I don't make a living out of this so, you guys know what's best for yourselves hopefully. I'm really sad about this I was finally able to awesome things on my own and the advice I'd get from other users too I'll miss. I knew it had been too long before they released a major version*, I had been saying so. Did they ran out of cash?? No I have no more excuses to put off learning Inkscape. It's kinda ugly and bulky, it's supposed to be good but if it can't design itself a UI… 🙄 Anyway, farewell Seriff 💔 *: I have a theory that this is in part Apple's fault because it pressured devs to provide upgrades forever, creating the mess we're in. Adobe may been who made the biggest news when it did the subscription thing, and Microsoft may probably be the oldest doing it (in the Enterprise) but Apple is the biggest install base or users who actually spend cash on apps which recently locked away third parties from doing shady data collection, which in theory is good, until you think about it and question why are there facilities to randomize identifiers usable for data collection in the system? Why are they collectable in the first place? Why does these facilities remain in there if Apple is — conveniently — the sole intermediary to access user data? -
Slices with arbitrary layer configurations
vitaprimo replied to vitaprimo's topic in Desktop Questions (macOS and Windows)
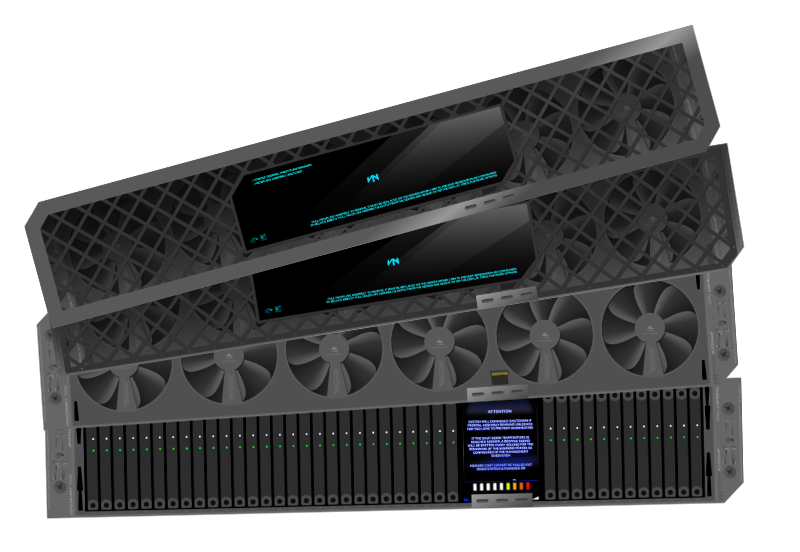
Thanks to everyone for answering, I'm sorry, like I said, I didn't think it through, I went back in history to take the flat screenshots because I was already in isometric mode, so I was kind of relying on what I had on the clipboard during that time. I didn't had to be that big but my default artboard is 2048pxx2048px@400dpi. I corrected it though. That's too bad. At least I still have the symbols backup plan. I'm thinking, if I do some sort of mega symbols group it wouldn't be so much work …soft of, this app is more like an addictive hobby. The nested artboard thing though is low key genius. Often I'd mistakenly draw an artboard within an other, ⌘Z, maybe wonder why would it let me do that. Even if it doesn't solves the issue, I will definitely try to see if I can incorporate it somewhere. I've been doing rackmount server designs (→) for this random project, that can be disassembled by unchecking groups of layers, it's the example I was going to use actually but it has to have close a 1000 layers and I struggled with 4 layers in isometric as it is... I'd still be writing the original question. Maybe artboarding it is easier, with their own constraints, I assume, and everything. Affinity Schrödinger… 😂 Thanks guys!
-
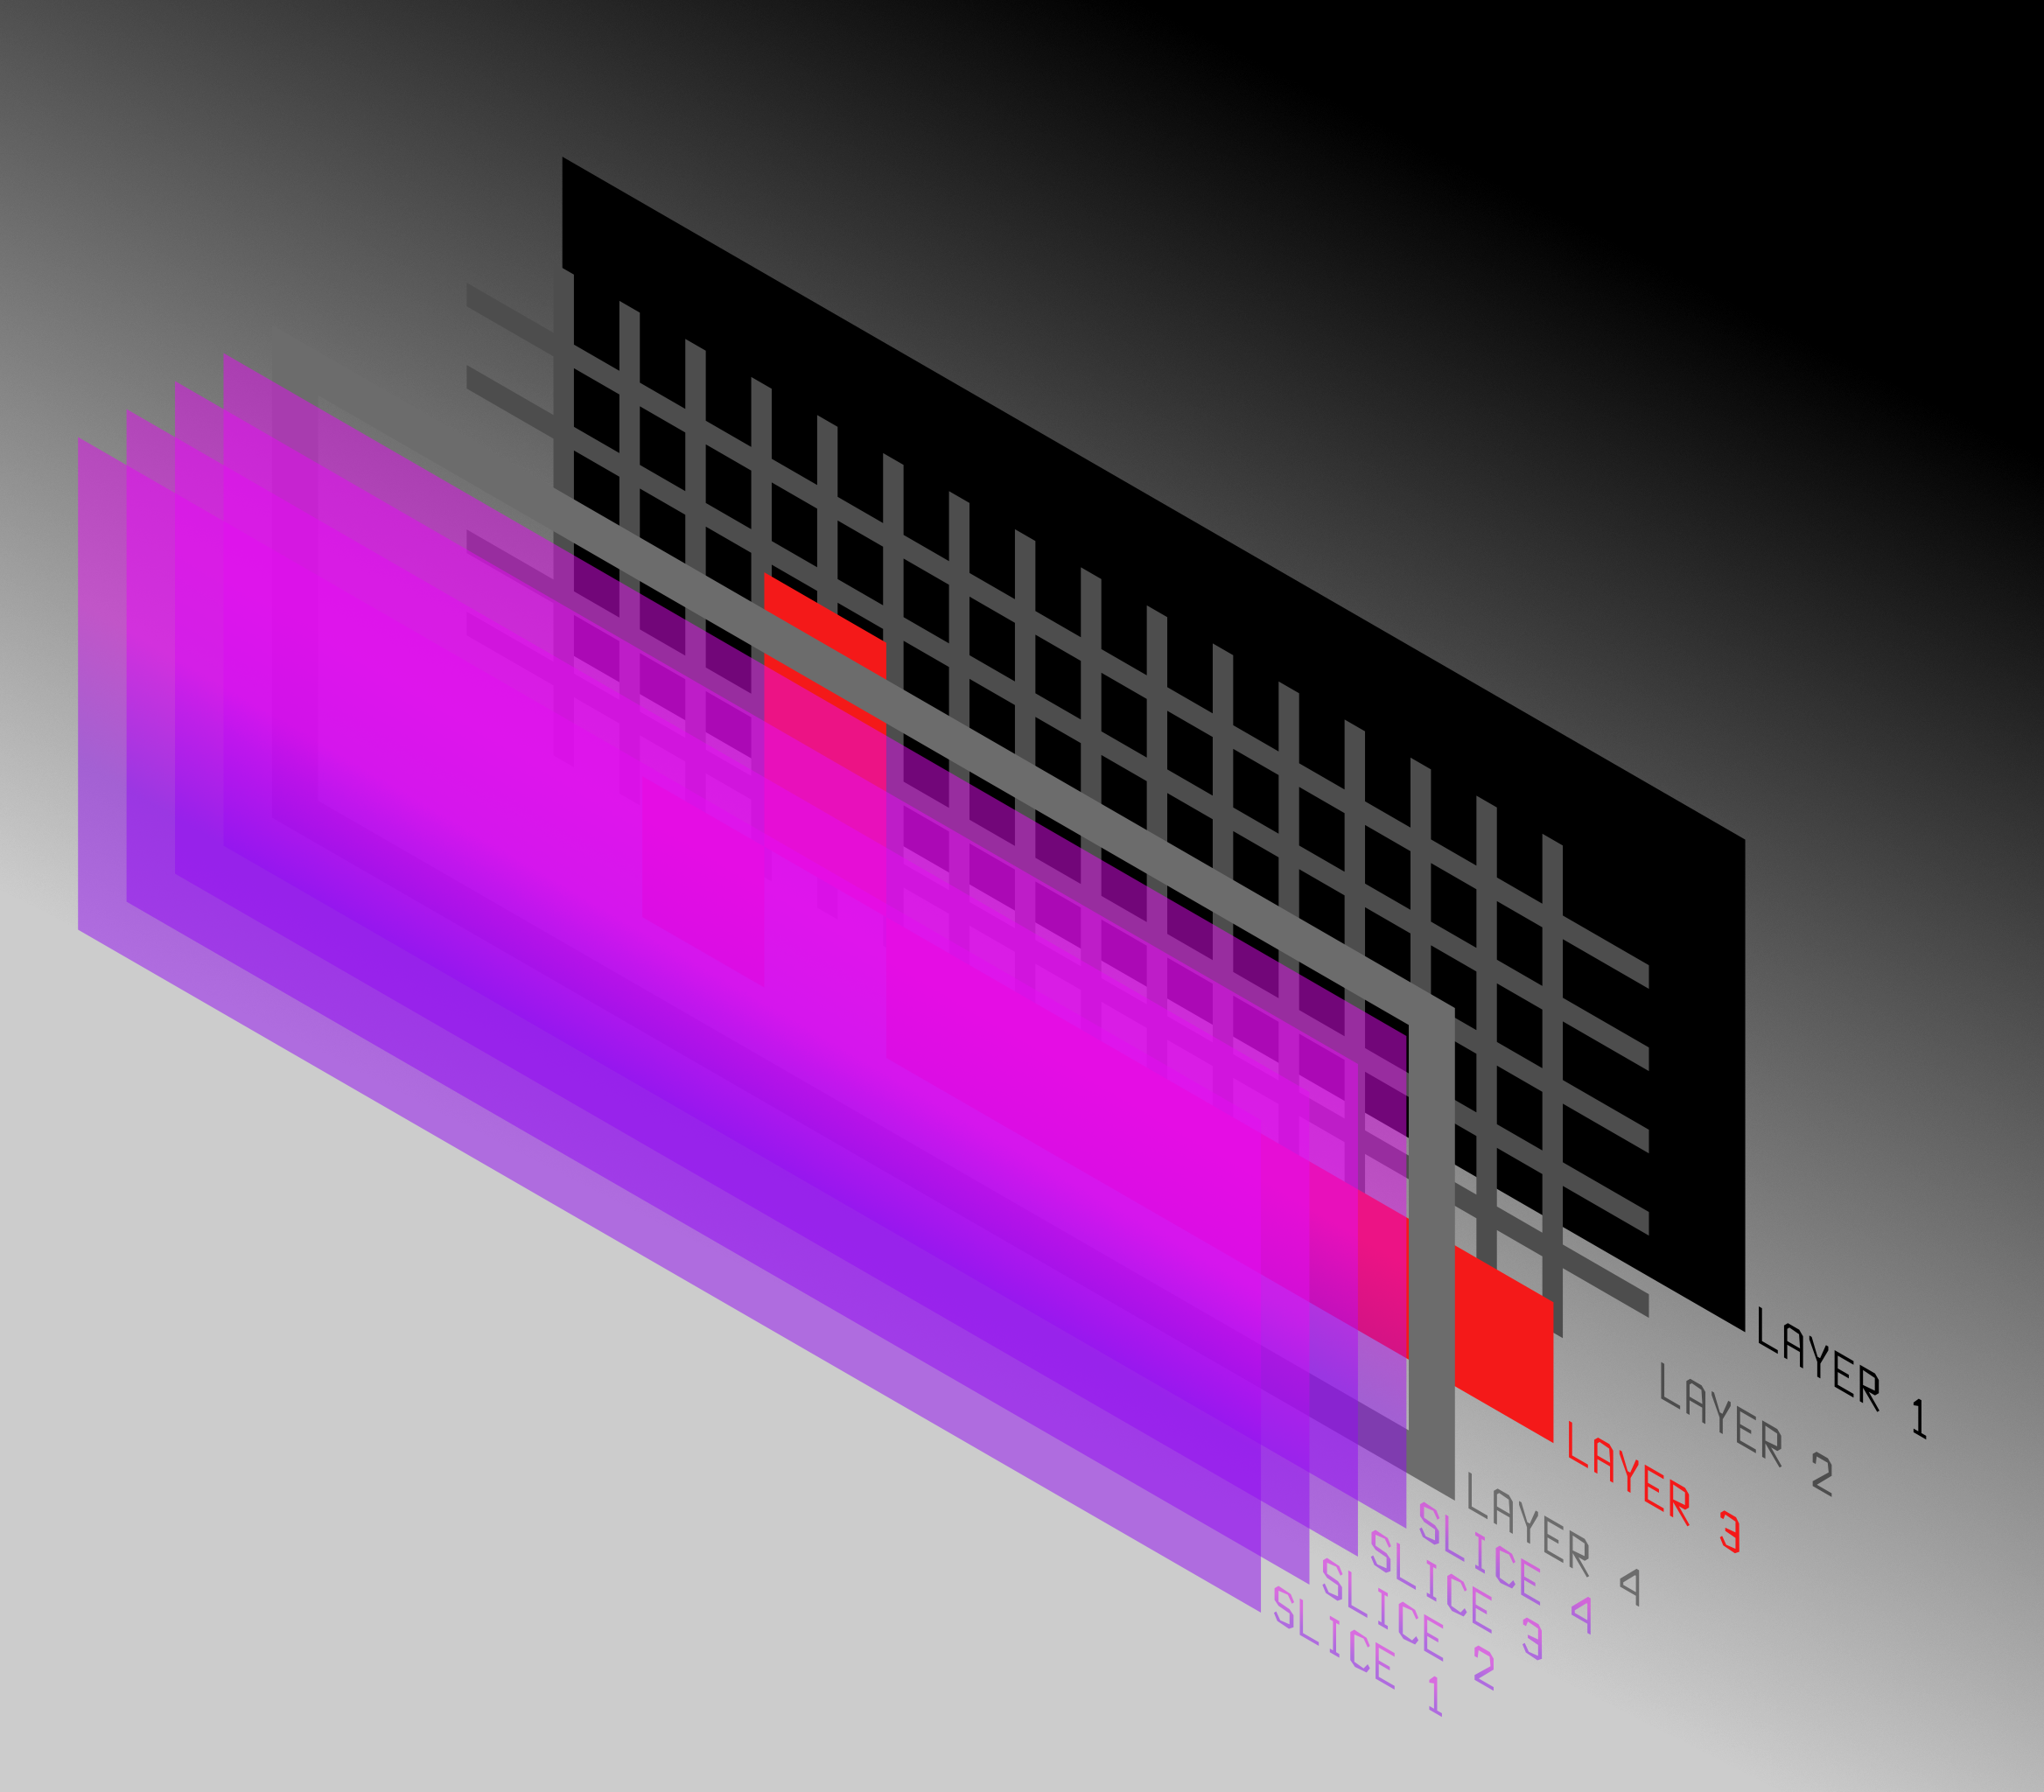
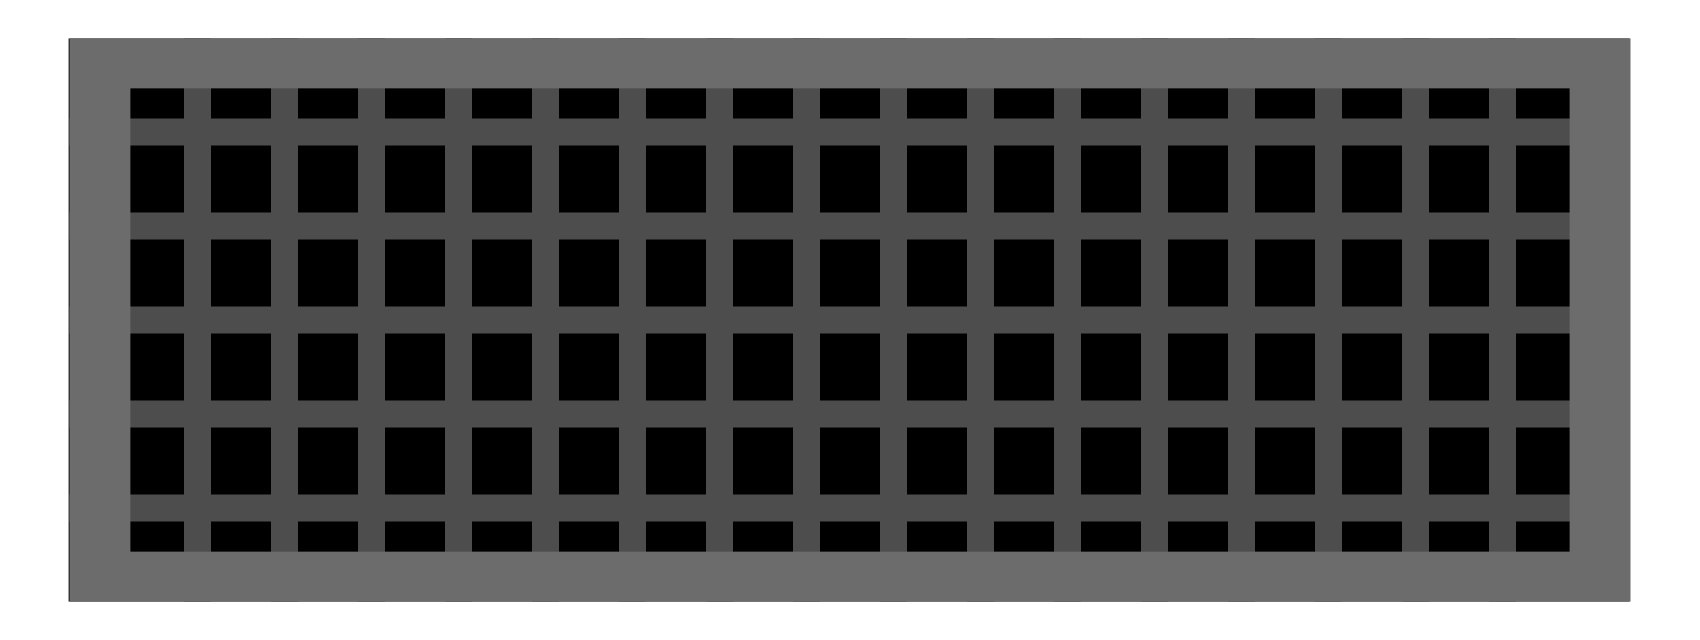
Let's pretend for a sec I need these four exports of a finished design, the first is the finished design: There are four layers on the design: the gray frame is the top layer or fourth layer from the bottom up, the black layer is the background/bottom layer, red and grid are middle layers; in other words, no matter what the export will include, it must be made over the fourth layer (the frame)… i.e; The design was a quick something just to illustrate this, I didn't think it through, sorry. For all intents and purposes though, just assume the layers can't be reordered, as they'd be here. …but to take the slices, I think, then I'd had to either take the slices at stages or something along those lines, or I'd had to duplicate the artboard to uncheck the layers for the slice, also I'd probably need to make every object a symbol so they're kept in sync. Is this correct? Can slices have arbitrary layers in them without affecting other slices in-line where the objects' presence differs? Thanks.
-
I want to apply a linear gradient with a parallel axis. These I've only gotten them exclusively by accident, never on purpose, I need them now though but the drawing is done, isometric, to scale, very easy to screw up. In the help the only guidance is that I skew the thing to get it, but I'd rather avoid that — even with the transform panel's precision — unless there's absolutely no other option. This is the one I need, BTW: (well, sort of; I need to apply it to open strokes) Can you share the secret, please? I promise I won't tell. This is in Designer.
-
 vitaprimo reacted to a post in a topic:
Typeface design (WIP)
vitaprimo reacted to a post in a topic:
Typeface design (WIP)
-
But… they ARE aligned perfectly. You can zoom in forever without a decimal point in the coordinates. Artboards are copies of the same because they have guides (another thing that can't be mass-applied) so I was careful of duplicating with ⌘J then moved with the transform panel. Other designs I'd just ⌥drag it. Also, you'd think they'd be misaligned all slices in a given axis, but no, some are, some aren't. It's very weird. Oh well, I'm nearly finished. There were a lot of artboards. I'd hate if I were doing this for work. Thanks nevertheless. 😃
-
I have a grid of 128px sq. placed every 200px apart, the objects in each artboard are centered with plenty of margin for shadows and other pseudo invisible objects however, in Export persona slices are created 128x129, and put at x:-1 y:0 or x:0 y:-1, which doesn't seem like a lot, except when you export 8x the size it is quite noticeable, though even a single pixel messes things up. It's not even the designs with shadows the ones messed up, it wouldn't be great either but at least there'd be an explanation. I've been fixing them one by one but they fight back; when I change positioning, it "corrects" size—that kind of thing. It's double the work. Is there a way to do this in bulk? Export Persona is like another app to me. Thanks.
-
Unlinked linked symbols--is it bad?
vitaprimo replied to vitaprimo's topic in Desktop Questions (macOS and Windows)
Hey thanks! I was just a little bit uneasy about it because it wasn't on the new doc's symbols panel, so naturally that left only one other panel where it could be…fortunately it seems just a tiny bug. No harm. Thanks again ! -
Unlinked linked symbols--is it bad?
vitaprimo replied to vitaprimo's topic in Desktop Questions (macOS and Windows)
Linking it to the new document then detaching it seems to fix it, but is the old document safe? 😮 -
Trying to save time on a quick design I copied an object from another design. It happened to be a symbol and copied as a symbol. I closed the donor document and carried on. I duplicated the object/symbol for backup because I was about to deface it be when I removed elements from it the other reacted as well. I undid the changes and opened the symbols panel to detach it but it's not there. Is it still attached to the donor document!?? I don't want to even open it just in case it updates it with the changes. How can I fix it? Thanks!
-
On an old MacBook Air remoting-in client, I opened a design directly on it because Affinity Designed isn't very usable over Apple Remote Desktop. It's just some artboards with diagrams on them but they are kind of big. They're more or less 2:1 with 8000-15000+ pixels on the longer side and I did notice it a little sluggish while zooming and panning around, not much though, just on the busier parts an object group would take a second to appear. They are this big because if smaller, when I really zoom in, moving and placing things gets jankier. It seems like Designer may be treating vectors as raster images or something that's making pixel count in vectors an issue—I think, I don't know. I tried changing the unit to something else; meters. Everything is under a meter but there are still three decimals in the dimensions, that's too many numbers. Do these changes have any effect at all of how Designer processes things or to I need to resize things? Reduce DPI? Does snapping work at sub-pixel? Is it affected by DPI? I'm open do any advice/suggestion. =) Thanks.
-
⌥-dragging an artboard works… it duplicates everything in it but works. Creating a new one doesn't, so it seems like defaults aren't set, but I'm not sure. Could you confirm?
-
That's pretty much it. I tried it using using the Synchronize defaults from selection button () while selecting the artboard with the artboard tool and with the "v"* tool but I it hasn't worked so far. I found some complain posts about not being able to copy guides, but there wasn't anything about defaulting them—yeah I know, semantics, but I'm still hopeful. 🤞 Thanks *: I think it's called "select". The black pointer one… maybe "move" or "transform" but that sounds Adobe-ish.
-
Can't cut into curve in [Designer v1]
vitaprimo replied to vitaprimo's topic in Desktop Questions (macOS and Windows)
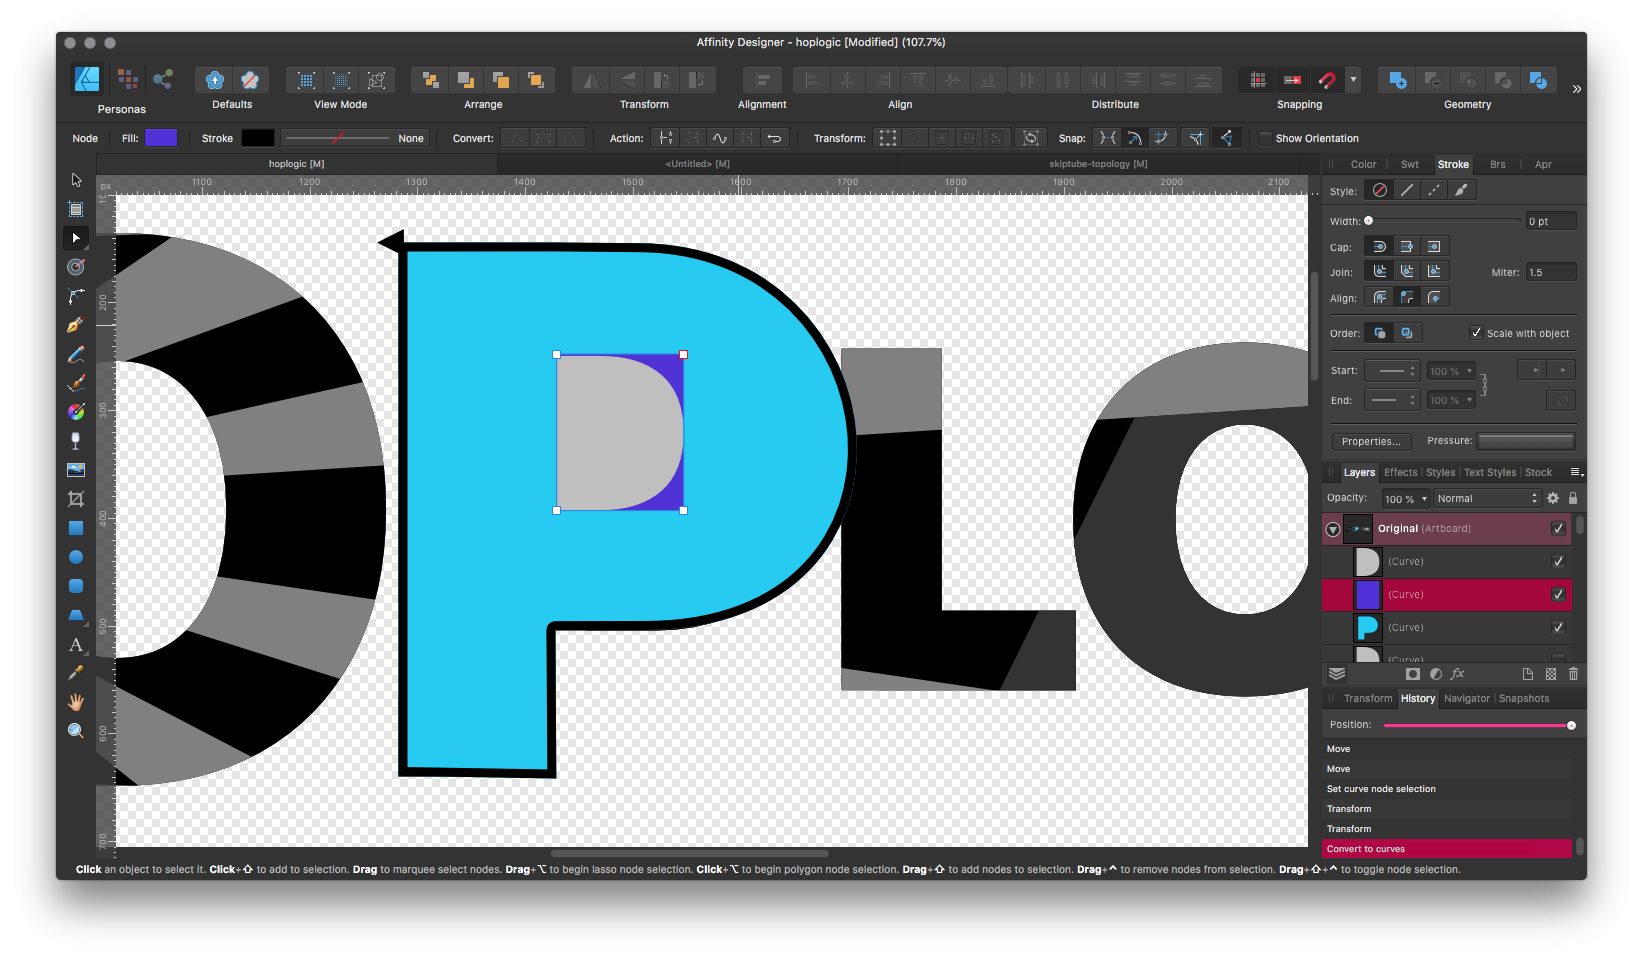
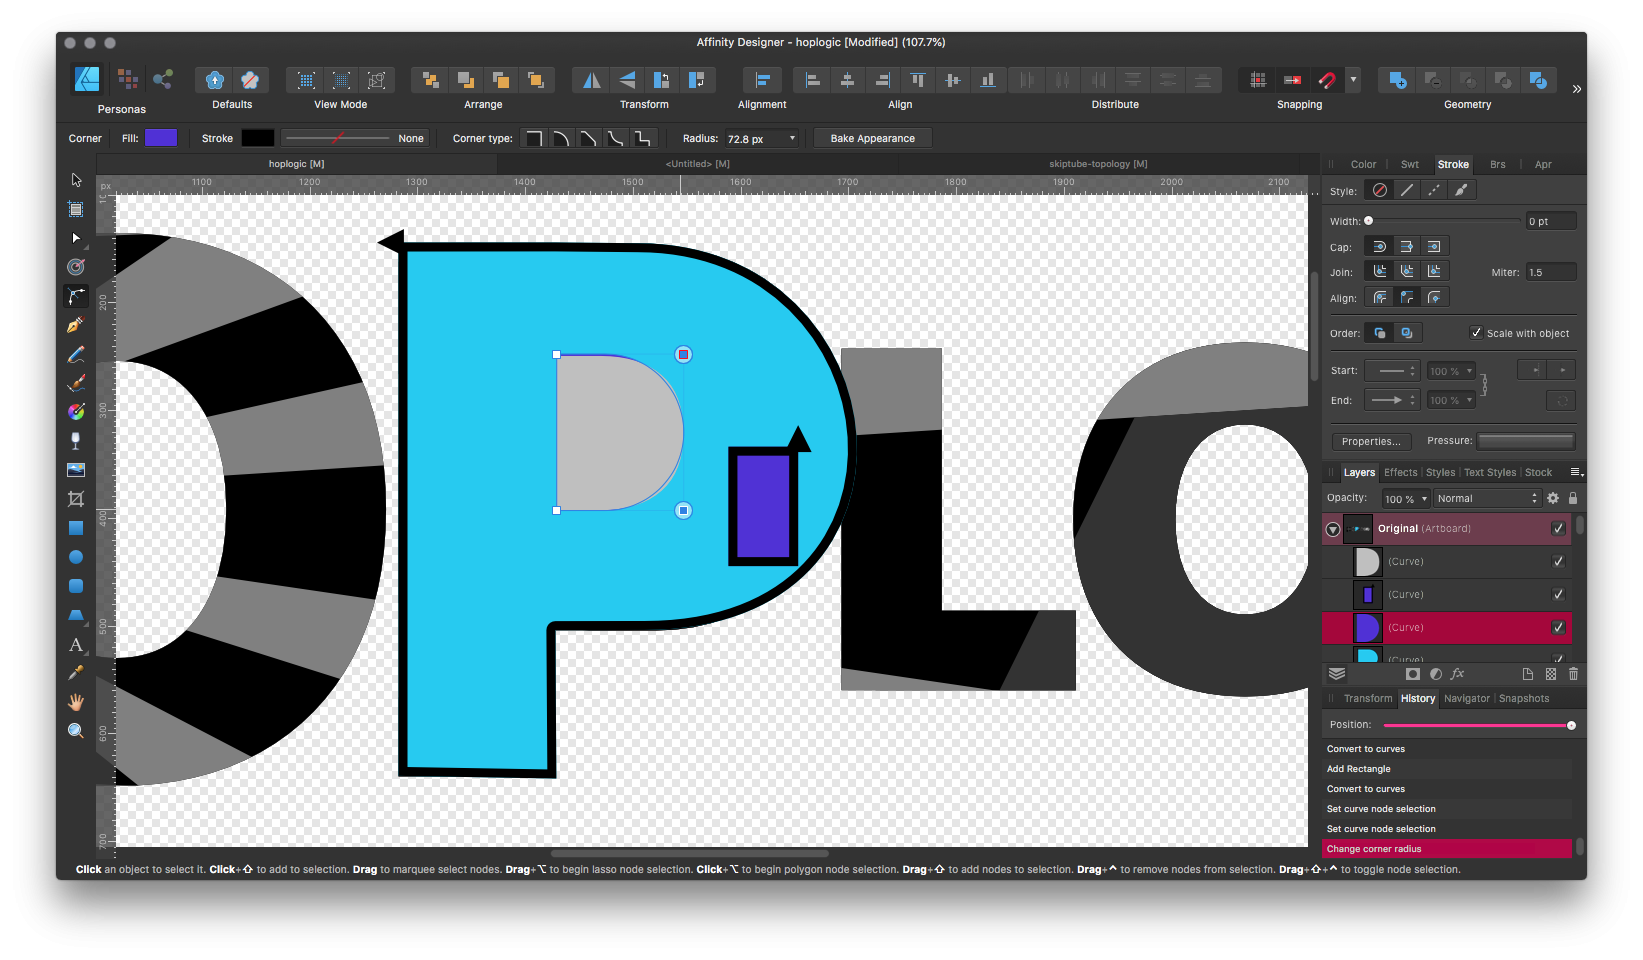
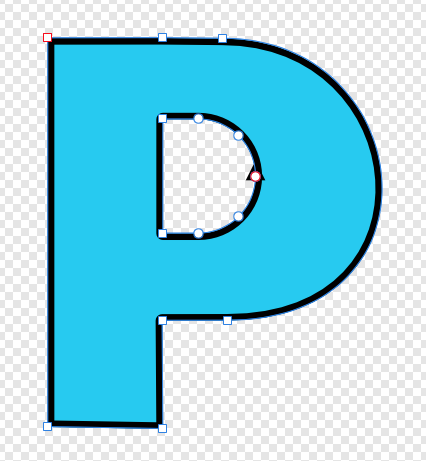
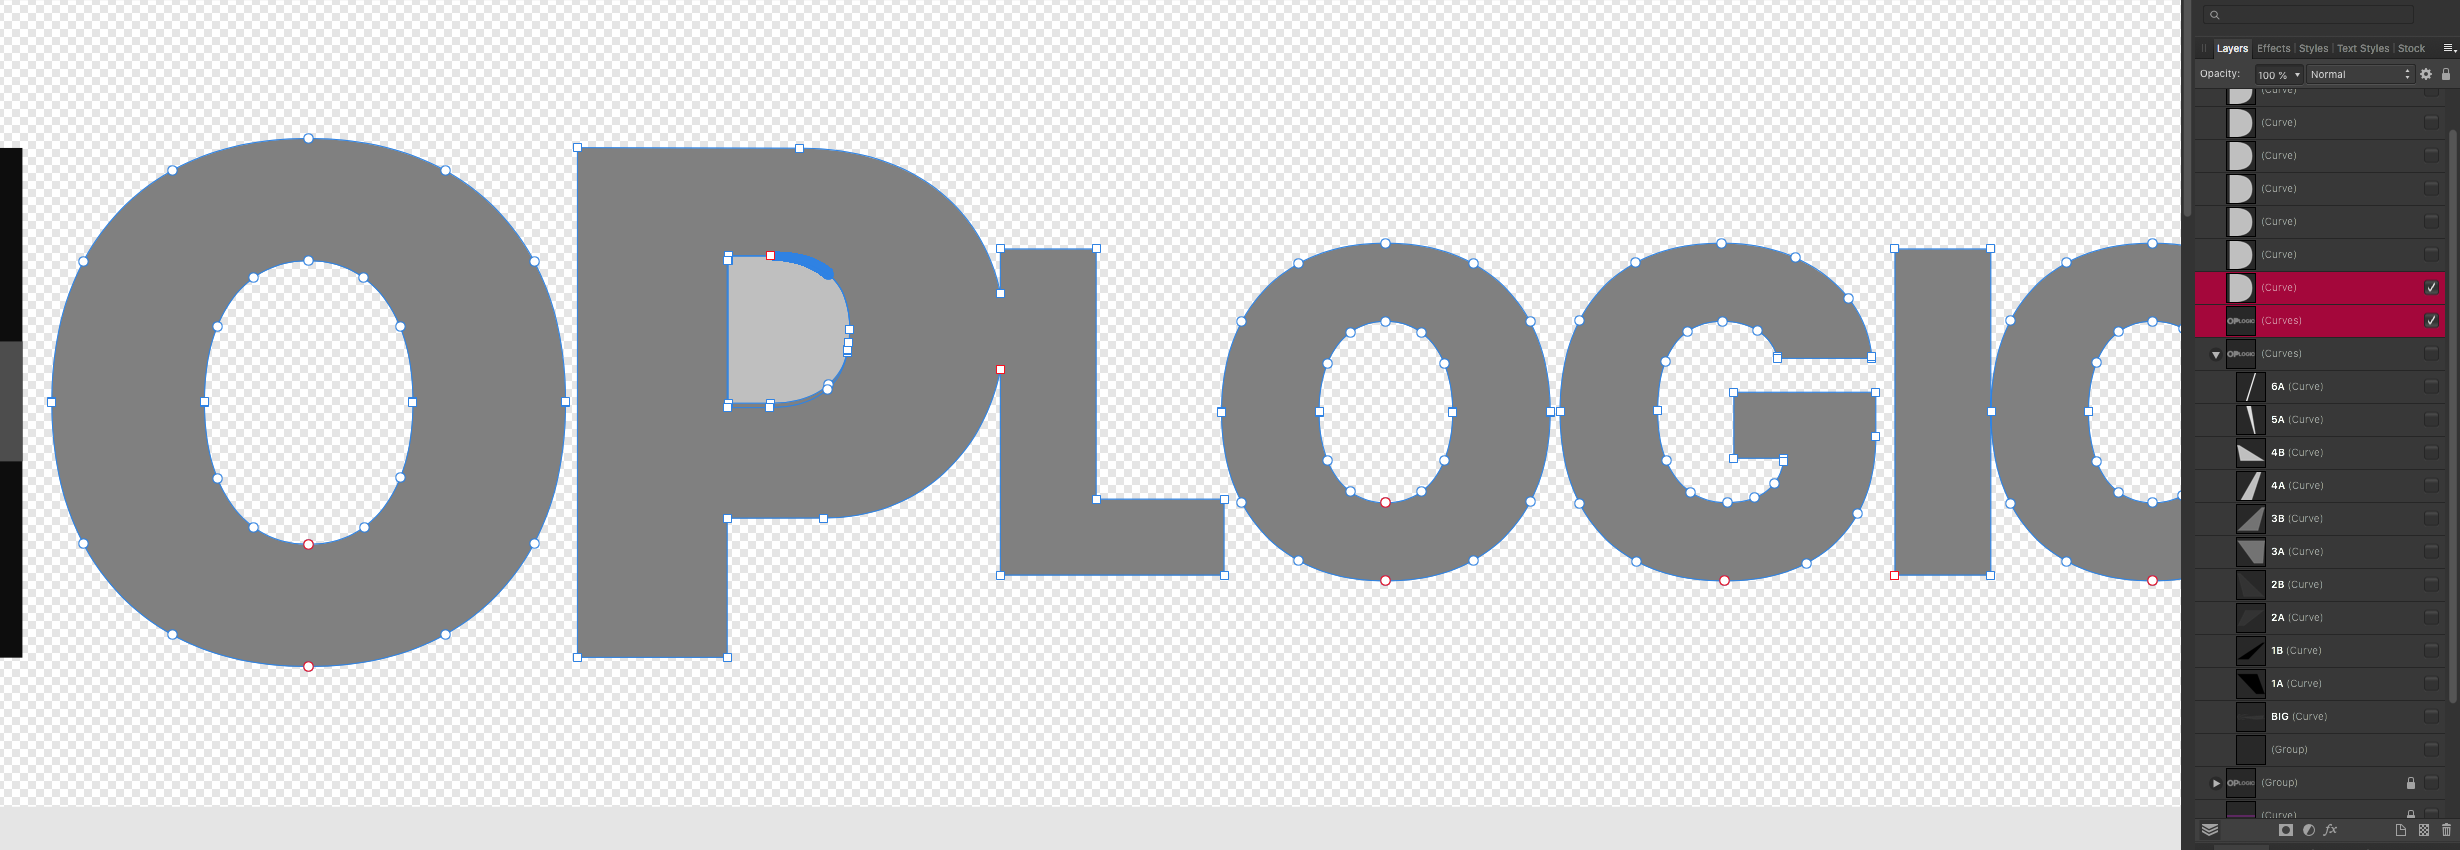
Hi, thanks again. That is what I'm doing. Except for the shapes which now I've drawn by hand with the pen tool. On the very last attempt it finally worked, but I now have to redraw the whole thing. And, I still get the red nodes even though the curves are closed, and stroke and fill are correct. P redrawn, I added the arrow in the stroke to see where it ends/begins: Like so: Corner tool, all normal: Selection of both curve before punching it: Two red nodes: Punched it. And notice there's one arrow, meaning it's a single closed curve, yet there are two red nodes again/still. ___________________ It turns out I didn't need to redraw the whole thing, luckily, but I still have a ton of red nodes and "open" curves in a single object: And if I select winding fill mode (I'm still not sure what's that supposed to do, later…) it, the P…: I mean, I'm starting to Stockholm Syndrome-myself into that P, but y'know… ___________________ I do really appreciate your help though. I think this might be a document-related setting because I just draw something else in a new document and curves closed correctly with no red nodes. I check on it later, I don't want to do it stressed because this is my fun app, I don't want to ruin it. Thanks a million.
-
Can't cut into curve in [Designer v1]
vitaprimo replied to vitaprimo's topic in Desktop Questions (macOS and Windows)
Thanks for answering, I learned something new today at the very least. —— Yeah, I knew something like that, that red nodes were bad news. But, AFAIK an open curve doesn't fill correctly and it's immediately noticeable in the stroke. The shapes behave like close curves until booleans are used. I tried the "new" menu item but it changed nothing. And I use the old share and added the thickest inner stroke possible to fill it completely, then expanded the stroke, which would again leave me with a brand new curve, right!? It came out with a lot of red nodes again. A new curve. Is there a setting that draws al new curve broken or something? The worst thing is that, say I make peace with having to close every curve, but I can't because the close curve button continues unavailable after selecting the nodes. I think I should start beginning to learn Inkscape soon. I had to move to Linux at some point anyway, I just thought I'd had a little more time left on macOS + Affinity Designer. Thanks again.
-
I can't substract (again!). I'm attempting to cut the little hole on the P. To get the shape, I duplicated the P and deleted all the surrounding nodes to reverse the filling, leaving the D-shaped curve to cut into the P. To be safe, I drew a big enough random curve, intersected the little D into the random curve to make a brand new D curve that had nothing to do with the original shape, and tried to cut that into the P… That's just one of the way I attempted to go about it but nothing I do seems to fix it. Boolen operations are really messed up at times, sometimes crossing a curve over various areas of another curve and adding it, fixes it, but not always. What do the red dots mean again? If curves are open, how come the cam add up and group without deforming horribly and when cutting they create more shapes in that are both part of the result but still they can deleted without leaving trace they existed? Like the little D-shaped curve.