Search the Community
Showing results for tags 'desktop'.
-
 Greetings, I have found that I am unable to drag and drop layers from one document to another. I know that I can copy paste. But drag and drop feels more convenient. Please consider this feature request. Thank you
- 1 reply
-
- 1
-

-
- affinity photo
- desktop
- (and 1 more)
-
 I am not sure if there is something I am doing wrong or if its just the cricut app doing something funky (which always seems to be the problem). I am new to Affinity and graphic design applications in general just an FYI. I created a design for a logo for myself in Affinity Photo. Ive taken off all effects and completely simplified the design for easy transfer into design space. But for some reason when it transfers over it takes only part of the image and distorts another part of the image. Is there anything that I can do to prevent this? Not even sure why the yoga pose silhouette won't even transfer.
-
 I'm trying to snap a guide to exactly 30 cm using the ruler. Looking in the snap settings, nothing suggests itself as a means to do so Q: Is it possible to set snap settings so placing guides will snap to the ruler when visible? Q: If not, how do you approach it?
 -
 Now, I am not sure if I am doing something wrong or if this is an update issue but, when I merge the visible layers after applying a distortion and filter, I can't do anything else. All I get is the hand and can't seem to use any other function. IMG_2673.MOV
 -
 I recently started vectoring an object on my desktop (PC) and needed to export it to my ipad. I used google drive to drop the file on and then opened the file up on designer for ipad with Zero problems but when I completed the vector object and tried to export it back to the desktop it keeps exporting the objects as pixels even though I chose "editable" for all aspects of the file it still opens up on the desktop as pixels. Please Help! Thank you in Advance for any help!
 -
 My desktop is starting to fail. I have copied thousands of Vector files (.svg, etc including .afdesigns) that I’d like to continue to work on using iPad version Affinity Designer. How do I import into iPad? And where do I save newly edited? Thank you in advance.
 -
 Hey everyone, I'm back with another video tutorial. This time, I've decided to create a minimalist vector illustration using Affinity Designer (Desktop version). I will be covering a few things in this illustration such as shape tools, pen tool, and geometry functions. Feel free to leave any feedback and I hope it will help you on your design journey. How to turn a sketch into a vector illustration in Affinity Designer (Desktop) Thanks, Mike
 -
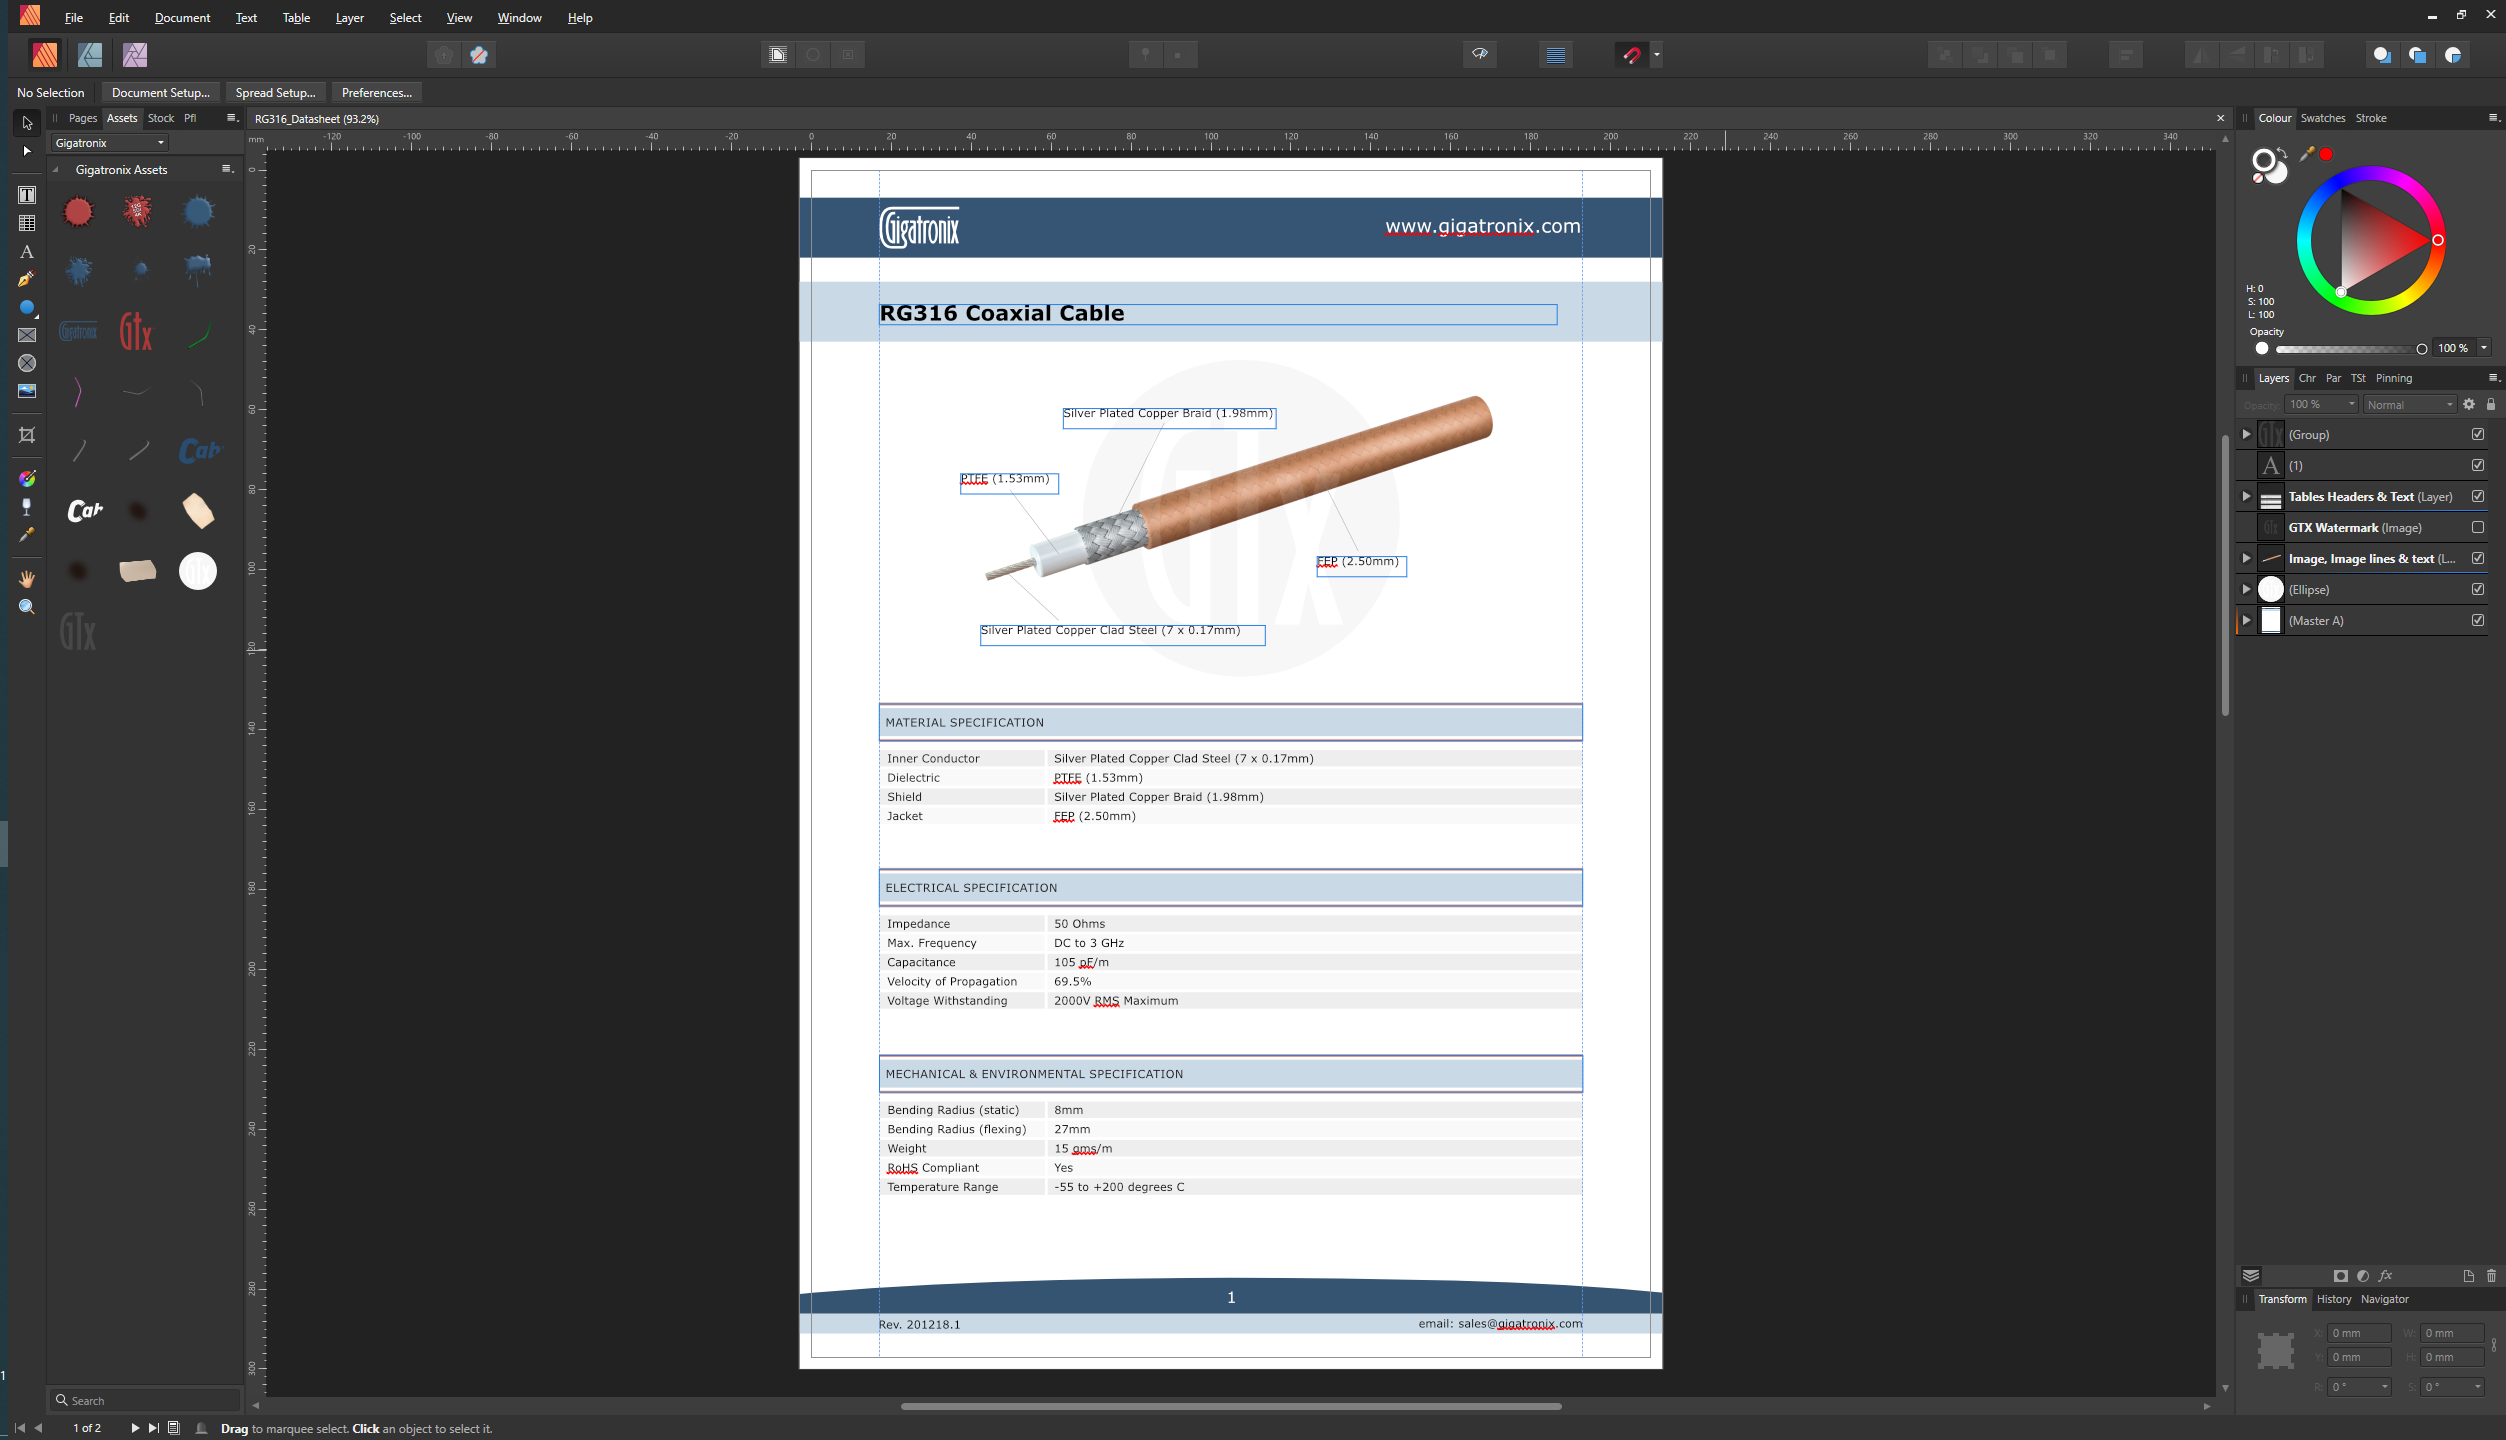
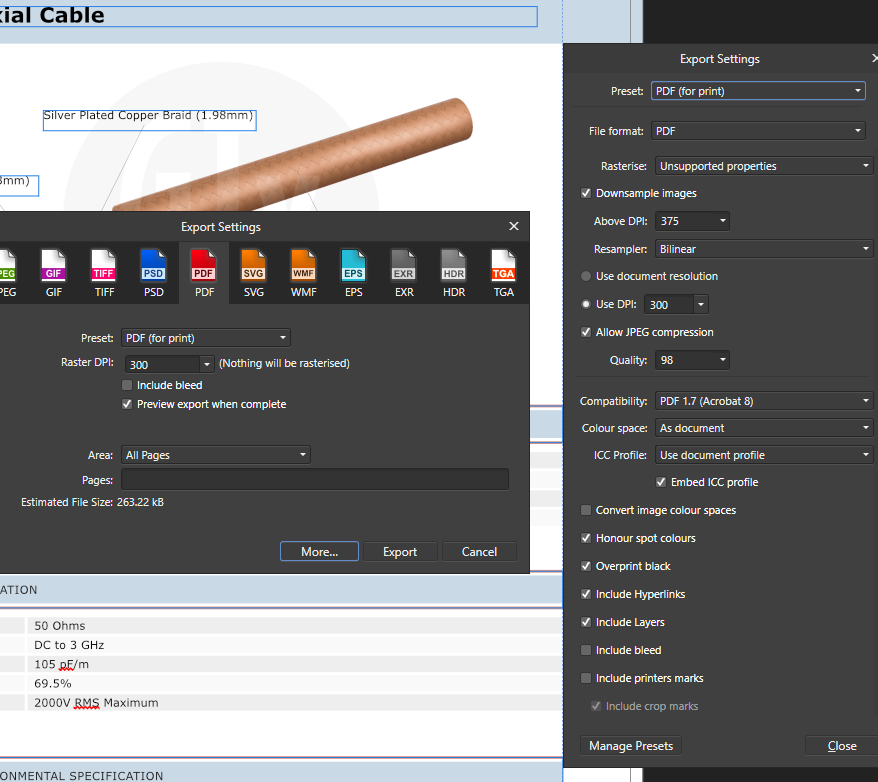
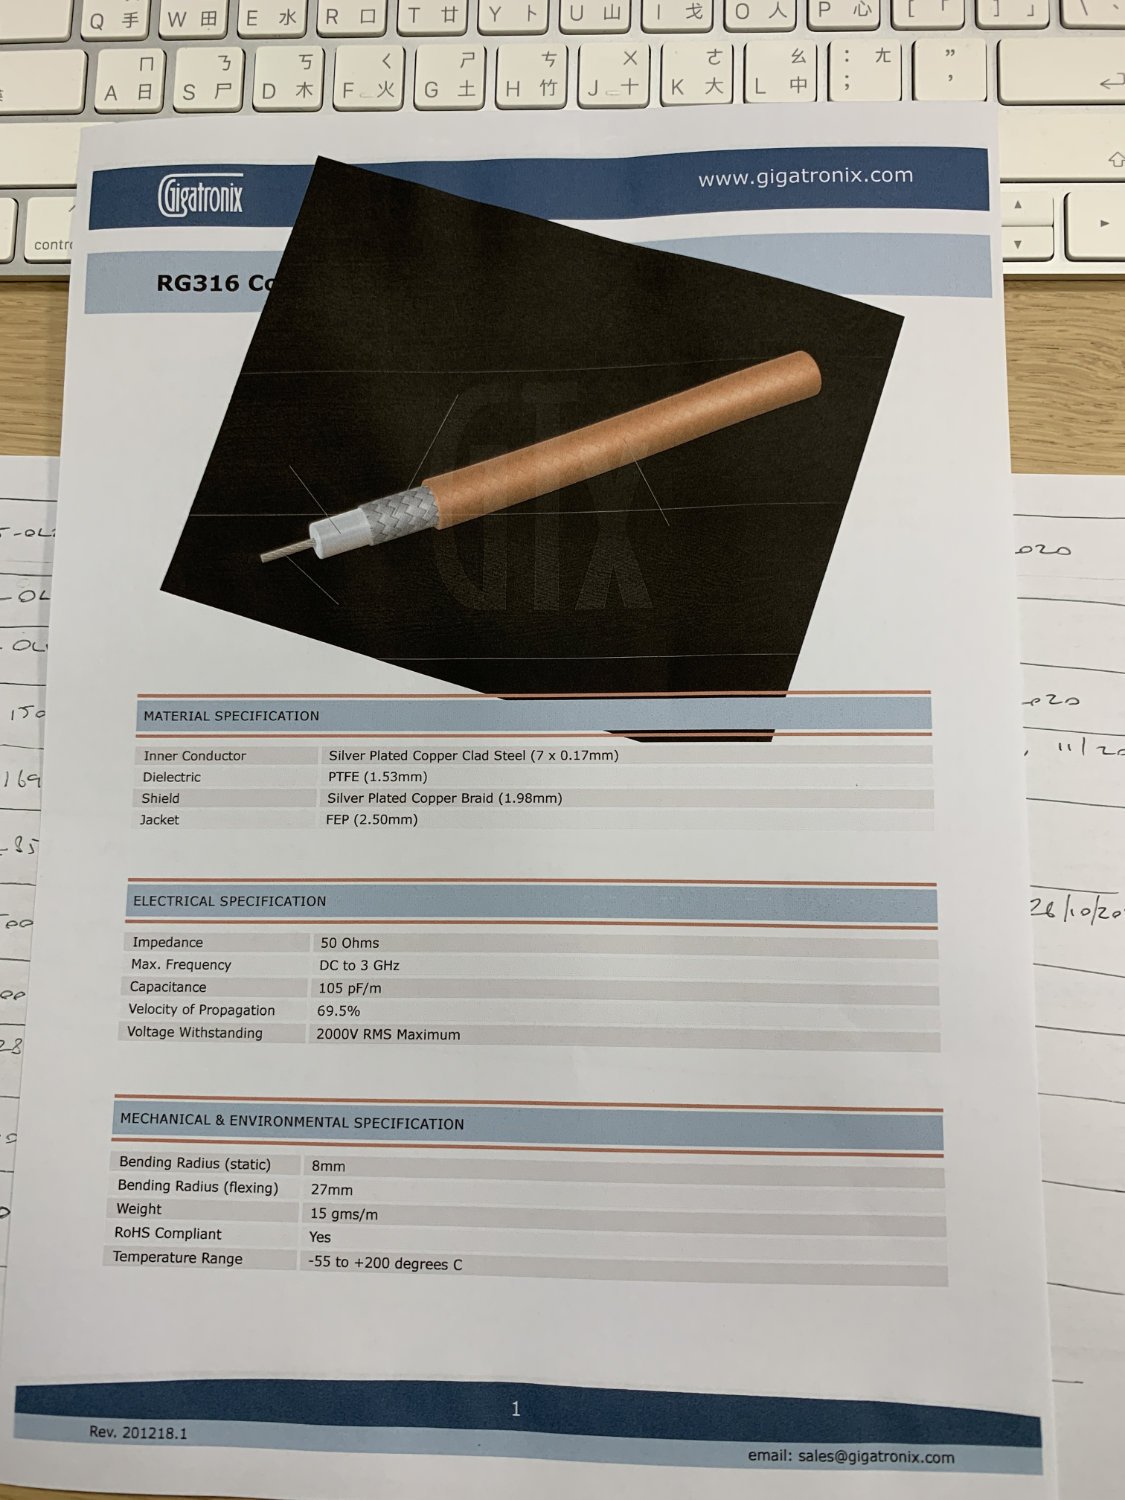
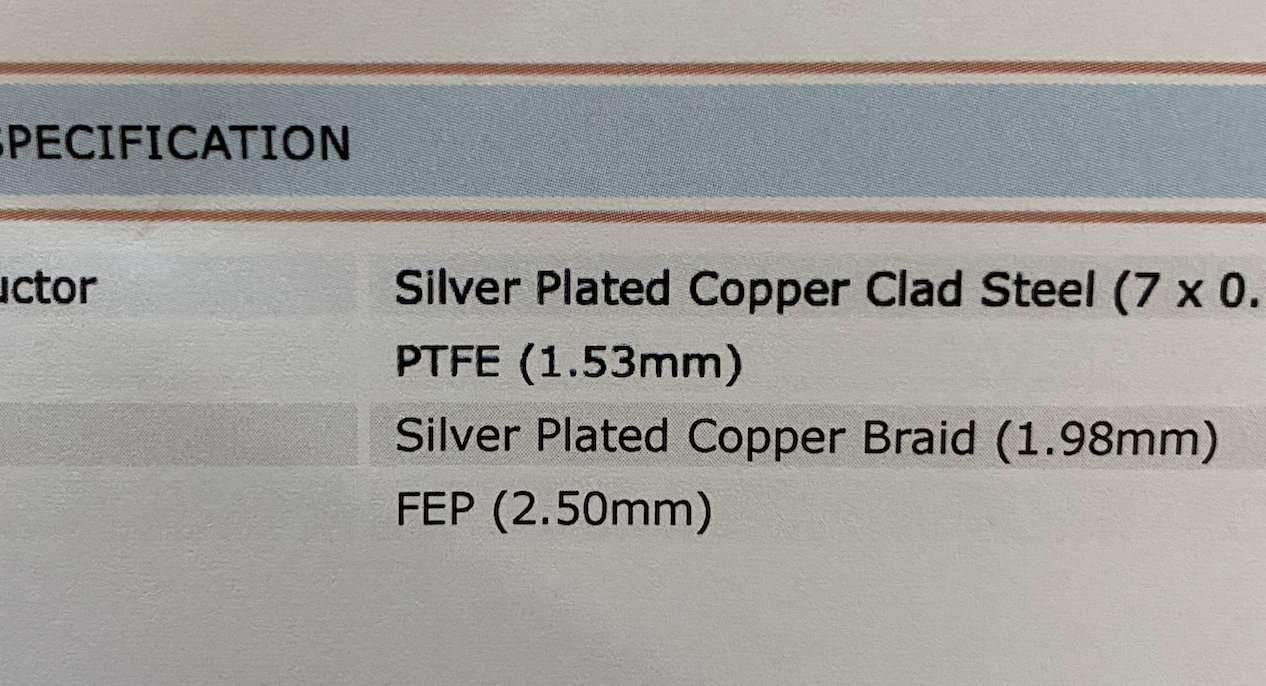
 Hi gang We have encountered a couple of problems when printing a pdf Image A is created in Publisher & exported as a pdf using the settings as per Image B ...it will be going online on our website & for our customers to download & print out. Online & as a pdf it looks fine ...spot on. Problem 1: When I printed it out here to check it, it came out as good as it could be, I was pleased but when one of my bosses printed it out on his printer the png image of the cable came out dark black ...see image C. Problem 2 So my other boss printed it out on another printer & the png image was fine but some of the text comes out much thicker than other text ... see image D Both things make me look a bit silly as I told my bosses the pdf was fine! ...I am very inexperienced in using pdf's so if you guys could bear that in mind in any explanations (if you are kind enough to reply) that would be cool! Thanks in advance
-
 needed to scale an object consistently with the artboard but it just mess up the object Affinity_Designer_2020-12-22_12-57-07.mp4
 -
 I can't even begin to explain how useful an Affinity alternative to the Quickshape (Procreate) or Snapline (Adobe) feature would be. 😊 The ability to draw a pixel line, circle, or rectangle by hand, and then hold the stylus/mouse down for a second for it to become a 'perfect' shape. It would be a total game changer and save so much time, especially for anyone using Affinity apps for illustration or digital artwork.
-
- 2
-
-
- shapes
- quickshape
- (and 7 more)
-
.thumb.jpg.906d0128edf7eab95162b8f71c9e34a8.jpg) I am not using proper terminology but I want to see images and objects that are not on the page but on the workspace or off canvas on every page in publisher. In Corel Draw is called the desktop and the settings are found in the page palette if someone knows what I mean by that. Thanks
I am not using proper terminology but I want to see images and objects that are not on the page but on the workspace or off canvas on every page in publisher. In Corel Draw is called the desktop and the settings are found in the page palette if someone knows what I mean by that. Thanks -
 When the iPad is backed up to desktop computer, not to iCloud, are the files saved in Affinity Photo restored to the iPad if the iPad is rebuilt/restored from that backup or are those files lost? The files I'm asking about are not stored to iCloud or to Files or anywhere outside of the app.
 -
 Hello everyone, I recently purchased some fonts and in one of the font families I have both Desktop Fonts and Web Fonts When I want to add both types of a single font it says that they are duplicates. 1) even though one extension is .ttf and the other .otf 2) even if I change the file name of one of the files (so that both the file name and the extension is different) I still get the same problem Is there a way to have both a Desktop and a Web version of the same font? I need the Web for designing websites (obviously ) but I would like to take advantage of the ligatures and other versions of some letters that the font designers have designed for print and avertising applications and I do need the Desktop .otf version as well. Thanks in advance! Best Regards Boyan
 -
 The most Complete isometric tutorial you will see on the internet about affinity is here! Available now! 100% Free to watch until 31st October! Brushes used: (PRO 77 Vector Brushes Bundle) Link below https://gum.co/MVBpack
 -
Complete tutorial! available now! 100% Free to watch until 31st October! Brushes used: (PRO 77 Vector Brushes Bundle) Link below https://gum.co/MVBpack
-
Complete tutorial! available now! 100% Free to watch until 31st October! Brushes used: (PRO 77 Vector Brushes Bundle) Link below https://gum.co/MVBpack
-
PIE Design! 🥧 Complete tutorial! available now! ☺️ 100% Vector 100% Free to watch until 31st October! Brushes used: (PRO Vector Brushes Bundle) https://gum.co/MVBpack
-
Chicken Design! Complete tutorial! available now! 100% Vector 100% Free to watch until 31st October! Brushes used: (PRO Vector Brushes Bundle) https://gum.co/MVBpack
-
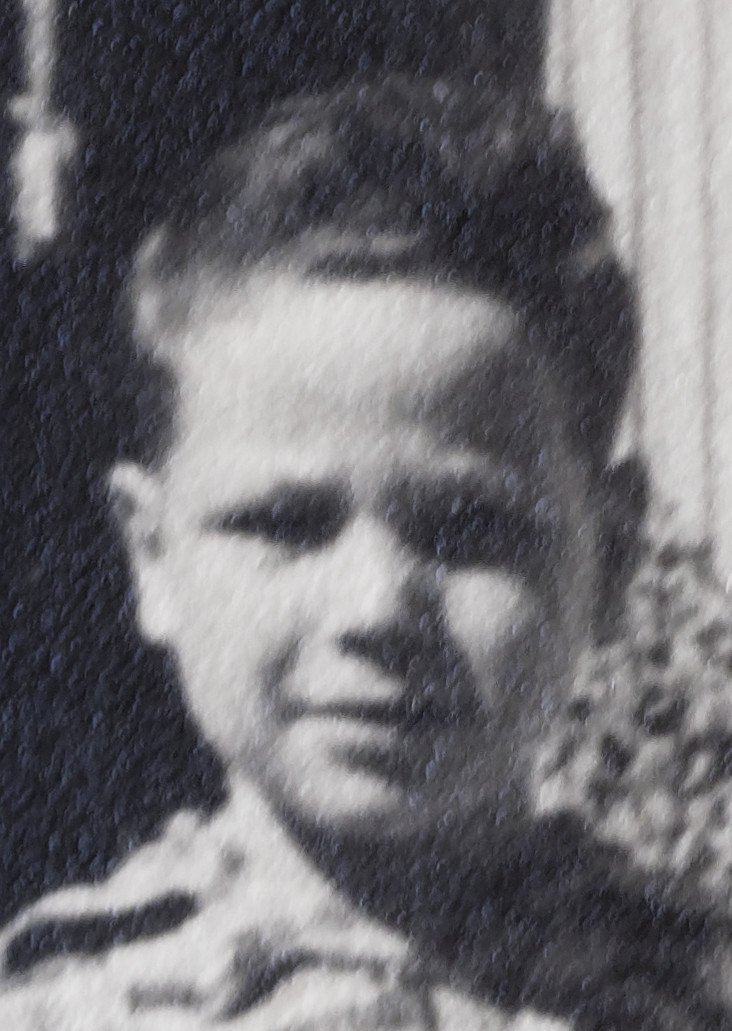
 New to Affinity Photo - steep learning curve but enjoying the challenge and getting some excellent results. Beginning to restore old photos. Any suggestions on how to remove the markings on the old B&W photo below? FFT Denoise does not seem to work. Thanks.
-
Is there a 'shift edge' or equivalent for selections/masks? If, yes, where is it ? Shift edge is something found in Photoshop. Photoshop's Shift Edge expands or contracts the mask by +/- pixels. It's available in the Refine Mask dialogue box in PhotoShop. Because it's in the Refine Mask dialogue, it means it can be experimented with at the same time as other subtle adjustments to the mask. I mostly use Shift Edge in combination with Mask feather adjustment. The amount of feather dictates the amount of shift. Shift Edge is really great for avoiding the halo effect when feathering the mask edge on levels adjustment layers. This is when you've got photos with the common problem of under-exposed foreground + over-exposed sky. How do you achieve this in Affinity Photo if there is no Shift Edge? (as I suspect might be the case)
-
 To align a group of objects, select them and do Cmd/Ctrl and an arrow key, up to align tops, down to align bottoms, right to align right edges, and left to align left edges. Filemaker Pro has used this scheme in Layout mode forever, and as a Filemaker user, I find myself continuously frustrated in Affinity apps without those efficient shortcuts. The icons for these actions are so small as to be almost unreadable, and spill off the right of the screen, requiring the user to scroll using the equally-obscure small double arrows at the upper right. To distribute objects, change the Layer menu selection for Alignment to Distribute Objects. With the keystrokes for alignment available, the Alignment item would be superfluous and could be done away with. Any time another menu level can be eliminated, the user experience improves.
 -
 Hello there, unfortunately I don’t understand (and can’t find a tut) how to apply a preset i.e. in the Curves Adjustment layer. 1. I make my adjustments (which I like to add to a batch of similar files) 2. I add a preset and name it 3. Where do I get this preset now in another image? Can someone help?
 -
 It seems like something is not working as we are used to, or probably I am missing something, and searching for 1 hour does not bring up any satisfying results. I would like to remove part of one shape using another shape in a way that I can see the transparent background, and unfortunately, topics like this also did not solve the problem. Here is an example screenshot, similar to what I would like to achieve: I would like to remove the inner rectangle in a way to subtract the outer one and see the transparent background. Thank you so much for your help.
 -
 Question: In Affinity Photo Export Persona, is it possible to set the export path relative to the source document? Issue/situation: I have a small AppleScript setup which creates a predefined folder structure for most of my commercial photo work, and once I'm done editing an image I will need to export it in multiple resolutions. The exported files are always placed in a fixed location relative to the source document and it would be great if there were an option to then export relative to the source document. My folder structure looks as following: Project folder name – 01 Source –– 01 phocus capture –– 02 capture one –– 03 other – 02 process –– 01 focus stacking –– 02 retouch ( export from retouch folder into low res, high res and website ) –– 03 assets – 03 export –– 01 low res version ( low res versions folder, always relative to the source document in 02 process / 02 retouch ) –– 02 high res version ( high res versions folder, always relative to the source document in 02 process / 02 retouch ) –– 03 contact sheet –– 04 website version Operating system: OSX Catalina 10.15.3 Affinity Photo: Version 1.8.3 Any help or input on this matter is much appreciated, as I'm considering moving from other editors to Affinity Photo. Thank you in advance. PS: if this post is in the wrong forum, then please let me know, and I will submit it in another.
 -
 Somewhere, I've seen a way to select a colour from another program for use withing Affinity Photo, for example a swatch held on my desktop. Can anyone help with how this can be done?