Search the Community
Showing results for tags 'bug'.
-
 this bug makes it impossible to work with the app right now ;-(( steps to reproduce: - open any image - go to layers and add a new layer (appears as first layer) - try to move any layer as soon as you try to move a layer the app crashes ;-(((
 -
 I'm using Affinity Publisher 2 on windows but the issue is with the entire Affinity line. I got this free font Aquire Free Font - Download Free Font (befonts.com) Inside the software the font is rendered like this But after export to pdf for example it looks like this The font renders without letter spacing in other programs as well. It's only Affinity issue. What could be the problem? Is there any setting I can change to fix this? This makes the software basically unusable because the final exported image never looks like the edited image...
-
 After applying the life filter "adding noise or scattering" and rasterizing the layer with the connected life filter, the filter effect is weakened. It is expected that there will be no visual change by rasterizing the layer.
 -
 I found this out by trying to duplicate/transform-position an image grouped with a clip-masked gradient-fill and grew frustrated when the new X and Y value didn't reflect what I set it with the transform option box, and the bounding boxes kept getting larger and larger. To test and break it down to simplest elements, I made a fill layer (conical so it would have an easy center to see, and because that's the fill in my initial file). The fill layer couldn't have it's location transformed - the X and Y options in the transform box were greyed out, not a big surprise. I then made a rectangle using the rectangle tool (solid fill). I transformed the rectangle's position with no mishap (just as somewhat of a control). I then clip-masked the rectangle onto the fill layer and selected the fill-layer-parent so I could transform it. ((If "clip-mask" isn't the proper term, what I did was grab the shape layer, drag it to the icon of the fill layer and released, leaving the fill layer with a mask in the form of the shape layer.)) Now, there was an option to set the X value and Y value, and when I added say 500 pixels to the initial X value of 0, the new X value showed up as -24706 pixels. Interestingly, the masked conical fill center did move the correct 500 pixels to the right. No bounding box showed up when the move tool was selected, but grouping this with another item showed a massive bounding box reflecting the new X and Y positions and dimensions following the transformation. I tested another mode of masking (empty mask and brushing a mask on), and that combination was untransformable like a straight fill layer, and grouping it with another item rendered the group properly transformable, with the bounding box pertaining only to the added item. Attached are screenshots showing the clip-masked transformation 500 pixels to the right (first and second pics as before and after), and since those don't show a bounding box, I am also including shots from my main file where I first found this issue. Layer/group duplications which repeated my X-position-transformation led to progressively larger bounding boxes, and I have included shots of selecting the different layers to show the boxes. In the last image I've selected a layer formed by grouping my initial 4 duplication/transformations and shifted the set up and right. I didn't bother rasterizing the fill/image group in my main file because the transformations shift the position as desired and I'll be rastorizing it all soon anyway, but I'm sure if I did so that it would transform normally.
-
 I had this problem since I first bought Affinity Photo iPad (V1, then V2). I had hoped this problem was solved when I read that V2 had an improved brush engine, but alas the problem persits. When I draw circles with a basic pixel brush (or any pixel brush really), I get these straight lines (see screenshot below). No matter how I alter the app's settings or brush settings, the problem remains. It makes it total unusable for me to draw in Affinity Photo. Anyone knows how I can solve this problem? Related info: - I use an Ipad Pro 12.9 (2020) - I use the official Apple Pencil 2 - Updated to latest Affinity Photo V2.4 (problem arose in any version though) - This problem only occurs within Affinity. No problems with Procreate, Clip Studio, etc - Problem is unrelated to zoom levels or brush width, I get it at any zoom level and with any brush width
-
Hi, all 3 of them are crashing on start on my M1 Pro MBP, macOS 14.4.1. Reports attached. Publisher.txt Designer.txt Photo.txt
-
Bildschirmaufnahme 2024-04-26 um 19.37.11.mov Tab Key is not working in FX Dialog.
-
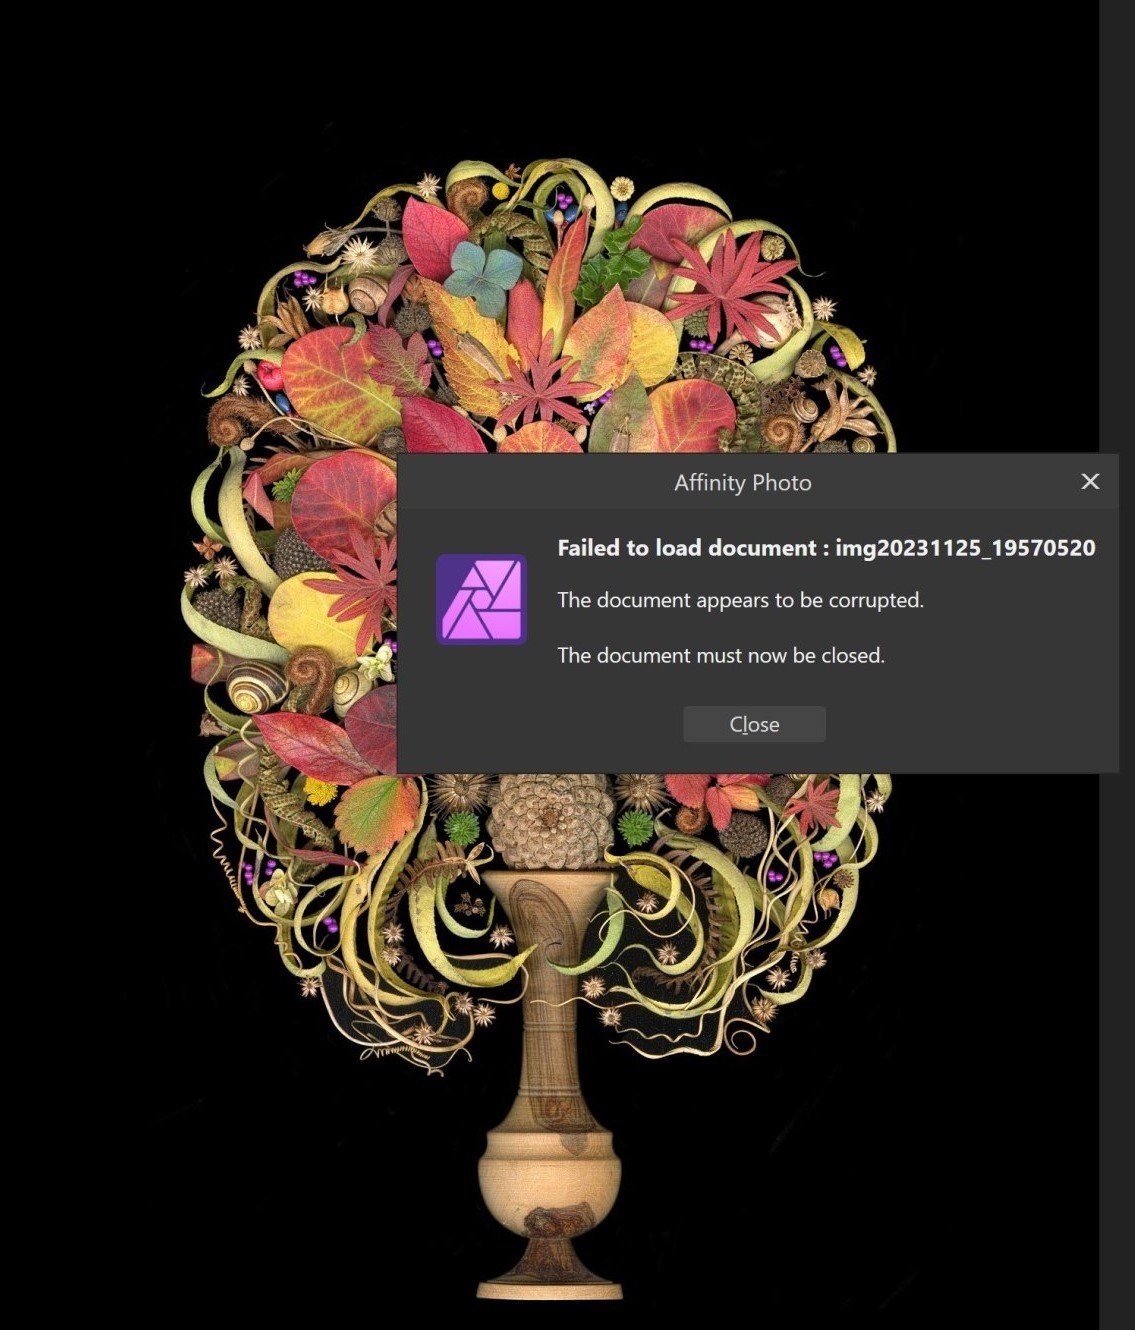
 Hi there. I have posted before and even got a tech to look at the problem, but no joy, so hoping the community can help. I scan images using an Epson graphic arts scanner. The images are 48 bit depth, uncompressed TIFs, typically about 1 GB off the scanner. I edit in Affinity and have done so through both Version 1 and 2. FIRST: my latest image, same parameters as described, has caused Affinity to choke twice, as I near completion in editing (which takes WEEKS). The file tries to load, and then I get a message that reads "failed to load document, document appears corrupted" Here is the response I got: "Hi Sandra, I just wanted to let you know that I've downloaded your file. It also fails to open for me, so I've logged it with our developers to see if anything can be done. However I can't give any timeframe as to when this may be. In reference to your other post and files getting larger, when this occurs try using File > Save As to create a new file. As this process should get rid of anything not being used and streamline the file." So I started editing it again, and again, near completion, Affinity has choked. I have a Dell Precision laptop, 32 gigs RAM, 2.57Ghz processor. There is no reason that affinity should be choking on this. I have worked on scores of similar images. SECOND: (and alluded to in tech response above): the uncompressed TIFs come off the scanner at just under a GB. But as I work, the image bloats to 5 or 6 GB. I tried the advice above, of saving iterations under different names, but they are ALL bloated. Why does this happen? I thought maybe all the history was saved with every edit, but not so. I don't work in layers either - the document is flattened. I do need to routinely zoom to 400% for editing (painting in a true black back ground with the clone tool, using a WACOM tablet and stylus). So. Any advice? Now Affinity got bought by Canva, let's hope it doesn't do a Boeing. Please advice why current version of Affinity chokes on large files, and how to stop the constant bloat in size. TIA.
-
 Hi, I have this image exported 2 times. The export on the left is a JPG export while the export on the right is a PNG export. No matter which settings I use for the PNG export, there is always a visible grid. This grid you are looking at comes from somewhere: I filled the artboard with bordering squares in each direction, like this: This grid should not be visible in the export however, as it is not visible in Designer while I'm editing. I have been working with variants of this image with the same background setup since version 2.4.0 and I have not encountered this problem before. This square is a linked file set in resource manager by the way. Can this be related to the new 'primaries' and 'transfer function' settings I'm seeing in advanced PNG export settings?
-
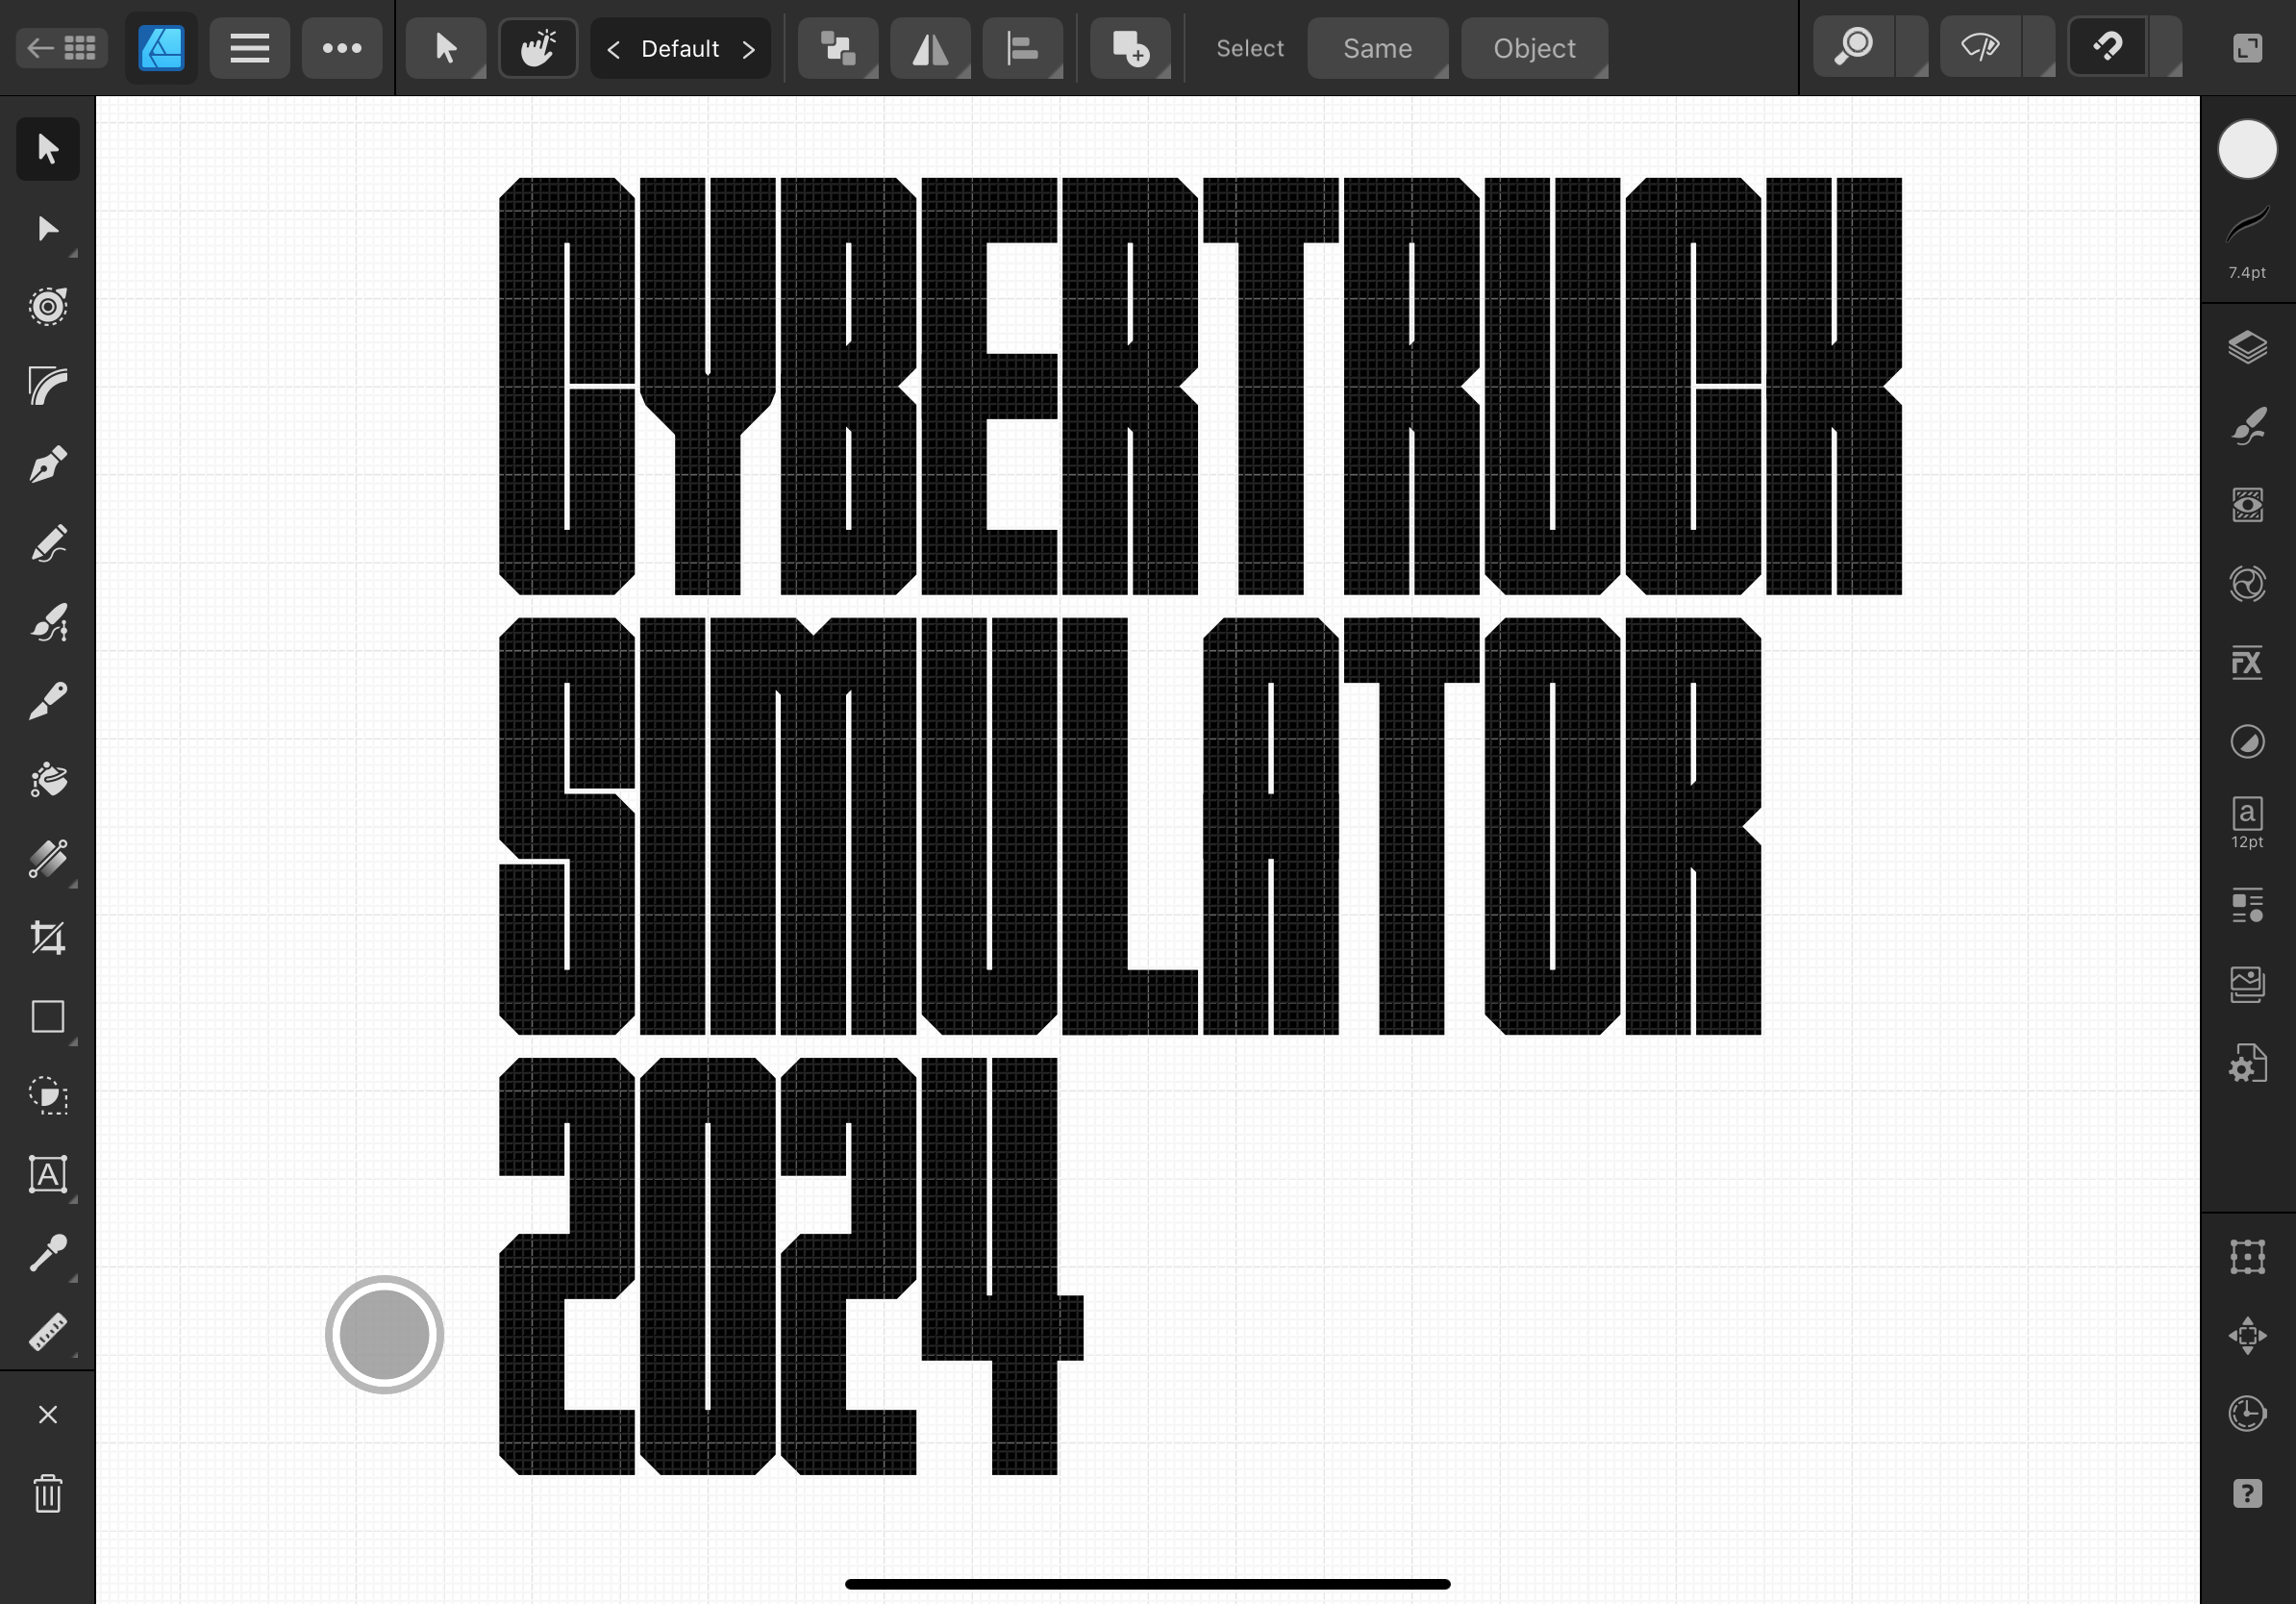
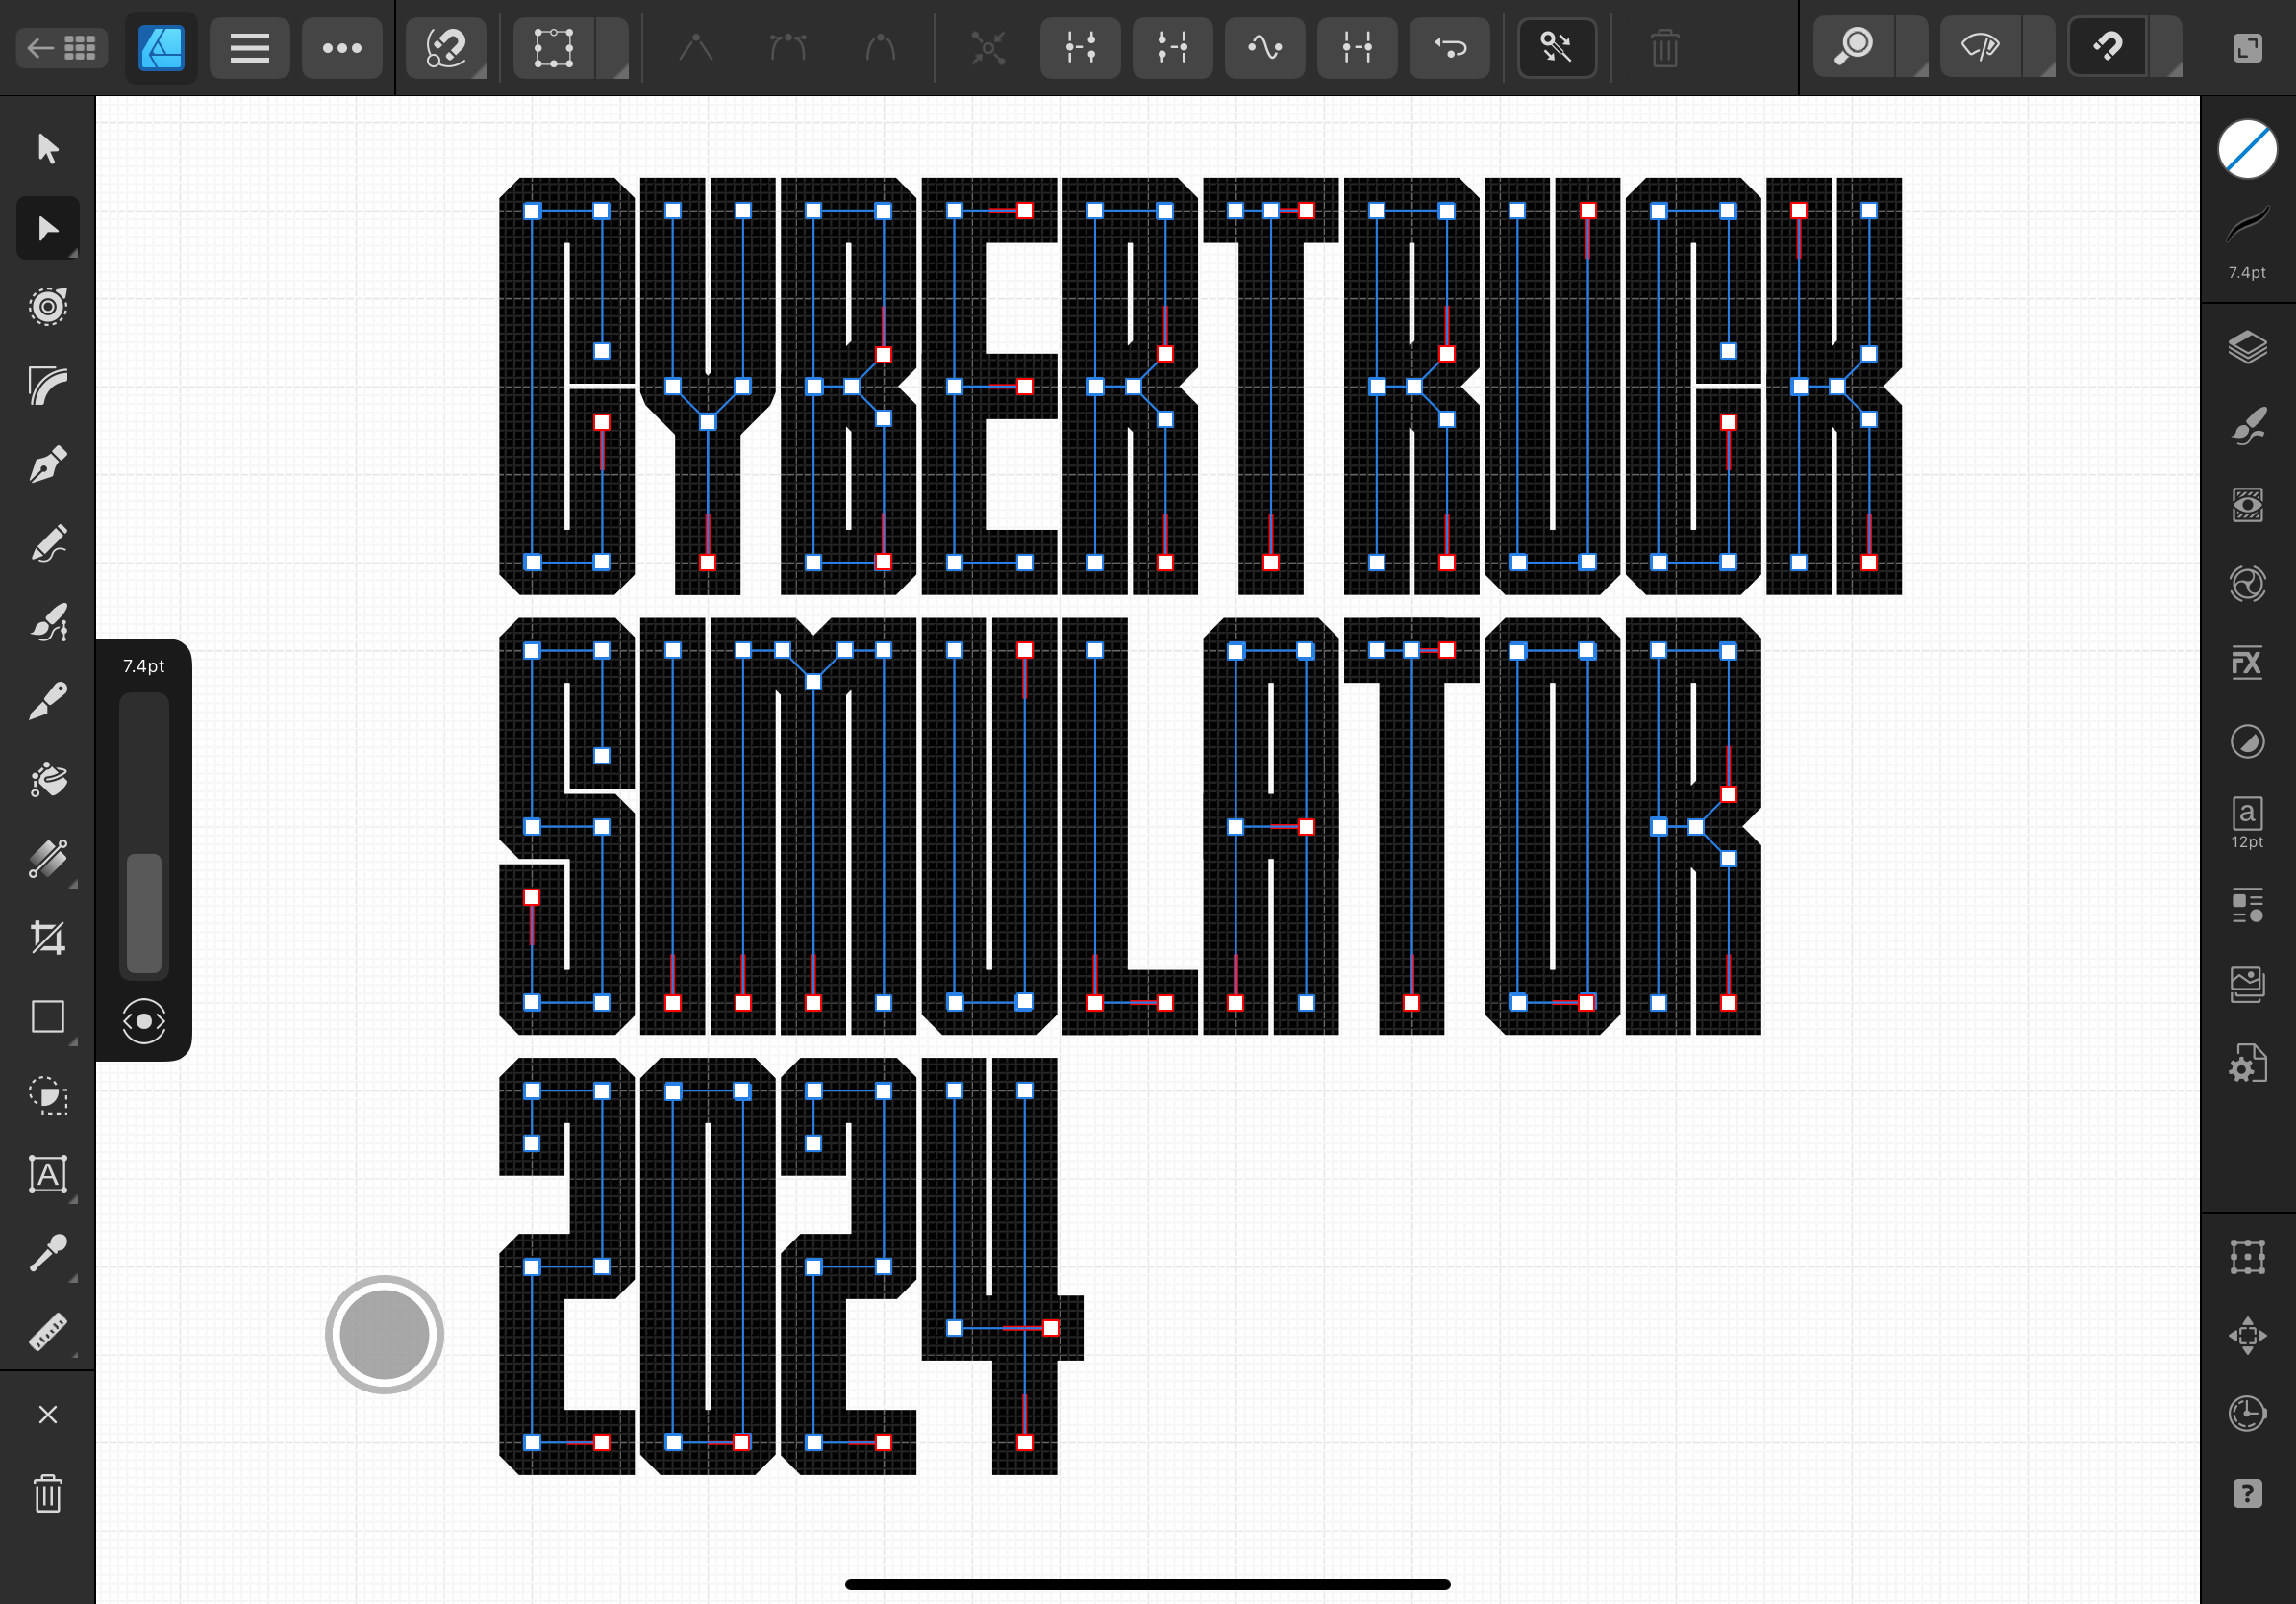
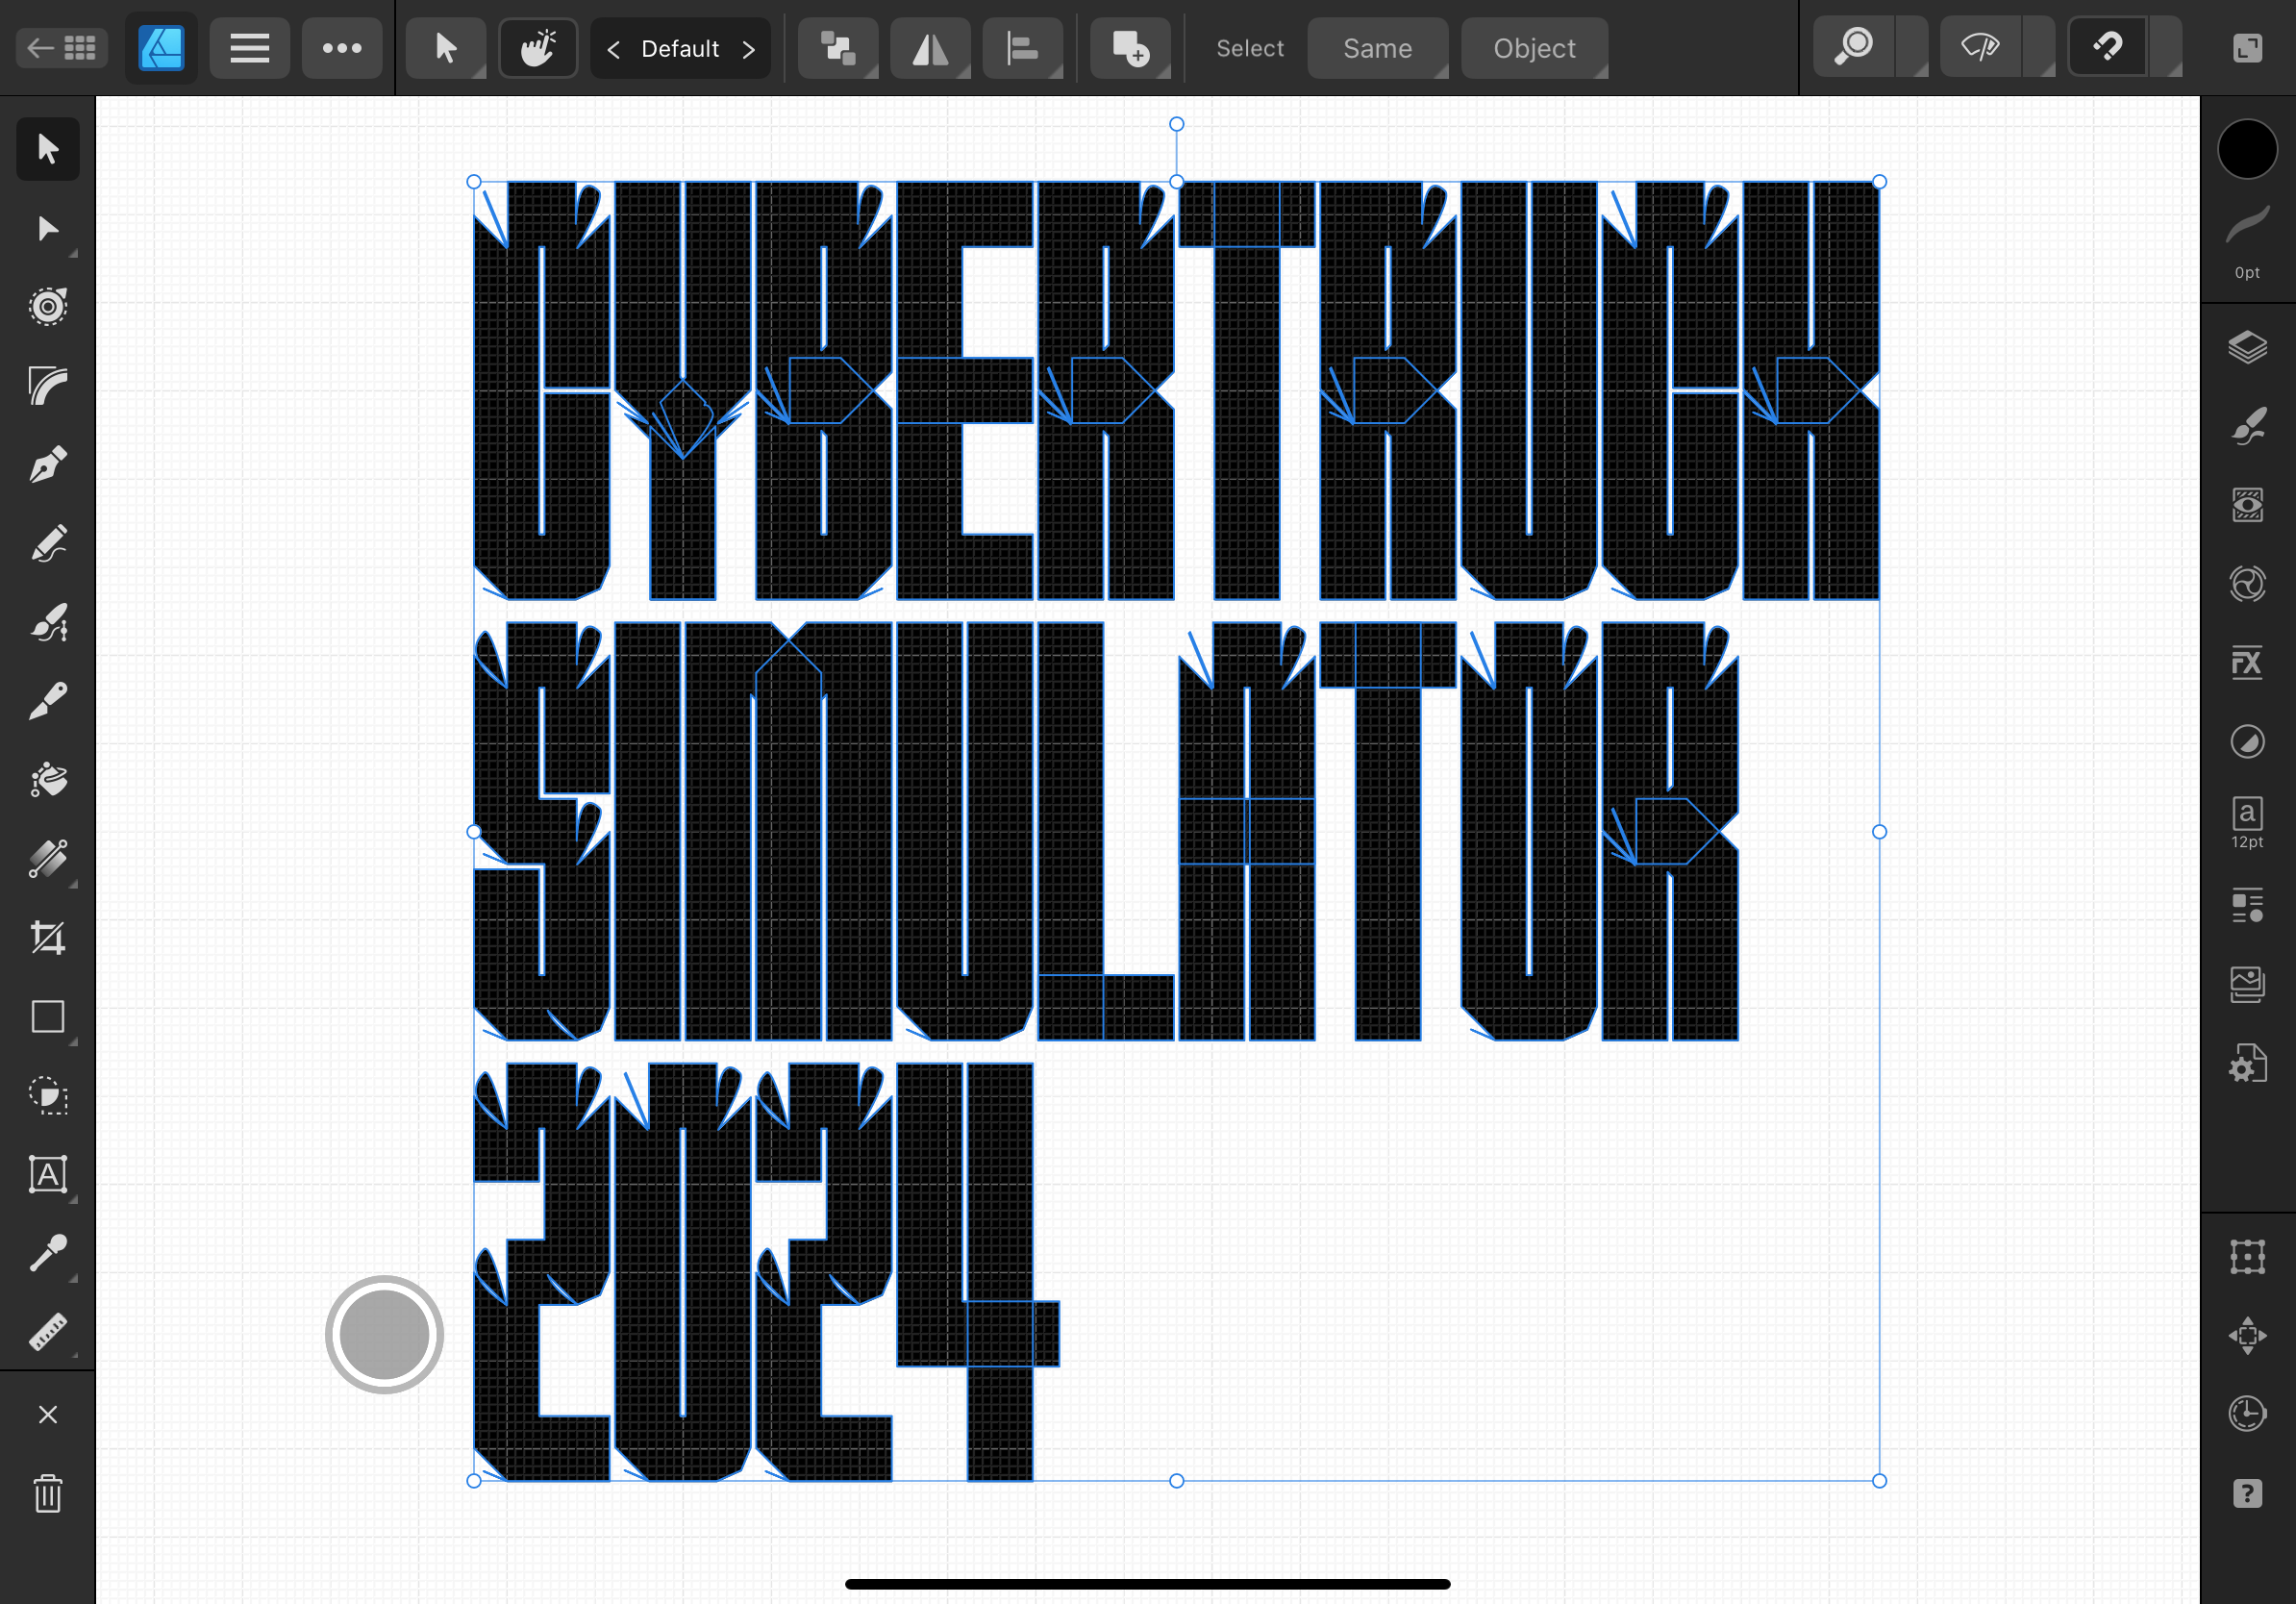
 I'm working on this custom typeface title which uses an extremely thick stroke. I have some small slanted corners in there. When I try and convert it to outlines it looks like a palm leaf on the edges. I don't know of a workaround. I have attached a working file to test. Test.afdesign
-
 So not too sure what's going on. Affinity has been rock solid for me and usually issues can be resolved by a simple restart on the program/machine. After several reboot attempts and digging through settings, I cannot figure out why Affinity Photo is doing this. Does not seem to be an issue during viewing. Attaching program files and images! Revision 2.afphoto
-
There are lines on borders of shapes. There is no stroke on objects. I know that I can turn off anti-aliasing, but then shapes are rough. These lines are visible even after exporting to raster or vector. I had this problem even in V1. I didn't find on Forum other solution than anti-aliasing. Is there any way to get rid of these lines without manually cover tens of these coffee beans by other whole shapes? (It is a pattern so I can't use whole beans. I can't add them together too, because most of them disappearing.) It is really annoying...
-
 Whenever I move my cursor, scroll up or down, or interact with any part of the program the active page momentarily zooms in and out uncontrollably. This makes the entire program almost unusable. I cant find any mention of this issue anywhere else. I've tried reinstalling the program, ensuring it's up to date, tried it with hardware acceleration both on and off, and nothing seems to work. Any advice? Edit: When it does this, it also covers other tabs. Video of the issue: 20240410_145942.mp4
 -
bug 表现:钢笔工具中断,具体表现看视频。 软件 :只测试了affinity designer 其他两个软件你们可以测试一下, 版本:2.4.1 复现方法: 1.打开designer 并新建文件, 2.切换为钢笔工具,并打开 "创建新曲线时保留远取项" 选项, 3.使用钢笔工具,当绘制第二个闭合路径时,发生钢笔工具终止bug。 4.操作系统:windows 11 最新版 5.硬件加速开启状态 (弱弱的问一下🥲🥲🥲🥲,affinity 什么时候能支持中文竖排) bkATCexUtM.mp4
-
 At one point Affinity Photo started doing this slightly annoying behavior. Repro steps: 1. Use the loop selection tool to select part of the image. 2. Shift-F6 (on my system I use Shift-Fn-F6 because of how I have the F shortcut keys set up). 3. Tab to the pixel input box (it has 0px to start) and type "30px" (for example) in the input box. 4. Press Enter (this is very important- do not click Apply, just press Enter and you will need to do it twice because the first Enter just "commits" to "30px" input in the input itself while the second Enter essentially triggers the default action button which is "Apply" for this dialog) 5. Watch in horror as the dialog just re-appears with 0px as the input once again. 🙂 I know, it isn't a big bug, but it just annoys me that this is really the only bug I encounter with an otherwise perfect product. *Edit: after getting feedback from others below, I'd like to clarify that this only appears to be an issue on Mac OS X with Affinity Photo v2.x (specifically use v2.4.1 so you're on the latest version because it is possible that this bug was only introduced after a minor update to v2- maybe the initial v2 worked fine... I can't recall exactly when I started seeing the issue, but I know that v1.x did not have it).
 -
 If you drag an image (eg: *.png) from a .ZIP file onto a document in Publisher v2.2.1 the application will crash. NOTE: Worked in v1.0. ***Also crashes in beta Publisher 2.30 (2114) MacOS: Sonoma v14.1.1 (23B81)
 -

Photo: TIFF metadata corruption on export
Paul Coddington posted a topic in V2 Bugs found on Windows
Problem: When exporting to TIFF, any of the Subject, Tags, Comments metadata fields are corrupted (changed to Chinese characters). Usually the Subject and Tags or the Subject and Comments fields are corrupted depending on scenario. Steps (Scenario 1): 1. Add metadata tags to a TIFF file in File Explorer. 2. Open in Affinity Photo. 3. Export to TIFF unaltered (with ZIP compression). Steps (Scenario 2): 1. Add metadata tags to an image in Affinity Photo. 2. Export to TIFF (with ZIP compression). Steps (Scenario 3): 1. Add tagged TIFF files to Batch process in Affinity Photo. 2. Use Batch process to export TIFF files unaltered to TIFF (with ZIP compression). The goal of resaving the file with ZIP compression is to workaround the bug in File Explorer that saves tagged TIFF (Zip) as TIFF (LZW) at about three times the size. However, I currently have no editors available that can save a TIFF file with metadata intact without corrupting it (this is also a bug in all Adobe products last time I used them, which was quite some time ago, and the reason I would attempt to use File Explorer to add metadata after editing). Side discussion: Compression is an interesting problem. On top of the metadata tagging in File Explorer roughly tripling the file size by converting to LZW, simply embedding a TIFF in an AFPHOTO file roughly doubles its size, and if the layer is rasterised with no modifications whatsoever, the AFPHOTO file doubles in size again (even when saved as a fresh copy to compact it). All of this adds up to massive (and expensive) storage waste. They say storage is cheap, but it isn't cheap enough to want to buy three times as many hard drives at several hundred dollars a pop to do the job of one. For the sake of not sharing family photos, examples are a frame exported from Blu-ray movie for desktop wallpaper. Tags made up to be "typical" (with Unicode characters). [Explorer bug has been reported to Microsoft.] export.tiff original.tiff -
Affinity Photo recompresses JPEG images when metadata is edited even though the image itself has no changes. Steps: 1. Make a copy of a test JPEG image as backup. 2. Edit metadata in one copy of the image in Affinity Photo. 3. Stack before and after images in layers and view as Difference.
-
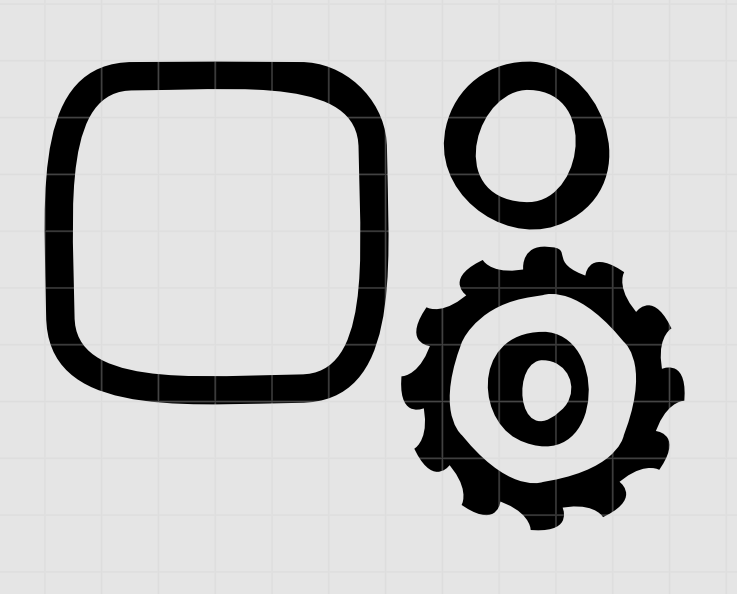
After the 1.6 update, the expand stroke function that wasn't accurate with rounded rectangles before, now is completely broken (see screenshot of a rounded rectangle, circle, and a cog). Upd. It seems to happen only in certain affinity files, not all of them. Regards, Anton
- 124 replies
-
- 3
-

-
- bug
- expand stroke
- (and 2 more)
-
 Hi everyone, I was working on a project for a client in Affinity Designer 2.4.0, and suddenly, while I was testing different fonts for a logo, it crashed Windows 11 (blue screen of death). When I restarted the computer, Affinity Designer didn't open the file anymore, stating that it appeared to be corrupted. I'm a professional branding and packaging designer. I charge hourly, and I've already worked 15 hours on this project. In other words, this file is extremely important, and I need someone from the Affinity team to jump in and help me urgently. I've attached the file to this message. Please, anyone, help! Thank you in advance. Tres Five logo.afdesign
 -
 Screen Recording 2024-03-10 at 14.49.02.mov Same for cog tool and probably others. V 2.4.
 -
Applying the states takes almost 5-7 minutes! I have to mention that I have 16067 layers.
-
 Hi, There is a problem with my HSL. It doesn't look like it is supposed to. I can't see all the colours as you can see in the image. HSL is usually showing in a form of circle but I have only one quarter of the circle. Thanks for helping, Lauriane
-
 - looks like Smudge tool still not working when applied on pattern-layer. Instead of smudging it add more and more original background color. Steps to reproduce: create pattern layer and fill it with random color. Then apply smudge tool, - instead of no-changes observe white (original document background color) stroke: early report for v1: Note that Blur-brush tool have similar issues when applied on/close to pattern border area.
-
 Bug Using either the . or delete keys on the iPad Pro/iPad Air 4 attachable Magic Keyboard return (null) when entering a form field for an attribute (I.e. document dimensions, transform tools, stroke size, etc.) The expected result would be 10.4 instead 10(null)4 centimeters when entering a value into the transform or other tools. Delete doesn’t remove text either. For example, if I enter 10.5 and hit delete the then 4, the output should be 10.4 but the systems renders it as 10(null)5(null)4. Temporary Workaround Can be corrected only by using the touch interface to use the calculator’s . And <x| Virtual key. Devices Used: iPad Air 4 (2020) on iPadOs 14.2 Magic Keyboard
- 7 replies
-
- 1
-
-
- form fields
- bug
- (and 3 more)