Search the Community
Showing results for tags 'blender'.
Found 19 results
-
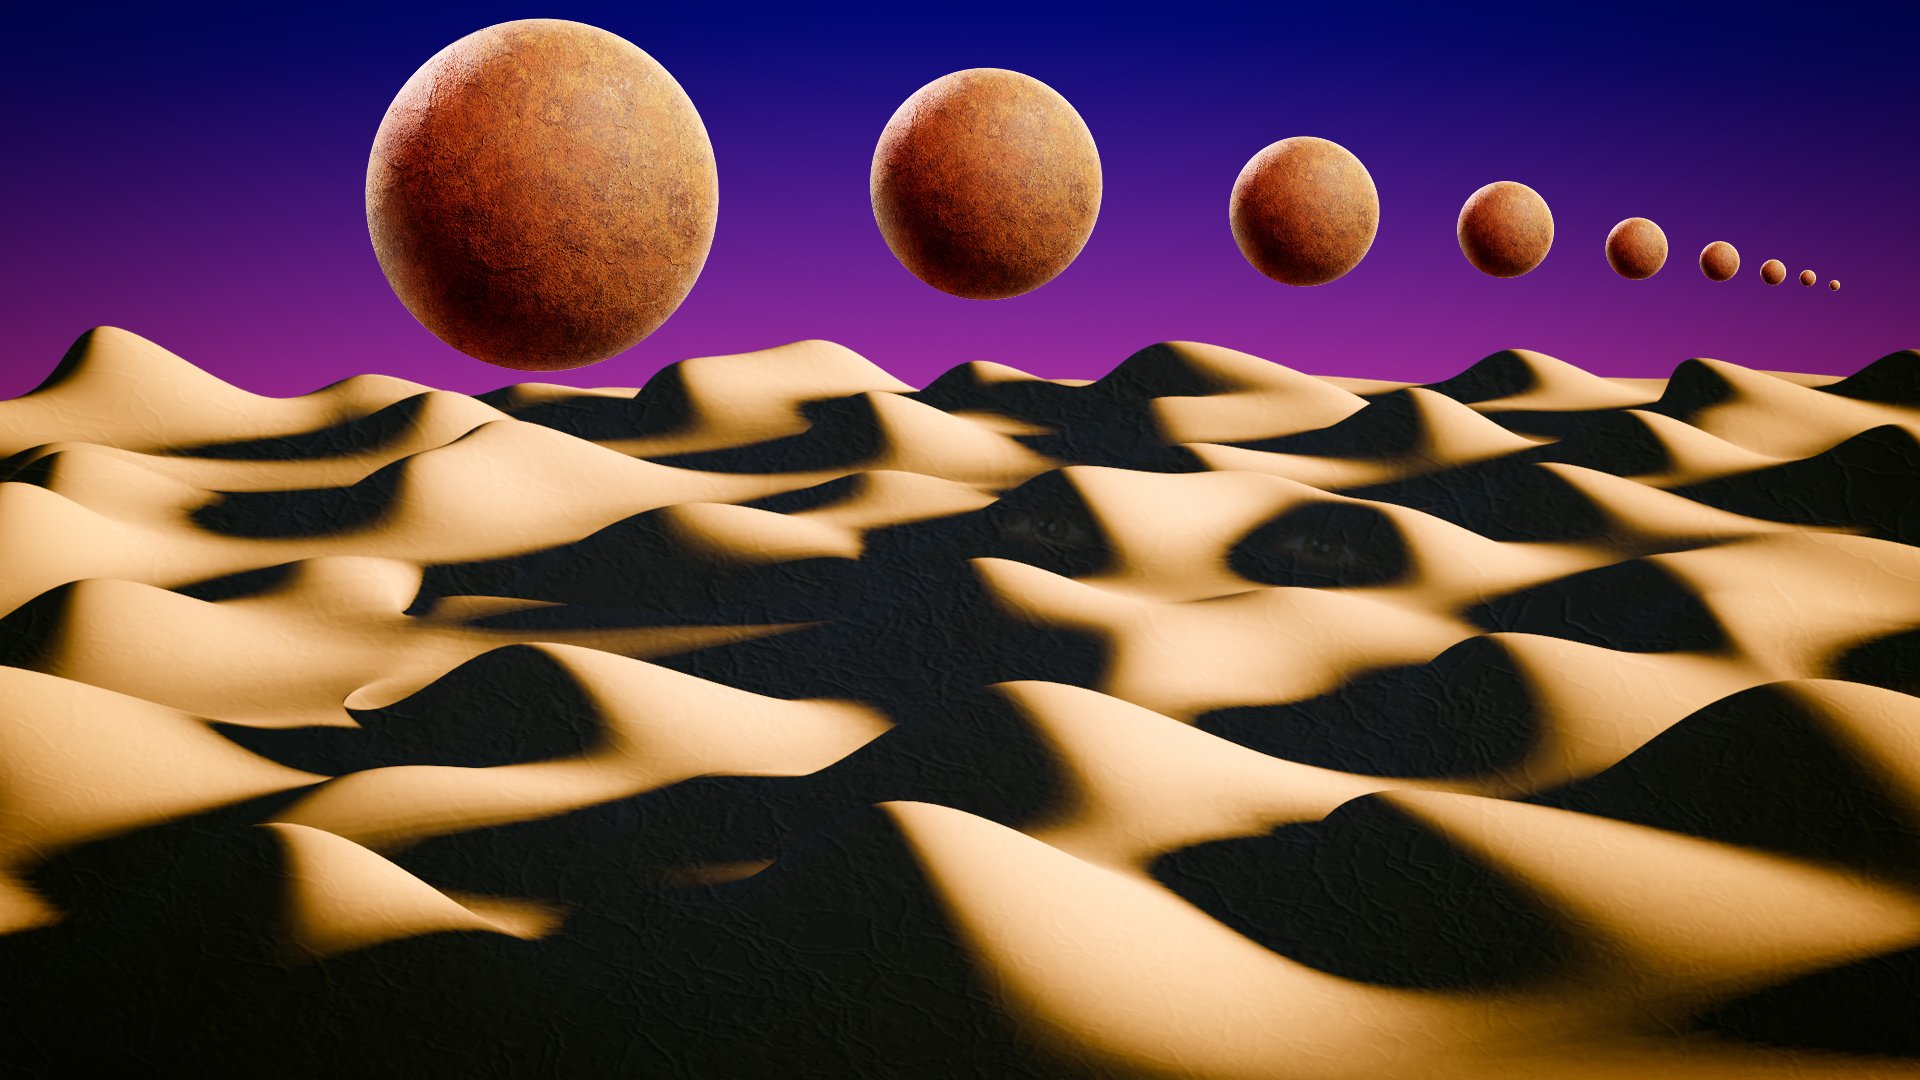
I'm trying to get my arms around Blender 3D, which is what I used to create the sand dunes in the attached image. I am confused and completely overwhelmed by Blender, navigation, render passes, etc. The desert isn't overly convincing, but it's the best I could do with my newbie, rudimentary skills (or perhaps I should say, the lack thereof). I brought exported desert scene into Affinity Photo, where I did the rest of the work. Haha, anyway, I thought I'd post this and see if anyone has any sage advice on coming up to speed with Blender.

-
 I have always wondered why 2D vector applications have not implemented a procedural modifier based workflow for design exploration and block-outs. The features could be implemented similar to warp groups, basically expanding upon it to bring a modifier based workflow. So perhaps this could be integrated into Designer in the future. It should at least include the following modifiers: Linear array Circular array Array on path Mirror (options for particular axis) Booleans (all the various options) Smooth curves Fillet & Chamfer (basically a modifier which captures any edits using the fillet tool to procedurally fillet specific vertices) Edit Vector (like the Edit poly modifier in 3ds Max, it should capture any edits to the vector object below this modifier in the layer group. It would then propagate any edits to the modifiers above. This can be used to make some manual edits to an otherwise procedural object.)
- 11 replies
-
- 4
-

-
- parametric
- procedural
- (and 3 more)
-
What I would like is to have new ways of changing the layer of an object. Usually, I select the objects on the canvas, so they can be in multiple nested layers. Currently, I have to do an awful lot of scrolling to move content from one nested layer to another. Or use the Move Outside command, followed by Bring to Front/ Sent to bottom and then drag the objects to the layer I want them in. In CAD software and in Blender you have commands like these, which you can use to pick a layer to nest the objects in. Basically it shows a layer tree without showing the objects themselves (those need to be preselected). Then you pick the layer you want to drop the objects in. It's as simple as that. For Affinity, the button to confirm could even be removed (if you add a button next to a layer so that it is easy to click on and hard to misclick). 2022-12-07 15-29-04.mp4 Another idea is to copy Illustrator's layer panel where you see in which layer the selected objects are (it displays a dot with the layer colour). Then, you can drag and drop this dot to another layer, which effectively moves the content to this layer. 2022-12-07 15-29-04.mp4
-
- 1
-
-
- illustrator
- rhinoceros
- (and 8 more)
-
 Hello! For the past few hours I have been searching for a solution to the problem of importing an affinity designer SVG file into blender. I can import the file but it doesn't process the right way in blender. All the layers are mixed up, curves that are pasted inside other curves protrude. I have looked through the forums and have watched YouTube videos but none of the fixes seem to address this issue. I very much appreciate any suggestions on how to solve this.
 -
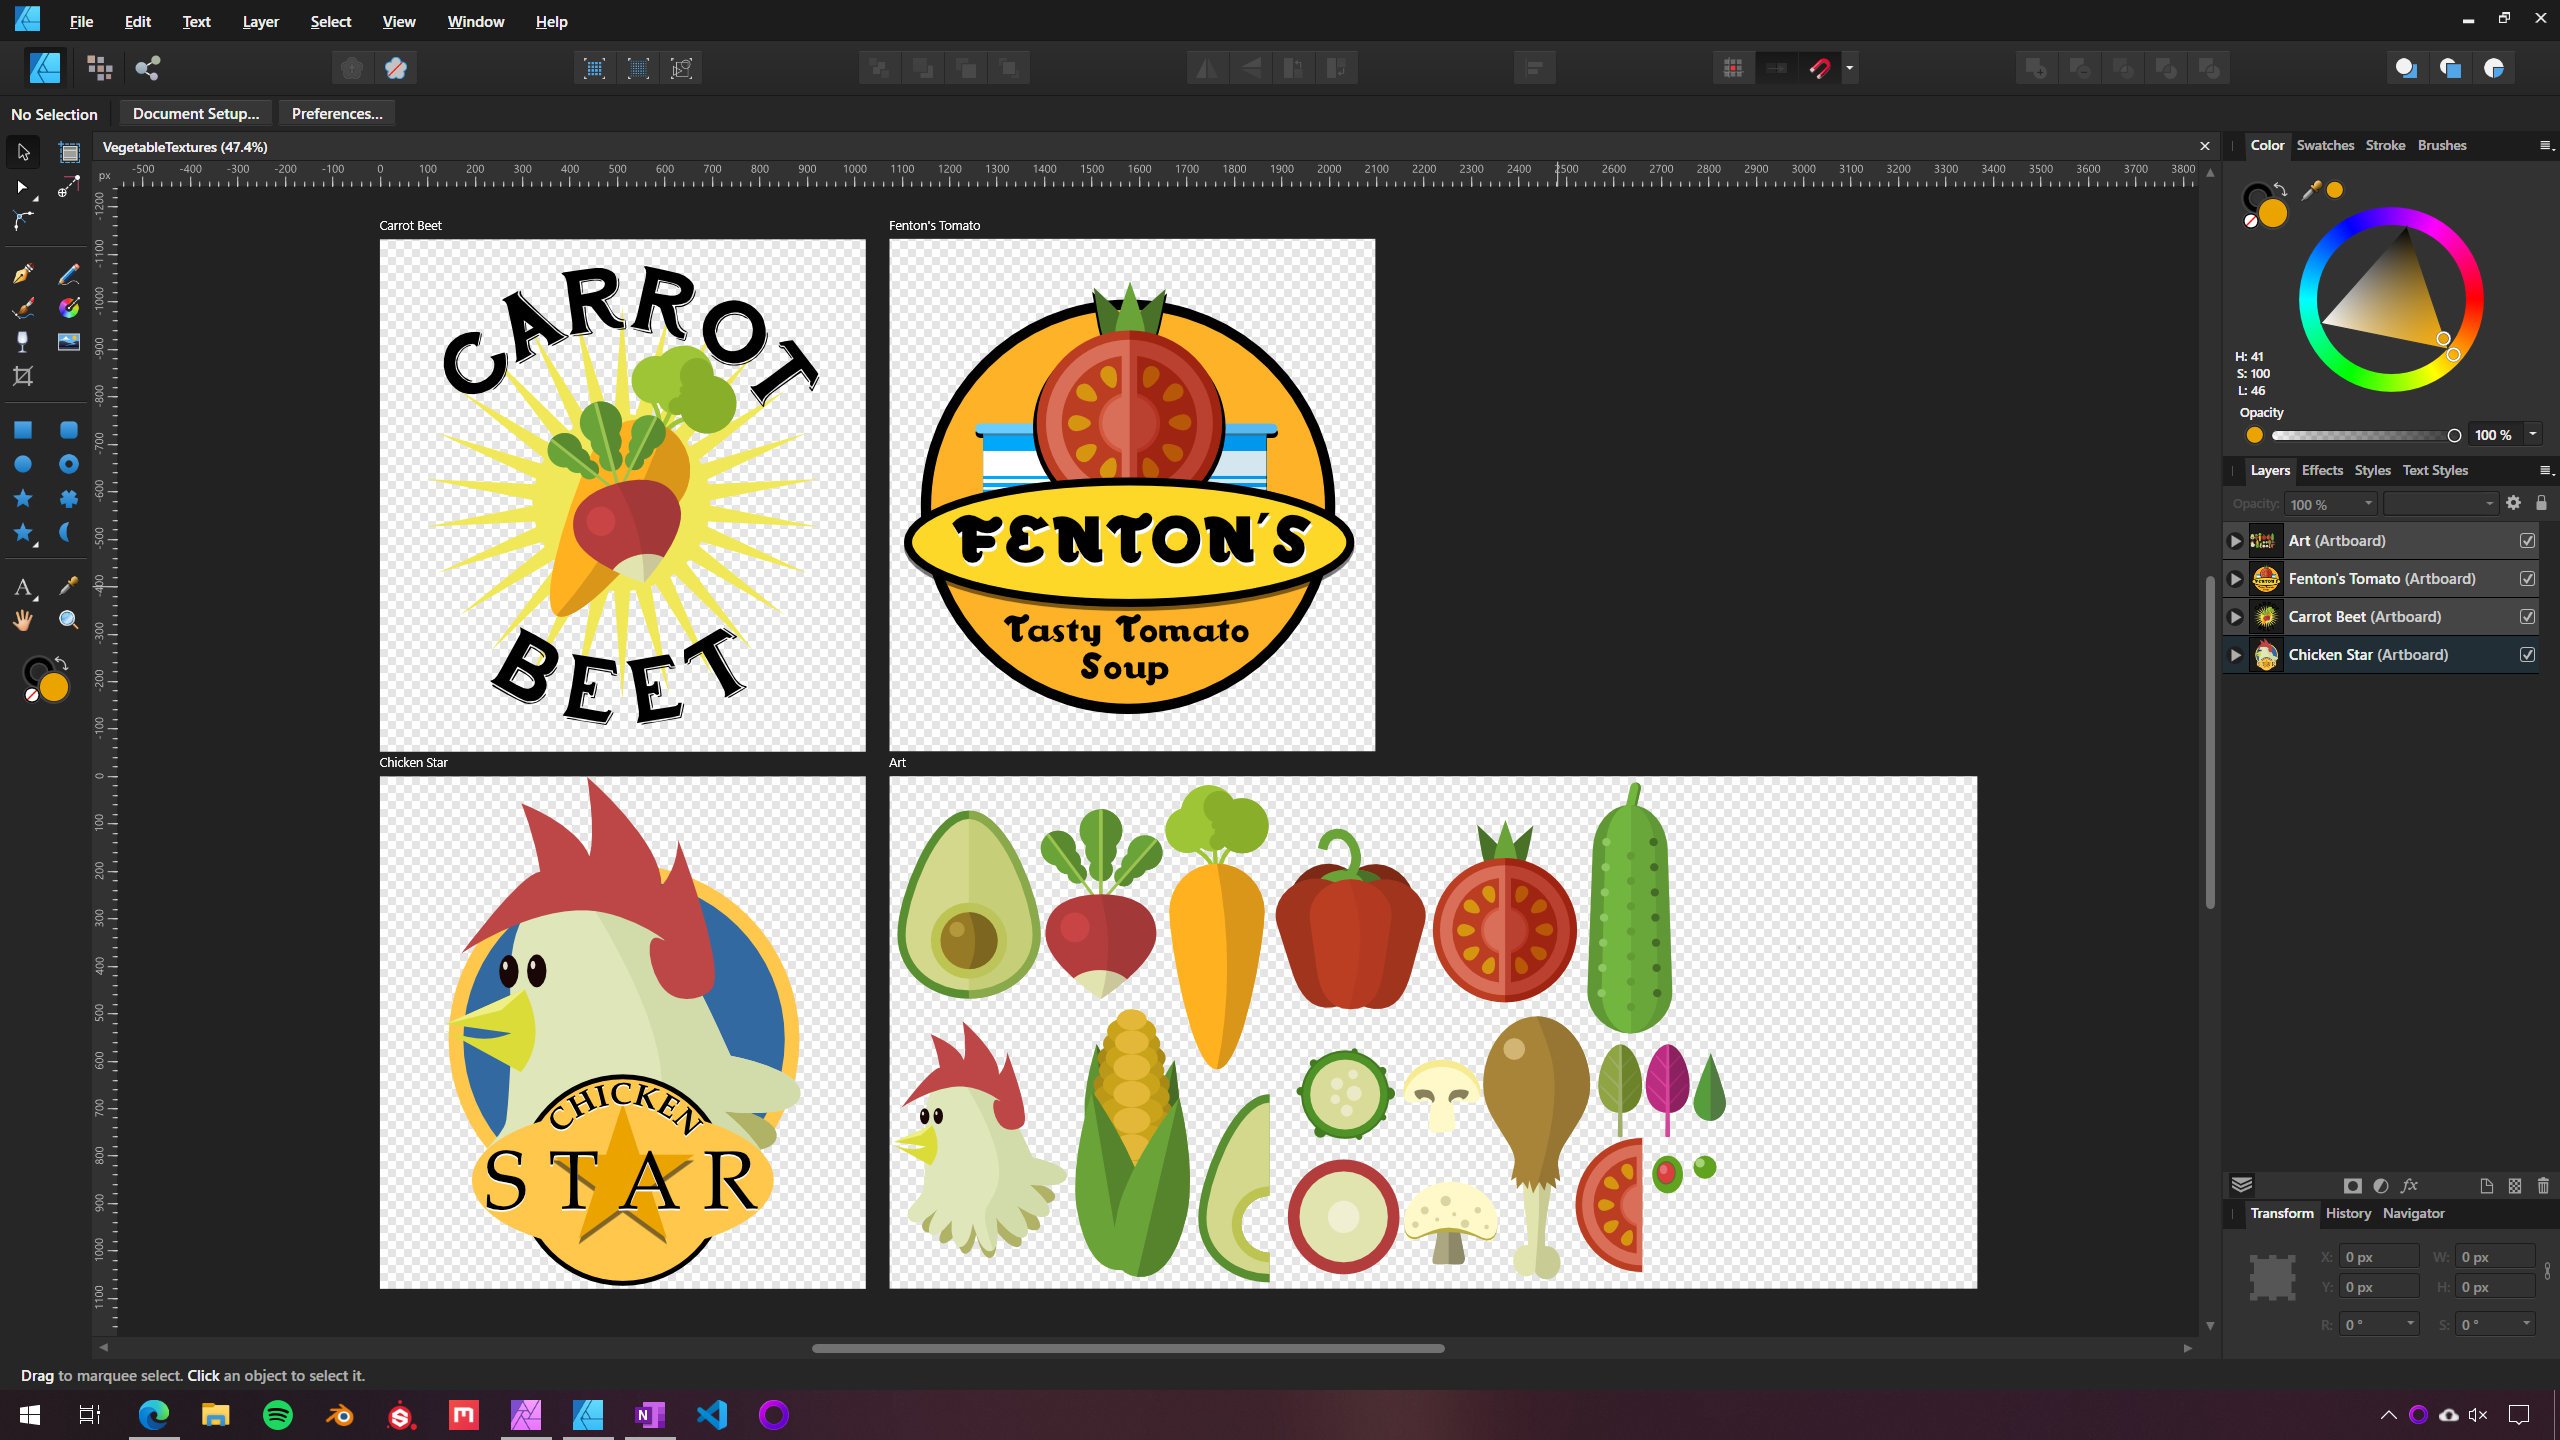
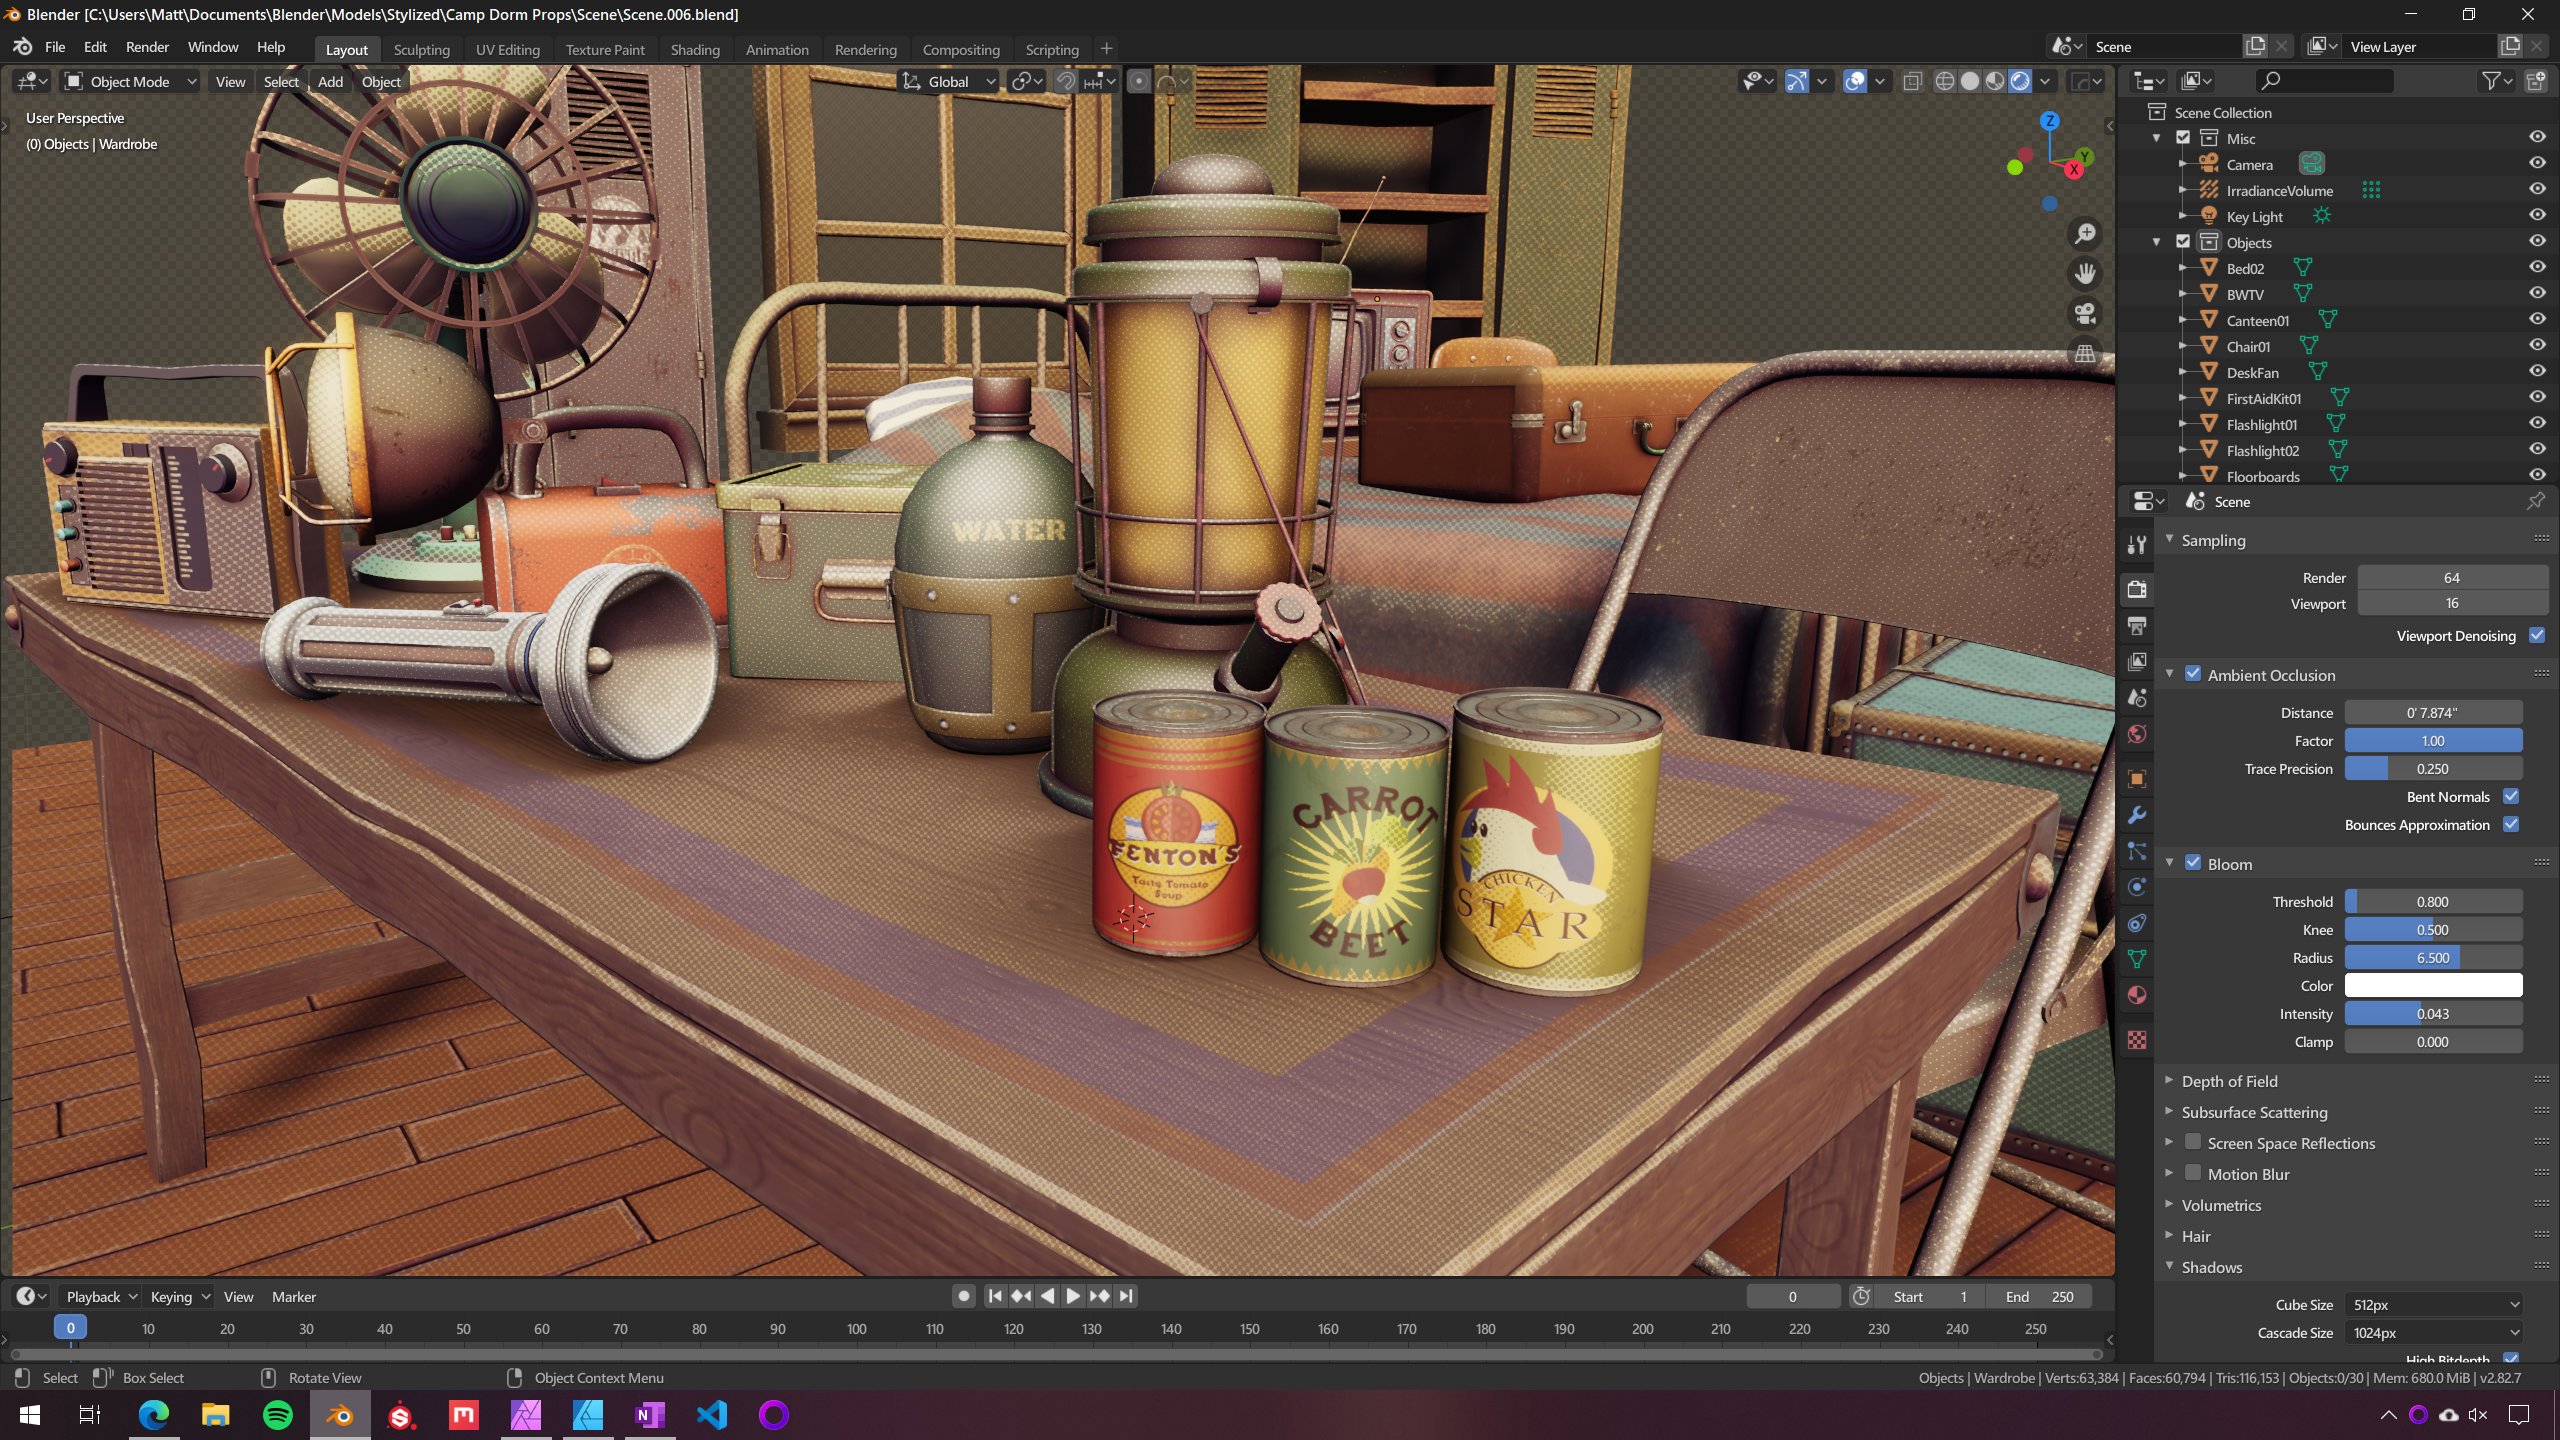
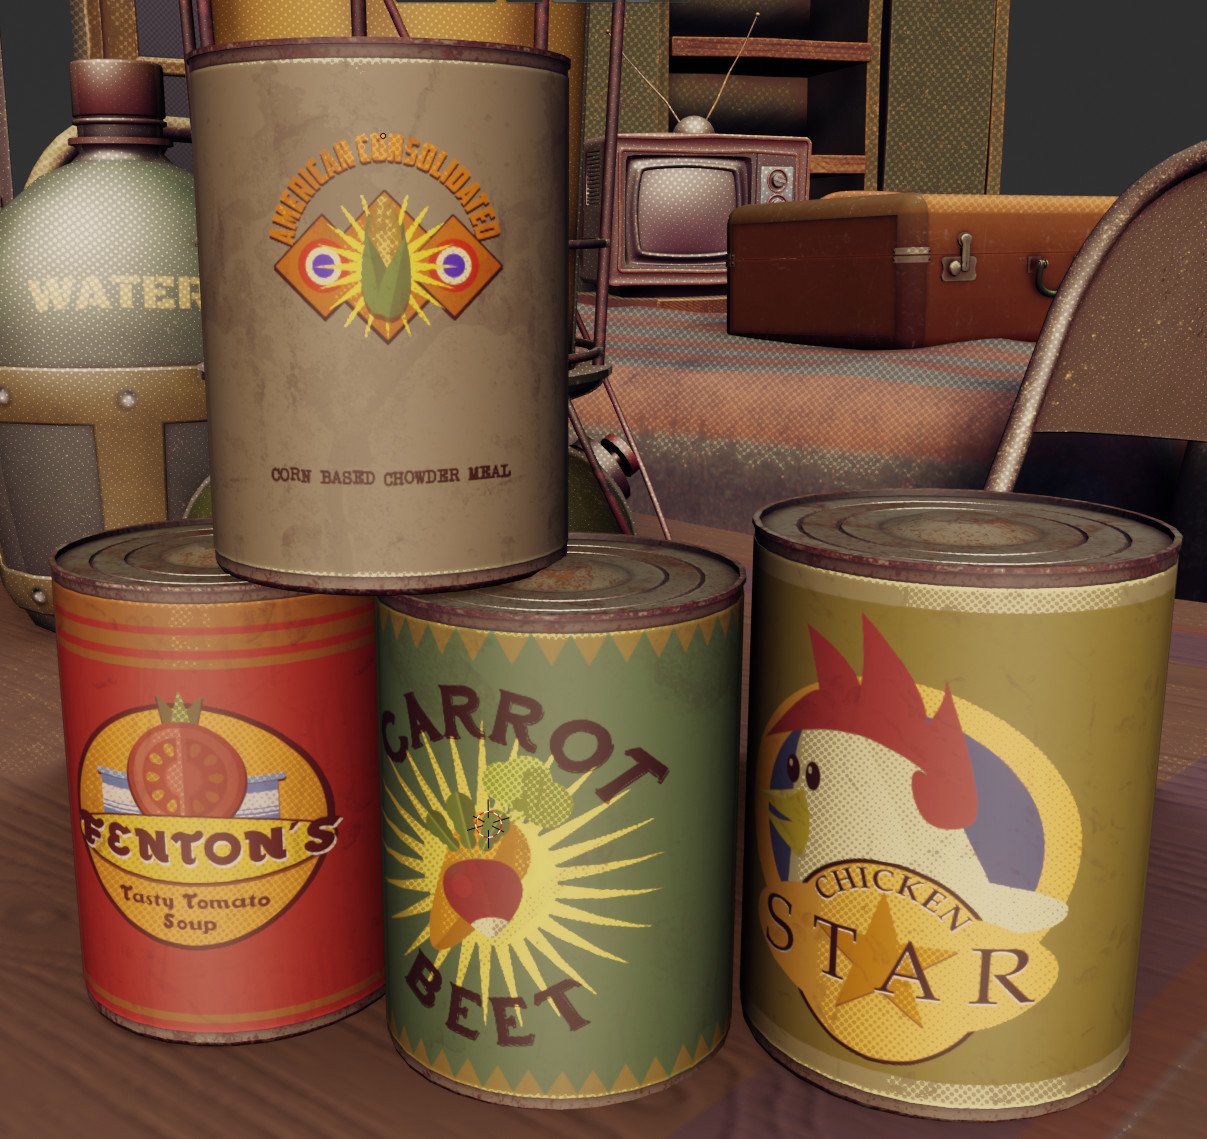
It's been a minute since I last posted here, so I figured I'd show off what I've been working on these last few. I don't have a complete project as of yet. What I'm doing is building up assets for a comic project I'm working on, trying to do at least one model a day over the next year or so until I have enough objects to mix and match together to build up my various scenes. I have about 23 models so far. I've thrown them together into a single scene to see if they work together coherently, and, so far, I've been pleased with the results. Since I'm using Designer heavily for labels and other designs, alongside a bit of Photo for touch up work, I figured I'd show off what I've done here. These are some of the labels I've done over the last couple of days. It's the first time I've used artboards, which makes me feel extra fancy. I actually did a lot of these vegetable objects awhile ago, based on a tutorial I did back when I was first learning Designer. I decided to repurpose them here, and add a few more to flesh things out. And here they are in scene, alongside a bunch of other objects I've made. I'm only a few steps along on a greater journey, but I think I'm off to a good start thus far. edit: Gotta include my most recent can.
-
 Hi, I recently switched to Affinity Photo from Photoshop. I used to composite my renders as 16bit PNGs in Photoshop. But, since Affinity Photo supports all adjustments and filters in 32bit mode, I started compositing in 32bit using EXR files. However, now the problem is OCIO. The renders from Blender use Filmic color management. As per @James Ritson 's tutorial on baking color space transforms using OCIO adjustment layers, I added two OCIO adjustments -- one from Linear to Filmic sRGB and the second one from sRGB to Linear (with view transform set to ICC in 32bit Preview mode). But, now my question is, where should I add my adjustments (curves, levels, etc.) for compositing? Below or above these two OCIO adjustments? Or should I add them between these two? And also, the problem is, Filmic makes JPEG or PNG layers look very washed out. So, I am currently placing my JPEG or PNG layers (e.g. cutouts) above these two OCIO adjustments and any adjustments that I need to make to my EXR layers, I keep the below these two OCIO adjustments. Am I doing this right? Or is the a different way to do this properly?
 -
 I'm having a problem with affinity photo not transferring exr files rendered in blender with the color transform chosen inside blender. I remember this having worked in the past, so I don't know wether I accidentally changed anything. I rendered an image in blender with a filmic color transform and saved it as a 32 bit exr. Here is what it looks like in blender with the color management settings. And here is what it looks like upon opening the file in affinity photo. (Side-by-side closeup). The highlights are over-exposed and it looks like the srgb color transform in blender. So I tried using an opencolorio transform in affinity photo, however I am unable to select any color profiles and the transform option in the 32 bit preview window in greyed out, despite having selected a opencolorio configuration file in the settings.
 -
 I created a tutorial on how to take your designs in Affinity Designer and export them into blender to create 3D prints. Hope you find it interesting. https://youtu.be/r--mPzHZDlw
-
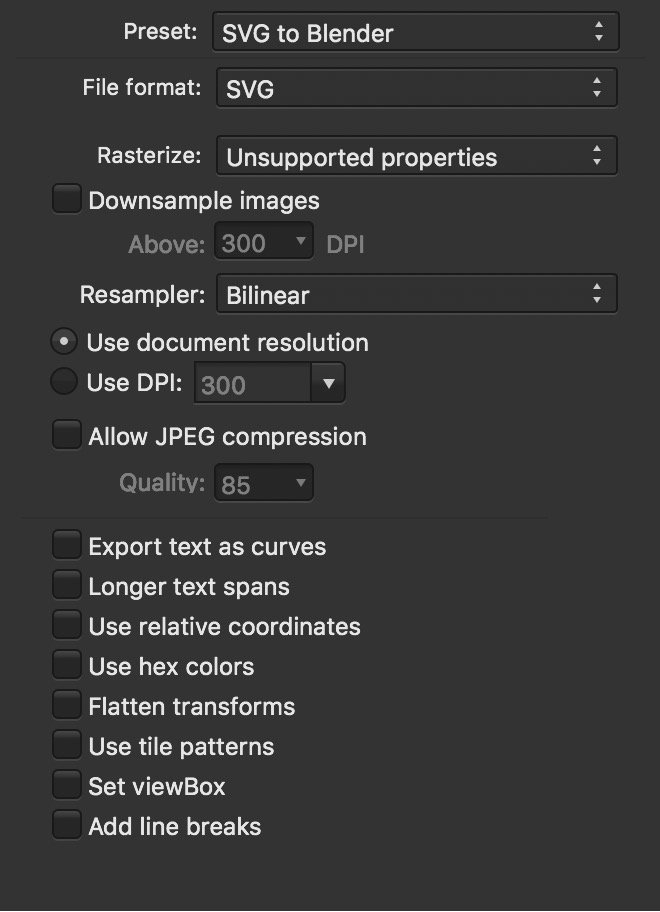
Searching for a doable workflow I am trying to develop a workflow in which I can create assets in AD (macOS or iOS), export them as SVG, and import them into Blender for animation. I have discovered, after quite a few failed attempts over the course of many months, that this is not as straight-forward as one would imagine. Breakthrough Yesterday, I stumbled across an old post that turned out to be a breakthrough for me. Apparently, while exporting the assets out of AD, a specific setting must be unchecked, as shared by @Dave Harris here: After playing around with the different settings, I settled upon the following combo that seems to work relatively well: This did indeed allow me to get them into Blender, colors and all. However, I did discover another problem. A New Challenge Here is an admittedly silly little project that I created in AD a while, just for fun: And this is what I got when I import it into Blender (after rearranging the layers for visibility): As soon as I saw this, my response was, "Ah yes, it did exactly what I told it to do, even if it was not what I had expected. Duhhh..." What I want to do What I would like to do is to get each of the letters of our names into Blender so I can extrude them into 3D objects and animate them - that is simple enough. But I also want the colors of each letter to go along with them - not so simple. Is there a way that this can be done? It seems that I will need to flatten out or convert the layer masks to something else before exporting them to SVG. This is where I am stumped. Finally... Kudos for the iPad app! I purchased the iPad app the very moment I received the email. The dev team really outdid themselves with this, big time! I truly enjoy using the Mac app for working, but I am actually LOVING it!
-
 Hello Affinity Team, Wizaerd already created a topic last year, but he never made a feature suggestion. I know that 3D in Photoshop is basic, but it still it does it job. Otherwise I've to work in other software, like blender, to create and render them to import into a project. I would rather have an "All-in-one" solution and ditch Adobe software, as far as I can.
 -
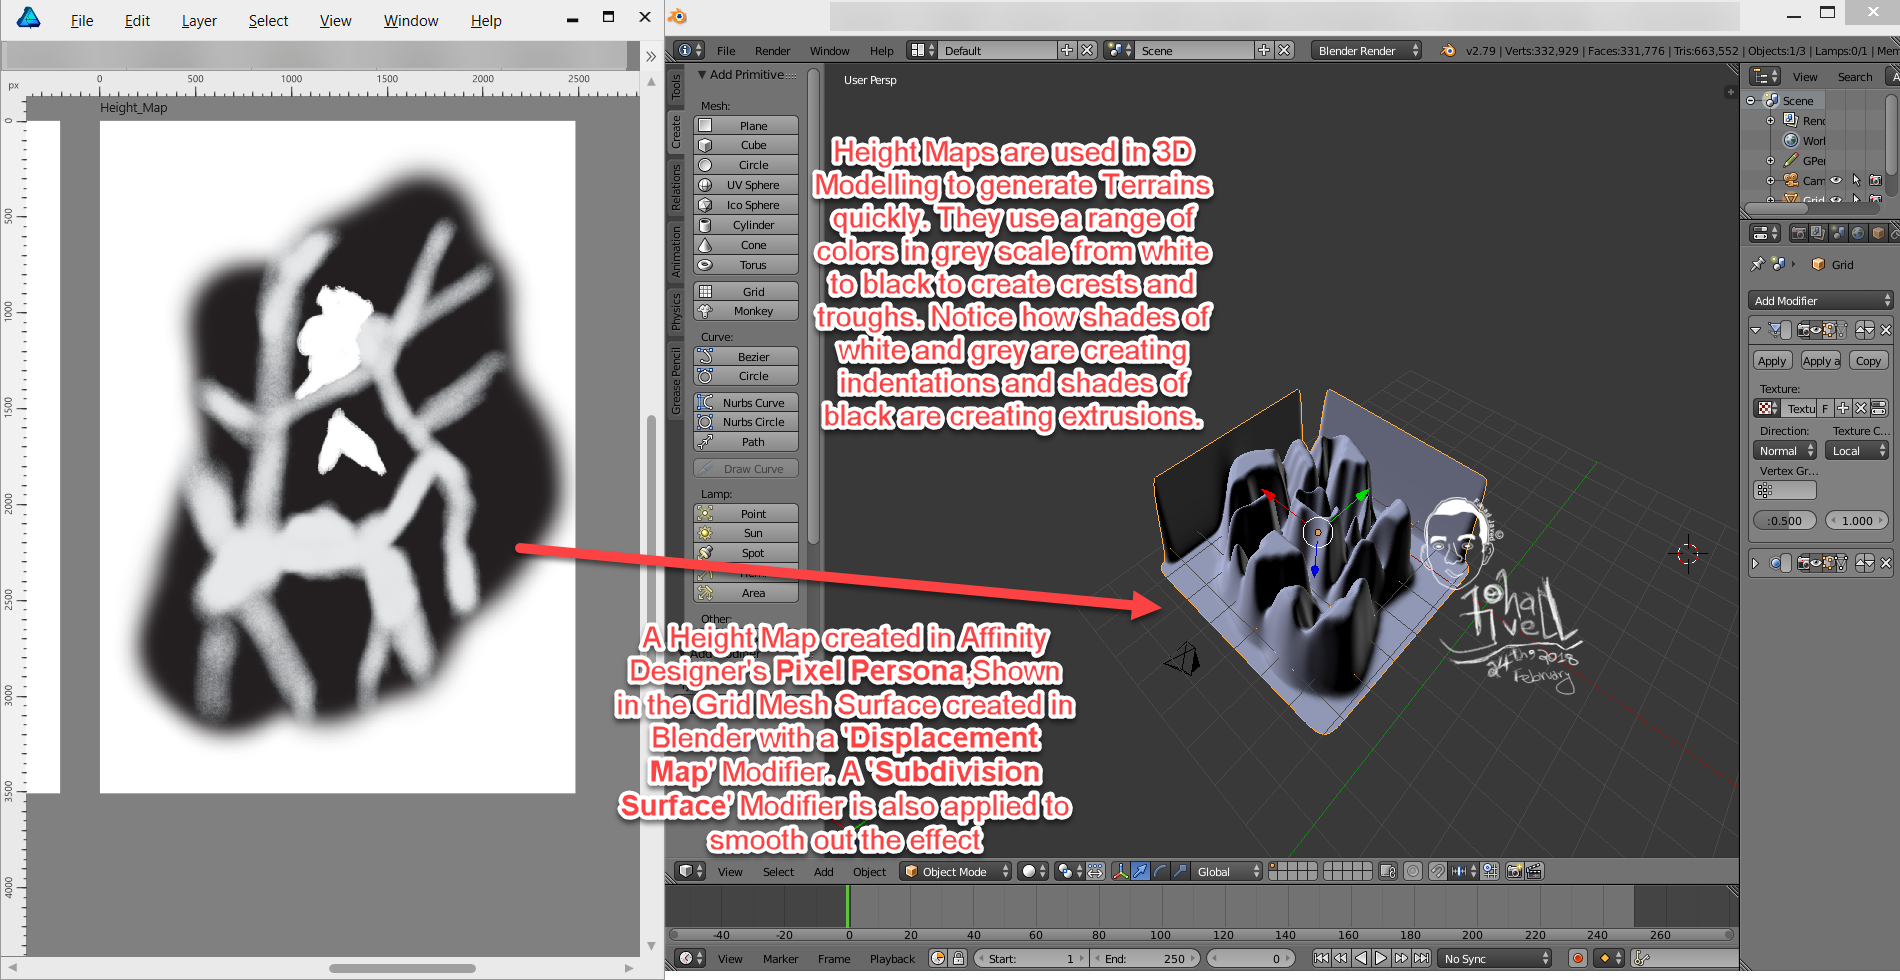
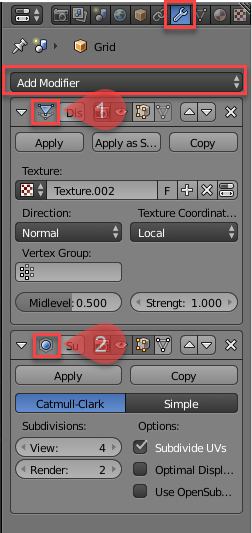
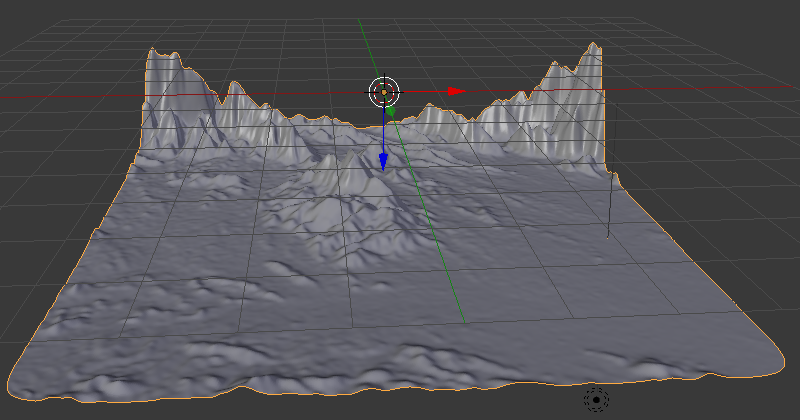
 The screen shot shows a roughly created height map in Affinity Designer's Pixel Persona[] using the Paint Brush tool[] and using grey scale values[] and how it is used in generating a 3D Terrain in Blender by applying this height map Image as a 'Displace'[] modifier on a Grid []Mesh Surface. For smoothness, i have applied a 'Subdivision Surface'[] modifier. Modifiers in 3D Modelling tools help modify an object's geometry. They can be accessed in the Tabs on the right side[] and have a 'wrench icon'[] . Just click the 'Add Modifier'[] dropdown to add the modifiers mentioned above. Notice, if you apply these modifiers by clicking the 'apply' button it will apply the effect and remove the modifier from stack of modifiers applied. If you want fine tune control over these without removing them from the stack of modifiers,don't apply them. [1] = Displace Modifier Added, [2] = Subdivision Surface Modifier Added [ >>>> [Source Files]] > The Height Map file in Affinity Designer has also been attached[File Name = Terrain_Height_Map.afdesign]. > The Blender Source File with the Height Map Applied has also been attached[File Name = Blender_File_with_Terrain_Created_Using_Height_map_from_Affinity_Designer.blend][Added on 27th February 2018] [ >>>> [Video File]] Here is a short video[around 3minutes and 26 seconds] that demonstrates the steps required:[Update: Added the Video on 26th February 2018] Blender can be downloaded from the following link: https://www.blender.org/ [ >>>> [Exercise]][Added on 27th February 2018] As an Extra Exercise,apply these concepts by making use of Real Terrain Height Maps[that contain Real World Elevation Data] generated by the following website for your own country or city: https://terrain.party/ Just search your city or country and press the Export Button[] to export a zip file that contains the height maps for the searched area. Extract the zip file and apply it to your own blender files. Notice how the grey scale values are used based on Real World Elevation data. Here is a sample of a terrain i generated using the Height Maps generated by this website: Happy Learning
- 1 reply
-
- 1
-
-
- greyscale
- fahadjaved
- (and 4 more)
-
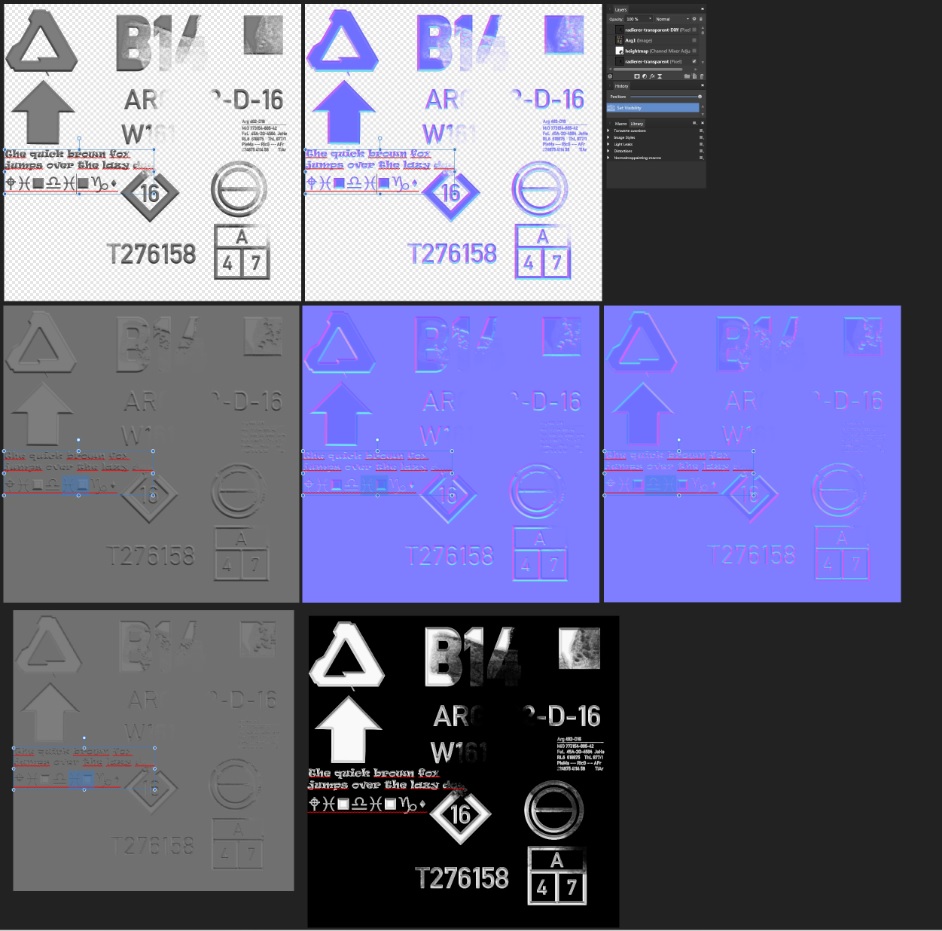
 Hi all :) , So far Affinity Photo is impressive and quite useful for an 3D Artist. I decided to try my luck in making a heightmap/normalmap creation solution for it. It obviously needs some more work but it already gives passable enough results at least in the simple setup with Brush input vector support the more advanced setup: Shapes, Texts and Brush input are currently supported, inward/outward is available. there are two ways of adding shapes available; one which is piling them over each other and the other is mixing their height. You can therefore erase parts of brush work and shapes/Texts -vector data at the same time. Heightmaps are already useful but the Normalmaps in the more advanced Setup have a strong discoloration. next big steps are corrections and refining the output and creating macros for accelerating the workflow. greetings myclay
-
 Good evening everyone, I've a little question because I'm new to Photo and I cannot understand if I'm doing something wrong or if it's an Affinity Photo problem. I'm opening a Multichannel OpenEXR generated by Blender that contains all my render passes (I've check that with a compositing software and all the passes are there) but Photo only show me into the layer tab the RGB "beauty" channel and the alpha one. I don't understand why that's happen because as far as I know Photo should support Multichannel OpenEXR without any problem. I'm missing something or I've found a potential bug/issue? Thanks for the help N.
 -
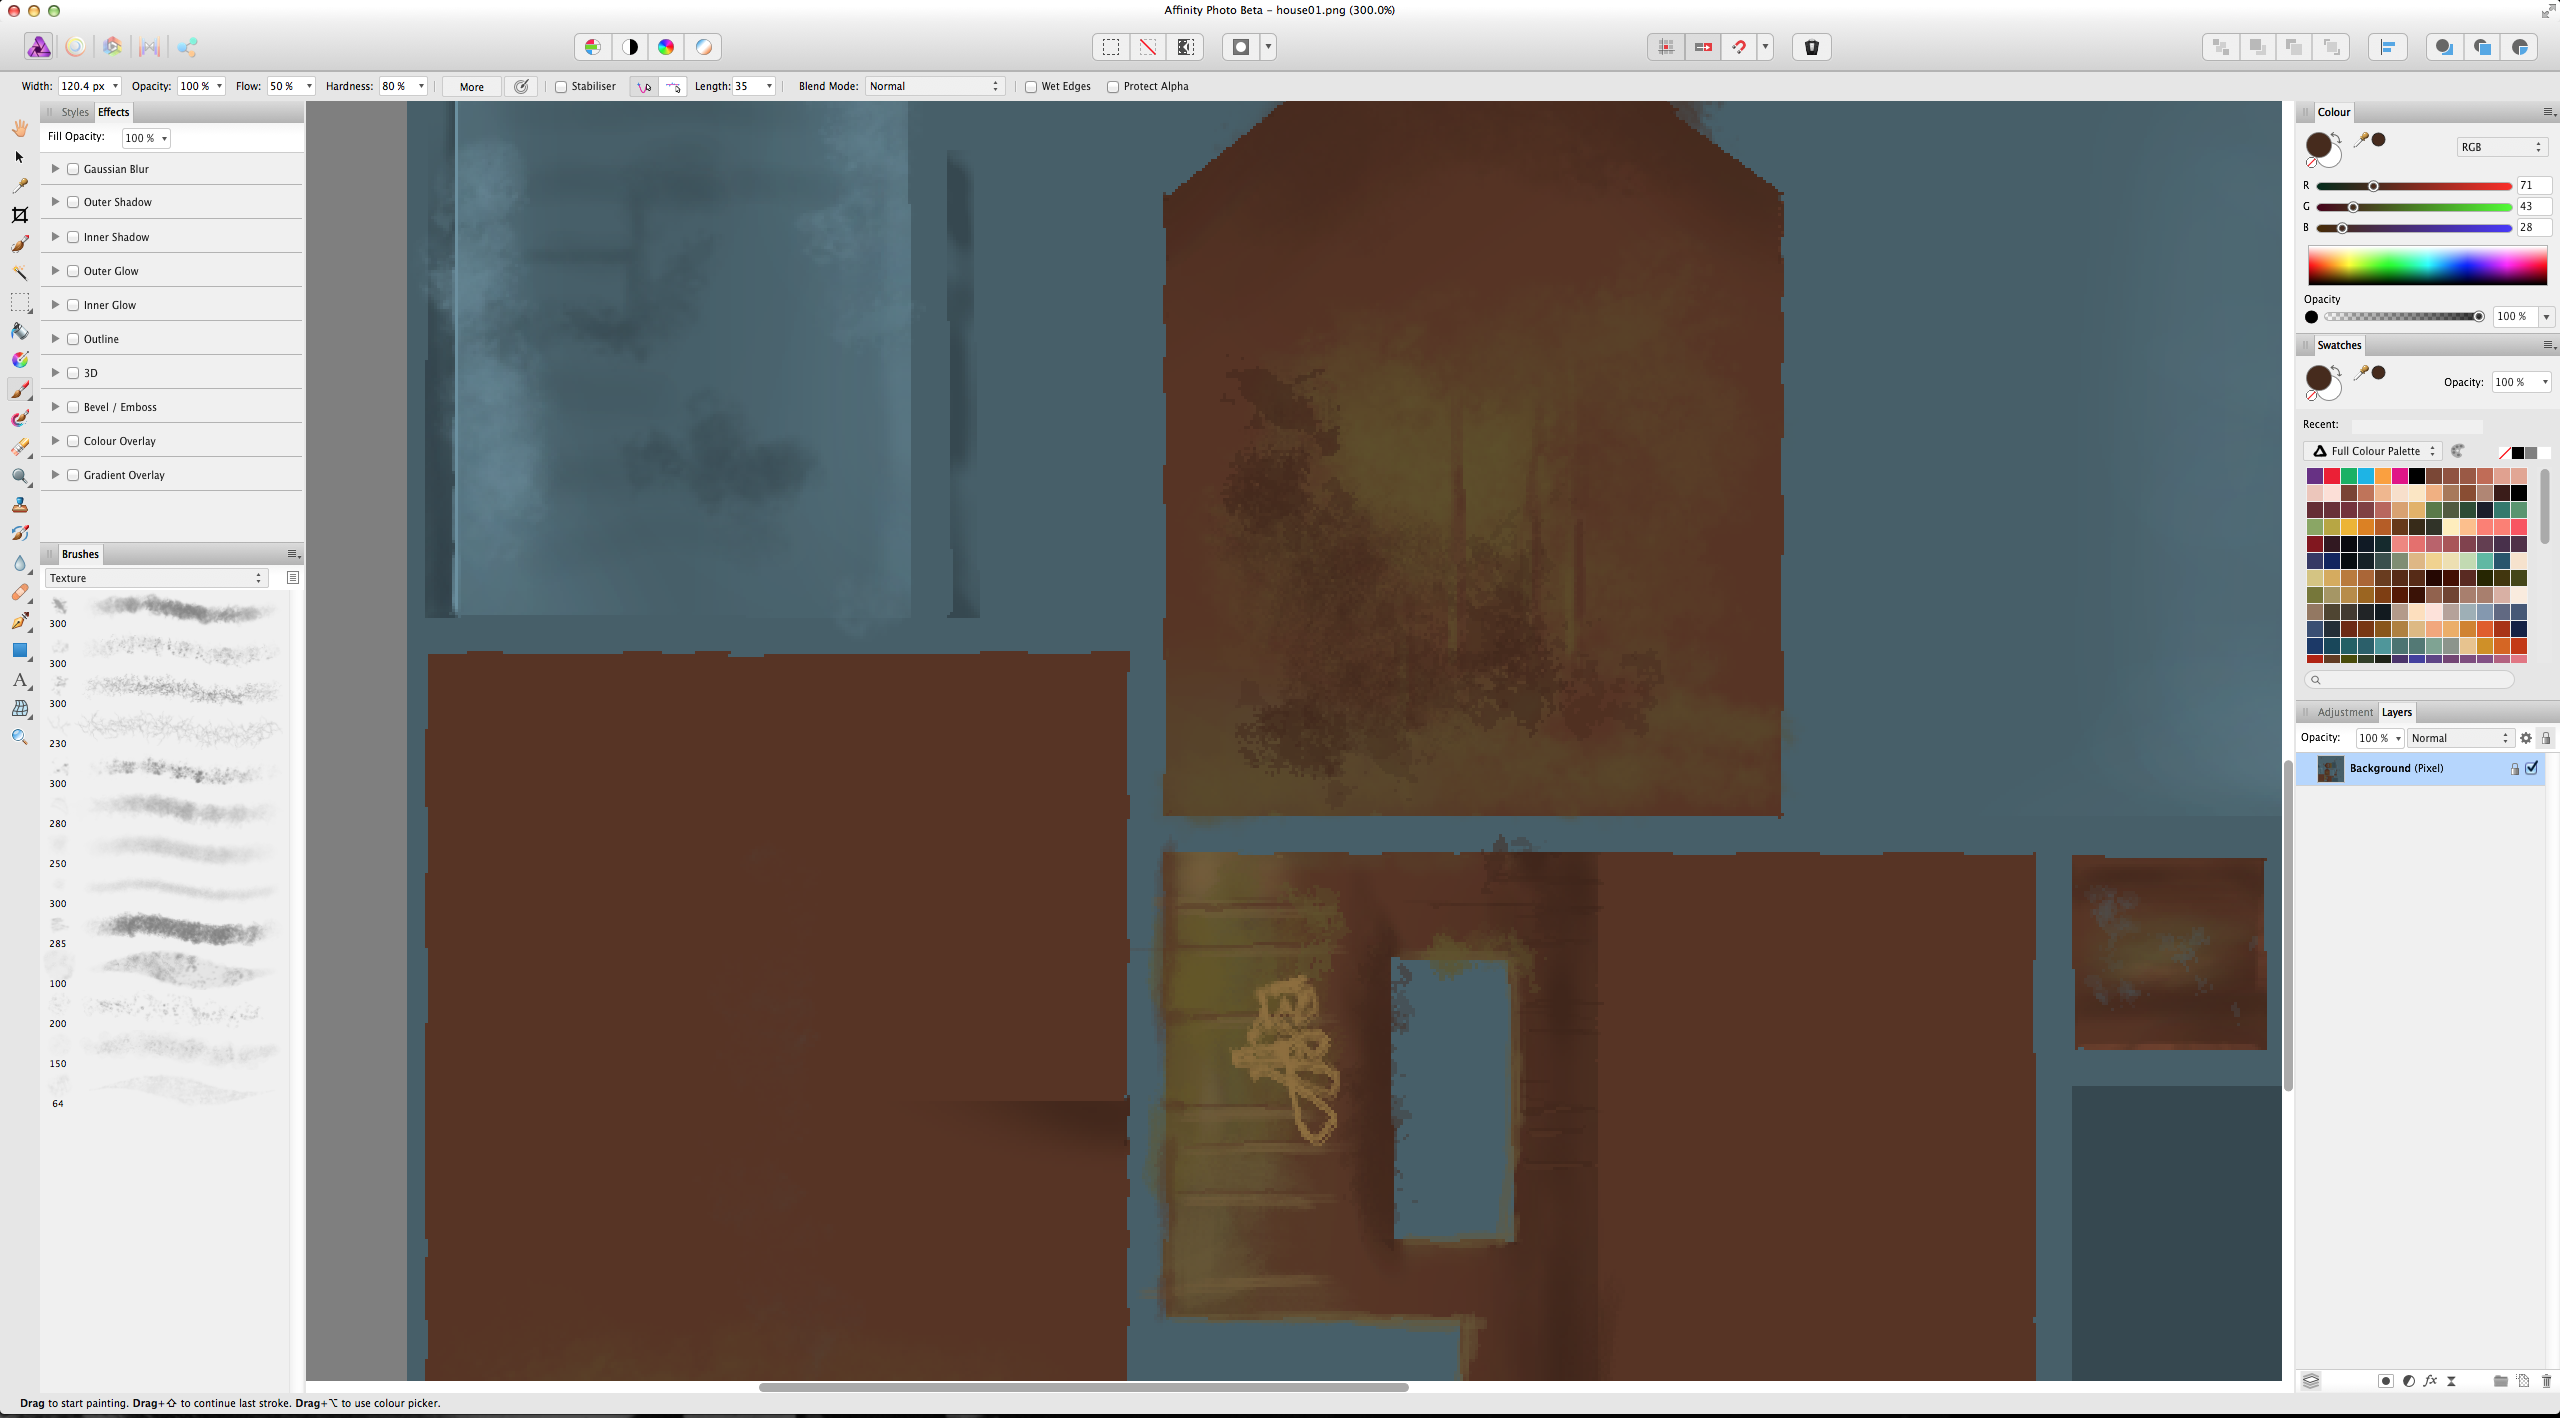
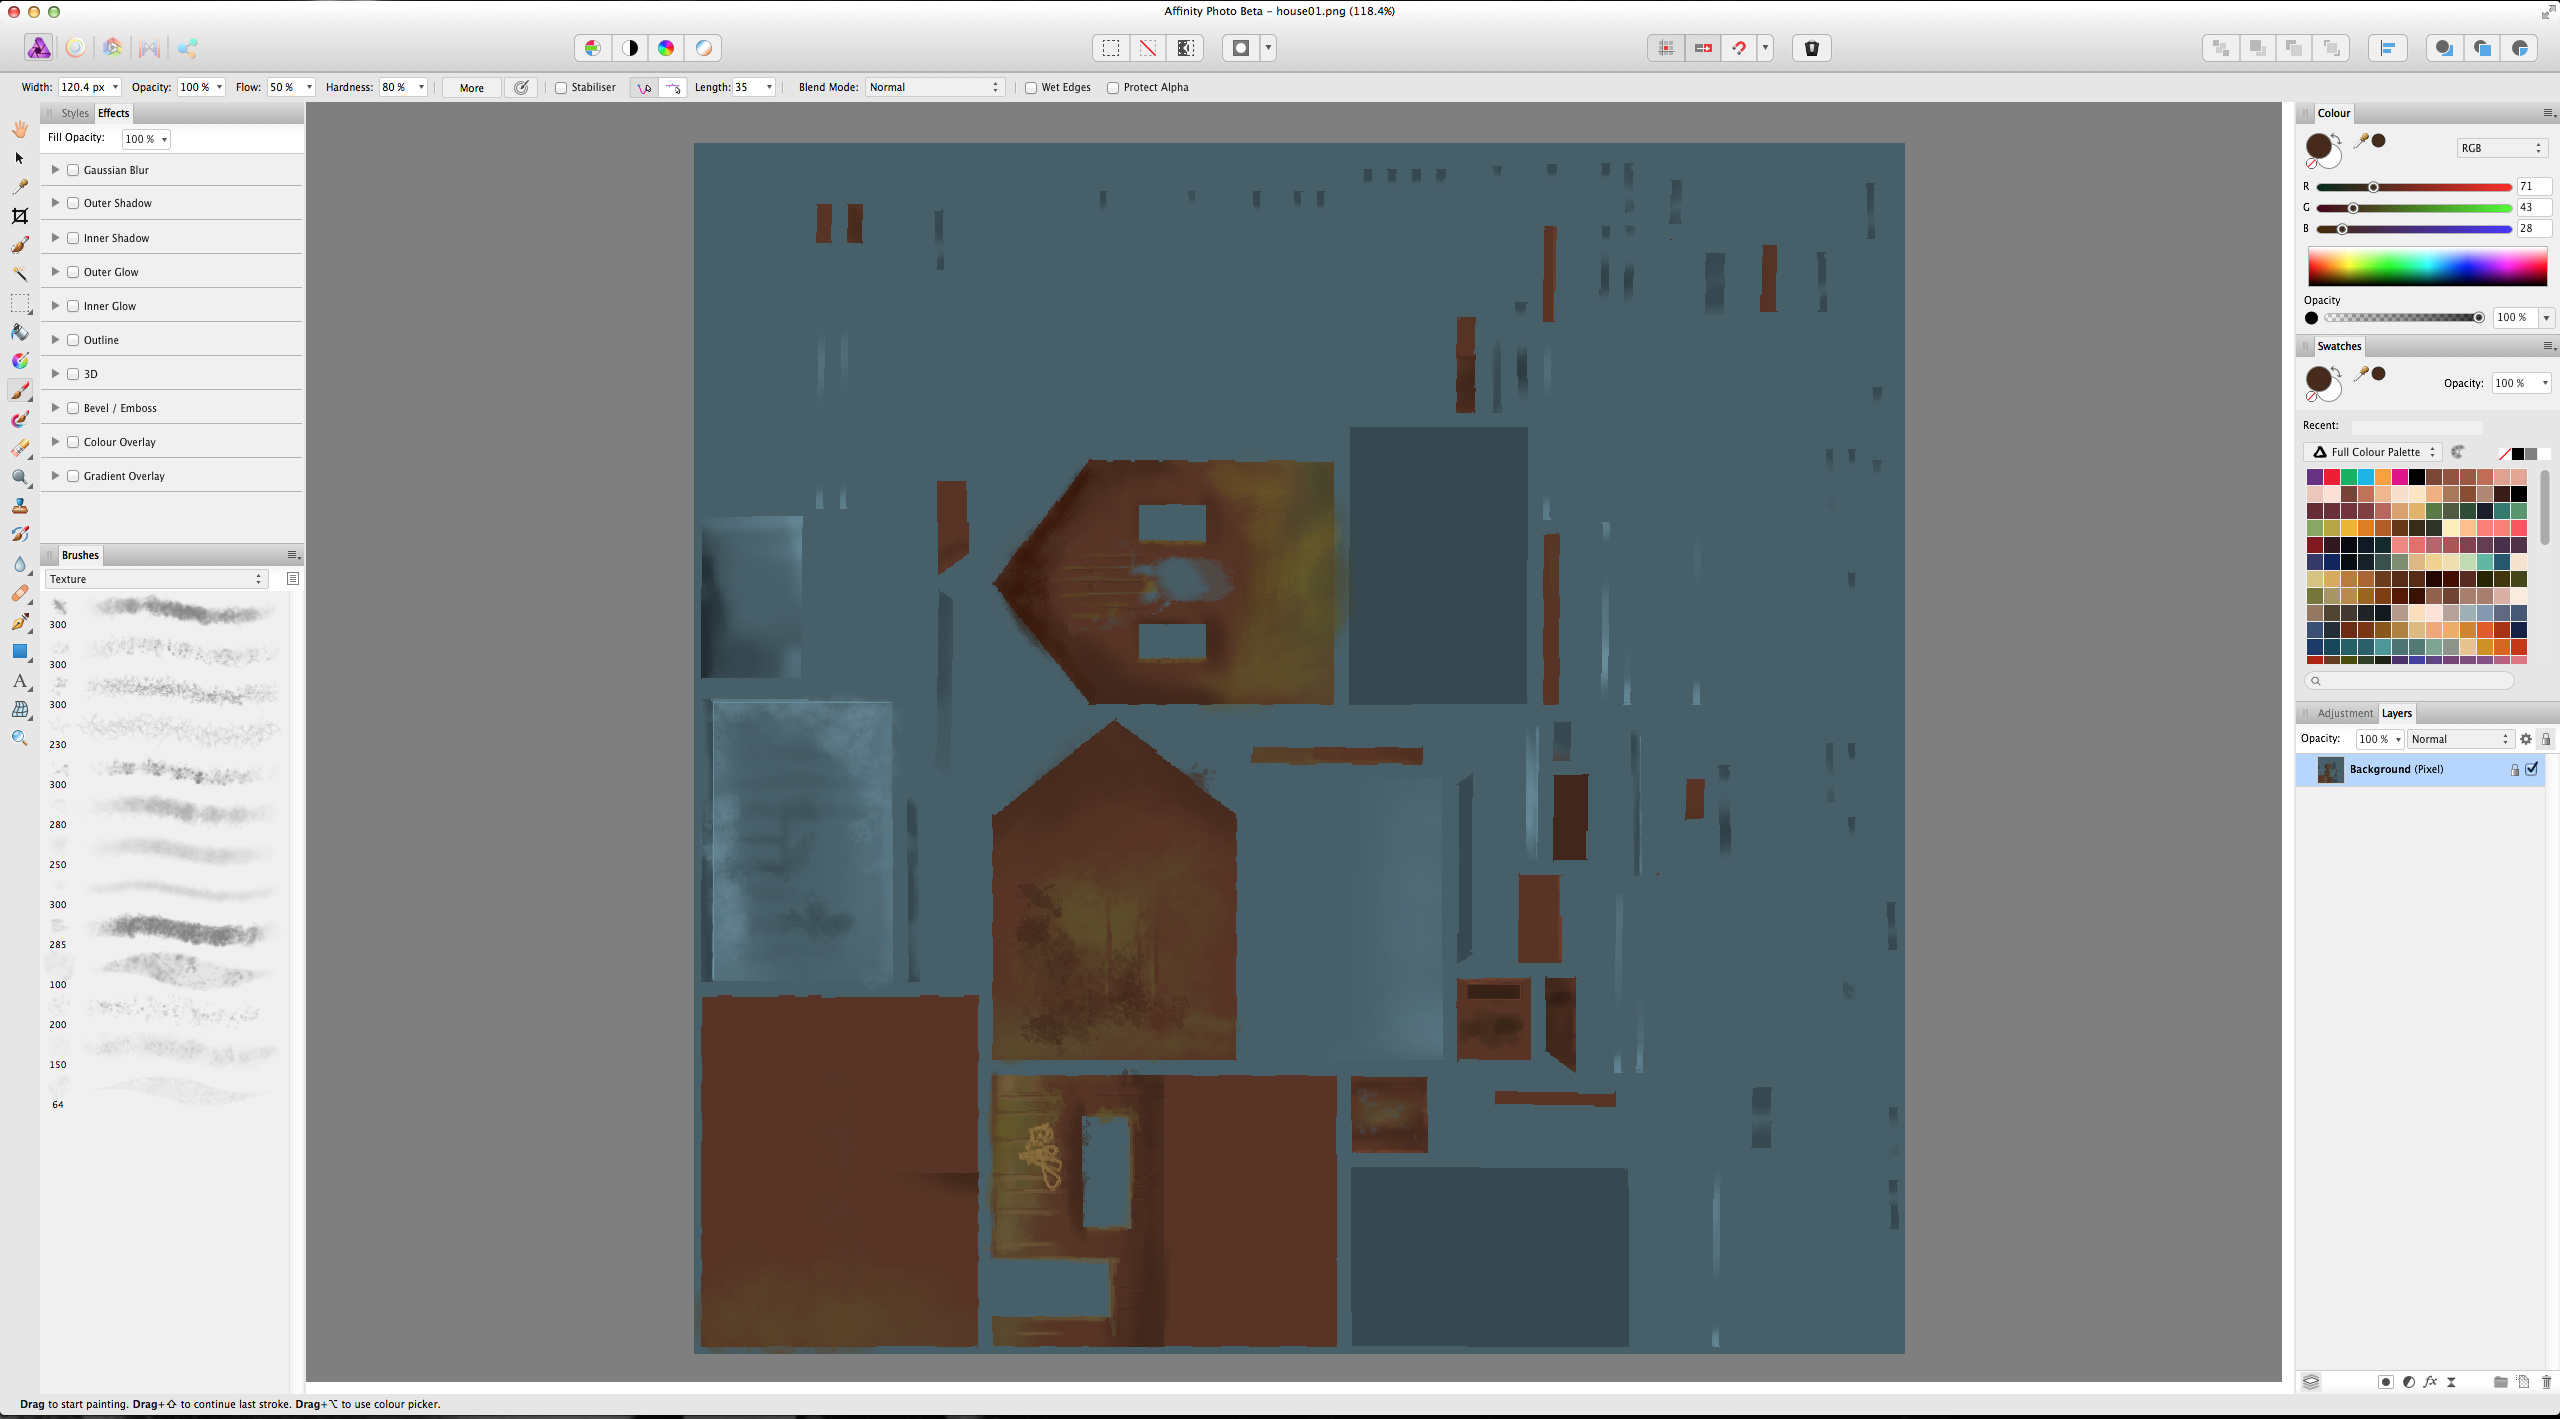
Having fun with the new Photo 1.6 beta and Blender texture painting workflow. Liking the new light UI in Photo too. I'm using the file path option in Blender's preferences (see screenshot) so it's a one click jump to Photo for painting. Then just save in Photo, jump back to Blender and click reload image. Boom, couldn't be easier. :-) Blender's internal texture painting is pretty good but not quite as dedicated yet as Photo is for this sort of stuff. EDIT: sorry for the yuge screenshots...
-
 Photo & Draw have come a long way in a short time, haven't opened PS in over 6 months. :P any-hoo, the question: When it comes to bump map creation, I do not want to have to add Gimp to my workflow. Gimp has built in tone map and bump map as well as plugin called Insane Bump. (any way to make that plugin work in Photo?) for 3D images, Normal, AO, Specular, and Bump Map layers are used to map onto a surface for realistic effects. In addition; a Displacement Map or Tonal Map for use in milling / CNC relief cutting, and laser engraving. It seems to me that these ends can be achieved with Affinity Designer / Photo, however; my lack of understanding of both CNC and Affinity has me at a loss. Any help?
 -
 Hi i'll start a new topic because my first one was a little confusing. I asked to be able to texture and colorize 3D model made in a 3D modeling software. So what I meant is to be able to import UV unwrap. Because the way I see it is Affinity Designer could do amazing job as a UX/UI design tool, for concept art and if it could do this (import UV unwrap) than I could certainly ditch Illustrator and Photoshop at the same time and reduce my pipeline of tools. Thank You
- 5 replies
-
- 1
-
-
- video game
- maya
- (and 5 more)
-
 Blender has a way to render SVG files from freestyle renders. The attached SVG opens OK in Illustrator but both Affinity Designer and Photo claim "The file appears to be corrupted." Its just a cube :) 0001.svg
-
Hi, My take on a classic. Made the shots dramatic to enhance the feeling of old and prestige. Rendering time was quite short about 5 min each. POST in Affinity Photo Beta. ;) For more pics check my behance + a modeling timelapse. https://www.behance.net/gallery/24002497/Classical-Violin? Cheers, Vlad
-
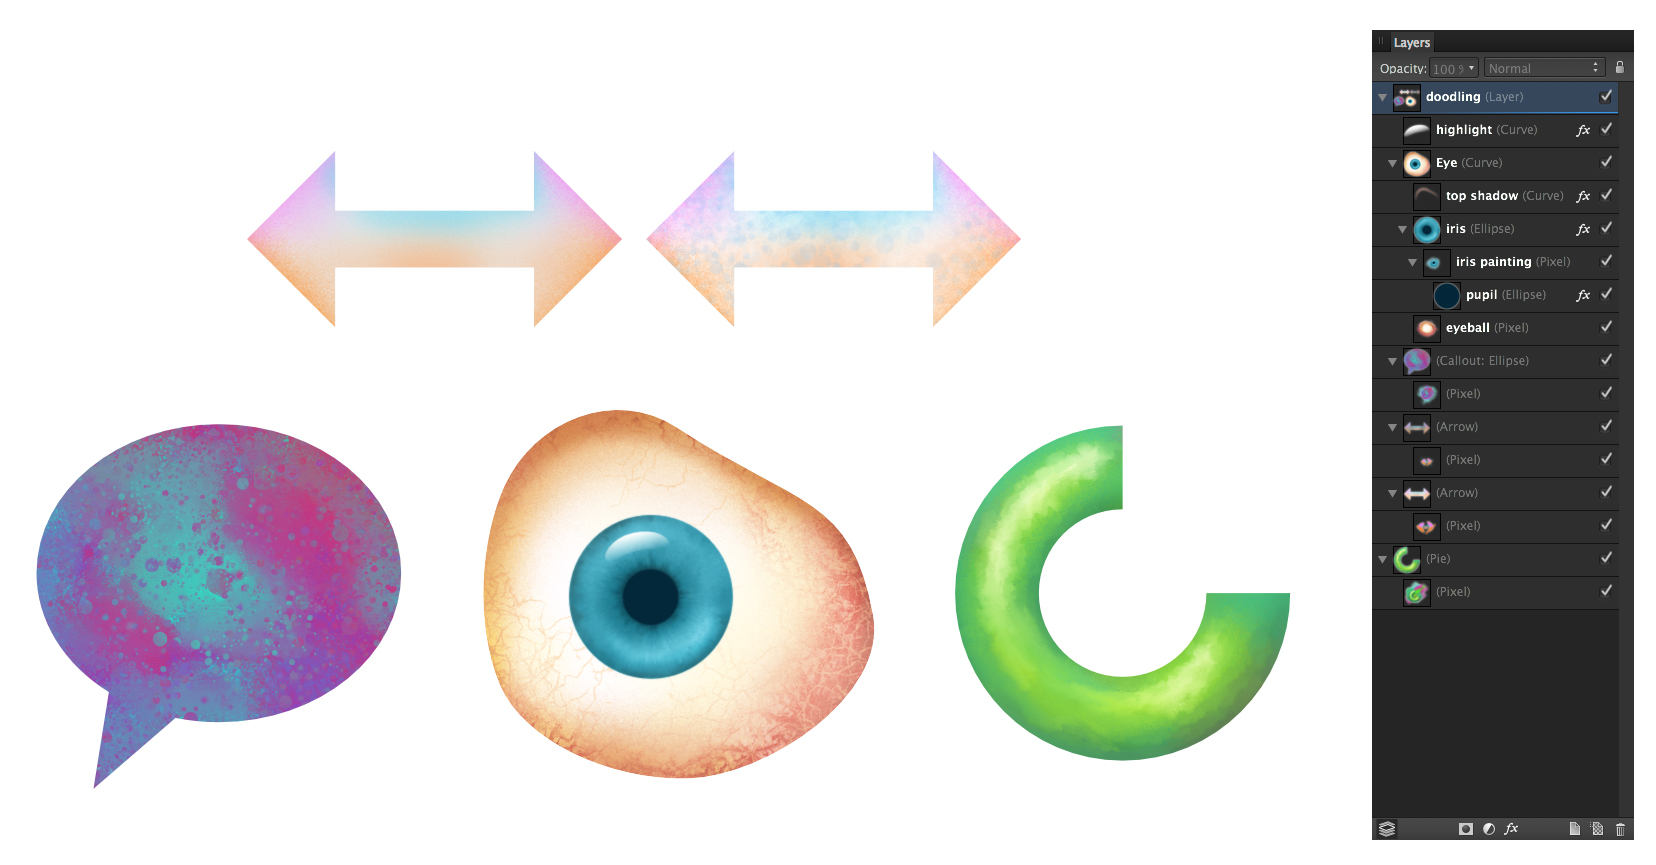
Hi all, just some doodling here trying out painting inside of shapes in Designer. Started playing with Paolo's blender brushes he so graciously created. When using them in conjunction with the smudge tool you get some really nice mixing abilities. In the call out shape for instance I painted a mixture of the 2 main colours then applied some "blending" using one of Paolo's spatter blend brushes. It just spatters using the underlying colour and doesn't put any new colour down. Changing the size of the brush changes the size of the texture it paints. For the eyeball, (I didn't start out to do an eye it just ended up that way) I used a mix of painting and blending especially in the white of the eye with the blood vessels and texturing... then in the iris I painted inside the circle shape laying in the colour in the general areas and using Paolo's blenders to really gave it a nice complex feel. I usually add a .01 gaussian blur to take the hard edge off the shapes. it tends to soften the paint work a bit but it's a reasonable trade off. On the donut-pie shape I was just playing with a nice painterly play of light and shadow. The blenders are great for adding that "painterly" feel with tons of control. Again by reducing the blender brush size the blend effect gets smaller and more precise. This is all in Designer, which for me is probably where I will spend most of my time. The fact that I can get these type of results in a "vector" app is incredible. The hardest part of all of this is knowing when to stop! :D