Search the Community
Showing results for tags 'affinity Designer'.
-
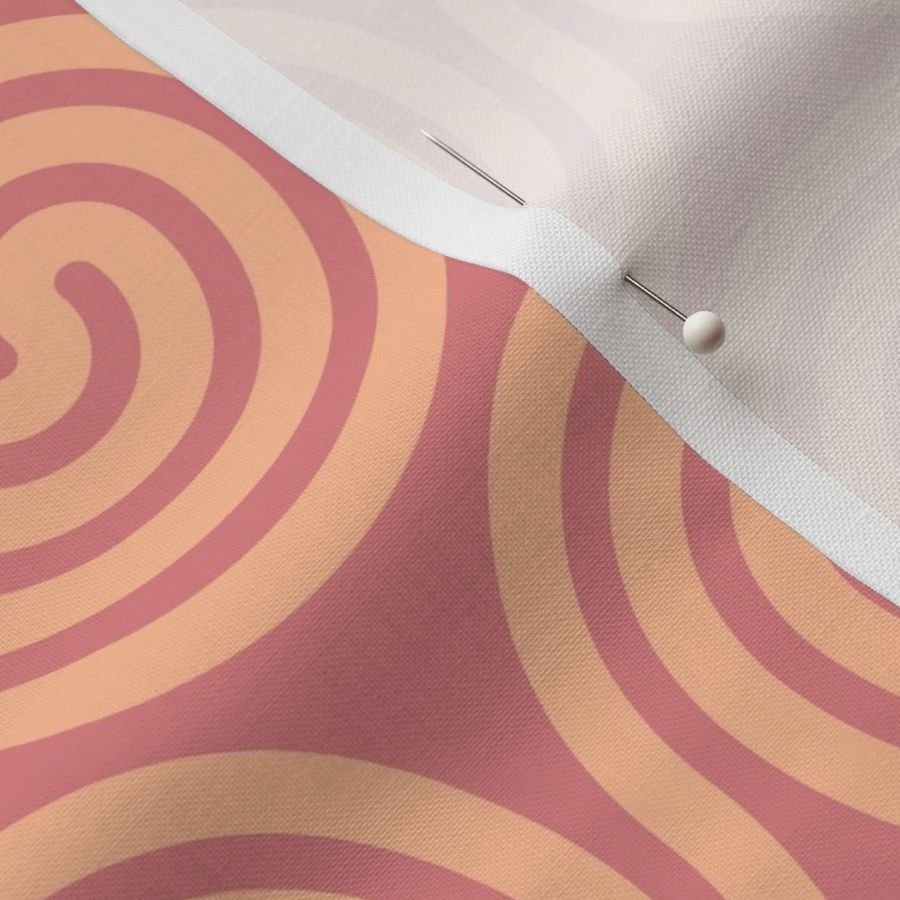
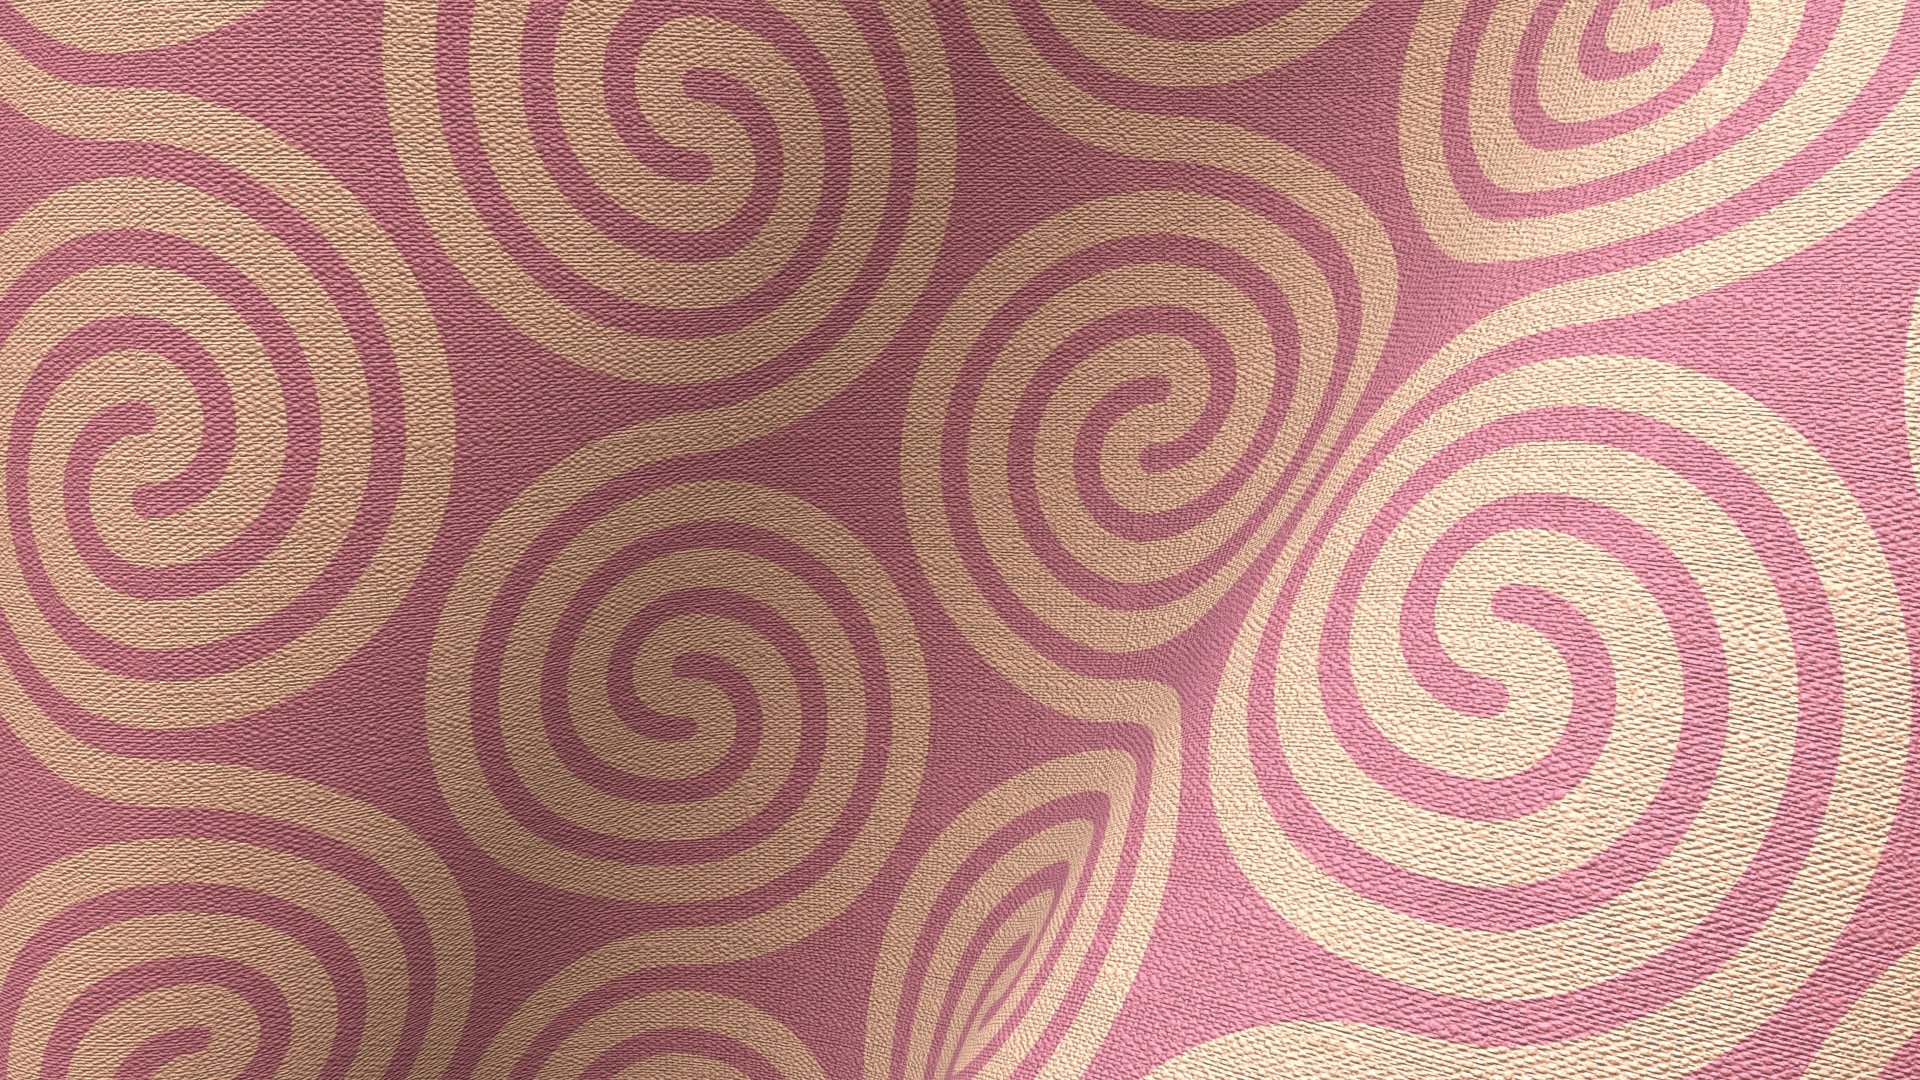
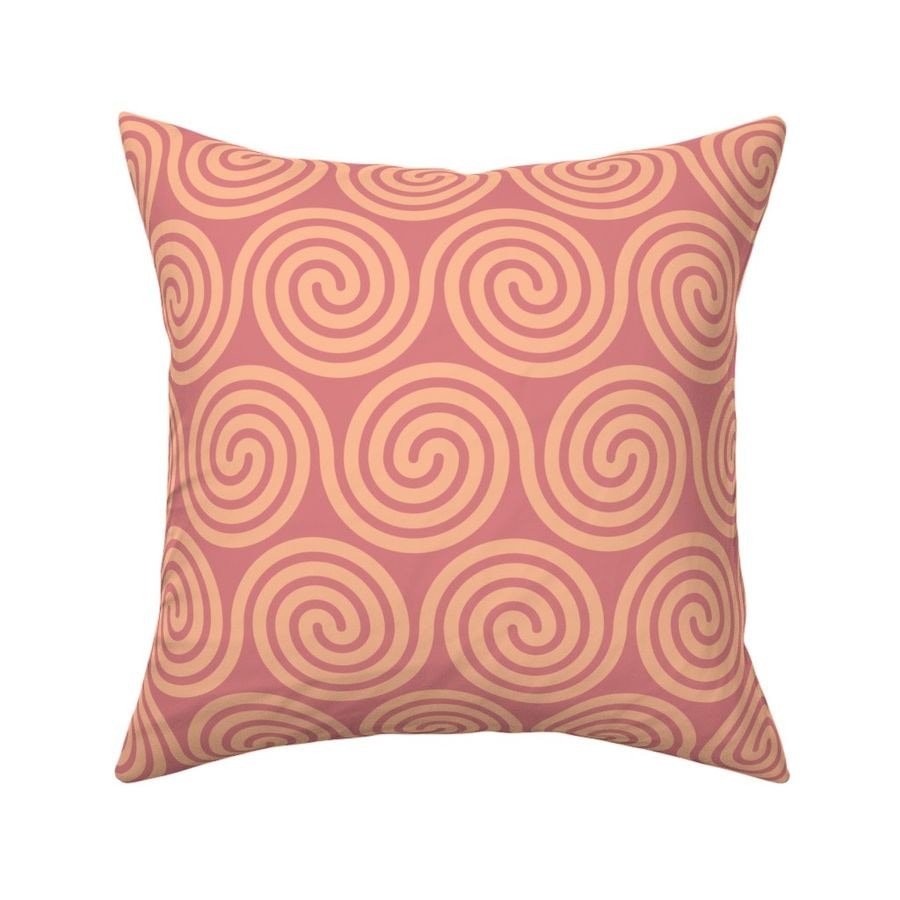
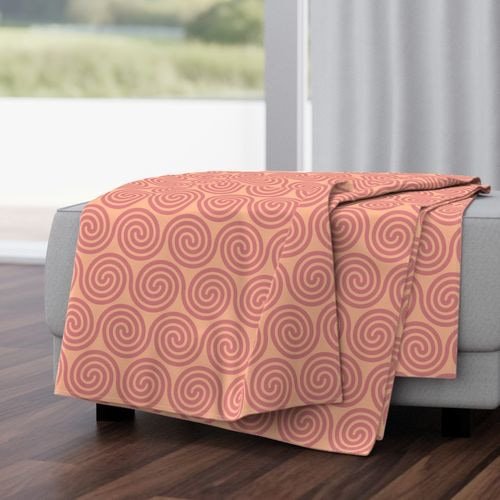
 I thought I'd take Affinity Designer's amazing new spiral tool for a spin in a recent Spoonflower competition. Spoonflower is a print-on-demand service for anyone who wants to buy printed fabrics and wallpaper. These spirals incorporate Pantone Peach Fuzz and Peach Blossom. Peach Fuzz is the 2024 Colour of the Year. The image above was rendered in Cheetah 3D. The remaining images are Spoonflower mockups. These patterns can be bought printed on demand; not just on fabric and wallpaper, but also as ready-made duvet covers, pillow cases, table cloths and napkins. https://www.spoonflower.com/en/collections/796023-spirals-by-geometrical_design?productType=FABRIC I'll be adding more spiral patterns to this collection over the months to come.
-

affinity designer Nottingham - Tram Network Transit Map
transitdiagrams posted a topic in Share your work
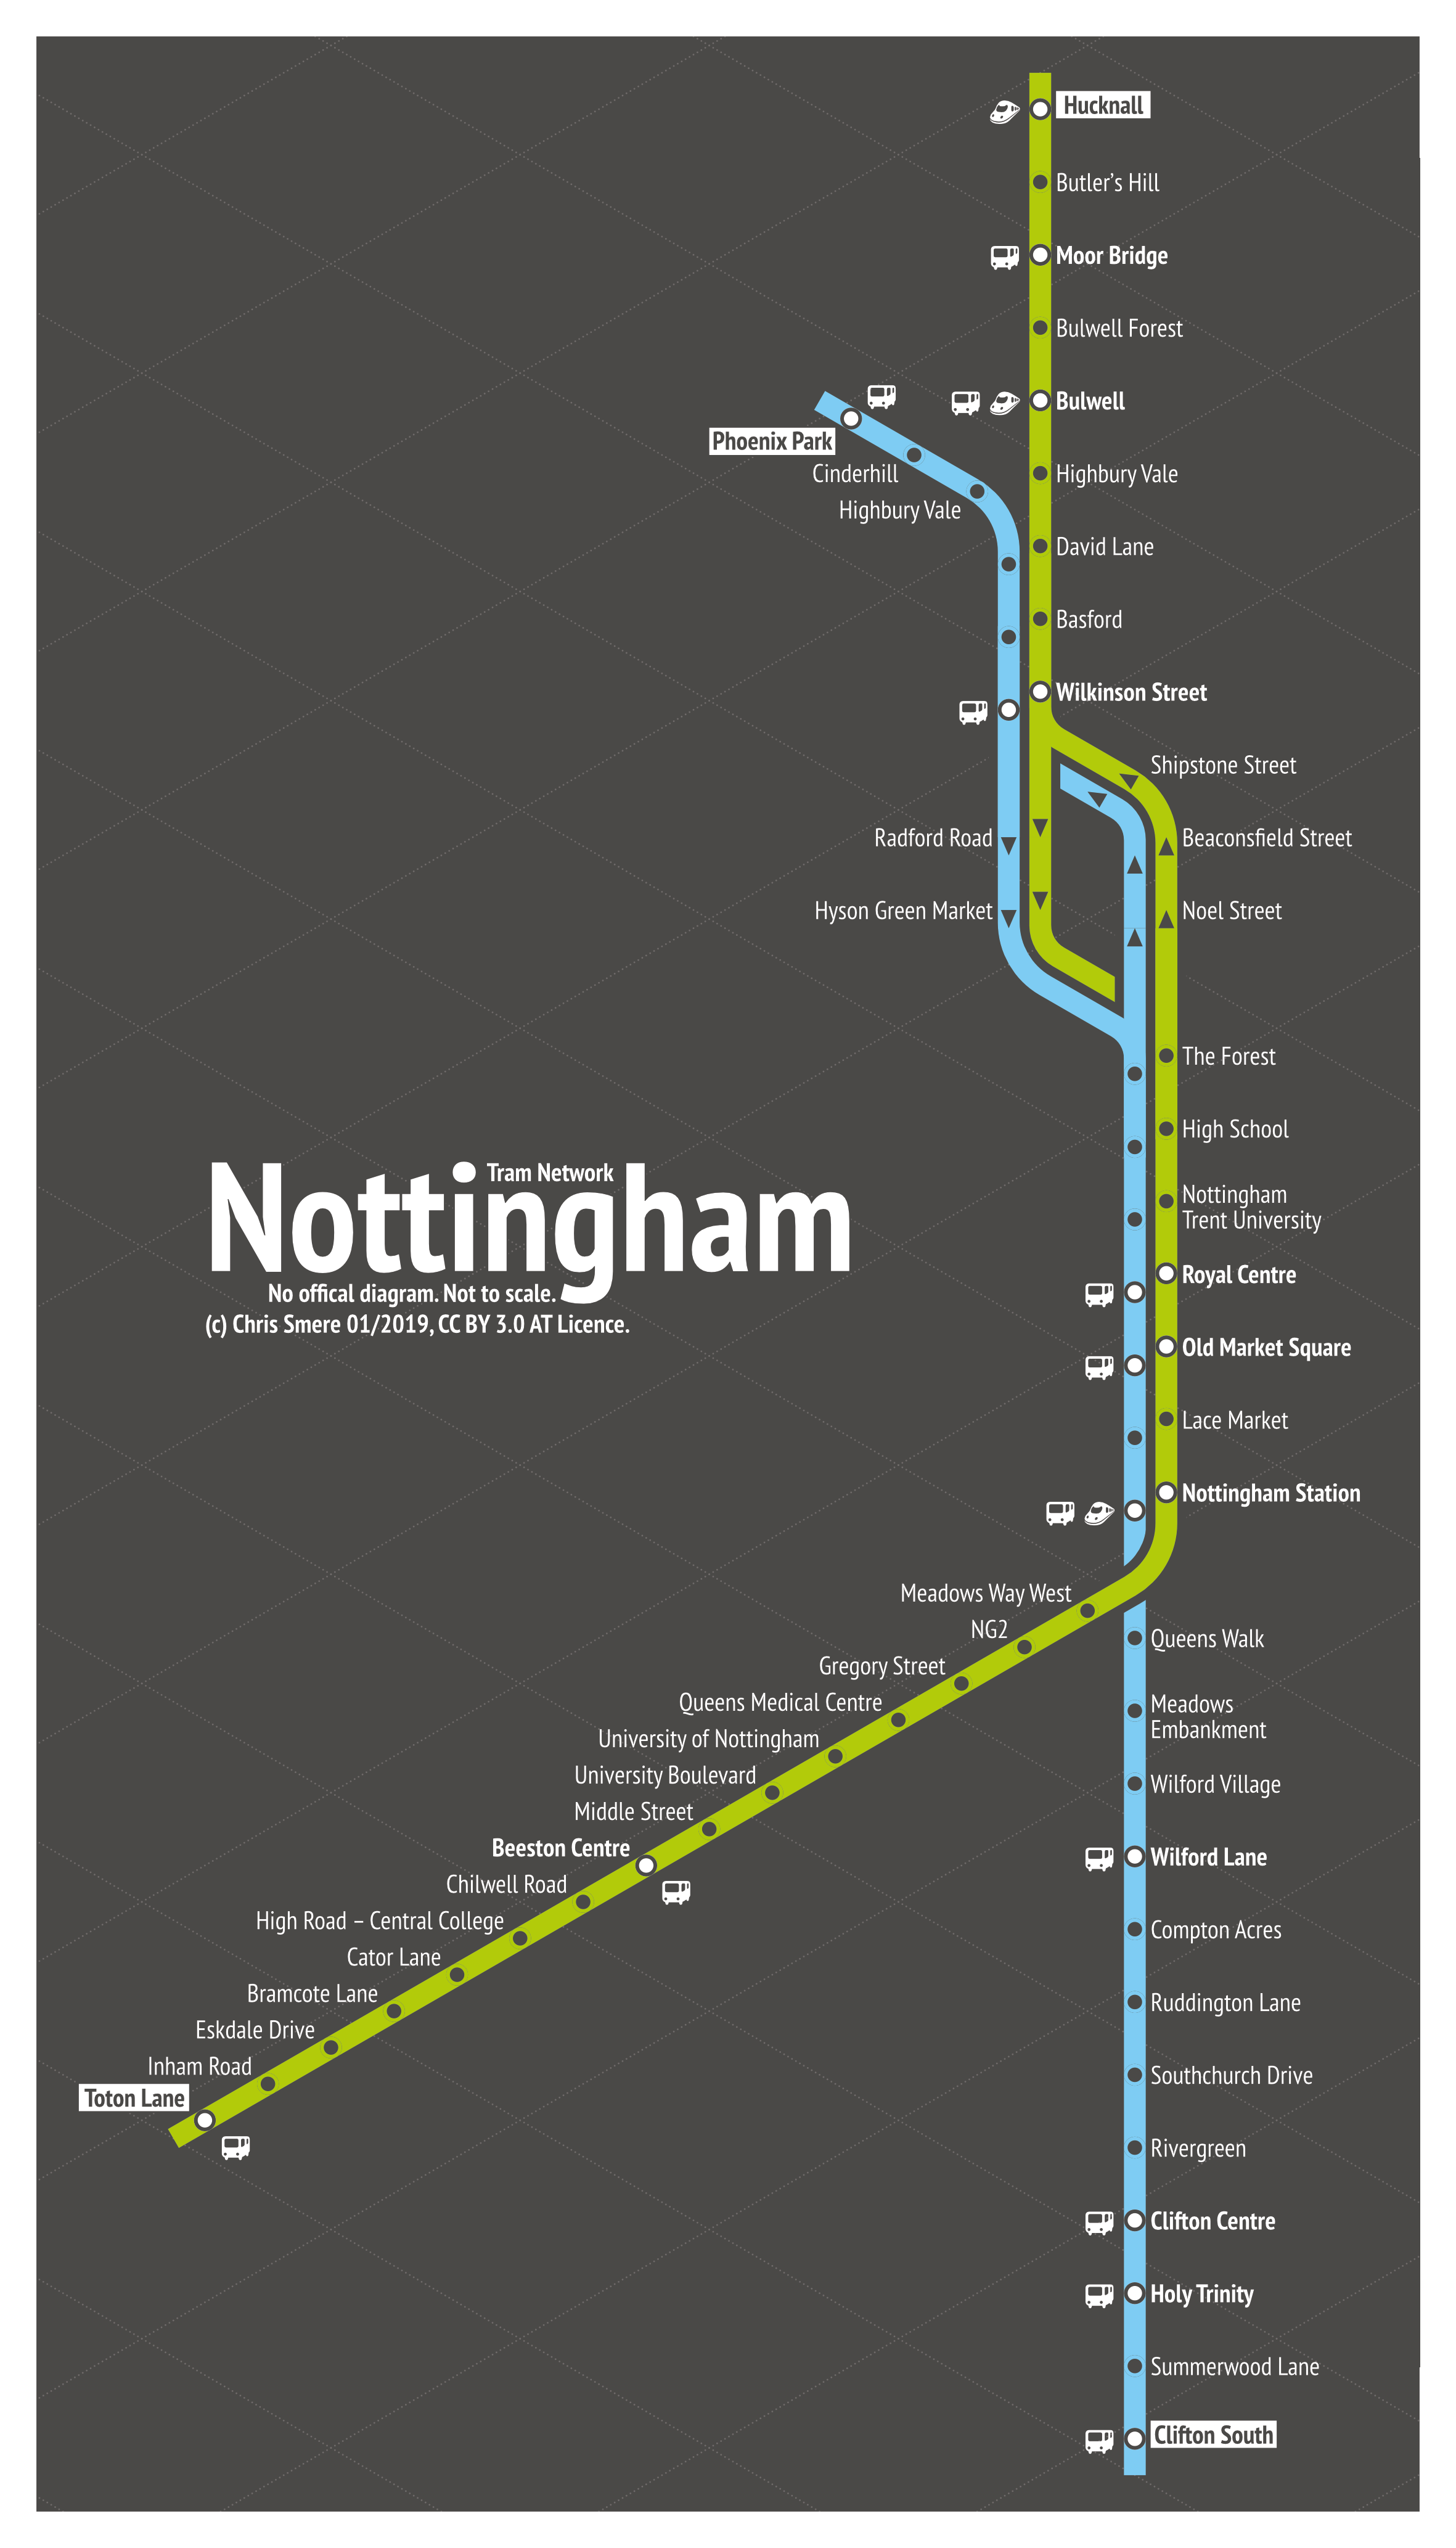
Hey :-) I do transit maps (diagrams) for fun in my spare time to relax. Here is one of my recent works: the Nottingham Tram Network in my own interpretation (unofficial of course). The whole map is entirely done with Affinity Designer. If you have any thoughts on it or feedack this is much appreciated. Have a great day! Chris
- 25 replies
-
- 14
-

-
- nottingham
- tram
- (and 5 more)
-
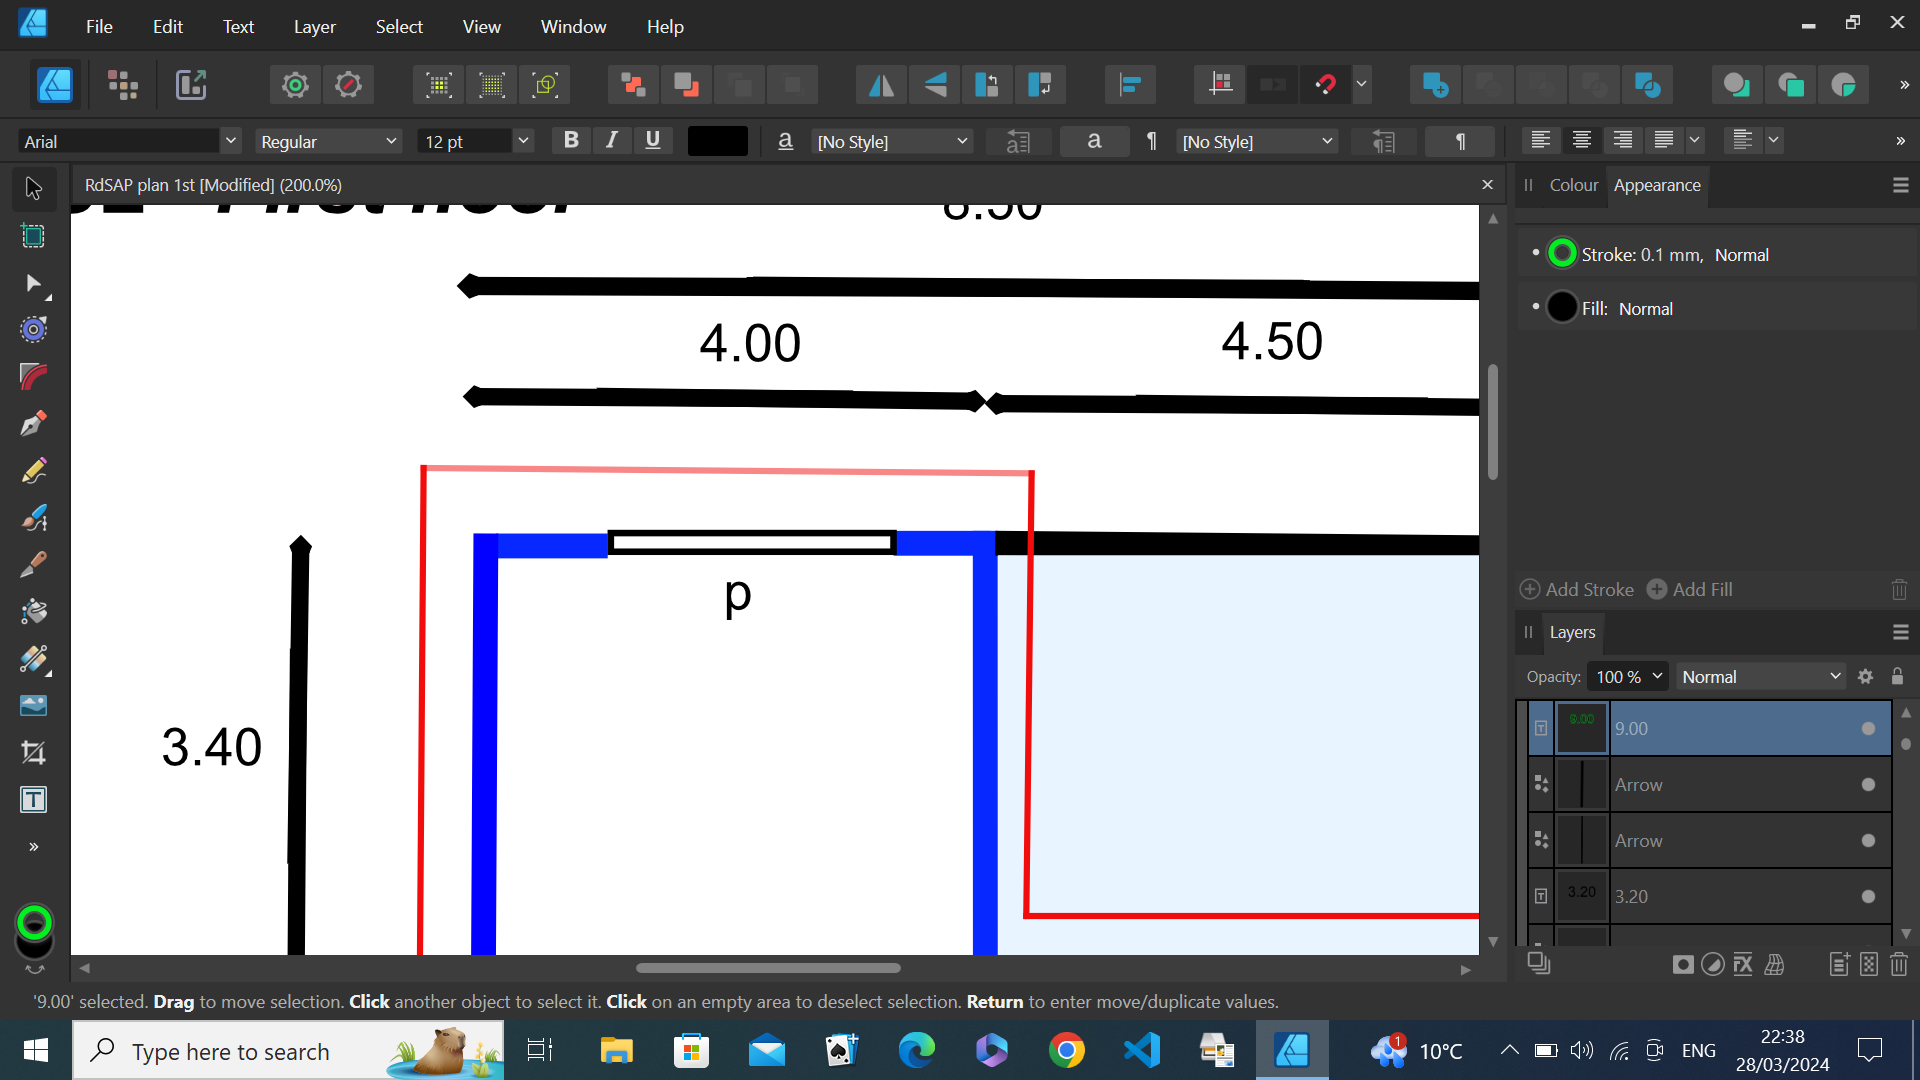
 I am new to Affinity designer and am strugling to get used to it. I am trying to export a floorplan to pdf but the corners on the straight lines are missing in the pdf file. (i've attached a copy of the pdf and screen print from affinity). The lines were originally individually drawn. I then tried ?snapping where I stopped changed direction and carried on. Neither resolved the problem. I've also watched an old Affinity video for drawing plans. I couldn't find a solution. There is a red line around the outside of the walls. I tried deleting them and re exporting but got the same result. Is there a way around this? RdSap plan 1st.pdf
-
 Blend tool (object blending) has been requested since 2015. It's a crucial part of doing parametric / creative work. Any chance to put in onto priority / pipe? Thanks
- 122 replies
-
- 38
-

-
-
- blend tool
- blend
- (and 1 more)
-
Recently purchased the above pack in the Affinity sale. Does anyone have any tutorials, worked examples or tips showing how to utilise this package? Contacted the developer who could not help.
-
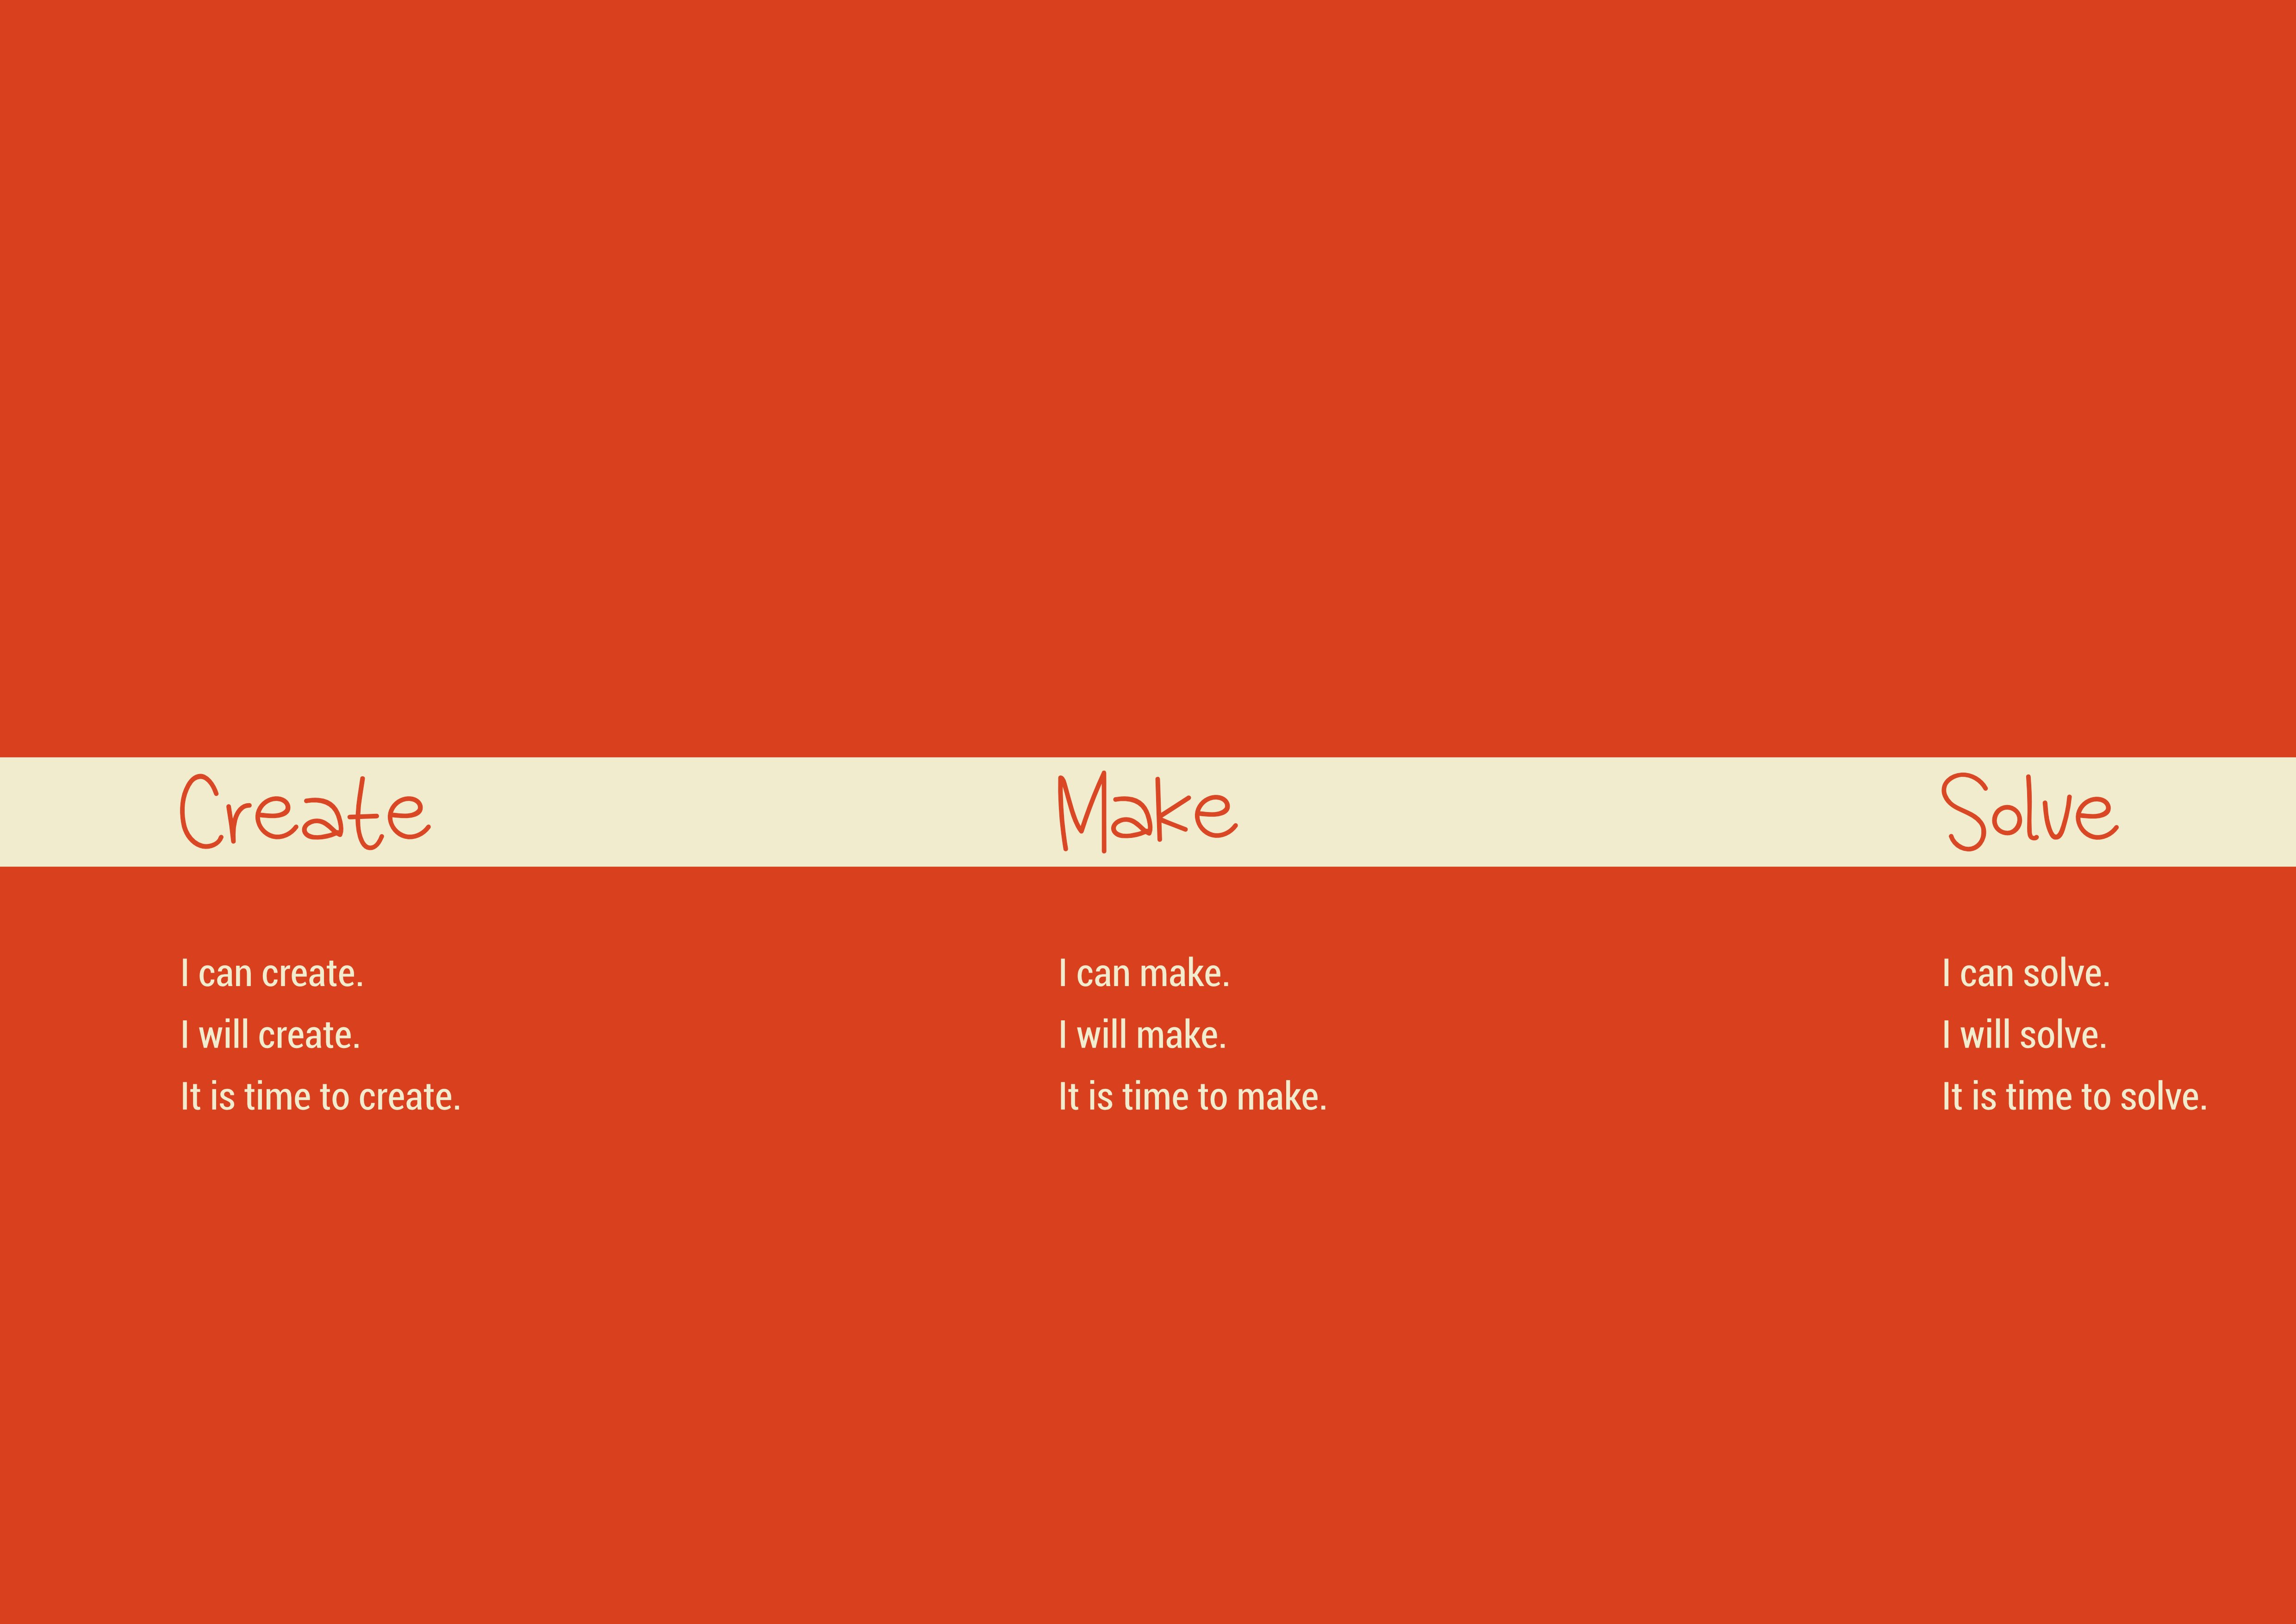
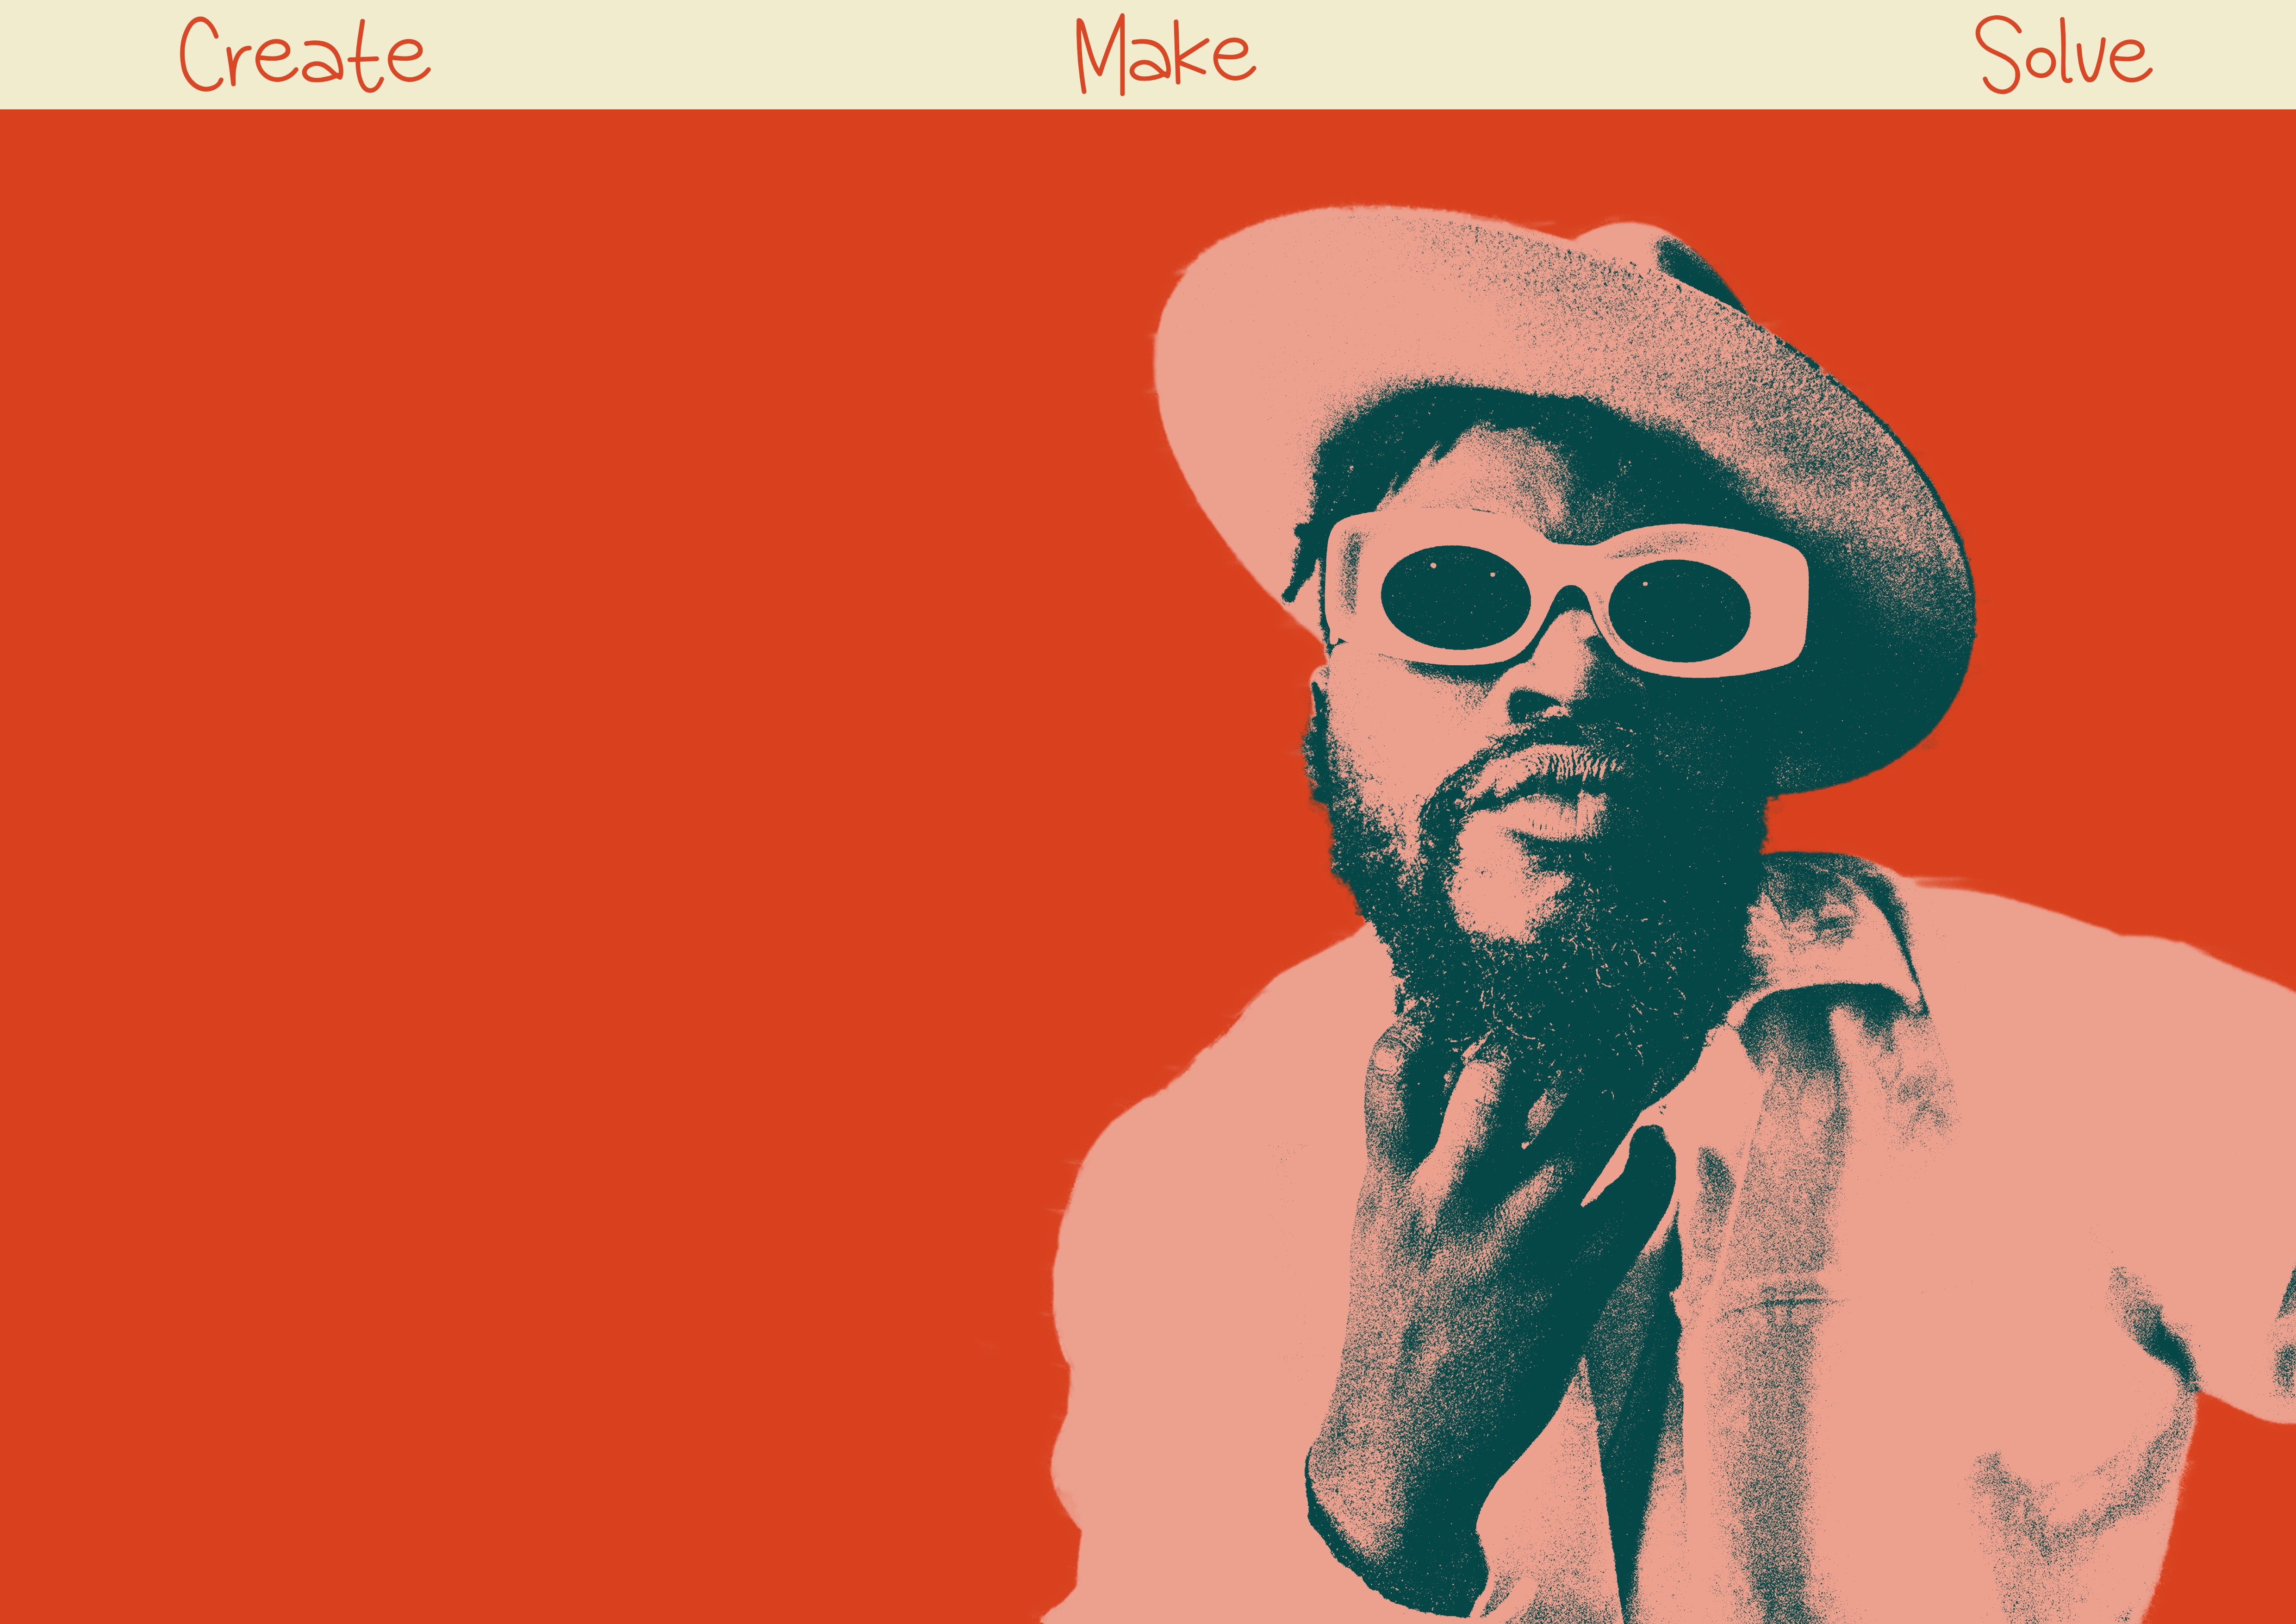
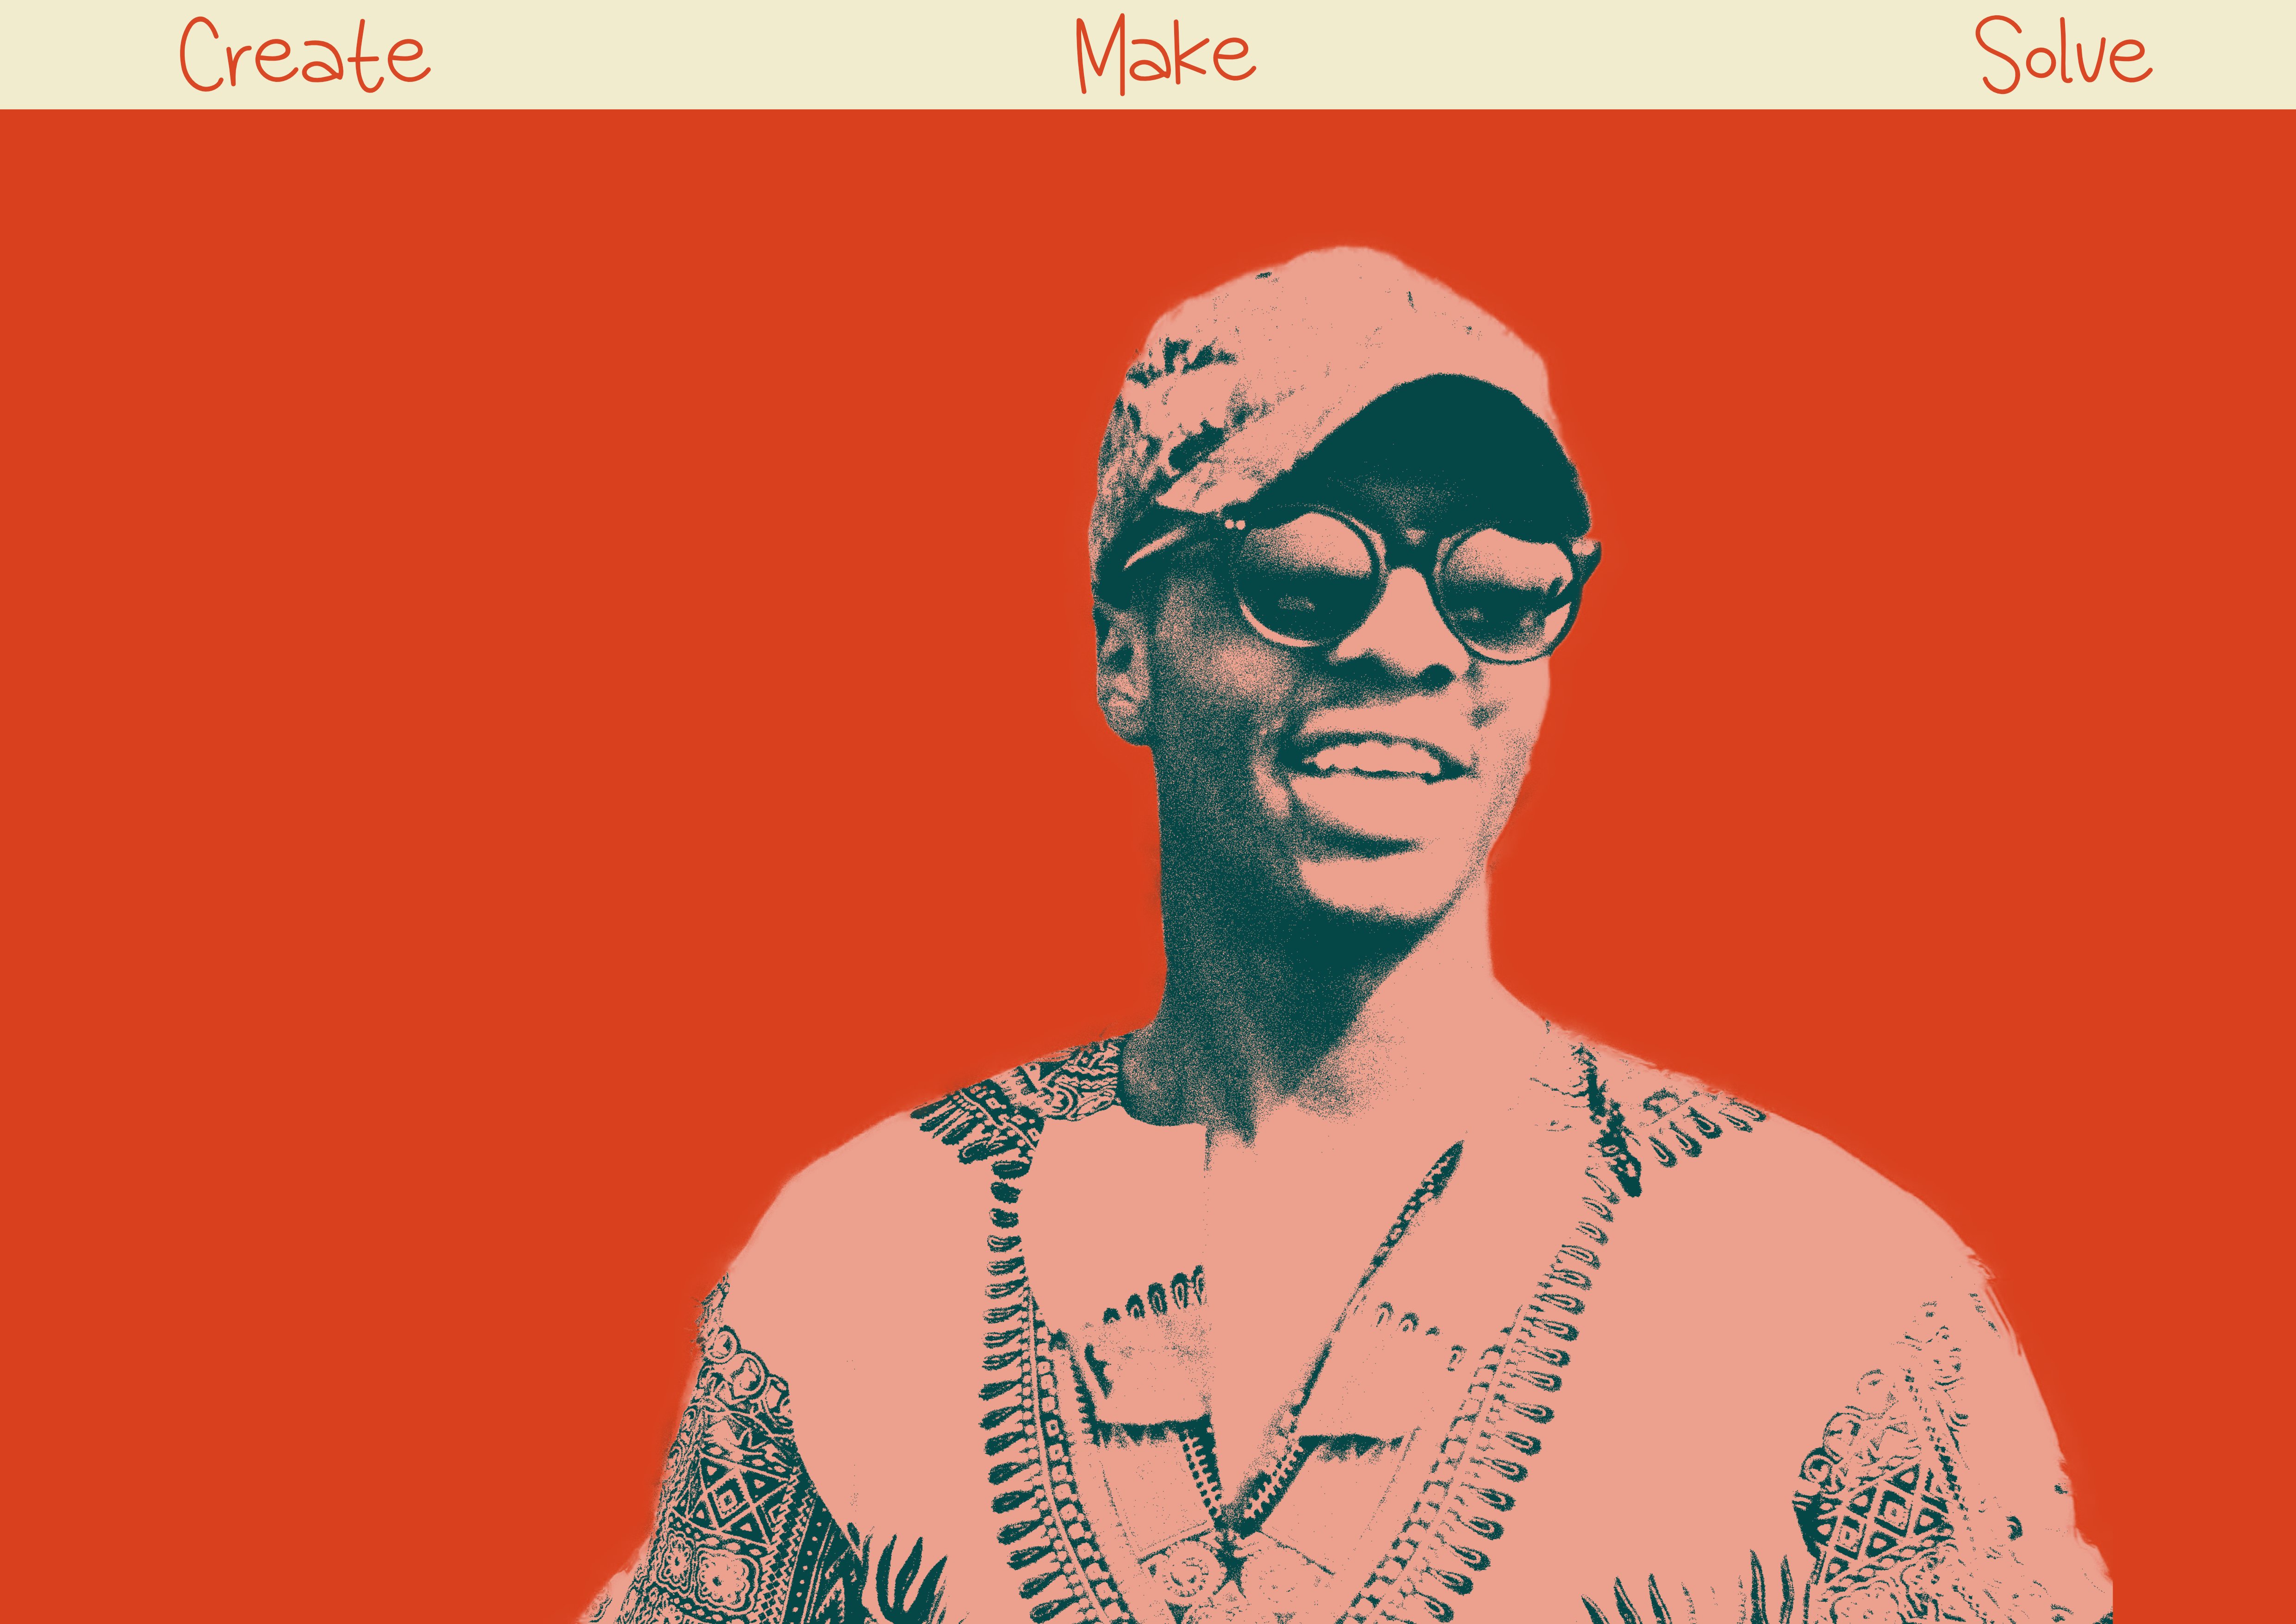
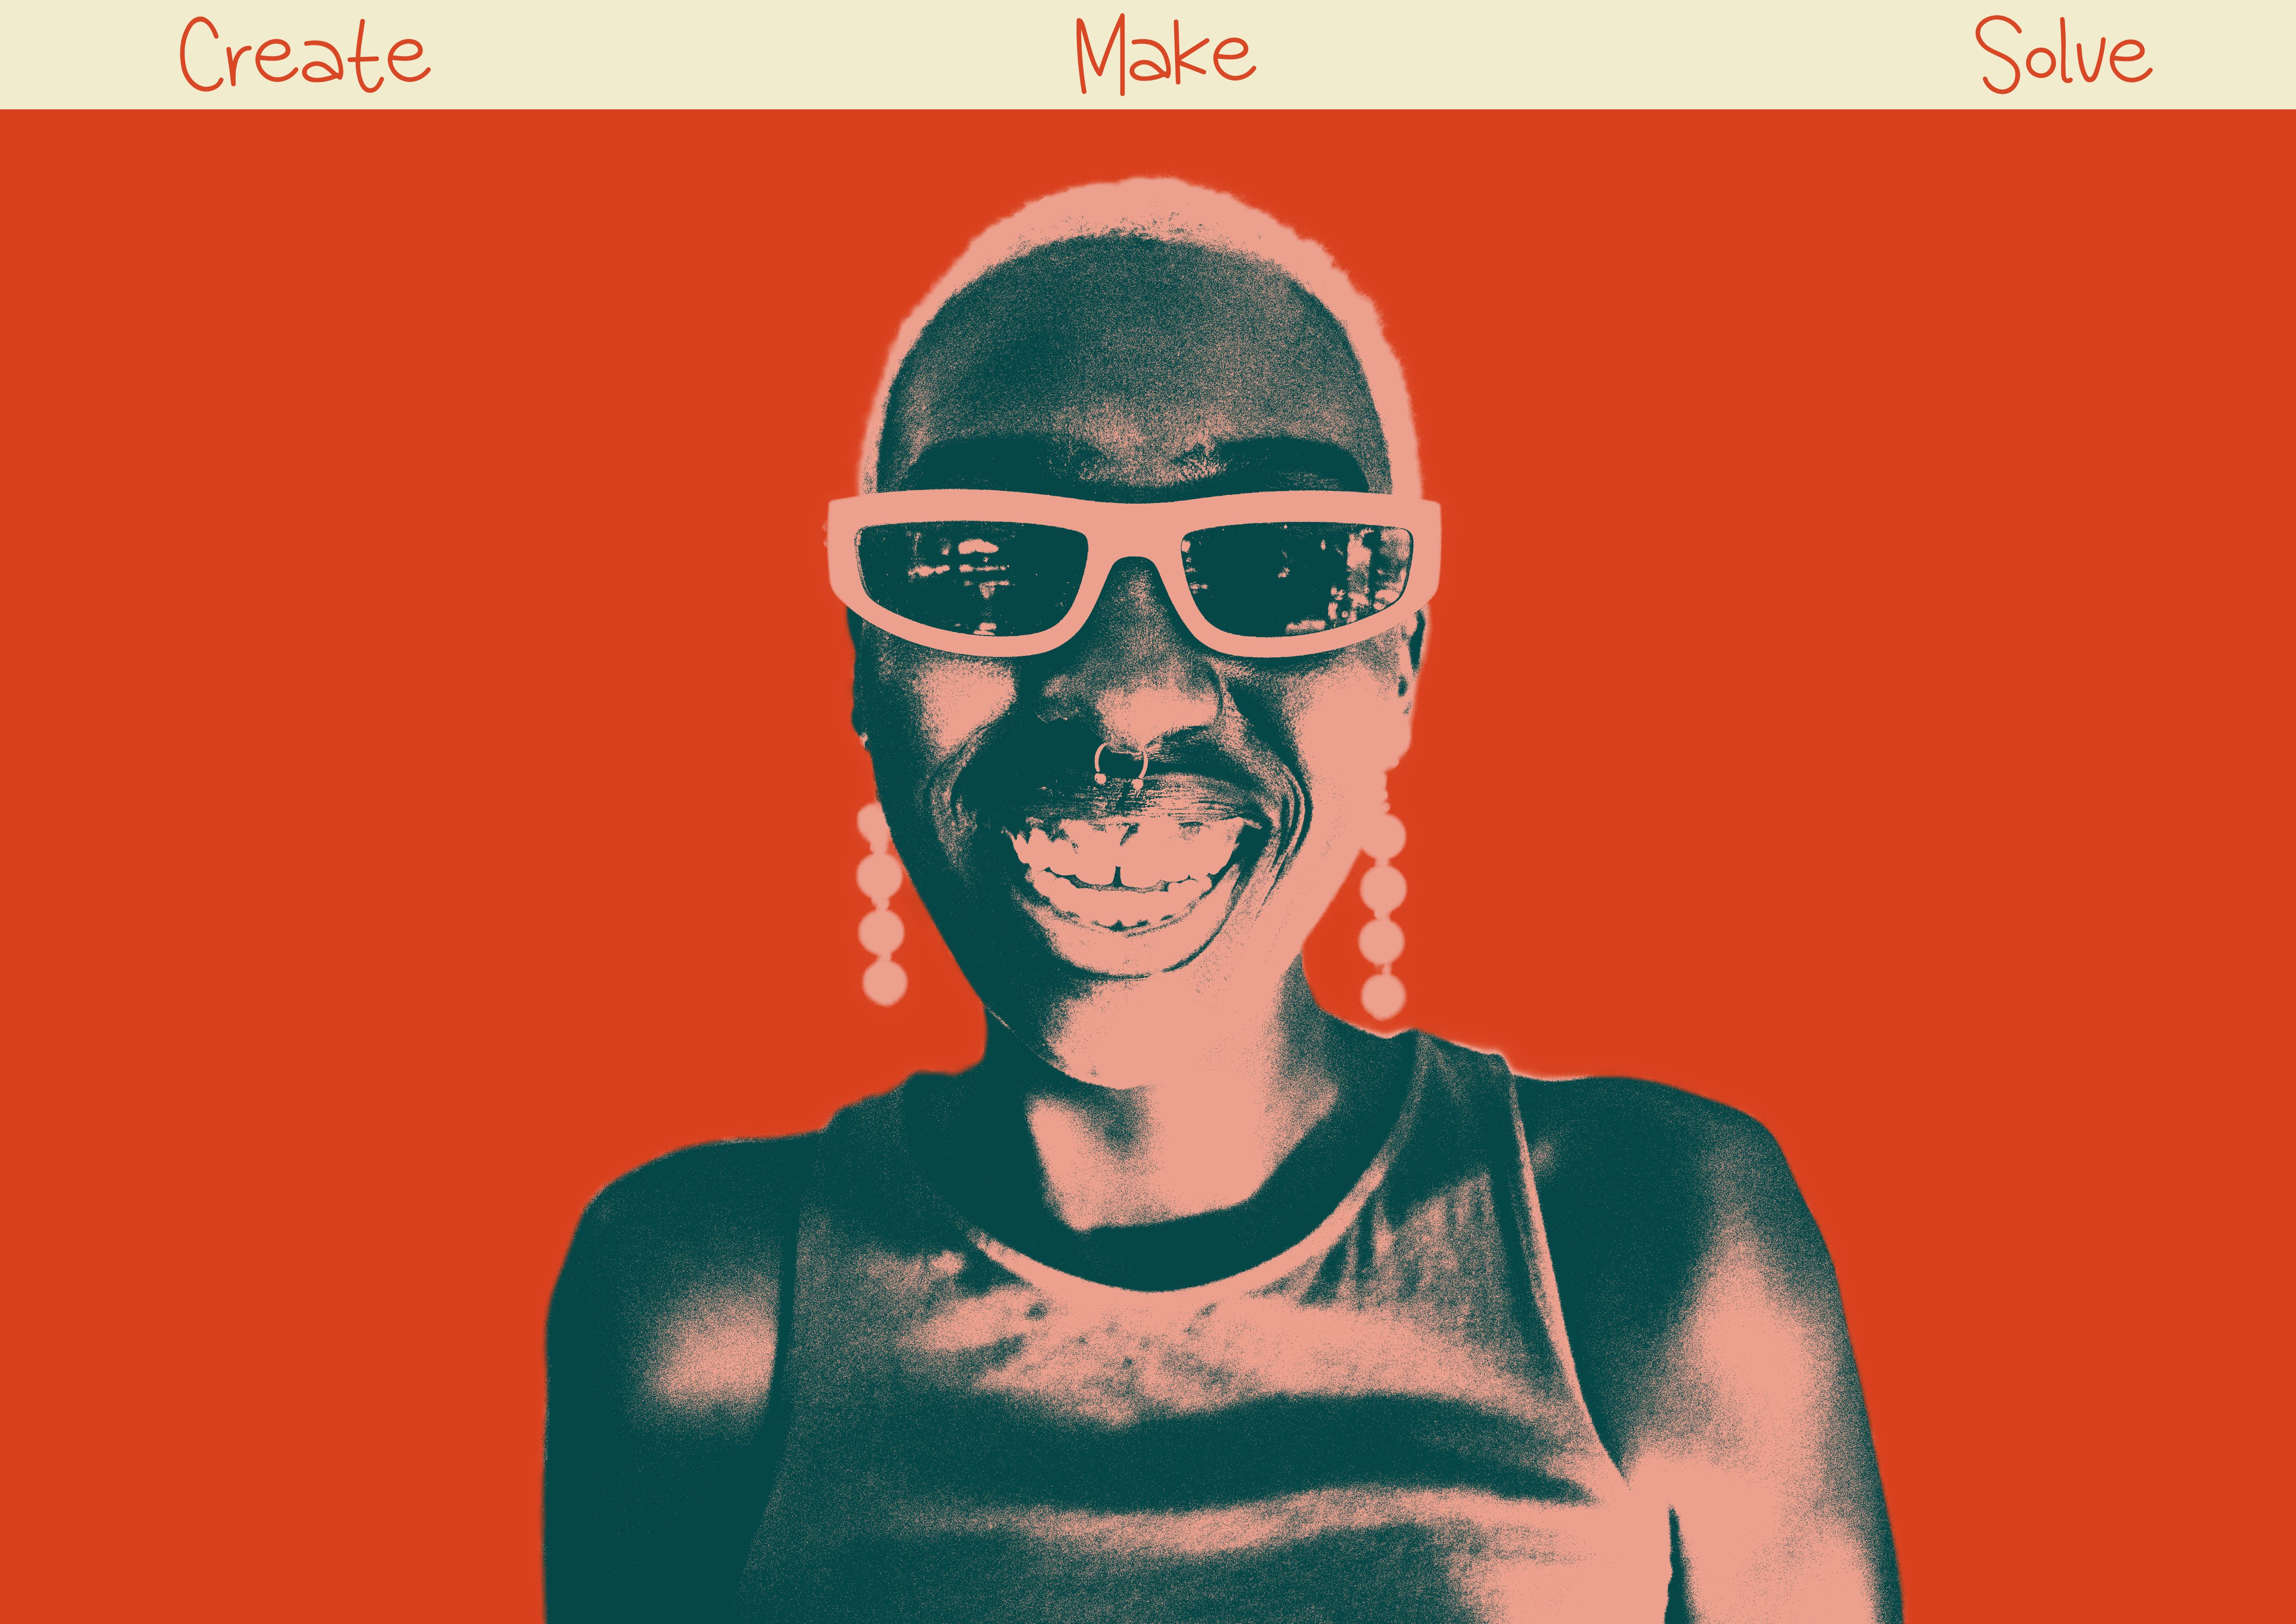
CREATE I can create. I will create. It is time to create. MAKE I can make. I will make. It is time to make. SOLVE I can solve. I will solve. It is time to solve. Tools: Affinity Photo, Affinity Designer Let's connect: https://www.behance.net/bah-is-life https://www.instagram.com/bah_is_life/
-
bug 表现:钢笔工具中断,具体表现看视频。 软件 :只测试了affinity designer 其他两个软件你们可以测试一下, 版本:2.4.1 复现方法: 1.打开designer 并新建文件, 2.切换为钢笔工具,并打开 "创建新曲线时保留远取项" 选项, 3.使用钢笔工具,当绘制第二个闭合路径时,发生钢笔工具终止bug。 4.操作系统:windows 11 最新版 5.硬件加速开启状态 (弱弱的问一下🥲🥲🥲🥲,affinity 什么时候能支持中文竖排) bkATCexUtM.mp4
-
Hi When I look for a typo sometimes affinity gets stuck on the color wheel, I need to force quit the application, then lost my work and my time. But the biggest issue is Affinity designer get totally lost after that looking for a License... I need to come here see if there is a solution, I think I try to disable all my fronts to relaunch but its really lot of time lost. Don't know what your software is checking but blocking the starting I not a good idea, I need to work. Please can you fix this issue Its not the first time happen. I am on M3Pro with the last infinity update I use standard Google Font activabled by Typeface, Thanks
-
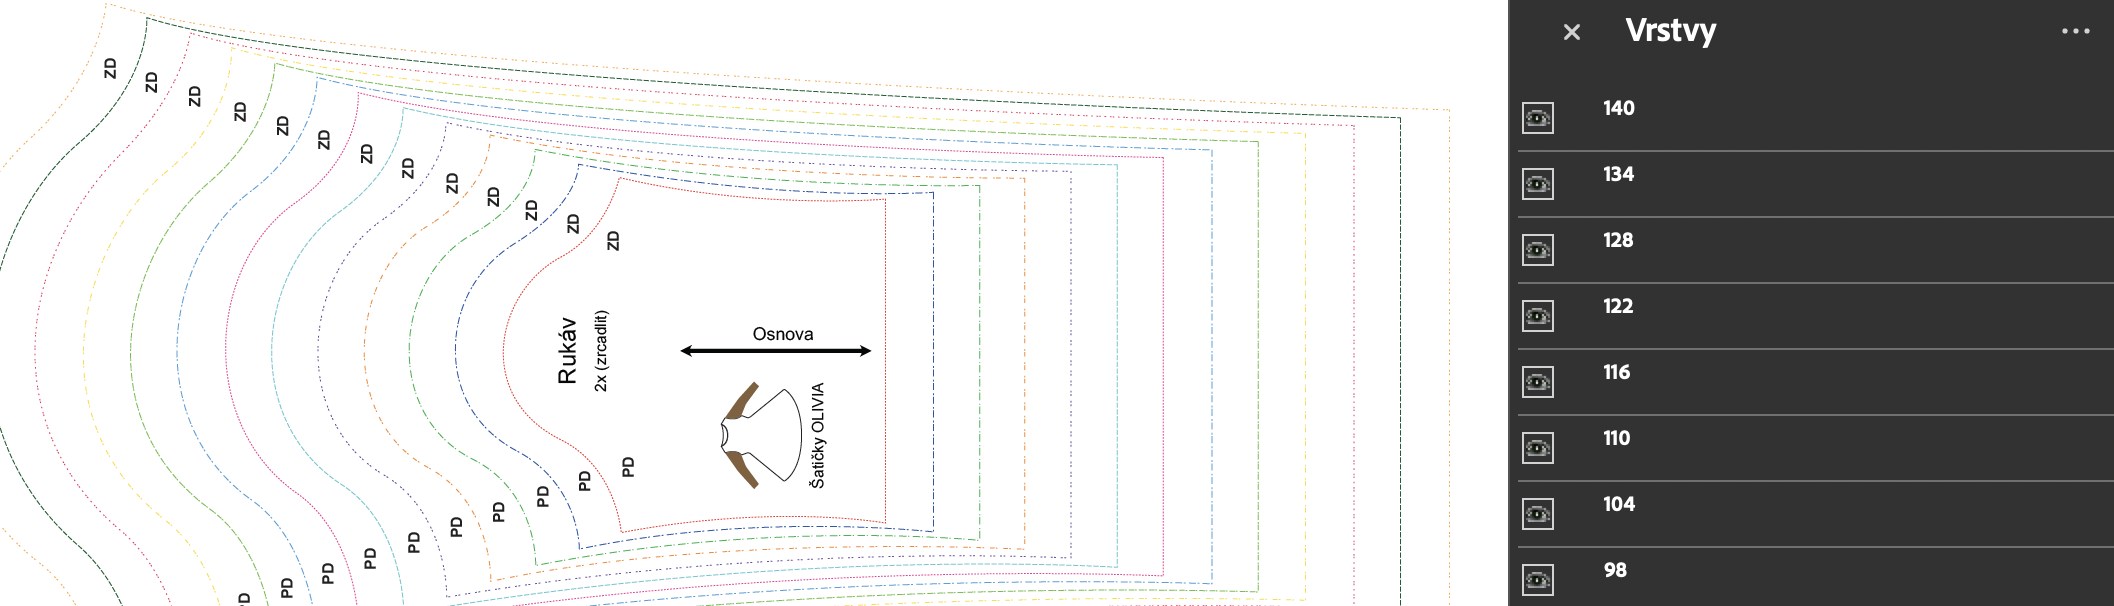
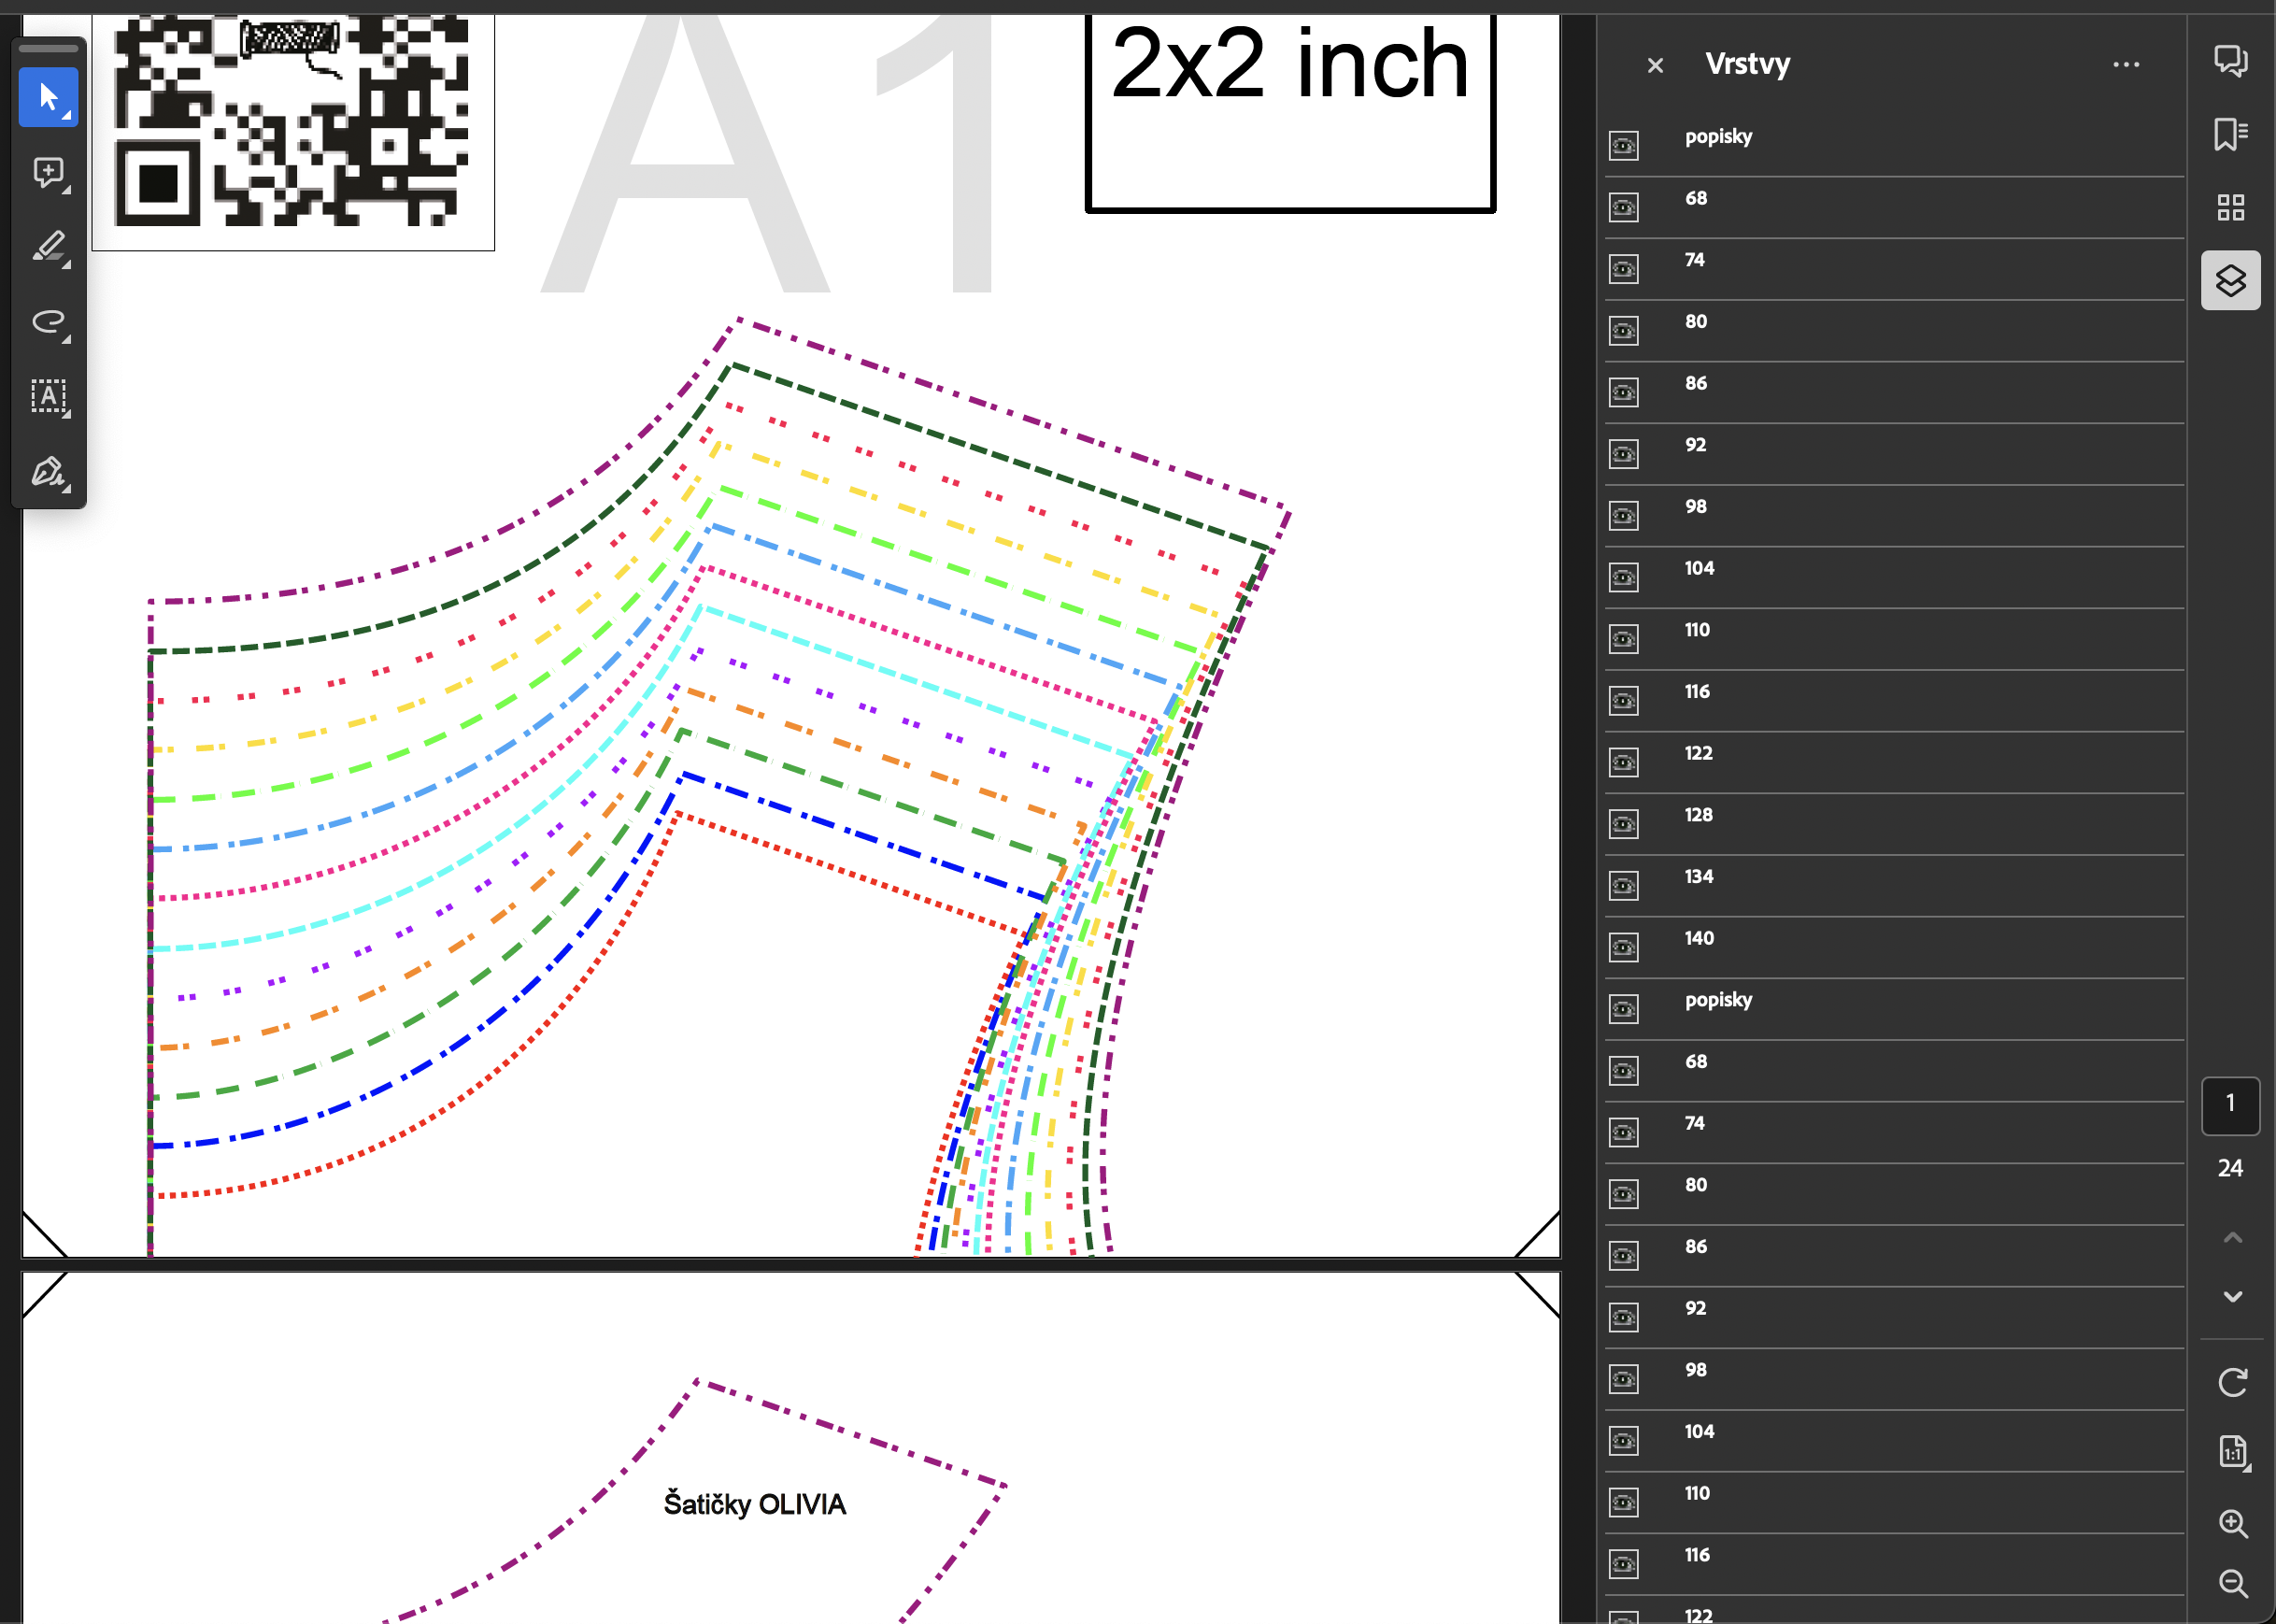
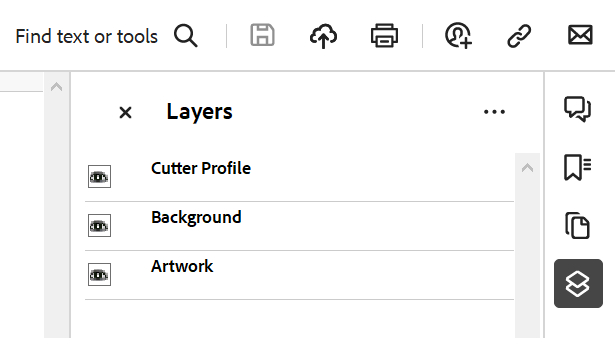
 Hello. I encountered very specific problem I can't find solution to. I am creating sewing cutting patterns. And I wanted to export the file with layers so people can print only the size they are interested in. It should work like this - you have pattern with multiple sizes and in layers you can choose which one you want to see/print. This was created and exported in Illustrator and works as expected. But when I try to export the same thing in AD, the layers on multiple pages are not linked - meaning you'd have to select the visible layer for every page of the document separately. You can see when I am in the middle of two pages I see all the layers of every page but it should be just one layers for all twenty something pages of the document. I also created super simple documents simulating my issue since I am not able to upload the screenshotted document itself. Is there any setting to make the "layers linked" across all the pages or is it something than can not be done in AD? Thank for any kind of help. A4 .pdf A4 Print Template.afdesign
-
 I have looked through the forums, the support pages, and watched a couple YouTube videos, but I haven't found the best method of accomplishing my task. In summary, I want to take a .jpeg image, and cut out the background of spaces outside the image, and inside the image. Then I want to export to SVG. I want the background of all the spots I've cutout to be transparent. With the methods listed below, my image cutouts are not transparent on the exported SVG. My image is a case. sample.afdesign is attached. I am using Affinity Designer V2 at the moment because I found the most documentation and methods around using this software. The methods I have found and tried are. using the pen tool to draw around the case, give the curve a fill, and then from the layer drop down I made it an erase layer. Visually it looks to do the job, but the exported SVG does not show that area cut out. I tried the Pixel Persona selection brush tool to select the portions of the background that differed from the black of the case. That seemed to work well until I got to the portions of the image where the background was very similar to the case. I had to touch up the edges / stroke with the eraser brush to remove the boarder. I found that I can use the pen tool to make a shape of a section that I want to cut out, choose invert selection to get the piece I want, but I am not sure what to do with it from there. From what I am reading, I feel like a need a method of making the shape of the area I want to cut out, make a mask, then delete the mask. Or flatten the mask and the image I am working with. I don't completely understand the usage of a mask, so I am trying to figure that out as well. If it helps, in the past I used fireworks to accomplish the task with the pen tool, converting that to a marquee, cutting out whatever was within the marquee, and making another shape. I refuse to go back to that. I bought the whole Affinity suite, so if another tools is more efficient I can go that route as well. Thanks in advance for any help. sample.afdesign
 -
 Hi everyone, and happy Easter! I record this tutorial on how to draw a Torus Eye mandala in Affinity Designer. I hope you guys find it interesting.
-
- 3
-
-
-
- affinity designer
- torus
- (and 3 more)
-
With all the hype surrounding Canva's acquisition, let's not forget it's Easter. Have a great Easter. Made with Affinity Photo, assets from @v_kyr.
- 5 replies
-
- 8
-
-
-
- affinity photo
- affinity designer
- (and 1 more)
-
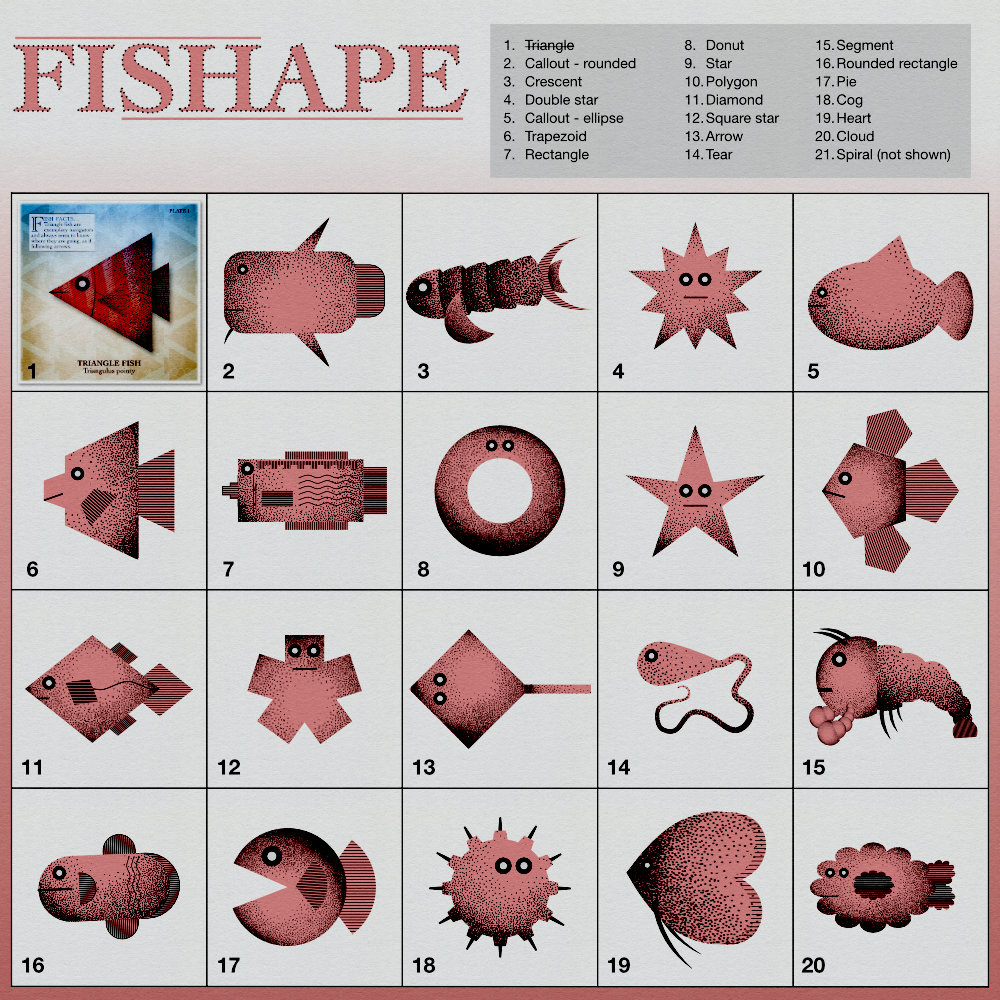
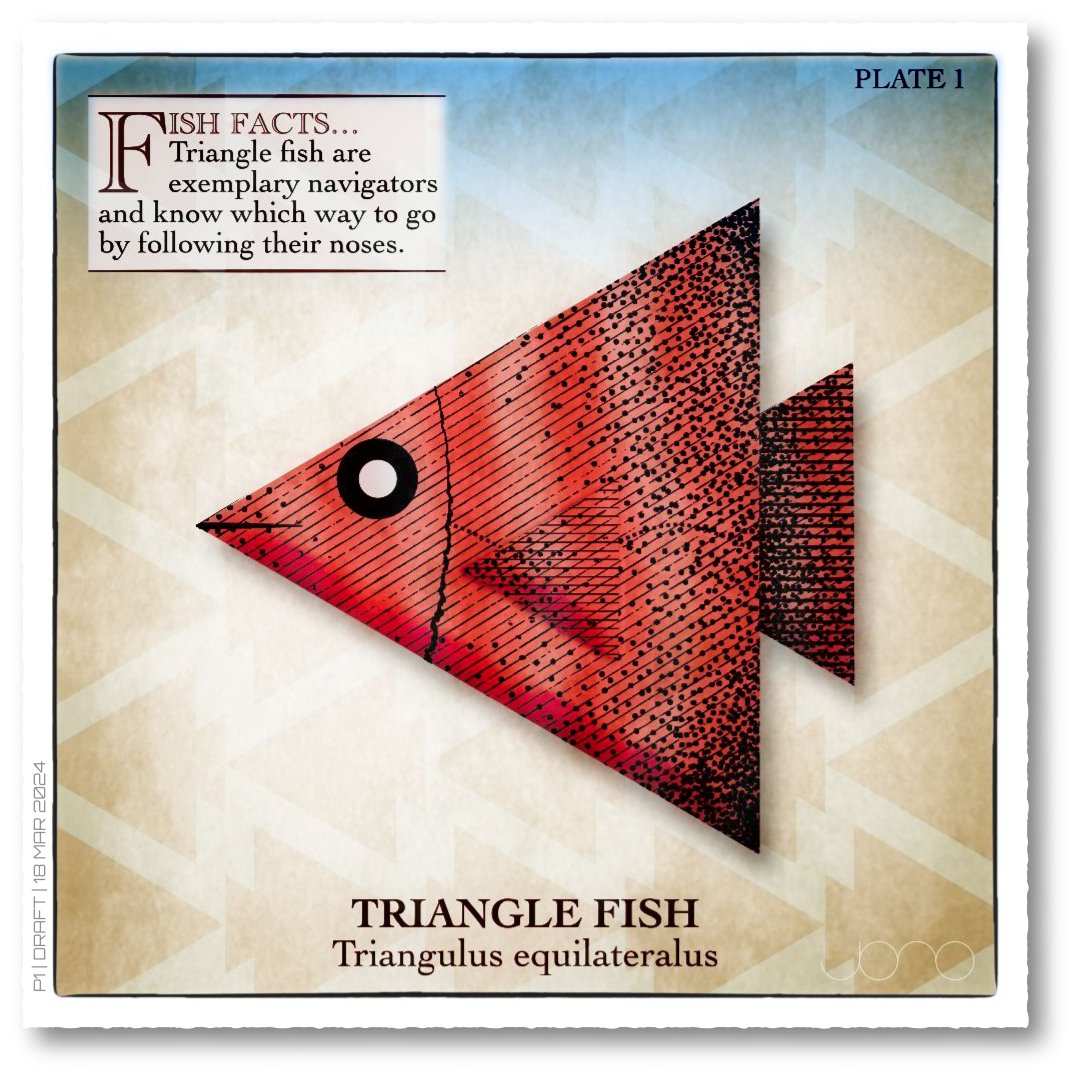
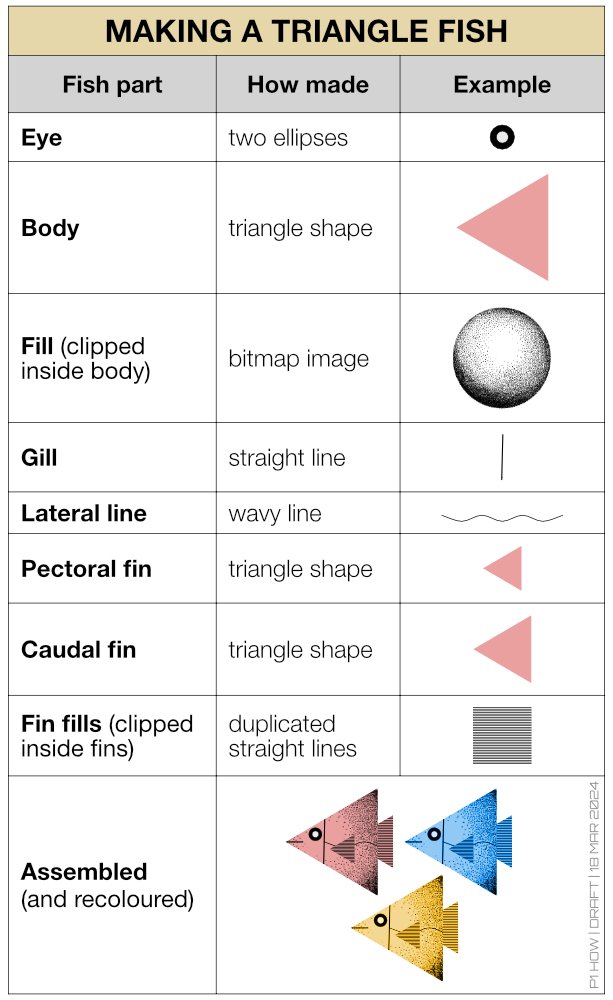
Hi all, I thought I'd give myself a quick project to explore Affinity's Shape tools and make a series of images. I've made some fish like creatures, but other themes could easily used, like monsters, faces etc. I was thinking this idea could help new users learn about the Shape tools and generally have some creative fun. When I get a few spare moments, my intention is to further embellish each shape with colours, different fills, backgrounds, text etc Note: the bitmap fill is from The Shizzle Style and Brush Pack (Grizzle 1), the paper texture is from True Grit Texture Supply (Folio-Vellum) and additional line shading is from Artifex Forge's Vintage Engraved Patterns (Pattern 6). Yes, I have splashed out on the Spring Sale offers!
- 8 replies
-
- 18
-
-
- affinity photo
- affinity designer
- (and 1 more)
-
 Hello! I am currently doing my trial on Affinity and it has a lot of things I love using. On designer 2 that is. I have used inkscape before and am considering the leap here but one thing inkscape had that I love was a create snapping function. It was so easy to get anything into place with it able to line of up things at angles. Like if I have a half circle and a line and I want them to connect, it was so easy to snap them into place as the nodes hooked onto each other with a snap! Now I am trying the snapping function on Designer 2 and it does not do that as I keep trying. Given this is professionally made with more money behind I have a hard time believing the issue is the program, but the issue has to be me. So my question is, how do I turn it so I can make different objects line up up and snap in place more? Like this example and even more ones where the edges of objects, even strokes, snap into place against each other and so on. Am I missing something as I played around with it and it just fails and I am certain I am the dummy here. Thank you for your time!
 -
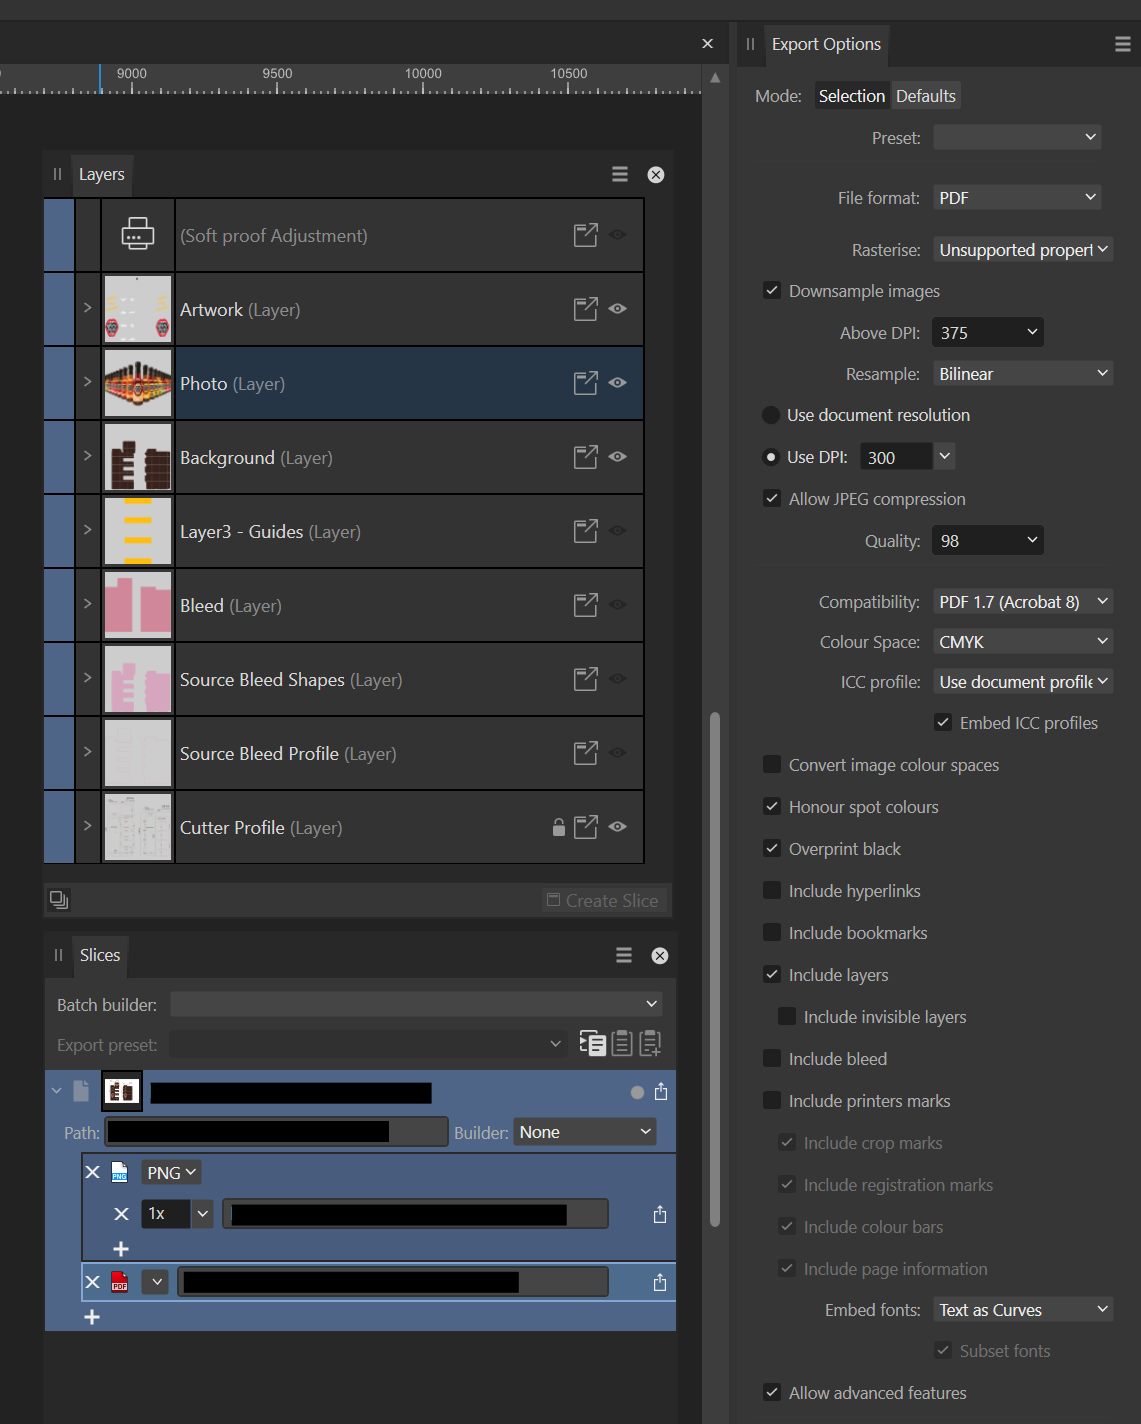
 Hi everyone, I'm exporting some artwork to PDF and I'm unable to export one layer as a layer. The results is that all but one layer export as expected and the contents of one layer appear at the top level and not as a layer. Here's the setup in Designer: And here is the result when opened in Acrobat Reader: The Photo layer is missing. The Photo Layer contents appear at the top level so this might not be a showstopper but I'm curious as to why it didn't export. Any thoughts?
-
 I made a tutorial all about Boolean Operations in Affinity Designer, have fun!
- 2 replies
-
- 2
-
-
-
- affinity designer
- boolean
- (and 7 more)
-
Hello designers, In this video i start from scratch using a pencil and pen, then take a photo of it and import it into affinity designer so we can make a vector version. You will learn how to trace an image with the pen tool and then create a background from all of the outlines and much much more. https://youtu.be/EYsoWbceM4w
- 1 reply
-
- 6
-
-
-
- affinity designer
- affinity designer 2.4
- (and 3 more)
-
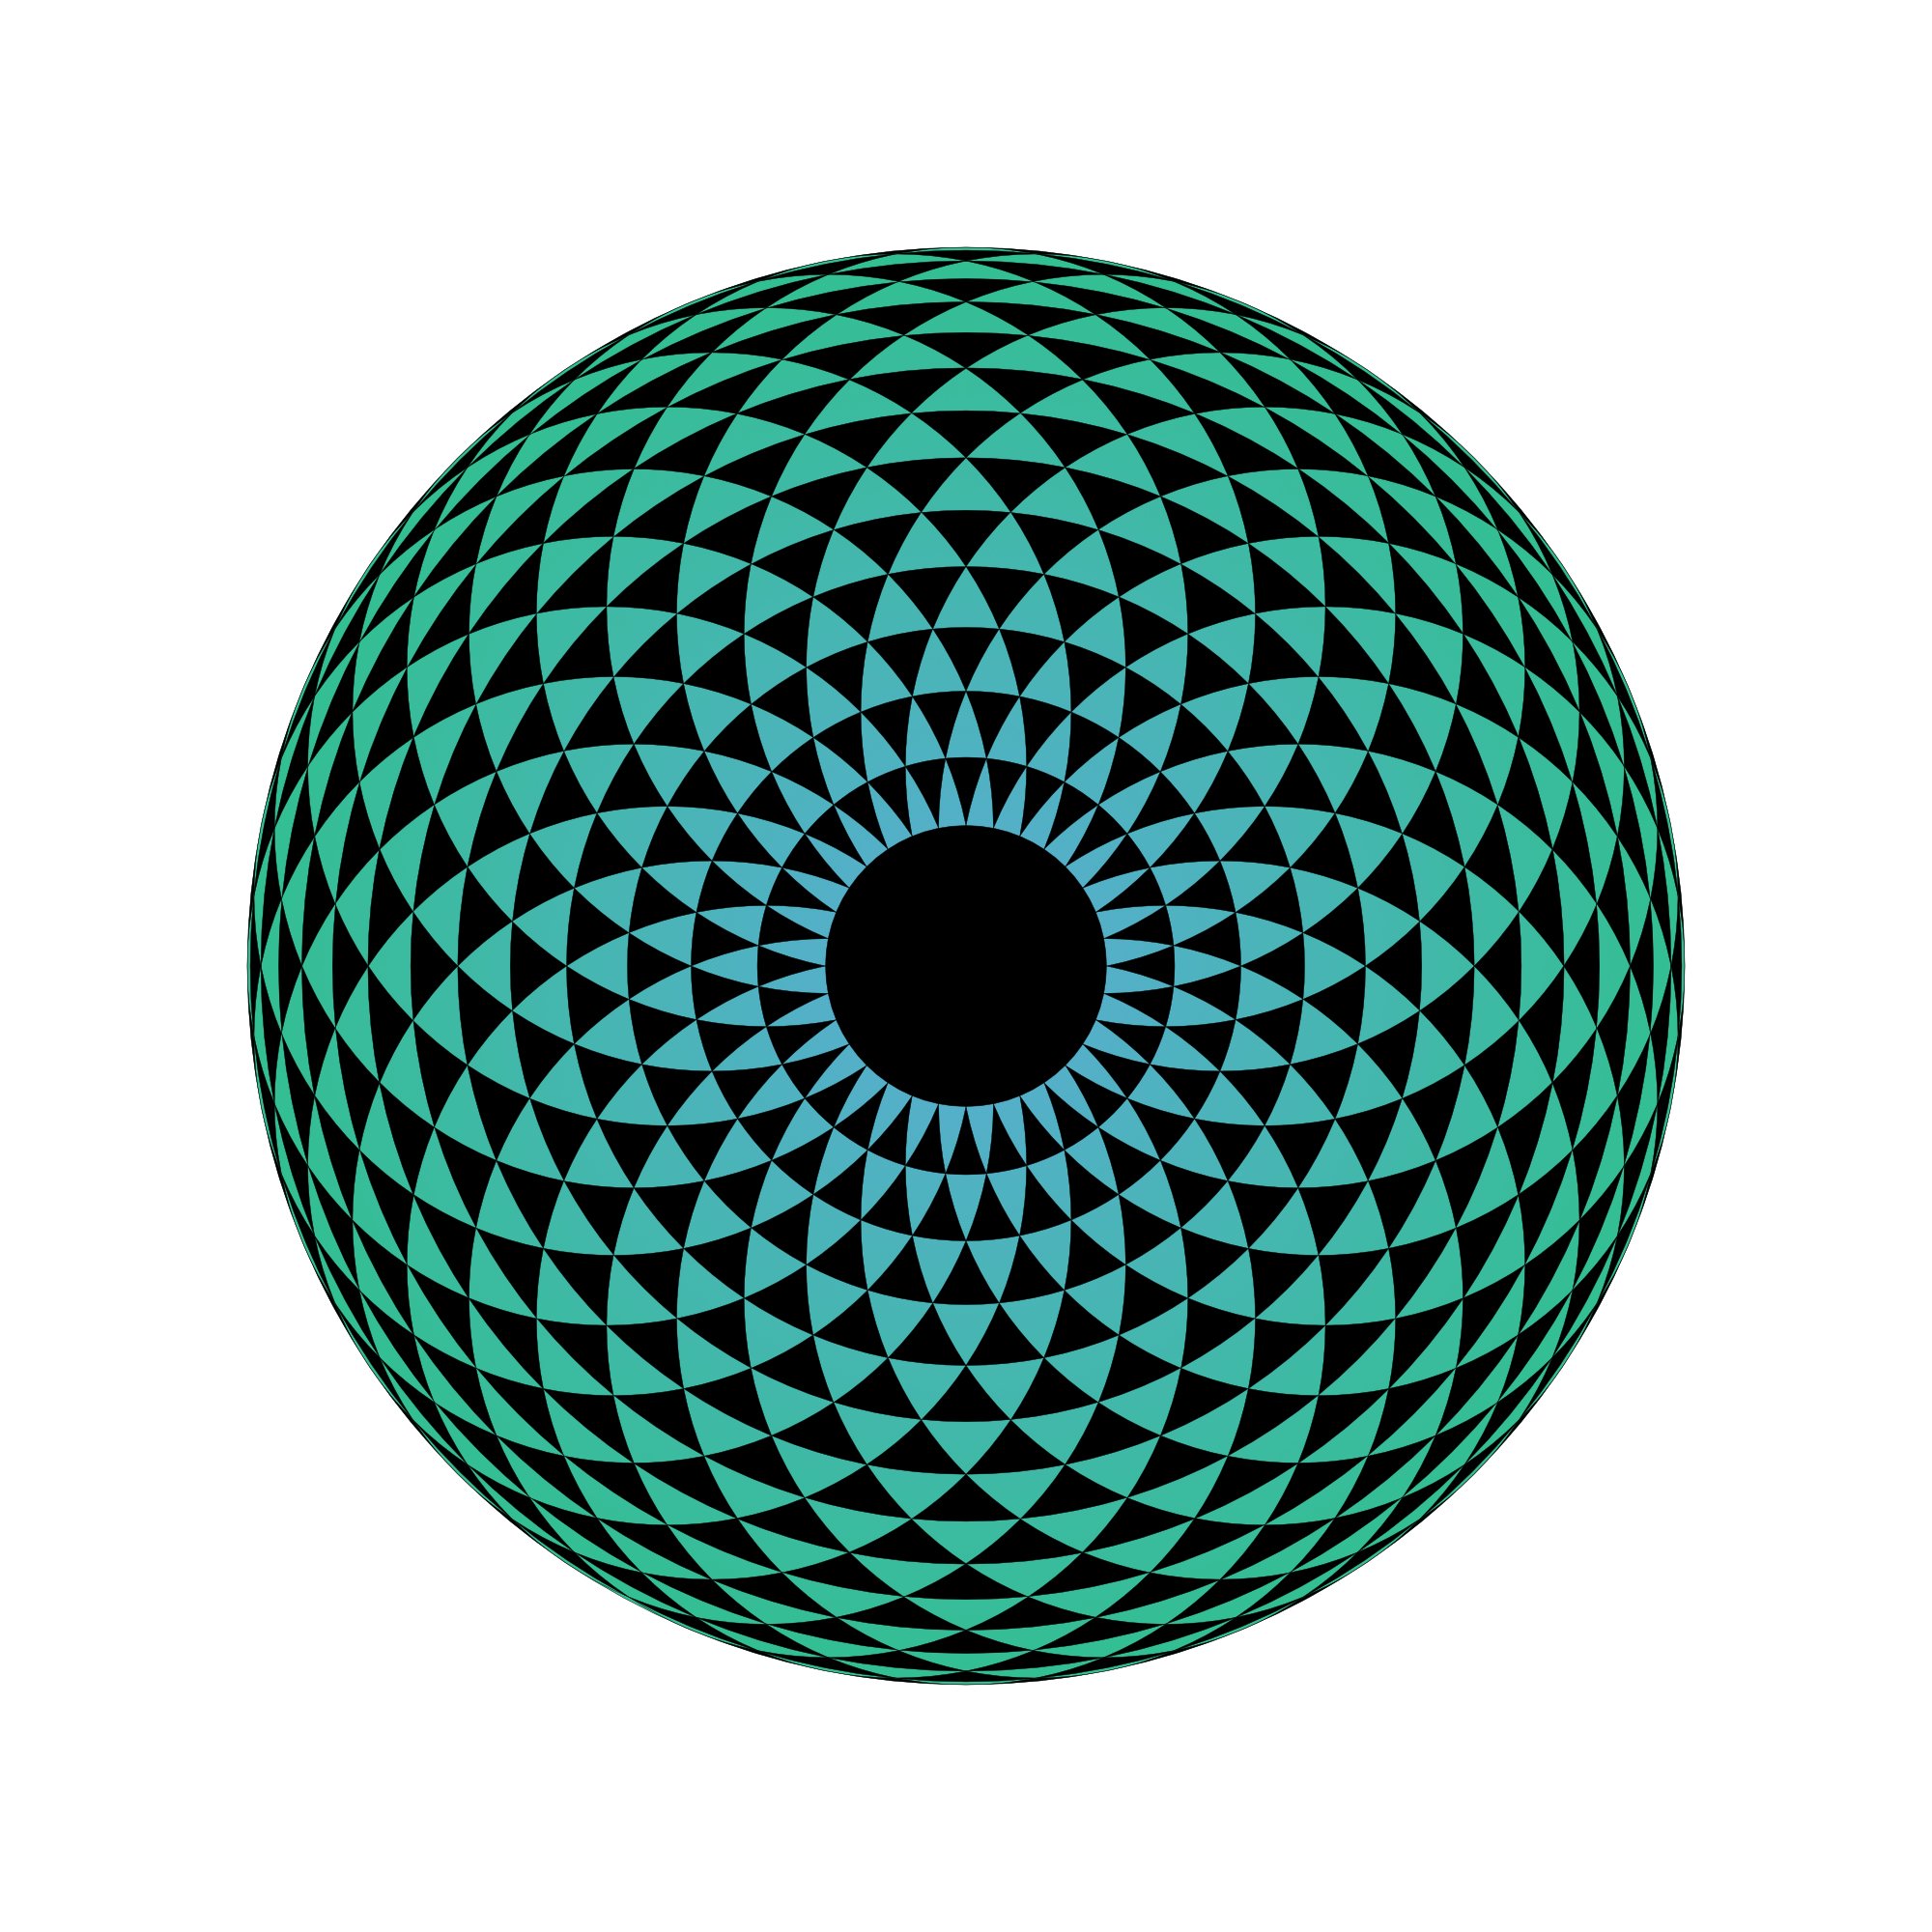
Hi everyone, I created this Torus-Eye mandala in Affinity Designer. It is really a labor of love, but I am satisfied with the result.
-
- 6
-
-
- torus
- torus yantra
- (and 2 more)
-
Authentically textured vector brushes for Affinity Designer, made from real crayon marks! Get our Wax Crayon Brushes FREE (plus other products) when you sign up for our newsletter. Find out more HERE! Your free download features: 40 high-quality realistic Wax Crayon Brushes Affinity Designer. A fully comprehensive instruction guide. Head to artifexforge.com and get them now! Head to artifexforge.com and get them now!
- 2 replies
-
- 2
-
-
- resources
- affinity designer
- (and 2 more)
-
 NEW TUTORIAL! - Learn How to Create a Neon Sausage Dog Design in Affinity Designer. Enjoy!
 -
Android tablet getting pretty good. And there is no combination in it if you add the affinity suite. There is no full creative apps in Android it would be amazing if we could have apps like the affinity suite. Thanks and I hope y'all think about it
- 157 replies
-
- 13
-
-
-
- android
- affinity designer
- (and 3 more)
-
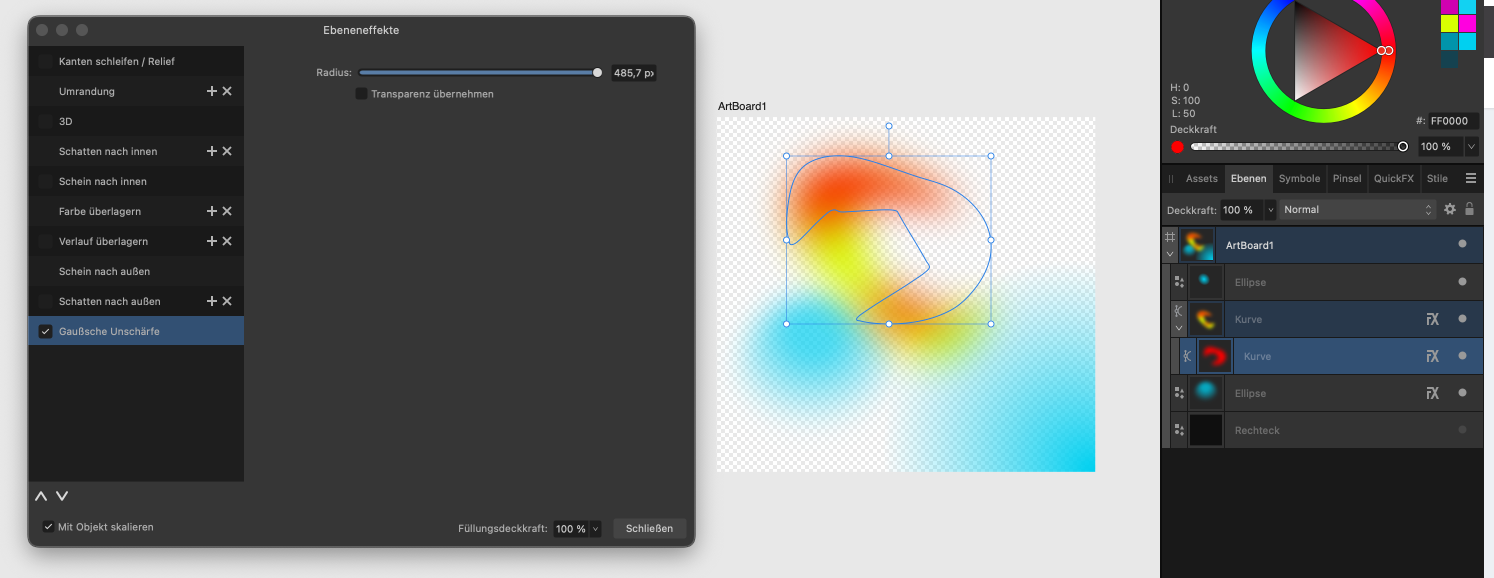
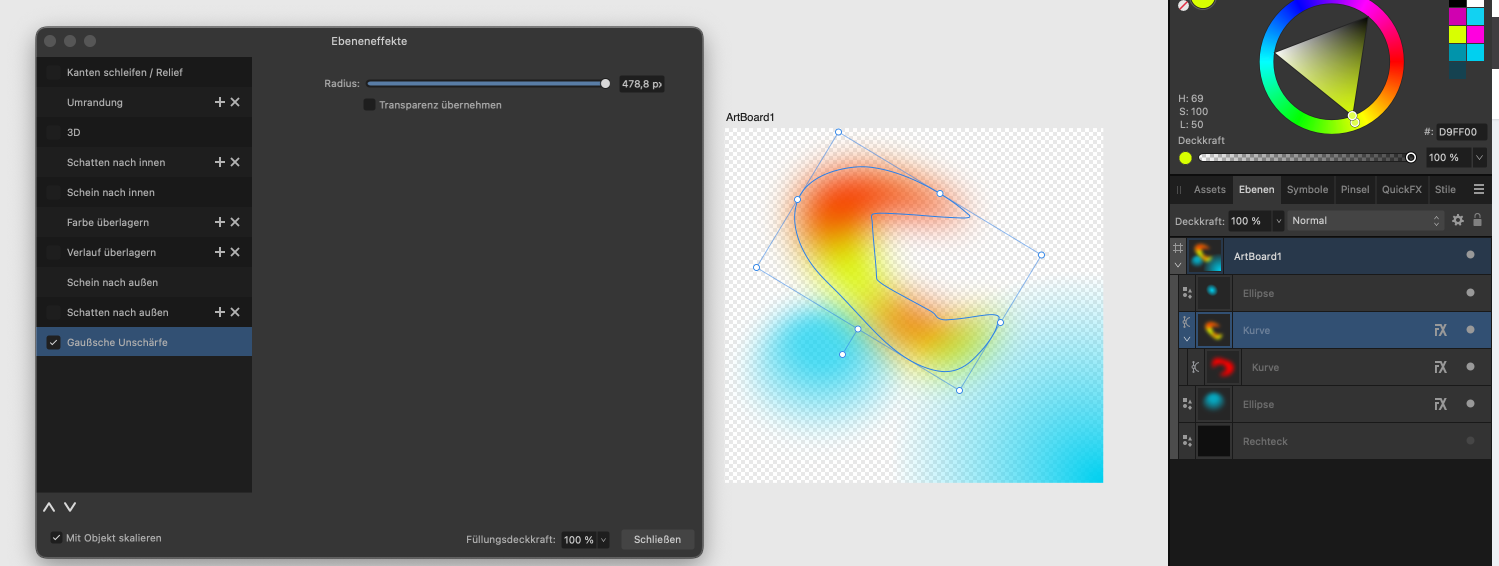
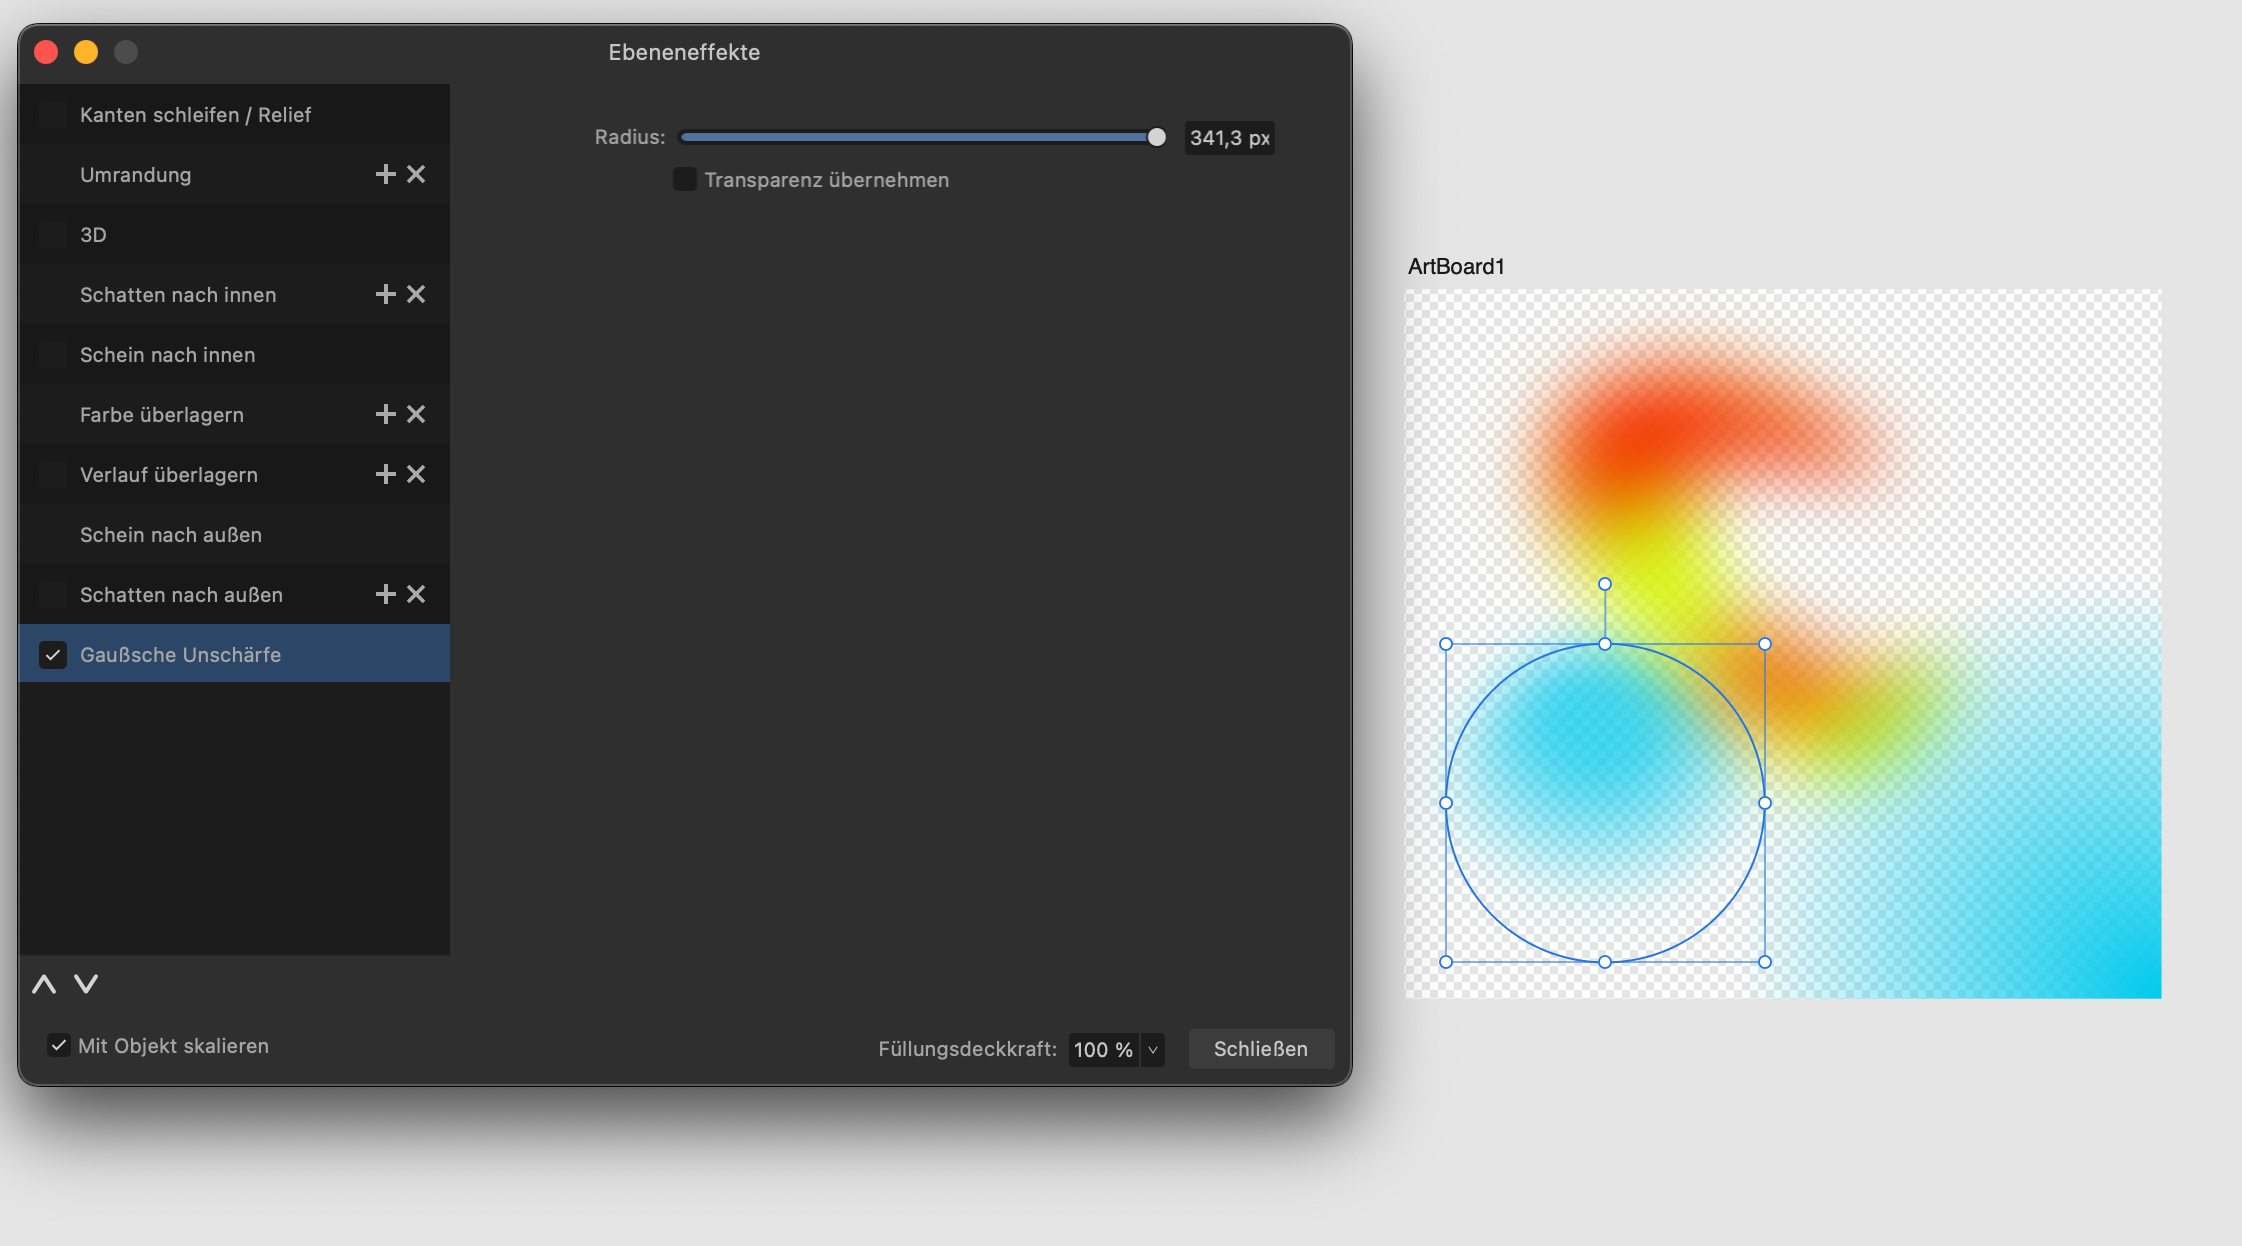
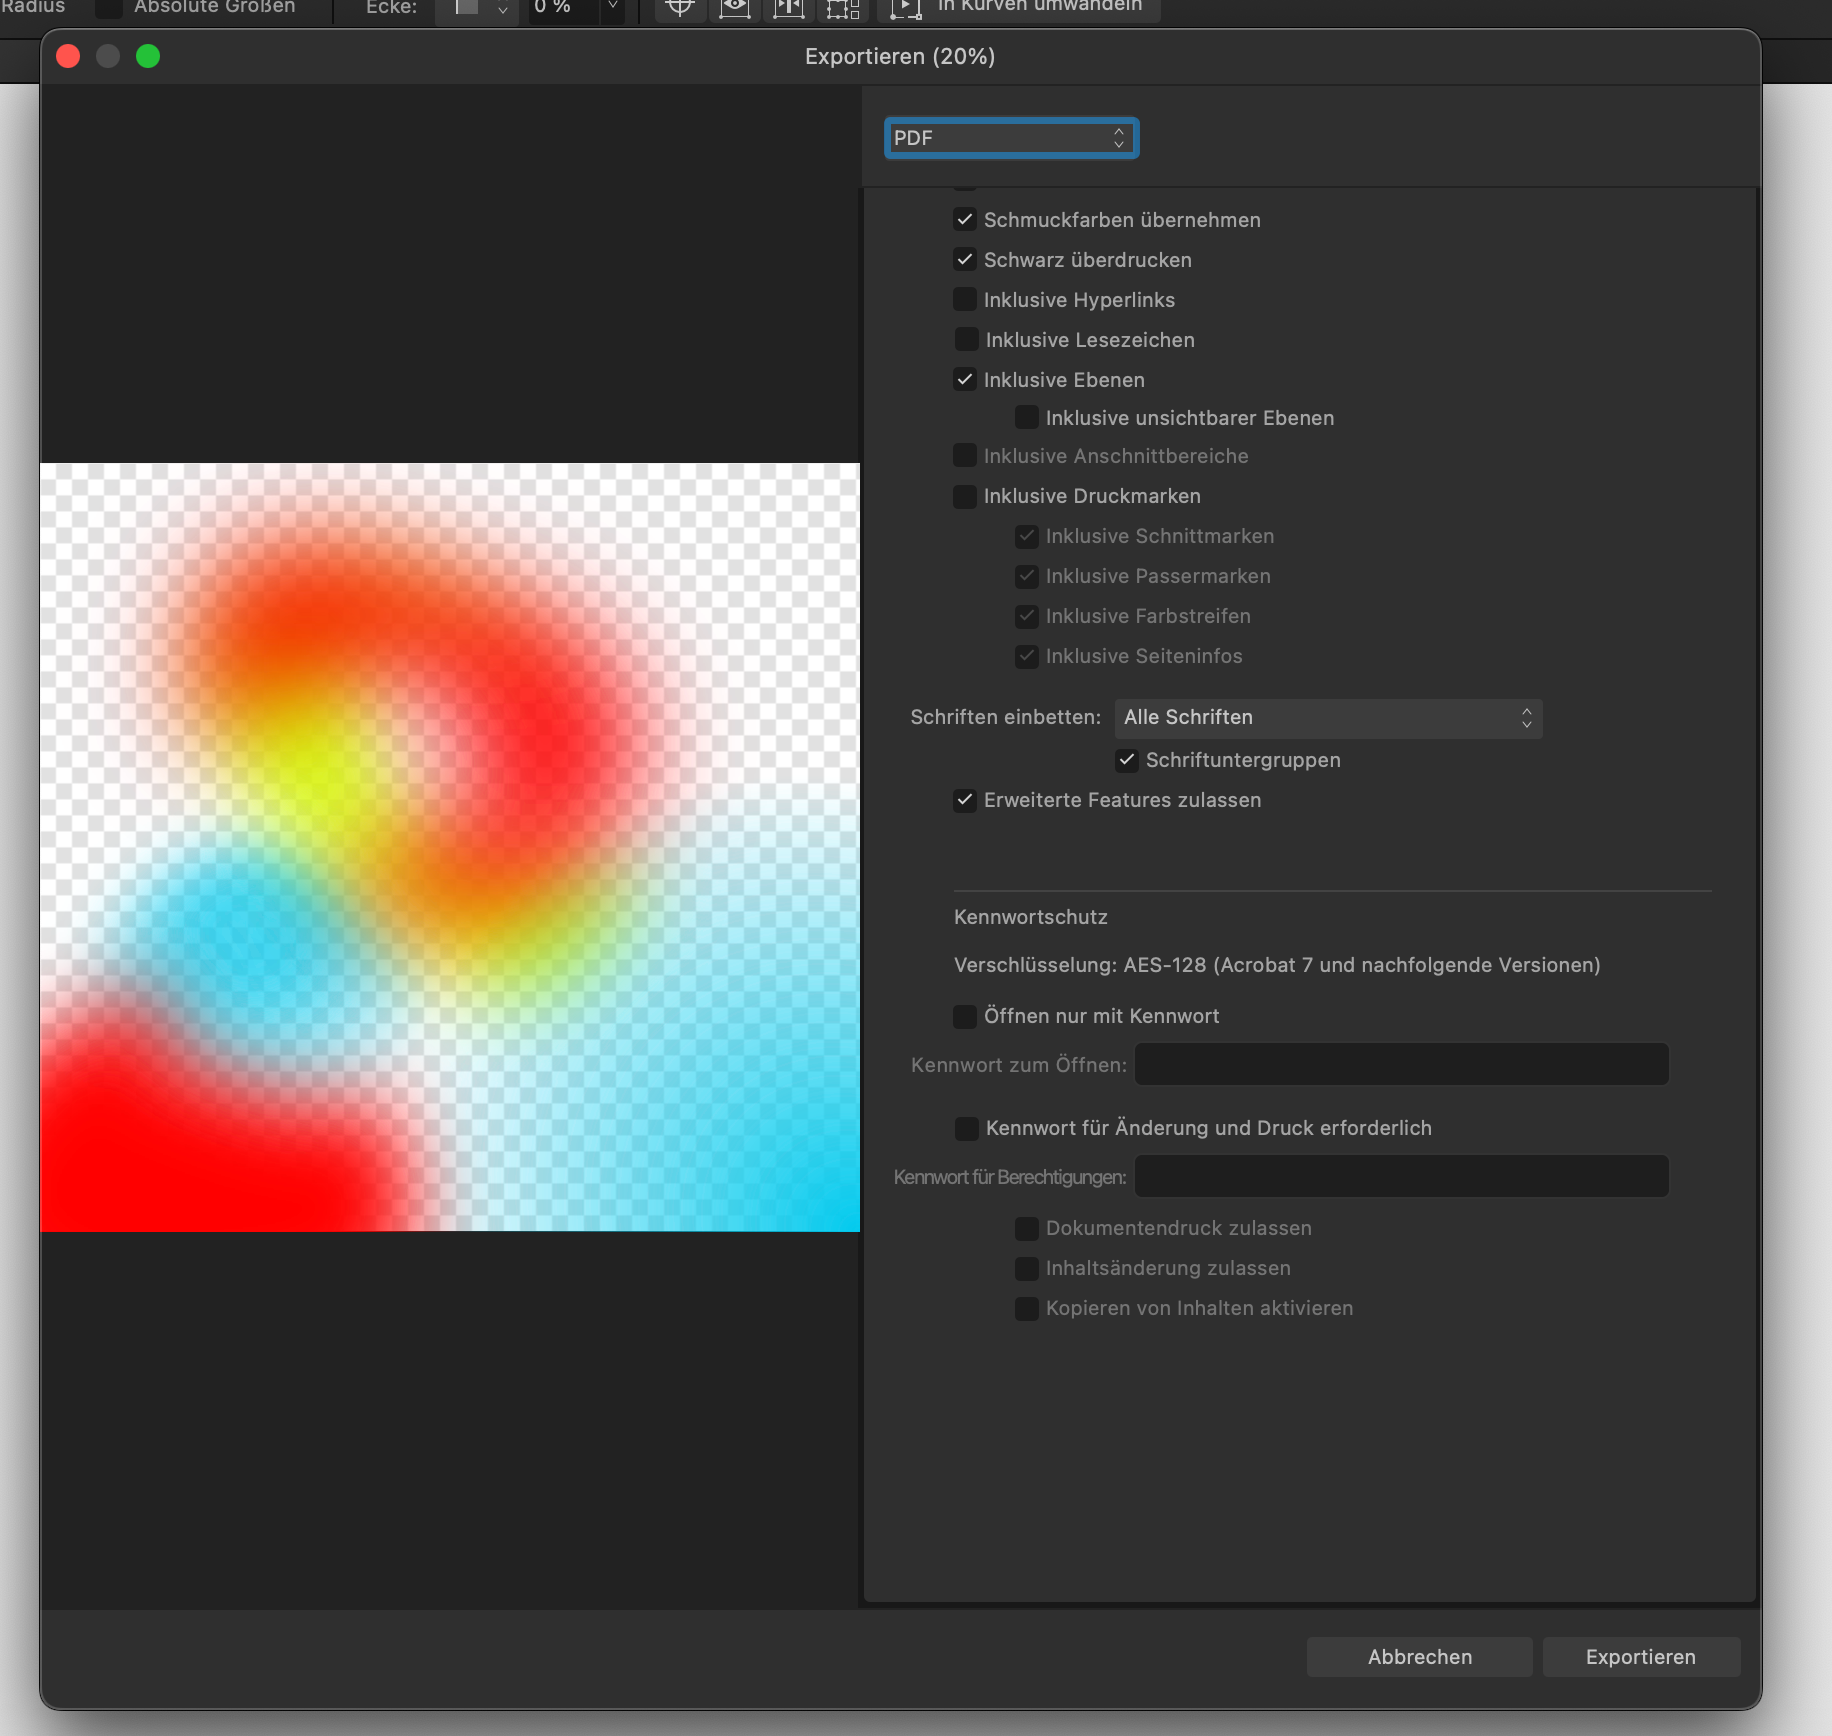
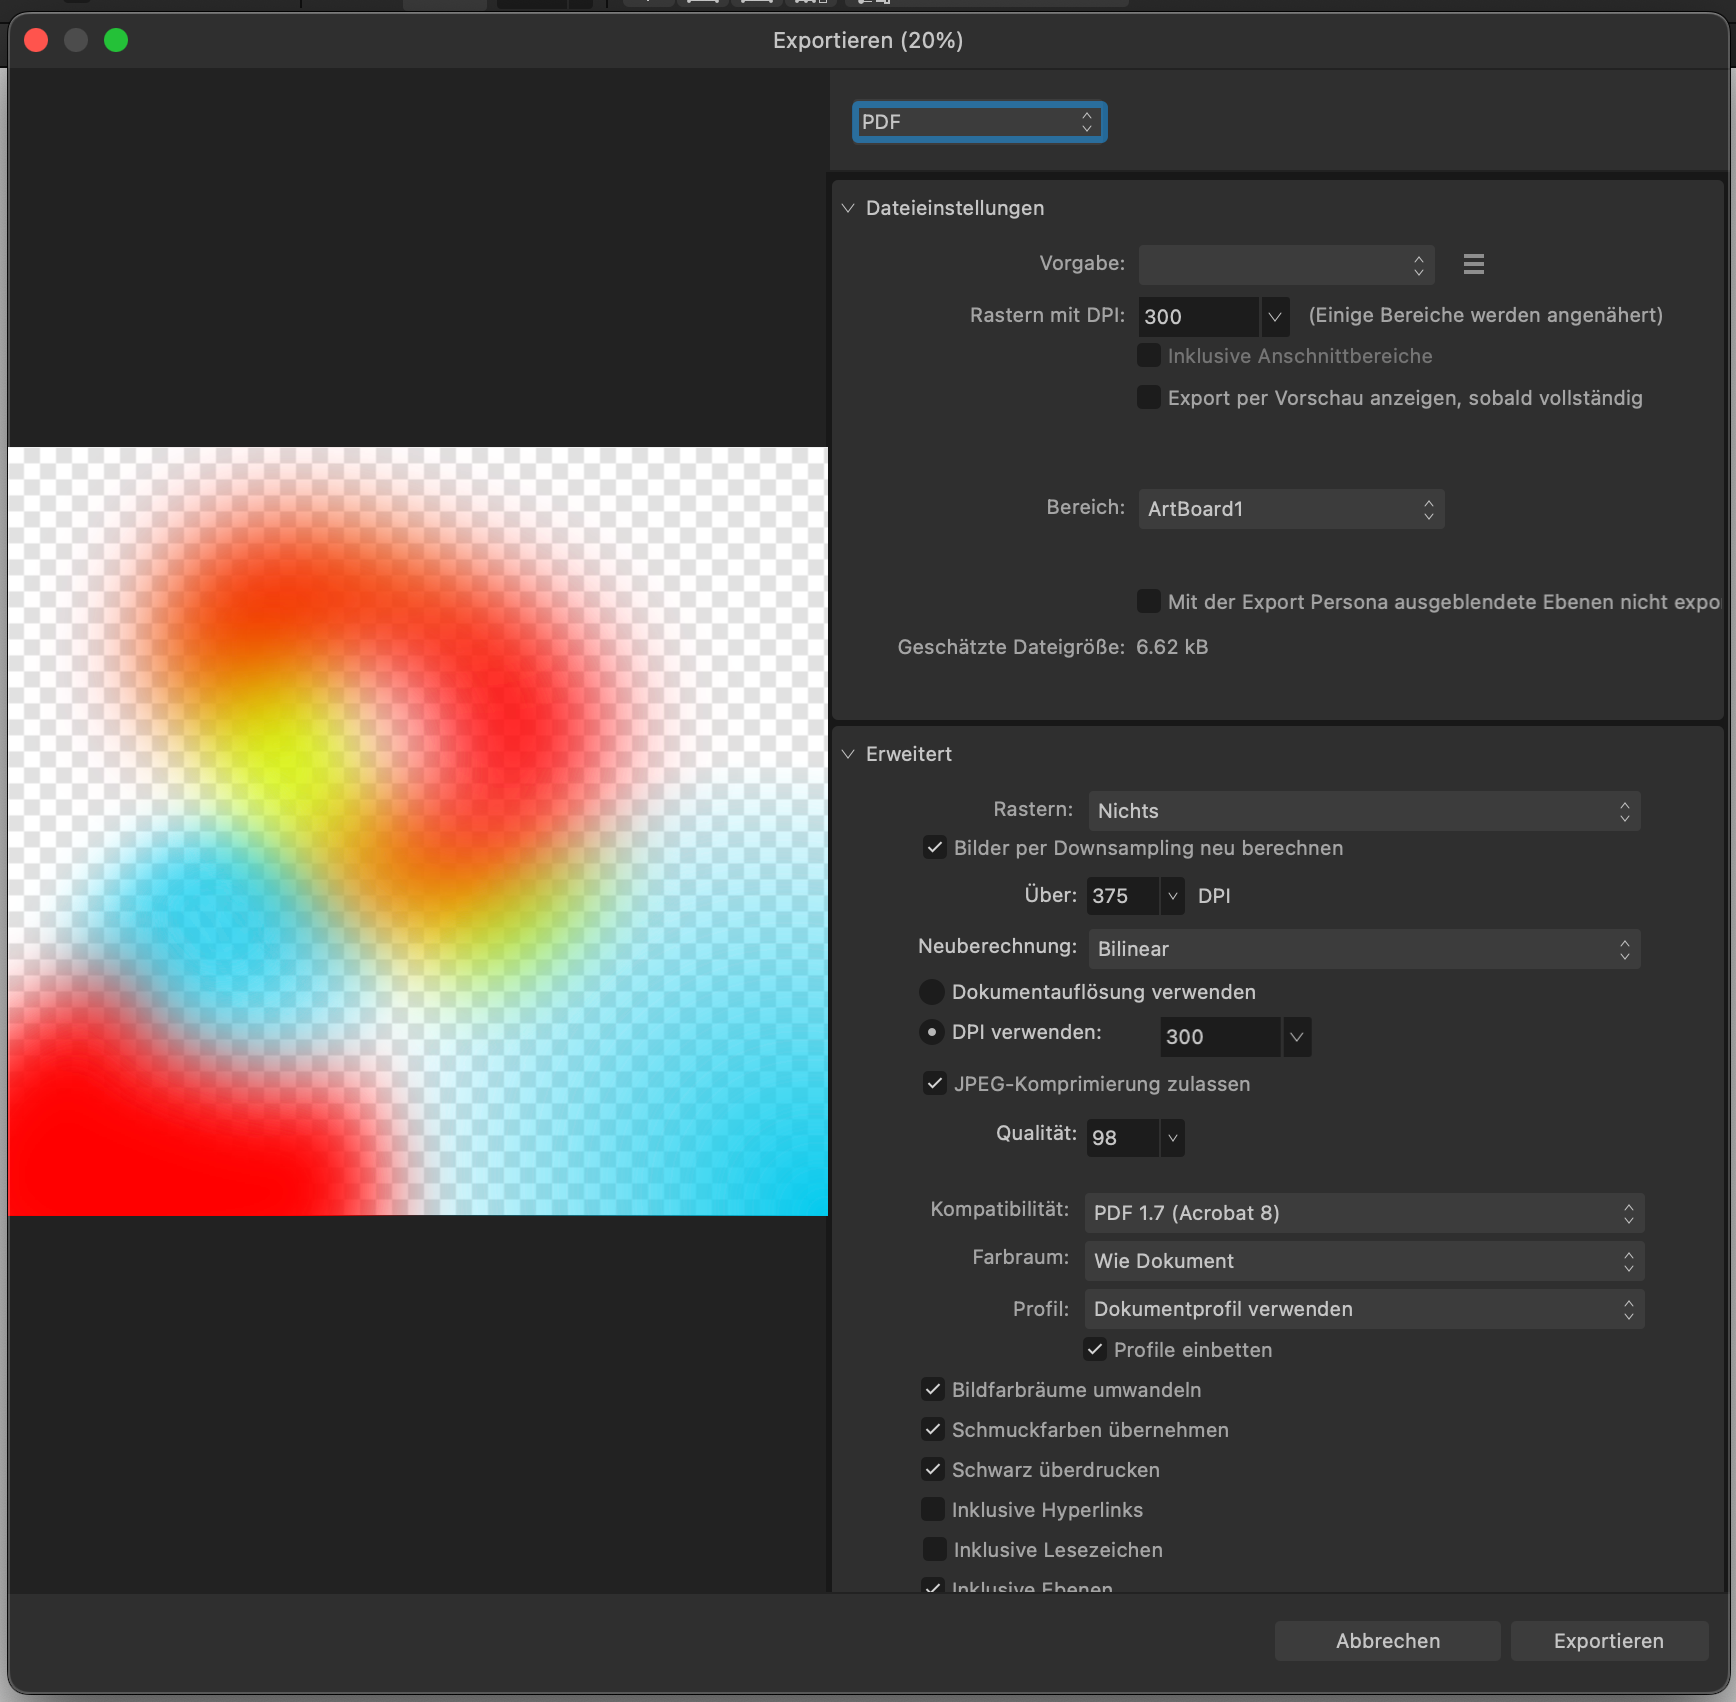
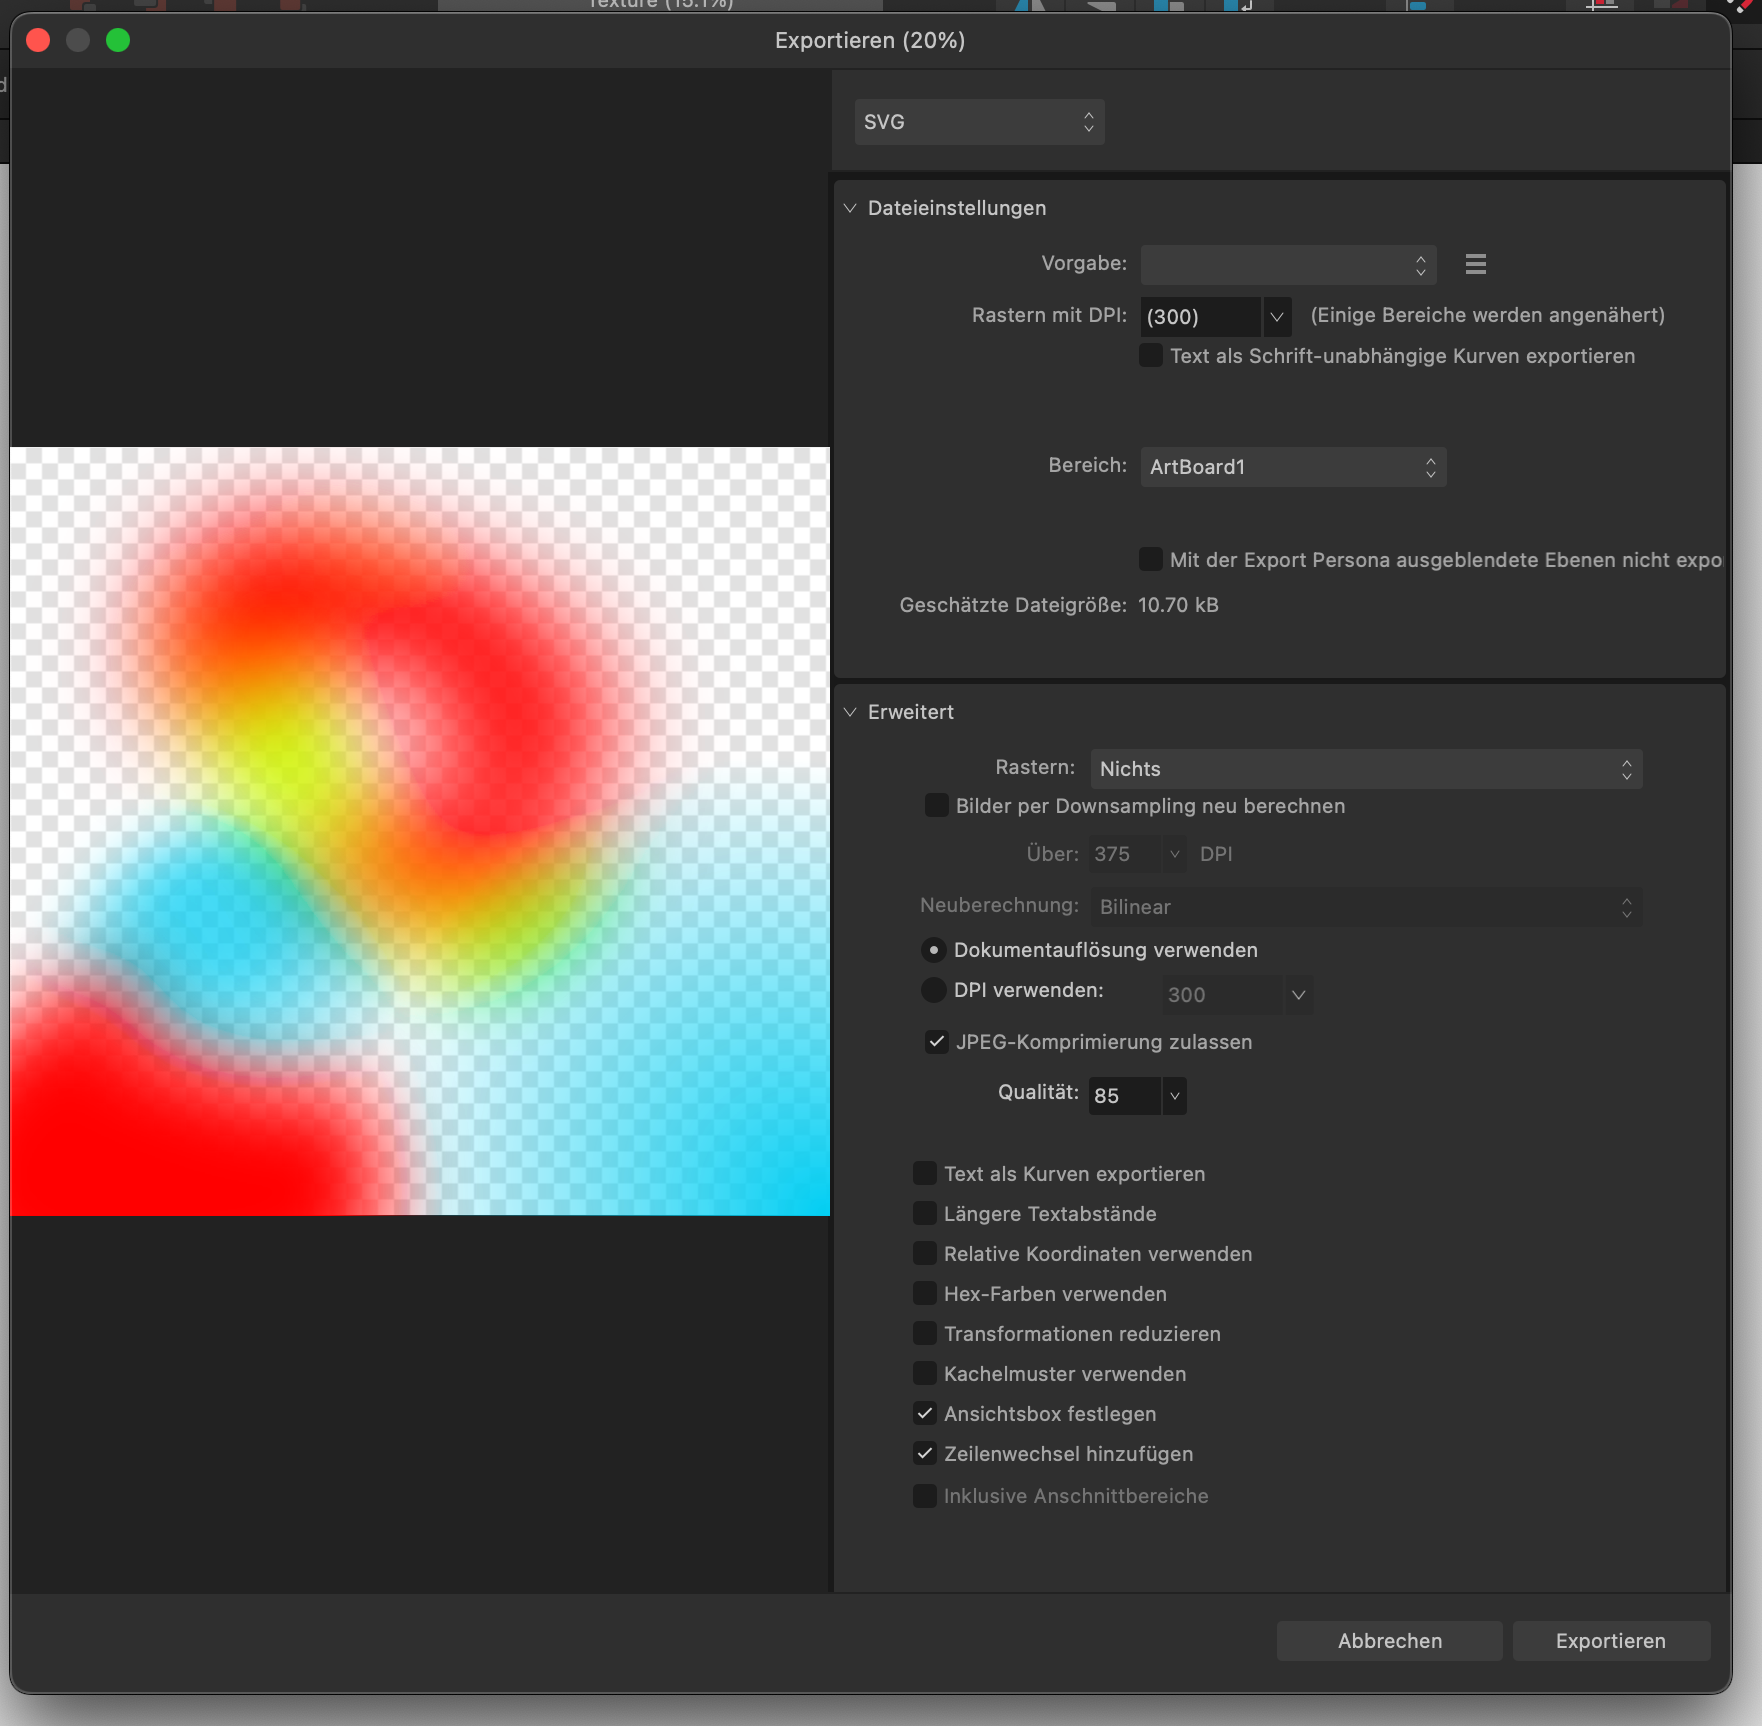
 I want to create with Affinity Designer a gradient mesh. In order to be able to define a brand specific texture, I am experimenting. The texture shall be used in Powerpoint slides but also on large prints like banners. So I must work in a way that it does not raster the image, because I want to scale it infinitly. Unfortunatelly you see in the Texture.pdf that the gaussian blur applied on the shape does not exist any more. Only the color gradients work in the PDF. If I export to SVG, then the gaussian blur exits. Also if I bring the SVG to Powerpoint and Export the Powerpoint as PDF, then the shape is blured correctly. So I assume this must be an export error in the Affinity Designer 2.4. Can you please help? I have posted the export menu screen shots so you may see whether any adjustment should be made, to get it to work. Thank you. Texture.pdf Texture.afdesign Texture.svg
-
 I’m trying to find an answer to this and can’t seem to, but I would hope there is one. I am using Designer 2.x on my iPad Pro and when I select a shape tool, such as the circle, and draw some circles, then click the selection arrow tool to move some things around. The shape tool automatically switches back to the square instead of staying on the circle (or whatever shape I had selected). How can I stop it from reverting like that? I want it to remain on the shape I was drawing with. In my Settings I already have “Synchonize Tools Between Documents” checked. Although, I wouldn’t think that has anything to do with this anyway. Additionally, how can I make the pen tool keep the settings I was using to draw with on the iPad? Thank you.
- 1 reply
-
- 1
-
-
- affinity designer
- shape tool
- (and 2 more)