Search the Community
Showing results for tags 'Mask'.
-
 Hi guys, I finally got into reediting in AP after a long time. I know the questions thatfollows have been answered before, and trust me I searched in the forum but to no avail. 1-So the first one would be, keyboard and mouse shortcut for increasing and decreasing brush size, as of right now no combination of strokes seems to work. And no, left and right bracket keys are no viable option nor do they work on an italian layout keyboard 2-the slice tool in export persona: I do post images on instagram after having them resized to 2048px on the long edge, so for pano I usually use the clise tool on PS and make say a 3 slice off of a pano that has been cropped to 3:1 and export them, so that I can upload them as multipe images to instagram and retain the pano. How do I do that in AP? it seems that the slices are only there for free and rectangular slices...any way to tell AP to slice my document in 3 equal part vertically and export them? 3-Copy one layer mask to another layer/adjustment layer, how do I do that? 4-when I have something selected and marching ant areon, how do I flood that selection with back or white? (on a layer mask) 5-I do like lthe stack option for files I already have on my HDD (I don't know what, but it's freaking stupid fast with 16bit tiffs), but let's say I have 4 layers in a document that I want to align, do I simply select 'Live Stack group' from the arrange toolbar? since it does not give me the option to align layers i am skeptic It'll actually align them PS. I am using English as a language even though I am using an italian layout keyboard. BTW, thanks AP team
 -
 Hello, having masked a layer. Now I want to edit the mask more detailed. Therefore it might be useful to see the image / background instead the white background of the masked layer. is it possible to see the mask and the image?
 -
 Quick and simple question guys... What is the best/most efficient way to reduce the outer dimensions of this document, while MAINTAINING the size of the logo image within it?...masking?...cropping? Not sure what direction to go. I attached a copy of the file for your viewing. My desired end result is a thin border around the outer edge of the white curved corner portion of the logo. Thanks! -Christo (sorry for all the newbie questions) @christovw66ComebackROUNDEDprimary2.afdesign
 -
 I don't have time to search entire forums or the interwebs to see if someone else has ever suggested this feedback before. So I offer my apologies if my suggestions have already been covered. 1) Please can you provide a feedback function WITHIN the application it self. It's incredibly frustrating to have to use out dated methods of signing up to god-awful web-forums which just leads to nonconstructive replies of un-thought out opinions and arguments. It also allows you to correctly link feedback (and abuse) to the software license of the user and even categorise the feedback so you can easily see which areas are causing most concern to the user base. 2) Please can you fix the mouse icon when painting in masks in the develop mode. The standard OS mouse icon does not feel accurate to paint with. Also a nice to improve if possible: Painting often feels sluggish to see the red tint forming. If there is a way to make this feel more responsive without upgrading an existing 32GB RAM I7 processor machine, that would be lovely please. 3) Cropping in Develop mode is missing an "ok" or "finished" button. It's frustrating to be sitting back with my tablet, controlling everything then having reach over to the keyboard which I moved to one side, just to hit <enter>. I don't want to map the enter key to my tablet device as it's never used for anything else! if you simply put a button in the UI it will mean I can just move the mouse there and click! perhaps I've missed a trick that does what I want, but then that would mean it's not obvious and intuitive to the user. 4) Please update the flash function for uploading files on this forum. Who runs flash in 2017? Browsers auto block flash from running by default because it's nasty. 5) More of a question then a suggestion, but is there a way to rename the overlays in the Overlays tab in Develop mode? I have 3 gradient overlays, all with the same name! that's very confusing to simple minds like myself. 6) Although I generally hope you spend more time fine tuning what you have already developed, instead of just rushing out new features, it would be nice if there was an in-application function for browsing image files, with a nice big preview of the image and EXIF data, which you can then double click to open it in the develop mode. I don't think anyone wants all this "importing" and cataloguing rubbish which is very slow. But browsing files within Affinity with a UI that suits photographers that windows/macOS don't offer, would be a great win. Thanks for your time.
 -
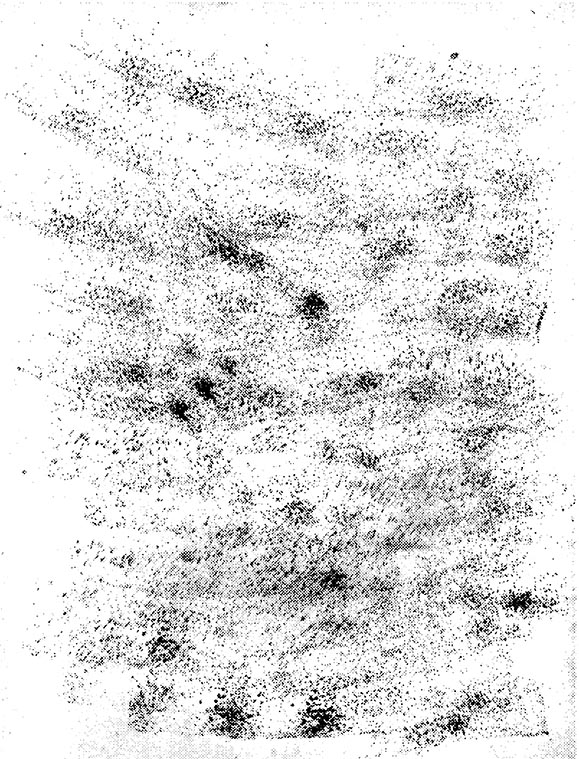
We need a way to use black and white images as a Layer Mask. I am trying to use some grain/noise images as a matte, but my final image needs an alpha channel. Currently, I have to use PS to convert my BW images to an image with an alpha channel to use. The workflow isn't very convenient. I have attached the type of image that I would like to use as a Layer Mask. You can see that creating a selection from the image would be impossible.

-
 Hello, I have a question regarding the "Apply Image" function. I saw a tutorial where Apply Image was used in Photoshop to change the mask of an image to become the source image but as a mask (so just the dark and bright information). It was used to blend multiple exposures together. Is it also possible with the Apply Image feature in AP, or is there any other option? I hope it is clear what I mean, because I find it hard to explain. Thanks in advance :)
 -
 I have a B&W pixel layer that I have converted to a mask layer and put inside a live adjustment layer. I decided that I want to boost the contrast of the mask after I had put it into the live adjustment layer. How do I do that? Preferably non-destructively such as adding the Levels adjustment to the mask for more control. If not possible I'm still happy with a destructive method too. In Photoshop I just ALT+CLICK on the mask to make it active and then CTRL+L to adjust the Levels of the mask.
 -
 In the hopes that someone can use this. I had trouble figuring this out so i want it to be available to anyone who needs it. https://youtu.be/l3W8zz94DEA
 -
I would like to have the ability to use an b/w-image as mask for a layer without first converting it to a mask layer. Editing of a mask should be possible with mask as colored overlay, so I can easily see what I'm actually doing.
-
 Hi humans I've just recently purchased affinity photo. I've never used any sort of photo editing software in my life. I am trying to separate a very detailed and complex drawing from its paper backround so i can edit from there. Its black ink on white paper. I have attached photos of the drawings to better understand. I have watched plenty of videos which explain how to do it in photoshop, but none in Affinity Photo. I started watching the tutorials that are supplied by Affinity, however, I am not aware of which tutorials would specifically benefit me for this project. from what i understand, a lot of the work done should involve masking, white and black adjustments etc.. ANY help would be greatly appreciated. I have little to no idea on how to go about this 001.bmp 002.bmp
 -
 I imported an openEXR image with a bunch auf b/w-layers (Object buffers from C4D) into Affinity Photo. I tried to use them as mask right away, but that didn't work. Instead I have to "rasterise to mask" each one of this layers. The resulting mask layer can be used in the expected way. There is no hint in the help what "rasterise to mask" actually does. (To be honest, there isn't even a topic about that.) What are the properties that decide whether a layer works as mask or don't? edit: It seems that b/w-images generally can't be used as mask in version 1.5.1.54 anymore...
 -
 Hi Guys, It might be me but I can't figure out how to use masking effectively. Here is a picture to illustrate my problem with it: As you can see the masking is applied but instead of taking out the window it takes out the whole building. How can I invert this? I have searched the forum and the vimeo tutorials but can't seem to find it. Thanks for the help, regards
-
 Is it possible to destructively apply a later mask so the export only has the lines visible on screen? Here is why: I've been playing around with topographical maps, a laser cutter and wood veneers. Starting with USGS vector data I've separated the 10' topo lines for the area around my house. I've laser cut these lines on wood veneers and glued them up to build a 3D map of my neighborhood. Its pretty cool, but I want to etch the rivers/lakes and roads too. My design has ~30 layer groups for each of the topo lines and a layer group with the water and roads. I want to generate 30 layers for each of the of the layers to be etched. To do this I want to mask the water and roads layer with a pair of the topo layers. Visually I can do this by creating a mask of the two topo layers and applying it to the water and roads group. However, this in only on the screen. When this is exported lots of other lines come through. I've done a few layers with the Intersect, and Divide commands, but it doesn't work with a multi curve group. IFNY-sort-redueced.afdesign
 -
Hello, need some advice with refining selections and mask layer. - After selection with the selection brush I saved the selection as mask layer. But the mask isn't within the background instead it will be a separate layer. The tutorial "refining mask" shows the mask within the background layer (3.12 minute). Of course I can drag the mask layer into the background layer. - The tutorial shows with right click "refine mask" I can again edit the mask layer. Tried it with CTRL (I have no right click option with the apple mouse) a menu open but "refine mask" is not there. Thanks
-
Currently exporting masked objects as SVG causes the objects to become rasterized. Disabling rasterization altogether when exporting will cause the mask object to end up visible in the result. Why is this? SVG supports masking after all. Clipping seems to be supported so why not masking?
-
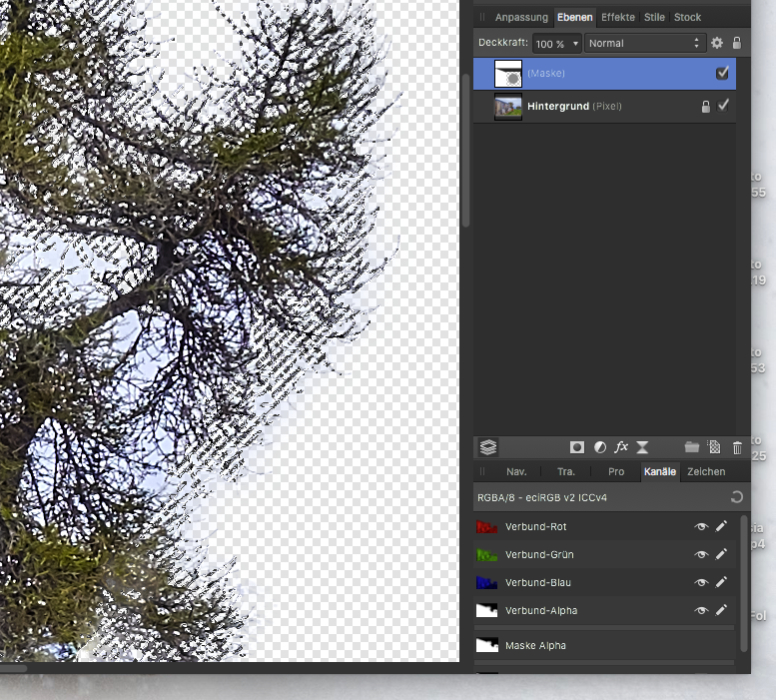
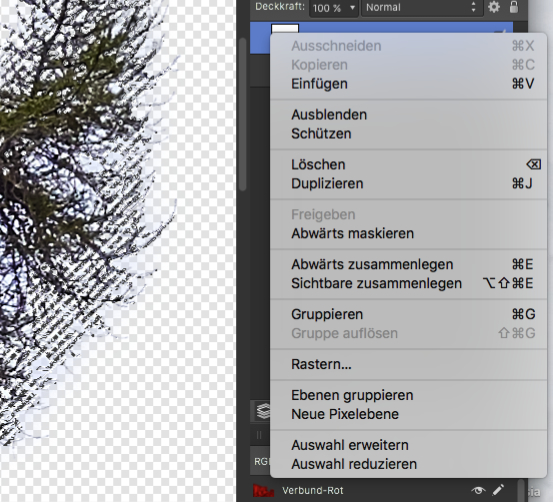
 I am compositing multiple layers, using masking to control the visibility of lower layers. I have a really simple example, but I see that there is a transparent or white fringe around the main shapes where the colours of the lower layer do not 'meet' the higher layer. I attach a snapshot of the image issue and also of the layers tab. the main shapes (flowers) have themselves been created by selection or eraser to separate them from a background, and they sit on a transparent background. I figure that I am doing something simple wrong, although I have watched the relevant videos (I think!). So would welcome tips to rectify.
-
 Hello, I'm a newbie to Affinity designer, and pretty much any vector design, so this may be quite obvious. I have made an object, and want to draw more stuff on that object. However, I want everything I draw to be automatically cut off at the edge of the main object, so that no marks stray out of it's bounds. I have been able to accomplish this by duplicating the object, then making that duplicate a mask for the things inside the main object. Is there a way I can just make the main object a "mask", but also show it? Right now if I make it a mask, it dissapears. Thanks for the help!
 -
While it is possible to see a rubylith overlay for quick masks, it is not possible when just editing a mask. This is useful because it can useful to know what areas of the image the mask is operatintg on and allows better control over the editing of masks
-
 Hi, I'm having troubles with a small design of mine. I want to apply a gradient fade (from both sides) on a text layer. I tried this method: https://www.youtube.com/watch?v=m5TqqrC3AOY. It works quite well, I get my faded sides of the text. But unfortunately, the colors get gradually desaturated as well. I'm attaching a screenshot, where there are 2 layers visible. One with the fade (and desaturation problem) and the other as a reference. I tried rasterising the text and then the fade works fine, the colors are preserved. But I need to keep the text as a vector. Am I doing something wrong? Could I achieve this effect on a vector text without losing color information? Thanks for any tip or advice.
-
 In Photoshop I can view which part of the mask is affecting the image via a Rubylith overlay. While you get something similar in quick masks is there a method of viewing a overlay at any point (i.e not a quick mask)?
 -
I tried the beta a little and as a landscape photographer the first thing I was looking at was how I could mimic photoshop "luminosty mask" workflow. And as far as I understood it was that you do not need to do it, you have a seperate curve controller for that in your adjustments but I must say I lake some sort of preview for that, perhaps there is but then it needs to be made more visible. But on a whole I would love if there was some real though and awesome experience working with luminosity masks in Affinity Photo, because the current workflow with the extra controller in adjustments feels more like a after thought than designed to perfection.
-
 Greatings, I searched Affinity Forum using "Mask" and "Refine +Mask" but did not get a hit about my specific question; In the Tutorial Video named "Refining Selections", after creating the Mask from the selection in the Panel, the tutor instructs to right click the Mask and select "refine mask" in the drop down list. This option is missing from the two version I currently use on my mac mini (1.4) and MacBook Pro (1.5.2); The Tutorial does not match the current options available in the drop down menu on right click. How do you "refine" Mask then? Pisk
 -
 Hi there. I'm trying to find a workflow for combining several (5-7) bracketed images with brightness masks in landscape photography. Something similar to the Tony Kuyper panel in PS. The hdr module, for the moment, does not provide acceptable quality results. I've sailed through the meager material about using Blend Ranges to replace brightness masks. Lots of potential, and plenty of empty space yet. I would appreciate sharing your experience, your workflow, or some useful tutorial video on this topic. Many thanks in advance.
 -
Sometimes you want a mask to affect multiple layers, and the layers are in radically different parts of your layer stack, making grouping those layers impossible. It would be great if you could instance a mask between layers, so you apply the mask to layer 1, then apply the same mask to layer 2, and if you modify either mask, its instanced version is modified as well. - Neil
-
 I'm thinking of stacking several astrophotos with foregrounds and to do it I'll guess I will need to mask the foreground to get clean and sharp stars. Is it possible to do one mask in one layer and then copy it to all of the other layers?