Search the Community
Showing results for tags 'Affinity designer'.
-
 我想要一个“矩阵克隆/分布”,可以增加在对齐与分布的功能组里。 现在的对齐与分布,只能对单行或者单列进行设置,我希望同时对行和列一起设置。 大概是这样,当我选择一个“元素/组”,对他进行矩阵分布时候,可以同时设置横向排列的数量、间距;以及纵向数量、间距;旋转角度,甚至大小,等参数。 如果能做到全自动以最大数量布满画布就更棒了。 ----- 这个功能将对小尺寸卡片类的排版减少很多重复的工作,节省很多时间。这个功能也可以很方便的制作无缝图案 ---------------------------- I want a "matrix clone / distribution" that can be added to the alignment and distribution function group. Now the alignment and distribution can only be set for a single row or a single column. I want to set both rows and columns at the same time. In this way, when I select an "element / group" for matrix distribution, I can set the number and spacing of horizontal arrangement, as well as the number and spacing of vertical arrangement, rotation angle and even size. It would be even better if we could fill the canvas with the maximum number automatically. ----- This function will reduce a lot of repetitive work and save a lot of time for small size card typesetting. This function can also be very convenient to make seamless patterns
 -
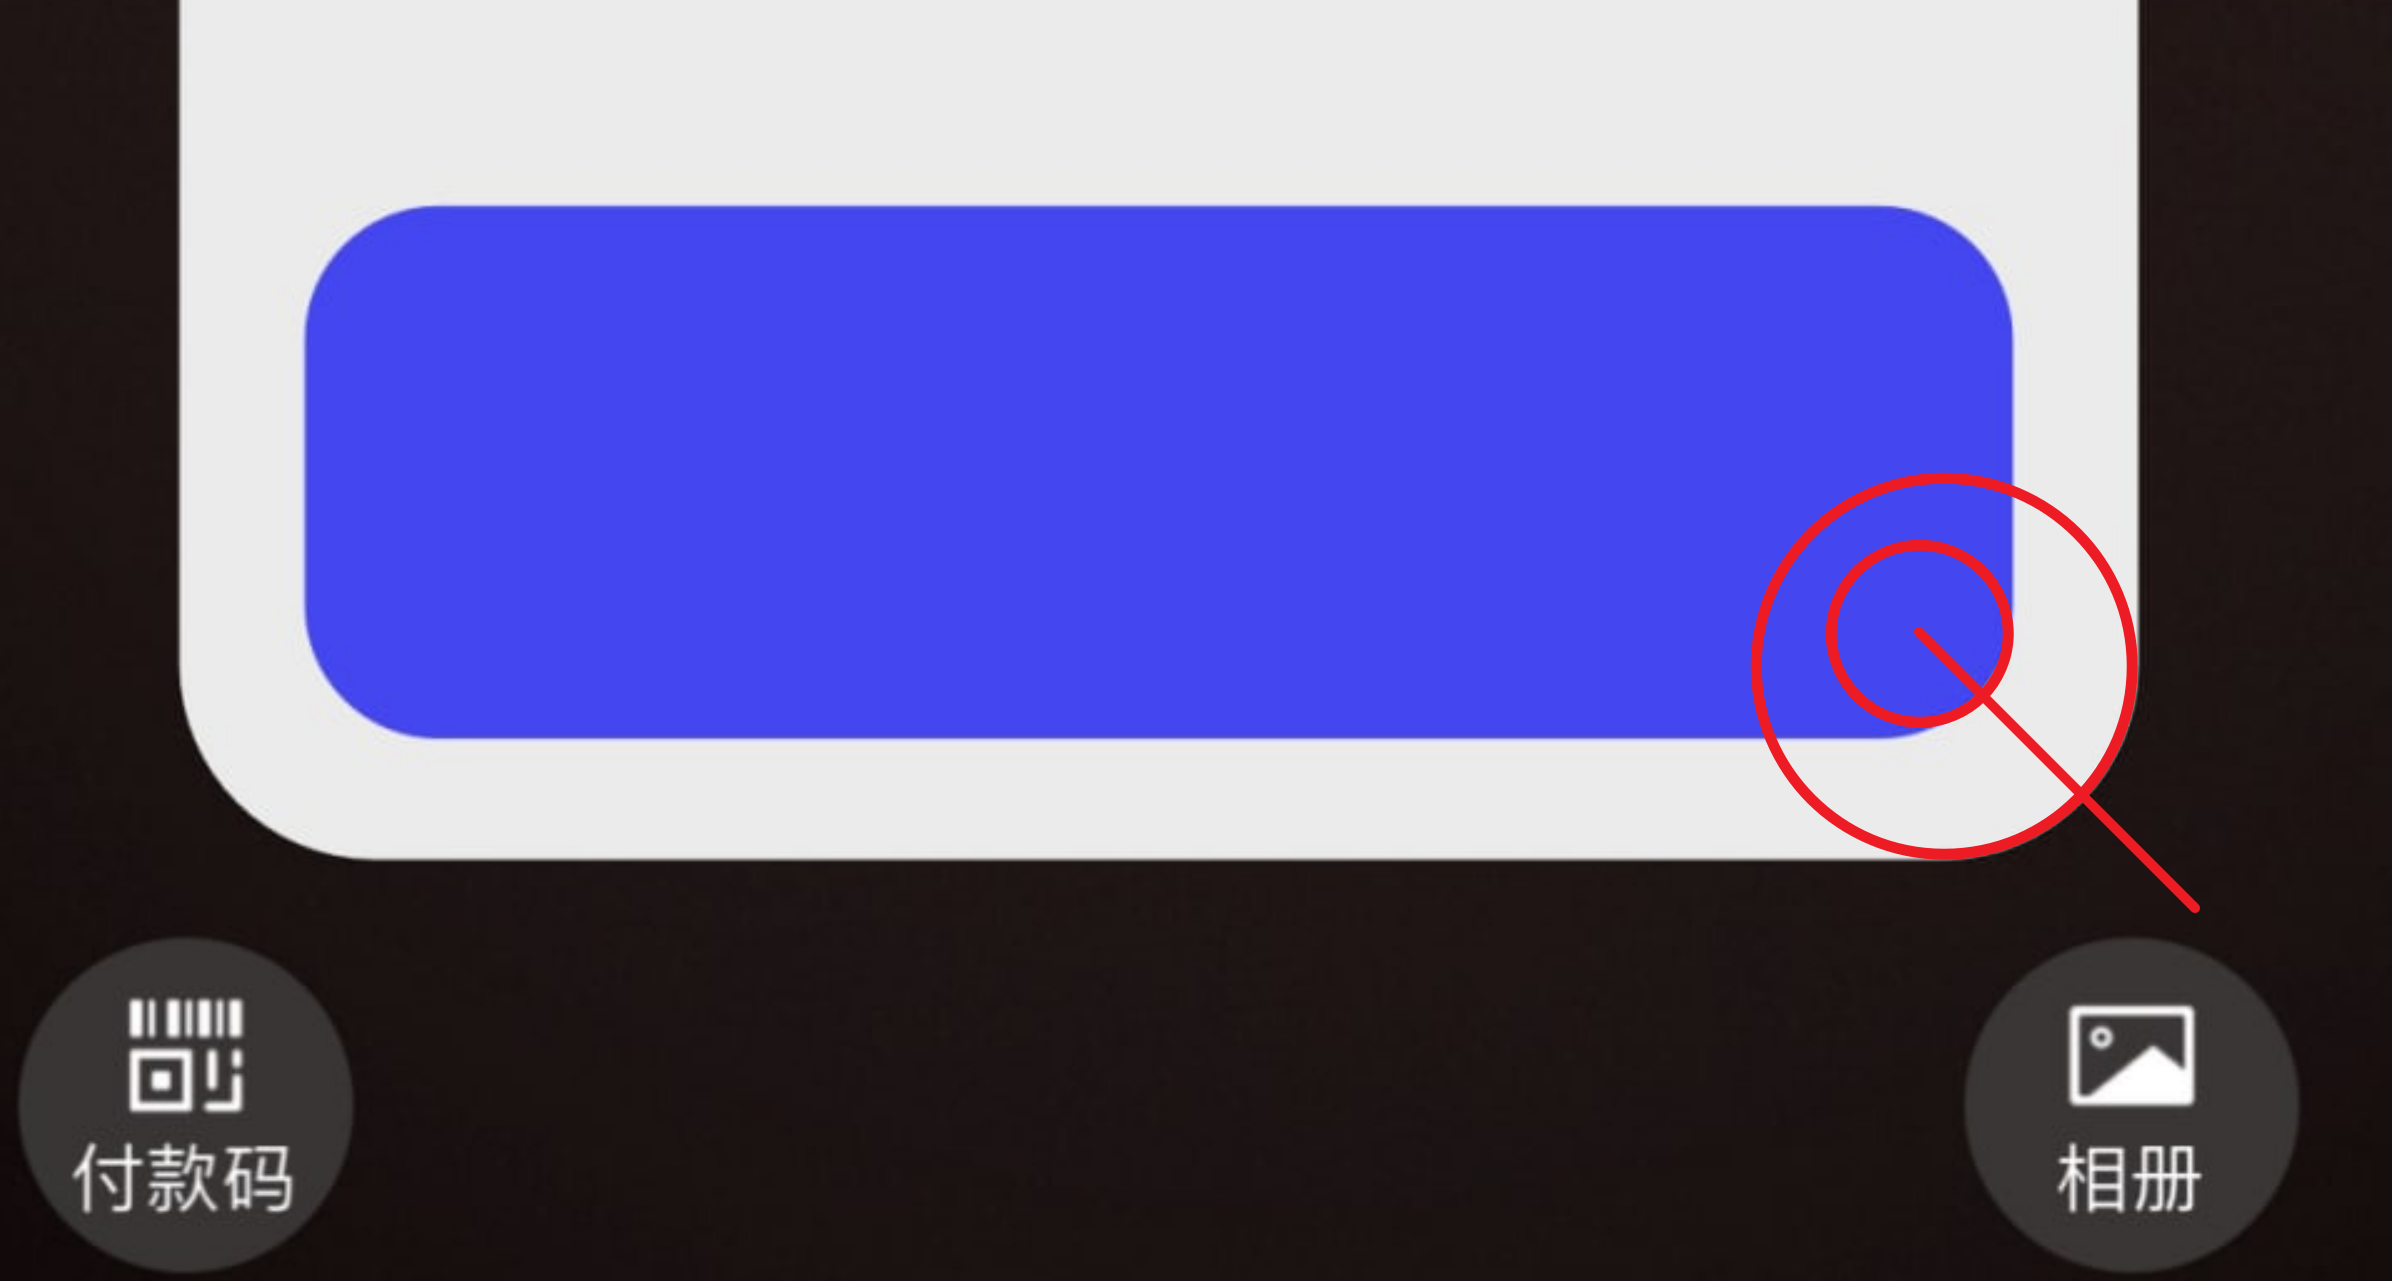
 Hi Affinity community, I've had a look in the forums but nothing is showing(maybe it's how I'm terming it). Anyway, I have a canvas with a size of 798px *798px. I also have an image 798px * 798px positioned 0px & 0px. I also have a square/rectangle the same size 798px * 798px with 1px orange stroke on the inside positioned at 0px & 0px with no fill. However the square/rectangle does not fit on the canvas. It disappears 1px & 1px to the right and bottom(in this case). Is this an issue with me & my sizes or is it a bug. In the attached image in image 1 at top you can see the selected rectangle is at 0px 0px & is 798px and that the canvas is also 798px. In the bottom part of image (image 2) you can see the stroke disappears to the right & bottom. This is happening in both AD & AP. I have tried changing where the stroke sits on inside, center, outside many times. This has happened quite a few times in the past & tonight I thought I have to try & solve it before it does my head in(that may be too late). I've noticed this happening with images as well, that they sometimes they don't fill the canvas properly. Any help appreciated.
-
 It is hard to explain...Just like offset,distance between side and side is the same.but it seems that there is no offset function in AD😂
-
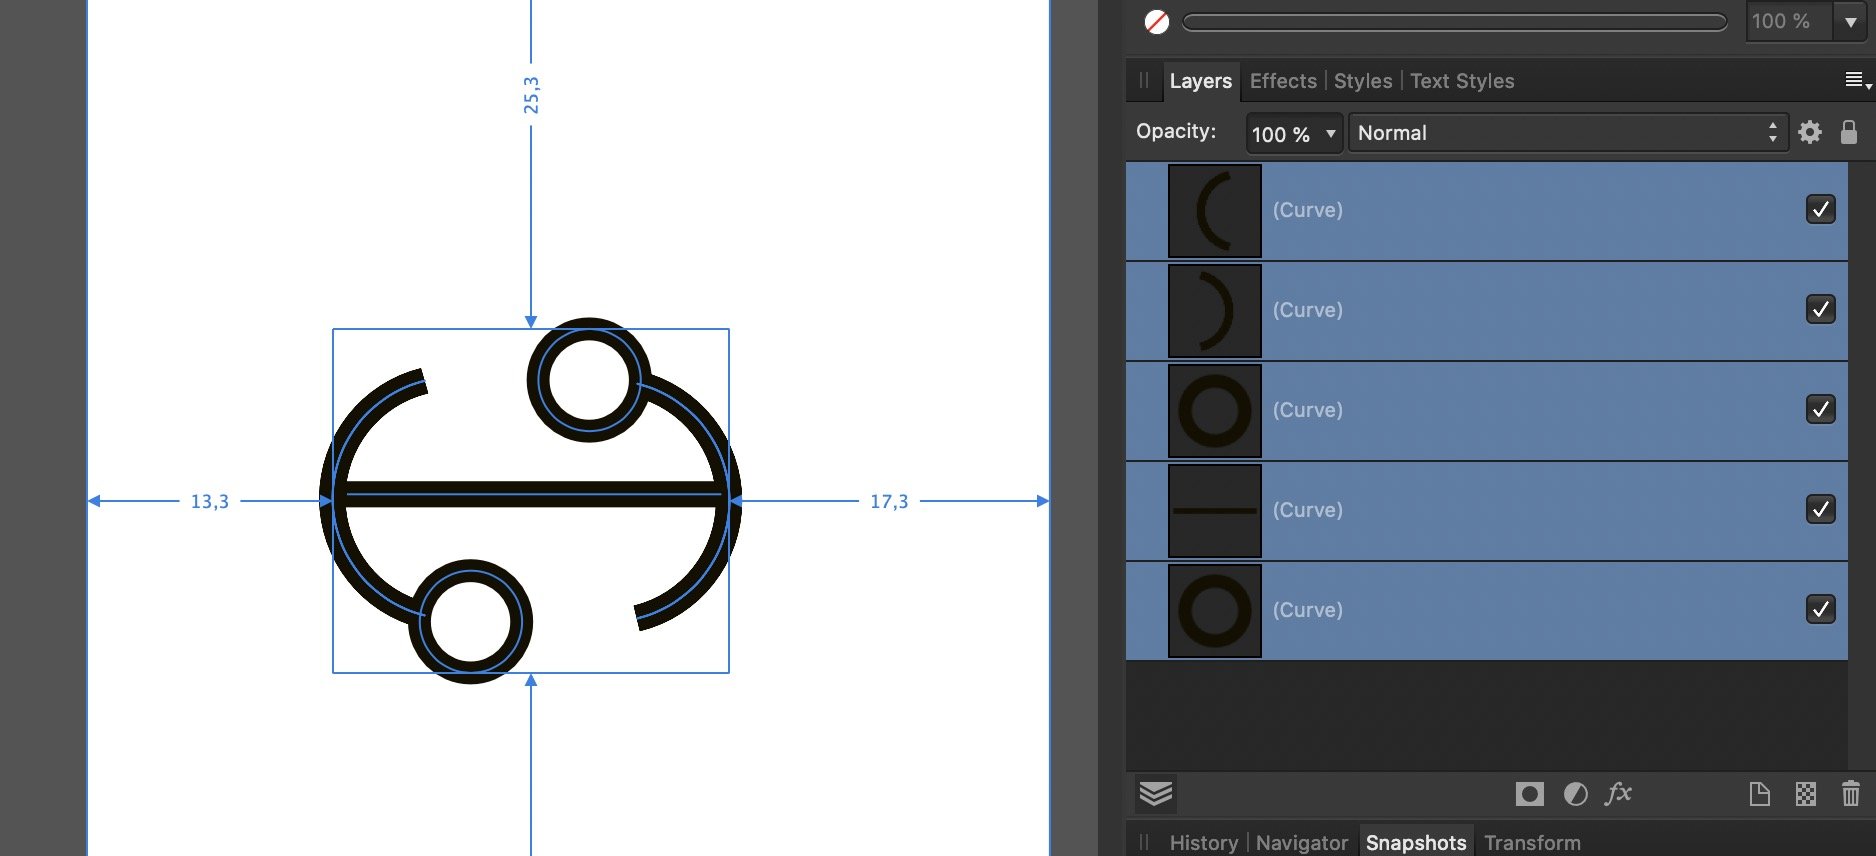
How can I do like this? I have try to use pen line to make a Dividing but it is not work ,I only need to create a rectangle to do with it.But in illustrator you can do the split.Can I operate to realize that?
-
Always makes me laugh when I see people who probably don’t like each other very much air kissing in greeting so I thought I”d draw it. I’d previously abandoned this piece as I couldn’t get it to work, but after returning to it last week it suddenly came together, so I’m really pleased I made the effort to revisit it. It’s given me a lot of confidence to go back and examine some other projects I’d previously given up on.
-
 I use affinity designer for sublimation printing, I have an epsom ET7750 and print 12 x 12 images. when I send an image to the printer it sounds like the image os printing, but the image is so faint it looks like their is no image there. I have printed in word and other programmes and they print fine, its just this programme that I have an issue with.
 -
 Hi, Vectorize a photo with Affinity Designer is it possible (In automatic)? Can I transform png? How is it possible? Thank you.
 -
I need to do some operation like split by line,but now it is seems not work on 1.8.5. And I need offset feature in affinity designer (like rhino)😘
-
 Hi, I am under the impression that there is no tool that automatically gives the area of a given shape. Is there any hope that this would come out in a future update? This would be incredibly useful! Thank you.
 -

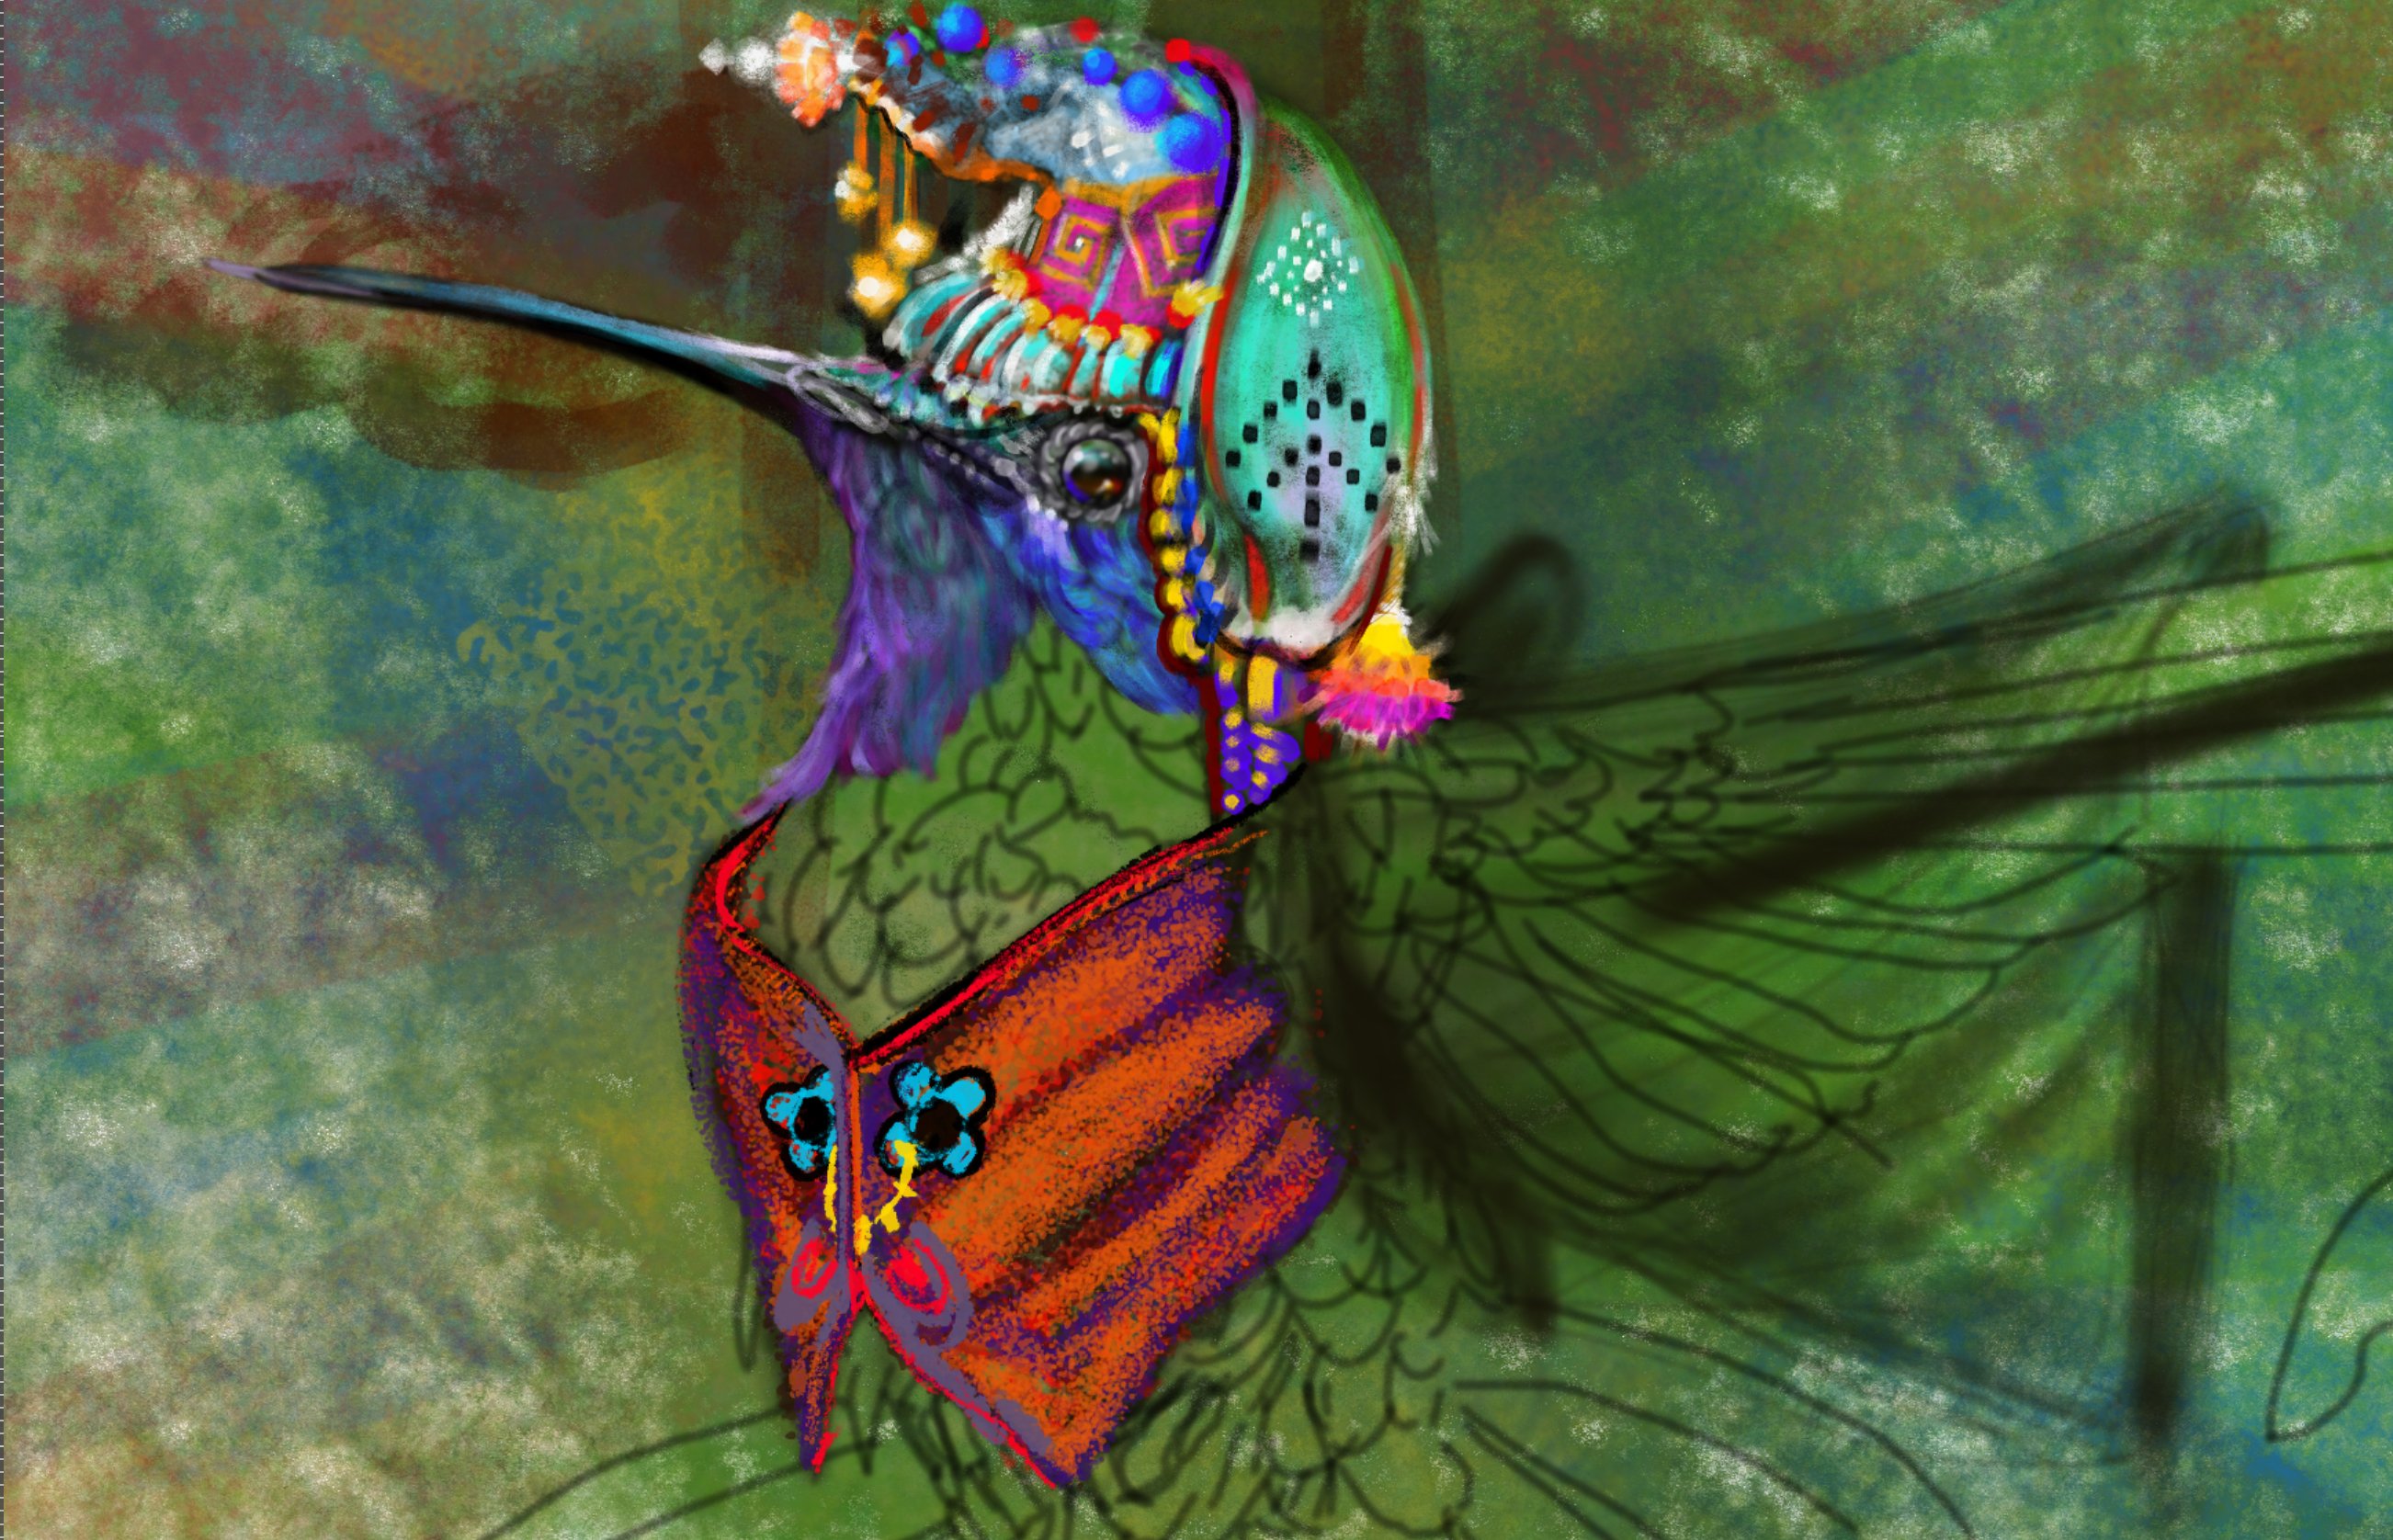
affinity designer "Shaman Hummingbird King". Look hard when in the woods.
Guest posted a topic in Share your work
Recent start to a new idea, all Affinity Designer, still and videos. Part one - Part two - Part three- Please enjoy my artistic madness!
-
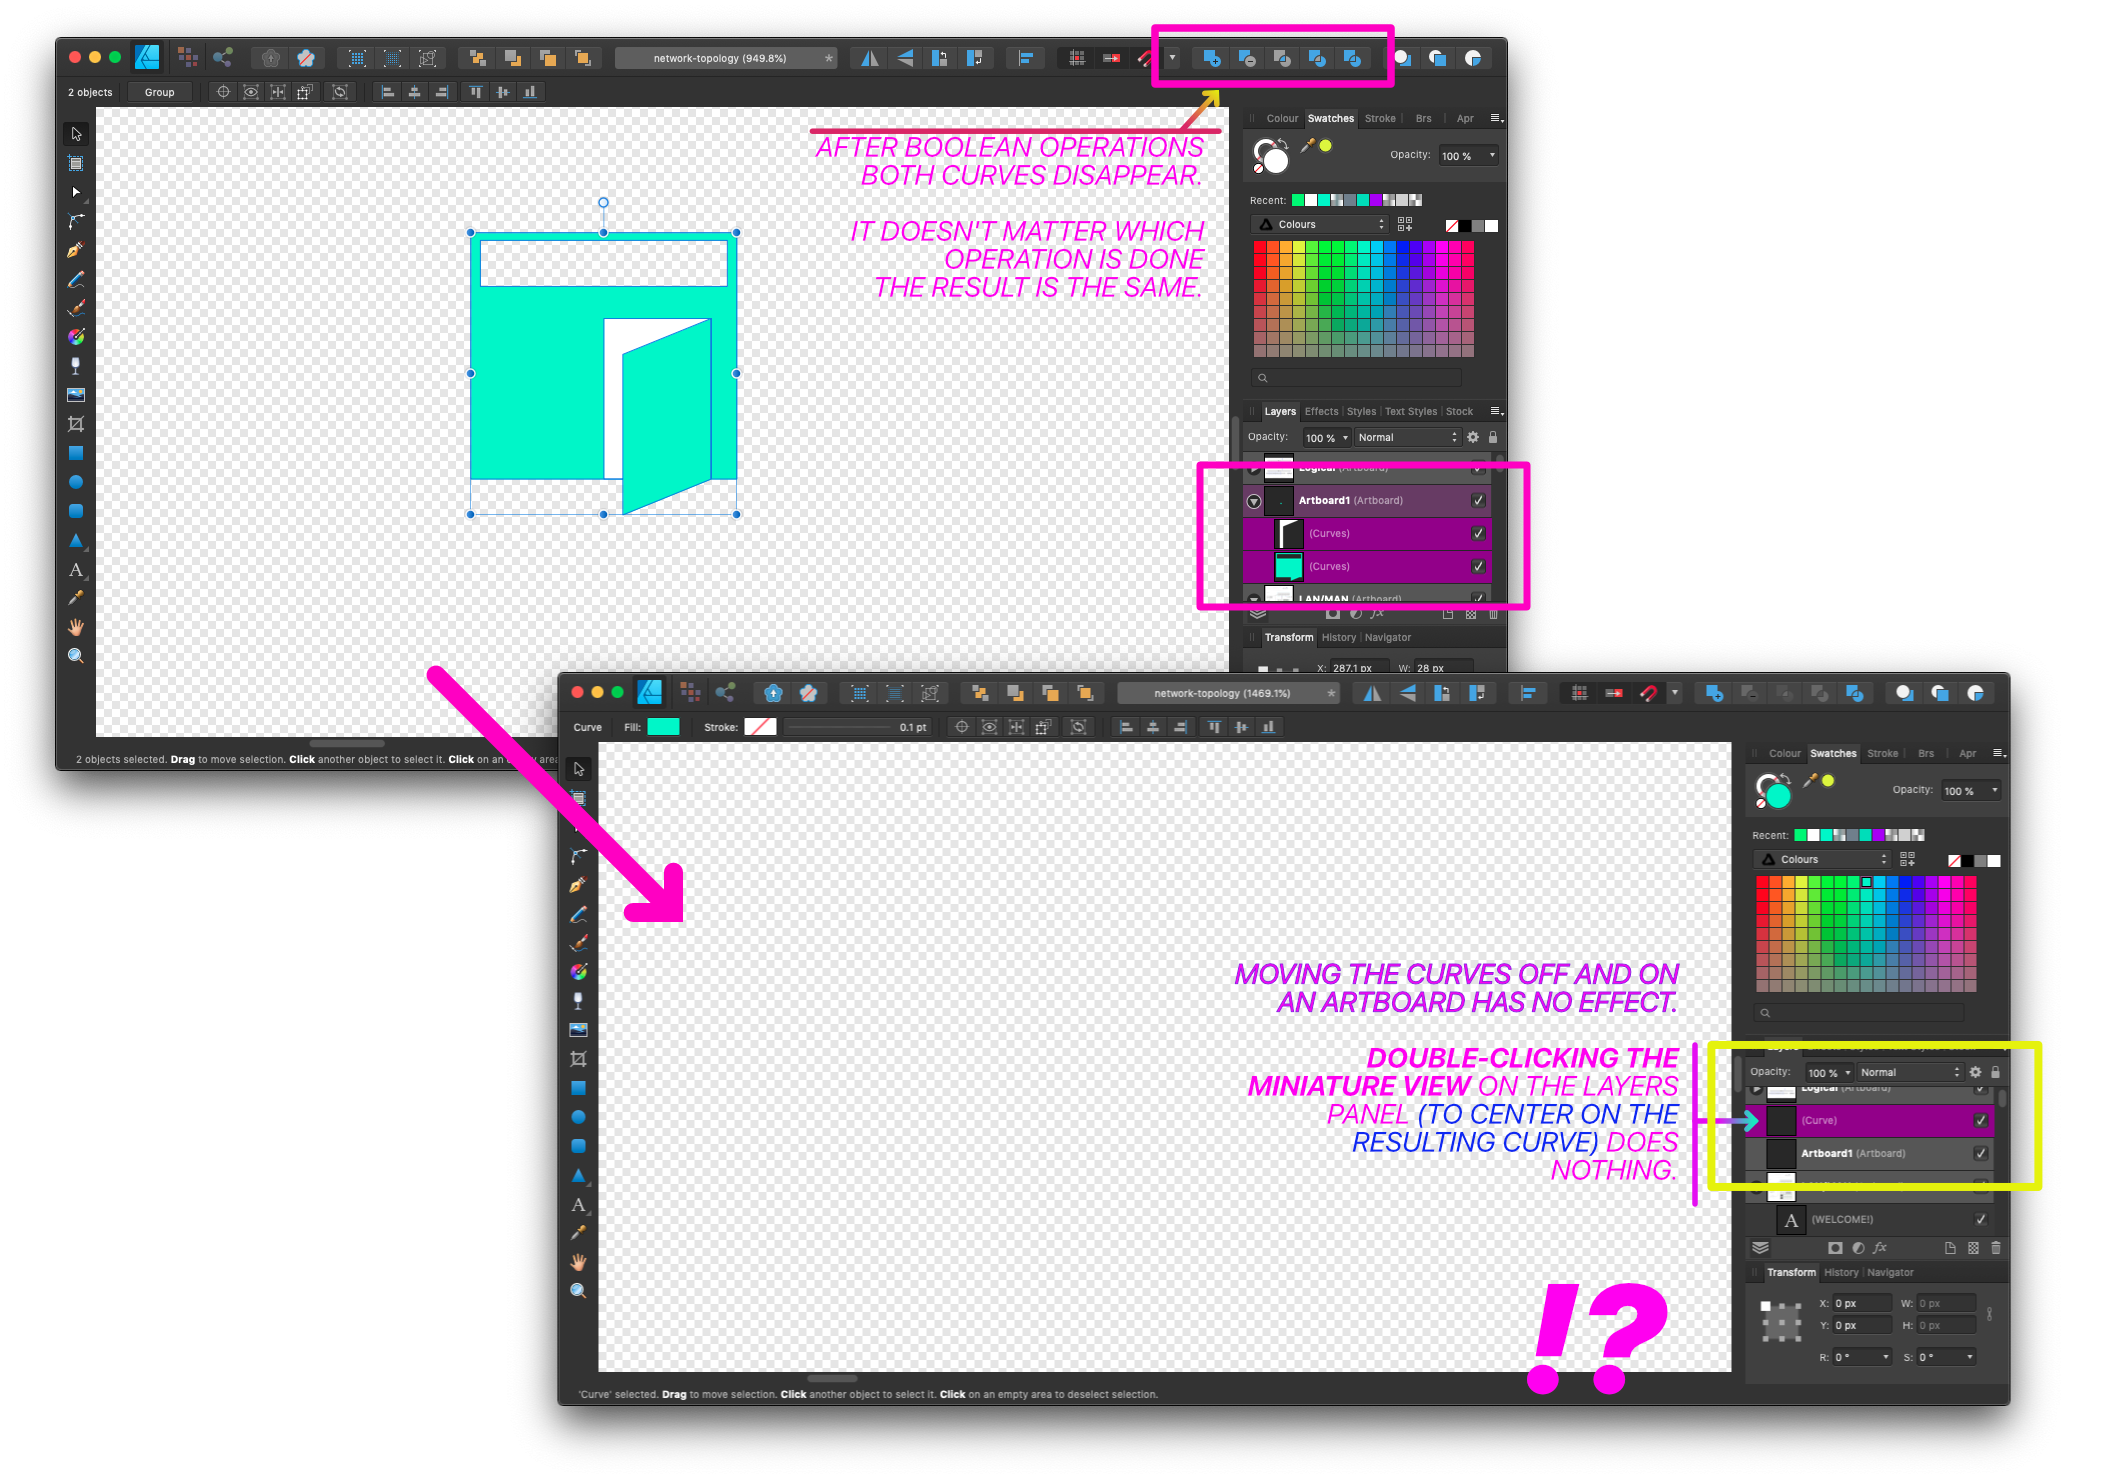
Can someone please check why this shape "combines" so horribly? Debug Doc Shapes.afdesign
-
Vector illustration of a nice jellyfish made with Affinity Designer
-

affinity designer [DESIGNER] MY ARTWORK FOR QUEEN'S GAMBIT
Jhonatan S posted a topic in Share your work
Vector based, from the #QueensGambit Character, my stylization Using #AffinityDesigner on iPad more of my work on insta: @jhonatan.ssilva www.youtube.com/jhonatanssilva brushes used MVB package: gumroad.com/jhonatanssilva
- 2 replies
-
- 10
-

-
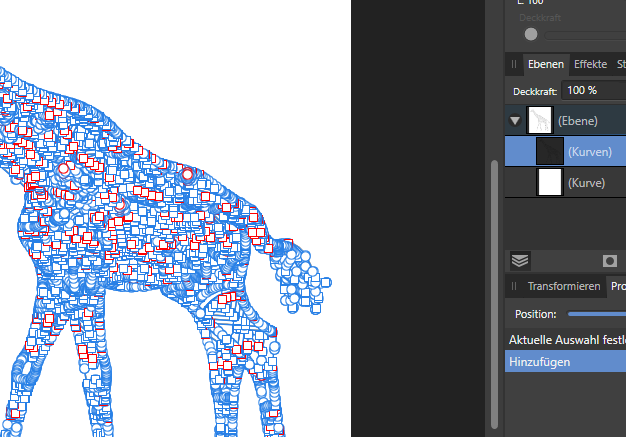
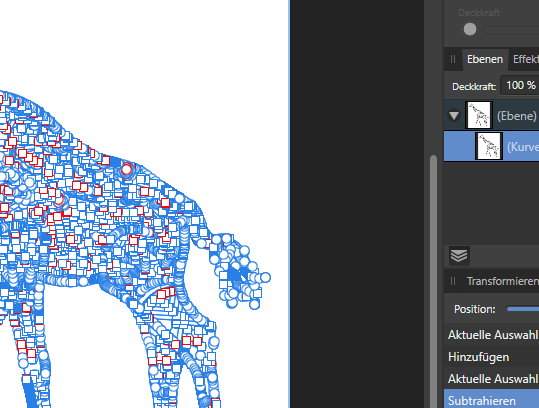
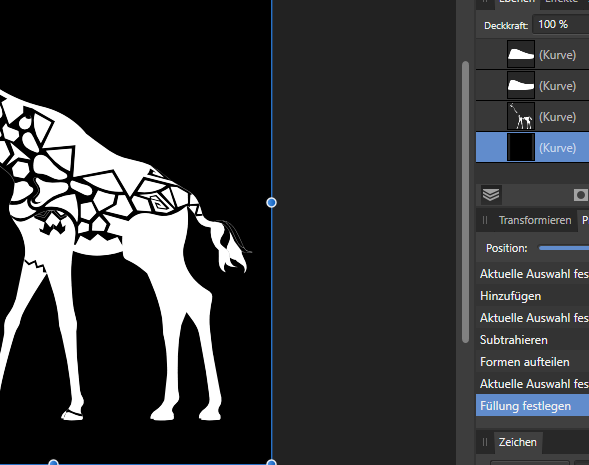
 Hi everybody, first of all I'm not professional at using Affinity right now but keen to improve. I've come to a point where I don't know how to proceed or not sure if there is a more clever way in doing it. My Target: I would like to fill in all enclosed areas in a vector frame. And have borders and the enclosed areas as seperate vectors. The vector consists only of borders surronding empty areas. My Problem Vector Below u find a vector work, where I would like to fill all enclosed areas with white while ( not really a must have but would be nice to have) [ and the surrondings should be black as an border.] Currently I do the following: 1. ADD funktion so i get one big Vector where all borders are connected 2. I subtract this big vector from a new white layer in the very back. 3. Then I use the split up function to split this into pieces 4. Deleting superimposed layers -manual work- Sometimes difficult and not possible sometimes crazy vector failurs... 5. Sometimes usable results... Maybe you have a more sufficient way in solving my problem. *Incase this has been mentioned already I'm very sorry but I didn't find it using the search function.* Thank you in advance for your input! PS.: Very best from Germany stay healty. Silent.
-
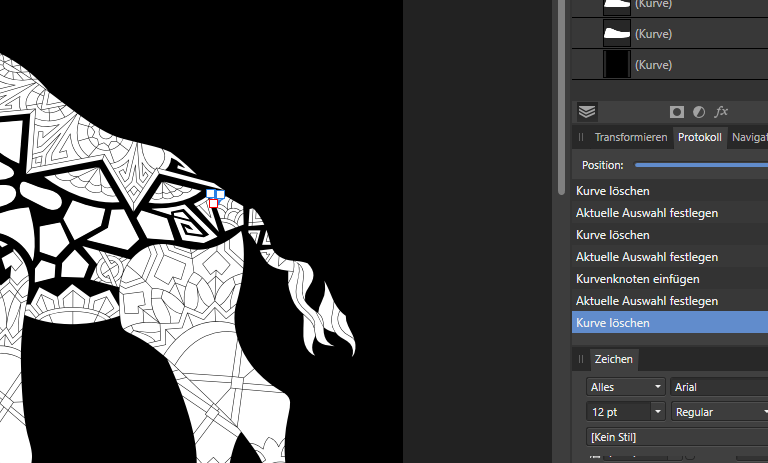
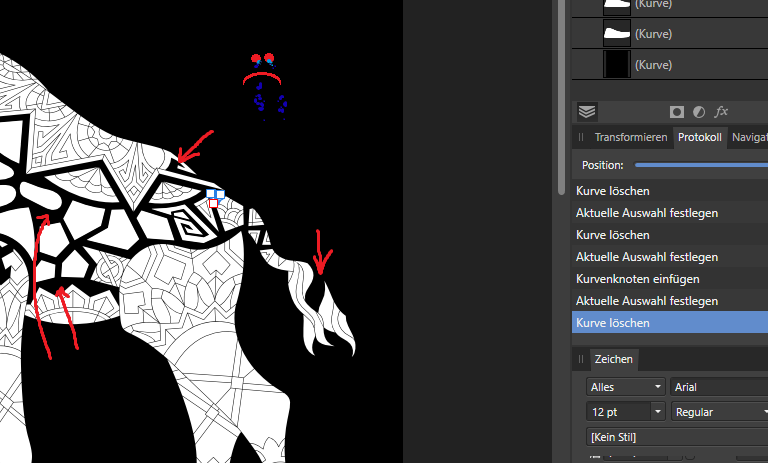
 How do I prevent it? I thought I finally had the hang of curves and it seems I don't. 😩 I don't recall doing anything different to change the behavior because it I've had been doing these for about an hour or two and it worked every time until it didn't.
-
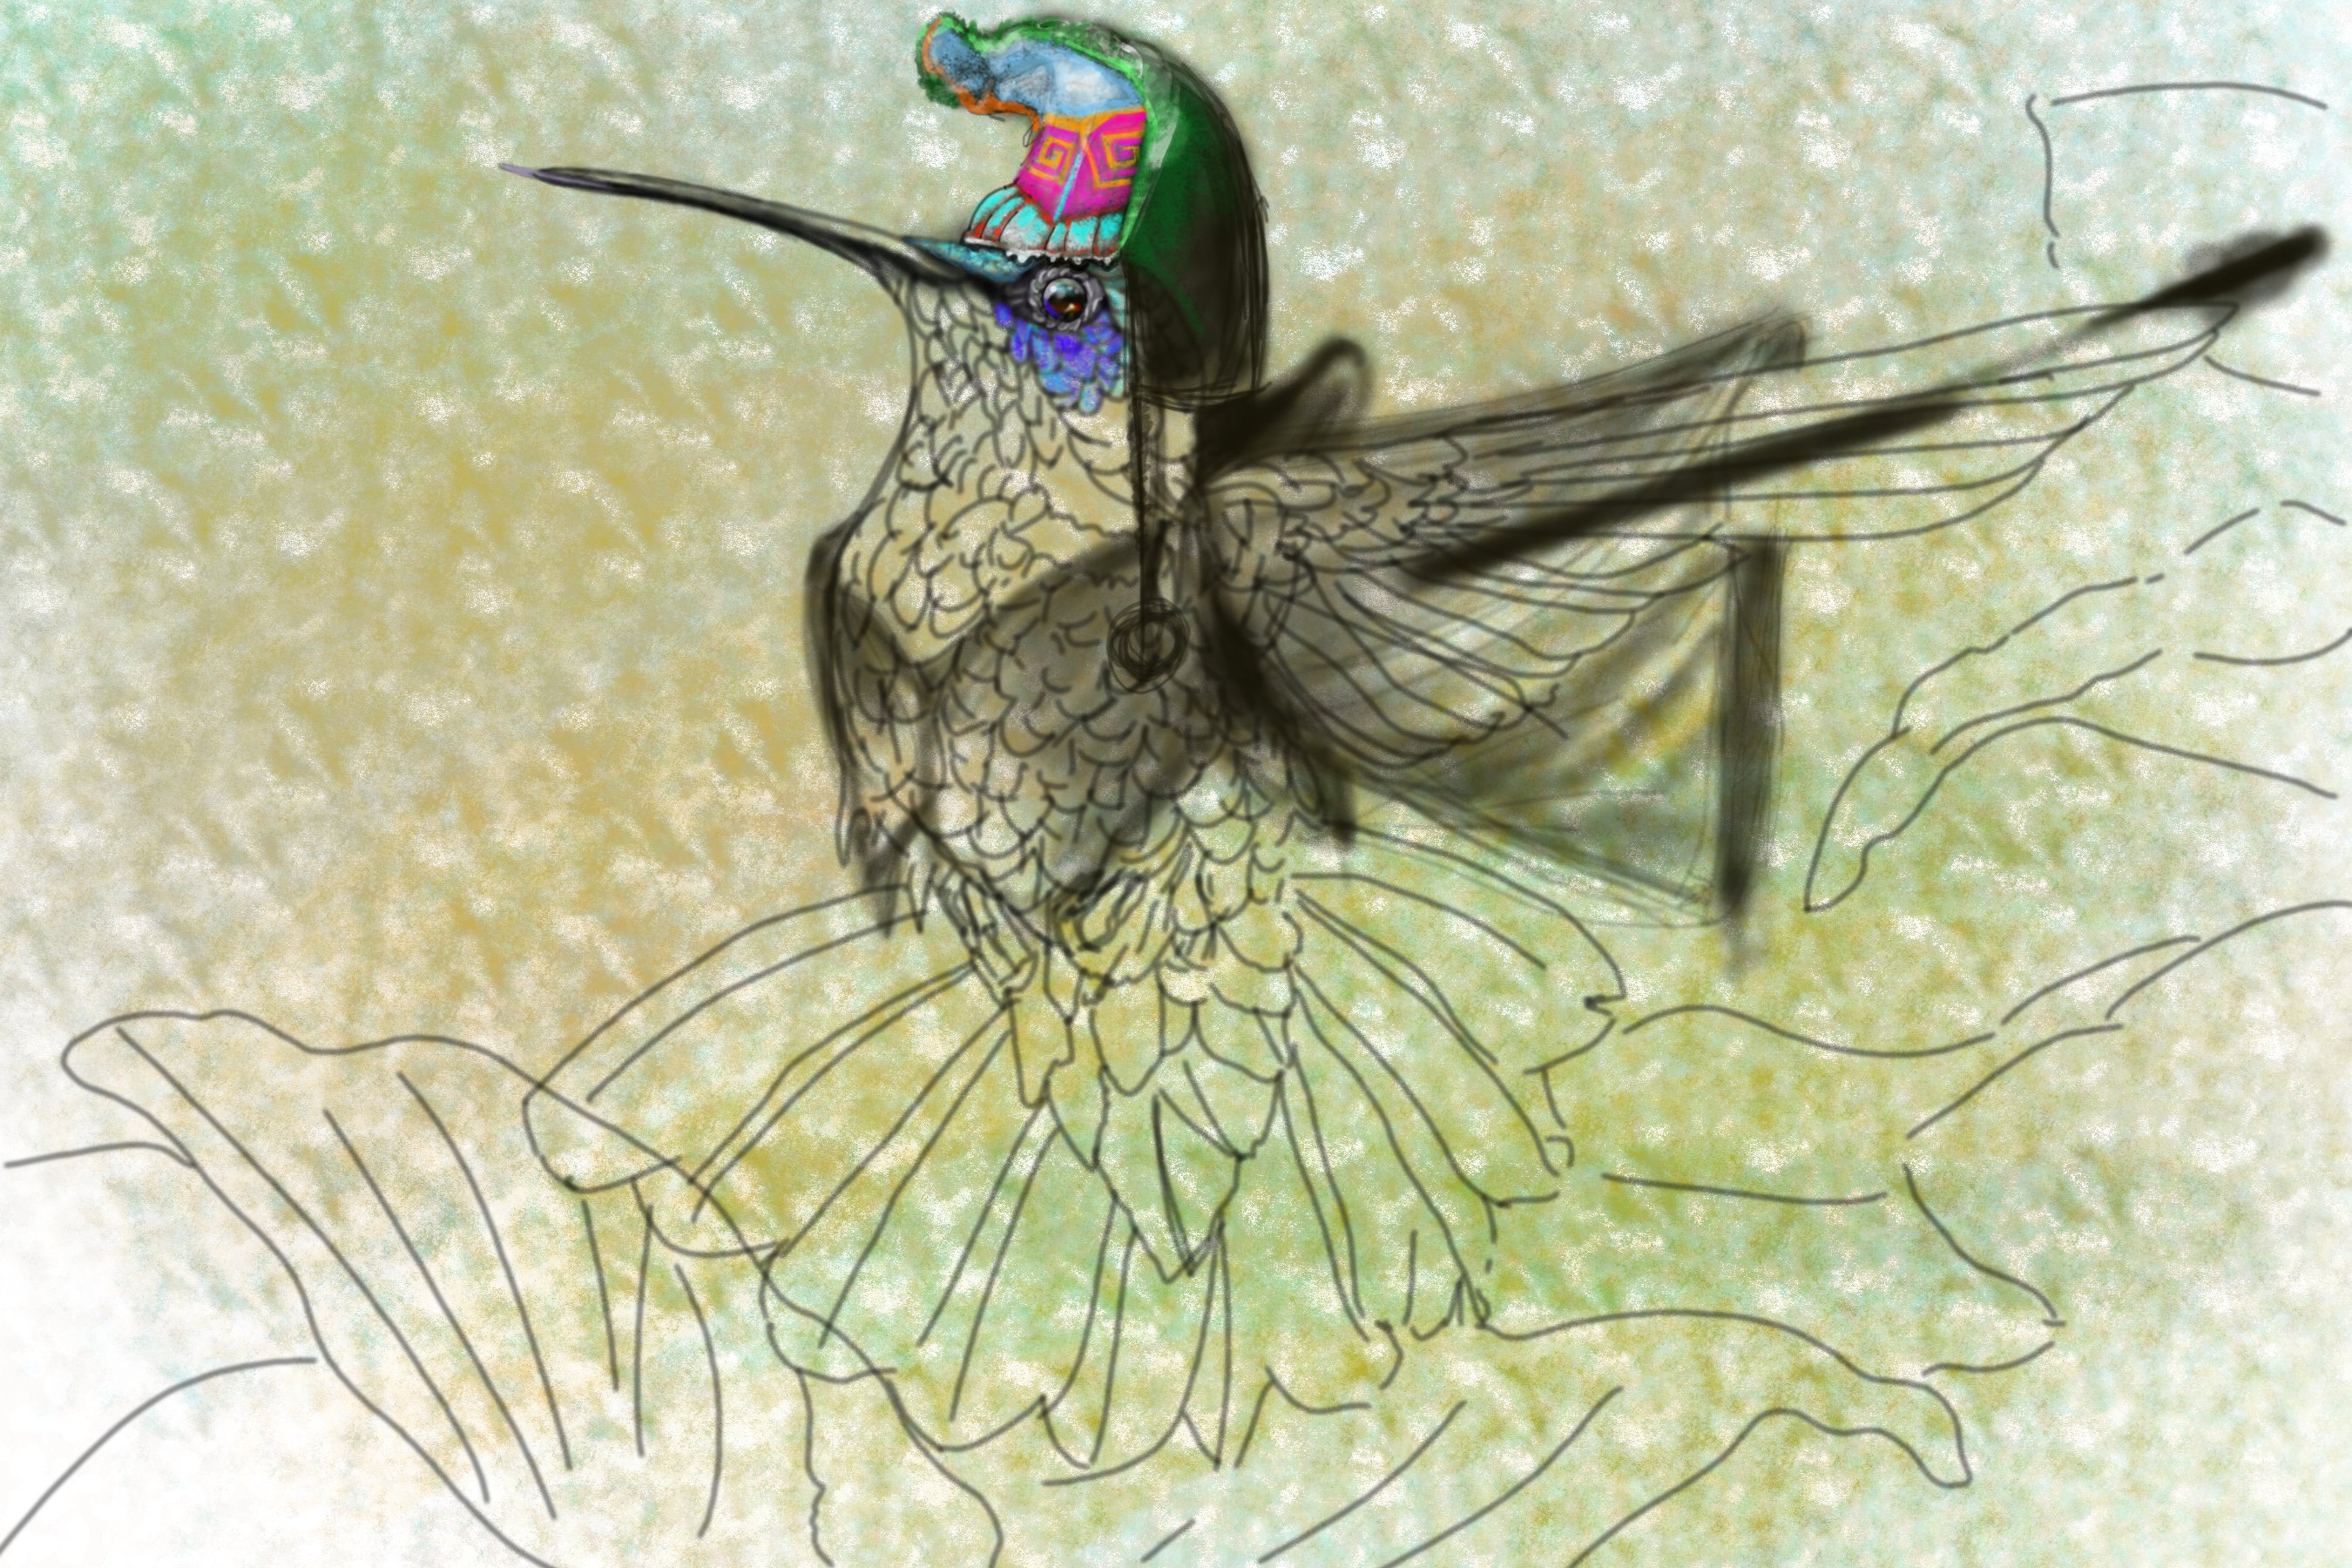
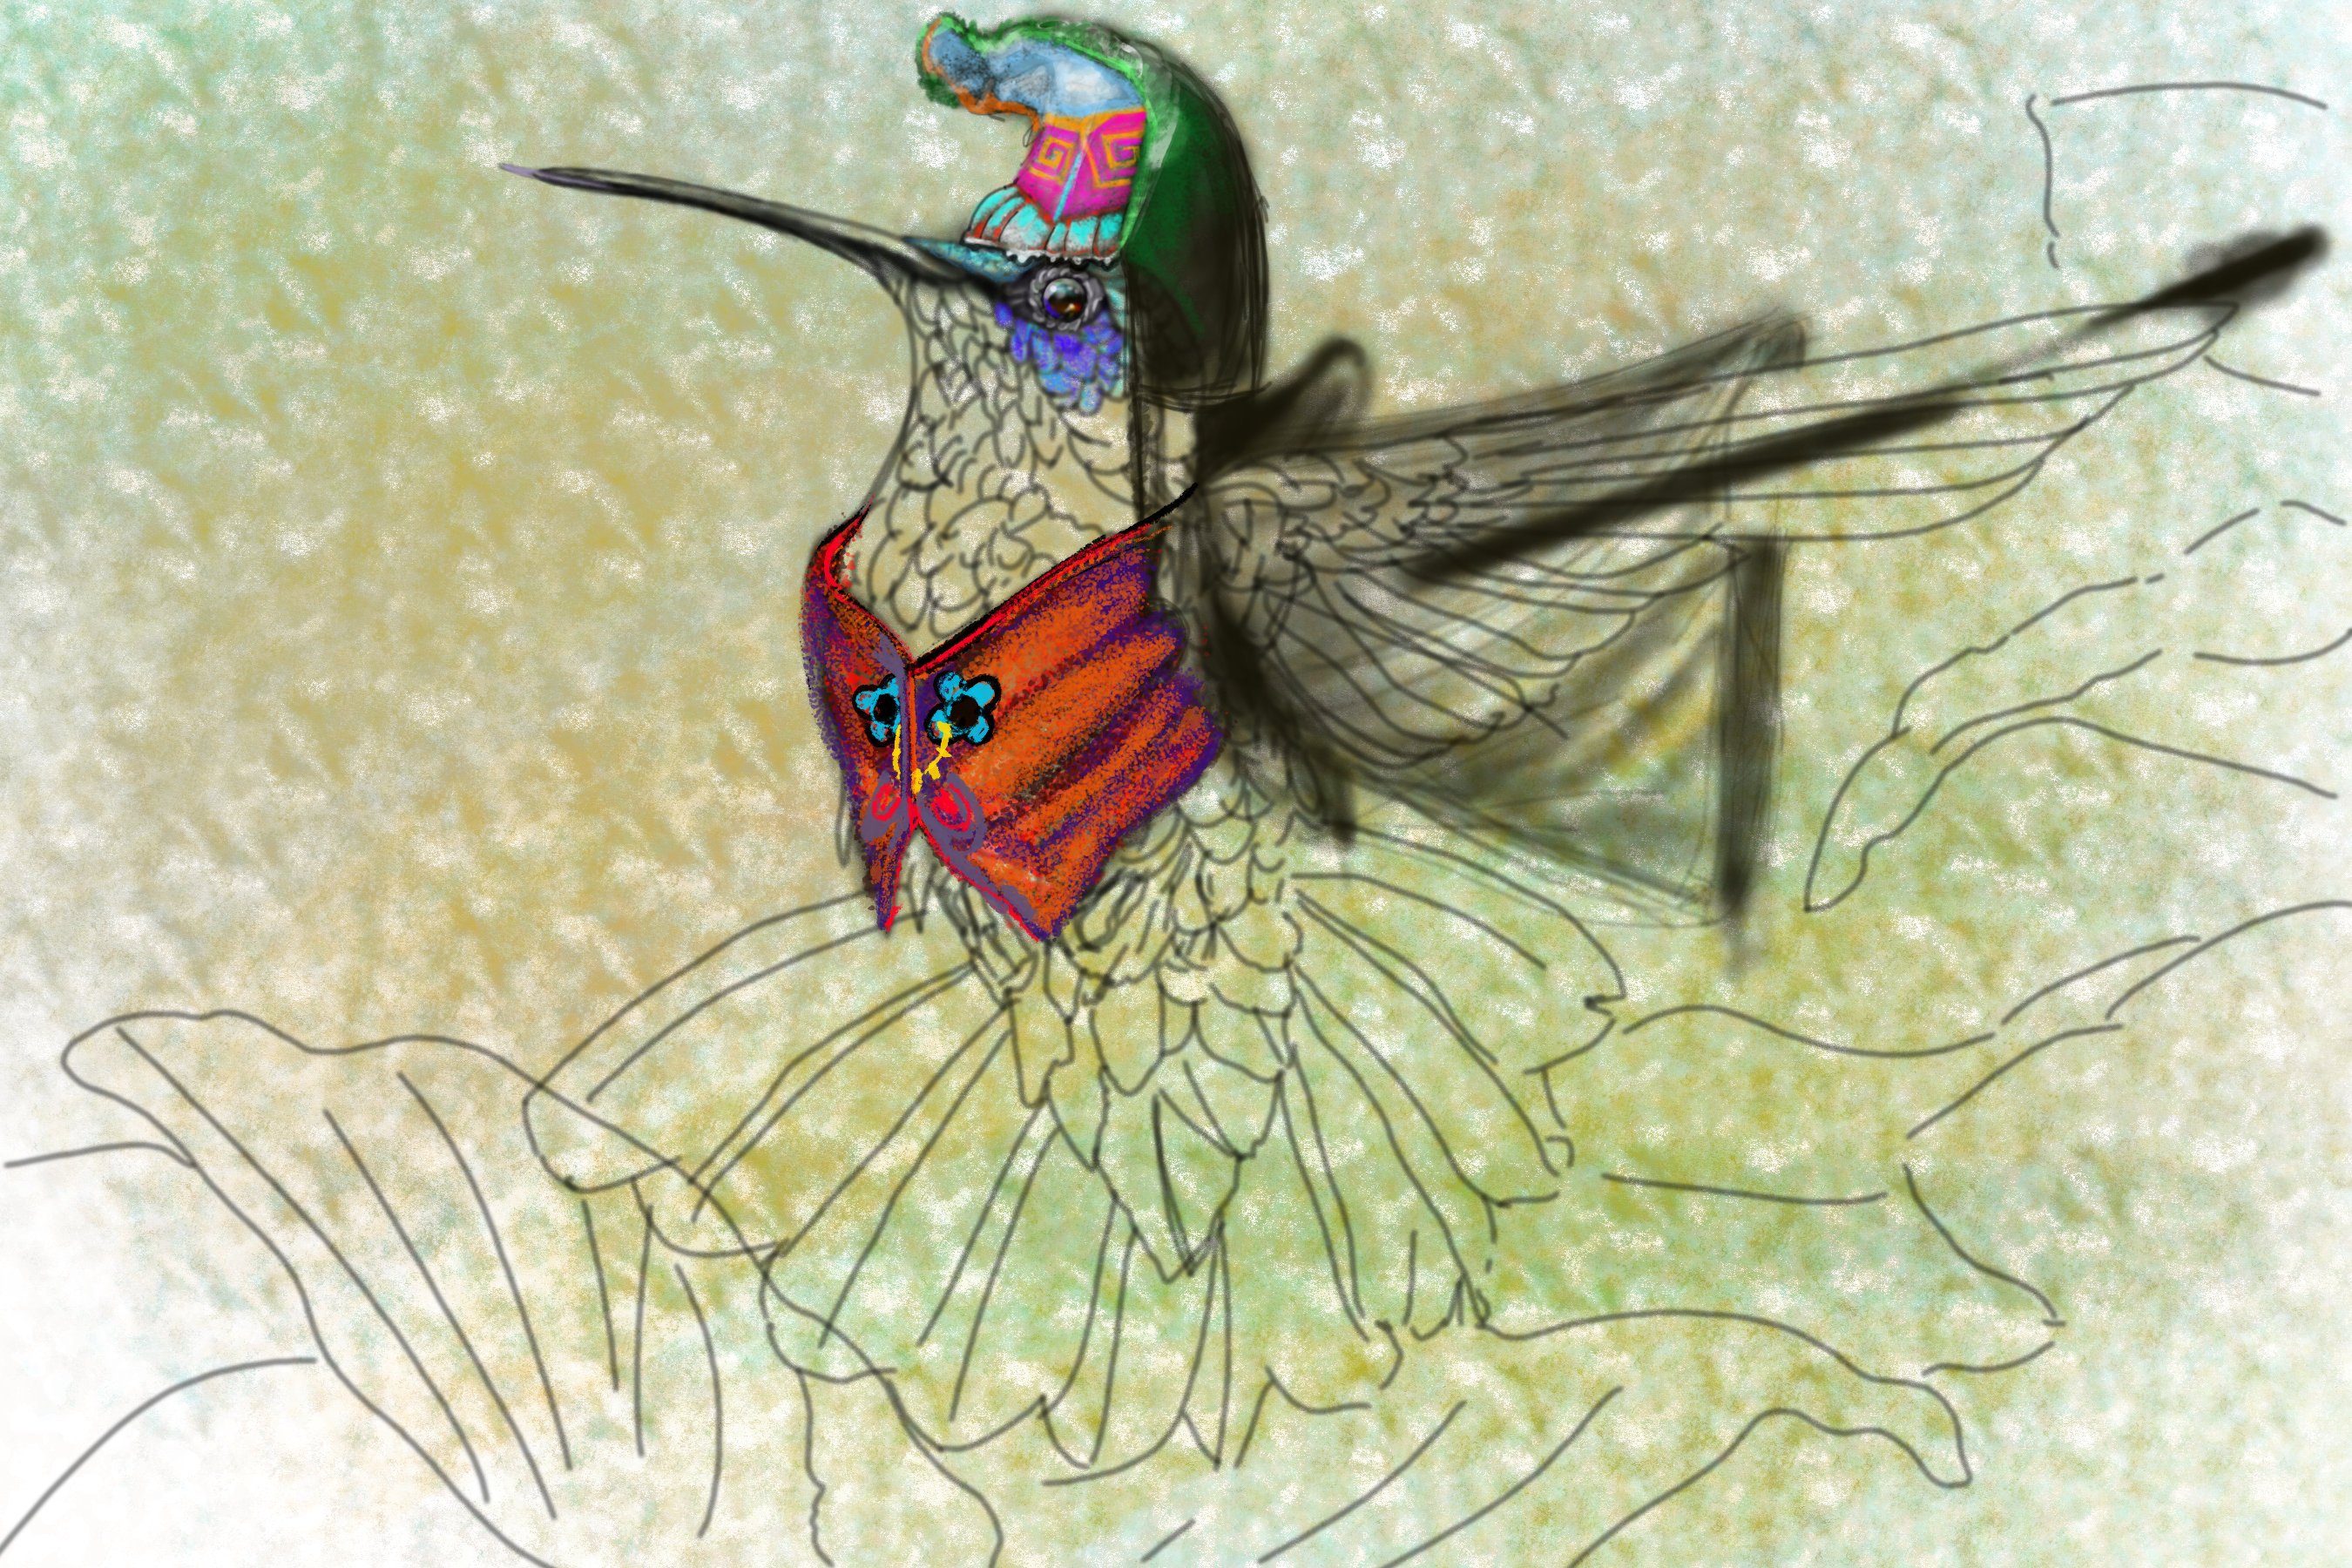
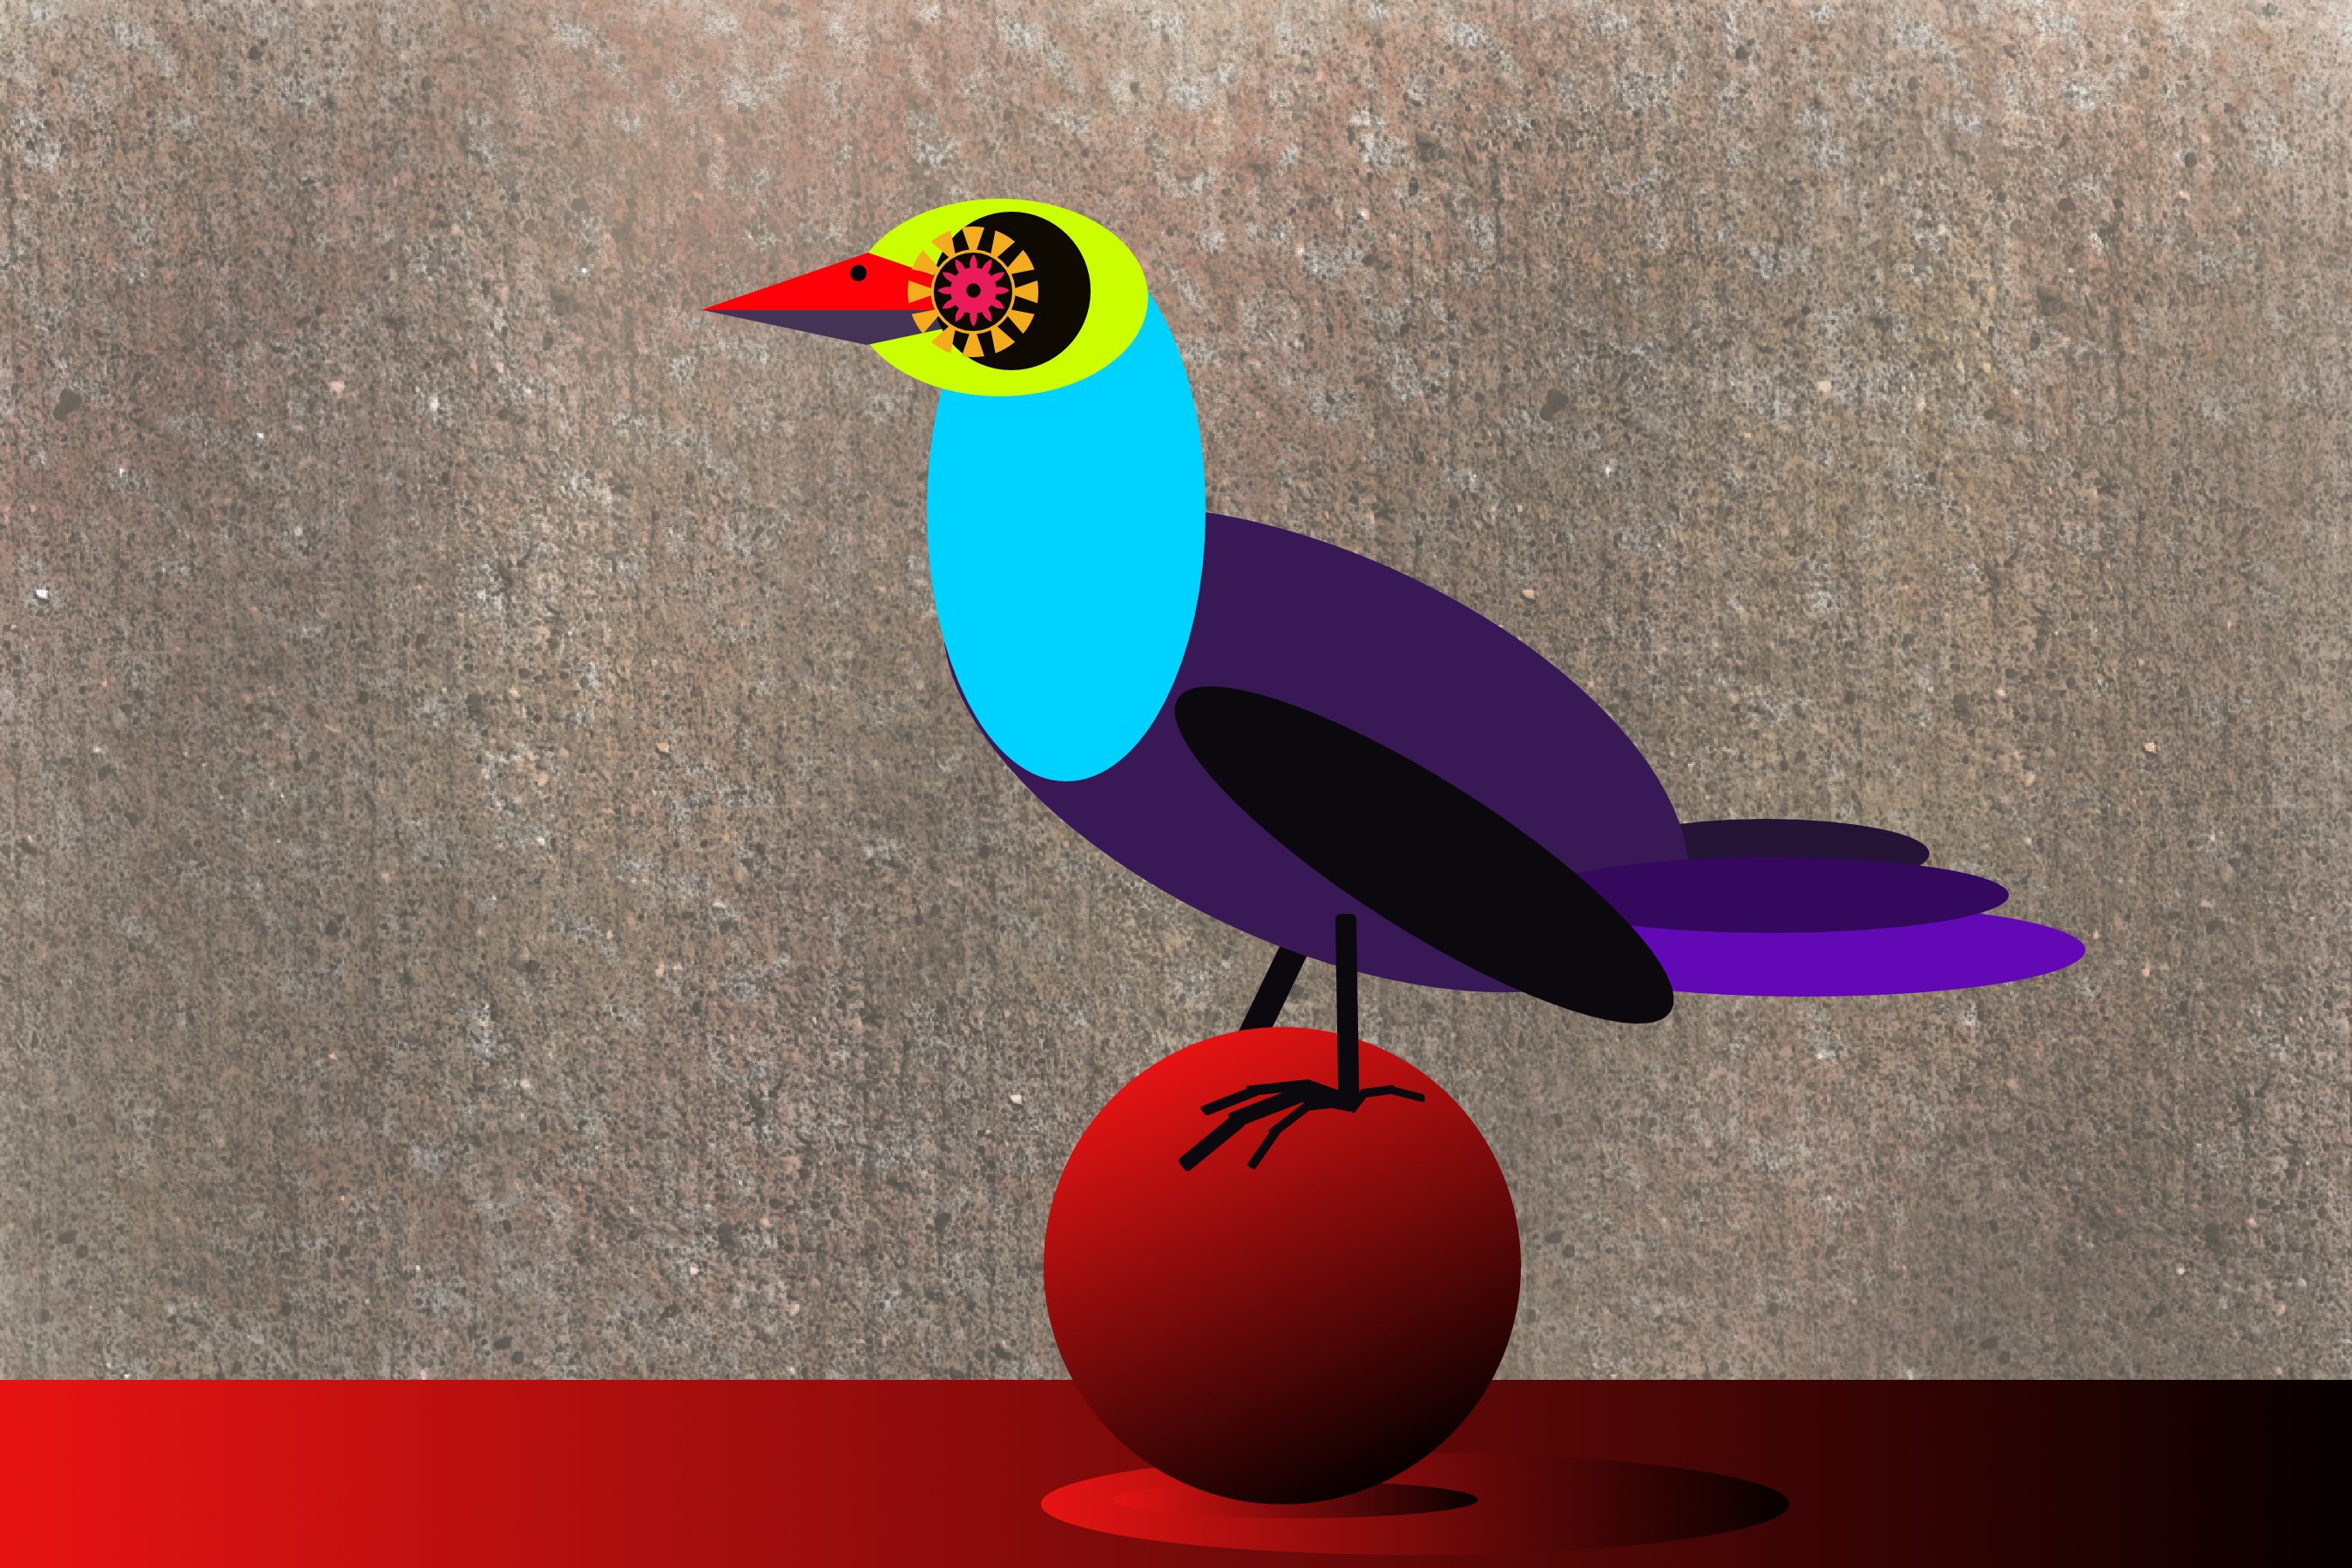
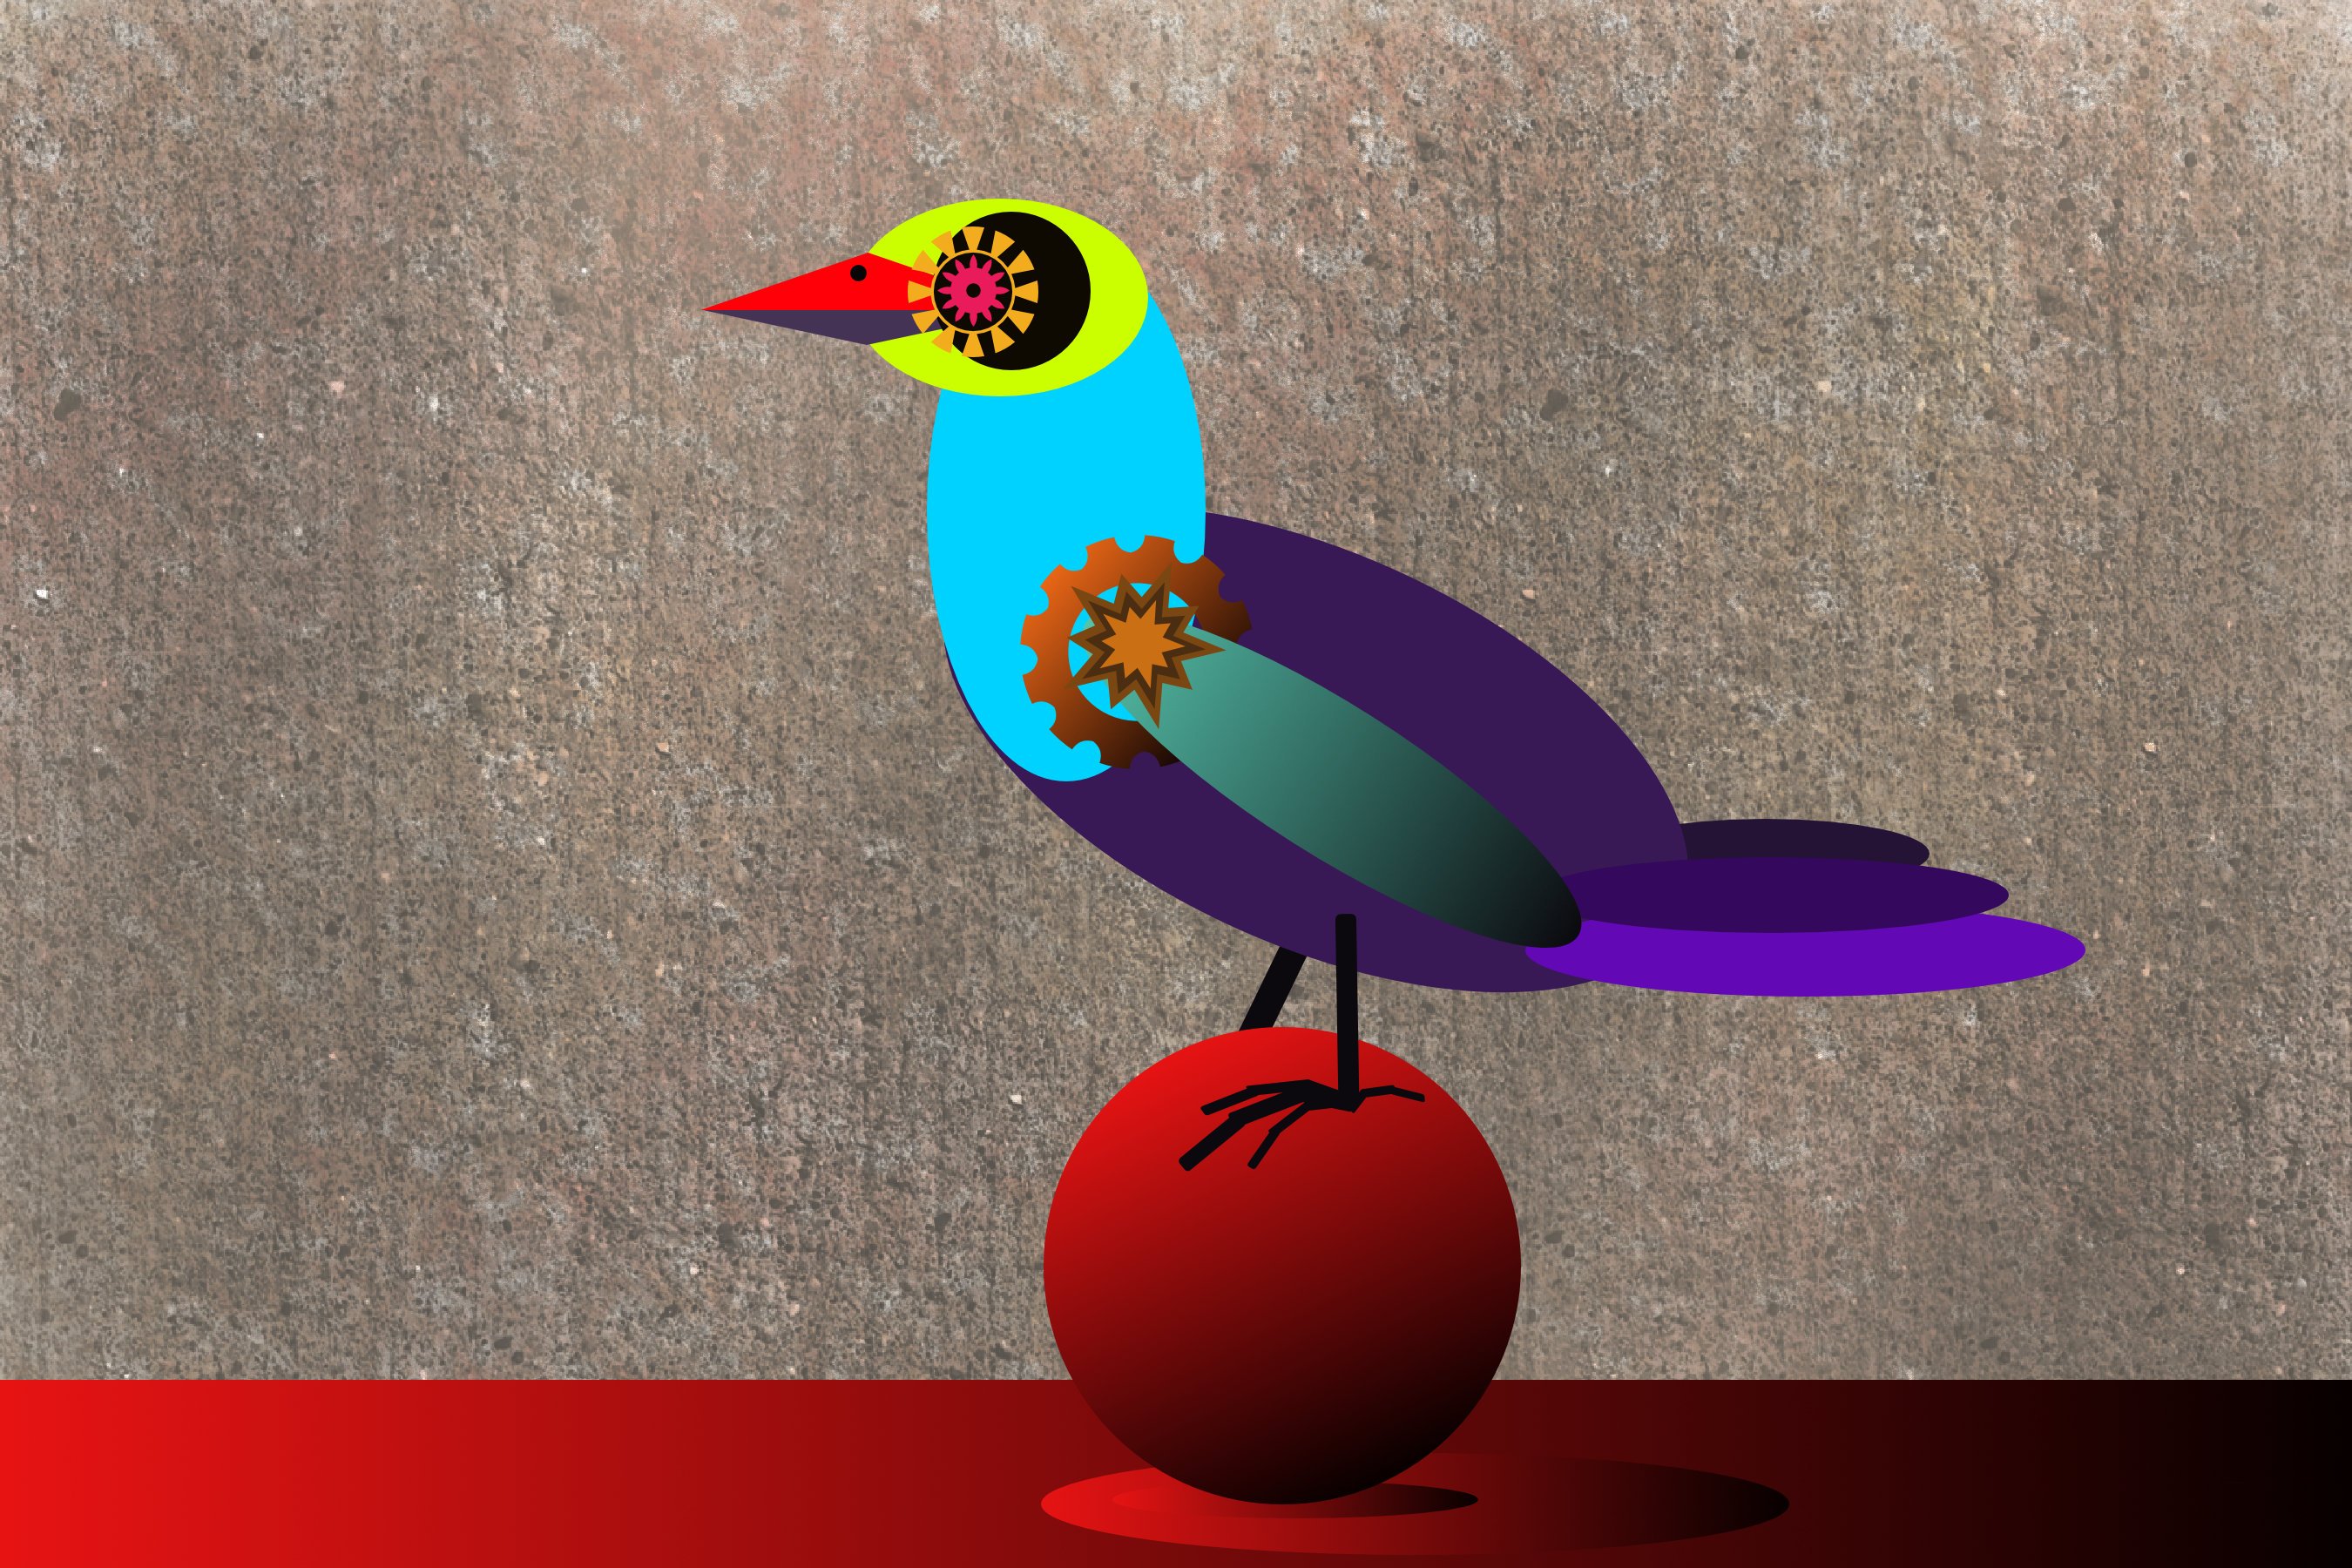
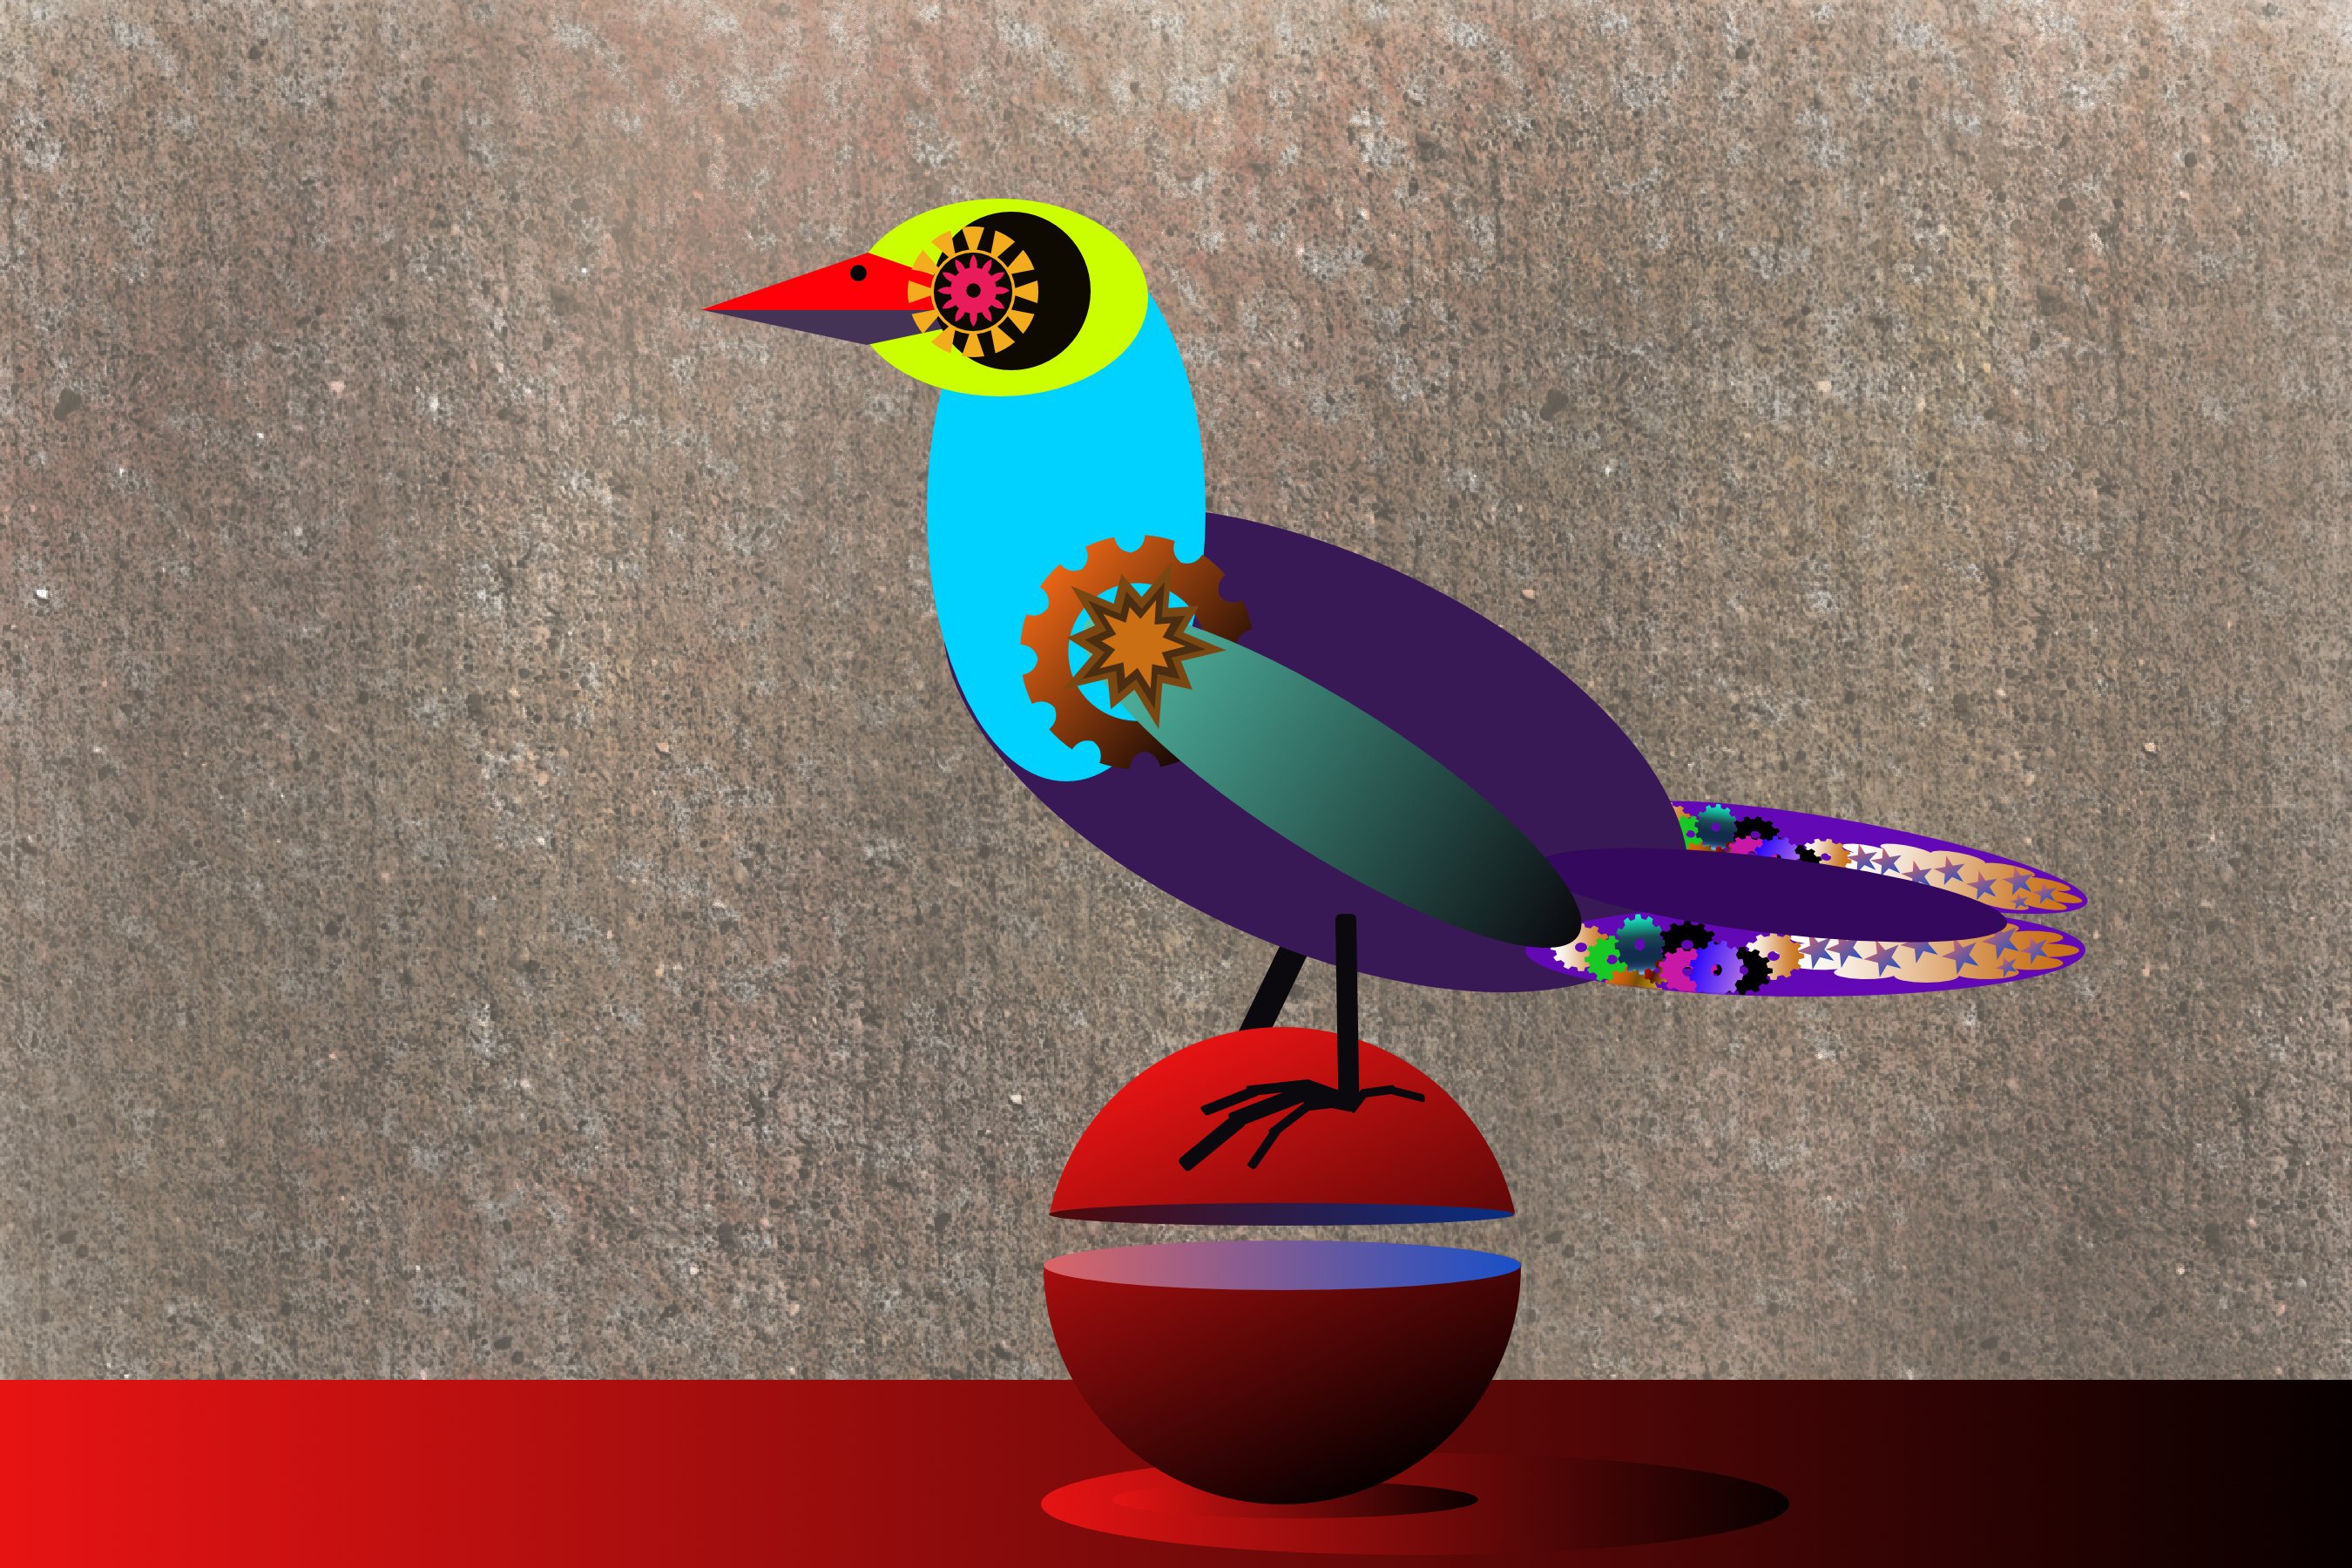
affinity designer "Creation of a Mechanical Bird" - ongoing.
Guest posted a topic in Share your work
Hello artists and creatives, I am posting three videos and 5 still frames of progress creating an artwork. More to come and post here in time for this. I have been struck by an Idea that may distract me a bit. I will continue this in a few days. Video part one - Video part two - Video part three -
-
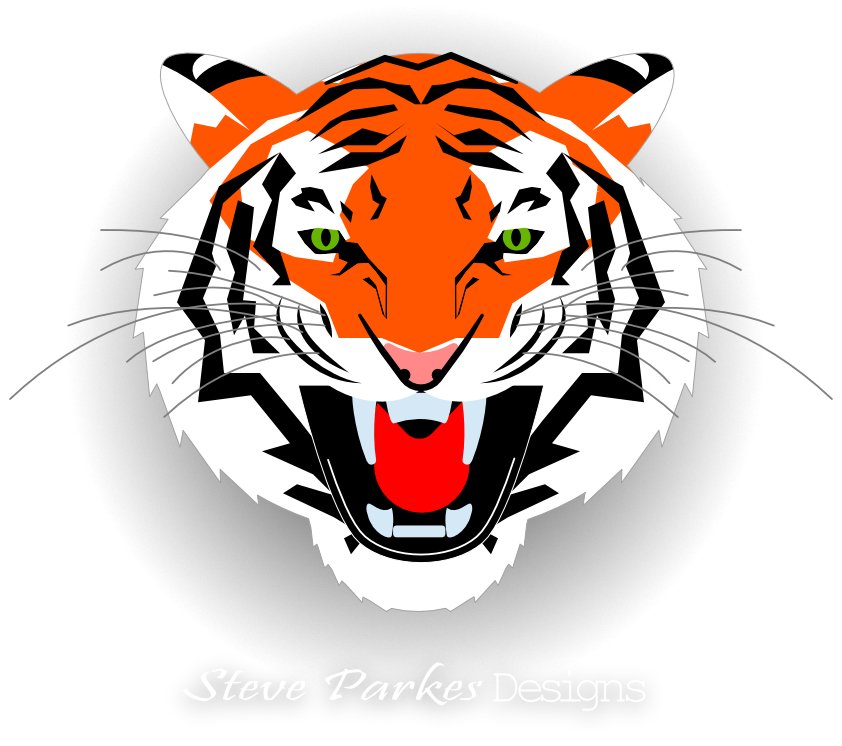
Browsing for something else, I came across a poster advertising Peugeot cycles, and I was inspired to have a go myself. After quite a few changes of colour and relative size, I finally settled for this: The original is A2 size, though I don't intend to print any copies. Here's a bigger (but not full size) crop: And here's the original tiger, which I made first. I dropped the orange markings for the poster, as the tiger clashed with the bike (and we have some gorgeous white tigers in the local zoo). Oh, and if you were wondering, Walsall is the English town I grew up in. It's not noted for its bikes, but is famous for its saddlery and leather goods, and lorinery, which is the metal bits and pieces in horse harness.
-
 Hey guys! - I'm just plugging a YouTube tutorial I did on how to create your own beskar steel using Affinity Photo & Affinity Designer. I've also got a few other tutorials up on my page that you might wanna check out. I suspect forum users are already pretty savvy to a lot of the techniques etc, but there may still be something of interest there for some of you. Hope everybody's doing well and hanging in there during these chaotic times. Cheers! Beskar Steel Tutorial
-
- 1
-
-
- tutorial
- beskar steel
- (and 3 more)
-
Hi there! Well, this is my entry for a competition here in Mexico. Telecom enterprise izzi does an anual competition to do a work using their Logo. With the little time I had, I made this Isometric design. Best regards!
-
 I am trying a separate a portion of curve into another layer. But can't seem to find any option! May be I am missing something obvious - could anyone please help?
 -
Hello, I present you this flying pig made with Affinity Designer in various styles.
- 2 replies
-
- 10
-
-
Feed back much welcomed. This is my first attempt at a vector self portrait. I’ve learnt a lot of techniques doing it.
-

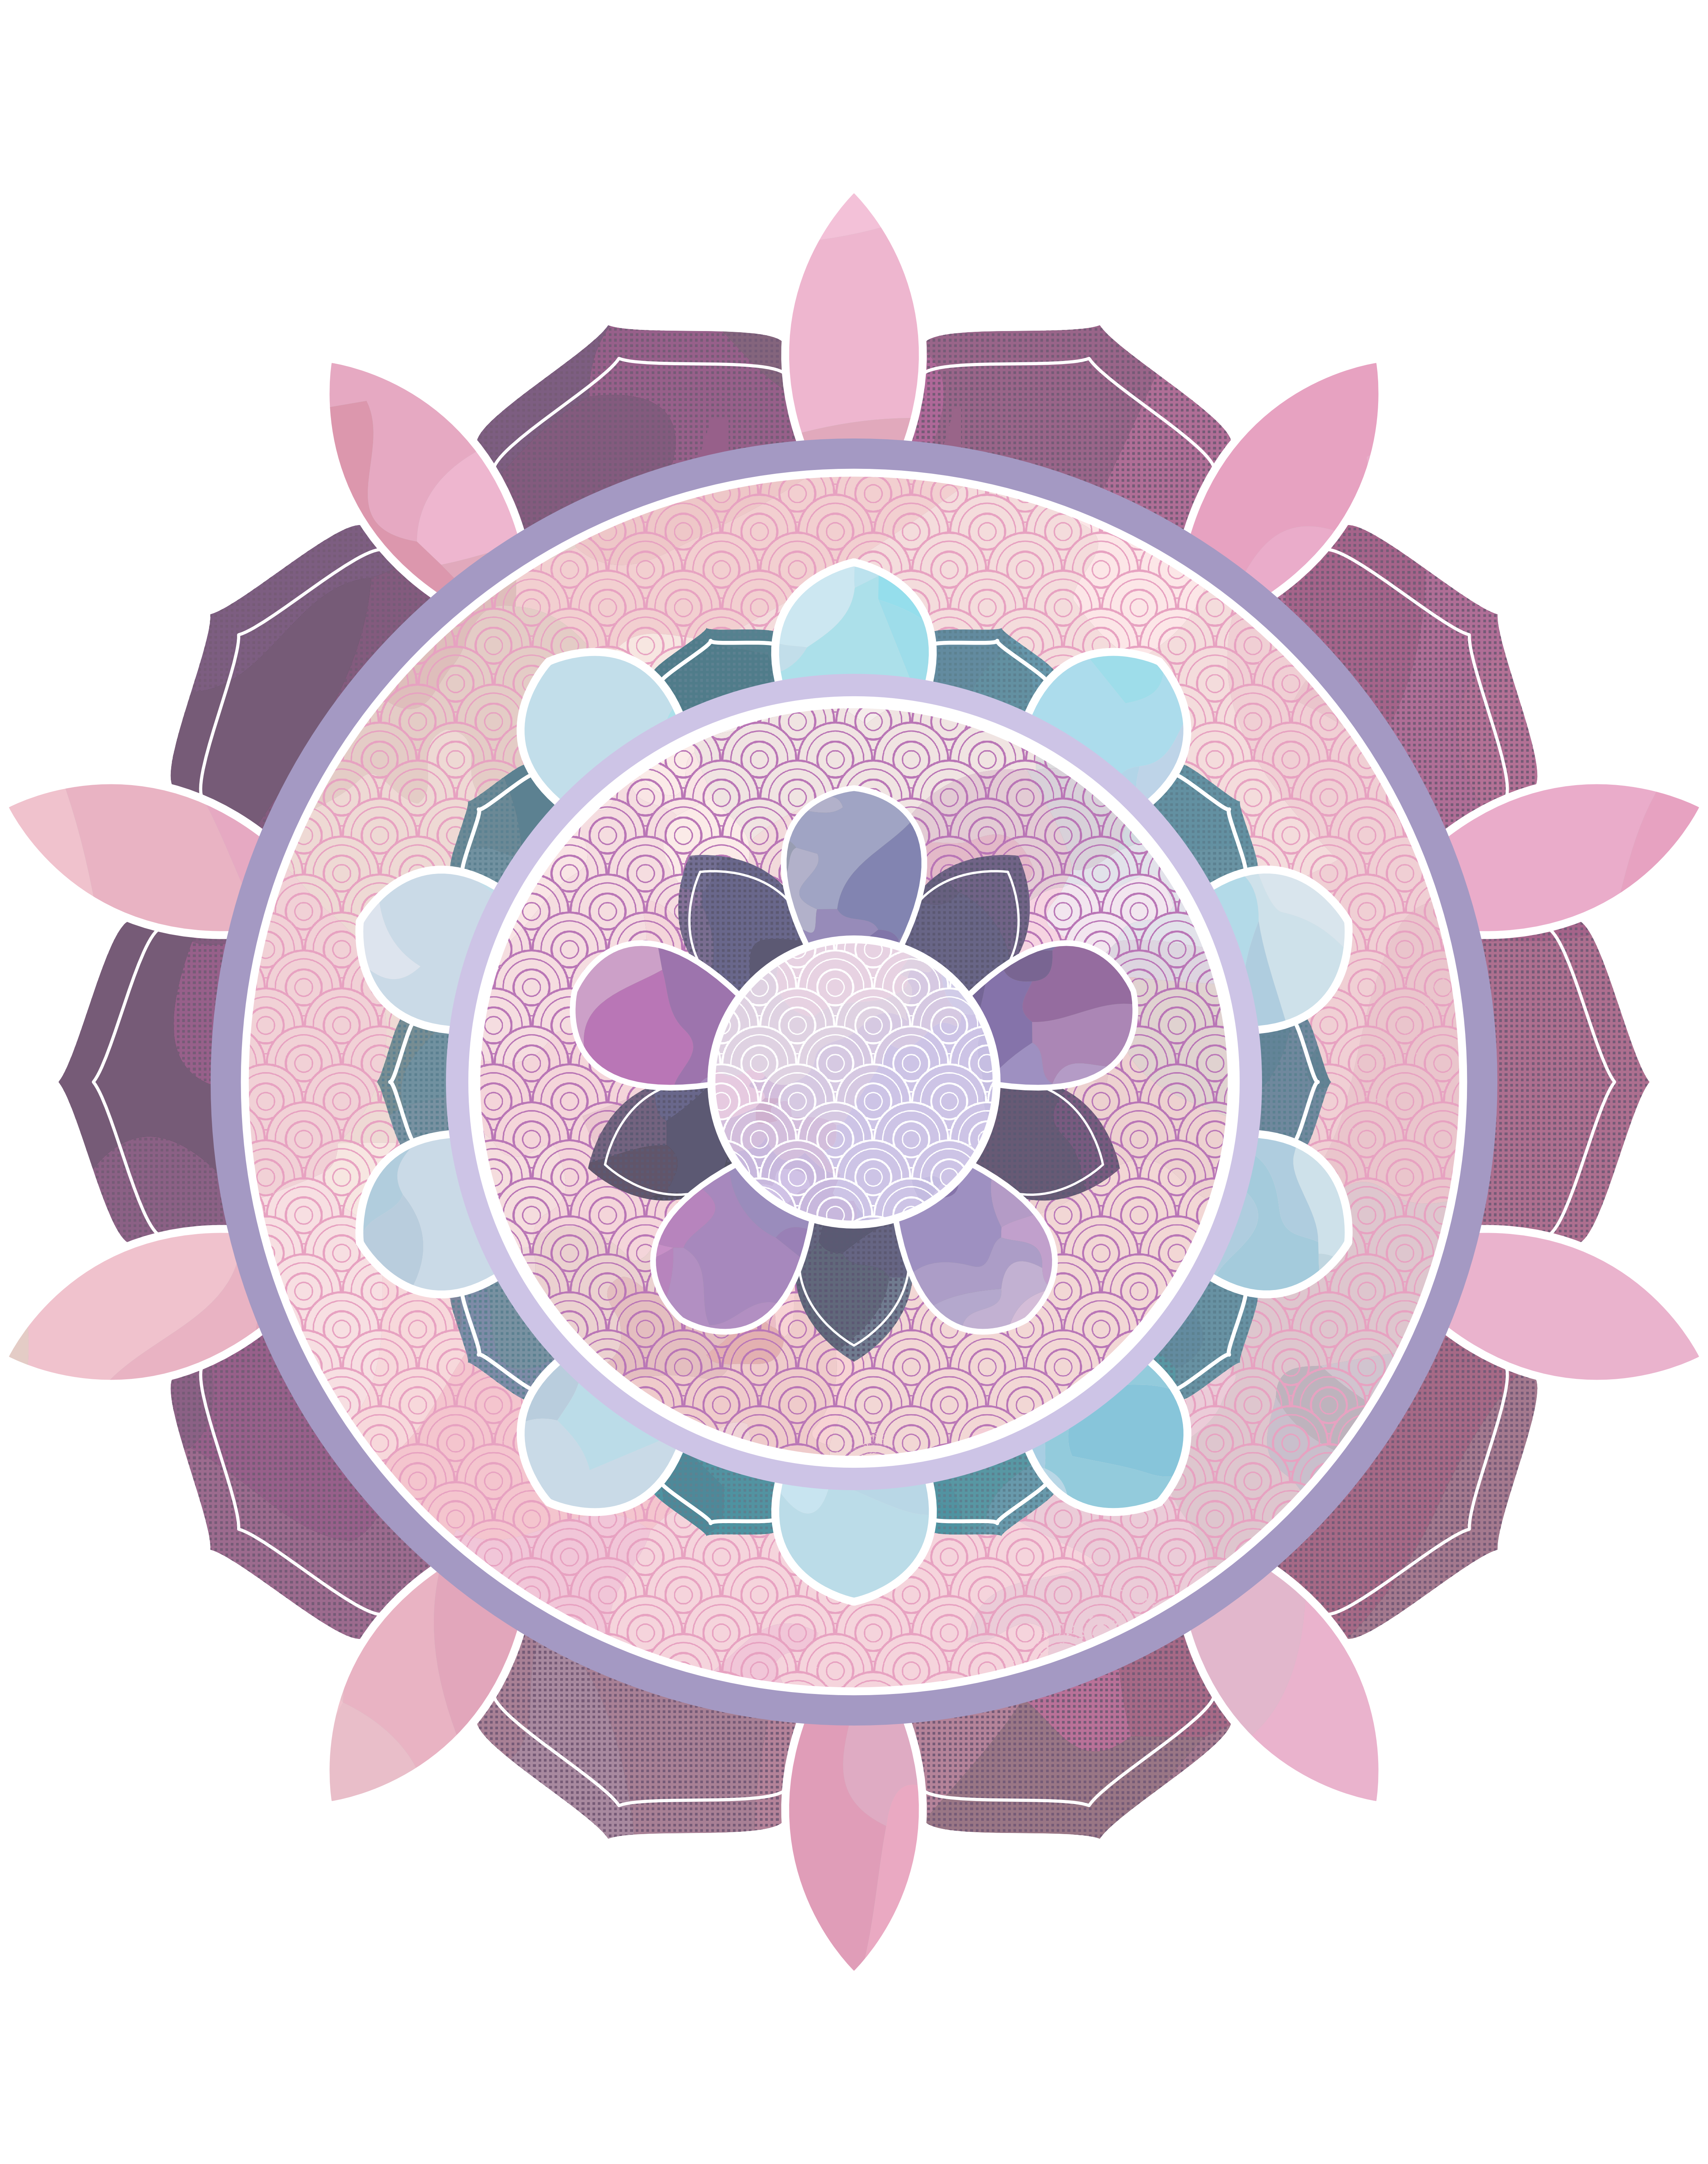
affinity designer digital mandalas with affinity designer
theyzzzecom posted a topic in Share your work
i like they symmetry tool in affinity designer , but i wish i can raise the count of it so i can make better artwork
- 2 replies
-
- 4
-
-
- mandala
- digitalart
- (and 1 more)
-
 I've just stumbled across the tutorial linked to below, which explains a lot of the Designer features in a basic way, often using basic shapes. Although a bit out of date, the features are well explained. Clicking on SHOW MORE in the section directly under the video gives the contents and the ability to jump along the time line to the various items covered. https://youtu.be/Gd7FmjUxFnE
 -
I've just stumbled across the tutorial linked to below, which explains a lot of the Designer features in a basic way, often using basic shapes. Although a bit out of date, the features are well explained. Clicking on SHOW MORE in the section directly under the video gives the contents and the ability to jump along the time line to the various items covered. https://youtu.be/Gd7FmjUxFnE