Search the Community
Showing results for 'non destructive RAW'.
-
 In my view everything works as designed, and with reasonable design. You need to set the default color format and color profile in settings before opening a RAW file. Changing of color profiles after starting non-destructive edits with adjustment layers etc must be avoided. The only suitable way is to change corporate profile at export, for a rasterized export format. Changing color formats only for pure bitmap documents, but not for layer stacks with adjustments and filters (which depend on color format). Rare exceptions may be possible, but you must know what are you doing and what side effects will occur.
 -
 Don't know if this is a bug or somehow a feature, but I can't move, resize, or otherwise edit some placed images in my Publisher document. Visually, they look and act like master elements, but they are most definitely not. How do I free them?
-
 procedure: I convert a document colour space from e.g. sRGB to ROMM RGB. Then I develop the document in the Development Persona. After committing the development the document is now sRGB again. My default RGB colour space is ROMM RGB. This behavior does not occur when a raw file, e.g. a dng file, is already imported/developed with ROMM RGB set as default colour space etc. When a document was initially imported/developed with sRGB as default colour space in the settings this behavior does occur. ---- I can reproduce the issue: When setting the default colour space to sRGB and then importing > developing e fresh .dng file I get the described behavior. The file is imported as sRGB, as expected. I save the file as .afphoto. Now I open & convert the document to a wider colour space like ROMM RGB and save the file again. Next I open the .aphoto file, which is now ROMM RGB, and re-develop the embedded .dng file. After accepting these develop changes (any change wil do, the saving is the trigger here) the file is sRGB. When I change the default colour space to ROMM RGB after the original .afphoto file was created during this process the behavior is the same. The trigger seems to be the initial import/development with sRGB as default colour space. Whatever change is made to the default colour space after this event does not have any influence. When setting the default colour space to ROMM RGB and repeating the above process the behavior is identical. My conclusion is that a file has a default colour space 'build in', being the colour space that was set as default colour space when the file was imported / developed the first time. It does not make a difference what the default colour space is after that event, whenever passing by the development persona, the document resumes the initial colour space that was the default colour space when the document was initially imported/developed, no matter what the document was converted to or what the default colour space is at this moment. The terminologie I use: default colour space: the colour space set in 'settings' > 'colour' document colour space: the colour space as visible in the channels studio. development: using the development Persona and submitting the file using the '√' button.
 -

AF-Photo 2.2 Loading linked file from network drive
Demys posted a topic in V2 Bugs found on Windows
Hi, I'm working on file wich use linked exr 3D render. The affinity files, and the exr render are on a NAS drive wich is connected to my windows as network drives, so they have their own letter and not just an IP. A lot of the time, when i load the af files i'm getting a low resolution image, without any error message about something missing, and i need to replace the linked file with himself within the Ressource Manager to get the true resolution. Even if the file path are exactly the same. The small preview also shows a difference, but excepted the resolution, everything look the same. Some files are working, some are not, even when the configuration are the same. The working ones show me this icon: The non working this one But they both are in the exact same folder windows 11, Affinity photo 2.2.0 and now 2.2.1, synology NAS DS220. Connected by wire, no stability problem on my local network. Regards,
-
 @emmatf This forum is for users of Affinity apps (Publisher, Designer and Photo). If you're having an issue with their use, please expand on the issue with as much information as possible, including your system spec and OS. If your issue is non Affinity app related, try doing an internet search to hopefully find suggestions to assist you.
 -
 In Photoshop there is the the puppet warp tool to deform an image by moving pins around. It's great if you want to put an object into an compositing and want to bend it in a way that everything fits. Affinity Photo has the same thing under "Filter -> Distort -> Deform". I really like that you can see the original position AND the deformed position of a pin. You can't see that in Photoshop. However, in Photoshop the puppet warp is non-destructive as long as you use it on a smart object. In that case, you get a puppet warp entry below the smart object in the layer panel and when you open it you see all your pins right where you left them. That's really essential. We don't live in a perfect world where we get every operation right on the first try. In reality, usually you notice at some point that it still is not the way it should be and you tweak it. When you do a new deform over and over again you will lose quality over time. So please add a non-destructive version of the deform filter. For example, as a live filter right next to the perspective live filter.
 -
In another attempt to fix the artefacts that can appear on Windows when developing RAW files in 2.4.x (with hardware enabled), we have changed the RAW processing pipeline. Please can you report in this thread any problems you continue to see with RAW processing when using the 2.5.0 beta builds. I will be asking users from some of these threads to come here and test the beta builds and post here (rather than their original 2.4.x thread)
-
 When I open my Canon CR2 test photo in Affinity Photo, the application recognizes the correct Lens profile 'Canon EF 28mm f/1.8 USM'. So this profile is included in the application. The Distortion correction is not good, however. I also noticed that Chromatic Aberration Reduction and Remove Lens Vignette are not automatically checked. Turning Remove Lens Vignette on gives a better result but is still not perfect. This whole profile seems wrong. So I decided to create my own lens profile for the Lensfun project and added distortion, tca and vignetting elements in the XML. I copied this XML to the correct directory and my lens profile is now visible in the list. To recognize my own profile I added two characters at the end of the name. When I again open the test photo I have exactly the same results. Affinity Photo recognizes its own profile. When I change the Lens profile to my created profile, the distortion correction is way better. The application responds to my profile! Yeah. Still no checked boxes in the other two fields. When I turn on Remove Lens Vignette I get exactly the same result as before. It even seems that this correction is not responding any lens profile I choose. I get the same result with different lenses from the list. Where are Chromatic Aberration Reduction and Remove Lens Vignette getting its information from? Not from the Lensfun database I guess.
 -
 I use a retina MBP with non-retina external display (aside: I work in portrait orientation at 19:10 aspect) Some UI elements are blurred when using a mix of retina and non-retina displays. I guess that some user interface elements are positioned at what amounts to half pixels on non-retina displays? It would be great if all user interface elements could be positioned to look good on both types of displays. Scenario 1 MBP open, as secondary display Affinity on external display, as main display some UI is blurred Scenario 2 MBP closed, no secondary display Affinity on external display, as main display UI is not blurred Screen recording of the difference crop.mov
-
 I don't think this is a bug. If you Develop to a Raw layer (embedded or linked) rather than a pixel layer, then when you go back into the Develop Persona again you are re-developing your original Raw image. And part of Developing is changing the color space (to RGB-16 or RGB-32) and setting the color profile to the default color profile you've specified in your application Settings/Color. But perhaps there is room for improvement. I will be interested in seeing the thoughts from the Serif staff when they respond to your report.
 -
 Photo 2.4 has recently included compatibility with RAW files for Sony A6700. On first try loading a RAW file, there are strange coloured artefacts in various parts of the photo. I have turned of warnings for clipped highlights and shadows, but they remain. If the file is developed then reloaded to the develop persona, the artefacts are gone. A6700340.ARW
-
 When I take a raw file into Photo 2 to develop I'm getting bright yellow lines all over the subject which stay there even when I click the develop tab. This has only started happening in the past few days. I'm following my usual workflow when developing raw images and haven't changed the way I usually do things so don't know how to put things right. Could do with some advice please.
 -
 Since upgrading to V2.4.0 my RAW file do not display correctly when open. They remain that way even after being developed.
-
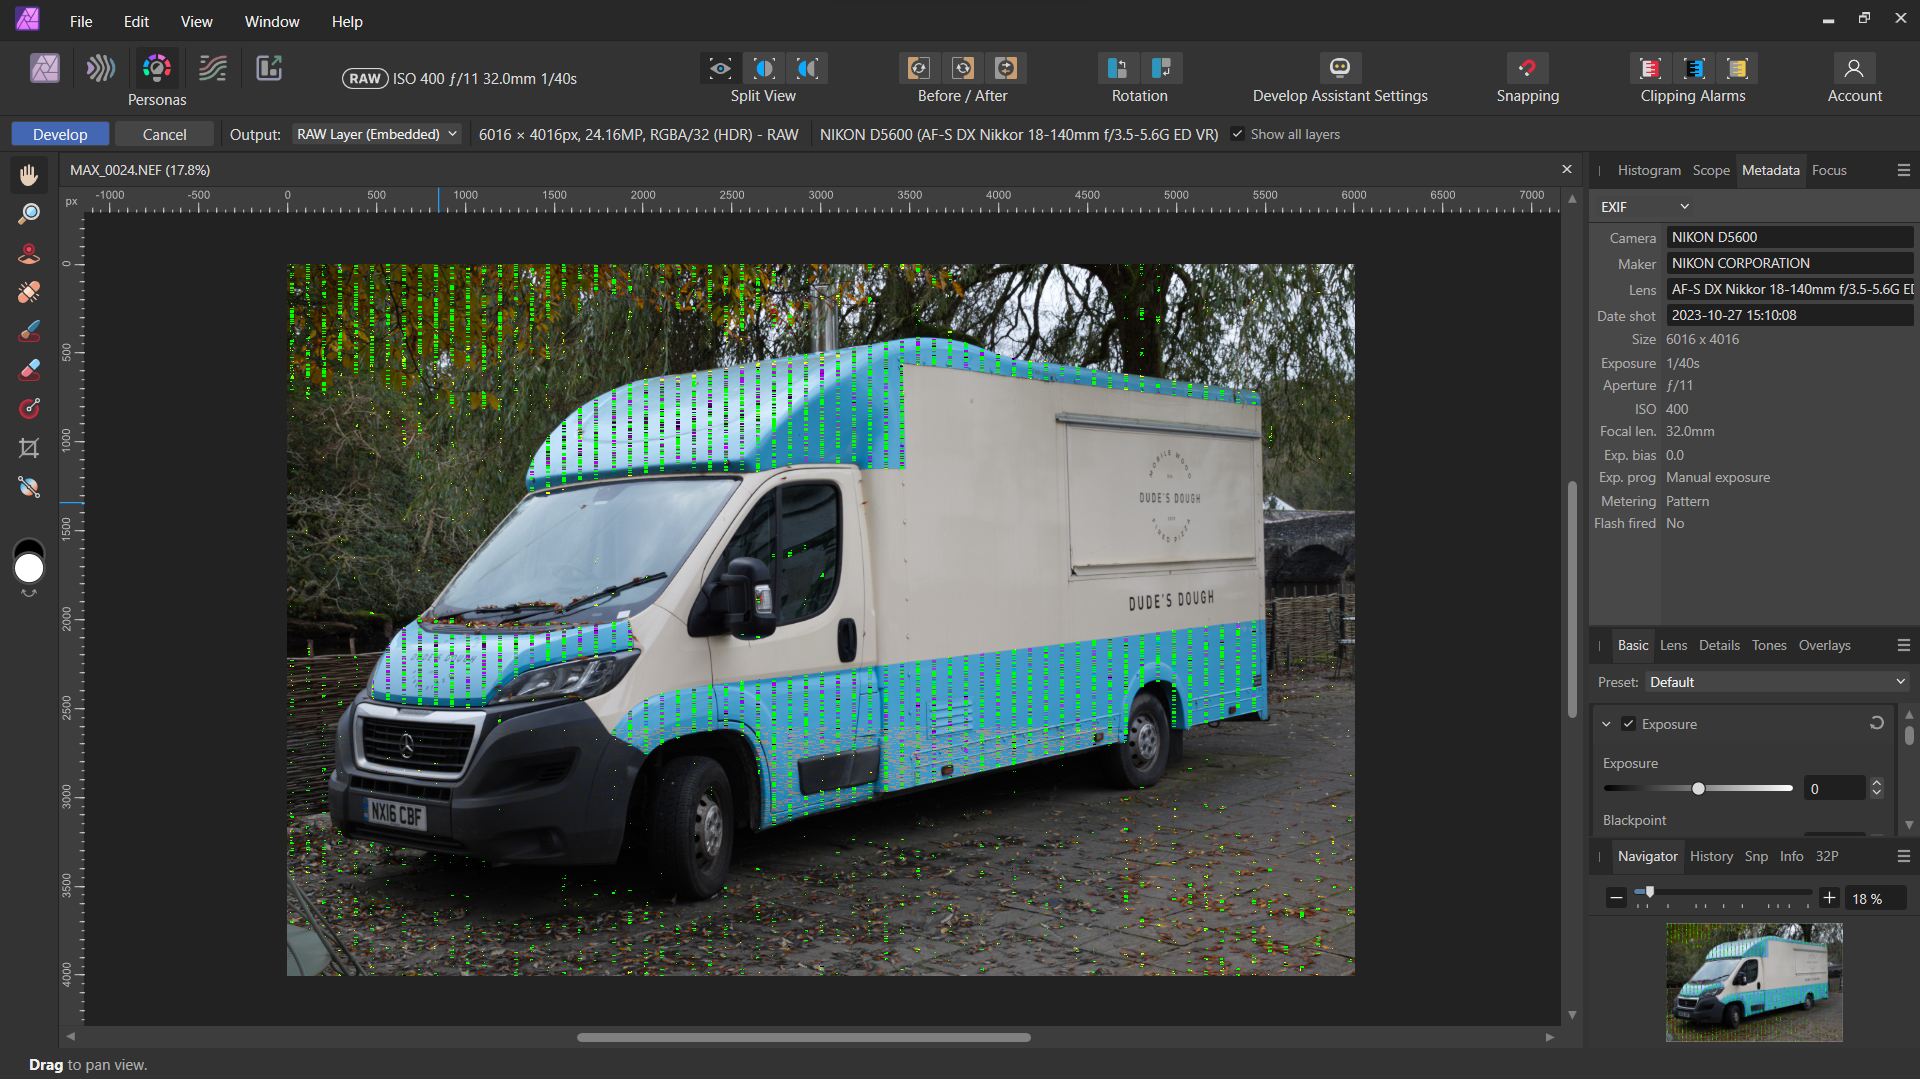
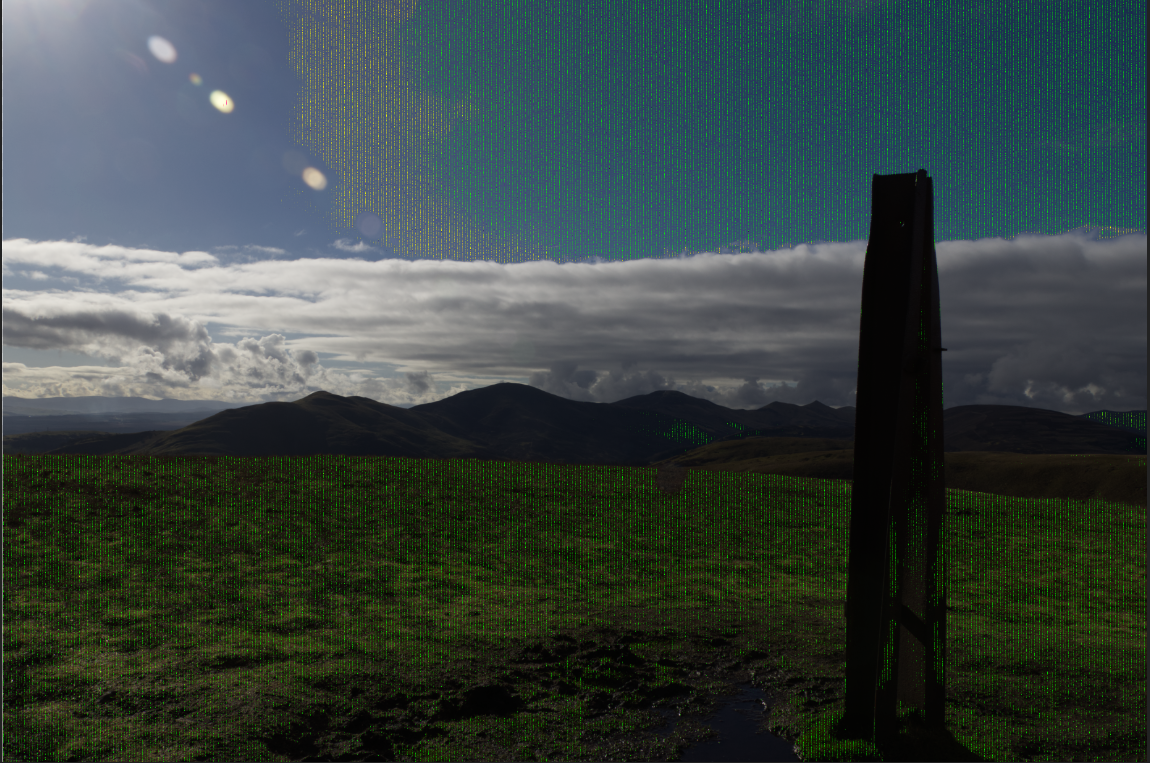
When I import Nikon RAW files (.NEF) the image is blurred. If I zoom in or out, vertical green bars appear. _DSC3669.afphoto _DSC3669.NEF
-
After updating to the latest version of Affinity Photo all my raw file now shows artefacts (vertical lines across parts of the photo) as I attempt editing. Any editing results in the same lines across the image as does any export to jpeg. Editing the jpeg shows the photo as expected. I've attached screenshots which hopefully shows this. I am using the latest version of Affinity Photo (2.4.0) with the following Windows version and hardware Edition Windows 10 Home Version 22H2 Installed on 16/03/2021 OS build 19045.4046 Experience Windows Feature Experience Pack 1000.19053.1000.0 Processor Intel(R) Core(TM) i7-6700HQ CPU @ 2.60GHz 2.60 GHz Installed RAM 16.0 GB (15.9 GB usable) System type 64-bit operating system, x64-based processor Please let me know if I can supply anything else or if you want me to try anything further. Ken
-
 Hi, I've just downloaded and installed the latest beta and while the presence of artefacts has reduced significantly it is not completely resolved/removed (see below) Below are details of the system and the graphics adapter Processor Intel(R) Core(TM) i7-6700HQ CPU @ 2.60GHz 2.60 GHz Installed RAM 16.0 GB (15.9 GB usable) Device ID 9E946E9E-F147-4B54-88AE-CA1907EB9491 Product ID 00325-96026-34908-AAOEM System type 64-bit operating system, x64-based processor Pen and touch No pen or touch input is available for this display I do recognise this system is 'old' but, it did work, albeit slowly, in the older release. Also, once again changing the "RAW output format" to 32 bit resolves the issue. Please let me know if you'd like me to do anything else or provide further information. Ken
 -
 It appears that there is a likelihood that with the advent of a merger of Canva a subscription based editor and Serif, that Serif products may become subscription based in the future. If that happens, can Serif/Canva cripple existing Affinity apps to force a transition to the subscription based model? ie will old unadulterated software versions still be available? Not having a subscription based model is a large contributing factor in Affinity products success. Looking at Canva and its reviews on iPad, I dont see the benefit to me. Canva seems to target non-artists that want a simple way to produce multimedia. The iPad already has issues regarding memory management and throwing in video and audio into the mix will only exacerbate an existing problem on the iPad. Reviews tell of the problems with video editing…. no surprise.
 -
By the way, when working on the iPad version (I don't use desktops / laptops for years now) there is no choice option for your colour profile when developing your RAW file. It is developed with the default colour profile from your settings, that is your only 'choice' of colour profile. I think that explains the issue, at least the idea behind it. But I do think that should be documented better, not everybody using the iPad version is fluent with the desktop workflow etc.
-
Hi. I open a raw file in 2.2.1 and try to view the grid. It doesn't appear, so I go to grid settings and although a grid will now appear my image darkens massively. No idea why! Please see the short video. 2023-11-12 13-08-17.mp4
-
 I don't know if this is possible, but I selected an object in a photo, removed the background, and want to bring the object into another photo... and want to be able to do it so I don't have jagged edges? Is this possible? I'm also working with AfDesign ... so I could ostensibly work with that too. See attached example. This is the object I want to move into another photo ... but without jagged edges.
-
I will add non-breaking to all the applicable spaces in the other languages if I can make room. It's starting to get a bit tight. I think the more common word for non-breaking in Dutch is "vaste" and not "onbreekbare". A "vaste spatie" is the name for a non-breaking space. This is the term used by Adobe. It turns out Publisher handles quads differently than InDesign, although it matches ID for breaking and not-breaking. I believe that in ID, an em quad is always one em wide, regardless of the horizontal scale, while an em space scales like a normal character.
- 30 replies
-
- 1
-

-
- invisibles
- special characters
- (and 1 more)
-

RAW Processing in 2.5.0
MadMaxie replied to Patrick Connor's topic in Other New Bugs and Issues in the Betas
Artifacts with 2.5 have gone! But when I bring in a RAW pic I get a "Black box" on the pic for about 5sec then disappears. If I turn OFF Open CL all works fine, maybe a touch slower but not a problem for me. As a point of interest, my issue (Black box)has been happening way back in "AF1". which I reported then but to no avail. I think my GPU (Nvidia GeForce GTX1650Ti) and Open CL don't like each other!!. -
 Hello all. Lovey to be on the forums. I recently started using Affinity extensively in my workflow, which until recently was purely Photoshop and Lightroom for the last 15 years. I've been really astounded my a number of things. The sheer fluidity is one, the level of user interface granular control is another (in relation to the rapid feedback allowing more nuanced control). I especially love the Raw processing in Affinity photo. I work in very demanding low light situations (Live music) and as such the power of the Raw processing in V2 has become apparent to me very quickly. I've noticed a couple of changes that I thought could be useful, and for the sake of been constructive, sharing them here: 1. Labelling I'd love to be able to label the overlays and Snapshots with custom names. 2. Preset accessibility I use custom presets heavily in many apps, and having 'Save current settings as New Preset' or something shorter would be more convenient than the burger menu, and more visible so people would use this feature more. 3. Toning UI Numerical feedback on selected values would be good, or perhaps a neighbouring histogram view instead 4. 'Fit' Love to see a 'Fit' option here 5. Unrelated Feature, and nothing to do with Raw but a wishlist item for me, as someone who has to share layered files often with agencies record labels etc, is a data annotation feature. Essentially draggable notes that you can drag onto an image, with either manual entry, or for instance displaying the hex of a colour dynamically at a given pixel coordinate (or some other value such as average colour of an area). These would only exist in AF photo files, but might offer to save as a raster layer if saving to a layered Tiff for example. Please pardon the terrible, awful mockup here, I'm aware how naff it looks! Again, just some thoughts, feel free to disregard! I think however some of these may be useful to users similar to I. Cheers and thank you for doing what you do, Pete p.s. Sorry for the Rick Roll.
-
 I am trying to convert a portion of my logo (which I have as a *.aphoto file) to an SVG usable with Autodesk Fusion. End goal is to be able to engrave the logo using a CNC machine, typically onto another part created in Fusion. In order to be able to do this, if I understand it correctly, I need to import an SVG file of the image to be engraved into an existing Fusion file. Problem is, I don't have the image as a usable SVG file, and simply exporting it from Affinity Photo isn't working; when I try to import the resulting SVG file into Fusion, I get an error. Based on a little Googling, the error is because the exported SVG file contains an image of my artwork instead of the actual curves/geometry of my artwork. So what I need to do is 1) Crop my logo (which contains some text and a graphic element) to just the graphic element (don't want to engrave the text portion), then 2) Convert that graphic element from an image into curves/geometry, then 3) Export that geometry as an SVG file I can then import into Fusion. Can someone point me in the right direction? I'm a complete novice when it comes to Affinity Photo and Designer - I own both but rarely use them as they're just massive overkill for the light image editing I normally do. I really don't even know where to start. Thanks in advance! (In the attached file, the *only* portion I want to keep/export/SVG-ize is the starfish in the middle. I've cropped it but the rest of the logo is still there, outside the crop box. That's another thing I don't understand. I want an actual honest-to-god destructive crop when I crop.) Starfish.afphoto
 -
 Your previous raw for the EF 28mm shows conflicts in the exiftool report: Cropped Image Width : 3960 Cropped Image Height : 2640 Focal Length : 28.0 mm (35 mm equivalent: 27.2 mm) -- my note: 27.2/28=0.971 Scale Factor To 35 mm Equivalent: 1.0 Sensor Width : 3960 Sensor Height : 2640 Sensor Left Border : 0 Sensor Top Border : 0 Sensor Right Border : 3959 Sensor Bottom Border : 2639 I suspect that it's being caused by using the crop mode, you could ask on the exiftool forum or use Canon's raw developer and see what that shows You could experiment by changing the lens xml to <camera> <maker>Canon</maker> <model>Canon EOS 5D Mark III</model> <mount>Canon EF</mount> <cropfactor>0.971</cropfactor> </camera> <lens> <maker>Canon</maker> <model>Canon EF 28mm f/1.8 USM</model> <mount>Canon EF</mount> <cropfactor>0.971</cropfactor> etc </lens> but I think you'd be wasting your time and this would screw results using the same lens in full frame mode 35 mm equivalent is only stated as a convenience, I doubt that any software uses it so whether it's right or wrong doesn't matter As it's a full frame lens on a full frame body I'd use a crop factor of 1 and ignore metadata